
 Development Tools
VSCode
Detailed explanation of how to use vscode to write code for development on iPad
Development Tools
VSCode
Detailed explanation of how to use vscode to write code for development on iPad
Detailed explanation of how to use vscode to write code for development on iPad

Can I develop on iPad? The following article will introduce to you how to turn the iPad into a productivity tool in seconds - use vscode to write code for development on the iPad. I hope it will be helpful to you!
#With the popularity of tablet computers, most people’s living habits and life scenes are inseparable from the use of tablet computers, such as watching TV series and watching short videos. Play mainstream games, etc., but these are just entertainment scenarios. What if you want to integrate the tablet into work or production scenarios, such as editing documents, making worksheet, and writing code?
So after buying iPad, in order to avoid "productivity before buying, iQiyi after buying". We can build a code server on Linux, and then use an iPad to remotely access the code server through a browser or app. Use the resources of the server to run the code, and the iPad front-end only needs to be responsible for writing the code and running it, making the iPad a perfect mobile development tool! !
Moreover, in order to achieve remote mobile development anytime and anywhere, we used cpolar intranet penetration to break through the limitations of the local area network and realize that we can also use iPad to write code and develop in the public network environment! !
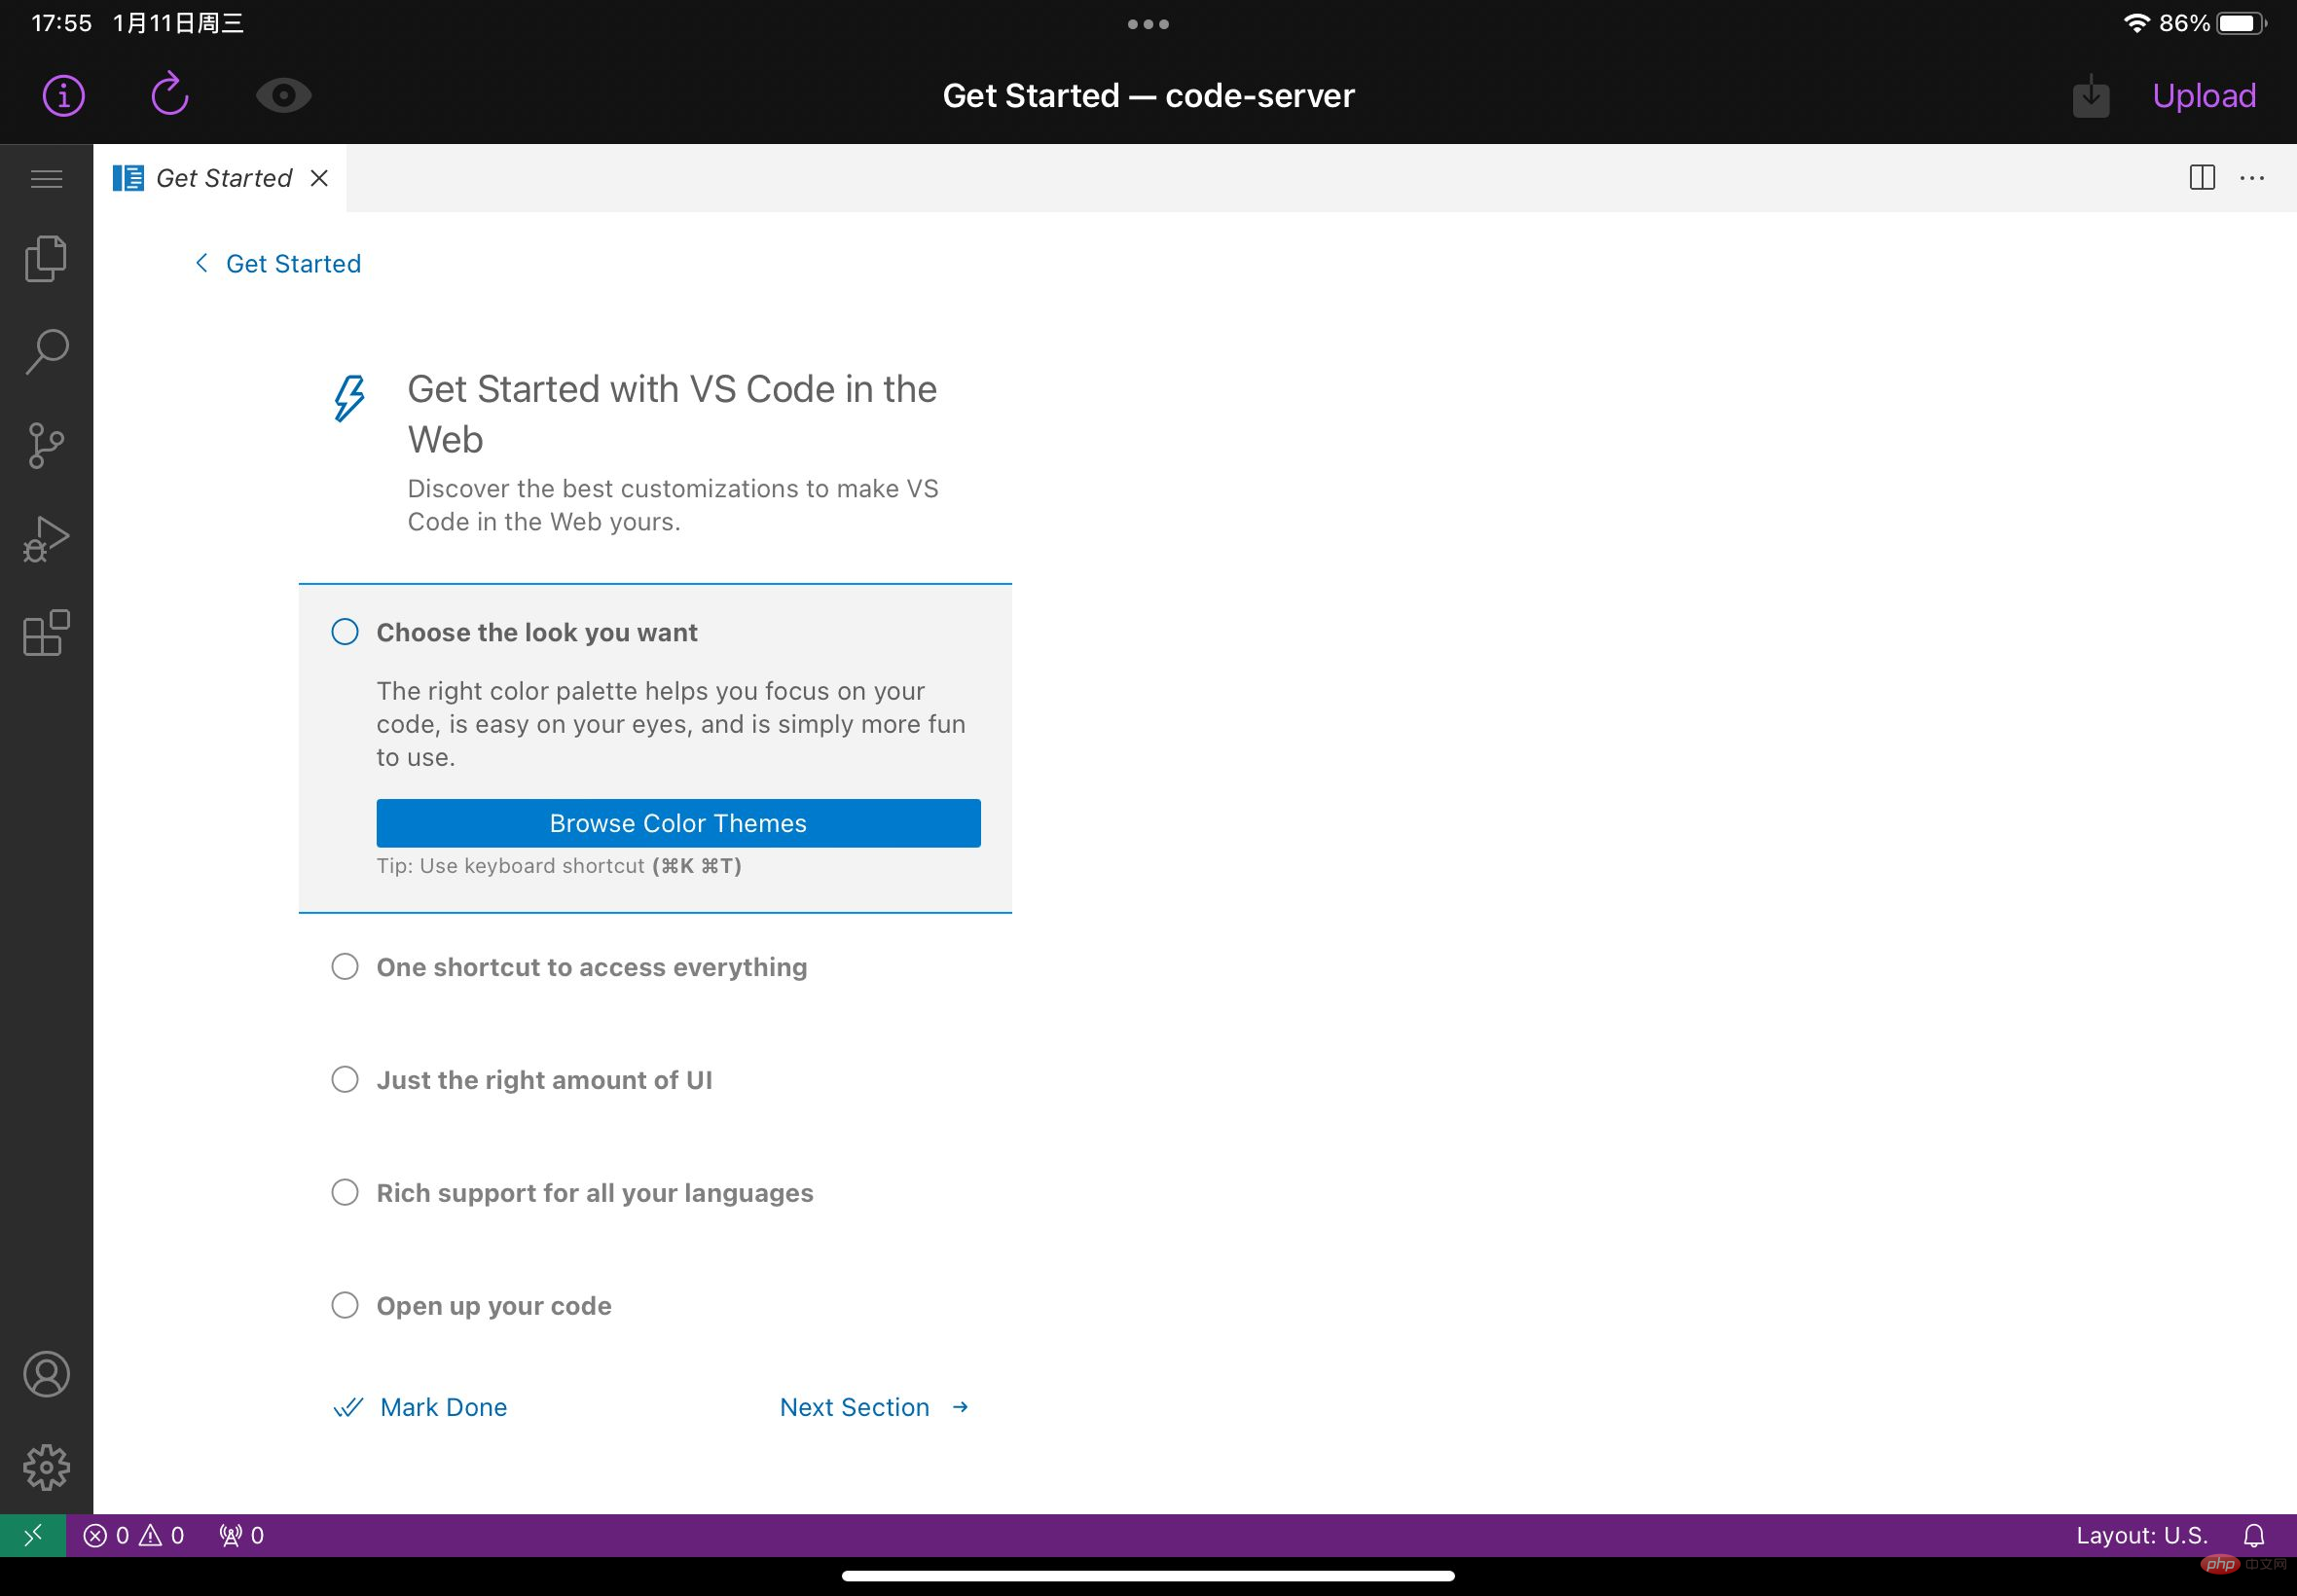
The iPad becomes a productivity tool in seconds! Write code with vscode on iPad. [Recommended learning: vscode tutorial, Programming teaching]
1. Local environment configuration
Prepare a virtual machine, either Ubuntu or centos. Here we take the VMware Ubuntu system as an example.
Download the code server service
Visit in the browser: https://github.com/coder/code-server, Copy the download command
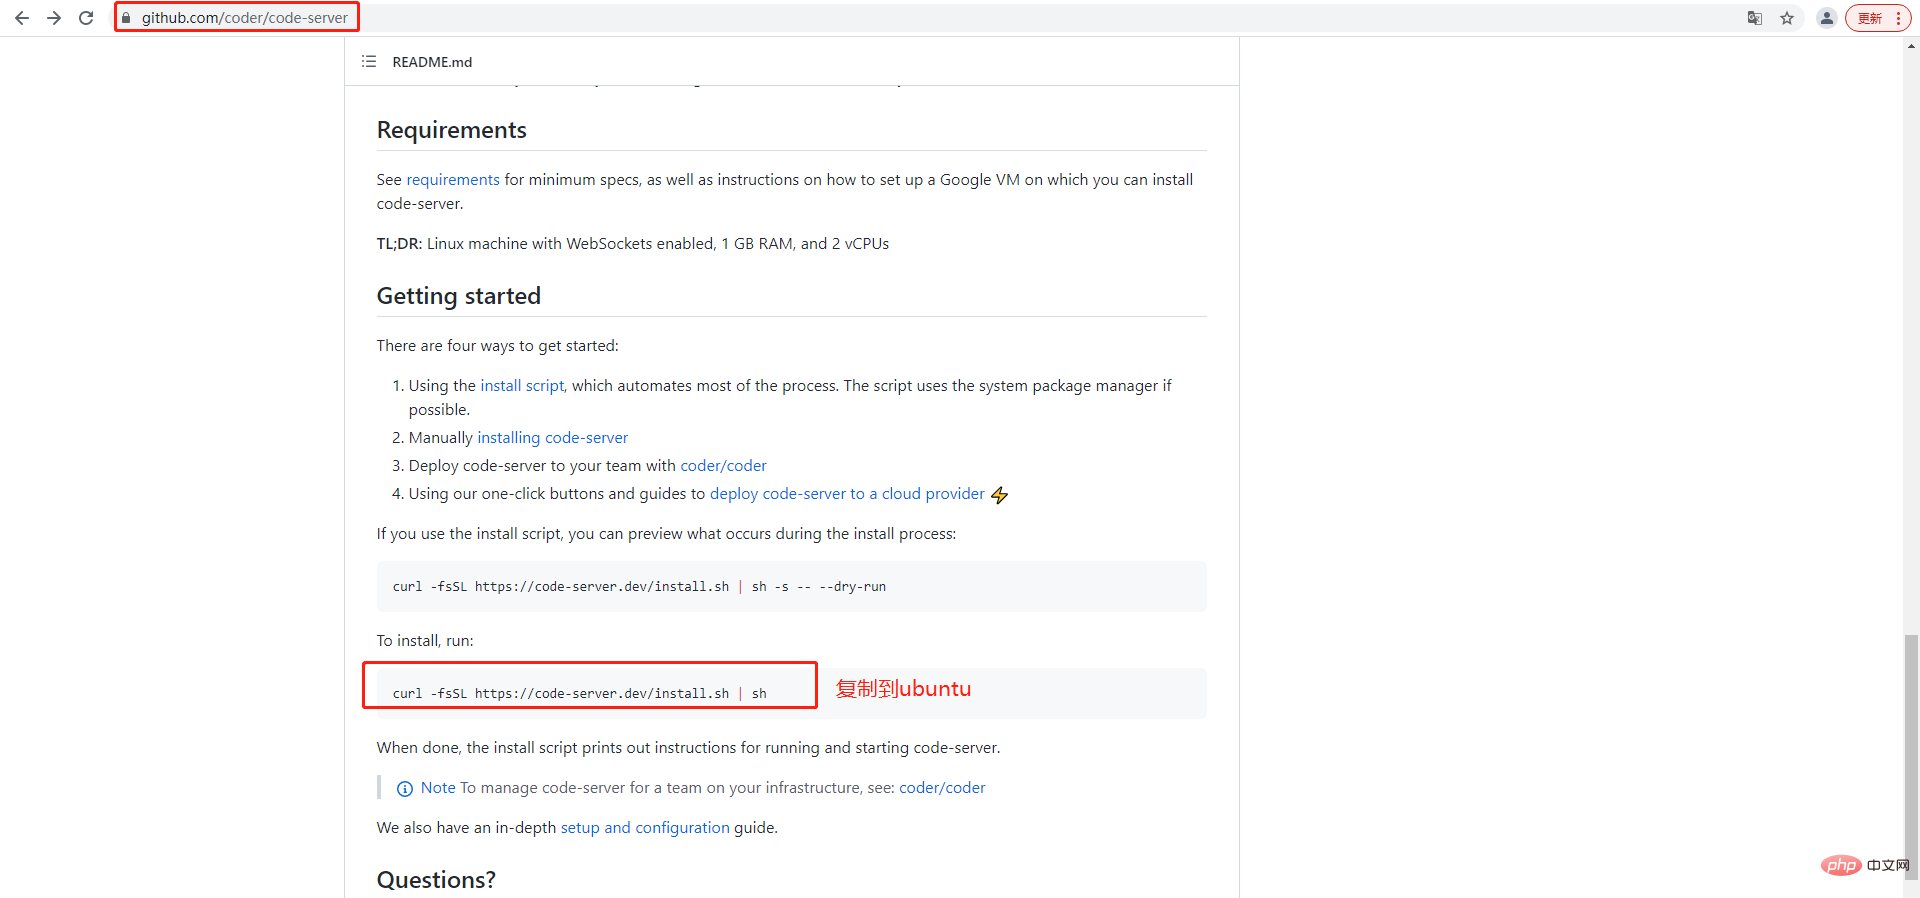
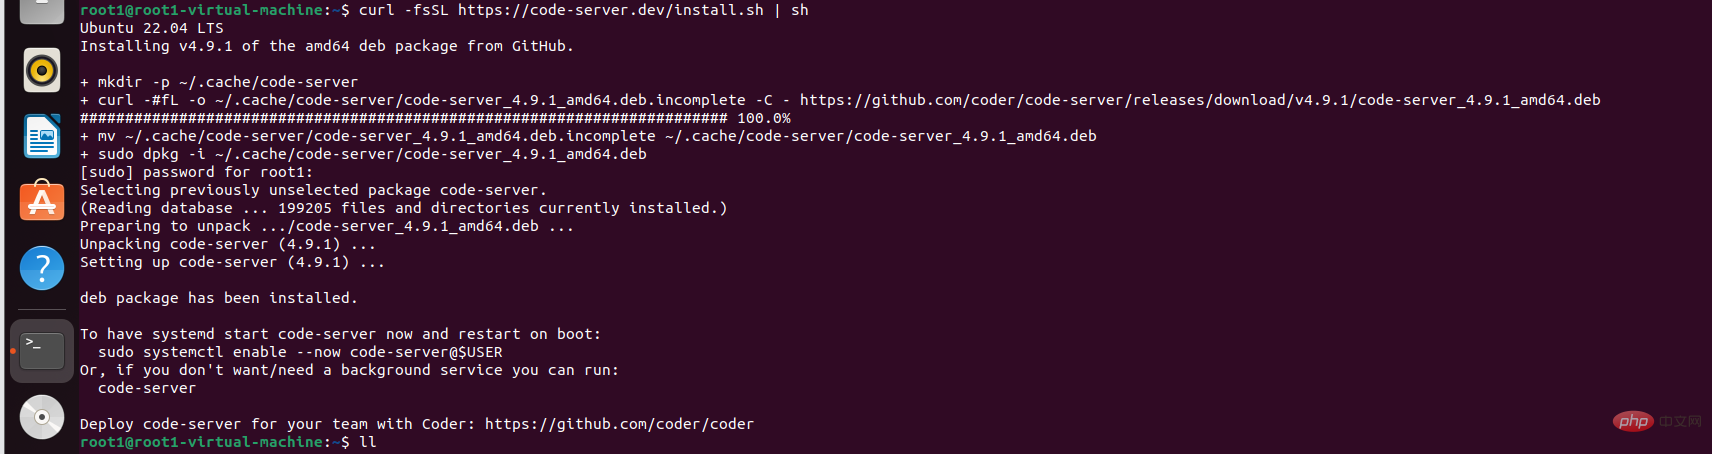
Open the ubuntu command line and execute it
curl -fsSL https://code-server.dev/install.sh | sh
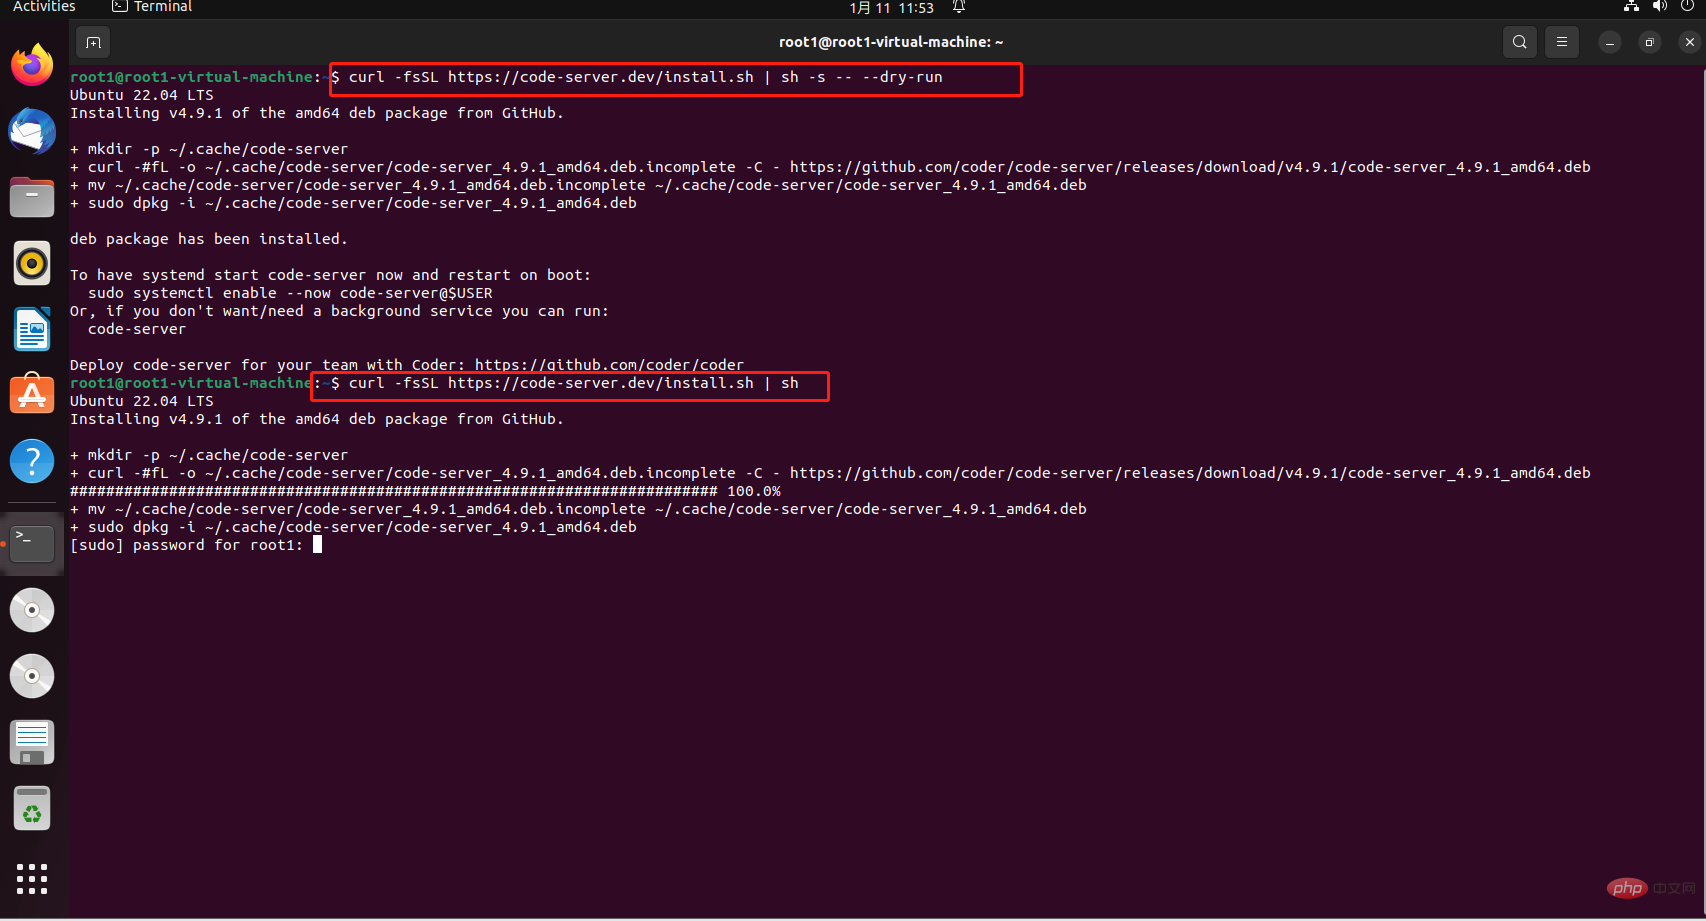
If you need to enter the ubuntu login account password, enter the password That’s it, then wait for the installation to complete

The following information indicates that the installation is successful
Then enter the following command to set up code-server Login password
export PASSWORD=”000000”

ifconfig
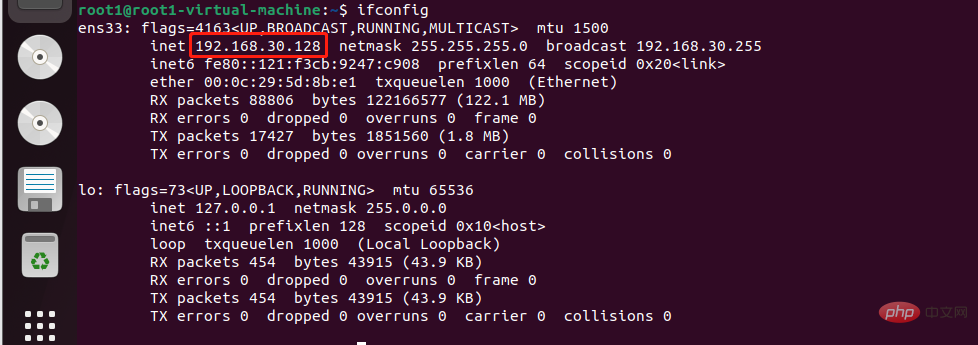
code-server --host= “0.0.0.0”

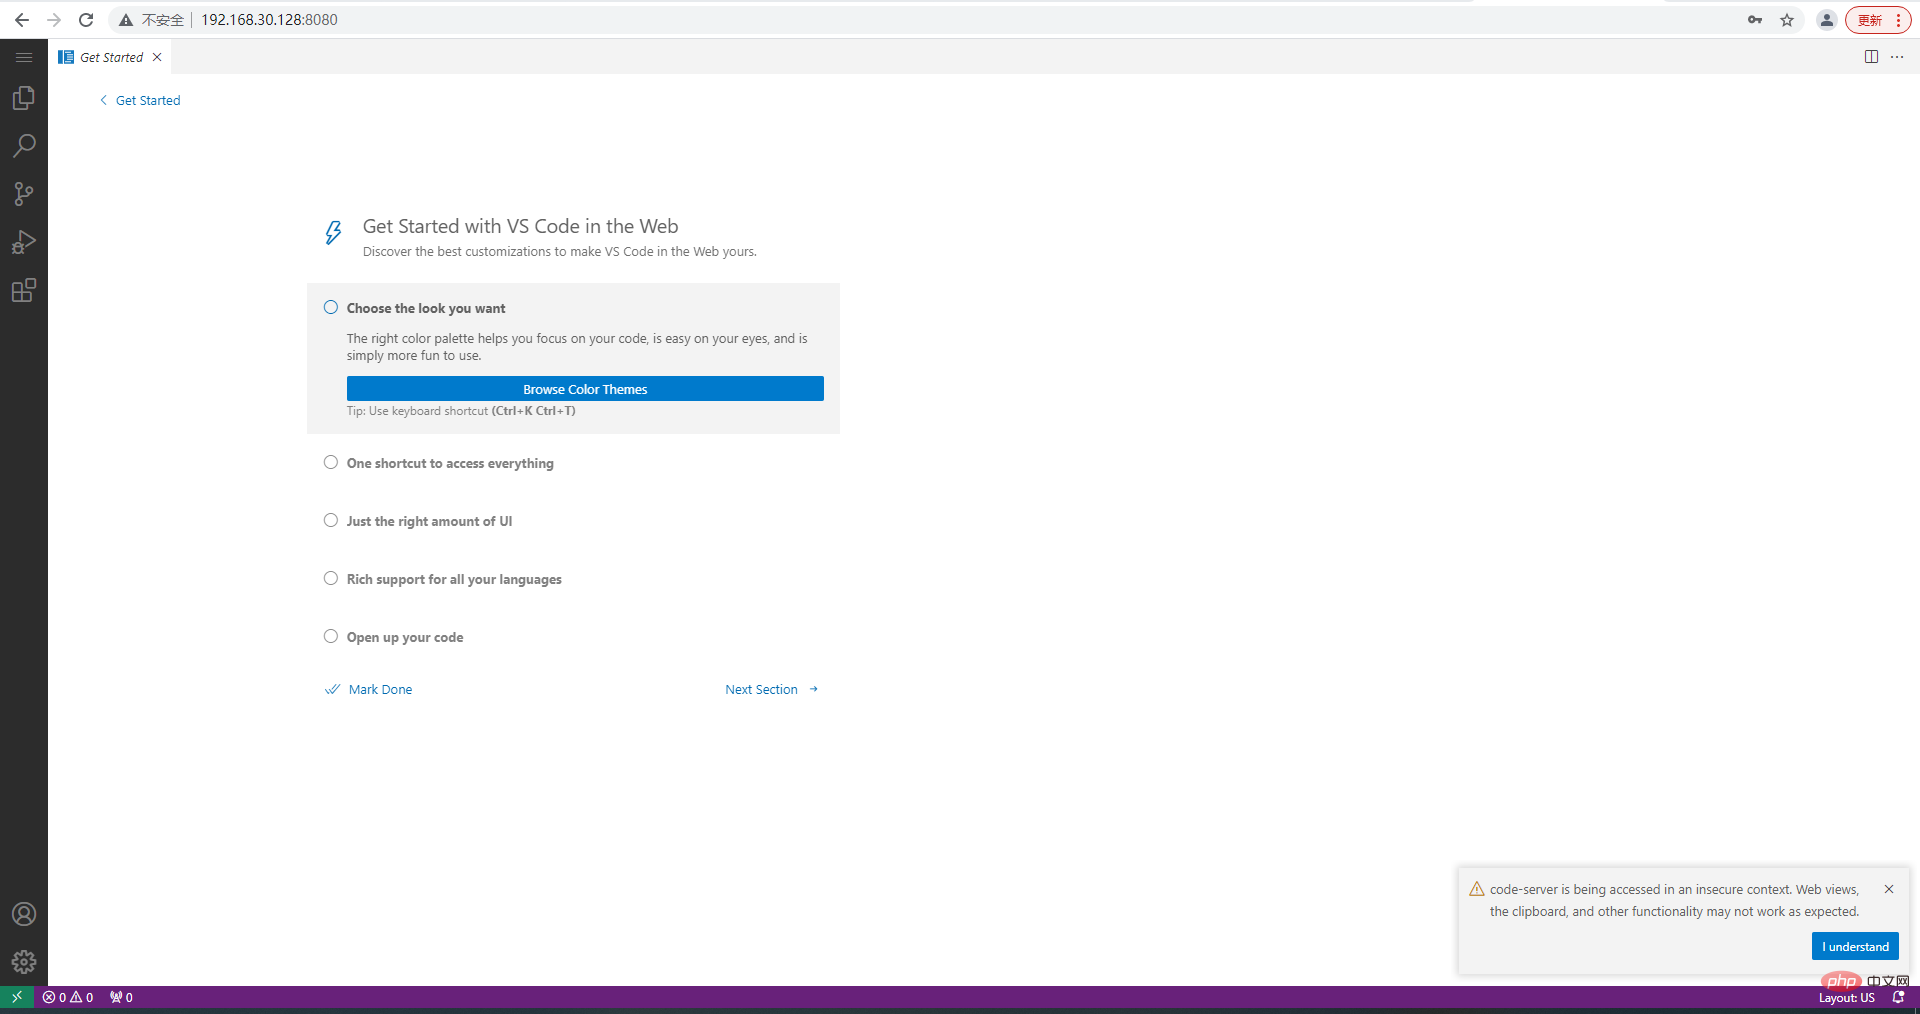
http:/ /192.168.30.128:8080/, welcone code-server appears, indicating success. Enter the password we set and log in.
2. Intranet penetration
Then we use cpolar to penetrate the local code-server service , making it possible to access remotely and write code anytime and anywhere. cpolar supports http/https/tcp protocols, does not limit traffic, is simple to operate, and does not require a public IP or router.cpolar official website:
2.1 Install cpolar Network penetration (supports one-click automatic installation script)
- cpolar installation (domestic use)
curl -L https://www.cpolar.com/static/downloads/install-release-cpolar.sh | sudo bash
Copy after login
- or cpolar short link installation method: ( For foreign use)
curl -sL https://git.io/cpolar | sudo bash
- View version number
cpolar version
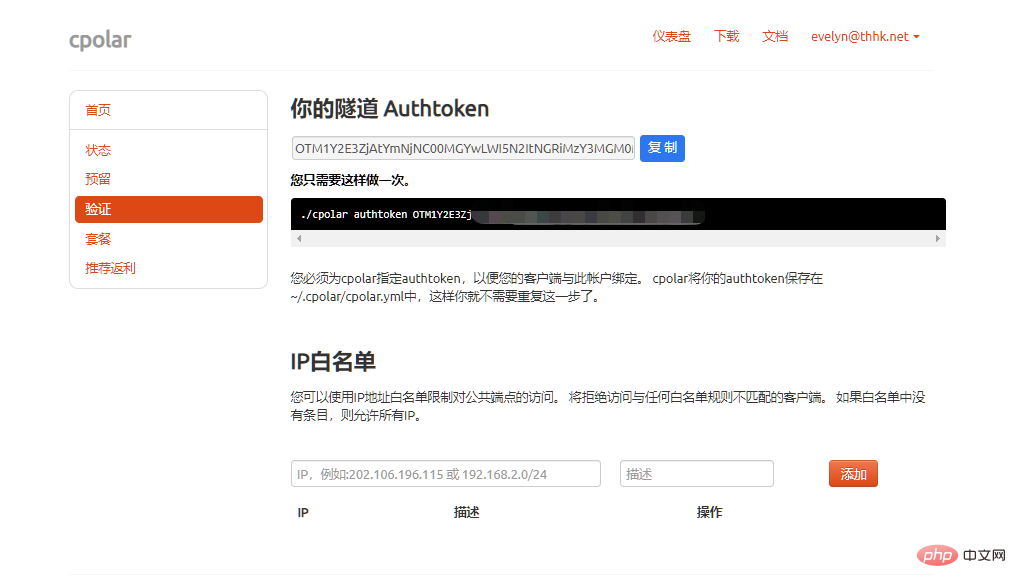
- token authentication
cpolar authtoken xxxxxxx
cpolar http 8080
Copy after loginPress ctrl c to exit
sudo systemctl enable cpolar
Copy after login
sudo systemctl start cpolar
Copy after login
sudo systemctl status cpolar
Copy after login
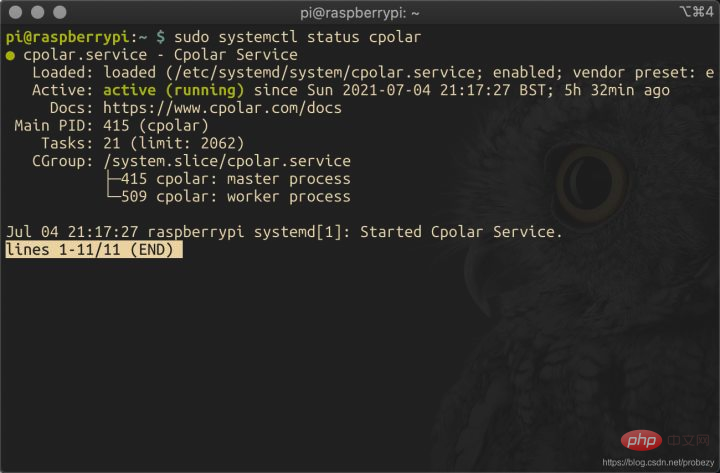 Normally displayed as
, it means that the service is in the normal online startup state
2.2 Create HTTP tunnelAfter installing cpolar intranet penetration locally on the ubuntu system, access the local 9200 port on the ubuntu browser and open the cpolar web ui interface: http://127.0.0.1 :9200.
Click Tunnel Management on the left dashboard - Create Tunnel. Since port 8080 is configured in code-server, we need to create an http tunnel pointing to port 8080:
Tunnel name: Customizable, be careful not to repeat- Protocol: http protocol
- Local address: 8080
- Domain name type: Select a random domain name
- Region: Select China VIP
- Click
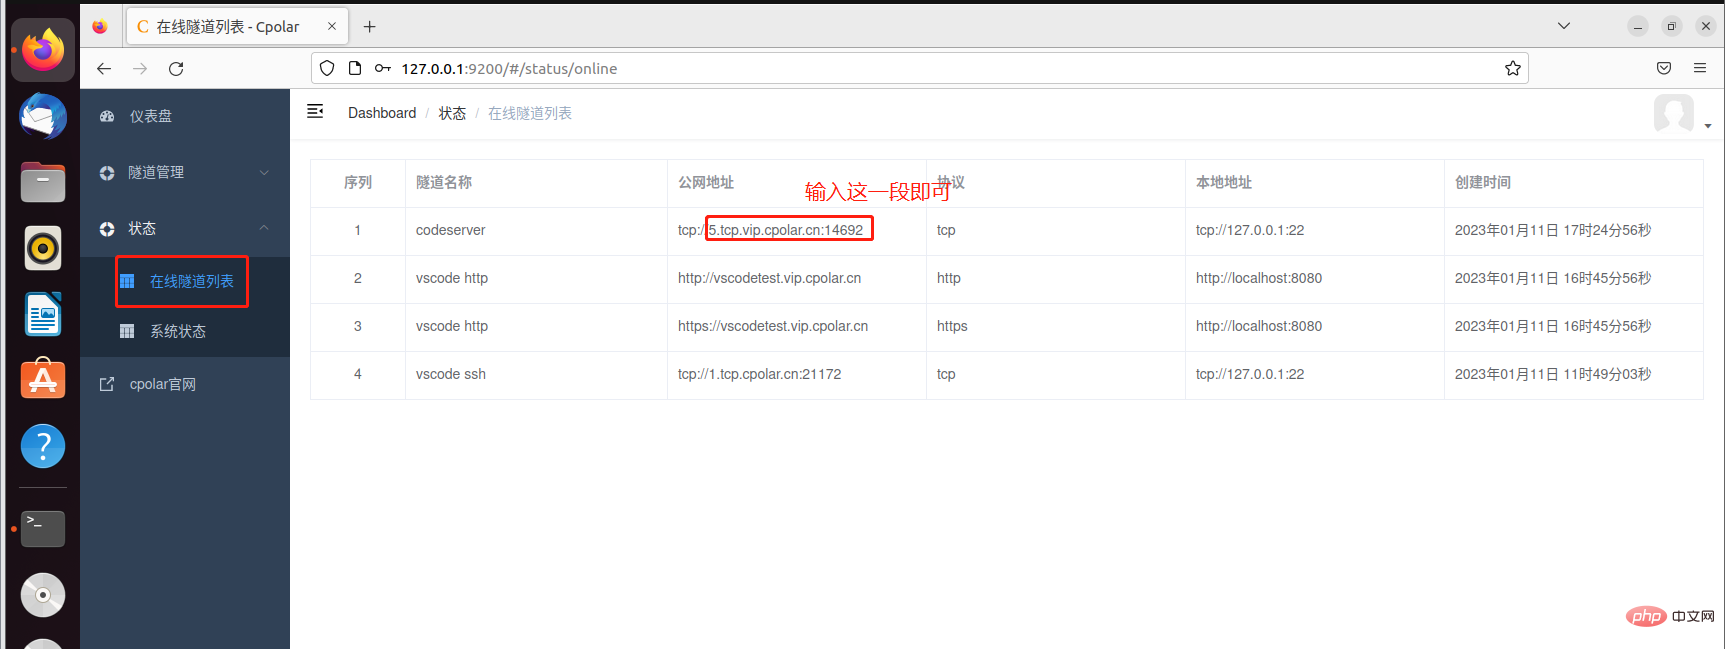
##After creating, click the status on the left - Online Tunnel List, view the public network address, copy it down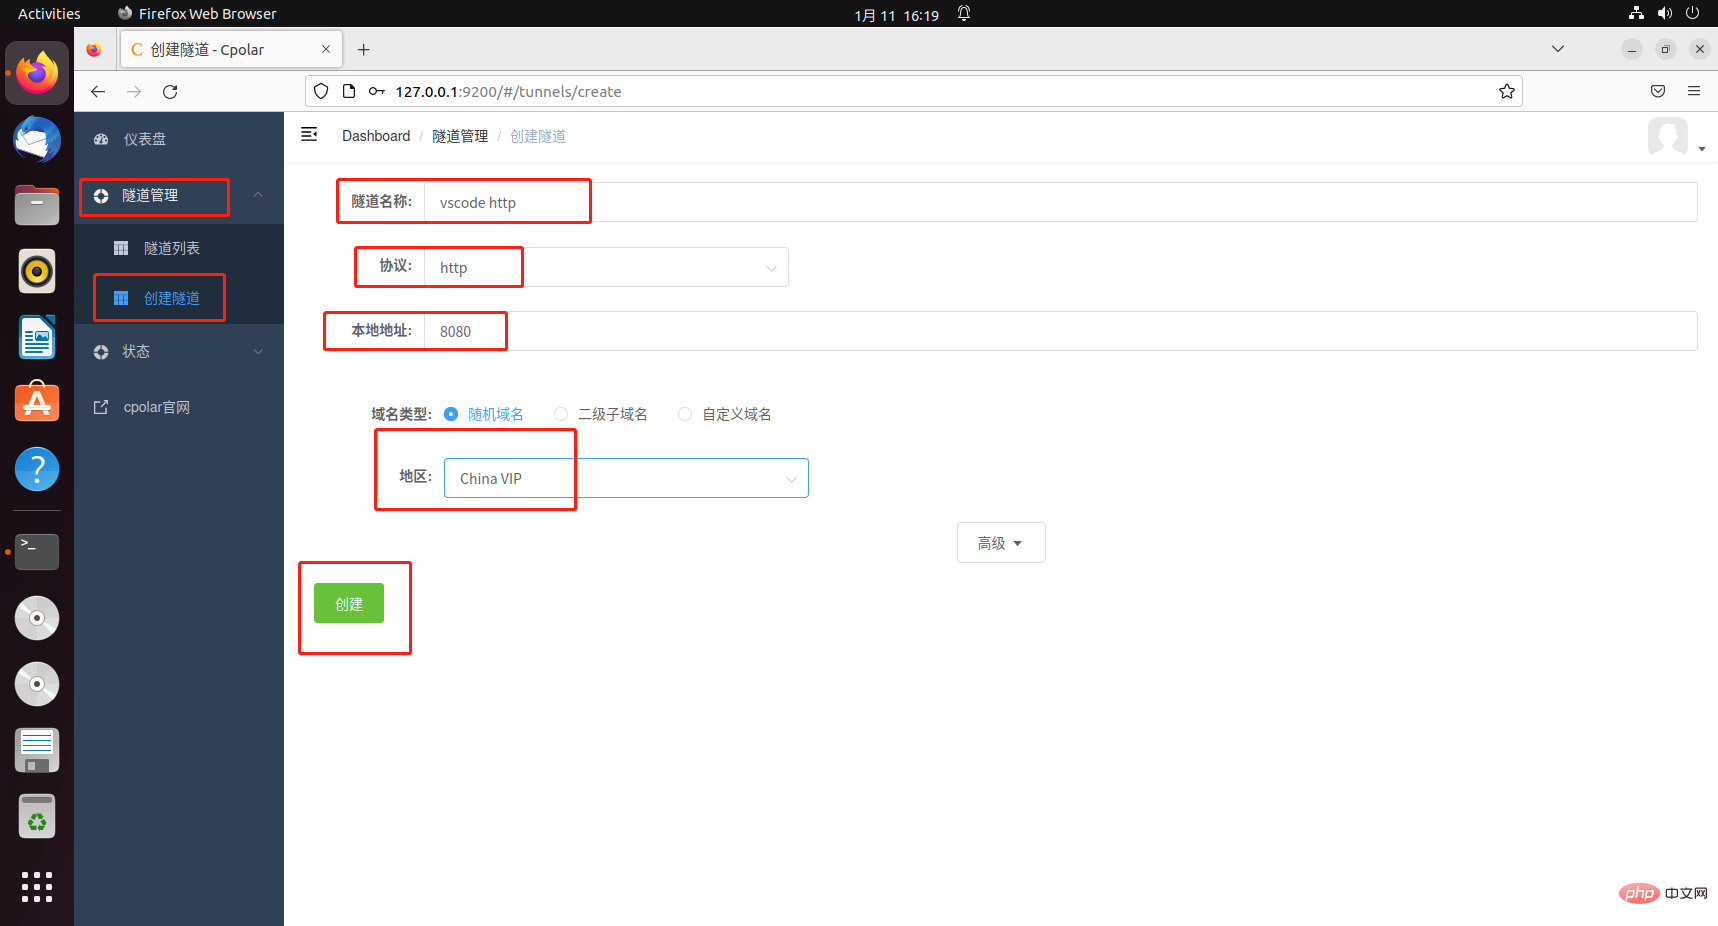
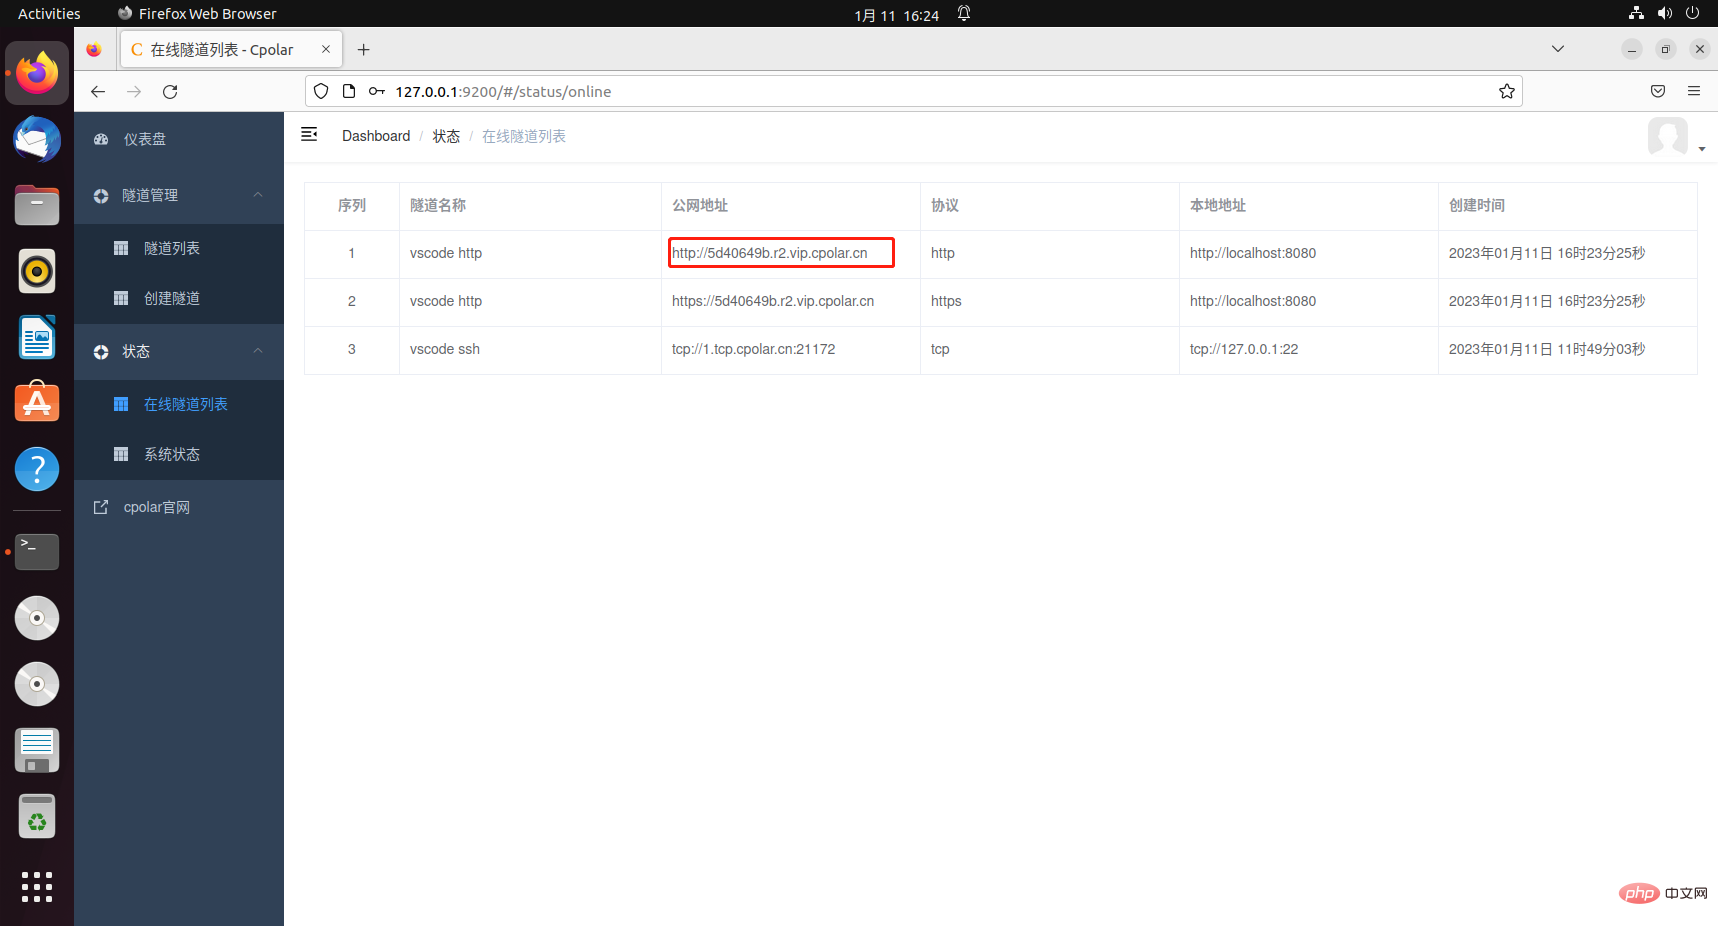
Open Use the iPad browser to access the public network address you just copied. After accessing, enter the password set earlier. The vscode interface will appear to indicate success.
4. Configure a fixed second-level subdomain name
4.1 Reserve the second-level subdomain name
Since the tunnel created using cpolar above uses a random temporary public network address, the address will change within 24 hours, which is not conducive to long-term remote access. Therefore, we can configure a second-level subdomain name for it. This address is a fixed address and will not change randomly [ps: cpolar.cn has been filed]
It should be noted that configuring a fixed second-level subdomain name requires Upgrade cpolar to the basic package or above.
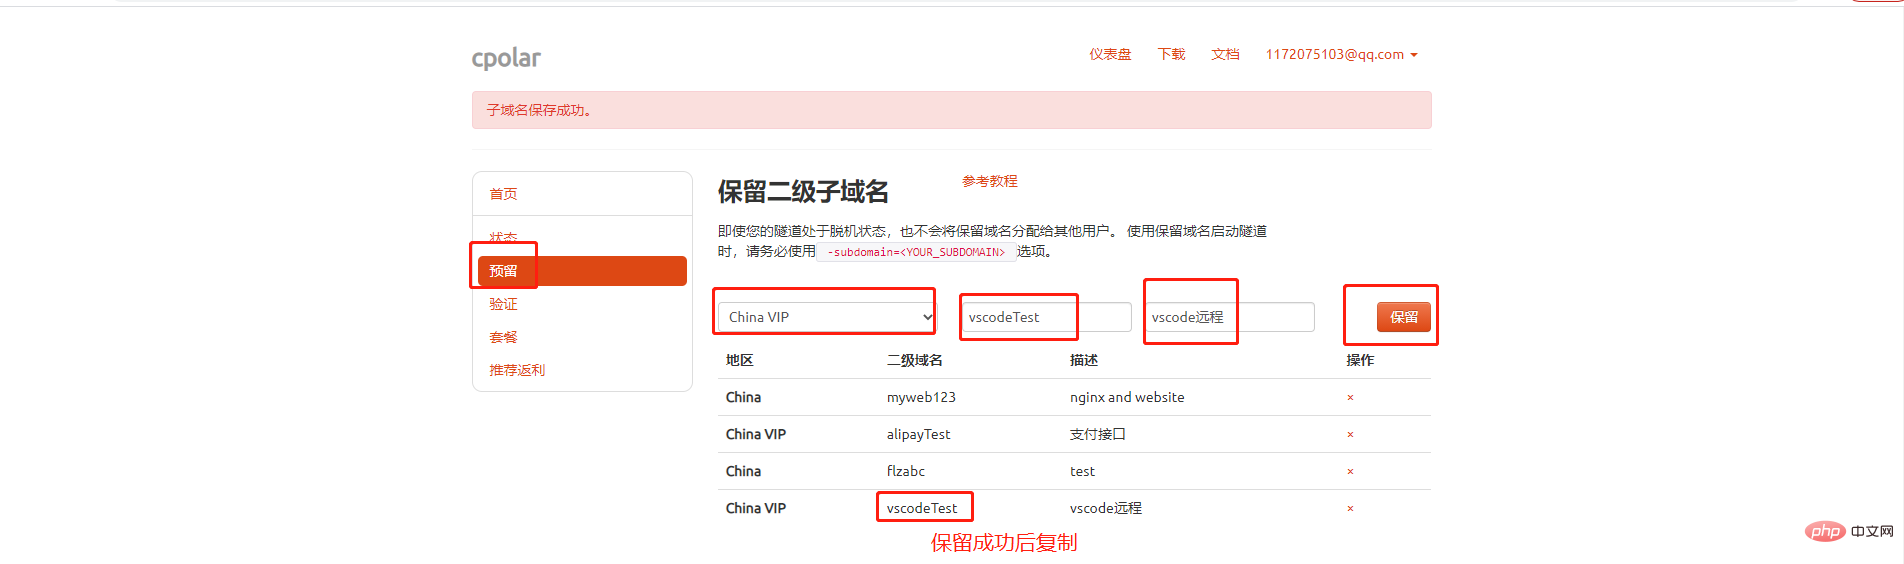
Log in to the cpolar official website, click Reserve on the left, select to reserve the second-level subdomain name, set a second-level subdomain name, click Reserve, and copy the reserved second-level subdomain name after the reservation is successful
- Region: Select China vip
- Second-level domain name: Can be customized to fill in
- Description: Remarks, can be customized to fill in
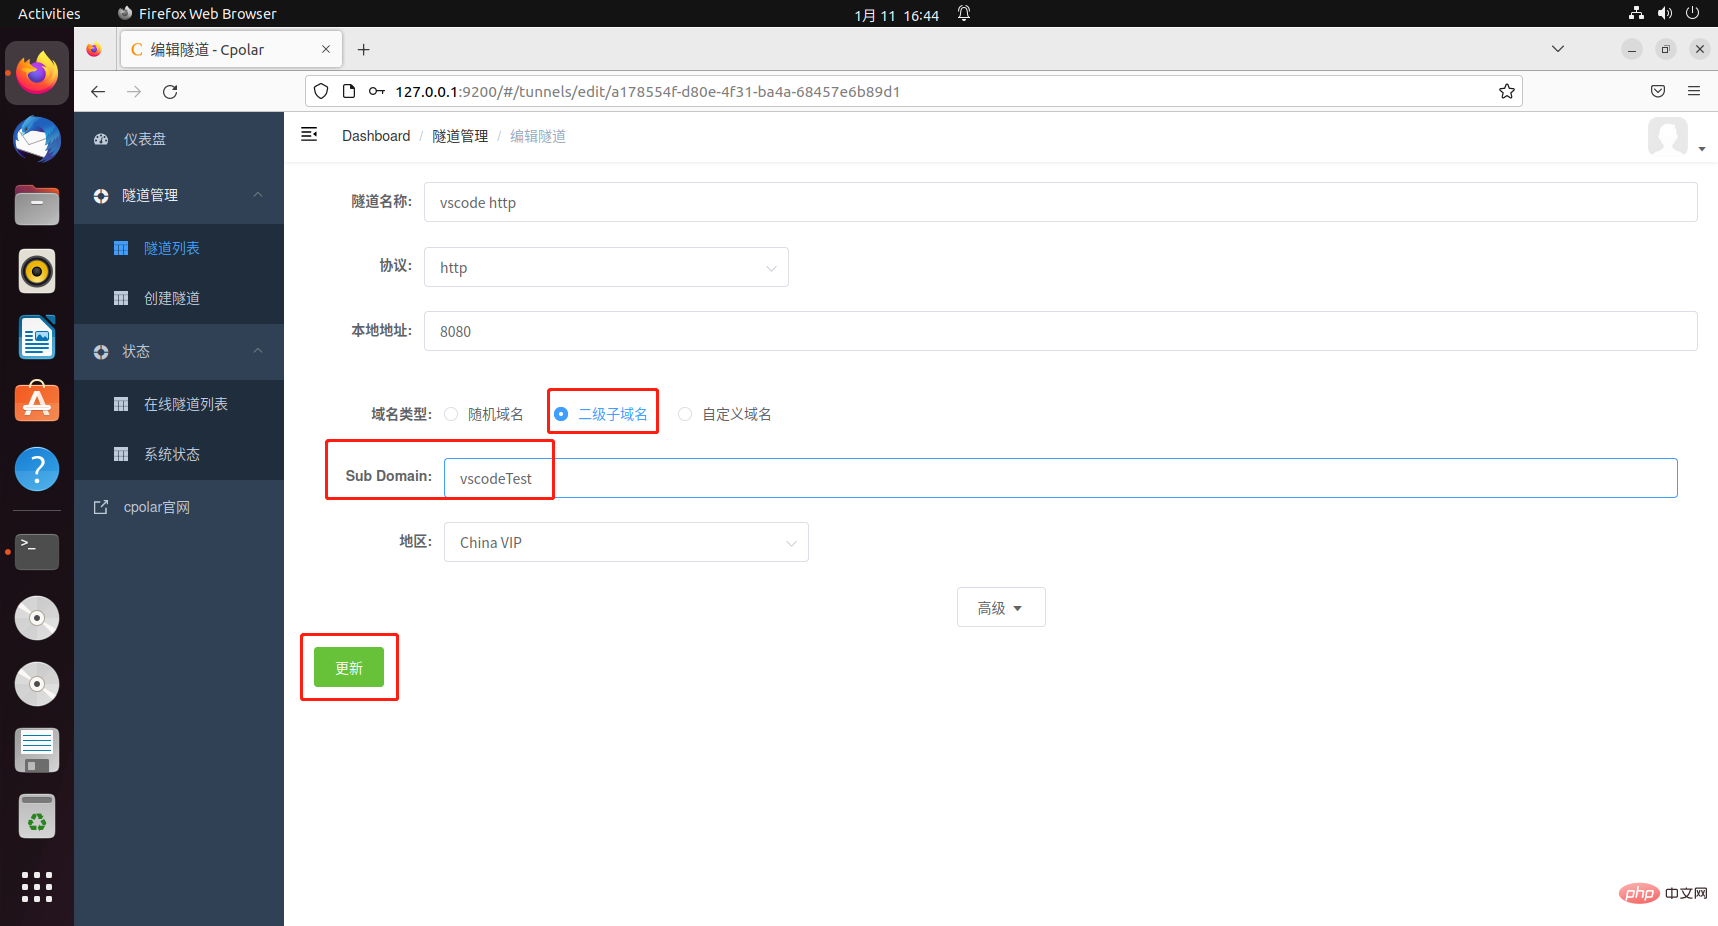
4.2 Configure the second-level subdomain name
Access the local port 9200, open the cpolar web ui interface, and click the tunnel on the left Management - Tunnel List, find the vscode tunnel, click Edit on the right
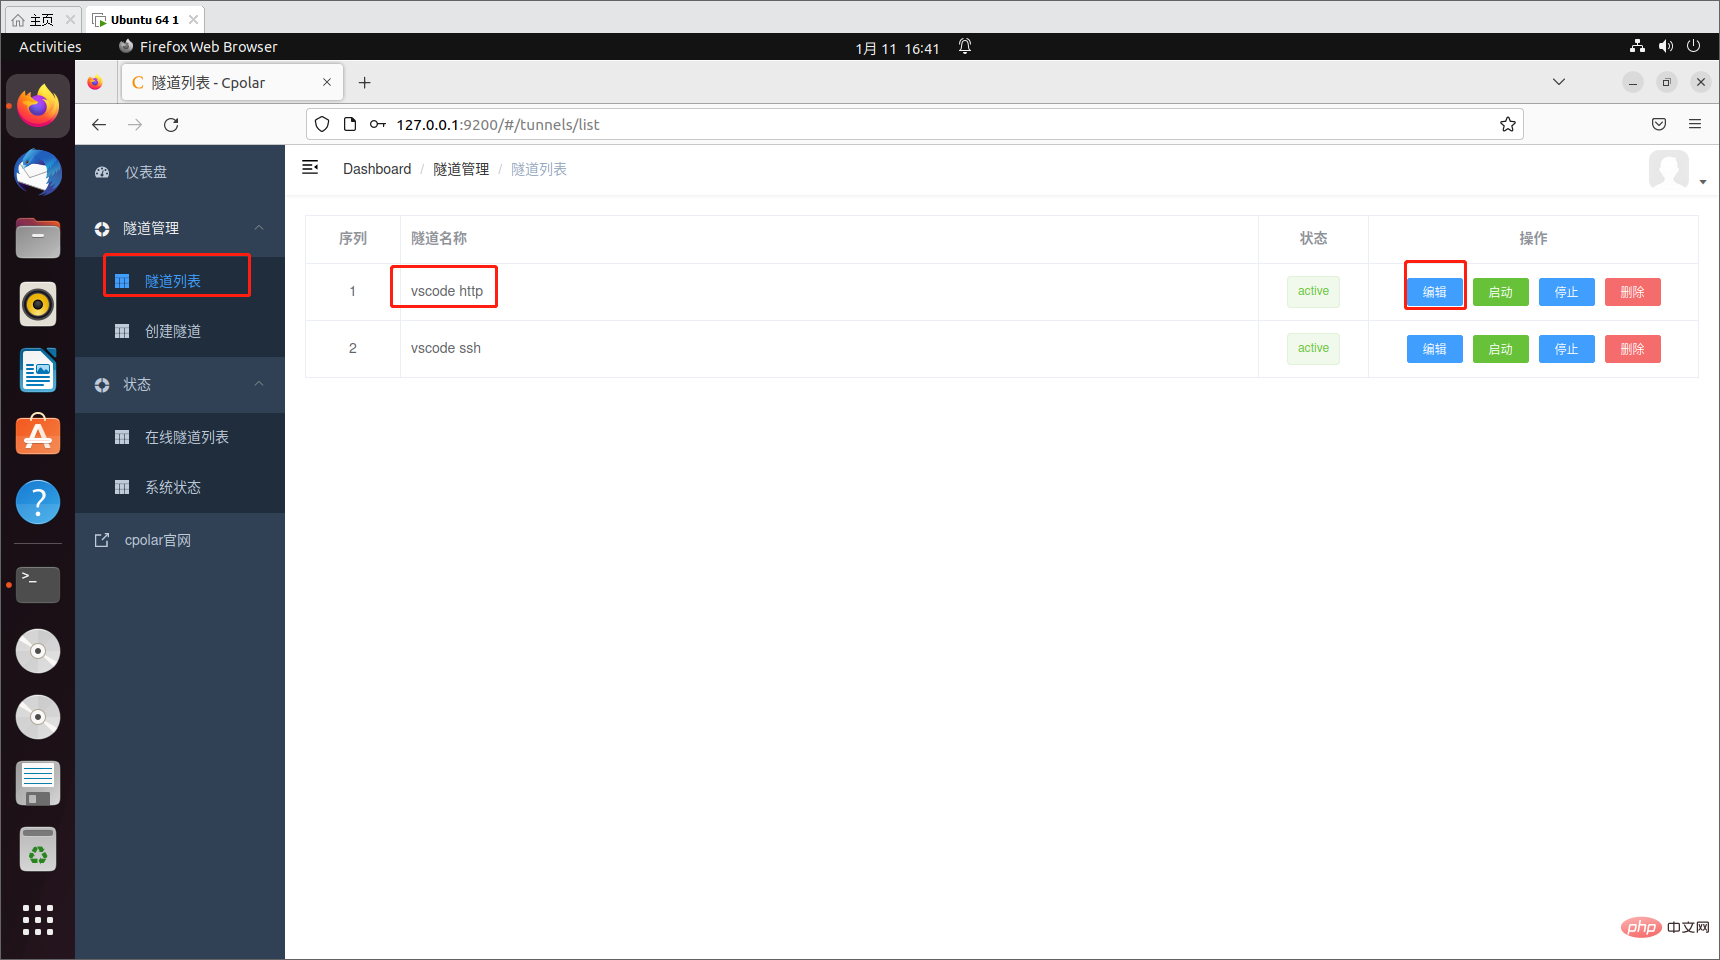
Modify the tunnel information:
- Change the domain name type to selection two Second-level subdomain name
- subdomain: Fill in the second-level subdomain name that has been successfully reserved
Click Update

5. Test remote access using a fixed second-level subdomain name
Then we open the iPad browser again and access the fixed second-level that we just configured successfully Subdomain name address, the vscode interface appears to indicate success, and you can happily write code.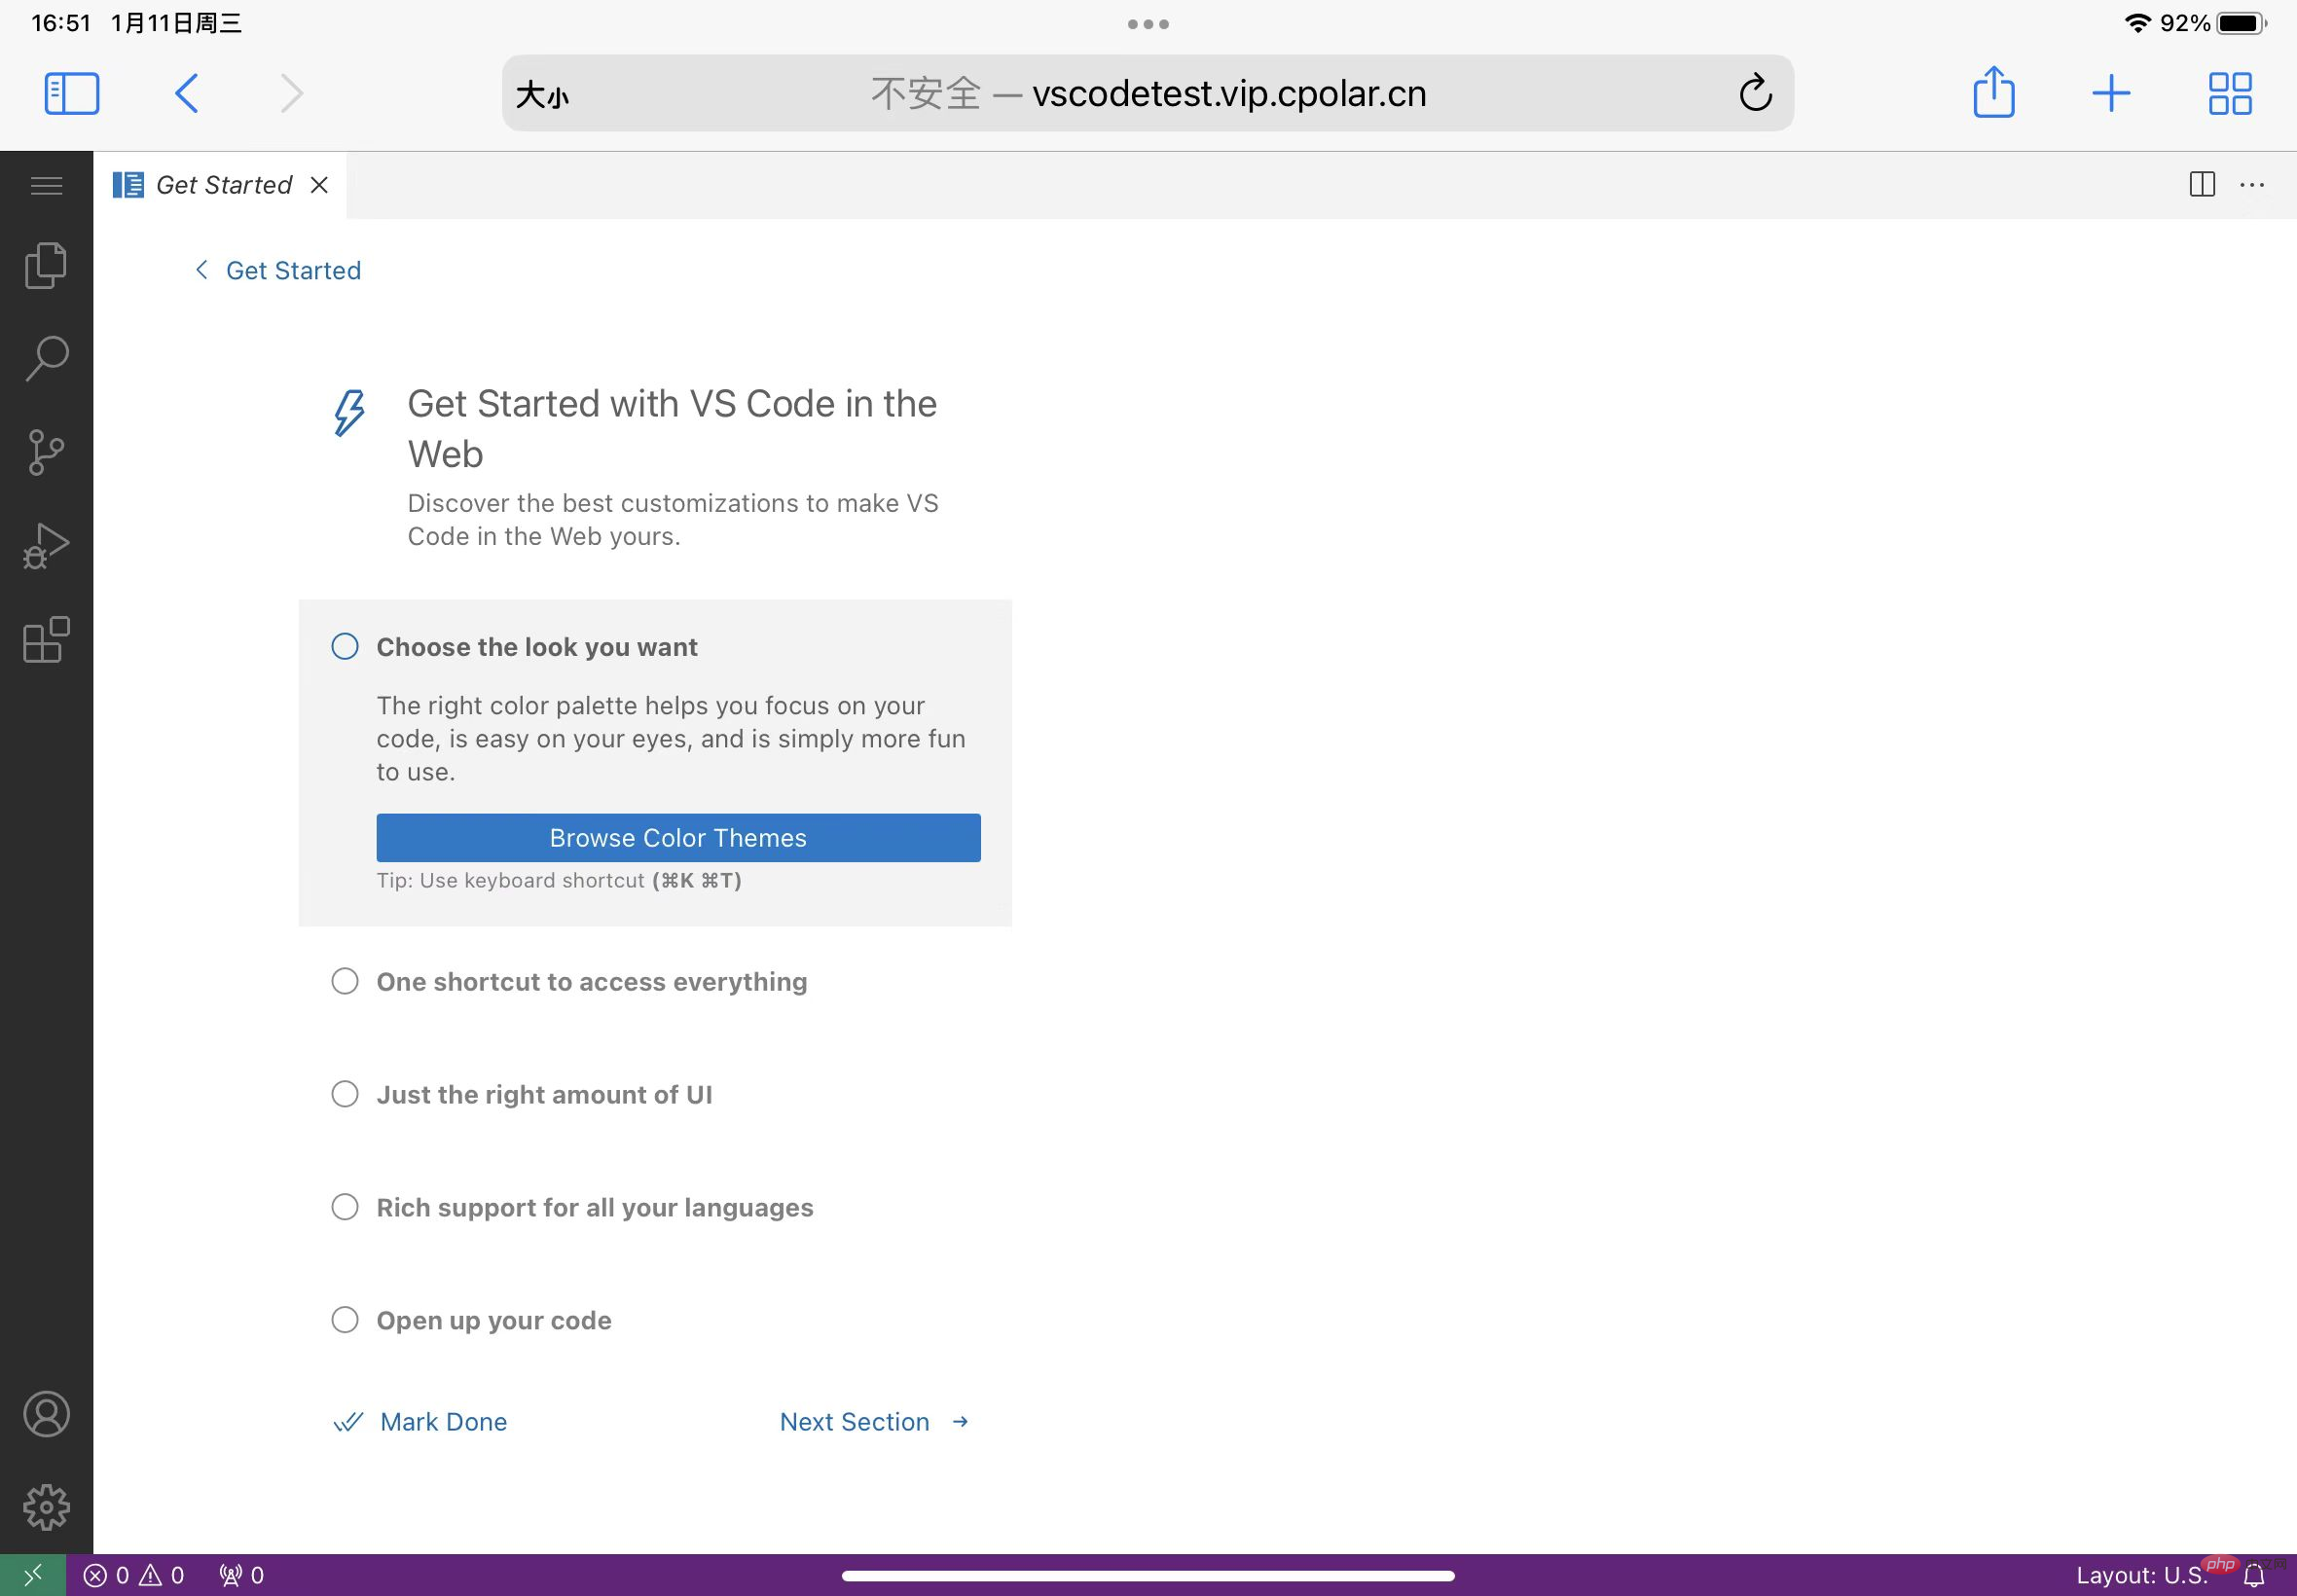
6. iPad remote vscode through software
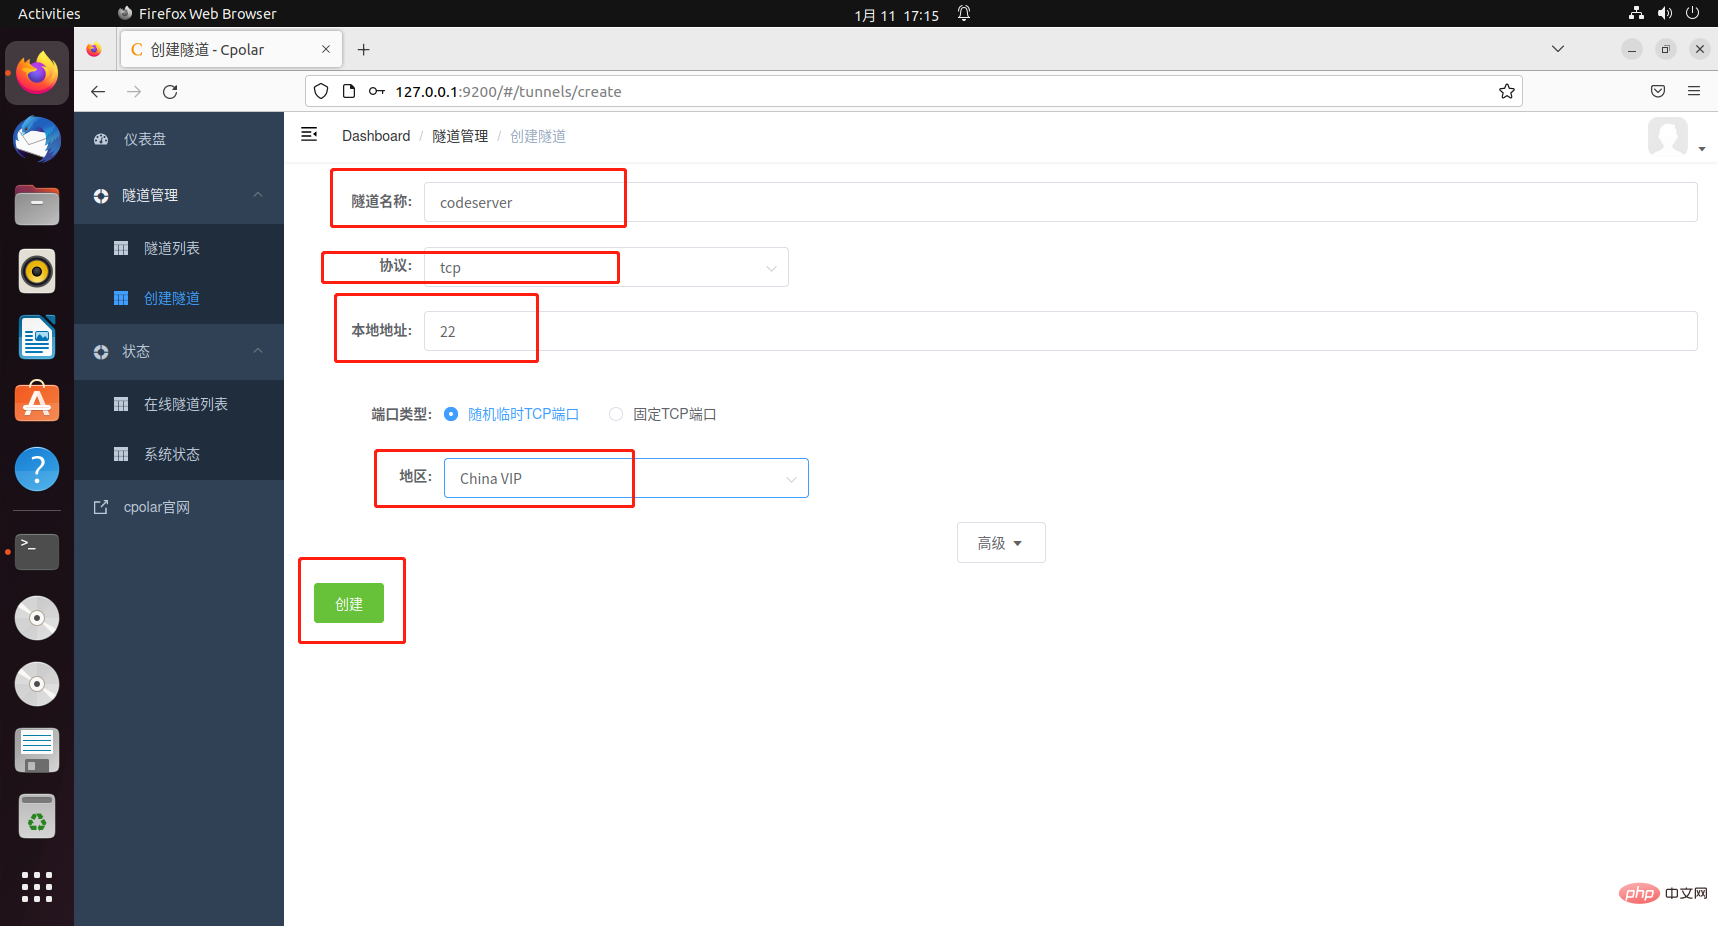
Next we use the servediter for code-server software to implement ipad remote access to vscode6.1 Create a TCP tunnel
First you need to create a TCP tunnel, pointing to port 22 of our server,servediter for code-serverThis software needs to connect to the server, open the browser on ubuntu to access the local 9200 port, and log in to the cpolar web ui interface. Click Tunnel Management on the left - Create Tunnel
- Tunnel name: Customizable, be careful not to repeat it
- Protocol: tcp protocol
- Local address: 22
- Domain name type: Select a random temporary TCP port
- Region: Select China VIP
Create
 ##After the tunnel is successfully created, click Status on the left - Online Tunnel List, and copy the generated public network address.
7. ipad remote vscodeOn the ipad, click to open the appstore and download the software
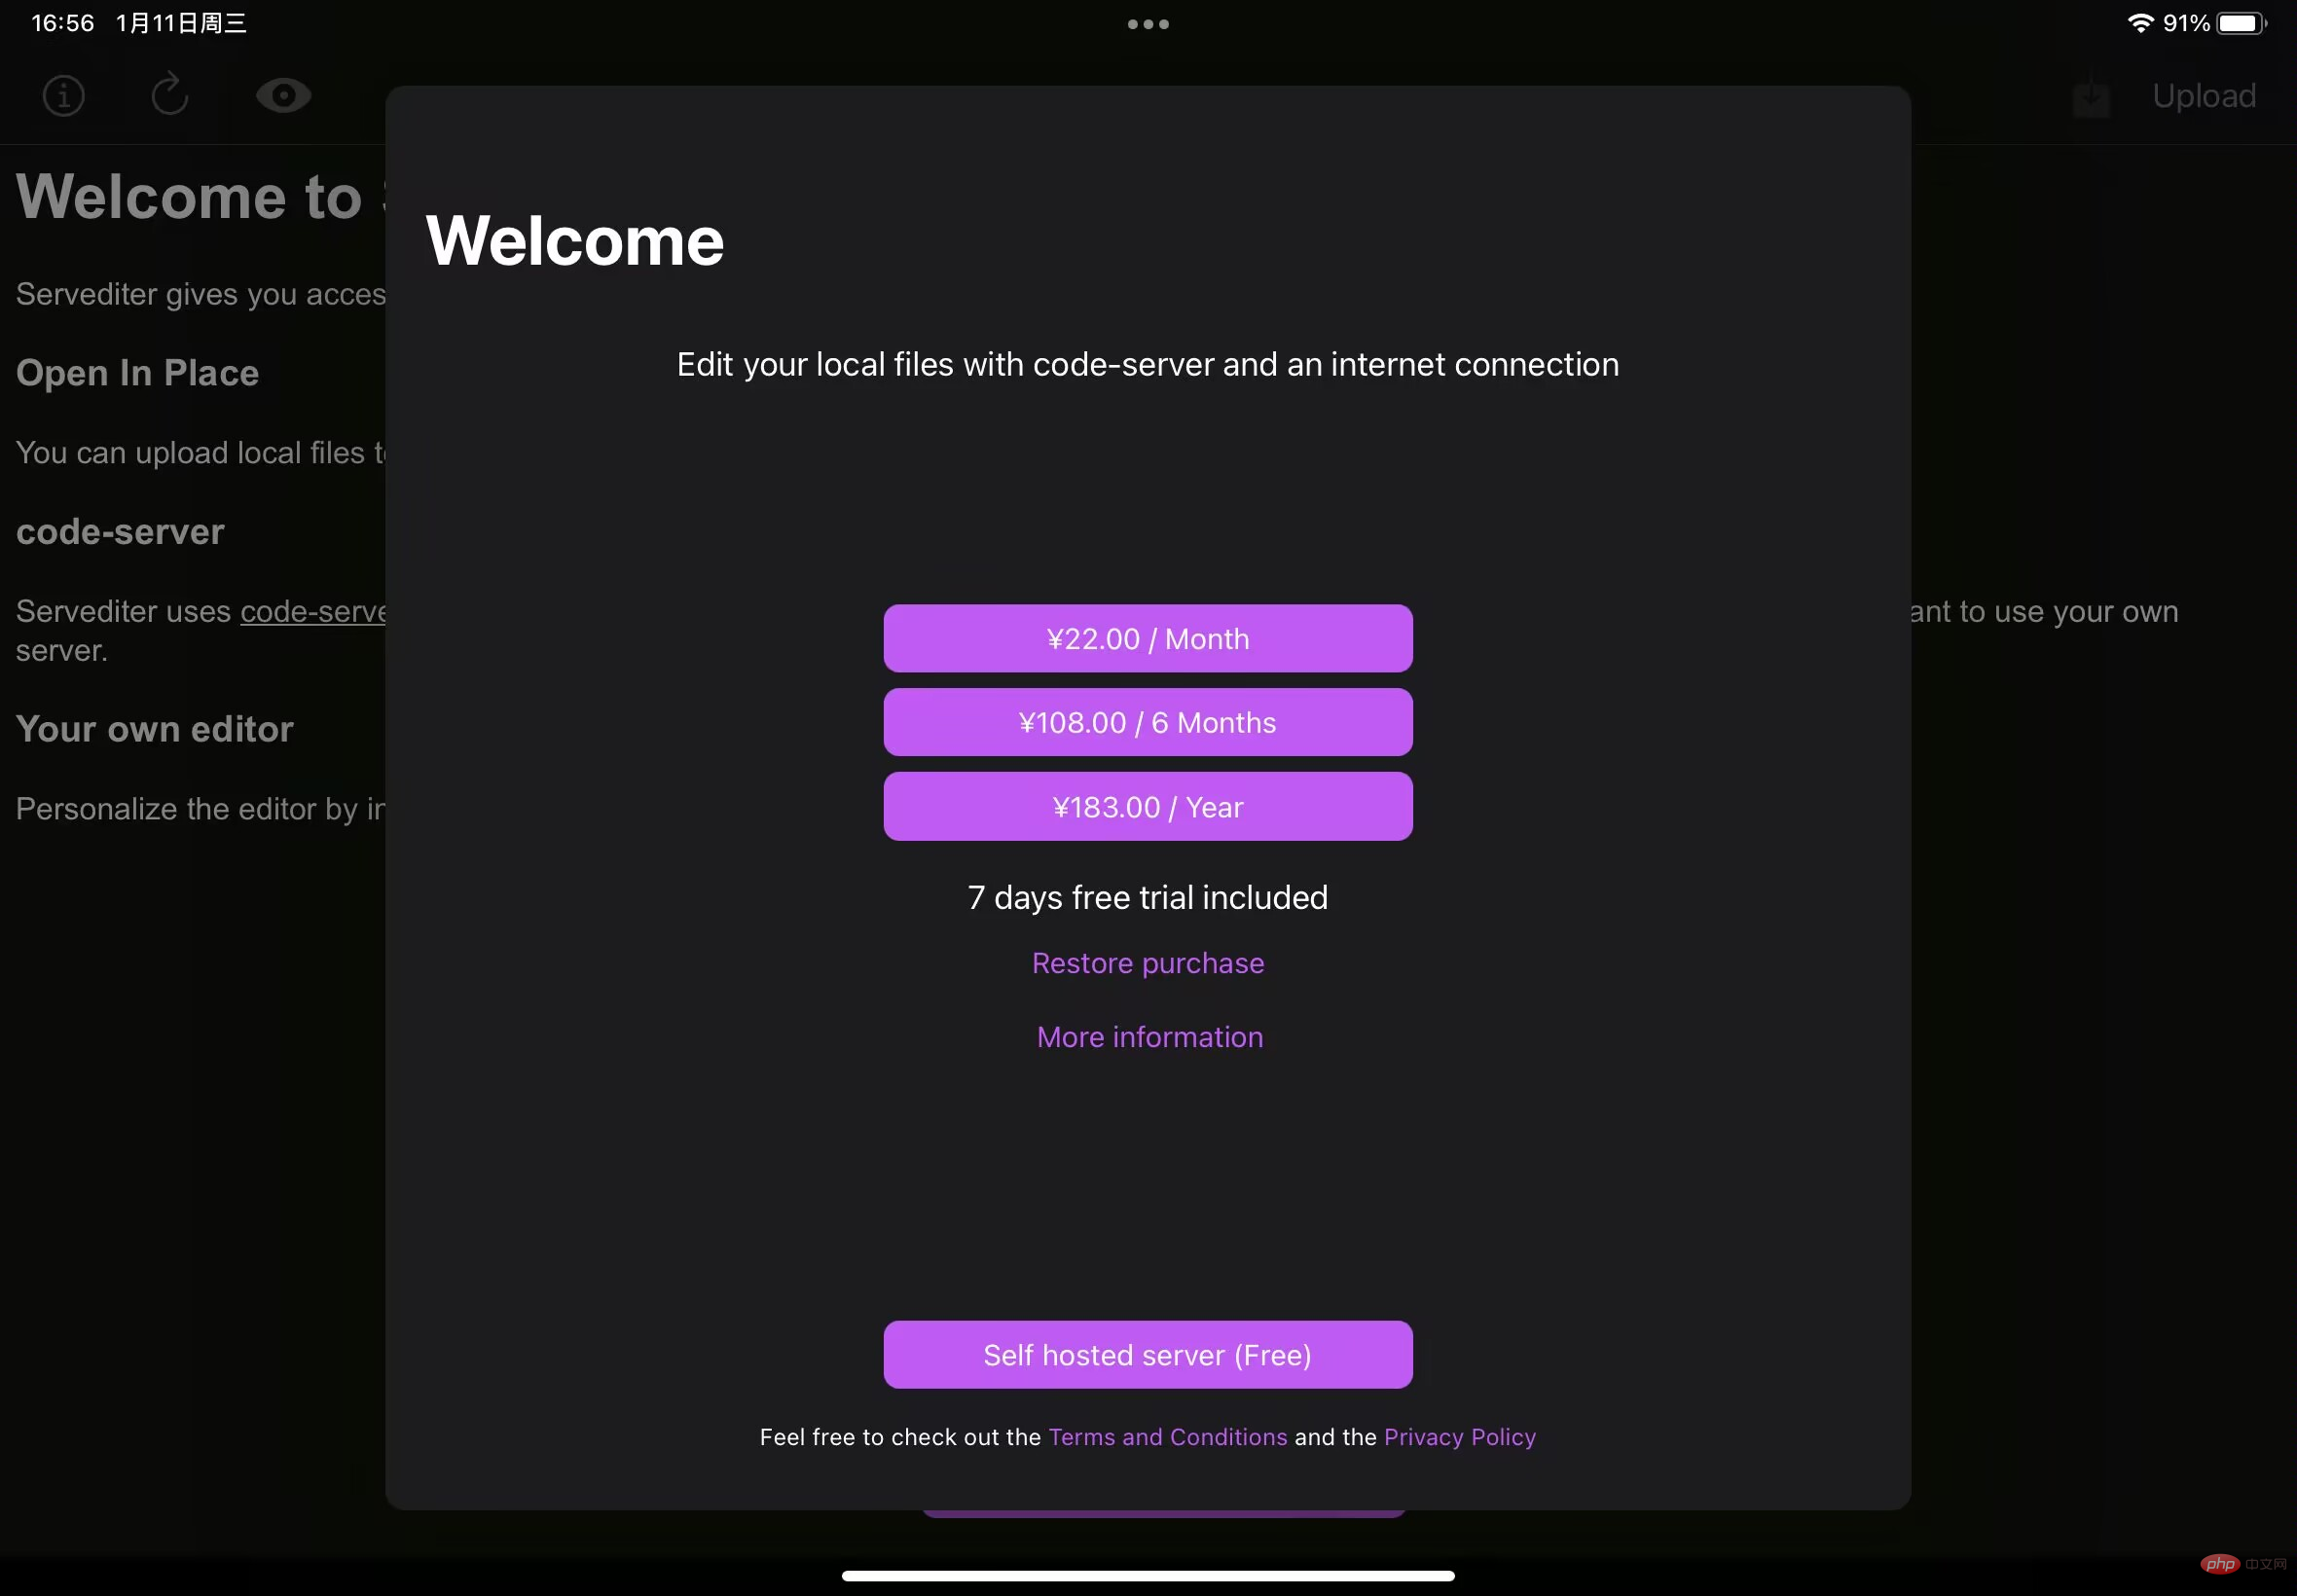
servediter for code-server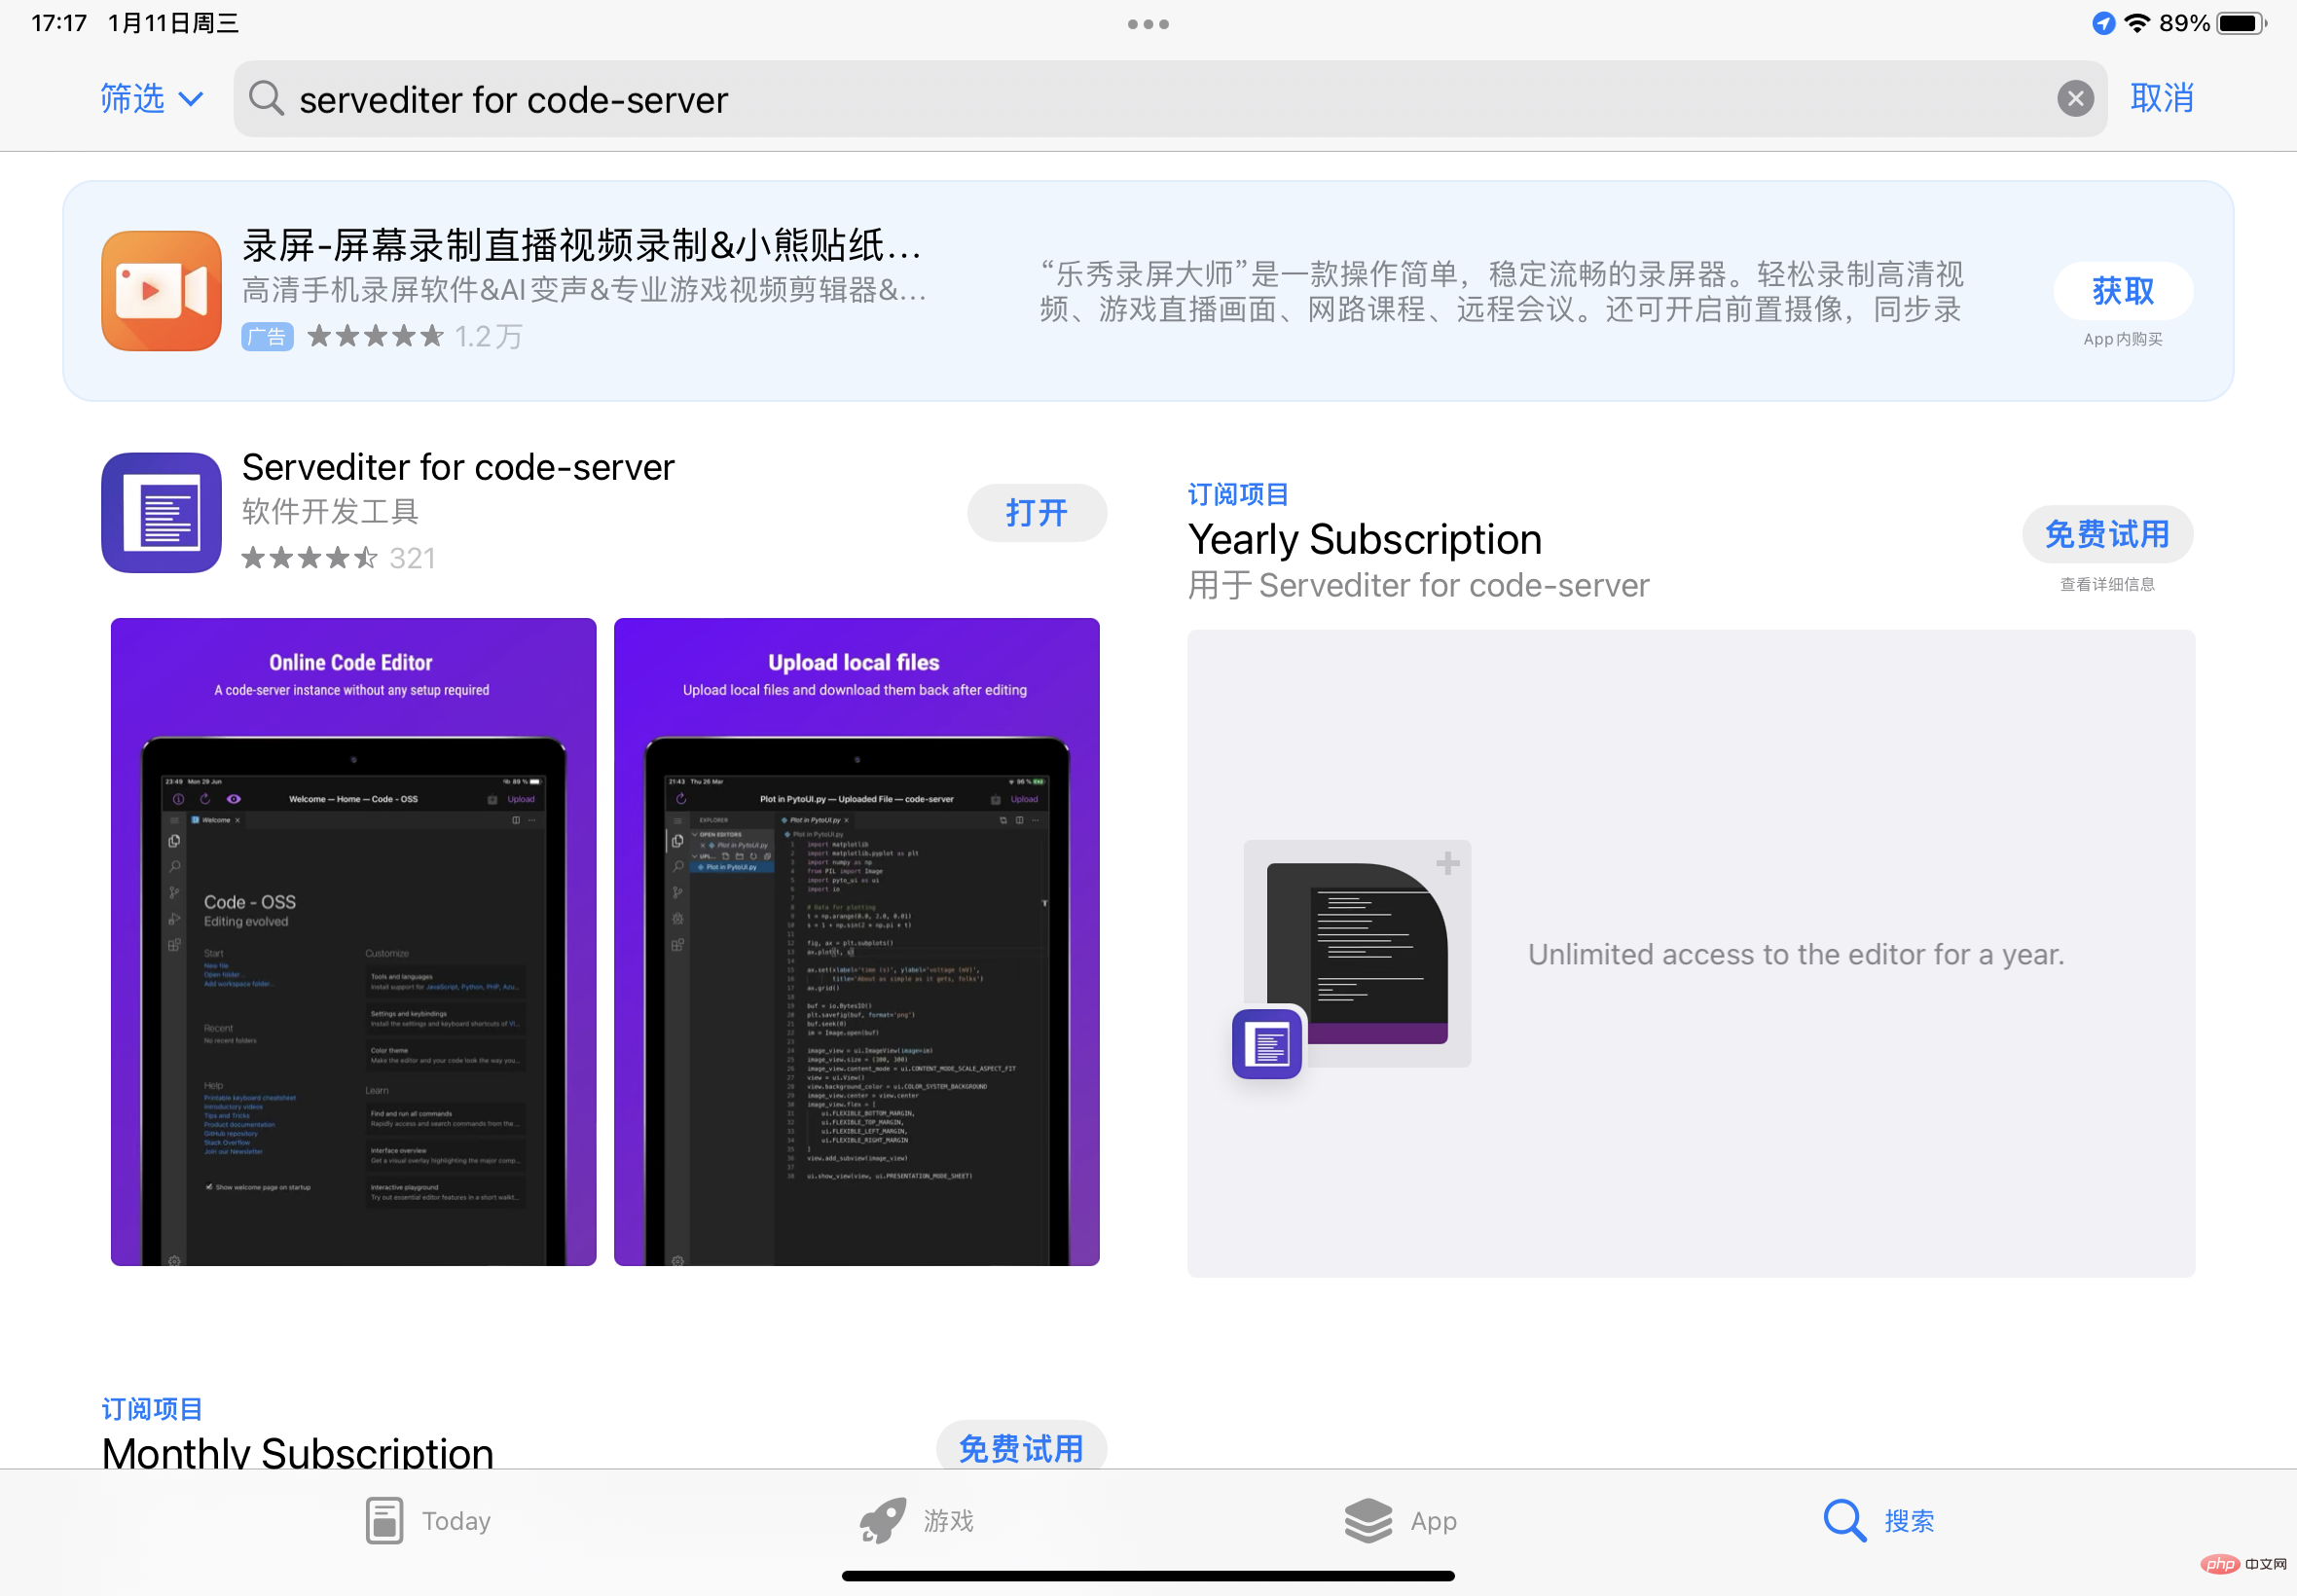 After the download is successful, click to open it. Since the software is paid, you can freely choose to purchase it. Choose free trial here and choose the last one. free
 Enter relevant information
code-server URL: fill in the front The successfully configured http public network address [the address accessed by the ipad browser]
- Instance password: the password configured by code-server
- Host: fill in the public address of the 22 tunnel we created successfully earlier here Network address
- Username: This fills in the user name of the ubuntu system
- Port: The default here is no need to modify
- Authentication: This fills in the password corresponding to the ubuntu system user name
 After entering the information, click save in the upper right corner and it will automatically connect. The vscode interface appears to indicate that the connection is successful
8. Configure a fixed TCP port address
Since the ssh port 22 tunnel we created earlier selected a random temporary address, the address will be in 24 Changes within hours. In order to make the connection using vscode on our iPad smoother, we need to fix the public address of ssh.
Note that you need to upgrade the cpolar package to the professional package or above.
8.1 Reserve a fixed TCP address
Log in to cpolarofficial website backend, click Reserve on the left, Find the reserved TCP address:
- Region: Select China VIP
- Description: Remarks, which can be customized
ClickReserve
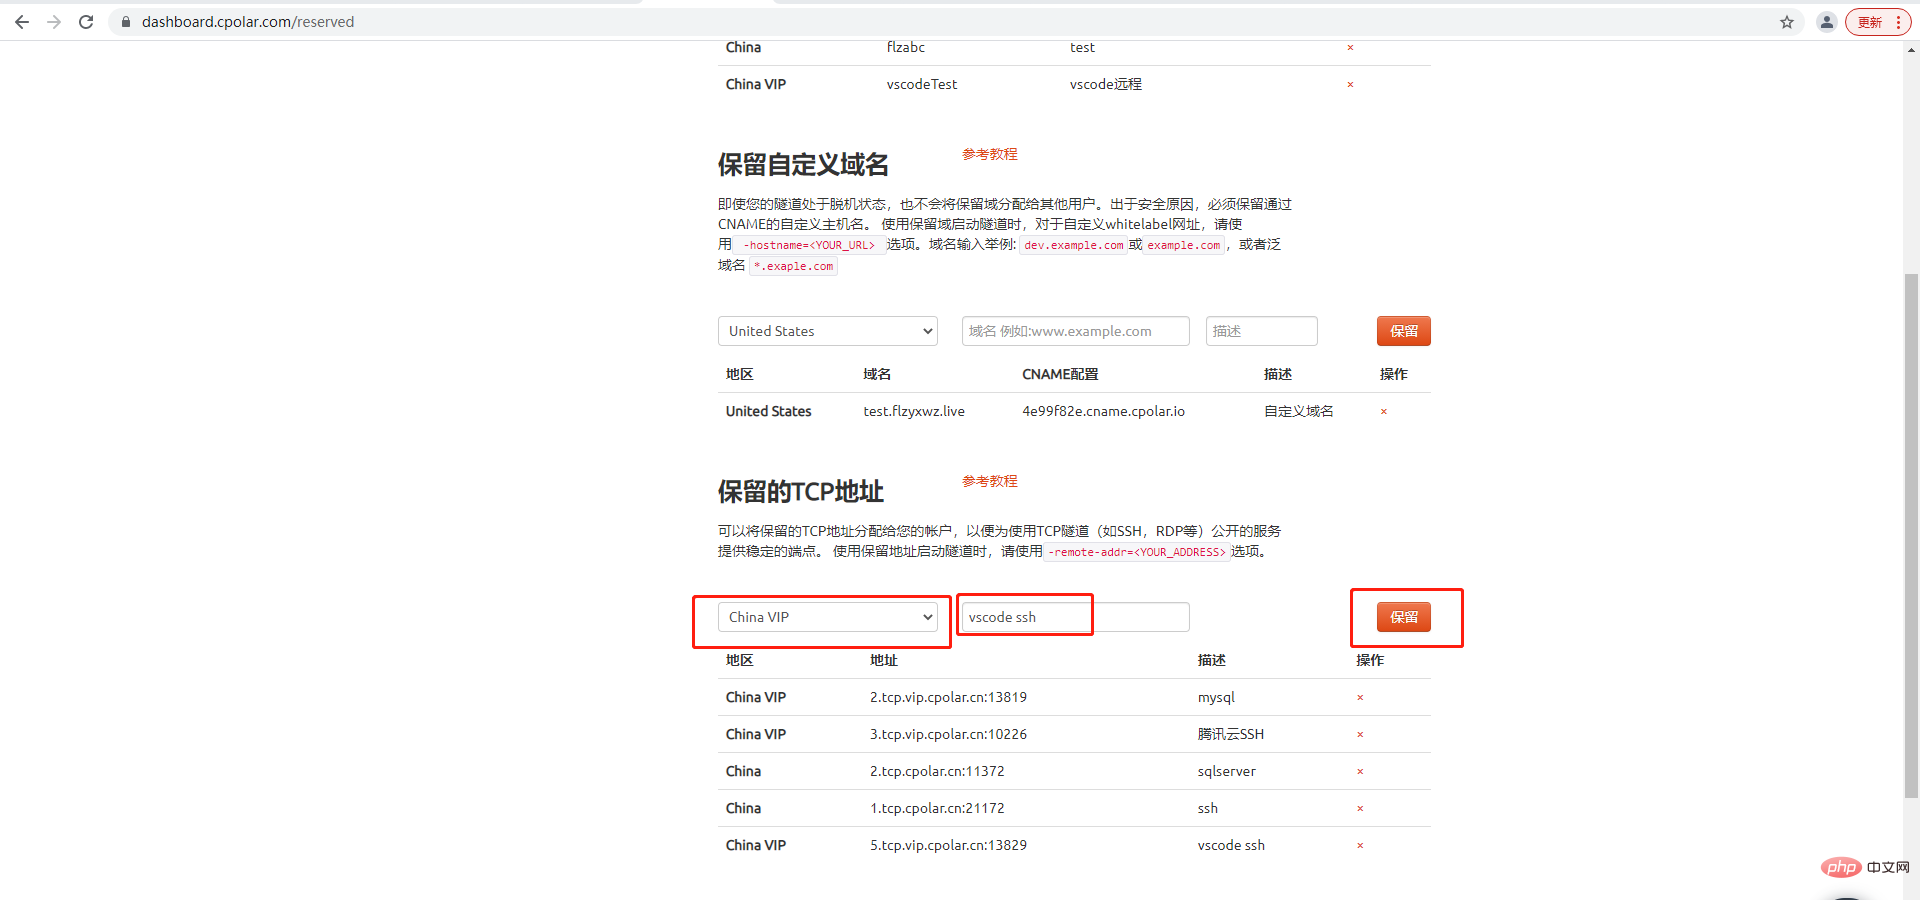
The fixed TCP address is retained successfully. The system generates the corresponding public network address fixed port number and copies it

8.2 Configure a fixed TCP port address
Visit http://127.0.0.1:9200/ with your browser and log in to the cpolar web UI management interface, click on the left Tunnel management on the dashboard - Tunnel list, find the codeserver tunnel, click Edit on the right
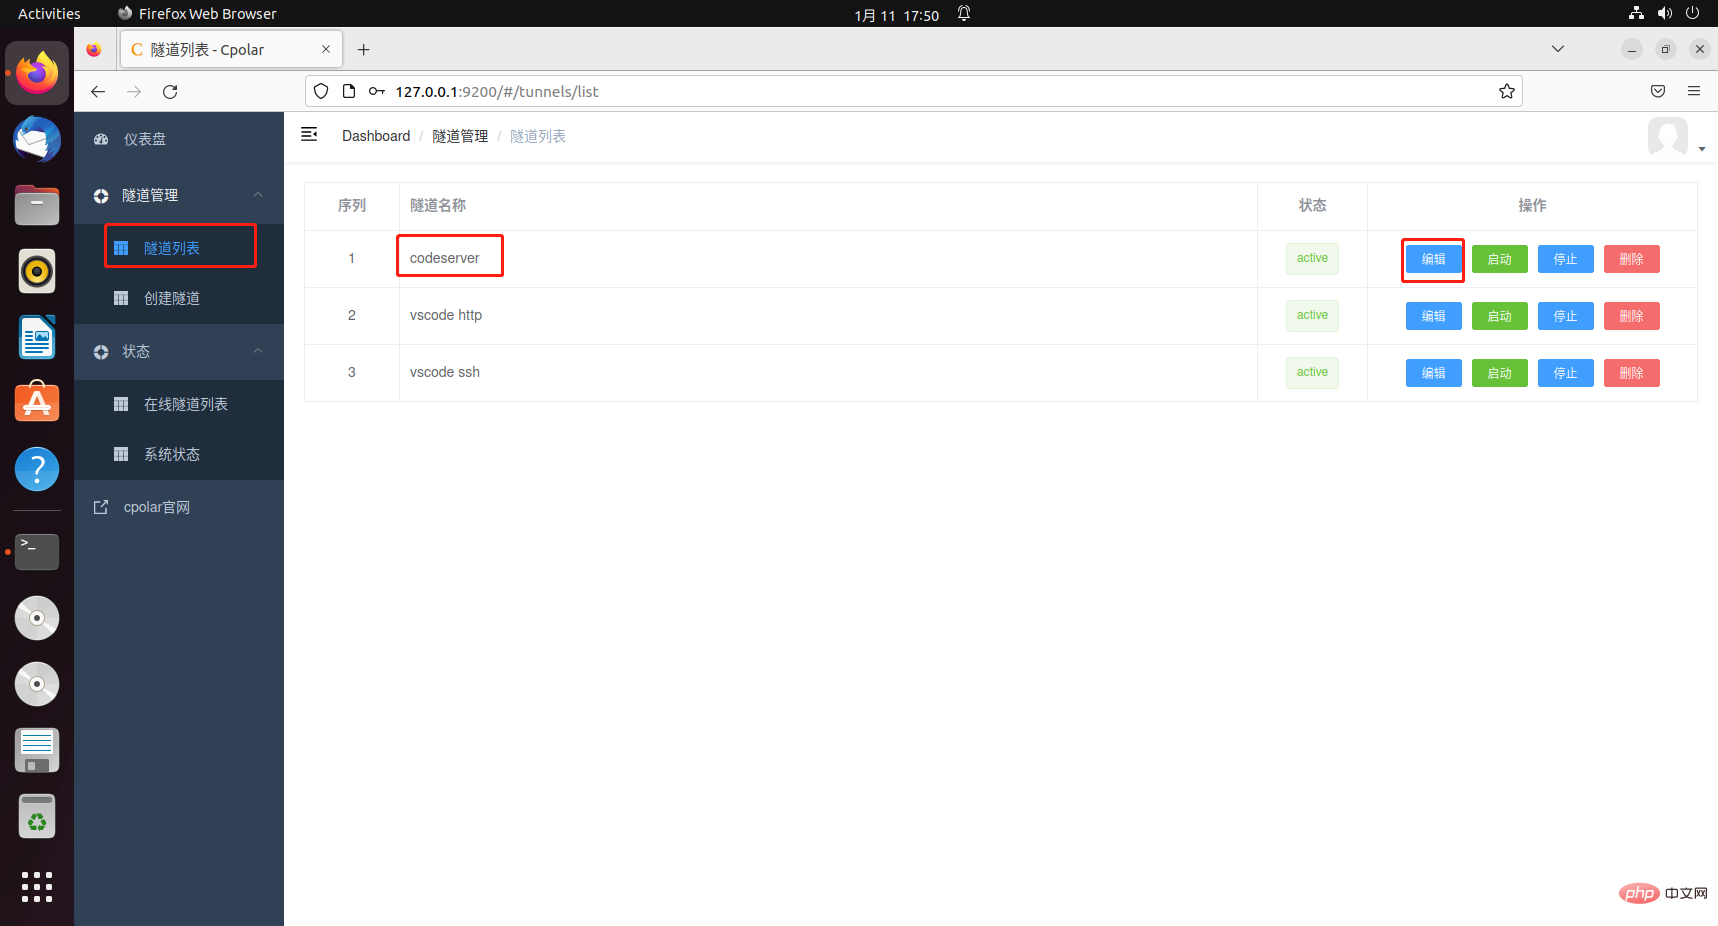
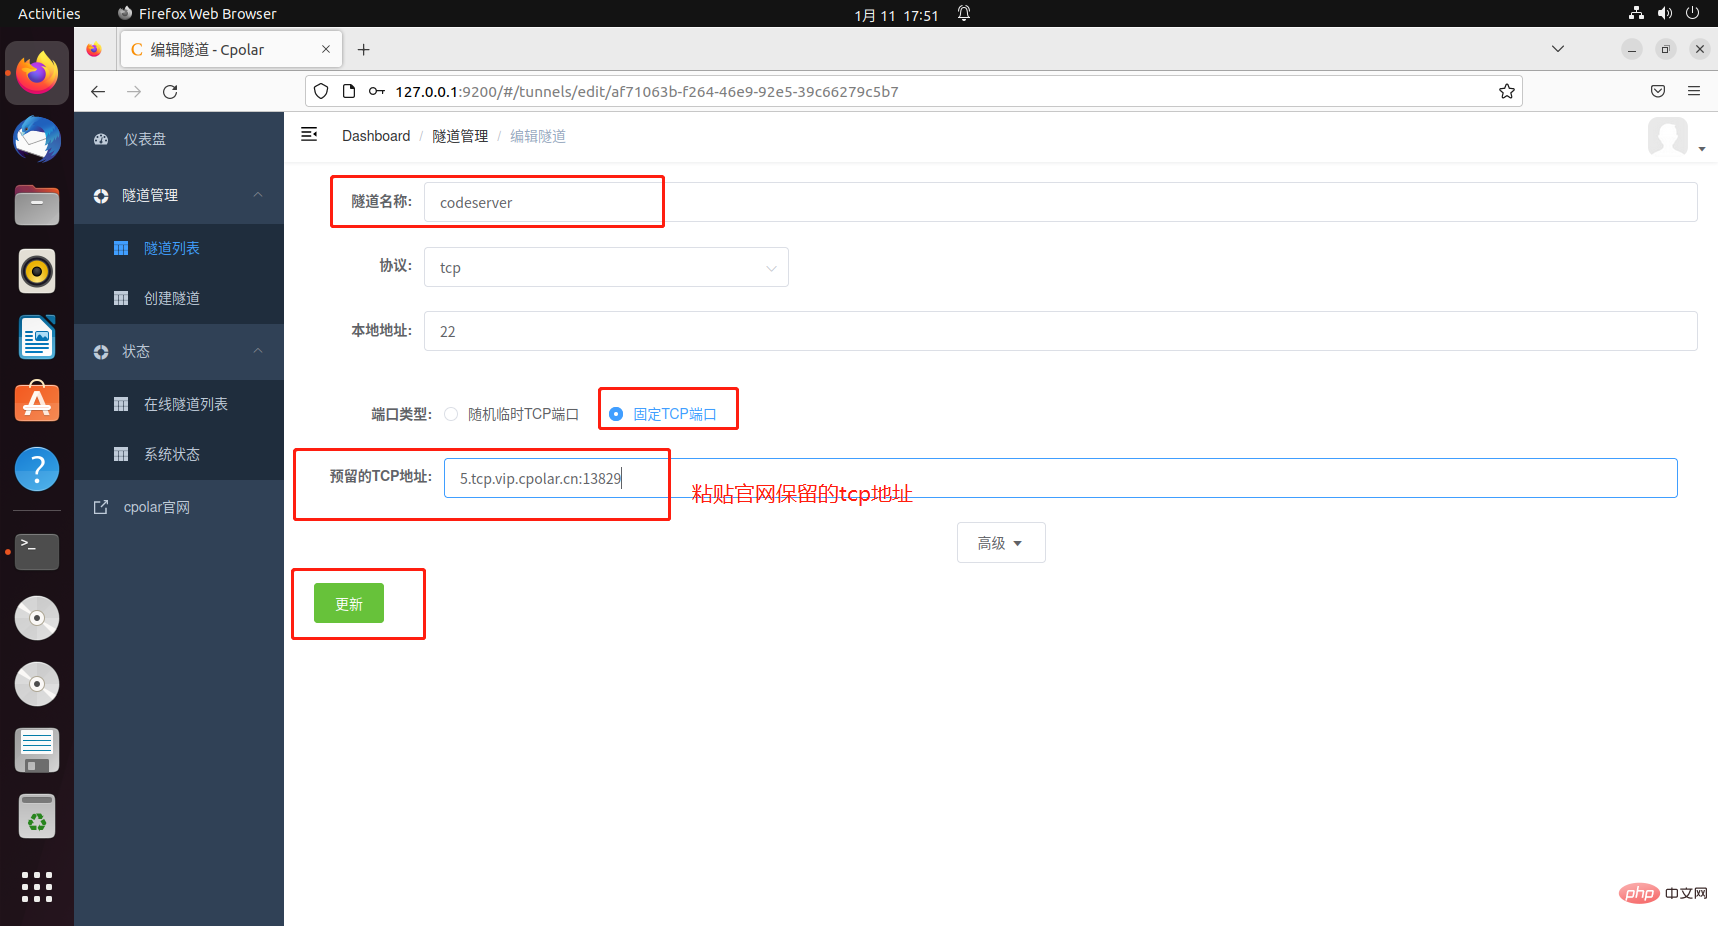
to modify the tunnel information and configure a fixed TCP port address:
- Port type: Change to select a fixed TCP port
- Reserved TCP address: Fill in the fixed TCP port address that was successfully reserved
Click Update
prompts that the tunnel update is successful. Click the status on the left dashboard - Online Tunnel List. You can see that the public network address of the tunnel you just modified has been updated to a fixed TCP port. address and copy it.

9. Remote vscode using a fixed TCP address
On iPad, open servediter for code- Server software, modify the host parameters to the fixed TCP port address we just configured successfully.
Click the i logo in the upper left corner
Select self Host Server

Change the Host value to the tcp address we just reserved on the official website
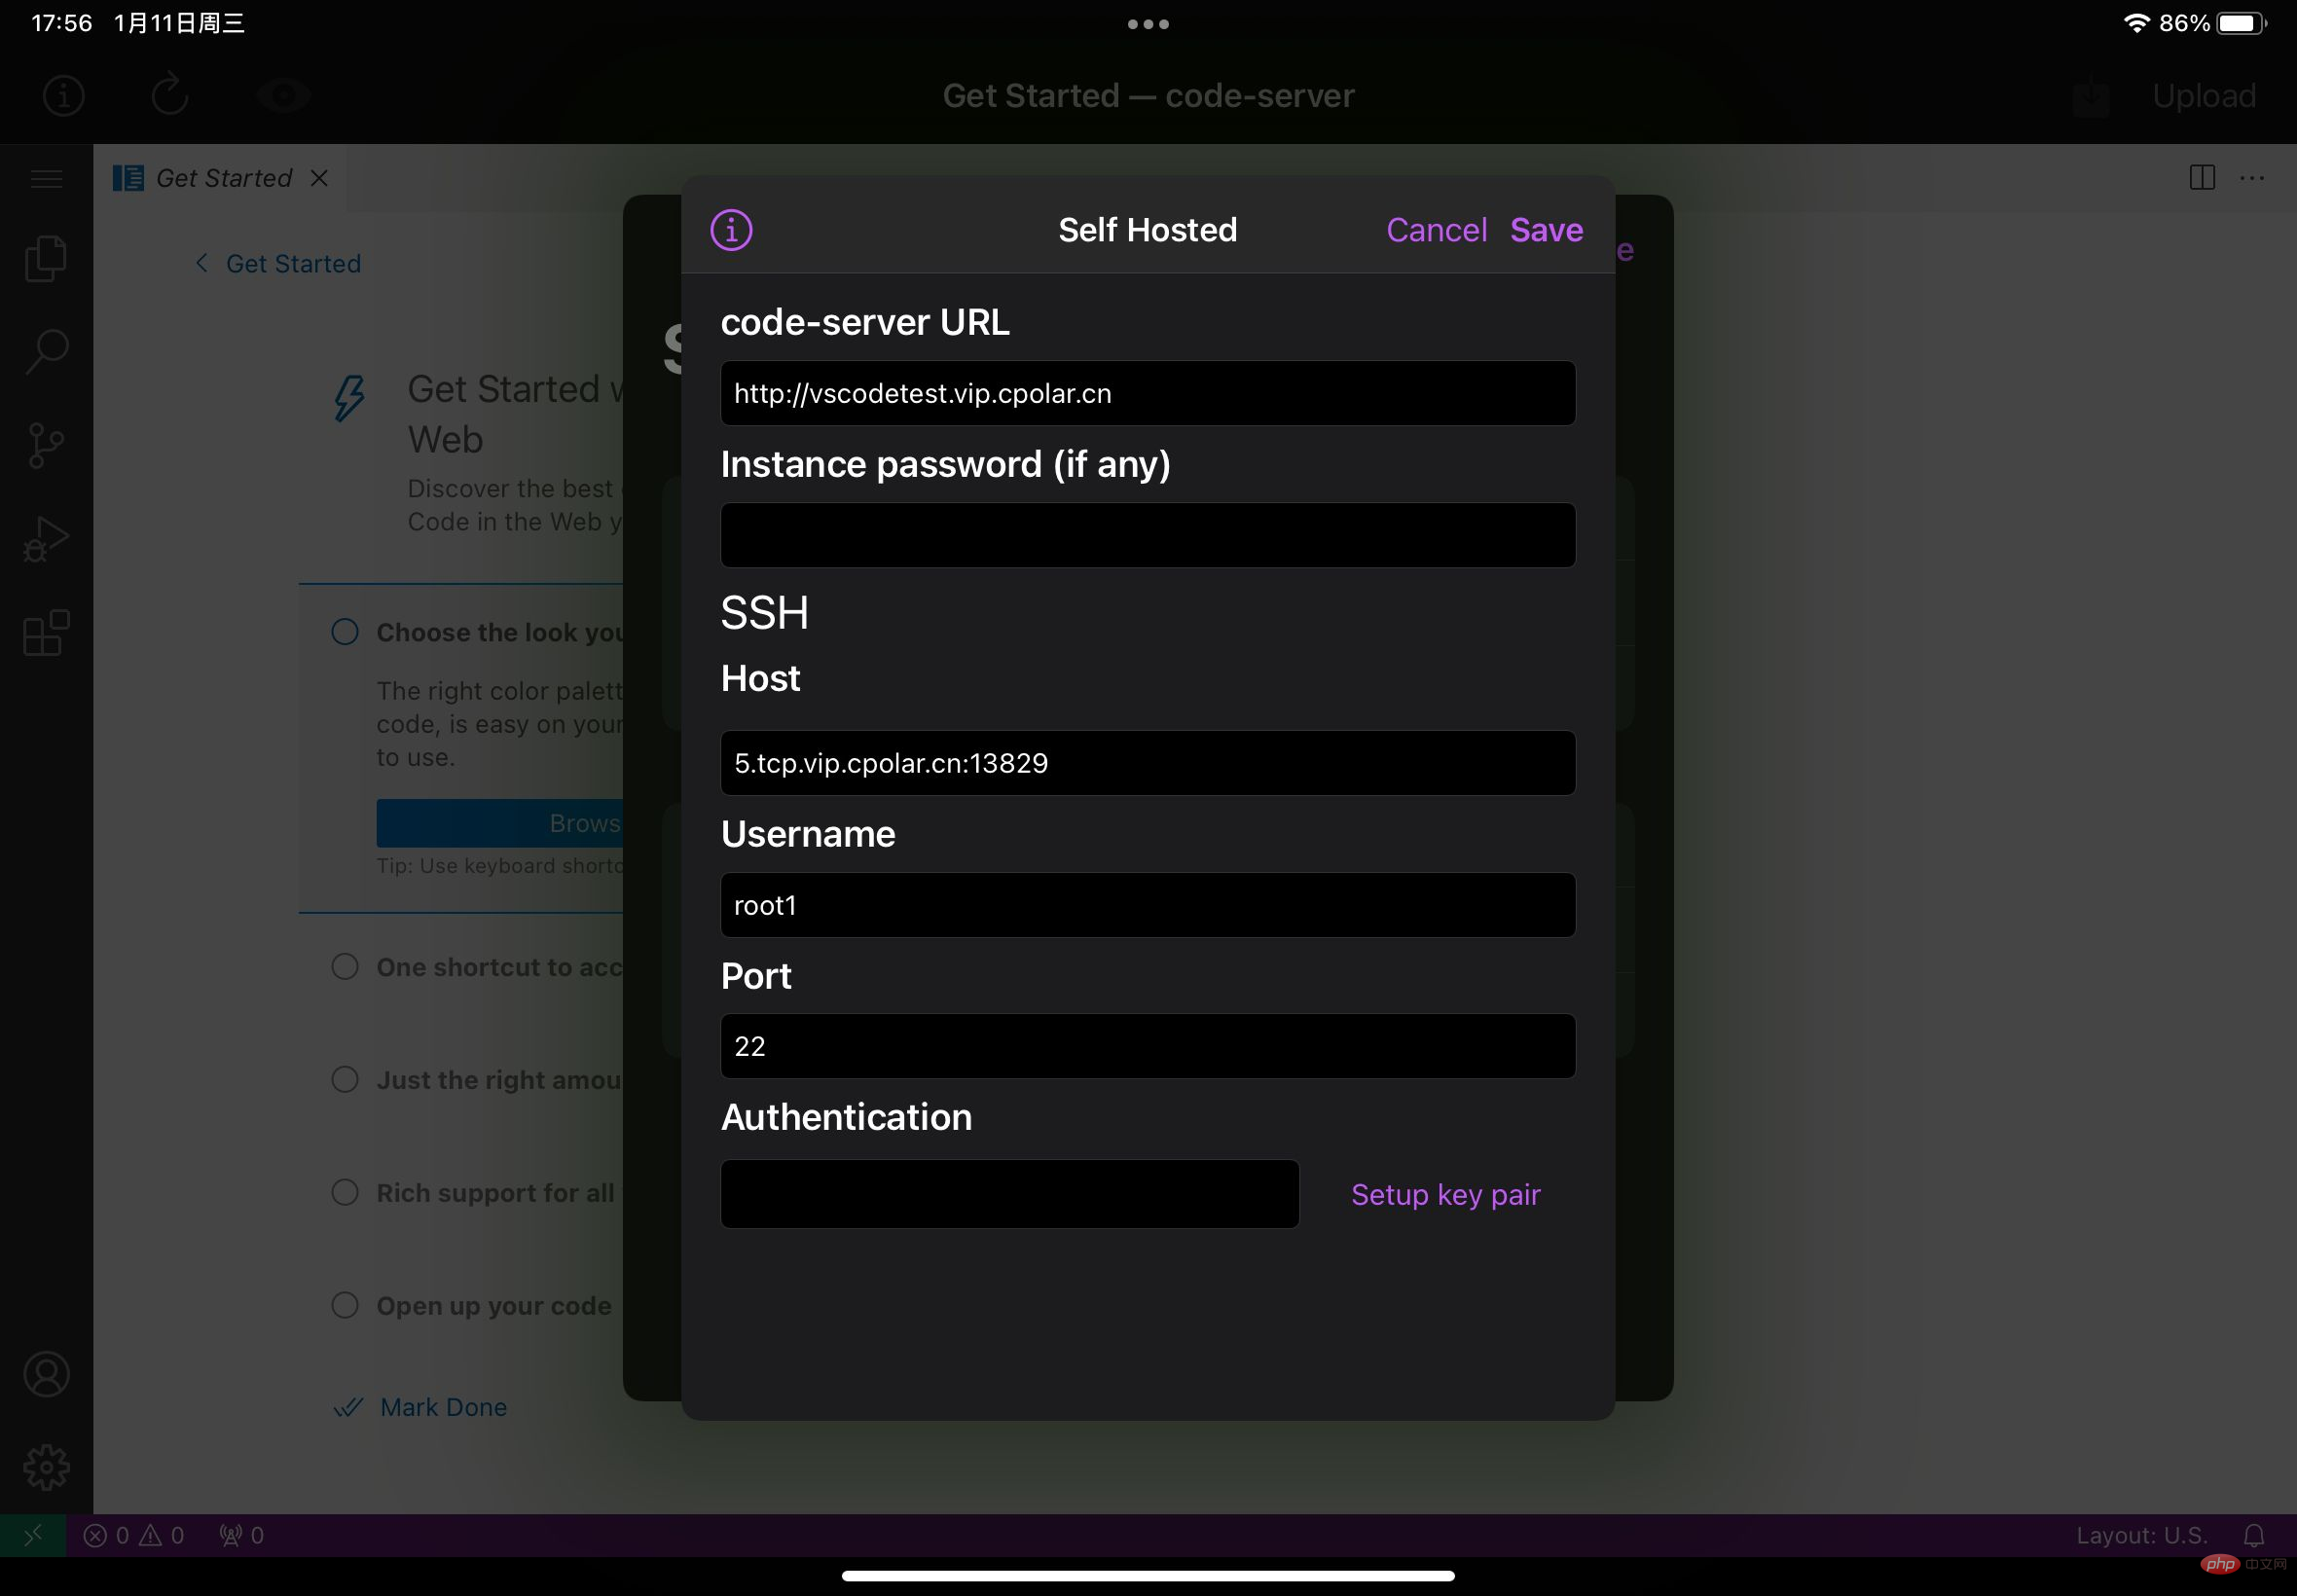
After changing, click save in the upper right corner. After clicking, it will automatically connect, and the vscde interface will appear to indicate success. At this point, the tutorial is over, use iPad to start happy programming! The public network address will no longer change randomly.

For more knowledge about VSCode, please visit: vscode Basic Tutorial!
The above is the detailed content of Detailed explanation of how to use vscode to write code for development on iPad. For more information, please follow other related articles on the PHP Chinese website!

Hot AI Tools

Undresser.AI Undress
AI-powered app for creating realistic nude photos

AI Clothes Remover
Online AI tool for removing clothes from photos.

Undress AI Tool
Undress images for free

Clothoff.io
AI clothes remover

Video Face Swap
Swap faces in any video effortlessly with our completely free AI face swap tool!

Hot Article
Hot Tools

Notepad++7.3.1
Easy-to-use and free code editor

SublimeText3 Chinese version
Chinese version, very easy to use

Zend Studio 13.0.1
Powerful PHP integrated development environment

Dreamweaver CS6
Visual web development tools

SublimeText3 Mac version
God-level code editing software (SublimeText3)
Hot Topics
 1386
1386
 52
52

 What computer configuration is required for vscode
Apr 15, 2025 pm 09:48 PM
What computer configuration is required for vscode
Apr 15, 2025 pm 09:48 PM
VS Code system requirements: Operating system: Windows 10 and above, macOS 10.12 and above, Linux distribution processor: minimum 1.6 GHz, recommended 2.0 GHz and above memory: minimum 512 MB, recommended 4 GB and above storage space: minimum 250 MB, recommended 1 GB and above other requirements: stable network connection, Xorg/Wayland (Linux)
 How to define header files for vscode
Apr 15, 2025 pm 09:09 PM
How to define header files for vscode
Apr 15, 2025 pm 09:09 PM
How to define header files using Visual Studio Code? Create a header file and declare symbols in the header file using the .h or .hpp suffix name (such as classes, functions, variables) Compile the program using the #include directive to include the header file in the source file. The header file will be included and the declared symbols are available.
 How to switch Chinese mode with vscode
Apr 15, 2025 pm 11:39 PM
How to switch Chinese mode with vscode
Apr 15, 2025 pm 11:39 PM
VS Code To switch Chinese mode: Open the settings interface (Windows/Linux: Ctrl, macOS: Cmd,) Search for "Editor: Language" settings Select "Chinese" in the drop-down menu Save settings and restart VS Code
 Common commands for vscode terminal
Apr 15, 2025 pm 10:06 PM
Common commands for vscode terminal
Apr 15, 2025 pm 10:06 PM
Common commands for VS Code terminals include: Clear the terminal screen (clear), list the current directory file (ls), change the current working directory (cd), print the current working directory path (pwd), create a new directory (mkdir), delete empty directory (rmdir), create a new file (touch) delete a file or directory (rm), copy a file or directory (cp), move or rename a file or directory (mv) display file content (cat) view file content and scroll (less) view file content only scroll down (more) display the first few lines of the file (head)
 vscode Previous Next Shortcut Key
Apr 15, 2025 pm 10:51 PM
vscode Previous Next Shortcut Key
Apr 15, 2025 pm 10:51 PM
VS Code One-step/Next step shortcut key usage: One-step (backward): Windows/Linux: Ctrl ←; macOS: Cmd ←Next step (forward): Windows/Linux: Ctrl →; macOS: Cmd →
 How to use VSCode
Apr 15, 2025 pm 11:21 PM
How to use VSCode
Apr 15, 2025 pm 11:21 PM
Visual Studio Code (VSCode) is a cross-platform, open source and free code editor developed by Microsoft. It is known for its lightweight, scalability and support for a wide range of programming languages. To install VSCode, please visit the official website to download and run the installer. When using VSCode, you can create new projects, edit code, debug code, navigate projects, expand VSCode, and manage settings. VSCode is available for Windows, macOS, and Linux, supports multiple programming languages and provides various extensions through Marketplace. Its advantages include lightweight, scalability, extensive language support, rich features and version
 How to set vscode in Chinese
Apr 15, 2025 pm 09:27 PM
How to set vscode in Chinese
Apr 15, 2025 pm 09:27 PM
There are two ways to set up a Chinese language in Visual Studio Code: 1. Install the Chinese language package; 2. Modify the "locale" settings in the configuration file. Make sure Visual Studio Code version is 1.17 or higher.
 What is the difference between vscode and pycharm
Apr 15, 2025 pm 11:54 PM
What is the difference between vscode and pycharm
Apr 15, 2025 pm 11:54 PM
The main differences between VS Code and PyCharm are: 1. Extensibility: VS Code is highly scalable and has a rich plug-in market, while PyCharm has wider functions by default; 2. Price: VS Code is free and open source, and PyCharm is paid for professional version; 3. User interface: VS Code is modern and friendly, and PyCharm is more complex; 4. Code navigation: VS Code is suitable for small projects, and PyCharm is more suitable for large projects; 5. Debugging: VS Code is basic, and PyCharm is more powerful; 6. Code refactoring: VS Code is basic, and PyCharm is richer; 7. Code
