Spark is an open source framework designed for interactive querying, machine learning, and real-time workloads, and PySpark is a library for Python using Spark.
PySpark is an excellent language for performing exploratory data analysis at scale, building machine learning pipelines, and creating ETL for data platforms. If you're already familiar with libraries like Python and Pandas, PySpark is a great language to learn and create more scalable analyzes and pipelines.
The purpose of this article is to show how to use PySpark to build a machine learning model.
Conda manages almost all tools and third-party packages as packages, even python and conda itself. Anaconda is a packaged collection, which is pre-installed with conda, a certain version of python, various packages, etc.
Open the command line and enter conda -V to check whether it is installed and the current conda version.
Install the default version of Python through Anaconda. 3.6 corresponds to Anaconda3-5.2, and 5.3 and later are python 3.7.
(https://repo.anaconda.com/archive/)
1) Check which packages are installed
conda list
2) Check which virtual environments currently exist
conda env list <br>conda info -e
3) Check and update the current conda
conda update conda
conda create -n your_env_name python=x.x
anaconda command creates a python version of x.x , a virtual environment named your_env_name. Your_env_name file can be found under the envs file in the Anaconda installation directory.
Open the command line and enter python --version to check the current python version.
Linux:source activate your_env_nam<br>Windows: activate your_env_name
conda install -n your_env_name [package]
(i.e. exit from the current environment and return to using the default python version in the PATH environment )
deactivate env_name<br># 或者`activate root`切回root环境<br>Linux下:source deactivate
conda remove -n your_env_name --all
conda remove --name $your_env_name$package_name
http:/ The server of /Anaconda.org is located abroad. When installing multiple packages, conda download speed is often very slow. Tsinghua TUNA mirror source has the mirror of the Anaconda warehouse, just add it to the conda configuration:
# 添加Anaconda的TUNA镜像<br>conda config --add channels https://mirrors.tuna.tsinghua.edu.cn/anaconda/pkgs/free/<br><br># 设置搜索时显示通道地址<br>conda config --set show_channel_urls yes
conda config --remove-key channels
PySpark installation process As simple as other python packages (eg Pandas, Numpy, scikit-learn).
One important thing is to first make sure that java is installed on your machine. You can then run PySpark on your jupyter notebook.

We use the diabetes dataset, which is associated with the National Institute of Diabetes and Digestive and Kidney Diseases Diabetes Disease. The classification goal is to predict whether a patient has diabetes (yes/no).
from pyspark.sql import SparkSession<br>spark = SparkSession.builder.appName('ml-diabetes').getOrCreate()<br>df = spark.read.csv('diabetes.csv', header = True, inferSchema = True)<br>df.printSchema()The data set consists of several medical predictor variables and a target variable Outcome. Predictor variables include the patient's number of pregnancies, BMI, insulin levels, age, etc.
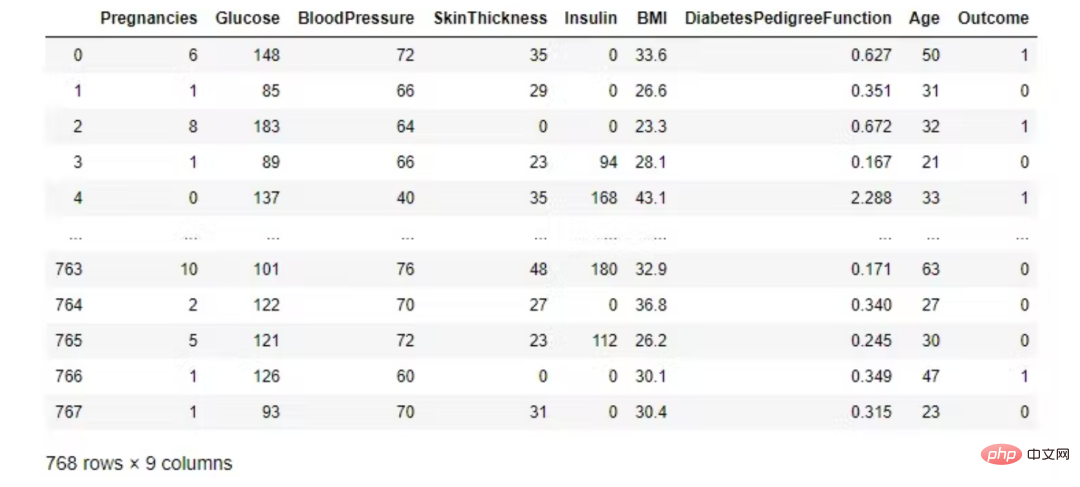
Look at the first five observations. Pandas dataframes are prettier than Spark DataFrame.show().
import pandas as pd<br>pd.DataFrame(df.take(5), <br> columns=df.columns).transpose()
In PySpark, you can display data using Pandas's DataFrame toPandas().
df.toPandas()

Check that the class is completely balanced!
df.groupby('Outcome').count().toPandas()
numeric_features = [t[0] for t in df.dtypes if t[1] == 'int']<br>df.select(numeric_features)<br>.describe()<br>.toPandas()<br>.transpose()
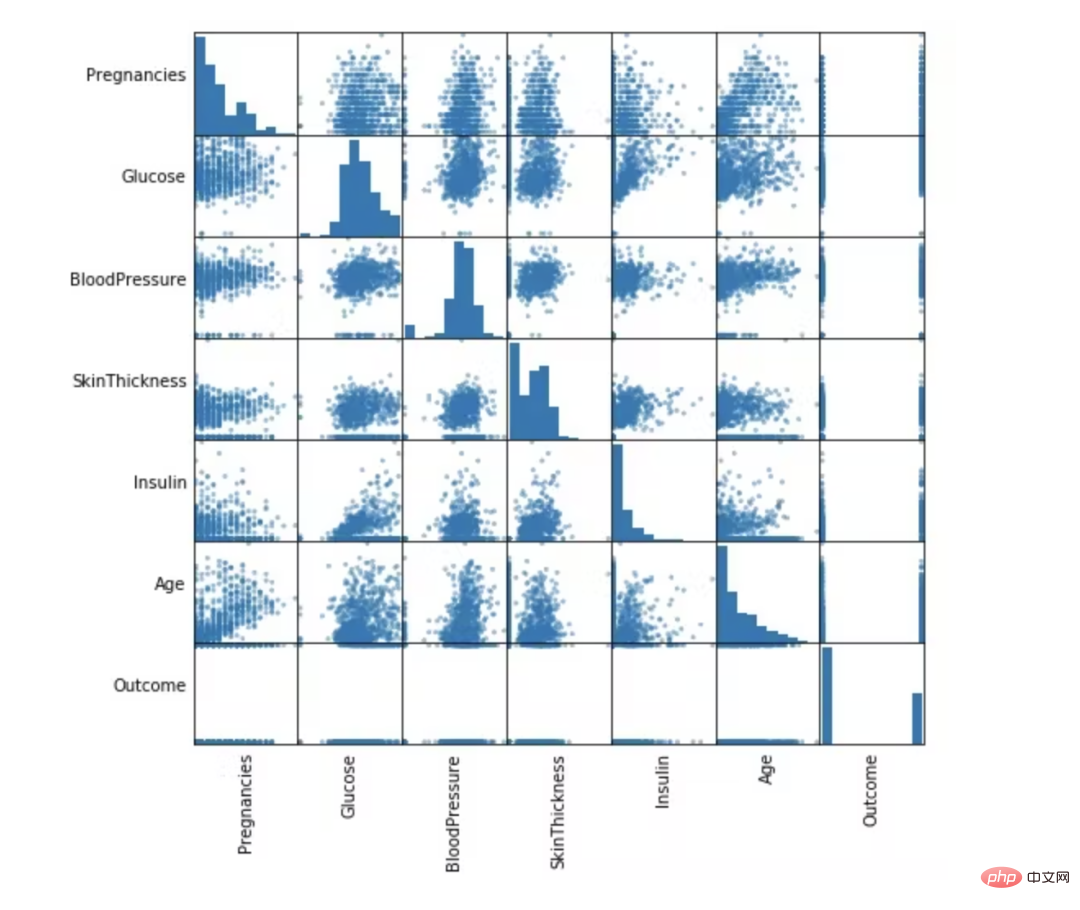
from pandas.plotting import scatter_matrix<br>numeric_data = df.select(numeric_features).toPandas()<br><br>axs = scatter_matrix(numeric_data, figsize=(8, 8));<br><br># Rotate axis labels and remove axis ticks<br>n = len(numeric_data.columns)<br>for i in range(n):<br>v = axs[i, 0]<br>v.yaxis.label.set_rotation(0)<br>v.yaxis.label.set_ha('right')<br>v.set_yticks(())<br>h = axs[n-1, i]<br>h.xaxis.label.set_rotation(90)<br>h.set_xticks(())
In this part, we will remove unnecessary columns and fill in missing values. Finally, features are selected for the machine learning model. These functions will be divided into two parts: training and testing.
from pyspark.sql.functions import isnull, when, count, col<br>df.select([count(when(isnull(c), c)).alias(c)<br> for c in df.columns]).show()
This data set is great, there are no missing values.

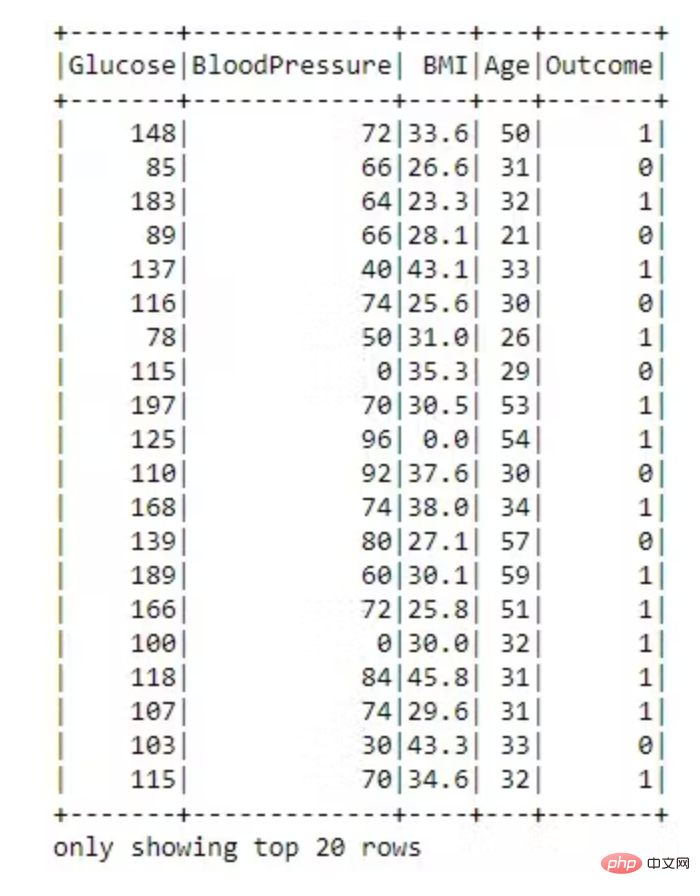
dataset = dataset.drop('SkinThickness')<br>dataset = dataset.drop('Insulin')<br>dataset = dataset.drop('DiabetesPedigreeFunction')<br>dataset = dataset.drop('Pregnancies')<br><br>dataset.show()
VectorAssembler —— 将多列合并为向量列的特征转换器。
# 用VectorAssembler合并所有特性<br>required_features = ['Glucose',<br>'BloodPressure',<br>'BMI',<br>'Age']<br><br>from pyspark.ml.feature import VectorAssembler<br><br>assembler = VectorAssembler(<br>inputCols=required_features, <br>outputCol='features')<br><br>transformed_data = assembler.transform(dataset)<br>transformed_data.show()
现在特征转换为向量已完成。
将数据随机分成训练集和测试集,并设置可重复性的种子。
(training_data, test_data) = transformed_data.randomSplit([0.8,0.2], seed =2020)<br>print("训练数据集总数: " + str(training_data.count()))<br>print("测试数据集总数: " + str(test_data.count()))训练数据集总数:620<br>测试数据集数量:148
随机森林是一种监督学习算法,用于分类和回归。但是,它主要用于分类问题。众所周知,森林是由树木组成的,树木越多,森林越茂盛。类似地,随机森林算法在数据样本上创建决策树,然后从每个样本中获取预测,最后通过投票选择最佳解决方案。这是一种比单个决策树更好的集成方法,因为它通过对结果进行平均来减少过拟合。
from pyspark.ml.classification import RandomForestClassifier<br><br>rf = RandomForestClassifier(labelCol='Outcome', <br>featuresCol='features',<br>maxDepth=5)<br>model = rf.fit(training_data)<br>rf_predictions = model.transform(test_data)
from pyspark.ml.evaluation import MulticlassClassificationEvaluator<br><br>multi_evaluator = MulticlassClassificationEvaluator(<br>labelCol = 'Outcome', metricName = 'accuracy')<br>print('Random Forest classifier Accuracy:', multi_evaluator.evaluate(rf_predictions))Random Forest classifier Accuracy:0.79452
决策树被广泛使用,因为它们易于解释、处理分类特征、扩展到多类分类设置、不需要特征缩放,并且能够捕获非线性和特征交互。
from pyspark.ml.classification import DecisionTreeClassifier<br><br>dt = DecisionTreeClassifier(featuresCol = 'features',<br>labelCol = 'Outcome',<br>maxDepth = 3)<br>dtModel = dt.fit(training_data)<br>dt_predictions = dtModel.transform(test_data)<br>dt_predictions.select('Glucose', 'BloodPressure', <br>'BMI', 'Age', 'Outcome').show(10)from pyspark.ml.evaluation import MulticlassClassificationEvaluator<br><br>multi_evaluator = MulticlassClassificationEvaluator(<br>labelCol = 'Outcome', <br>metricName = 'accuracy')<br>print('Decision Tree Accuracy:', <br>multi_evaluator.evaluate(dt_predictions))Decision Tree Accuracy: 0.78767
逻辑回归是在因变量是二分(二元)时进行的适当回归分析。与所有回归分析一样,逻辑回归是一种预测分析。逻辑回归用于描述数据并解释一个因二元变量与一个或多个名义、序数、区间或比率水平自变量之间的关系。当因变量(目标)是分类时,使用逻辑回归。
from pyspark.ml.classification import LogisticRegression<br><br>lr = LogisticRegression(featuresCol = 'features', <br>labelCol = 'Outcome', <br>maxIter=10)<br>lrModel = lr.fit(training_data)<br>lr_predictions = lrModel.transform(test_data)
评估我们的逻辑回归模型。
from pyspark.ml.evaluation import MulticlassClassificationEvaluator<br><br>multi_evaluator = MulticlassClassificationEvaluator(<br>labelCol = 'Outcome',<br>metricName = 'accuracy')<br>print('Logistic Regression Accuracy:', <br>multi_evaluator.evaluate(lr_predictions))Logistic Regression Accuracy:0.78767
梯度提升是一种用于回归和分类问题的机器学习技术,它以弱预测模型(通常是决策树)的集合形式生成预测模型。
from pyspark.ml.classification import GBTClassifier<br>gb = GBTClassifier(<br>labelCol = 'Outcome', <br>featuresCol = 'features')<br>gbModel = gb.fit(training_data)<br>gb_predictions = gbModel.transform(test_data)
评估我们的梯度提升树分类器。
from pyspark.ml.evaluation import MulticlassClassificationEvaluator<br>multi_evaluator = MulticlassClassificationEvaluator(<br>labelCol = 'Outcome',<br>metricName = 'accuracy')<br>print('Gradient-boosted Trees Accuracy:',<br>multi_evaluator.evaluate(gb_predictions))Gradient-boosted Trees Accuracy:0.80137
PySpark 是一种非常适合数据科学家学习的语言,因为它支持可扩展的分析和 ML 管道。如果您已经熟悉 Python 和 Pandas,那么您的大部分知识都可以应用于 Spark。总而言之,我们已经学习了如何使用 PySpark 构建机器学习应用程序。我们尝试了三种算法,梯度提升在我们的数据集上表现最好。
The above is the detailed content of Build machine learning models with PySpark ML. For more information, please follow other related articles on the PHP Chinese website!
 Data analysis methods
 What are the data analysis methods?
 What are the website building functions?
 Recommended data analysis websites
 What data does redis cache generally store?
 Webstorm startup project method
 How to return to the homepage from an html subpage
 How to enter root privileges in linux
 jquery each


