

Zend Framework自定义Helper类相关注意事项总结_PHP

本文讲述了Zend Framework自定义Helper类相关注意事项。分享给大家供大家参考,具体如下:
编写自定义的Helper类
编写自定义的Helper类很容易,只要遵循以下几个原则即可:
① 类名必须是 Zend_View_Helper_*,*是helper的名称。例如,你在写一个名为“specialPurpose”的类,类名将至少是"SpecialPurpose",另外你还应该给类名加上前缀,建议将“View_Helper”作为前缀的一部份:“My_View_Helper_SpecialPurpose”。(注意大小写)你将需要将前缀(不包含下划线)传递给addHelperPath() 或 setHelperPath()。
② 类中必须有一个public的方法,该方法名与helper类名相同。这个方法将在你的模板调用"$this->specialPurpose()"时执行。在我们的“specialPurpose”例子中,相应的方法声明可以是 “public function specialPurpose()”。
③ 一般来说,Helper类不应该echo或print或有其它形式的输出。它只需要返回值就可以了。返回的数据应当被转义。
④ 类文件的命名应该是helper方法的名称,比如在"specialPurpose"例子中,文件要存为“SpecialPurpose.php”。
把helper类的文件放在你的helper路径下, Zend_View就会自动加载,实例化,持久化,并执行。
三点类文件名称,类名称,类中helper方法,保持某种程度上的一致。
贴代码:
两个helper,看清楚了,他们的不同啊。。。。。
version zf 1.10
Bootstrap.php
class Bootstrap extends Zend_Application_Bootstrap_Bootstrap {
  protected function _initDoctype() {
    $this->bootstrap ( 'view' );
    $view = $this->getResource ( 'view' );
    $view->doctype ( 'XHTML1_STRICT' );
  }
  protected function _initView() {
    $view = new Zend_View ();
    $view->setEncoding ( 'UTF-8' );
    $view->doctype ( 'XHTML1_STRICT' );
    $view->addHelperPath('../application/views/helpers', 'My_View_Helper');
    $viewRenderer = new Zend_Controller_Action_Helper_ViewRenderer();
    Zend_Controller_Action_HelperBroker::addHelper($viewRenderer);
    $viewRenderer->setView($view);
    return $view;
  }
}
application/views/helpers
Img.php:
class Zend_View_Helper_Img extends Zend_View_Helper_Abstract
{
  public function img()
  {
    return "this is a img";
  }
}
TestHelper.php:
class My_View_Helper_TestHelper extends Zend_View_Helper_Abstract
{
  public function testHelper()
  {
    return "this is a TestHelper";
  }
}
action中使用:
<?php echo $this->doctype() ?> <?php echo $this->img() ?> <?php echo $this->testHelper() ?>
附加内容,在initView中添加addHelperPath,可以改成采用加载application。ini文件配置项的方式把路径进行配置。如下
class Bootstrap extends Zend_Application_Bootstrap_Bootstrap {
 protected function _initDoctype() {
 $this->bootstrap ( 'view' );
 $view = $this->getResource ( 'view' );
 $view->doctype ( 'XHTML1_STRICT' );
 }
 protected function _initView() {
 $view = new Zend_View ();
 $view->setEncoding ( 'UTF-8' );
 $view->doctype ( 'XHTML1_STRICT' );
 $options = $this->getOptions ();
 $viewOptions = $options ['resources']['view']['helperPath'];
 if (is_array ($viewOptions)) {
  foreach($viewOptions as $helperName =>$path)
  {
  $view->addHelperPath ( $path, $helperName );
  }
 }
 $viewRenderer = new Zend_Controller_Action_Helper_ViewRenderer ();
 Zend_Controller_Action_HelperBroker::addHelper ( $viewRenderer );
 $viewRenderer->setView ( $view );
 return $view;
 }
}
[production]
phpSettings.display_startup_errors = 1
phpSettings.display_errors = 1
includePaths.library = APPLICATION_PATH "/../library"
bootstrap.path = APPLICATION_PATH "/Bootstrap.php"
bootstrap.class = "Bootstrap"
appnamespace = "Application"
resources.view[] =
resources.view.helperPath.My_View_Helper = "../application/views/helpers"
resources.frontController.controllerDirectory = APPLICATION_PATH "/controllers"
resources.frontController.params.displayExceptions = 1
[staging : production]
[testing : production]
phpSettings.display_startup_errors = 1
phpSettings.display_errors = 1
[development : production]
phpSettings.display_startup_errors = 1
phpSettings.display_errors = 1
resources.frontController.params.displayExceptions = 1
更多关于zend相关内容感兴趣的读者可查看本站专题:《Zend FrameWork框架入门教程》、《php优秀开发框架总结》、《Yii框架入门及常用技巧总结》、《ThinkPHP入门教程》、《php面向对象程序设计入门教程》、《php+mysql数据库操作入门教程》及《php常见数据库操作技巧汇总》
希望本文所述对大家PHP程序设计有所帮助。

Hot AI Tools

Undresser.AI Undress
AI-powered app for creating realistic nude photos

AI Clothes Remover
Online AI tool for removing clothes from photos.

Undress AI Tool
Undress images for free

Clothoff.io
AI clothes remover

AI Hentai Generator
Generate AI Hentai for free.

Hot Article
Hot Tools

Notepad++7.3.1
Easy-to-use and free code editor

SublimeText3 Chinese version
Chinese version, very easy to use

Zend Studio 13.0.1
Powerful PHP integrated development environment

Dreamweaver CS6
Visual web development tools

SublimeText3 Mac version
God-level code editing software (SublimeText3)
Hot Topics
 1379
1379
 52
52

 Microsoft NET Framework Installation Issues Error Code 0x800c0006 Fix
May 05, 2023 pm 04:01 PM
Microsoft NET Framework Installation Issues Error Code 0x800c0006 Fix
May 05, 2023 pm 04:01 PM
.NET Framework 4 is required by developers and end users to run the latest versions of applications on Windows. However, while downloading and installing .NET Framework 4, many users complained that the installer stopped midway, displaying the following error message - " .NET Framework 4 has not been installed because Download failed with error code 0x800c0006 ". If you are also experiencing it while installing .NETFramework4 on your device then you are at the right place
 How to identify Windows upgrade issues using SetupDiag on Windows 11/10
Apr 17, 2023 am 10:07 AM
How to identify Windows upgrade issues using SetupDiag on Windows 11/10
Apr 17, 2023 am 10:07 AM
Whenever your Windows 11 or Windows 10 PC has an upgrade or update issue, you will usually see an error code indicating the actual reason behind the failure. However, sometimes confusion can arise when an upgrade or update fails without an error code being displayed. With handy error codes, you know exactly where the problem is so you can try to fix it. But since no error code appears, it becomes challenging to identify the issue and resolve it. This will take up a lot of your time to simply find out the reason behind the error. In this case, you can try using a dedicated tool called SetupDiag provided by Microsoft that helps you easily identify the real reason behind the error.
![SCNotification has stopped working [5 steps to fix it]](https://img.php.cn/upload/article/000/887/227/168433050522031.png?x-oss-process=image/resize,m_fill,h_207,w_330) SCNotification has stopped working [5 steps to fix it]
May 17, 2023 pm 09:35 PM
SCNotification has stopped working [5 steps to fix it]
May 17, 2023 pm 09:35 PM
As a Windows user, you are likely to encounter SCNotification has stopped working error every time you start your computer. SCNotification.exe is a Microsoft system notification file that crashes every time you start your PC due to permission errors and network failures. This error is also known by its problematic event name. So you might not see this as SCNotification having stopped working, but as bug clr20r3. In this article, we will explore all the steps you need to take to fix SCNotification has stopped working so that it doesn’t bother you again. What is SCNotification.e
 Microsoft .NET Framework 4.5.2, 4.6, and 4.6.1 will end support in April 2022
Apr 17, 2023 pm 02:25 PM
Microsoft .NET Framework 4.5.2, 4.6, and 4.6.1 will end support in April 2022
Apr 17, 2023 pm 02:25 PM
Microsoft Windows users who have installed Microsoft.NET version 4.5.2, 4.6, or 4.6.1 must install a newer version of the Microsoft Framework if they want Microsoft to support the framework through future product updates. According to Microsoft, all three frameworks will cease support on April 26, 2022. After the support date ends, the product will not receive "security fixes or technical support." Most home devices are kept up to date through Windows updates. These devices already have newer versions of frameworks installed, such as .NET Framework 4.8. Devices that are not updating automatically may
 KB5012643 for Windows 11 breaks .NET Framework 3.5 apps
May 09, 2023 pm 01:07 PM
KB5012643 for Windows 11 breaks .NET Framework 3.5 apps
May 09, 2023 pm 01:07 PM
It's been a week since we talked about the new safe mode bug affecting users who installed KB5012643 for Windows 11. This pesky issue didn't appear on the list of known issues Microsoft posted on launch day, thus catching everyone by surprise. Well, just when you thought things couldn't get any worse, Microsoft drops another bomb for users who have installed this cumulative update. Windows 11 Build 22000.652 causes more problems So the tech company is warning Windows 11 users that they may experience problems launching and using some .NET Framework 3.5 applications. Sound familiar? But please don't be surprised
 PHP Implementation Framework: Zend Framework Getting Started Tutorial
Jun 19, 2023 am 08:09 AM
PHP Implementation Framework: Zend Framework Getting Started Tutorial
Jun 19, 2023 am 08:09 AM
PHP implementation framework: ZendFramework introductory tutorial ZendFramework is an open source website framework developed by PHP and is currently maintained by ZendTechnologies. ZendFramework adopts the MVC design pattern and provides a series of reusable code libraries to serve the implementation of Web2.0 applications and Web Serve. ZendFramework is very popular and respected by PHP developers and has a wide range of
 How to use ACL (Access Control List) for permission control in Zend Framework
Jul 29, 2023 am 09:24 AM
How to use ACL (Access Control List) for permission control in Zend Framework
Jul 29, 2023 am 09:24 AM
How to use ACL (AccessControlList) for permission control in Zend Framework Introduction: In a web application, permission control is a crucial function. It ensures that users can only access the pages and features they are authorized to access and prevents unauthorized access. The Zend framework provides a convenient way to implement permission control, using the ACL (AccessControlList) component. This article will introduce how to use ACL in Zend Framework
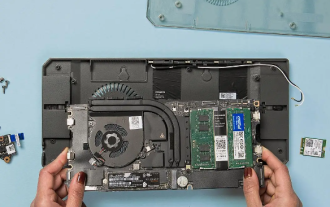 Cooler Master and Framework launch innovative mini case kit, compatible with laptop motherboards
Dec 15, 2023 pm 05:35 PM
Cooler Master and Framework launch innovative mini case kit, compatible with laptop motherboards
Dec 15, 2023 pm 05:35 PM
According to news on December 9, Cooler Master recently demonstrated a mini chassis kit in cooperation with notebook modular solution provider Framework at a demonstration event at the Taipei Compute Show. The unique thing about this kit is that it can be compatible with and Install the motherboard from the framework notebook. Currently, this product has begun to be sold on the market, priced at 39 US dollars, which is equivalent to approximately 279 yuan at the current exchange rate. The model number of this chassis kit is named "frameWORKMAINBOARDCASE". In terms of design, it embodies the ultimate compactness and practicality, measuring only 297x133x15 mm. Its original design is to be able to seamlessly connect to framework notebooks
