
 Backend Development
Python Tutorial
Python obtains tourist attraction information and reviews and creates word clouds and data visualization
Backend Development
Python Tutorial
Python obtains tourist attraction information and reviews and creates word clouds and data visualization
Python obtains tourist attraction information and reviews and creates word clouds and data visualization


Hello everyone, I am Mr. Chewshu!
As the saying goes: Wouldn’t it be great to have friends come from afar? It is a very happy thing to have friends come to play with us, so we must do our best to be landlords and take our friends to play! So the question is, when is the best time and where to go, and where is the most fun place?
Today I will teach you step by step how to use the thread pool to crawl the attraction information and review data of the same trip and make word cloud and data visualization! ! ! Let you know information about tourist attractions in various cities.
Before we start crawling data, let’s first understand threads.
Thread
Process: A process is a running activity of code on a data collection. It is the basic unit of resource allocation and scheduling in the system.
Thread: It is a lightweight process, the smallest unit of program execution, and an execution path of the process.
There is at least one thread in a process, and multiple threads in the process share the resources of the process.
Thread life cycle
Before creating multiple threads, let’s first learn about the thread life cycle, as shown in the following figure:
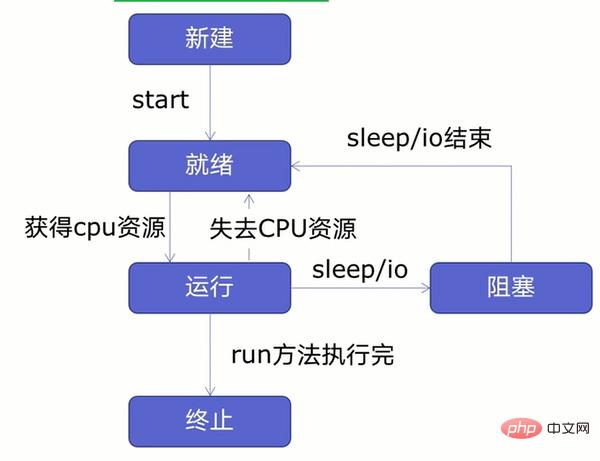
As can be seen from the figure, threads can be divided into five states - new, ready, running, blocked, and terminated.
First create a new thread and start the thread. After the thread enters the ready state, the thread in the ready state will not run immediately. It will enter the running state only after obtaining CPU resources. After entering the running state, the thread may lose the CPU. The thread enters the ready state or blocked state when the resource encounters sleep or IO operations (reading, writing, etc.). It will enter the running state only after the sleep or IO operation ends or the CPU resources are regained. It will enter the terminated state after the operation is completed.
Note: Creating a new thread system requires allocating resources, and terminating the thread system requires recycling resources. So how to reduce the system overhead of creating/terminating threads? At this time, we can create a thread pool to reuse threads. This can reduce system overhead.
Before creating a thread pool, let's first learn how to create multiple threads.
Creating multi-threads
Creating multi-threads can be divided into four steps:
- Create functions;
- Create threads;
- Start the thread;
- Wait for the end;
Create function
For the convenience of demonstration, we use the web page of the Blog Park as the crawler function, The specific code is as follows:
import requests
urls=[
 f'https://www.cnblogs.com/#p{page}'
 for page in range(1,50)
]
def get_parse(url):
 response=requests.get(url)
print(url,len(response.text))First import the requests network request library, save all the URLs we want to crawl in a list, and then customize the function get_parse to send network requests, print the requested URLs and responses character length.
Create thread
In the previous step we created the crawler function, and now we will create the thread. The specific code is as follows:
import threading
#多线程
def multi_thread():
 threads=[]
 for url in urls:
 threads.append(
 threading.Thread(target=get_parse,args=(url,))
 )
First We import the threading module, customize the multi_thread function, create an empty list threads to store thread tasks, and create threads through the threading.Thread() method. Among them:
- target is the running function;
- args are the parameters required to run the function.
Note that the parameters in args must be passed in as tuples, and then add the thread to the empty list of threads through the .append() method.
Start the thread
The thread has been created, and the thread will be started next. Starting the thread is very simple, the specific code is as follows:
for thread in threads:
 thread.start()
First we get the thread tasks in the threads list through the for loop, and start the thread through .start().
Waiting for the end
After starting the thread, the next step will be to wait for the thread to end. The specific code is as follows:
for thread in threads:
 thread.join()
Same as starting the thread, first Get the thread tasks in the threads list through a for loop, and then use the .join() method to wait for the thread to end.
Multi-threading has been created. Next, we will test the speed of multi-threading. The specific code is as follows:
if __name__ == '__main__':
t1=time.time()
 multi_thread()
 t2=time.time()
 print(t2-t1)
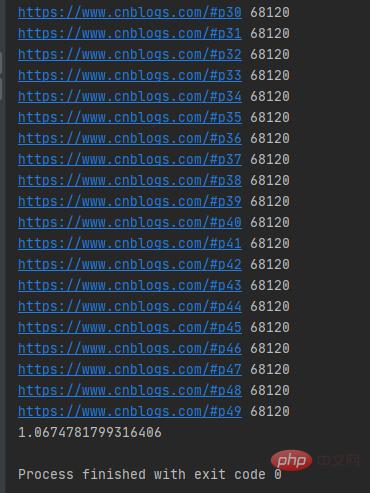
The running results are as shown below:
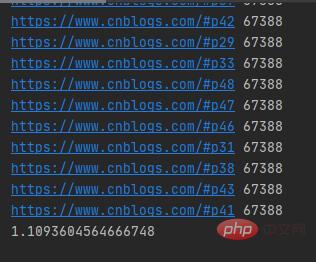
It only takes more than 1 second to crawl 50 blog garden web pages with multiple threads, and the URLs sent by multi-threads for network requests are random.
Let’s test the running time of a single thread. The specific code is as follows:
if __name__ == '__main__':
 t1=time.time()
 for i in urls:
 get_parse(i)
 t2=time.time()
 print(t2-t1)
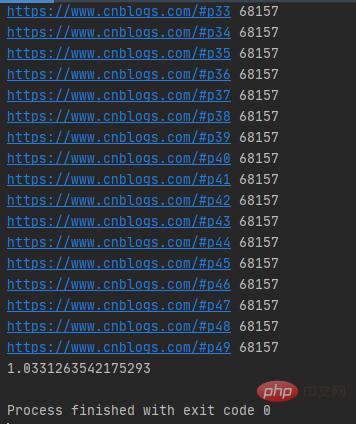
The running results are as shown below:
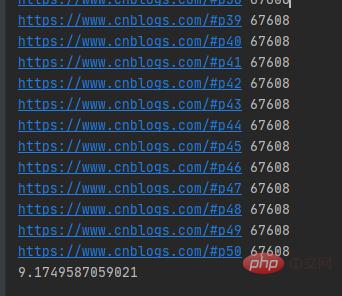
It took more than 9 seconds for a single thread to crawl 50 blog park web pages. The single thread sent the URLs of network requests in order.
As we said above, creating a new thread system requires allocating resources, and terminating the thread system requires recycling resources. In order to reduce system overhead, we can create a thread pool.
线程池原理
一个线程池由两部分组成,如下图所示:
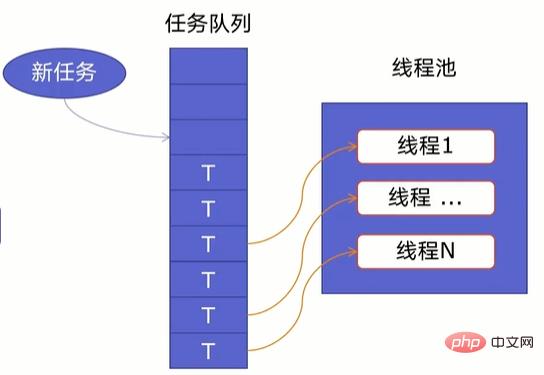
- 线程池:里面提前建好N个线程,这些都会被重复利用;
- 任务队列:当有新任务的时候,会把任务放在任务队列中。
当任务队列里有任务时,线程池的线程会从任务队列中取出任务并执行,执行完任务后,线程会执行下一个任务,直到没有任务执行后,线程会回到线程池中等待任务。
使用线程池可以处理突发性大量请求或需要大量线程完成任务(处理时间较短的任务)。
好了,了解了线程池原理后,我们开始创建线程池。
线程池创建
Python提供了ThreadPoolExecutor类来创建线程池,其语法如下所示:
ThreadPoolExecutor(max_workers=None, thread_name_prefix='', initializer=None, initargs=())
其中:
- max_workers:最大线程数;
- thread_name_prefix:允许用户控制由线程池创建的threading.Thread工作线程名称以方便调试;
- initializer:是在每个工作者线程开始处调用的一个可选可调用对象;
- initargs:传递给初始化器的元组参数。
注意:在启动 max_workers 个工作线程之前也会重用空闲的工作线程。
在ThreadPoolExecutor类中提供了map()和submit()函数来插入任务队列。其中:
map()函数
map()语法格式为:
map(调用方法,参数队列)
具体示例如下所示:
import requestsimport concurrent.futuresimport timeurls=[f'https://www.cnblogs.com/#p{page}'for page in range(1,50)]def get_parse(url):response=requests.get(url)return response.textdef map_pool():with concurrent.futures.ThreadPoolExecutor(max_workers=20) as pool:htmls=pool.map(get_parse,urls)htmls=list(zip(urls,htmls))for url,html in htmls:print(url,len(html))if __name__ == '__main__':t1=time.time()map_pool()t2=time.time()print(t2-t1)首先我们导入requests网络请求库、concurrent.futures模块,把所有的URL放在urls列表中,然后自定义get_parse()方法来返回网络请求返回的数据,再自定义map_pool()方法来创建代理池,其中代理池的最大max_workers为20,调用map()方法把网络请求任务放在任务队列中,在把返回的数据和URL合并为元组,并放在htmls列表中。
运行结果如下图所示:
可以发现map()函数返回的结果和传入的参数顺序是对应的。
注意:当我们直接在自定义方法get_parse()中打印结果时,打印结果是乱序的。
submit()函数
submit()函数语法格式如下:
submit(调用方法,参数)
具体示例如下:
def submit_pool():with concurrent.futures.ThreadPoolExecutor(max_workers=20)as pool:futuress=[pool.submit(get_parse,url)for url in urls]futures=zip(urls,futuress)for url,future in futures:print(url,len(future.result()))
运行结果如下图所示:
注意:submit()函数输出结果需需要调用result()方法。
好了,线程知识就学到这里了,接下来开始我们的爬虫。
爬前分析
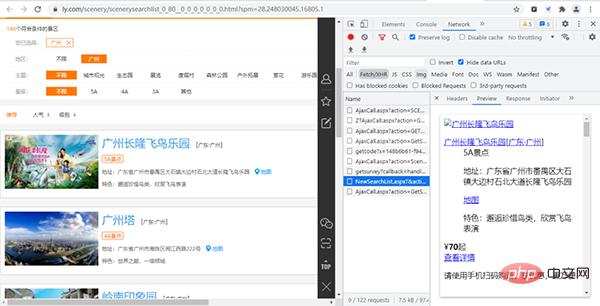
首先我们进入同程旅行的景点网页并打开开发者工具,如下图所示:

经过寻找,我们发现各个景点的基础信息(详情页URL、景点id等)都存放在下图的URL链接中,
其URL链接为:
https://www.ly.com/scenery/NewSearchList.aspx?&action=getlist&page=2&kw=&pid=6&cid=80&cyid=0&sort=&isnow=0&spType=&lbtypes=&IsNJL=0&classify=0&grade=&dctrack=1%CB%871629537670551030%CB%8720%CB%873%CB%872557287248299209%CB%870&iid=0.6901326566387387
经过增删改查操作,我们可以把该URL简化为:
https://www.ly.com/scenery/NewSearchList.aspx?&action=getlist&page=1&pid=6&cid=80&cyid=0&isnow=0&IsNJL=0
其中page为我们翻页的重要参数。
打开该URL链接,如下图所示:
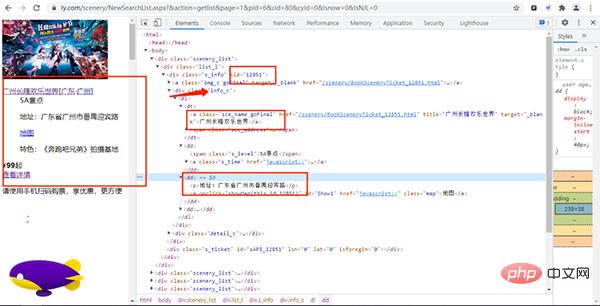
通过上面的URL链接,我们可以获取到很多景点的基础信息,随机打开一个景点的详情网页并打开开发者模式,经过查找,评论数据存放在如下图的URL链接中,
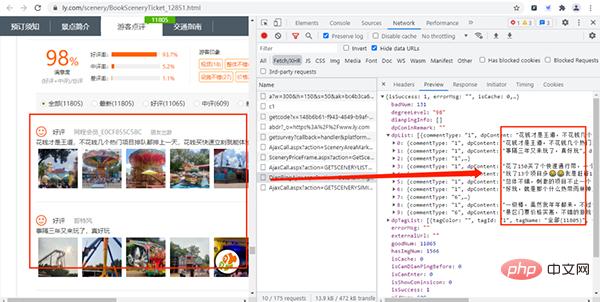
其URL链接如下所示:
https://www.ly.com/scenery/AjaxHelper/DianPingAjax.aspx?action=GetDianPingList&sid=12851&page=1&pageSize=10&labId=1&sort=0&iid=0.48901069375088
其中:action、labId、iid、sort为常量,sid是景点的id,page控制翻页,pageSize是每页获取的数据量。
在上上步中,我们知道景点id的存放位置,那么构造评论数据的URL就很简单了。
实战演练
这次我们爬虫步骤是:
- 获取景点基本信息
- 获取评论数据
- 创建MySQL数据库
- 保存数据
- 创建线程池
- 数据分析
获取景点基本信息
首先我们先获取景点的名字、id、价格、特色、地点和等级,主要代码如下所示:
def get_parse(url):response=requests.get(url,headers=headers)Xpath=parsel.Selector(response.text)data=Xpath.xpath('/html/body/div')for i in data:Scenery_data={'title':i.xpath('./div/div[1]/div[1]/dl/dt/a/text()').extract_first(),'sid':i.xpath('//div[@]/div/@sid').extract_first(),'Grade':i.xpath('./div/div[1]/div[1]/dl/dd[1]/span/text()').extract_first(), 'Detailed_address':i.xpath('./div/div[1]/div[1]/dl/dd[2]/p/text()').extract_first().replace('地址:',''),'characteristic':i.xpath('./div/div[1]/div[1]/dl/dd[3]/p/text()').extract_first(),'price':i.xpath('./div/div[1]/div[2]/div[1]/span/b/text()').extract_first(),'place':i.xpath('./div/div[1]/div[1]/dl/dd[2]/p/text()').extract_first().replace('地址:','')[6:8]}首先自定义方法get_parse()来发送网络请求后使用parsel.Selector()方法来解析响应的文本数据,然后通过xpath来获取数据。
获取评论数据
获取景点基本信息后,接下来通过景点基本信息中的sid来构造评论信息的URL链接,主要代码如下所示:
def get_data(Scenery_data):for i in range(1,3):link = f'https://www.ly.com/scenery/AjaxHelper/DianPingAjax.aspx?action=GetDianPingList&sid={Scenery_data["sid"]}&page={i}&pageSize=100&labId=1&sort=0&iid=0.20105777381446832'response=requests.get(link,headers=headers)Json=response.json()commtent_detailed=Json.get('dpList')# 有评论数据if commtent_detailed!=None:for i in commtent_detailed:Comment_information={'dptitle':Scenery_data['title'],'dpContent':i.get('dpContent'),'dpDate':i.get('dpDate')[5:7],'lineAccess':i.get('lineAccess')}#没有评论数据elif commtent_detailed==None:Comment_information={'dptitle':Scenery_data['title'],'dpContent':'没有评论','dpDate':'没有评论','lineAccess':'没有评论'}首先自定义方法get_data()并传入刚才获取的景点基础信息数据,然后通过景点基础信息的sid来构造评论数据的URL链接,当在构造评论数据的URL时,需要设置pageSize和page这两个变量来获取多条评论和进行翻页,构造URL链接后就发送网络请求。
这里需要注意的是:有些景点是没有评论,所以我们需要通过if语句来进行设置。
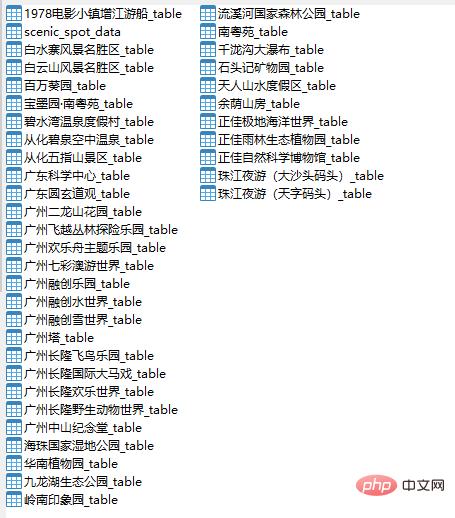
创建MySQL数据库
这次我们把数据存放在MySQL数据库中,由于数据比较多,所以我们把数据分为两种数据表,一种是景点基础信息表,一种是景点评论数据表,主要代码如下所示:
#创建数据库def create_db():db=pymysql.connect(host=host,user=user,passwd=passwd,port=port)cursor=db.cursor()sql='create database if not exists commtent default character set utf8'cursor.execute(sql)db.close()create_table()#创建景点信息数据表def create_table():db=pymysql.connect(host=host,user=user,passwd=passwd,port=port,db='commtent')cursor=db.cursor()sql = 'create table if not exists Scenic_spot_data (title varchar(255) not null, link varchar(255) not null,Grade varchar(255) not null, Detailed_address varchar(255) not null, characteristic varchar(255)not null, price int not null, place varchar(255) not null)'cursor.execute(sql)db.close()
首先我们调用pymysql.connect()方法来连接数据库,通过.cursor()获取游标,再通过.execute()方法执行单条的sql语句,执行成功后返回受影响的行数,然后关闭数据库连接,最后调用自定义方法create_table()来创建景点信息数据表。
这里我们只给出了创建景点信息数据表的代码,因为创建数据表只是sql这条语句稍微有点不同,其他都一样,大家可以参考这代码来创建各个景点评论数据表。
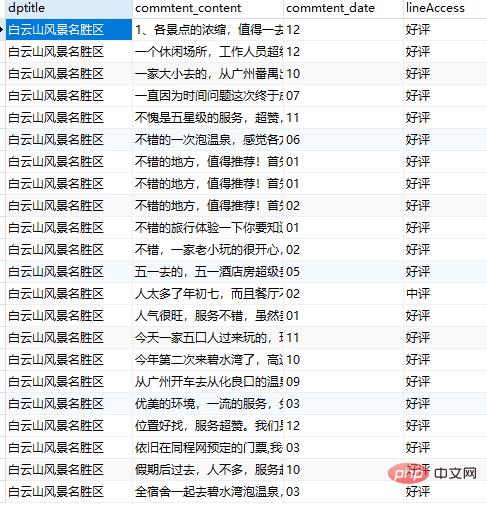
保存数据
创建好数据库和数据表后,接下来就要保存数据了,主要代码如下所示:
首先我们调用pymysql.connect()方法来连接数据库,通过.cursor()获取游标,再通过.execute()方法执行单条的sql语句,执行成功后返回受影响的行数,使用了try-except语句,当保存的数据不成功,就调用rollback()方法,撤消当前事务中所做的所有更改,并释放此连接对象当前使用的任何数据库锁。
#保存景点数据到景点数据表中def saving_scenery_data(srr):db = pymysql.connect(host=host, user=user, password=passwd, port=port, db='commtent')cursor = db.cursor()sql = 'insert into Scenic_spot_data(title, link, Grade, Detailed_address, characteristic,price,place) values(%s,%s,%s,%s,%s,%s,%s)'try:cursor.execute(sql, srr)db.commit()except:db.rollback()db.close()
注意:srr是传入的景点信息数据。
创建线程池
好了,单线程爬虫已经写好了,接下来将创建一个函数来创建我们的线程池,使单线程爬虫变为多线程,主要代码如下所示:
urls = [f'https://www.ly.com/scenery/NewSearchList.aspx?&action=getlist&page={i}&pid=6&cid=80&cyid=0&isnow=0&IsNJL=0'for i in range(1, 6)]def multi_thread():with concurrent.futures.ThreadPoolExecutor(max_workers=8)as pool:h=pool.map(get_parse,urls)if __name__ == '__main__':create_db()multi_thread()创建线程池的代码很简单就一个with语句和调用map()方法
运行结果如下图所示:
好了,数据已经获取到了,接下来将进行数据分析。
数据可视化
首先我们来分析一下各个景点那个月份游玩的人数最多,这样我们就不用担心去游玩的时机不对了。
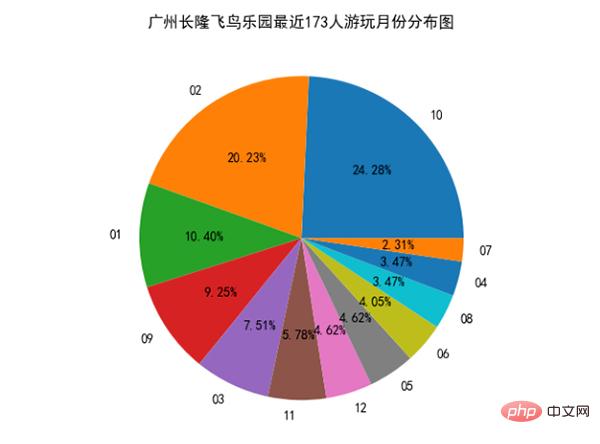
我们发现10月、2月、1月去广州长隆飞鸟乐园游玩的人数占总体比例最多。分析完月份后,我们来看看评论情况如何:
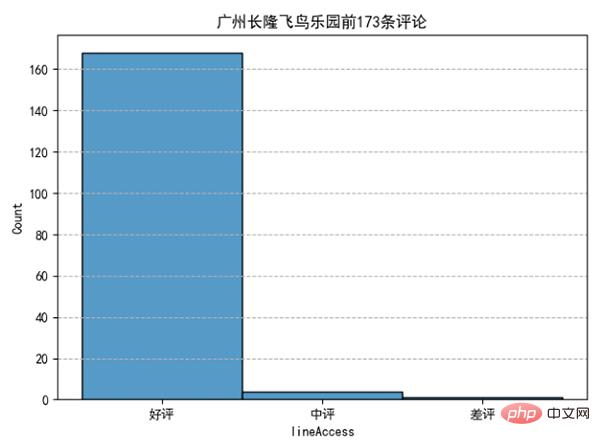
可以发现去好评占了绝大部分,可以说:去长隆飞鸟乐园玩耍,去了都说好。看了评论情况,评论内容有什么:

好了,获取旅游景点信息及评论并做词云、数据可视化就讲到这里了。
The above is the detailed content of Python obtains tourist attraction information and reviews and creates word clouds and data visualization. For more information, please follow other related articles on the PHP Chinese website!

Hot AI Tools

Undresser.AI Undress
AI-powered app for creating realistic nude photos

AI Clothes Remover
Online AI tool for removing clothes from photos.

Undress AI Tool
Undress images for free

Clothoff.io
AI clothes remover

AI Hentai Generator
Generate AI Hentai for free.

Hot Article
Hot Tools

Notepad++7.3.1
Easy-to-use and free code editor

SublimeText3 Chinese version
Chinese version, very easy to use

Zend Studio 13.0.1
Powerful PHP integrated development environment

Dreamweaver CS6
Visual web development tools

SublimeText3 Mac version
God-level code editing software (SublimeText3)
Hot Topics
 1378
1378
 52
52

 Python: Exploring Its Primary Applications
Apr 10, 2025 am 09:41 AM
Python: Exploring Its Primary Applications
Apr 10, 2025 am 09:41 AM
Python is widely used in the fields of web development, data science, machine learning, automation and scripting. 1) In web development, Django and Flask frameworks simplify the development process. 2) In the fields of data science and machine learning, NumPy, Pandas, Scikit-learn and TensorFlow libraries provide strong support. 3) In terms of automation and scripting, Python is suitable for tasks such as automated testing and system management.
 The 2-Hour Python Plan: A Realistic Approach
Apr 11, 2025 am 12:04 AM
The 2-Hour Python Plan: A Realistic Approach
Apr 11, 2025 am 12:04 AM
You can learn basic programming concepts and skills of Python within 2 hours. 1. Learn variables and data types, 2. Master control flow (conditional statements and loops), 3. Understand the definition and use of functions, 4. Quickly get started with Python programming through simple examples and code snippets.
 Navicat's method to view MongoDB database password
Apr 08, 2025 pm 09:39 PM
Navicat's method to view MongoDB database password
Apr 08, 2025 pm 09:39 PM
It is impossible to view MongoDB password directly through Navicat because it is stored as hash values. How to retrieve lost passwords: 1. Reset passwords; 2. Check configuration files (may contain hash values); 3. Check codes (may hardcode passwords).
 How to use AWS Glue crawler with Amazon Athena
Apr 09, 2025 pm 03:09 PM
How to use AWS Glue crawler with Amazon Athena
Apr 09, 2025 pm 03:09 PM
As a data professional, you need to process large amounts of data from various sources. This can pose challenges to data management and analysis. Fortunately, two AWS services can help: AWS Glue and Amazon Athena.
 How to start the server with redis
Apr 10, 2025 pm 08:12 PM
How to start the server with redis
Apr 10, 2025 pm 08:12 PM
The steps to start a Redis server include: Install Redis according to the operating system. Start the Redis service via redis-server (Linux/macOS) or redis-server.exe (Windows). Use the redis-cli ping (Linux/macOS) or redis-cli.exe ping (Windows) command to check the service status. Use a Redis client, such as redis-cli, Python, or Node.js, to access the server.
 How to read redis queue
Apr 10, 2025 pm 10:12 PM
How to read redis queue
Apr 10, 2025 pm 10:12 PM
To read a queue from Redis, you need to get the queue name, read the elements using the LPOP command, and process the empty queue. The specific steps are as follows: Get the queue name: name it with the prefix of "queue:" such as "queue:my-queue". Use the LPOP command: Eject the element from the head of the queue and return its value, such as LPOP queue:my-queue. Processing empty queues: If the queue is empty, LPOP returns nil, and you can check whether the queue exists before reading the element.
 How to view server version of Redis
Apr 10, 2025 pm 01:27 PM
How to view server version of Redis
Apr 10, 2025 pm 01:27 PM
Question: How to view the Redis server version? Use the command line tool redis-cli --version to view the version of the connected server. Use the INFO server command to view the server's internal version and need to parse and return information. In a cluster environment, check the version consistency of each node and can be automatically checked using scripts. Use scripts to automate viewing versions, such as connecting with Python scripts and printing version information.
 How secure is Navicat's password?
Apr 08, 2025 pm 09:24 PM
How secure is Navicat's password?
Apr 08, 2025 pm 09:24 PM
Navicat's password security relies on the combination of symmetric encryption, password strength and security measures. Specific measures include: using SSL connections (provided that the database server supports and correctly configures the certificate), regularly updating Navicat, using more secure methods (such as SSH tunnels), restricting access rights, and most importantly, never record passwords.
