 Technology peripherals
 AI
AI
 Generative adversarial network, AI transforms pictures into comic style
Generative adversarial network, AI transforms pictures into comic style
Hello, everyone.
Everyone is playing with AI painting recently. I found an open source project on GitHub to share with you.

The project shared today is implemented using GAN Generative Adversarial Network. We have shared many articles before about the principles and practice of GAN. Friends who want to know more can read it Historical articles.
The source code and data set are obtained at the end of the article. Let’s share how to train and run the project.
1. Prepare the environment
Install tensorflow-gpu 1.15.0, use 2080Ti as the GPU graphics card, and cuda version 10.0.
git download project AnimeGANv2 source code.
After setting up the environment, you need to prepare the data set and vgg19.

Download the dataset.zip compressed file, which contains 6k real pictures and 2k comic pictures for GAN training.

vgg19 is used to calculate the loss, which will be introduced in detail below.
2. Network model
Generative adversarial network requires the definition of two models, one is the generator and the other is the discriminator.
The generator network is defined as follows:
with tf.variable_scope('A'):
inputs = Conv2DNormLReLU(inputs, 32, 7)
inputs = Conv2DNormLReLU(inputs, 64, strides=2)
inputs = Conv2DNormLReLU(inputs, 64)

with tf.variable_scope('B'):
inputs = Conv2DNormLReLU(inputs, 128, strides=2)
inputs = Conv2DNormLReLU(inputs, 128)

with tf.variable_scope('C'):
inputs = Conv2DNormLReLU(inputs, 128)
inputs = self.InvertedRes_block(inputs, 2, 256, 1, 'r1')
inputs = self.InvertedRes_block(inputs, 2, 256, 1, 'r2')
inputs = self.InvertedRes_block(inputs, 2, 256, 1, 'r3')
inputs = self.InvertedRes_block(inputs, 2, 256, 1, 'r4')
inputs = Conv2DNormLReLU(inputs, 128)

with tf.variable_scope('D'):
inputs = Unsample(inputs, 128)
inputs = Conv2DNormLReLU(inputs, 128)

with tf.variable_scope('E'):
inputs = Unsample(inputs,64)
inputs = Conv2DNormLReLU(inputs, 64)
inputs = Conv2DNormLReLU(inputs, 32, 7)
with tf.variable_scope('out_layer'):
out = Conv2D(inputs, filters =3, kernel_size=1, strides=1)
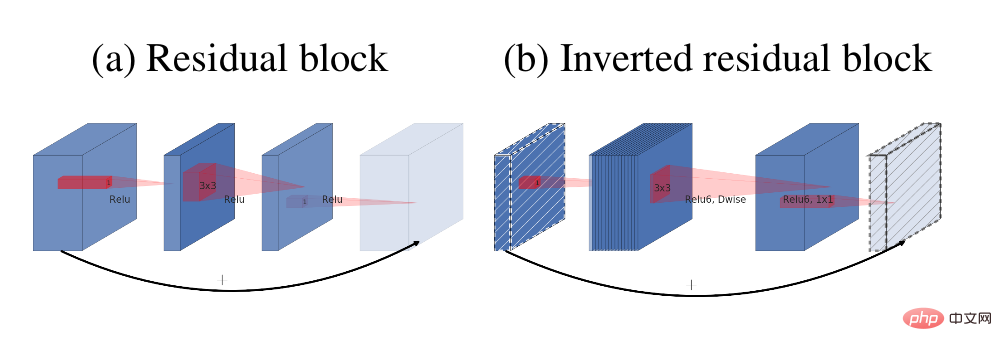
self.fake = tf.tanh(out)The main module in the generator is the reverse residual block

The residual structure ( a) and reverse residual block (b)
The discriminator network structure is as follows:
def D_net(x_init,ch, n_dis,sn, scope, reuse):
channel = ch // 2
with tf.variable_scope(scope, reuse=reuse):
x = conv(x_init, channel, kernel=3, stride=1, pad=1, use_bias=False, sn=sn, scope='conv_0')
x = lrelu(x, 0.2)

for i in range(1, n_dis):
x = conv(x, channel * 2, kernel=3, stride=2, pad=1, use_bias=False, sn=sn, scope='conv_s2_' + str(i))
x = lrelu(x, 0.2)

x = conv(x, channel * 4, kernel=3, stride=1, pad=1, use_bias=False, sn=sn, scope='conv_s1_' + str(i))
x = layer_norm(x, scope='1_norm_' + str(i))
x = lrelu(x, 0.2)

channel = channel * 2

x = conv(x, channel * 2, kernel=3, stride=1, pad=1, use_bias=False, sn=sn, scope='last_conv')
x = layer_norm(x, scope='2_ins_norm')
x = lrelu(x, 0.2)

x = conv(x, channels=1, kernel=3, stride=1, pad=1, use_bias=False, sn=sn, scope='D_logit')

return x
3. Loss
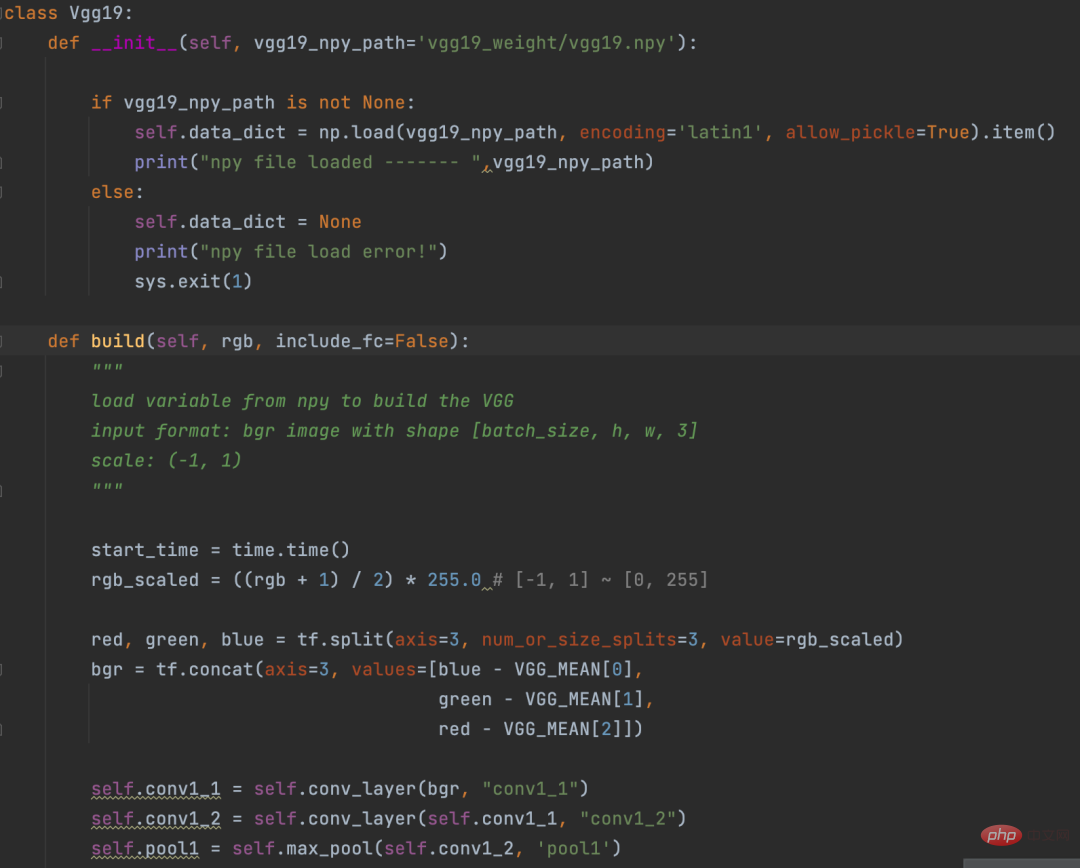
Before calculating the loss, use the VGG19 network to convert the image Vectorization. This process is a bit like the Embedding operation in NLP.
Eembedding is to convert words into vectors, and VGG19 is to convert pictures into vectors.

VGG19 definition
The logic of calculating the loss part is as follows:
def con_sty_loss(vgg, real, anime, fake):

# 真实Generative adversarial network, AI transforms pictures into comic style向量化
vgg.build(real)
real_feature_map = vgg.conv4_4_no_activation

# 生成Generative adversarial network, AI transforms pictures into comic style向量化
vgg.build(fake)
fake_feature_map = vgg.conv4_4_no_activation

# 漫画风格向量化
vgg.build(anime[:fake_feature_map.shape[0]])
anime_feature_map = vgg.conv4_4_no_activation

# 真实Generative adversarial network, AI transforms pictures into comic style与生成Generative adversarial network, AI transforms pictures into comic style的损失
c_loss = L1_loss(real_feature_map, fake_feature_map)
# 漫画风格与生成Generative adversarial network, AI transforms pictures into comic style的损失
s_loss = style_loss(anime_feature_map, fake_feature_map)

return c_loss, s_loss
Here vgg19 is used to calculate the real image (parameter real) and generation respectively The loss of the picture (parameter fake), the loss of the generated picture (parameter fake) and the comic style (parameter anime).
c_loss, s_loss = con_sty_loss(self.vgg, self.real, self.anime_gray, self.generated)
t_loss = self.con_weight * c_loss + self.sty_weight * s_loss + color_loss(self.real,self.generated) * self.color_weight + tv_loss
Finally give different weights to these two losses, so that the pictures generated by the generator not only retain the appearance of the real pictures, but also migrate to the comic style
4. Training
Execute the following command in the project directory to start training
python train.py --dataset Hayao --epoch 101 --init_epoch 10
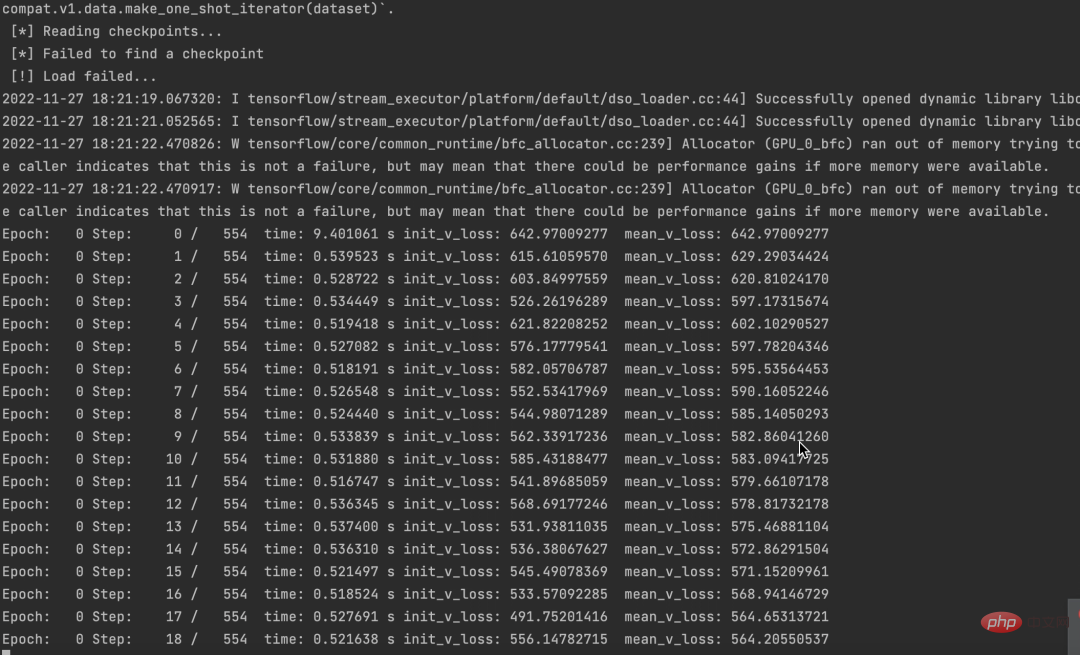
After the operation is successful, you can see the data.

At the same time, we can also see that losses are declining.
The source code and data set have been packaged. If you need it, just leave a message in the comment area.
If you think this article is useful to you, please click and read to encourage me. I will continue to share excellent Python AI projects in the future.
The above is the detailed content of Generative adversarial network, AI transforms pictures into comic style. For more information, please follow other related articles on the PHP Chinese website!

Hot AI Tools

Undresser.AI Undress
AI-powered app for creating realistic nude photos

AI Clothes Remover
Online AI tool for removing clothes from photos.

Undress AI Tool
Undress images for free

Clothoff.io
AI clothes remover

AI Hentai Generator
Generate AI Hentai for free.

Hot Article

Hot Tools

Notepad++7.3.1
Easy-to-use and free code editor

SublimeText3 Chinese version
Chinese version, very easy to use

Zend Studio 13.0.1
Powerful PHP integrated development environment

Dreamweaver CS6
Visual web development tools

SublimeText3 Mac version
God-level code editing software (SublimeText3)

Hot Topics
 1359
1359
 52
52
 What is the reason why PS keeps showing loading?
Apr 06, 2025 pm 06:39 PM
PS "Loading" problems are caused by resource access or processing problems: hard disk reading speed is slow or bad: Use CrystalDiskInfo to check the hard disk health and replace the problematic hard disk. Insufficient memory: Upgrade memory to meet PS's needs for high-resolution images and complex layer processing. Graphics card drivers are outdated or corrupted: Update the drivers to optimize communication between the PS and the graphics card. File paths are too long or file names have special characters: use short paths and avoid special characters. PS's own problem: Reinstall or repair the PS installer.
 How to solve the problem of loading when PS is started?
Apr 06, 2025 pm 06:36 PM
A PS stuck on "Loading" when booting can be caused by various reasons: Disable corrupt or conflicting plugins. Delete or rename a corrupted configuration file. Close unnecessary programs or upgrade memory to avoid insufficient memory. Upgrade to a solid-state drive to speed up hard drive reading. Reinstalling PS to repair corrupt system files or installation package issues. View error information during the startup process of error log analysis.
 The process of H5 page production
Apr 06, 2025 am 09:03 AM
H5 page production process: design: plan page layout, style and content; HTML structure construction: use HTML tags to build a page framework; CSS style writing: use CSS to control the appearance and layout of the page; JavaScript interaction implementation: write code to achieve page animation and interaction; Performance optimization: compress pictures, code and reduce HTTP requests to improve page loading speed.
 How to control the video playback speed in HTML5? How to achieve full screen of video in HTML5?
Apr 06, 2025 am 10:24 AM
In HTML5, the playback speed of video can be controlled through the playbackRate attribute, which accepts the following values: less than 1: slow playback equals 1: normal speed playback greater than 1: fast playback equals 0: pause in HTML5, the video full screen can be realized through the requestFullscreen() method, which can be applied to video elements or their parent elements.
 How to solve the problem of loading when the PS opens the file?
Apr 06, 2025 pm 06:33 PM
"Loading" stuttering occurs when opening a file on PS. The reasons may include: too large or corrupted file, insufficient memory, slow hard disk speed, graphics card driver problems, PS version or plug-in conflicts. The solutions are: check file size and integrity, increase memory, upgrade hard disk, update graphics card driver, uninstall or disable suspicious plug-ins, and reinstall PS. This problem can be effectively solved by gradually checking and making good use of PS performance settings and developing good file management habits.
 How to use PS feathering to create transparent effects?
Apr 06, 2025 pm 07:03 PM
Transparent effect production method: Use selection tool and feathering to cooperate: select transparent areas and feathering to soften edges; change the layer blending mode and opacity to control transparency. Use masks and feathers: select and feather areas; add layer masks, and grayscale gradient control transparency.
 Which is easier to learn, H5 or JS?
Apr 06, 2025 am 09:18 AM
The learning difficulty of H5 (HTML5) and JS (JavaScript) is different, depending on the requirements. A simple static web page only needs to learn H5, while it is highly interactive and requires front-end development to master JS. It is recommended to learn H5 first and then gradually learn JS. H5 mainly learns tags and is easy to get started; JS is a programming language with a steep learning curve and requires understanding of syntax and concepts, such as closures and prototype chains. In terms of pitfalls, H5 mainly involves compatibility and semantic understanding deviations, while JS involves syntax, asynchronous programming and performance optimization.
 Will PDF exporting on PS be distorted?
Apr 06, 2025 pm 05:21 PM
To export PDF without distortion, you need to follow the following steps: check the image resolution (more than 300dpi for printing); set the export format to CMYK (printing) or RGB (web page); select the appropriate compression rate, and the image resolution is consistent with the setting resolution; use professional software to export PDF; avoid using blur, feathering and other effects. For different scenarios, high resolution, CMYK mode, and low compression are used for printing; low resolution, RGB mode, and appropriate compression are used for web pages; lossless compression is used for archives.


