
 Technology peripherals
AI
Unbelievable! Use Numpy to develop deep learning framework and look into the neural network training process
Technology peripherals
AI
Unbelievable! Use Numpy to develop deep learning framework and look into the neural network training process
Unbelievable! Use Numpy to develop deep learning framework and look into the neural network training process

Hello, everyone.
Today I would like to share with you a very awesome open source project. A deep learning framework was developed using Numpy. The syntax is basically the same as Pytorch.

Today we take a simple convolutional neural network as an example to analyze the core steps involved in the neural network training process, such as forward propagation, back propagation, and parameter optimization. Source code.
The data sets and codes used have been packaged, and there are ways to obtain them at the end of the article.
1. Preparation
First prepare the data and code.
1.1 Build the network
First, download the framework source code, address: https://github.com/duma-repo/PyDyNet
git clone https://github.com/duma-repo/PyDyNet.git
Build the LeNet convolutional neural network, Train a three-classification model.

Just create the code file directly in the PyDyNet directory.
from pydynet import nn

class LeNet(nn.Module):
def __init__(self):
super().__init__()
self.conv1 = nn.Conv2d(1, 6, kernel_size=5, padding=2)
self.conv2 = nn.Conv2d(6, 16, kernel_size=5)
self.avg_pool = nn.AvgPool2d(kernel_size=2, stride=2, padding=0)
self.sigmoid = nn.Sigmoid()
self.fc1 = nn.Linear(16 * 5 * 5, 120)
self.fc2 = nn.Linear(120, 84)
self.fc3 = nn.Linear(84, 3)

def forward(self, x):
x = self.conv1(x)
x = self.sigmoid(x)
x = self.avg_pool(x)

x = self.conv2(x)
x = self.sigmoid(x)
x = self.avg_pool(x)

x = x.reshape(x.shape[0], -1)

x = self.fc1(x)
x = self.sigmoid(x)
x = self.fc2(x)
x = self.sigmoid(x)
x = self.fc3(x)

return x
As you can see, the definition of the network is exactly the same as Pytorch syntax.
In the source code I provided, the summary function is provided to print the network structure.
1.2 Preparing data
The training data uses the Fanshion-MNIST data set, which contains 10 categories of pictures, 6k images in each category.

In order to speed up training, I only extracted the first 3 categories, a total of 1.8w training images, to make a three-classification model.
1.3 Model training
import pydynet
from pydynet import nn
from pydynet import optim

lr, num_epochs = 0.9, 10
optimizer = optim.SGD(net.parameters(),
lr=lr)
loss = nn.CrossEntropyLoss()

for epoch in range(num_epochs):
net.train()
for i, (X, y) in enumerate(train_iter):
optimizer.zero_grad()
y_hat = net(X)
l = loss(y_hat, y)
l.backward()
optimizer.step()

with pydynet.no_grad():
metric.add(l.numpy() * X.shape[0],
 accuracy(y_hat, y),
 X.shape[0])
The training code is also the same as Pytorch.
The key thing to do next is to go deep into the source code of model training to learn the principles of model training.
2. train, no_grad and eval
Before the model starts training, net.train will be called.
def train(self, mode: bool = True):
set_grad_enabled(mode)
self.set_module_state(mode)
You can see that it will set grad(gradient) to True, and the Tensor created afterwards can have gradients. After Tensor brings the gradient, it will be put into the calculation graph and wait for derivation to calculate the gradient.
The following with no_grad(): code
class no_grad:
def __enter__(self) -> None:
self.prev = is_grad_enable()
set_grad_enabled(False)
will set grad(gradient) to False, so that the Tensor created later will not be placed in the calculation graph, and naturally it will not The gradient needs to be calculated, which can speed up inference.
We often see the usage of net.eval() in Pytorch, and we also take a look at its source code.
def eval(self):
return self.train(False)
As you can see, it directly calls train(False) to turn off the gradient, and the effect is similar to no_grad().
So, generally call train to turn on the gradient before training. After training, call eval to close the gradient to facilitate fast inference.
3. Forward propagation
In addition to calculating the category probability, the most important thing in forward propagation is to organize the tensors in the network into a calculation graph according to the order of forward propagation. The purpose It is used to calculate the gradient of each tensor during backpropagation.
In neural networks, tensor is not only used to store data, but also to calculate and store gradients.
Take the first layer convolution operation as an example to see how to generate a calculation graph.
def conv2d(x: tensor.Tensor,
 kernel: tensor.Tensor,
 padding: int = 0,
 stride: int = 1):
'''二维卷积函数
'''
N, _, _, _ = x.shape
out_channels, _, kernel_size, _ = kernel.shape
pad_x = __pad2d(x, padding)
col = __im2col2d(pad_x, kernel_size, stride)
out_h, out_w = col.shape[-2:]
col = col.transpose(0, 4, 5, 1, 2, 3).reshape(N * out_h * out_w, -1)
col_filter = kernel.reshape(out_channels, -1).T
out = col @ col_filter
return out.reshape(N, out_h, out_w, -1).transpose(0, 3, 1, 2)
x is the input image, and there is no need to record the gradient. Kernel is the weight of the convolution kernel and needs to calculate the gradient.
So, the new tensor generated by pad_x = __pad2d(x, padding) also has no gradient, so it does not need to be added to the calculation graph.
The tensor generated by kernel.reshape(out_channels, -1) needs to calculate the gradient and also needs to be added to the calculation graph.
Let’s take a look at the joining process:
def reshape(self, *new_shape):
return reshape(self, new_shape)

class reshape(UnaryOperator):
'''
张量形状变换算子,在Tensor中进行重载

Parameters
----------
new_shape : tuple
变换后的形状,用法同NumPy
'''
def __init__(self, x: Tensor, new_shape: tuple) -> None:
self.new_shape = new_shape
super().__init__(x)

def forward(self, x: Tensor)
return x.data.reshape(self.new_shape)

def grad_fn(self, x: Tensor, grad: np.ndarray)
return grad.reshape(x.shape)
The reshape function will return a reshape class object. The reshape class inherits the UnaryOperator class and is called in the __init__ function. Parent class initialization function.
class UnaryOperator(Tensor):
def __init__(self, x: Tensor) -> None:
if not isinstance(x, Tensor):
x = Tensor(x)
self.device = x.device
super().__init__(
data=self.forward(x),
device=x.device,
# 这里 requires_grad 为 True
requires_grad=is_grad_enable() and x.requires_grad,
)
The UnaryOperator class inherits the Tensor class, so the reshape object is also a tensor.
In the __init__ function of UnaryOperator, the initialization function of Tensor is called, and the required_grad parameter passed in is True, which means that the gradient needs to be calculated.
requires_gradThe calculation code is is_grad_enable() and x.requires_grad, is_grad_enable()has been set to True by train, and x is the convolution kernel, and its requires_grad is also True.
class Tensor:
def __init__(
self,
data: Any,
dtype=None,
device: Union[Device, int, str, None] = None,
requires_grad: bool = False,
) -> None:
if self.requires_grad:
# 不需要求梯度的节点不出现在动态计算图中
Graph.add_node(self)
Finally, in the initialization method of the Tensor class, call Graph.add_node(self) to add the current tensor to the calculation graph.
Similarly, new tensors that are commonly used in the tensor that requires_grad=True will be placed in the calculation graph.
After a convolution operation, 6 nodes will be added to the calculation graph.
4. Backpropagation
After one forward propagation is completed, start from the last node in the calculation graph and perform backpropagation from back to front.
l = loss(y_hat, y)
l.backward()
After propagating layer by layer through the forward network, it is finally transmitted to the loss tensor l.
Taking l as the starting point and propagating from front to back, the gradient of each node in the calculation graph can be calculated.
The core code of backward is as follows:
def backward(self, retain_graph: bool = False):

for node in Graph.node_list[y_id::-1]:
grad = node.grad
for last in [l for l in node.last if l.requires_grad]:
add_grad = node.grad_fn(last, grad)

last.grad += add_grad
Graph.node_list[y_id::-1] sorts the calculation graph in reverse order.
node是前向传播时放入计算图中的每个tensor。
node.last 是生成当前tensor的直接父节点。
调用node.grad_fn计算梯度,并反向传给它的父节点。
grad_fn其实就是Tensor的求导公式,如:
class pow(BinaryOperator):
'''
幂运算算子,在Tensor类中进行重载

See also
--------
add : 加法算子
'''
def grad_fn(self, node: Tensor, grad: np.ndarray)
if node is self.last[0]:
return (self.data * self.last[1].data / node.data) * grad
return后的代码其实就是幂函数求导公式。
假设y=x^2,x的导数为2x。
5. 更新参数
反向传播计算梯度后,便可以调用优化器,更新模型参数。
l.backward()
optimizer.step()
本次训练我们用梯度下降SGD算法优化参数,更新过程如下:
def step(self):
for i in range(len(self.params)):
grad = self.params[i].grad + self.weight_decay * self.params[i].data
self.v[i] *= self.momentum
self.v[i] += self.lr * grad
self.params[i].data -= self.v[i]
if self.nesterov:
self.params[i].data -= self.lr * grad
self.params是整个网络的权重,初始化SGD时传进去的。
step函数最核心的两行代码,self.v[i] += self.lr * grad 和 self.params[i].data -= self.v[i],用当前参数 - 学习速率 * 梯度更新当前参数。
这是机器学习的基础内容了,我们应该很熟悉了。
一次模型训练的完整过程大致就串完了,大家可以设置打印语句,或者通过DEBUG的方式跟踪每一行代码的执行过程,这样可以更了解模型的训练过程。
The above is the detailed content of Unbelievable! Use Numpy to develop deep learning framework and look into the neural network training process. For more information, please follow other related articles on the PHP Chinese website!

Hot AI Tools

Undresser.AI Undress
AI-powered app for creating realistic nude photos

AI Clothes Remover
Online AI tool for removing clothes from photos.

Undress AI Tool
Undress images for free

Clothoff.io
AI clothes remover

Video Face Swap
Swap faces in any video effortlessly with our completely free AI face swap tool!

Hot Article
Hot Tools

Notepad++7.3.1
Easy-to-use and free code editor

SublimeText3 Chinese version
Chinese version, very easy to use

Zend Studio 13.0.1
Powerful PHP integrated development environment

Dreamweaver CS6
Visual web development tools

SublimeText3 Mac version
God-level code editing software (SublimeText3)
Hot Topics


 Beyond ORB-SLAM3! SL-SLAM: Low light, severe jitter and weak texture scenes are all handled
May 30, 2024 am 09:35 AM
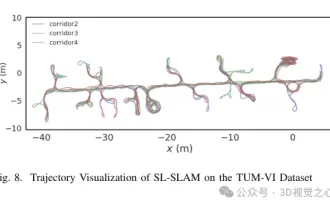
Beyond ORB-SLAM3! SL-SLAM: Low light, severe jitter and weak texture scenes are all handled
May 30, 2024 am 09:35 AM
Written previously, today we discuss how deep learning technology can improve the performance of vision-based SLAM (simultaneous localization and mapping) in complex environments. By combining deep feature extraction and depth matching methods, here we introduce a versatile hybrid visual SLAM system designed to improve adaptation in challenging scenarios such as low-light conditions, dynamic lighting, weakly textured areas, and severe jitter. sex. Our system supports multiple modes, including extended monocular, stereo, monocular-inertial, and stereo-inertial configurations. In addition, it also analyzes how to combine visual SLAM with deep learning methods to inspire other research. Through extensive experiments on public datasets and self-sampled data, we demonstrate the superiority of SL-SLAM in terms of positioning accuracy and tracking robustness.
 Four recommended AI-assisted programming tools
Apr 22, 2024 pm 05:34 PM
Four recommended AI-assisted programming tools
Apr 22, 2024 pm 05:34 PM
This AI-assisted programming tool has unearthed a large number of useful AI-assisted programming tools in this stage of rapid AI development. AI-assisted programming tools can improve development efficiency, improve code quality, and reduce bug rates. They are important assistants in the modern software development process. Today Dayao will share with you 4 AI-assisted programming tools (and all support C# language). I hope it will be helpful to everyone. https://github.com/YSGStudyHards/DotNetGuide1.GitHubCopilotGitHubCopilot is an AI coding assistant that helps you write code faster and with less effort, so you can focus more on problem solving and collaboration. Git
 Upgrading numpy versions: a detailed and easy-to-follow guide
Feb 25, 2024 pm 11:39 PM
Upgrading numpy versions: a detailed and easy-to-follow guide
Feb 25, 2024 pm 11:39 PM
How to upgrade numpy version: Easy-to-follow tutorial, requires concrete code examples Introduction: NumPy is an important Python library used for scientific computing. It provides a powerful multidimensional array object and a series of related functions that can be used to perform efficient numerical operations. As new versions are released, newer features and bug fixes are constantly available to us. This article will describe how to upgrade your installed NumPy library to get the latest features and resolve known issues. Step 1: Check the current NumPy version at the beginning
 Understand in one article: the connections and differences between AI, machine learning and deep learning
Mar 02, 2024 am 11:19 AM
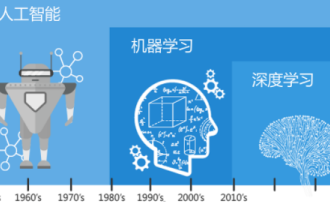
Understand in one article: the connections and differences between AI, machine learning and deep learning
Mar 02, 2024 am 11:19 AM
In today's wave of rapid technological changes, Artificial Intelligence (AI), Machine Learning (ML) and Deep Learning (DL) are like bright stars, leading the new wave of information technology. These three words frequently appear in various cutting-edge discussions and practical applications, but for many explorers who are new to this field, their specific meanings and their internal connections may still be shrouded in mystery. So let's take a look at this picture first. It can be seen that there is a close correlation and progressive relationship between deep learning, machine learning and artificial intelligence. Deep learning is a specific field of machine learning, and machine learning
 Super strong! Top 10 deep learning algorithms!
Mar 15, 2024 pm 03:46 PM
Super strong! Top 10 deep learning algorithms!
Mar 15, 2024 pm 03:46 PM
Almost 20 years have passed since the concept of deep learning was proposed in 2006. Deep learning, as a revolution in the field of artificial intelligence, has spawned many influential algorithms. So, what do you think are the top 10 algorithms for deep learning? The following are the top algorithms for deep learning in my opinion. They all occupy an important position in terms of innovation, application value and influence. 1. Deep neural network (DNN) background: Deep neural network (DNN), also called multi-layer perceptron, is the most common deep learning algorithm. When it was first invented, it was questioned due to the computing power bottleneck. Until recent years, computing power, The breakthrough came with the explosion of data. DNN is a neural network model that contains multiple hidden layers. In this model, each layer passes input to the next layer and
 Which AI programmer is the best? Explore the potential of Devin, Tongyi Lingma and SWE-agent
Apr 07, 2024 am 09:10 AM
Which AI programmer is the best? Explore the potential of Devin, Tongyi Lingma and SWE-agent
Apr 07, 2024 am 09:10 AM
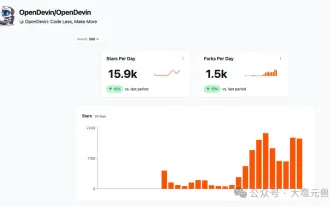
On March 3, 2022, less than a month after the birth of the world's first AI programmer Devin, the NLP team of Princeton University developed an open source AI programmer SWE-agent. It leverages the GPT-4 model to automatically resolve issues in GitHub repositories. SWE-agent's performance on the SWE-bench test set is similar to Devin, taking an average of 93 seconds and solving 12.29% of the problems. By interacting with a dedicated terminal, SWE-agent can open and search file contents, use automatic syntax checking, edit specific lines, and write and execute tests. (Note: The above content is a slight adjustment of the original content, but the key information in the original text is retained and does not exceed the specified word limit.) SWE-A
 Learn how to develop mobile applications using Go language
Mar 28, 2024 pm 10:00 PM
Learn how to develop mobile applications using Go language
Mar 28, 2024 pm 10:00 PM
Go language development mobile application tutorial As the mobile application market continues to boom, more and more developers are beginning to explore how to use Go language to develop mobile applications. As a simple and efficient programming language, Go language has also shown strong potential in mobile application development. This article will introduce in detail how to use Go language to develop mobile applications, and attach specific code examples to help readers get started quickly and start developing their own mobile applications. 1. Preparation Before starting, we need to prepare the development environment and tools. head
 AlphaFold 3 is launched, comprehensively predicting the interactions and structures of proteins and all living molecules, with far greater accuracy than ever before
Jul 16, 2024 am 12:08 AM
AlphaFold 3 is launched, comprehensively predicting the interactions and structures of proteins and all living molecules, with far greater accuracy than ever before
Jul 16, 2024 am 12:08 AM
Editor | Radish Skin Since the release of the powerful AlphaFold2 in 2021, scientists have been using protein structure prediction models to map various protein structures within cells, discover drugs, and draw a "cosmic map" of every known protein interaction. . Just now, Google DeepMind released the AlphaFold3 model, which can perform joint structure predictions for complexes including proteins, nucleic acids, small molecules, ions and modified residues. The accuracy of AlphaFold3 has been significantly improved compared to many dedicated tools in the past (protein-ligand interaction, protein-nucleic acid interaction, antibody-antigen prediction). This shows that within a single unified deep learning framework, it is possible to achieve
