

Introduction to WSGI, uWSGI and uwsgi in Python

1. Overview
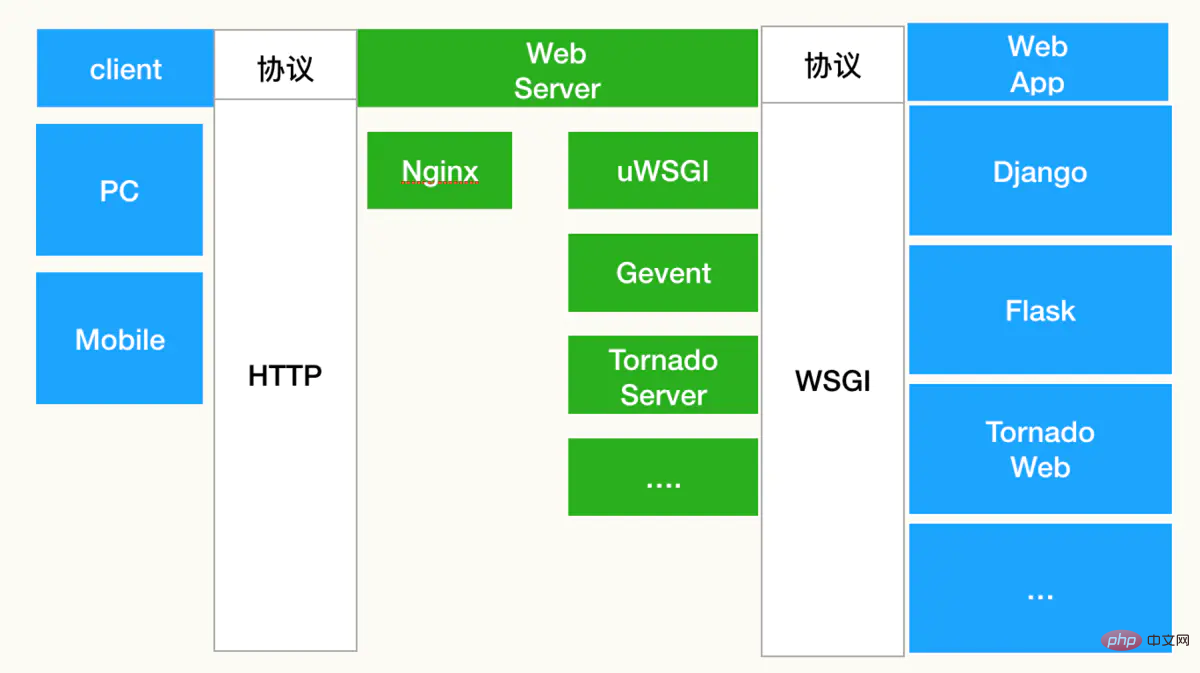
WSGI, uWSGI and uwsgi are three related concepts. They are different tools and protocols used in web application development. The following is their detailed introduction:
- WSGI (Web Server Gateway Interface) : WSGI is a Python web application and a web server. Interface specification , which defines the standard interface between applications and servers so that applications can run on different Web servers. The WSGI specification specifies the interface methods that applications must implement and that the server needs to support. WSGI protocol enables different Python web frameworks (such as Flask, Django, etc.) to run on different web servers, which can be Apache, Nginx, etc.
- uWSGI: uWSGI is a Web server. It is a Web application container written in C language and supports running Python and Ruby. , Perl and other programming languages. The uWSGI server can serve as a standalone application server or can be used with other web servers (such as Nginx, Apache) to communicate with Python applications through the WSGI protocol.
- uwsgi: uwsgi is a protocol related to the uWSGI server. The uwsgi protocol is a binary protocol that defines the communication protocol between the uWSGI server and applications. Using the uwsgi protocol, a uWSGI server can communicate with Python applications without starting a new process to handle each request like CGI does. The uwsgi protocol allows bidirectional communication between the uWSGI server and applications, thereby improving performance.
So, uWSGI is a web server that can communicate with Python applications through the WSGI protocol and communicate using the uwsgi protocol. WSGI is an interface specification between Python web applications and web servers, defining a standard interface between applications and servers. uwsgi is a binary communication protocol between the uWSGI server and applications.
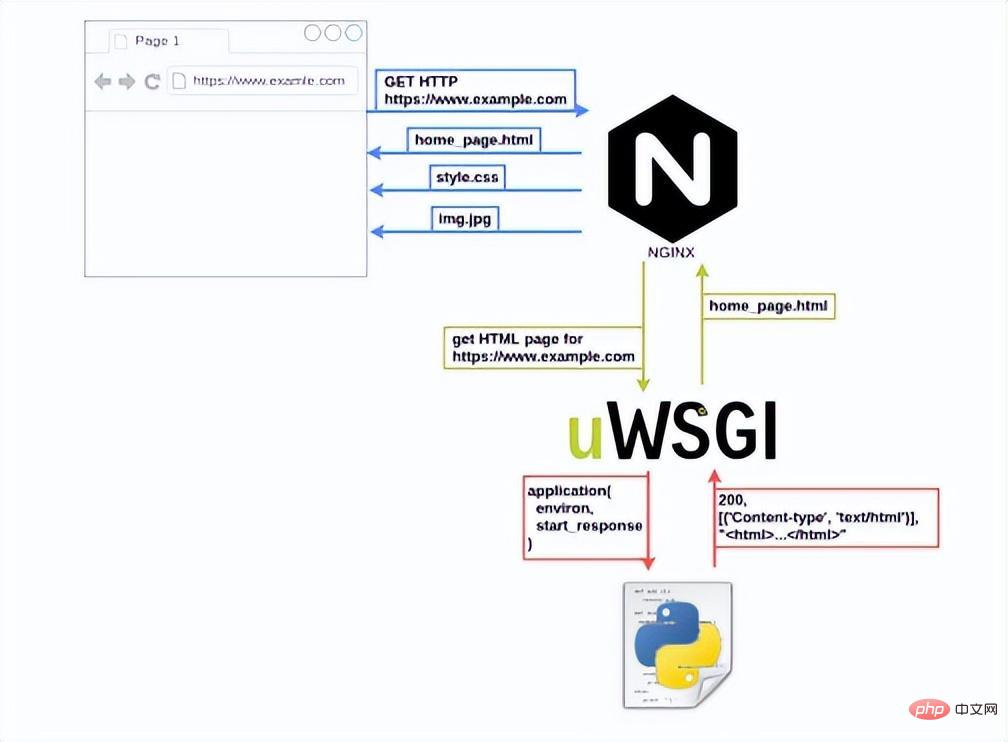
uWSGI is a Web Server Gateway Interface, which can be used For integrating Python web applications with web servers such as Nginx or Apache.
- When using the uWSGI module, you need to install the uwsgi module and import it in the Python web applicationuwsgi module, and use the functions provided by the uwsgi module to configure and manage the running of web applications. Common uwsgi module functions include uwsgi.optin(), uwsgi.route(), uwsgi.applications(), etc.
- In addition, the uWSGI module also provides some advanced features, such as Master/Worker mode, process management, load balancing, automatic expansion, etc., so that web applications can better adapt to high concurrency and large traffic Case.
Domestic source address:
- pypi Tsinghua University source: https://pypi.tuna.tsinghua.edu.cn/simple ##pypi Tencent source: http://mirrors.cloud.tencent.com/pypi/simple
- pypi Ali source: https://mirrors.aliyun.com/pypi/simple/
-
mkdir~/.pip/
cat >~/.pip/pip.conf<<EOF
[global]
index-url = https://repo.huaweicloud.com/repository/pypi/simple
trusted-host = repo.huaweicloud.com
timeout = 120
EOF
Copy after login2) Install uwsgi module
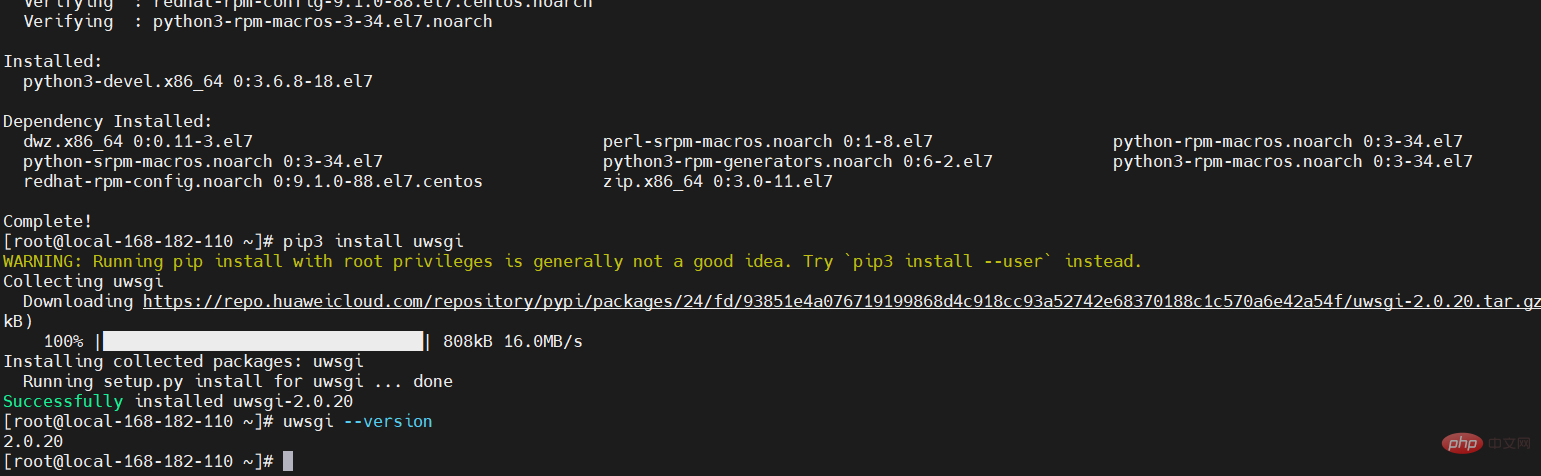
# 安装python3
yum -y install python3

yum -y install gcc-c++ -y
yum -y install python3-devel -y

# 安装 uwsgi flask 模块
pip3 install uwsgi flask

# 查看版本
uwsgi --version
 3. Example demonstration (uWSGI Nginx configuration)
 1) Install nginx
yum update -y
yum install epel-release
yum -y install nginx
2) Create app. py file
Create a file namedapp.py and add the following code: from flask import Flask
app = Flask(__name__)
@app.route('/')
def hello():
return 'Hello, World!'
if __name__ == '__main__':
app.run()
uwsgi.ini, which contains the following information: [uwsgi]
module = app:app
# 相当于命令下面两行
#wsgi-file = app.py # 项目入口文件
#callable = app #flask应用对象
# 支持http+socket两种方式,这里选用socket,也可以选择http-socket,下面会讲解这三种区别
# http = 127.0.0.1:8000
socket = 0.0.0.0:8000
# 也可以使用socket文件,在nginx配置文件中配置也对应,仅限本机通信,一般也很少使用
# socket = /app/myapp.sock
# 注意记得提前创建目录
chdir = /opt/myapp
pidfile=/opt/myapp/myapp.pid
processes = 4
threads = 2
master = true
vacuum = true
py-autoreload = 1
daemonize = /tmp/uwsgi.log
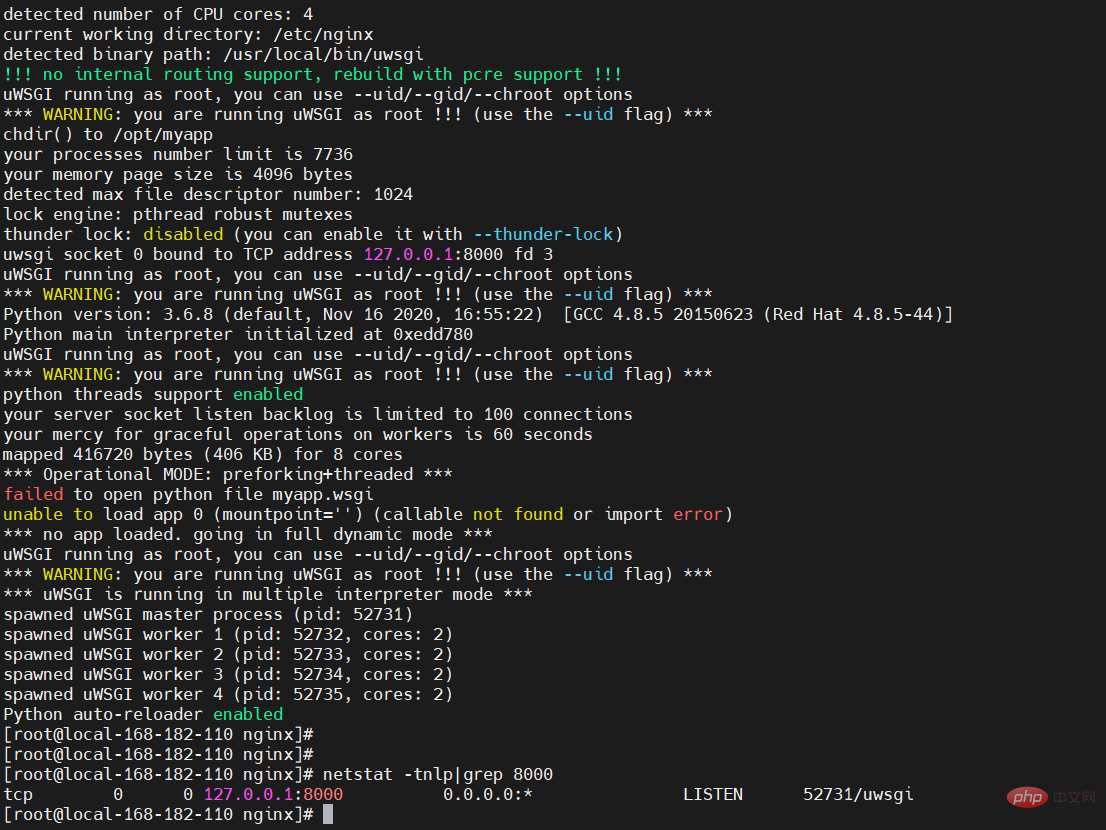
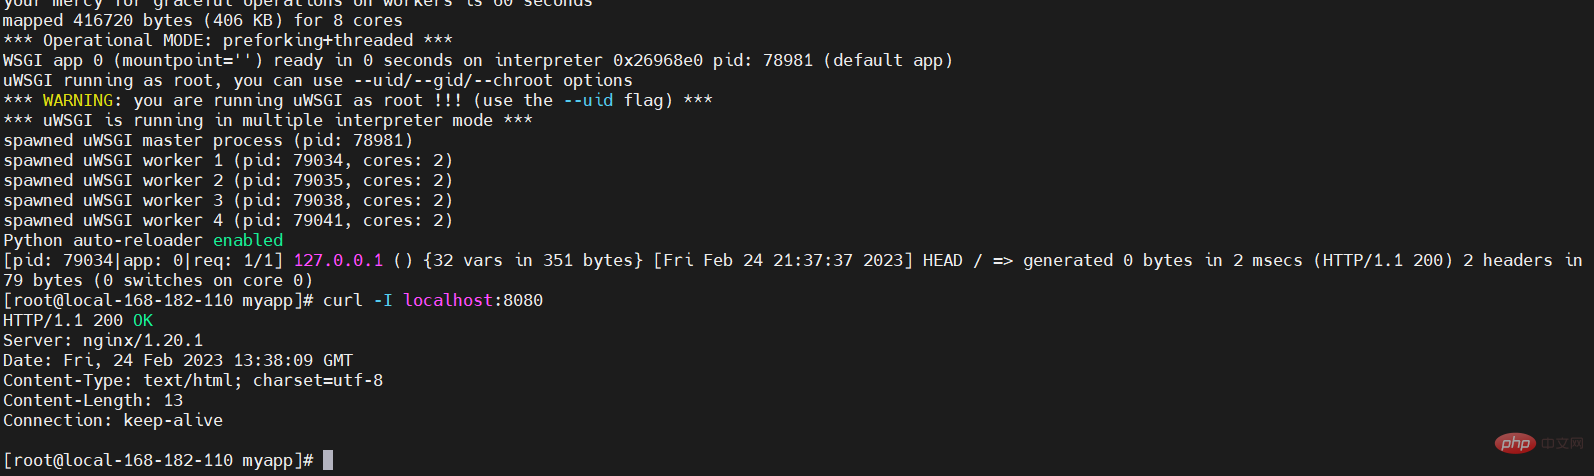
在命令行中启动 uWSGI: 【温馨提示】其实也可以通过一条命令带上对应的参数即可启动,但是不推荐,测试可以。一般使用配置文件的方式启动服务。 使用http协议启动uwsgi的命令为: 将 Web 服务器配置为反向代理 uWSGI,例如,在 Nginx 中,可以使用以下配置文件: 其中,uwsgi_params 文件包含以下内容: 【特别注意】uwsgi_params 在nginx conf文件夹下自带,uwsgi_pass一定要跟uwsgi_conf.ini中写的地址完全一致。 重启 Web 服务器以使配置生效。 访问(浏览器访问,curl访问也行) Nginx上游(upstream)是指一组后端服务器,Nginx可以与其通信并将客户端请求转发到这些服务器。换句话说,上游服务器是Nginx代理请求的后端服务器。 Nginx的upstream支持5种 分配方式,其中 轮询(默认)、权重、IP散列这三种为Nginx原生支持的分配方式,fair 和 url_hash 为第三方支持的分配方式。 轮询是upstream的默认分配方式,即每个请求按照时间顺序轮流分配到不同的后端服务器,如果某个后端服务器 down 掉后,能自动剔除。 轮询的加强版,既可以指定轮询比率,weight 和访问几率成正比,主要应用于后端服务器异质的场景下。 每个请求按照访问 Ip(即Nginx的前置服务器或客户端IP)的 hash结果分配,这样每个访客会固定访问一个后端服务器,可以解决 session 一致问题。 先在另外一个节点上再起一个uWSGI服务,将上面示例配置修改: 192.168.182.110 节点 app.py 192.168.182.111 节点 app.py 验证 从上图可知,请求轮询调度,这才是企业一般想要的效果,负载均衡。 【1】socket 示例(uwsgi.ini): nginx配置 【2】http 示例(uwsgi.ini): nginx配置 【3】http-socket 示例(uwsgi.ini): nginx配置 TCP和Unix套接字(Unix domain socket)是两种不同类型的套接字。 因此,TCP套接字用于在网络上进行通信,而Unix套接字用于在同一台计算机上进行通信。虽然TCP套接字可以通过网络连接到不同的计算机,但是Unix套接字提供了更高效的进程间通信机制,并且更适合于需要在同一台计算机上运行的进程间通信。 【TCP 示例】常用uwsgi.ini: 【unix 示例】仅限于本机通信,很少使用。uwsgi.ini: nginx配置 Python 中 web开发中的 WSGI、uWSGI 和 uwsgi 三者介绍就先到这里了 The above is the detailed content of Introduction to WSGI, uWSGI and uwsgi in Python. For more information, please follow other related articles on the PHP Chinese website!4)启动 uWSGI
uwsgi --ini uwsgi.ini
###或者
uwsgi uwsgi.ini

### 重启
uwsgi --reload /opt/myapp/myapp.pid
###关闭
uwsgi --stop /opt/myapp/myapp.pid
uwsgi --http :8000 --ini uwsgi_conf.ini -d ./uwsgi.log --pidfile=uwsgi.pid
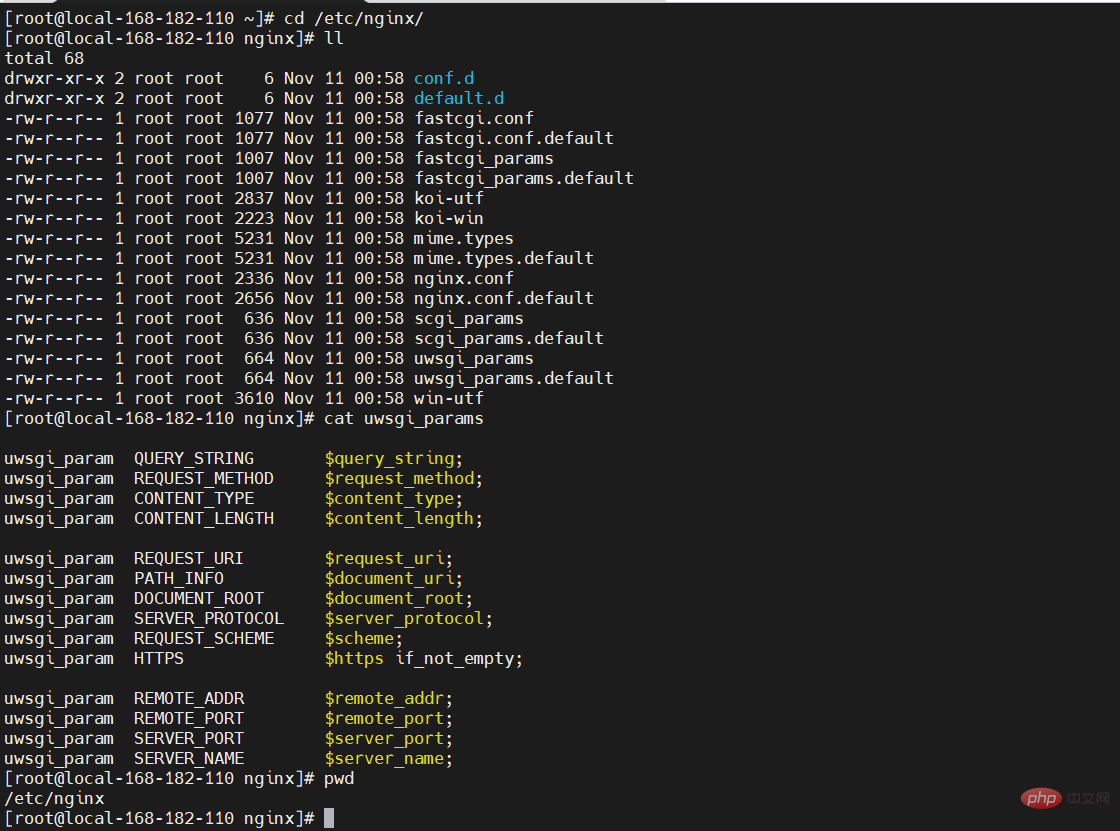
5)配置 Web 服务器
# vi /etc/nginx/conf.d/myapp.conf
server {
listen 8080;
server_name myapp.com;
location / {
 include uwsgi_params;
 uwsgi_pass 127.0.0.1:8000;
}
}uwsgi_paramQUERY_STRING $query_string;
uwsgi_paramREQUEST_METHOD $request_method;
uwsgi_paramCONTENT_TYPE $content_type;
uwsgi_paramCONTENT_LENGTH $content_length;
uwsgi_paramREQUEST_URI$request_uri;
uwsgi_paramPATH_INFO$document_uri;
uwsgi_paramDOCUMENT_ROOT$document_root;
uwsgi_paramSERVER_PROTOCOL$server_protocol;
uwsgi_paramREQUEST_SCHEME $scheme;
uwsgi_paramHTTPS$https if_not_empty;
uwsgi_paramREMOTE_ADDR$remote_addr;
uwsgi_paramREMOTE_PORT$remote_port;
uwsgi_paramSERVER_PORT$server_port;
uwsgi_paramSERVER_NAME$server_name;
6)重启 Web 服务器
# 重启
systemctl restart nginx

# 如果是之前nginx服务已经存在,只是修改了配置,可建议使用reload加载
nginx -t && nginx -s reload
# 或者
systemctl reload nginx
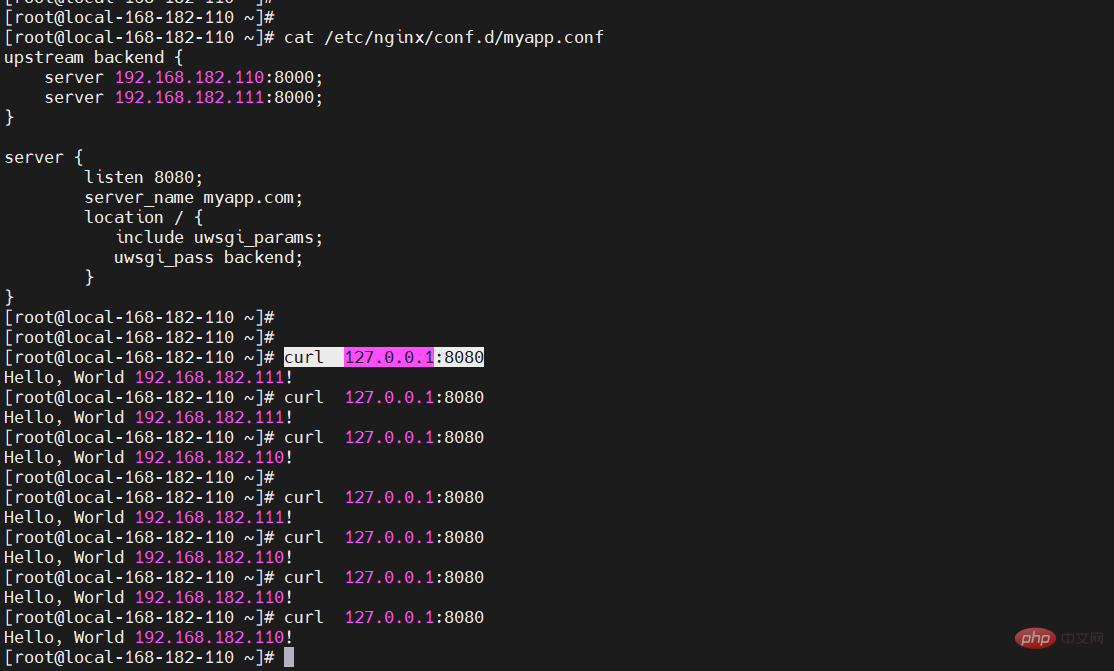
7)Nginx upstream 负载均衡
1、轮询(默认)
upstream backend {
server 192.168.182.110:8000;
server 192.168.182.111:8000;
}2、权重(weight)
upstream backend {
server 192.168.182.110:8000 weight=1;
server 192.168.182.111:8000 weight=2;
}3、IP散列(ip_hash)
upstream backend {
ip_hash;
server 192.168.182.110:8000 weight=1;
server 192.168.182.111:8000 weight=2;
}# vi /etc/nginx/conf.d/myapp.conf
upstream backend {
server 192.168.182.110:8000;
server 192.168.182.111:8000;
}
server {
listen 8080;
server_name myapp.com;
location / {
include uwsgi_params;
uwsgi_pass backend;
}
}from flask import Flask
app = Flask(__name__)
@app.route('/')
def hello():
return 'Hello, World 192.168.182.110!n'
if __name__ == '__main__':
app.run()from flask import Flask
app = Flask(__name__)
@app.route('/')
def hello():
return 'Hello, World 192.168.182.111!n'
if __name__ == '__main__':
app.run()curl127.0.0.1:8080
8)http、http-socket 和 socket 区别
[uwsgi]
module = app:app
#socket = 127.0.0.1:8000
socket = 0.0.0.0:8000

chdir = /opt/myapp
pidfile=/opt/myapp/myapp.pid
processes = 4
threads = 2
master = true
vacuum = true
py-autoreload = 1
daemonize = /tmp/uwsgi.log
upstream backend {
server 192.168.182.110:8000;
server 192.168.182.111:8000;
}

server {
listen 8080;
server_name myapp.com;
location / {
 include uwsgi_params;
 uwsgi_pass backend;
}
}[uwsgi]
module = app:app
socket = 0.0.0.0:8000
chdir = /opt/myapp
pidfile=/opt/myapp/myapp.pid
processes = 4
threads = 2
master = true
vacuum = true
py-autoreload = 1
daemonize = /tmp/uwsgi.log
upstream backend {
server 192.168.182.110:8000;
server 192.168.182.111:8000;
}

server {
listen 8080;
server_name myapp.com;
location / {
 include uwsgi_params;
 proxy_pass http://backend;
}
}[uwsgi]
module = app:app
http = 0.0.0.0:8000
chdir = /opt/myapp
pidfile=/opt/myapp/myapp.pid
processes = 4
threads = 2
master = true
vacuum = true
py-autoreload = 1
daemonize = /tmp/uwsgi.log
upstream backend {
server 192.168.182.110:8000;
server 192.168.182.111:8000;
}

server {
listen 8080;
server_name myapp.com;
location / {
 include uwsgi_params;
 proxy_pass http://backend;
}
}9)TCP 与 uinx 区别
[uwsgi]
module = app:app
socket = 127.0.0.1:8000

chdir = /opt/myapp
pidfile=/opt/myapp/myapp.pid
processes = 4
threads = 2
master = true
vacuum = true
py-autoreload = 1
daemonize = /tmp/uwsgi.log
[uwsgi]
module = app:app
socket = /opt/myapp/myapp.socket

chdir = /opt/myapp
pidfile=/opt/myapp/myapp.pid
processes = 4
threads = 2
master = true
vacuum = true
py-autoreload = 1
daemonize = /tmp/uwsgi.log
server {
listen 8080;
server_name myapp.com;
location / {
 include uwsgi_params;
 proxy_pass unix:///opt/myapp/myapp.sock;
}
}

Hot AI Tools

Undresser.AI Undress
AI-powered app for creating realistic nude photos

AI Clothes Remover
Online AI tool for removing clothes from photos.

Undress AI Tool
Undress images for free

Clothoff.io
AI clothes remover

AI Hentai Generator
Generate AI Hentai for free.

Hot Article
Hot Tools

Notepad++7.3.1
Easy-to-use and free code editor

SublimeText3 Chinese version
Chinese version, very easy to use

Zend Studio 13.0.1
Powerful PHP integrated development environment

Dreamweaver CS6
Visual web development tools

SublimeText3 Mac version
God-level code editing software (SublimeText3)
Hot Topics
 1386
1386
 52
52

 How to solve the complexity of WordPress installation and update using Composer
Apr 17, 2025 pm 10:54 PM
How to solve the complexity of WordPress installation and update using Composer
Apr 17, 2025 pm 10:54 PM
When managing WordPress websites, you often encounter complex operations such as installation, update, and multi-site conversion. These operations are not only time-consuming, but also prone to errors, causing the website to be paralyzed. Combining the WP-CLI core command with Composer can greatly simplify these tasks, improve efficiency and reliability. This article will introduce how to use Composer to solve these problems and improve the convenience of WordPress management.
 How to solve SQL parsing problem? Use greenlion/php-sql-parser!
Apr 17, 2025 pm 09:15 PM
How to solve SQL parsing problem? Use greenlion/php-sql-parser!
Apr 17, 2025 pm 09:15 PM
When developing a project that requires parsing SQL statements, I encountered a tricky problem: how to efficiently parse MySQL's SQL statements and extract the key information. After trying many methods, I found that the greenlion/php-sql-parser library can perfectly solve my needs.
 Accelerate PHP code inspection: Experience and practice using overtrue/phplint library
Apr 17, 2025 pm 11:06 PM
Accelerate PHP code inspection: Experience and practice using overtrue/phplint library
Apr 17, 2025 pm 11:06 PM
During the development process, we often need to perform syntax checks on PHP code to ensure the correctness and maintainability of the code. However, when the project is large, the single-threaded syntax checking process can become very slow. Recently, I encountered this problem in my project. After trying multiple methods, I finally found the library overtrue/phplint, which greatly improves the speed of code inspection through parallel processing.
 How to solve complex BelongsToThrough relationship problem in Laravel? Use Composer!
Apr 17, 2025 pm 09:54 PM
How to solve complex BelongsToThrough relationship problem in Laravel? Use Composer!
Apr 17, 2025 pm 09:54 PM
In Laravel development, dealing with complex model relationships has always been a challenge, especially when it comes to multi-level BelongsToThrough relationships. Recently, I encountered this problem in a project dealing with a multi-level model relationship, where traditional HasManyThrough relationships fail to meet the needs, resulting in data queries becoming complex and inefficient. After some exploration, I found the library staudenmeir/belongs-to-through, which easily installed and solved my troubles through Composer.
 How to optimize website performance: Experiences and lessons learned from using the Minify library
Apr 17, 2025 pm 11:18 PM
How to optimize website performance: Experiences and lessons learned from using the Minify library
Apr 17, 2025 pm 11:18 PM
In the process of developing a website, improving page loading has always been one of my top priorities. Once, I tried using the Miniify library to compress and merge CSS and JavaScript files in order to improve the performance of the website. However, I encountered many problems and challenges during use, which eventually made me realize that Miniify may no longer be the best choice. Below I will share my experience and how to install and use Minify through Composer.
 Solve CSS prefix problem using Composer: Practice of padaliyajay/php-autoprefixer library
Apr 17, 2025 pm 11:27 PM
Solve CSS prefix problem using Composer: Practice of padaliyajay/php-autoprefixer library
Apr 17, 2025 pm 11:27 PM
I'm having a tricky problem when developing a front-end project: I need to manually add a browser prefix to the CSS properties to ensure compatibility. This is not only time consuming, but also error-prone. After some exploration, I discovered the padaliyajay/php-autoprefixer library, which easily solved my troubles with Composer.
 Solve database connection problem: a practical case of using minii/db library
Apr 18, 2025 am 07:09 AM
Solve database connection problem: a practical case of using minii/db library
Apr 18, 2025 am 07:09 AM
I encountered a tricky problem when developing a small application: the need to quickly integrate a lightweight database operation library. After trying multiple libraries, I found that they either have too much functionality or are not very compatible. Eventually, I found minii/db, a simplified version based on Yii2 that solved my problem perfectly.
 Solve the PHP timeout problem: application of phpunit/php-invoker library
Apr 17, 2025 pm 11:45 PM
Solve the PHP timeout problem: application of phpunit/php-invoker library
Apr 17, 2025 pm 11:45 PM
When developing PHP projects, you often encounter the problem that some functions or methods have been executed for too long, causing program timeout. I've tried multiple solutions, but the results are not satisfactory until I discovered the phpunit/php-invoker library. This library completely solved my problem by setting the timeout time to call the executable function.
