 Backend Development
 Python Tutorial
 Eight ways to use Python's built-in libraries without writing code
Eight ways to use Python's built-in libraries without writing code

The Python language has become popular in recent years because we can use it to write less code to implement complex functions. The Python developer community welcomes toolkits that encapsulate complex implementations but are user-friendly.
However, Python’s simplicity doesn’t end there. Can you believe that we can use Python without writing any code? In the following article, I will introduce 8 examples of using Python’s built-in features without writing any code.
1. Python CLI “-m” parameter
Let’s start with the Python CLI (command line interface). Although we don't have to write code to use the features described later, in order for Python to know what we want to execute, we need to do it using the Python command line.
As long as the Python environment is installed on our computer, we can enter python --help in the Python command line interface to display all supported parameters.
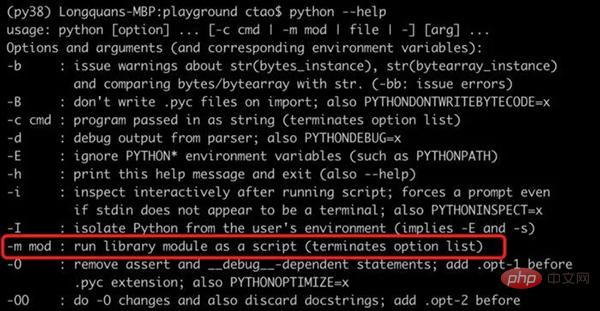
Because the command output is too long, only part of the content is shown in the above picture. The most important thing to emphasize here is the -m mod parameter, which will run the Python module as a script. Therefore, if the implementation of the module supports command line operations, we can use it directly from the command line. Next let us experience it:)
2. Service port test
Sometimes, we want to test the outbound network traffic of the ip port, usually the telnet command is a good choice. Telnet software is not installed by default on Windows platforms and needs to be installed manually before use. If it is just for simple testing and there are not many future usage scenarios, installing it may be a waste of resources.
However, if Python is installed, there is no need to download and install telnet, because Python has a built-in module corresponding to telnet. We can test port 443 of the Google search site.
python -m telnetlib -d 142.250.70.174 443

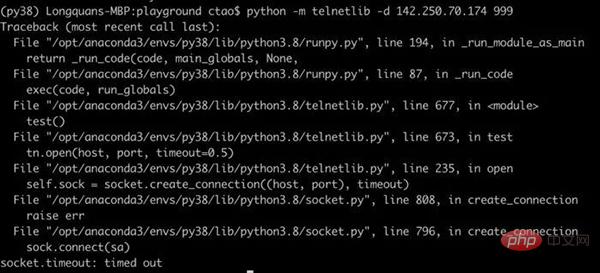
As you can see in the image above, the network traffic appears normal and we even received a null character response from Google. If we try to access a random port of the ip, an error will be thrown as shown in the image below.
python -m telnetlib -d 142.250.70.174 999
3. Start the web service locally
Many Python users don’t know this and will be surprised when they hear it for the first time. Yes, we can start a web service using Python without writing any code, just execute the following command on the command line as follows.
python -m http.server

After running, it is shown that the service is listening to the local port 8000. Then, we can try to access http://localhost:8000/ from the browser.

The web service will display the local file system under the command startup path as the root directory. In other words, we cannot access its parent directory.
You may ask, what are the usage scenarios of this function. For example, if you want to share many text/PDF/image files/subdirectory files in a certain directory on your computer with your good friends, then you can share it very easily using this method.

If you want to know more about this topic, you can refer to the article 3 Lines of Python Code to Write A Web Server. If you follow the article above to implement a "low-code" solution, then you can add more custom functionality to it.
4. Validate and format JSON string
If you have a very long and unformatted JSON string, it will be very difficult to read. Typically, I use some text editor with a JSON plugin, such as Sublime or VS Code, to format JSON strings. However, if you don’t have these tools on hand, Python can be used temporarily. For example, this short JSON string will be displayed below.
echo '{"name": {"first_name":"Chris", "last_name":"Tao"} "age":33}'
可以看到,当前操作系统的命令行工具只能按照原字符串的原始格式进行展示。但是,如果借助 Python 的 json.tool工具,JSON 字符串就会被很好的格式化。
echo '{"name": {"first_name":"Chris", "last_name":"Tao"} "age":33}' | python -m json.tool
Oops!JSON 字符串无效,并且 json.tool 帮助我们定位了问题。我们在名称对象后面漏掉了一个逗号。所以添加逗号以使该 JSON 合法有效。
echo '{"name": {"first_name":"Chris", "last_name":"Tao"}, "age":33}' | python -m json.tool
现在,JSON 字符串具有了完美缩进的格式化输出!更加方便阅读。
5. 创建文本编辑器
你没看错,我们可以使用 Python 来”创建”一个文本编辑器。当然,它的功能非常有限,但是如果当前没有更好的选择,使用它会方便很多。另外,功能上肯定无法与 Vim 和 Nanos 相比,但是它完全是基于 UI 编辑器而不是命令行文本形式。这个编辑器由基于 Tkinter 实现的idlelib 模块创建,所以它是可以跨平台运行的。
假设我们要编写一个简单的 Python 程序来显示当前的时间,我想快速编写代码而不想下载和安装庞大的代码编辑工具。现在让我们运行下面这个命令。
mkdir get_time_apppython -m idlelib get_time_app/print_time.py
如果文件目录不存在,idlelib将无法创建,因此如果必要,我们需要创建一个。我们运行完这个命令之后,print_time.py 只有执行保存的情况下才会创建到本地。现在应该会弹出编辑器,我们可以在里面写一些代码, 可以看到代码是支持语法高亮的。
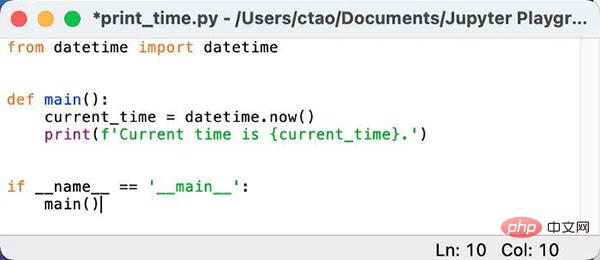
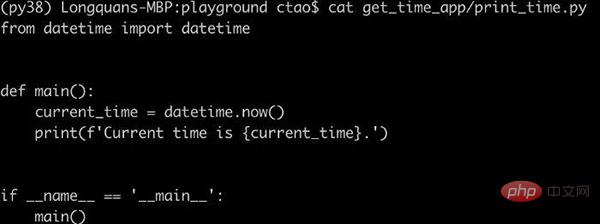
现在我们使用ctrl+s快捷键对编辑好的代码进行保存,并关闭编辑窗口。接下来使用命令行查看一下编辑好的代码文件进行验证,没有任何问题。
cat get_time_app/print_time.py
6. 创建可执行应用程序
如果我们想要创建一个简单的应用,比如前面写的获取当前时间的应用程序,我们不必再需要像 PyInstaller 这样的第三方工具包,Python 内置的 Zipapp 就可以做到。假设我们要打包成一个"Get Time"的应用,我们可以在命令行运行下面的命令。
python -m zipapp get_time_app -m "print_time:main"
在该命令中,我们只需要给 zipapp设置get_time_app名称,指定 Python 程序的入口文件及其程序入口函数即可。以.pyz为扩展名的文件就是我们创建的应用程序,至此我们就可以将项目作为单个文件而不是文件夹进行分发。

该程序的启动方式也很简单,直接使用 Python 进行调用即可。
python get_time_app.pyz

7. 编码和解码字符串或文件
通过 Python CLI,我们可以加密字符串或文件。我们以有趣的 ROT13 加密算法为例进行展示。ROT13 是一种偏移 13 位的凯撒密码,它的加密原理如下图所示。

我们可以使用 encodings.rot_13 来加密一个字符串,命令如下。
echo "I am Chris" | python -m encodings.rot_13

切记,不要将其用于任何真正的加密内容。因为英文有 26 个字母,所以再次运行这个算法我们可以很容易地破译这个加密字符串:)
echo 'V nz Puevf' | python -m encodings.rot_13

现在让我们尝试一个更常见的场景——base64 编码。我们可以对字符串进行 base64 编码,如下所示。
echo "I am Chris" | python -m base64

接下来,我们也可以使用-d参数对加密字符串进行解码。
echo "SSBhbSBDaHJpcwo=" | python -m base64 -d

base64 也经常用在对图像文件的编码和解码上。我们也可以对文件进行如下编码。
python -m base64 get_time_app/print_time.py

非常有趣的是,解码后的 Python 脚本可以即时执行,不会报错。。
echo "ZnJvbSBkYXRldGltZSBpbXBvcnQgZGF0ZXRpbWUKCgpkZWYgbWFpbigpOgogICAgY3VycmVudF90aW1lID0gZGF0ZXRpbWUubm93KCkKICAgIHByaW50KGYnQ3VycmVudCB0aW1lIGlzIHtjdXJyZW50X3RpbWV9LicpCgoKaWYgX19uYW1lX18gPT0gJ19fbWFpbl9fJzoKICAgIG1haW4oKQo=" | python -m base64 -d | python

8. 获取系统元数据
如果我们想获取当前的系统信息,Python 提供了一种非常简便的方法。我们只需要运行下面的命令即可。
python -m sysconfig
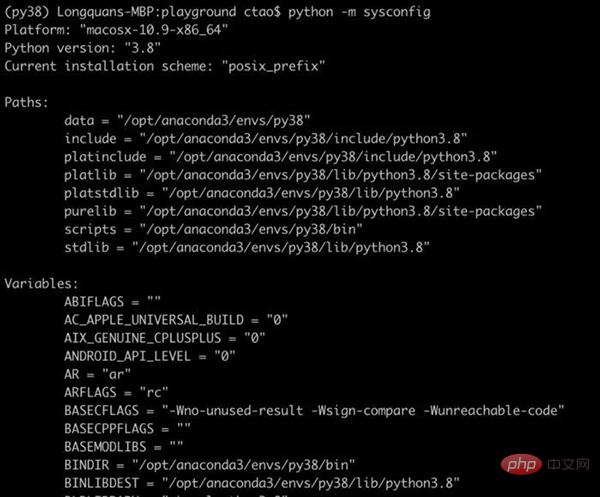
可以看到,这个命令执行后会显示所有的系统配置信息,比如 Python 环境路径和环境变量等。上面的截图仅仅展示了一部分内容,实际显示的内容会非常丰富。如果我们只想展示 Python 环境路径和当前工作路径,我们可以执行下面的命令。
python -m site

9. 文件压缩
我们可以使用 Python 来压缩文件,而无需下载 tar/zip/gzip 等工具。举个例子,如果我们想压缩我们刚刚在第 4 节中编写的应用程序,我们可以运行以下命令将文件夹压缩到 zip 文件中。在命令中,选项 -c 代表的是“create”即创建的含义。
python -m zipfile -c get_time_app.zip get_time_app

当然,我们也可以对压缩文件进行解压。紧接这上面的操作,我们把文件夹解压出来放到一个新目录中,这样就不会和原来的目录冲突了。在下面的命令中,选项 -e 代表“extract”即解压的含义。
python -m zipfile -e get_time_app.zip get_time_app_extracted
如果不放心,我们可以检验一下。
ls get_time_app_extractedcat get_time_app_extracted/get_time_app/print_time.py
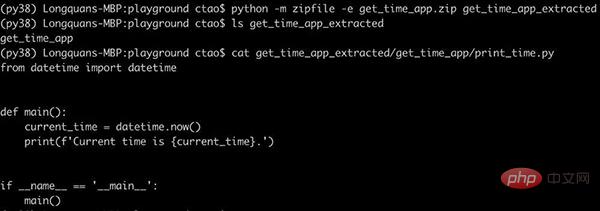
我们刚刚以 zip 文件为例进行了展示,Python 除了支持 zip 格式的解压缩以外,还支持 tar 和 gzip 的解压缩。
总结
该篇文章中介绍了一种无需编写任何代码即可使用 Python 内置库的方法。如果在某些场景下能够想到使用这些方法,毫无疑问可以给我们提供很多的便利。希望这篇文章能够给大家带来启发和帮助。
The above is the detailed content of Eight ways to use Python's built-in libraries without writing code. For more information, please follow other related articles on the PHP Chinese website!

Hot AI Tools

Undresser.AI Undress
AI-powered app for creating realistic nude photos

AI Clothes Remover
Online AI tool for removing clothes from photos.

Undress AI Tool
Undress images for free

Clothoff.io
AI clothes remover

Video Face Swap
Swap faces in any video effortlessly with our completely free AI face swap tool!

Hot Article

Hot Tools

Notepad++7.3.1
Easy-to-use and free code editor

SublimeText3 Chinese version
Chinese version, very easy to use

Zend Studio 13.0.1
Powerful PHP integrated development environment

Dreamweaver CS6
Visual web development tools

SublimeText3 Mac version
God-level code editing software (SublimeText3)

Hot Topics
 1386
1386
 52
52
 Can vs code run in Windows 8
Apr 15, 2025 pm 07:24 PM
VS Code can run on Windows 8, but the experience may not be great. First make sure the system has been updated to the latest patch, then download the VS Code installation package that matches the system architecture and install it as prompted. After installation, be aware that some extensions may be incompatible with Windows 8 and need to look for alternative extensions or use newer Windows systems in a virtual machine. Install the necessary extensions to check whether they work properly. Although VS Code is feasible on Windows 8, it is recommended to upgrade to a newer Windows system for a better development experience and security.
 How to run programs in terminal vscode
Apr 15, 2025 pm 06:42 PM
In VS Code, you can run the program in the terminal through the following steps: Prepare the code and open the integrated terminal to ensure that the code directory is consistent with the terminal working directory. Select the run command according to the programming language (such as Python's python your_file_name.py) to check whether it runs successfully and resolve errors. Use the debugger to improve debugging efficiency.
 Can visual studio code be used in python
Apr 15, 2025 pm 08:18 PM
VS Code can be used to write Python and provides many features that make it an ideal tool for developing Python applications. It allows users to: install Python extensions to get functions such as code completion, syntax highlighting, and debugging. Use the debugger to track code step by step, find and fix errors. Integrate Git for version control. Use code formatting tools to maintain code consistency. Use the Linting tool to spot potential problems ahead of time.
 Is the vscode extension malicious?
Apr 15, 2025 pm 07:57 PM
VS Code extensions pose malicious risks, such as hiding malicious code, exploiting vulnerabilities, and masturbating as legitimate extensions. Methods to identify malicious extensions include: checking publishers, reading comments, checking code, and installing with caution. Security measures also include: security awareness, good habits, regular updates and antivirus software.
 Python: Automation, Scripting, and Task Management
Apr 16, 2025 am 12:14 AM
Python excels in automation, scripting, and task management. 1) Automation: File backup is realized through standard libraries such as os and shutil. 2) Script writing: Use the psutil library to monitor system resources. 3) Task management: Use the schedule library to schedule tasks. Python's ease of use and rich library support makes it the preferred tool in these areas.
 What is vscode What is vscode for?
Apr 15, 2025 pm 06:45 PM
VS Code is the full name Visual Studio Code, which is a free and open source cross-platform code editor and development environment developed by Microsoft. It supports a wide range of programming languages and provides syntax highlighting, code automatic completion, code snippets and smart prompts to improve development efficiency. Through a rich extension ecosystem, users can add extensions to specific needs and languages, such as debuggers, code formatting tools, and Git integrations. VS Code also includes an intuitive debugger that helps quickly find and resolve bugs in your code.
 Python vs. JavaScript: The Learning Curve and Ease of Use
Apr 16, 2025 am 12:12 AM
Python is more suitable for beginners, with a smooth learning curve and concise syntax; JavaScript is suitable for front-end development, with a steep learning curve and flexible syntax. 1. Python syntax is intuitive and suitable for data science and back-end development. 2. JavaScript is flexible and widely used in front-end and server-side programming.
 Golang vs. Python: Concurrency and Multithreading
Apr 17, 2025 am 12:20 AM
Golang is more suitable for high concurrency tasks, while Python has more advantages in flexibility. 1.Golang efficiently handles concurrency through goroutine and channel. 2. Python relies on threading and asyncio, which is affected by GIL, but provides multiple concurrency methods. The choice should be based on specific needs.


