

Python text terminal GUI framework, so cool

Curses
The first one to appear is Curses[1].
Curse
Curses is a dynamic library that provides text-based terminal window functions. It can:
- Use the entire Screen
- Create and manage a window
- Use 8 different colors
- Provide mouse support for the program
- Use the function keys on the keyboard
Curses can run on any Unix/Linux system that follows the ANSI/POSIX standard. It can also run on Windows, but you need to install the windows-curses library additionally:
pip install windows-curses
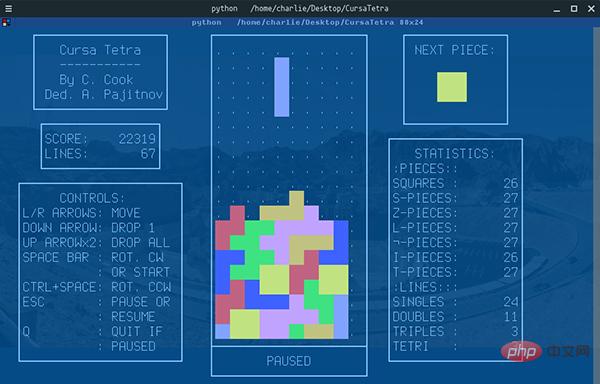
The picture above is a Tetris game written by a buddy using Curses[2]. It doesn’t feel full of memories, so you can take it Go and resurrect antique machines.
Let’s try our best:
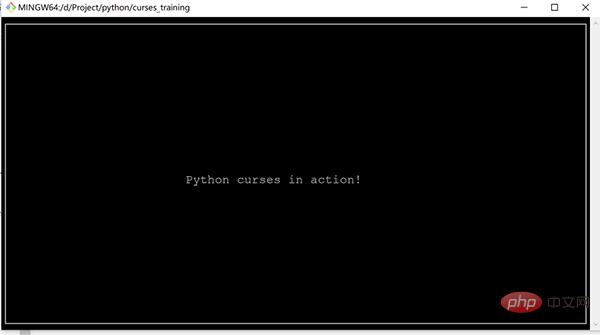
import curses
myscreen = curses.initscr()
myscreen.border(0)
myscreen.addstr(12, 25, "Python curses in action!")
myscreen.refresh()
myscreen.getch()
curses.endwin()
- Please note that the first two parameters of addstr are character coordinates, not pixel coordinates
- getch will block the program until waiting Keyboard input
- curses.endwin() is used to exit the window
- If you need to continuously monitor user interaction, you need to write a loop and judge the input obtained by getch()
The running effect of the code is as follows:
import npyscreen
class TestApp(npyscreen.NPSApp):
def main(self):
# These lines create the form and populate it with widgets.
# A fairly complex screen in only 8 or so lines of code - a line for each control.
F= npyscreen.Form(name = "Welcome to Npyscreen",)
t= F.add(npyscreen.TitleText, name = "Text:",)
fn = F.add(npyscreen.TitleFilename, name = "Filename:")
fn2 = F.add(npyscreen.TitleFilenameCombo, name="Filename2:")
dt = F.add(npyscreen.TitleDateCombo, name = "Date:")
s= F.add(npyscreen.TitleSlider, out_of=12, name = "Slider")
ml = F.add(npyscreen.MultiLineEdit,
 value = """try typing here!nMutiline text, press ^R to reformat.n""",
 max_height=5, rely=9)
ms = F.add(npyscreen.TitleSelectOne, max_height=4, value = [1,], name="Pick One",
values = ["Option1","Option2","Option3"], scroll_exit=True)
ms2= F.add(npyscreen.TitleMultiSelect, max_height =-2, value = [1,], name="Pick Several",
values = ["Option1","Option2","Option3"], scroll_exit=True)
# This lets the user interact with the Form.
F.edit()
print(ms.get_selected_objects())
if __name__ == "__main__":
App = TestApp()
App.run()
- Introduce the Npyscreen module. If not, you can install it through pip: pip install npyscreen Inherit npyscreen.NPSApp and create an application class. TestApp Implement the main method, create a Form object in the method, then add various controls to the form object, and set some properties of the controls Call the Edit method of the form object to perform the operation The power is given to the user At runtime, instantiate TestAPP, and then call the run method to start the application. The application can then enter a state waiting for user interaction
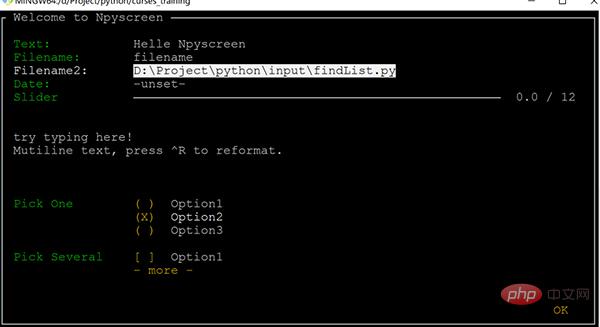
- [Tab] / [Shift Tab] Used to switch control focus [Enter] / [ Space] is used to enter selection, setting, and confirmation In the selection frame, the direction keys operate similarly to vim[4], that is, controlled by hjkl
- Application window adaption Automatic text alignment Easily set text blocks Powerful selection box control Can be integrated with various event-driven frameworks, such as Twisted[6], Glib[7], Tornado[8], etc. Provides a variety of prefabricated controls such as edit boxes, buttons, multiple (single) selection boxes, etc. Display mode supports native, Curses mode, LCD display and network display Supports UTF-8 And CJK character set (can display Chinese) Supports multiple colors
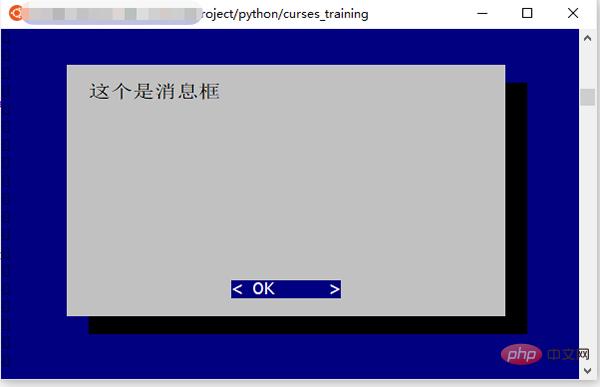

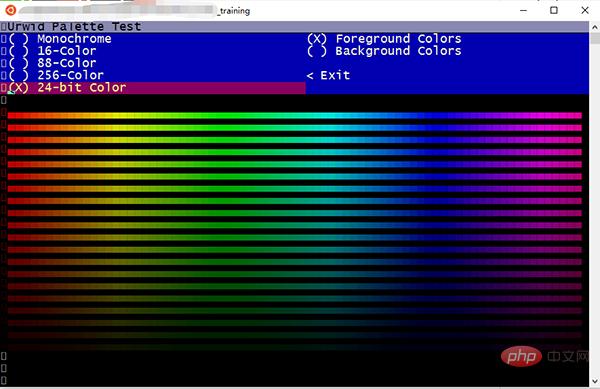
色彩
不知道你看了是什么感觉,我的感觉是:这也太卷了吧~
几乎可以做 GUI 下的所有事情!
更厉害的是,Urwid 完全是按照面向对象的思想打造的框架:
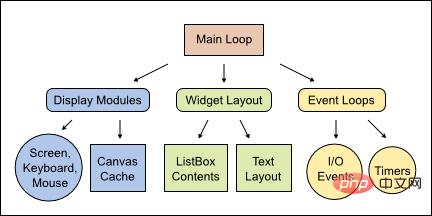
Urwid 结构图
现在我们来小试一把,感受一下 Urwid 的强大:
import urwid
def show_or_exit(key):
if key in ('q', 'Q'):
raise urwid.ExitMainLoop()
txt.set_text(repr(key))
txt = urwid.Text(u"Hello World")
fill = urwid.Filler(txt, 'middle')
loop = urwid.MainLoop(fill, unhandled_input=show_or_exit)
loop.run()
- 先引入 urwid 模块
- 定义了一个输入事件处理方法 show_or_exit
- 处理方法中,当输入按键是 q 或者 Q 时,退出主循环,否则将按键名称显示出来
- urwid.Text 是一个文本控件,接受一个字符串作为显示信息
- urwid.Filler 类似于 panel,将 txt 控件填充在上面,位置设置在窗口中央
- urwid.MainLoop 设置 Urwid 的主循环,将 fill 作为控件的绘制入口,参数 unhandled_input 接受一个按键事件处理方法,用的就是前面定义的 show_or_exit
- loop.run() 启动 UI,并监控各种事件
运行这段代码,就可以看到命令行被设置为交互模式,按键时会在窗口中央显示出键名,如果按下 q 键,程序就会退出。
注意:
Urwid 只能在 Linux 操作系统中运行,Windows 上会因为缺失必要组件无法运行
总结
限于篇幅,这里只展示了三种文本终端框架,不过已经能对基于文本终端 UI 框架的强大感受一二了。
还有一些框架也很优秀,比如 prompt_toolkit,有兴趣的同学可以研究一下。
虽然基于文本终端的 UI 早已不是主流,但是在一些特殊的行业或者业务中,还是有其存在的价值,研究一下,说不定在特殊的地方可以帮助到我们。
最后,推荐一个很有意思的基于文本终端的应用 —— 命令行网易云音乐[9]:

NetEase-MusicBox
是基于 Curses 开发,如果运行起来,能被它的强悍所震撼,有空可以玩玩,比心!
The above is the detailed content of Python text terminal GUI framework, so cool. For more information, please follow other related articles on the PHP Chinese website!

Hot AI Tools

Undresser.AI Undress
AI-powered app for creating realistic nude photos

AI Clothes Remover
Online AI tool for removing clothes from photos.

Undress AI Tool
Undress images for free

Clothoff.io
AI clothes remover

AI Hentai Generator
Generate AI Hentai for free.

Hot Article
Hot Tools

Notepad++7.3.1
Easy-to-use and free code editor

SublimeText3 Chinese version
Chinese version, very easy to use

Zend Studio 13.0.1
Powerful PHP integrated development environment

Dreamweaver CS6
Visual web development tools

SublimeText3 Mac version
God-level code editing software (SublimeText3)
Hot Topics
 1381
1381
 52
52

 PHP and Python: Code Examples and Comparison
Apr 15, 2025 am 12:07 AM
PHP and Python: Code Examples and Comparison
Apr 15, 2025 am 12:07 AM
PHP and Python have their own advantages and disadvantages, and the choice depends on project needs and personal preferences. 1.PHP is suitable for rapid development and maintenance of large-scale web applications. 2. Python dominates the field of data science and machine learning.
 How to train PyTorch model on CentOS
Apr 14, 2025 pm 03:03 PM
How to train PyTorch model on CentOS
Apr 14, 2025 pm 03:03 PM
Efficient training of PyTorch models on CentOS systems requires steps, and this article will provide detailed guides. 1. Environment preparation: Python and dependency installation: CentOS system usually preinstalls Python, but the version may be older. It is recommended to use yum or dnf to install Python 3 and upgrade pip: sudoyumupdatepython3 (or sudodnfupdatepython3), pip3install--upgradepip. CUDA and cuDNN (GPU acceleration): If you use NVIDIAGPU, you need to install CUDATool
 Detailed explanation of docker principle
Apr 14, 2025 pm 11:57 PM
Detailed explanation of docker principle
Apr 14, 2025 pm 11:57 PM
Docker uses Linux kernel features to provide an efficient and isolated application running environment. Its working principle is as follows: 1. The mirror is used as a read-only template, which contains everything you need to run the application; 2. The Union File System (UnionFS) stacks multiple file systems, only storing the differences, saving space and speeding up; 3. The daemon manages the mirrors and containers, and the client uses them for interaction; 4. Namespaces and cgroups implement container isolation and resource limitations; 5. Multiple network modes support container interconnection. Only by understanding these core concepts can you better utilize Docker.
 How is the GPU support for PyTorch on CentOS
Apr 14, 2025 pm 06:48 PM
How is the GPU support for PyTorch on CentOS
Apr 14, 2025 pm 06:48 PM
Enable PyTorch GPU acceleration on CentOS system requires the installation of CUDA, cuDNN and GPU versions of PyTorch. The following steps will guide you through the process: CUDA and cuDNN installation determine CUDA version compatibility: Use the nvidia-smi command to view the CUDA version supported by your NVIDIA graphics card. For example, your MX450 graphics card may support CUDA11.1 or higher. Download and install CUDAToolkit: Visit the official website of NVIDIACUDAToolkit and download and install the corresponding version according to the highest CUDA version supported by your graphics card. Install cuDNN library:
 Python vs. JavaScript: Community, Libraries, and Resources
Apr 15, 2025 am 12:16 AM
Python vs. JavaScript: Community, Libraries, and Resources
Apr 15, 2025 am 12:16 AM
Python and JavaScript have their own advantages and disadvantages in terms of community, libraries and resources. 1) The Python community is friendly and suitable for beginners, but the front-end development resources are not as rich as JavaScript. 2) Python is powerful in data science and machine learning libraries, while JavaScript is better in front-end development libraries and frameworks. 3) Both have rich learning resources, but Python is suitable for starting with official documents, while JavaScript is better with MDNWebDocs. The choice should be based on project needs and personal interests.
 How to choose the PyTorch version under CentOS
Apr 14, 2025 pm 02:51 PM
How to choose the PyTorch version under CentOS
Apr 14, 2025 pm 02:51 PM
When selecting a PyTorch version under CentOS, the following key factors need to be considered: 1. CUDA version compatibility GPU support: If you have NVIDIA GPU and want to utilize GPU acceleration, you need to choose PyTorch that supports the corresponding CUDA version. You can view the CUDA version supported by running the nvidia-smi command. CPU version: If you don't have a GPU or don't want to use a GPU, you can choose a CPU version of PyTorch. 2. Python version PyTorch
 MiniOpen Centos compatibility
Apr 14, 2025 pm 05:45 PM
MiniOpen Centos compatibility
Apr 14, 2025 pm 05:45 PM
MinIO Object Storage: High-performance deployment under CentOS system MinIO is a high-performance, distributed object storage system developed based on the Go language, compatible with AmazonS3. It supports a variety of client languages, including Java, Python, JavaScript, and Go. This article will briefly introduce the installation and compatibility of MinIO on CentOS systems. CentOS version compatibility MinIO has been verified on multiple CentOS versions, including but not limited to: CentOS7.9: Provides a complete installation guide covering cluster configuration, environment preparation, configuration file settings, disk partitioning, and MinI
 How to install nginx in centos
Apr 14, 2025 pm 08:06 PM
How to install nginx in centos
Apr 14, 2025 pm 08:06 PM
CentOS Installing Nginx requires following the following steps: Installing dependencies such as development tools, pcre-devel, and openssl-devel. Download the Nginx source code package, unzip it and compile and install it, and specify the installation path as /usr/local/nginx. Create Nginx users and user groups and set permissions. Modify the configuration file nginx.conf, and configure the listening port and domain name/IP address. Start the Nginx service. Common errors need to be paid attention to, such as dependency issues, port conflicts, and configuration file errors. Performance optimization needs to be adjusted according to the specific situation, such as turning on cache and adjusting the number of worker processes.
