Write a C++ extension module for Python

Use C extensions to provide specific functionality to Python.
In the previous article, I introduced Six Python interpreters. CPython is the default interpreter on most systems and, according to polls, the most popular. Unique to Cpython is the ability to write Python modules in C using an extension API. Writing Python modules in C allows you to move computationally intensive code to C while retaining the ease of use of Python.
In this article, I will show you how to write a C extension module. Use C instead of C because most compilers usually understand both languages. I must state the disadvantage upfront: Python modules built this way are not portable to other interpreters. They only work with the CPython interpreter. Therefore, if you are looking for a more portable way of interacting with C language modules, consider using the ctypes module.
Source code
As usual, you can find the relevant source code on GitHub. The C files in the warehouse have the following purposes:
-
my_py_module.cpp: Definition of Python moduleMyModule -
my_cpp_class.h: One header file - just a C class exposed to Python -
my_class_py_type.h/cpp : C class in Python -
pydbg.cpp: Separate application for debugging
The Python module built in this article will not have Of any practical use, but it's a good example.
Building Modules
Before viewing the source code, you can check whether it compiles on your system. I use CMake to create the build configuration information, so CMake must be installed on your system. In order to configure and build this module, you can let Python perform this process:
$ python3 setup.py build
or manually:
$ cmake -B build$ cmake --build build
After that, in the /build subdirectory Next you will have a file named MyModule. so.
Define extension modules
First, take a look at the my_py_module.cpp file, especially the PyInit_MyModule function:
PyMODINIT_FUNCPyInit_MyModule(void) {PyObject* module = PyModule_Create(&my_module);PyObject *myclass = PyType_FromSpec(&spec_myclass);if (myclass == NULL){return NULL;}Py_INCREF(myclass);if(PyModule_AddObject(module, "MyClass", myclass) < 0){Py_DECREF(myclass);Py_DECREF(module);return NULL;}return module;}This is the most important code in this example because it is the entry point to CPython. Generally speaking, when a Python C extension is compiled and provided as a shared object binary, CPython searches for in the binary with the same name (<ModuleName>.so) PyInit_<ModuleName> function and execute it when trying to import.
无论是声明还是实例,所有 Python 类型都是 PyObject 的一个指针。在此函数的第一部分中,module 通过 PyModule_Create(...) 创建的。正如你在 module 详述(my_py_module,同名文件)中看到的,它没有任何特殊的功能。
之后,调用 PyType_FromSpec 为自定义类型 MyClass 创建一个 Python 堆类型 定义。一个堆类型对应于一个 Python 类,然后将它赋值给 MyModule 模块。
注意,如果其中一个函数返回失败,则必须减少以前创建的复制对象的引用计数,以便解释器删除它们。
指定 Python 类型
MyClass 详述在 my_class_py_type.h 中可以找到,它作为 PyType_Spec 的一个实例:
static PyType_Spec spec_myclass = {"MyClass",// namesizeof(MyClassObject) + sizeof(MyClass),// basicsize0,// itemsizePy_TPFLAGS_DEFAULT | Py_TPFLAGS_BASETYPE, // flagsMyClass_slots // slots};它定义了一些基本类型信息,它的大小包括 Python 表示的大小(MyClassObject)和普通 C++ 类的大小(MyClass)。MyClassObject 定义如下:
typedef struct {PyObject_HEADint m_value;MyClass*m_myclass;} MyClassObject;Python 表示的话就是 PyObject 类型,由 PyObject_HEAD 宏和其他一些成员定义。成员 m_value 视为普通类成员,而成员 m_myclass 只能在 C++ 代码内部访问。
PyType_Slot 定义了一些其他功能:
static PyType_Slot MyClass_slots[] = {{Py_tp_new, (void*)MyClass_new},{Py_tp_init,(void*)MyClass_init},{Py_tp_dealloc, (void*)MyClass_Dealloc},{Py_tp_members, MyClass_members},{Py_tp_methods, MyClass_methods},{0, 0} /* Sentinel */};在这里,设置了一些初始化和析构函数的跳转,还有普通的类方法和成员,还可以设置其他功能,如分配初始属性字典,但这是可选的。这些定义通常以一个哨兵结束,包含 NULL 值。
要完成类型详述,还包括下面的方法和成员表:
static PyMethodDef MyClass_methods[] = {{"addOne", (PyCFunction)MyClass_addOne, METH_NOARGS,PyDoc_STR("Return an incrmented integer")},{NULL, NULL} /* Sentinel */};static struct PyMemberDef MyClass_members[] = {{"value", T_INT, offsetof(MyClassObject, m_value)},{NULL} /* Sentinel */};在方法表中,定义了 Python 方法 addOne,它指向相关的 C++ 函数 MyClass_addOne。它充当了一个包装器,它在 C++ 类中调用 addOne() 方法。
在成员表中,只有一个为演示目的而定义的成员。不幸的是,在 PyMemberDef 中使用的 offsetof 不允许添加 C++ 类型到 MyClassObject。如果你试图放置一些 C++ 类型的容器(如 std::optional),编译器会抱怨一些内存布局相关的警告。
初始化和析构
MyClass_new 方法只为 MyClassObject 提供一些初始值,并为其类型分配内存:
PyObject *MyClass_new(PyTypeObject *type, PyObject *args, PyObject *kwds){std::cout << "MtClass_new() called!" << std::endl;MyClassObject *self;self = (MyClassObject*) type->tp_alloc(type, 0);if(self != NULL){ // -> 分配成功// 赋初始值self->m_value = 0;self->m_myclass = NULL; }return (PyObject*) self;}实际的初始化发生在 MyClass_init 中,它对应于 Python 中的 __init__() 方法:
int MyClass_init(PyObject *self, PyObject *args, PyObject *kwds){((MyClassObject *)self)->m_value = 123;MyClassObject* m = (MyClassObject*)self;m->m_myclass = (MyClass*)PyObject_Malloc(sizeof(MyClass));if(!m->m_myclass){PyErr_SetString(PyExc_RuntimeError, "Memory allocation failed");return -1;}try {new (m->m_myclass) MyClass();} catch (const std::exception& ex) {PyObject_Free(m->m_myclass);m->m_myclass = NULL;m->m_value = 0;PyErr_SetString(PyExc_RuntimeError, ex.what());return -1;} catch(...) {PyObject_Free(m->m_myclass);m->m_myclass = NULL;m->m_value = 0;PyErr_SetString(PyExc_RuntimeError, "Initialization failed");return -1;}return 0;}如果你想在初始化过程中传递参数,必须在此时调用 PyArg_ParseTuple。简单起见,本例将忽略初始化过程中传递的所有参数。在函数的第一部分中,PyObject 指针(self)被强转为 MyClassObject 类型的指针,以便访问其他成员。此外,还分配了 C++ 类的内存,并执行了构造函数。
注意,为了防止内存泄漏,必须仔细执行异常处理和内存分配(还有释放)。当引用计数将为零时,MyClass_dealloc 函数负责释放所有相关的堆内存。在文档中有一个章节专门讲述关于 C 和 C++ 扩展的内存管理。
包装方法
从 Python 类中调用相关的 C++ 类方法很简单:
PyObject* MyClass_addOne(PyObject *self, PyObject *args){assert(self);MyClassObject* _self = reinterpret_cast<MyClassObject*>(self);unsigned long val = _self->m_myclass->addOne();return PyLong_FromUnsignedLong(val);}同样,PyObject 参数(self)被强转为 MyClassObject 类型以便访问 m_myclass,它指向 C++ 对应类实例的指针。有了这些信息,调用 addOne() 类方法,并且结果以 Python 整数对象 返回。
3 种方法调试
出于调试目的,在调试配置中编译 CPython 解释器是很有价值的。详细描述参阅 官方文档。只要下载了预安装的解释器的其他调试符号,就可以按照下面的步骤进行操作。
GNU 调试器
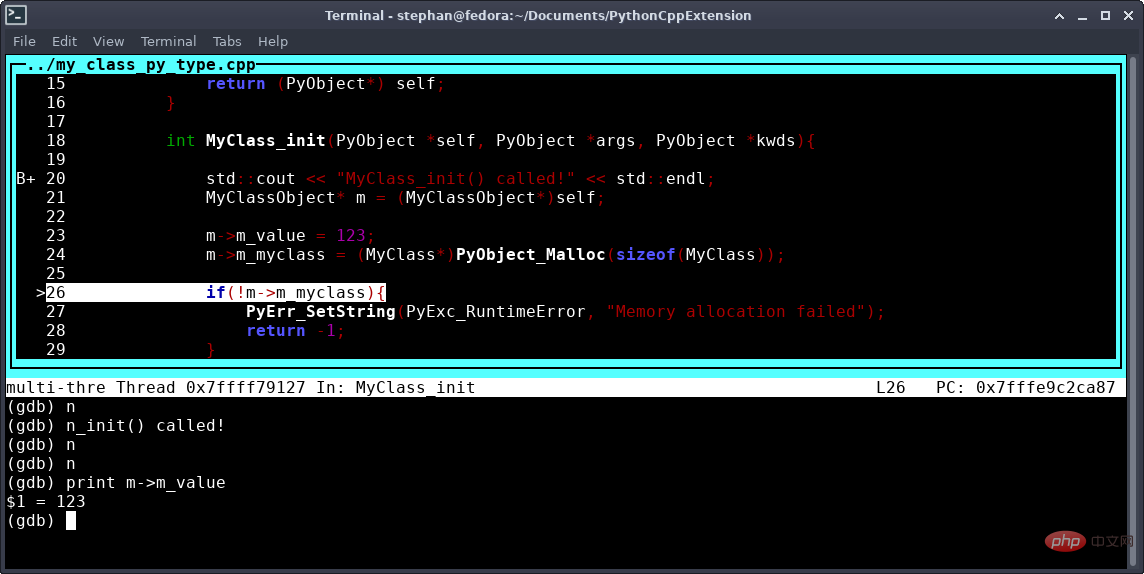
当然,老式的 GNU 调试器(GDB) 也可以派上用场。源码中包含了一个 gdbinit 文件,定义了一些选项和断点,另外还有一个 gdb.sh 脚本,它会创建一个调试构建并启动一个 GDB 会话:

Gnu 调试器(GDB)对于 Python C 和 C++ 扩展非常有用
GDB 使用脚本文件 main.py 调用 CPython 解释器,它允许你轻松定义你想要使用 Python 扩展模块执行的所有操作。
C++ 应用
另一种方法是将 CPython 解释器嵌入到一个单独的 C++ 应用程序中。可以在仓库的 pydbg.cpp 文件中找到:
int main(int argc, char *argv[], char *envp[]){Py_SetProgramName(L"DbgPythonCppExtension");Py_Initialize();PyObject *pmodule = PyImport_ImportModule("MyModule");if (!pmodule) {PyErr_Print();std::cerr << "Failed to import module MyModule" << std::endl;return -1;}PyObject *myClassType = PyObject_GetAttrString(pmodule, "MyClass");if (!myClassType) {std::cerr << "Unable to get type MyClass from MyModule" << std::endl;return -1;}PyObject *myClassInstance = PyObject_CallObject(myClassType, NULL);if (!myClassInstance) {std::cerr << "Instantioation of MyClass failed" << std::endl;return -1;}Py_DecRef(myClassInstance); // invoke deallocationreturn 0;}使用 高级接口,可以导入扩展模块并对其执行操作。它允许你在本地 IDE 环境中进行调试,还能让你更好地控制传递或来自扩展模块的变量。
缺点是创建一个额外的应用程序的成本很高。
VSCode 和 VSCodium LLDB 扩展
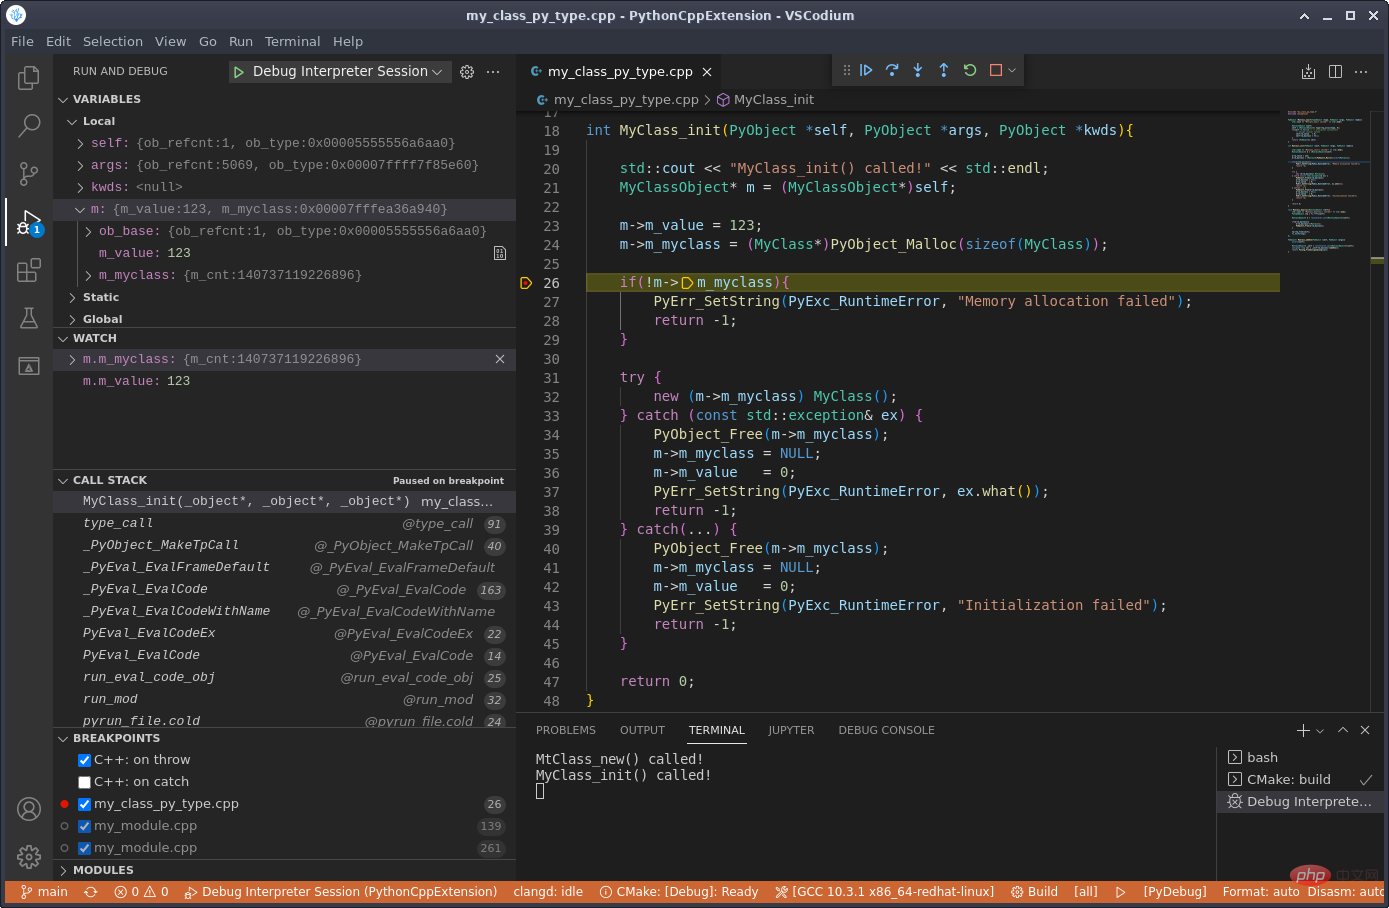
使用像 CodeLLDB 这样的调试器扩展可能是最方便的调试选项。仓库包含了一些 VSCode/VSCodium 的配置文件,用于构建扩展,如 task.json、CMake Tools 和调用调试器(launch.json)。这种方法结合了前面几种方法的优点:在图形 IDE 中调试,在 Python 脚本文件中定义操作,甚至在解释器提示符中动态定义操作。

VSCodium 有一个集成的调试器。
用 C++ 扩展 Python
Python 的所有功能也可以从 C 或 C++ 扩展中获得。虽然用 Python 写代码通常认为是一件容易的事情,但用 C 或 C++ 扩展 Python 代码是一件痛苦的事情。另一方面,虽然原生 Python 代码比 C++ 慢,但 C 或 C++ 扩展可以将计算密集型任务提升到原生机器码的速度。
你还必须考虑 ABI 的使用。稳定的 ABI 提供了一种方法来保持旧版本 CPython 的向后兼容性,如 文档 所述。
最后,你必须自己权衡利弊。如果你决定使用 C 语言来扩展 Python 中的一些功能,你已经看到了如何实现它。
The above is the detailed content of Write a C++ extension module for Python. For more information, please follow other related articles on the PHP Chinese website!

Hot AI Tools

Undresser.AI Undress
AI-powered app for creating realistic nude photos

AI Clothes Remover
Online AI tool for removing clothes from photos.

Undress AI Tool
Undress images for free

Clothoff.io
AI clothes remover

AI Hentai Generator
Generate AI Hentai for free.

Hot Article

Hot Tools

Notepad++7.3.1
Easy-to-use and free code editor

SublimeText3 Chinese version
Chinese version, very easy to use

Zend Studio 13.0.1
Powerful PHP integrated development environment

Dreamweaver CS6
Visual web development tools

SublimeText3 Mac version
God-level code editing software (SublimeText3)

Hot Topics
 How to download deepseek Xiaomi
Feb 19, 2025 pm 05:27 PM
How to download DeepSeek Xiaomi? Search for "DeepSeek" in the Xiaomi App Store. If it is not found, continue to step 2. Identify your needs (search files, data analysis), and find the corresponding tools (such as file managers, data analysis software) that include DeepSeek functions.
 How do you ask him deepseek
Feb 19, 2025 pm 04:42 PM
The key to using DeepSeek effectively is to ask questions clearly: express the questions directly and specifically. Provide specific details and background information. For complex inquiries, multiple angles and refute opinions are included. Focus on specific aspects, such as performance bottlenecks in code. Keep a critical thinking about the answers you get and make judgments based on your expertise.
 How to search deepseek
Feb 19, 2025 pm 05:18 PM
Just use the search function that comes with DeepSeek. Its powerful semantic analysis algorithm can accurately understand the search intention and provide relevant information. However, for searches that are unpopular, latest information or problems that need to be considered, it is necessary to adjust keywords or use more specific descriptions, combine them with other real-time information sources, and understand that DeepSeek is just a tool that requires active, clear and refined search strategies.
 How to program deepseek
Feb 19, 2025 pm 05:36 PM
DeepSeek is not a programming language, but a deep search concept. Implementing DeepSeek requires selection based on existing languages. For different application scenarios, it is necessary to choose the appropriate language and algorithms, and combine machine learning technology. Code quality, maintainability, and testing are crucial. Only by choosing the right programming language, algorithms and tools according to your needs and writing high-quality code can DeepSeek be successfully implemented.
 How to use deepseek to settle accounts
Feb 19, 2025 pm 04:36 PM
Question: Is DeepSeek available for accounting? Answer: No, it is a data mining and analysis tool that can be used to analyze financial data, but it does not have the accounting record and report generation functions of accounting software. Using DeepSeek to analyze financial data requires writing code to process data with knowledge of data structures, algorithms, and DeepSeek APIs to consider potential problems (e.g. programming knowledge, learning curves, data quality)
 The Key to Coding: Unlocking the Power of Python for Beginners
Oct 11, 2024 pm 12:17 PM
Python is an ideal programming introduction language for beginners through its ease of learning and powerful features. Its basics include: Variables: used to store data (numbers, strings, lists, etc.). Data type: Defines the type of data in the variable (integer, floating point, etc.). Operators: used for mathematical operations and comparisons. Control flow: Control the flow of code execution (conditional statements, loops).
 Problem-Solving with Python: Unlock Powerful Solutions as a Beginner Coder
Oct 11, 2024 pm 08:58 PM
Pythonempowersbeginnersinproblem-solving.Itsuser-friendlysyntax,extensivelibrary,andfeaturessuchasvariables,conditionalstatements,andloopsenableefficientcodedevelopment.Frommanagingdatatocontrollingprogramflowandperformingrepetitivetasks,Pythonprovid
 How to access DeepSeekapi - DeepSeekapi access call tutorial
Mar 12, 2025 pm 12:24 PM
Detailed explanation of DeepSeekAPI access and call: Quick Start Guide This article will guide you in detail how to access and call DeepSeekAPI, helping you easily use powerful AI models. Step 1: Get the API key to access the DeepSeek official website and click on the "Open Platform" in the upper right corner. You will get a certain number of free tokens (used to measure API usage). In the menu on the left, click "APIKeys" and then click "Create APIkey". Name your APIkey (for example, "test") and copy the generated key right away. Be sure to save this key properly, as it will only be displayed once


