

QR code is also called two-dimensional barcode. The common two-dimensional code is QR Code. The full name of QR is Quick Response. It is a recent It has been a very popular coding method on mobile devices in the past few years, and generating a QR code is also very simple. In Python, we can generate a QR code through the MyQR module, and we only need 2 lines of code to generate a QR code. We first install the MyQR module. Here we choose the domestic source download:
pip install qrcode
After the installation is completed, we can start writing code:
import qrcode
text = input(输入文字或URL:)
# 设置URL必须添加http://
img =qrcode.make(text)
img.save()
#保存图片至本地目录,可以设定路径
img.show()
After we execute the code, a QR code will be generated under the project. . Of course, we can also enrich the QR code:
Let’s install the MyQR module first
pip installmyqr
def gakki_code():
version, level, qr_name = myqr.run(
words=https://520mg.com/it/#/main/2,
# 可以是字符串,也可以是网址(前面要加http(s)://)
version=1,# 设置容错率为最高
level='H',
# 控制纠错水平,范围是L、M、Q、H,从左到右依次升高
picture=gakki.gif,
# 将二维码和图片合成
colorized=True,# 彩色二维码
contrast=1.0,
 # 用以调节图片的对比度,1.0 表示原始图片,更小的值表示更低对比度,更大反之。默认为1.0
brightness=1.0,
# 用来调节图片的亮度,其余用法和取值同上
save_name=gakki_code.gif,
# 保存文件的名字,格式可以是jpg,png,bmp,gif
save_dir=os.getcwd()# 控制位置
)

 gakki_code()
In addition, MyQR also supports dynamic pictures.
Word cloud is also called word cloud. It is a visual prominent presentation of "keywords" that appear frequently in text data, forming a rendering of keywords. A cloud-like color picture is formed, so that the main meaning of the text data can be understood at a glance.
But as an old coder, I still like to use code to generate my own word cloud. Is it complicated? Will it take a long time? Many texts have introduced various methods, but in fact only 10 lines of python code are needed.
Install the necessary libraries first
pip install wordcloud
pip install jieba
pip install matplotlib
import matplotlib.pyplot as plt
from wordcloud import WordCloud
import jieba
text_from_file_with_apath = open('/Users/linuxmi/linuxmi.txt').read()
wordlist_after_jieba = jieba.cut(text_from_file_with_apath, cut_all = True)
wl_space_split =.join(wordlist_after_jieba)
my_wordcloud = WordCloud().generate(wl_space_split)
plt.imshow(my_wordcloud)
plt.axis(off)
plt.show()
That’s all, the generated word cloud is like this:
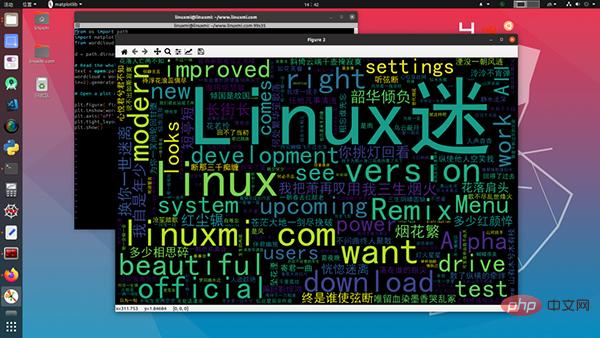
Read these 10 lines of code :
This is one of the reasons why I like python, it is simple and clear.
The implementation of cutout requires the help of Baidu Feipiao's deep learning tool paddlepaddle. We need to install two modules to quickly implement batch cutout. Chapter 1 One is PaddlePaddle:
python -m pip install paddlepaddle -i https://mirror.baidu.com/pypi/simple
and the other is paddlehub model library:
pip install -i https://mirror.baidu.com/pypi/simple paddlehub
Next, we only need 5 lines of code to implement batch cutout:
import os, paddlehub as hub
humanseg = hub.Module(name='deeplabv3p_xception65_humanseg')# 加载模型
path = 'D:/CodeField/Workplace/PythonWorkplace/GrapImage/'# 文件目录
files = [path + i for i in os.listdir(path)]# 获取文件列表
results = humanseg.segmentation(data={'image':files})# 抠图
In front of paddlepaddle, natural language processing has become very simple. To realize text emotion recognition, we also need to install PaddlePaddle and Paddlehub. For specific installation, please refer to Part 3. Then comes our code part:
import paddlehub as hub
senta = hub.Module(name='senta_lstm')# 加载模型
sentence = [# 准备要识别的语句
'你真美', '你真丑', '我好难过', '我不开心', '这个游戏好好玩', '什么垃圾游戏',
]
results = senta.sentiment_classify(data={text:sentence})# 情绪识别
# 输出识别结果
for result in results:
print(result)
The recognition result is a dictionary list:
{'text': '你真美', 'sentiment_label': 1, 'sentiment_key': 'positive', 'positive_probs': 0.9602, 'negative_probs': 0.0398}
{'text': '你真丑', 'sentiment_label': 0, 'sentiment_key': 'negative', 'positive_probs': 0.0033, 'negative_probs': 0.9967}
{'text': '我好难过', 'sentiment_label': 1, 'sentiment_key': 'positive', 'positive_probs': 0.5324, 'negative_probs': 0.4676}
{'text': '我不开心', 'sentiment_label': 0, 'sentiment_key': 'negative', 'positive_probs': 0.1936, 'negative_probs': 0.8064}
{'text': '这个游戏好好玩', 'sentiment_label': 1, 'sentiment_key': 'positive', 'positive_probs': 0.9933, 'negative_probs': 0.0067}
{'text': '什么垃圾游戏', 'sentiment_label': 0, 'sentiment_key': 'negative', 'positive_probs': 0.0108, 'negative_probs': 0.9892}
The sentiment_key field contains emotional information. For detailed analysis, please see Python natural language processing only requires 5 lines code.
This is also a product using PaddlePaddle. We installed PaddlePaddle and Paddlehub according to the above steps, and then started writing code:
import paddlehub as hub
# 加载模型
module = hub.Module(name='pyramidbox_lite_mobile_mask')
# 图片列表
image_list = ['face.jpg']
# 获取图片字典
input_dict = {'image':image_list}
# 检测是否带了口罩
module.face_detection(data=input_dict)
After executing the above program, the detection_result folder will be generated under the project, and the recognition results will be in it.
There are many ways to control input devices in Python. We can use the win32 or pynput module. We can achieve the effect of information bombing through simple loop operations. Taking pynput as an example, we need to install the module first:
pip install -i https://pypi.tuna.tsinghua.edu.cn/simple/ pynput
Before writing the code, we need to manually obtain the coordinates of the input box:
from pynput import mouse
# 创建一个鼠标
m_mouse = mouse.Controller()
# 输出鼠标位置
print(m_mouse.position)
There may be a more efficient way, but I don't know how.
After obtaining it, we can record the coordinates and do not move the message window. Then we execute the following code and switch the window to the message page:
import time
from pynput import mouse, keyboard
time.sleep(5)
m_mouse = mouse.Controller()# 创建一个鼠标
m_keyboard = keyboard.Controller()# 创建一个键盘
m_mouse.position = (850, 670) # 将鼠标移动到指定位置
m_mouse.click(mouse.Button.left) # 点击鼠标左键
while(True):
m_keyboard.type('你好')# 打字
m_keyboard.press(keyboard.Key.enter)# 按下enter
m_keyboard.release(keyboard.Key.enter)# 松开enter
time.sleep(0.5)# 等待 0.5秒
I admit, this is more than 10 lines of code, and it is not high-end.
We can use Tesseract to identify text in pictures. It is very simple to implement in Python, but downloading files and configuring environment variables in the early stage is a bit cumbersome. , so this article only shows the code:
import pytesseract
from PIL import Image
img = Image.open('text.jpg')
text = pytesseract.image_to_string(img)
print(text)
where text is the recognized text. If you are not satisfied with the accuracy, you can also use Baidu's universal text interface.
It feels very efficient to get started with some small examples.
import random
print(1-100数字猜谜游戏!)
num = random.randint(1,100)
guess =guess
i = 0
while guess != num:
i += 1
guess = int(input(请输入你猜的数字:))
if guess == num:
print(恭喜,你猜对了!)
elif guess < num:
print(你猜的数小了...)
else:
print(你猜的数大了...)
print(你总共猜了%d %i + 次)
Guess small cases to practice in front of others
The above is the detailed content of Ten lines of Python code to implement cool functions. For more information, please follow other related articles on the PHP Chinese website!


![[Web front-end] Node.js quick start](https://img.php.cn/upload/course/000/000/067/662b5d34ba7c0227.png)


