Give you a Santa hat using Python
Christmas is coming. Although we can’t celebrate this Western festival, we still have to join in the fun. I believe there are already a lot of Christmas hat-related peripherals circulating. Today we will do it ourselves and add a Christmas hat to the avatar
Basic knowledge preparation
In computers, images are saved in the form of a matrix, rows first and columns second. Therefore, an image with width × height × color channel = 480 × 256 × 3 will be stored in a 256 × 480 × 3 three-dimensional tensor. Image processing is also calculated according to this idea (including image processing under OpenCV), that is, height × width × color channel.
Digital image
For a digital image, what we see is a real picture visible to the naked eye, but to the computer, this image is just a bunch of different brightnesses. point. An image of size M × N can be represented by an M × N matrix. The value of the matrix element represents the brightness of the pixel at this position. Generally speaking, the larger the pixel value, the brighter the point.
Generally speaking, grayscale images are represented by 2-dimensional matrices, and color (multi-channel) images are represented by 3-dimensional matrices (M × N × 3).
Image channel
Describes a pixel. If it is grayscale, then only one value is needed to describe it, which is a single channel. If a pixel has three colors, RGB, to describe it, it has three channels. A four-channel image is R, G, B plus an A channel, indicating transparency. Generally called alpha channel, indicating transparency.
ROI and mask
Setting Region of Interest (ROI), translated into vernacular as, setting the region of interest. Mask is an image masking process, which is equivalent to covering the parts we don't care about, leaving the ROI part. The alpha mentioned above can be used as a mask.
Matrix (Numpy) knowledge
Matrix indexing, slicing, etc., I don’t know much about them here, so I won’t go into details. Friends can learn by themselves.
Environment preparation
After we have the basic knowledge, let’s take a brief look at the code.
First install the OpenCV and dlib libraries you need to use, use pip to install them respectively
1 2 3 |
|
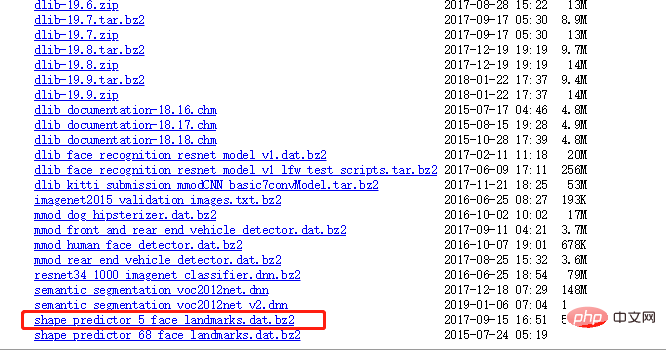
Then manually download the data model file shape_predictor_5_face_landmarks.dat from the Internet, address As follows: http://dlib.net/files/, download and put it in the project directory.
Interested students can play with shape_predictor_68_face_landmarks.dat, which recognizes as many as 68 key points on faces.

Code processing
Hat processing
The first thing we have to do is to process the hat. The pictures we use are as follows

First extract the rgb and alpha values of the hat image
1 2 3 4 5 6 7 8 9 |
|
The effect we get is as follows:
rgb image

alpha graph

The printed value of a is as follows:
1 2 3 4 5 6 7 |
|
Face detection
The following is face detection, using dlib processing.
1 2 3 4 5 6 7 8 9 |
|
The next step is to scale down the picture of the hat
1 2 3 4 5 6 7 8 9 10 11 12 |
|
ROI extraction
Perform ROI extraction
1 2 3 |
|
mask variable takes out the area of the hat.

mask_inv variable is used to remove the area where the hat is installed in the face image.

Next, take out the area (ROI) where the hat is installed in the face picture
1 2 3 4 |
|
Then next, in the face picture Take out the hat-shaped area
1 2 3 4 5 6 7 8 9 10 |
|
Here is to convert the default uint8 type of the picture into a float type for operation, and finally convert it back.
Synthesized picture

The black part is where we want to place the hat.
Extract the hat part from the hat picture.
1 2 |
|
Use the hat image you just resized to extract.

可以看到,除了帽子部分,其他区域已经掩模处理了。
以上就是提取ROI的过程,比较难懂,需要好好琢磨,尤其是矩阵的切片、mask处理部分。
合成Give you a Santa hat using Python
最后一步就是把人脸Give you a Santa hat using Python与帽子合成到一起了,也就是把人脸空余帽子部分的Give you a Santa hat using Python区域和帽子只展示帽子区域的Give you a Santa hat using Python区域(有点拗口)合并在一起。
1 2 3 4 |
|
效果如下:

刚刚好,完美叠加Give you a Santa hat using Python。
最后把这个片段放回人脸原图中,展示Give you a Santa hat using Python
1 |
|

美美的Give you a Santa hat using Python就出来啦!
我们再尝试几张不同的Give you a Santa hat using Python。


整体效果还不错哦,需要注意的是,在测试的时候,我们尽量选择人脸占比比较大的Give you a Santa hat using Python来合成,效果要好很多哦~
The above is the detailed content of Give you a Santa hat using Python. For more information, please follow other related articles on the PHP Chinese website!

Hot AI Tools

Undresser.AI Undress
AI-powered app for creating realistic nude photos

AI Clothes Remover
Online AI tool for removing clothes from photos.

Undress AI Tool
Undress images for free

Clothoff.io
AI clothes remover

Video Face Swap
Swap faces in any video effortlessly with our completely free AI face swap tool!

Hot Article

Hot Tools

Notepad++7.3.1
Easy-to-use and free code editor

SublimeText3 Chinese version
Chinese version, very easy to use

Zend Studio 13.0.1
Powerful PHP integrated development environment

Dreamweaver CS6
Visual web development tools

SublimeText3 Mac version
God-level code editing software (SublimeText3)

Hot Topics
 1389
1389
 52
52
 Can vs code run in Windows 8
Apr 15, 2025 pm 07:24 PM
VS Code can run on Windows 8, but the experience may not be great. First make sure the system has been updated to the latest patch, then download the VS Code installation package that matches the system architecture and install it as prompted. After installation, be aware that some extensions may be incompatible with Windows 8 and need to look for alternative extensions or use newer Windows systems in a virtual machine. Install the necessary extensions to check whether they work properly. Although VS Code is feasible on Windows 8, it is recommended to upgrade to a newer Windows system for a better development experience and security.
 Is the vscode extension malicious?
Apr 15, 2025 pm 07:57 PM
VS Code extensions pose malicious risks, such as hiding malicious code, exploiting vulnerabilities, and masturbating as legitimate extensions. Methods to identify malicious extensions include: checking publishers, reading comments, checking code, and installing with caution. Security measures also include: security awareness, good habits, regular updates and antivirus software.
 Choosing Between PHP and Python: A Guide
Apr 18, 2025 am 12:24 AM
PHP is suitable for web development and rapid prototyping, and Python is suitable for data science and machine learning. 1.PHP is used for dynamic web development, with simple syntax and suitable for rapid development. 2. Python has concise syntax, is suitable for multiple fields, and has a strong library ecosystem.
 Can visual studio code be used in python
Apr 15, 2025 pm 08:18 PM
VS Code can be used to write Python and provides many features that make it an ideal tool for developing Python applications. It allows users to: install Python extensions to get functions such as code completion, syntax highlighting, and debugging. Use the debugger to track code step by step, find and fix errors. Integrate Git for version control. Use code formatting tools to maintain code consistency. Use the Linting tool to spot potential problems ahead of time.
 PHP and Python: Different Paradigms Explained
Apr 18, 2025 am 12:26 AM
PHP is mainly procedural programming, but also supports object-oriented programming (OOP); Python supports a variety of paradigms, including OOP, functional and procedural programming. PHP is suitable for web development, and Python is suitable for a variety of applications such as data analysis and machine learning.
 Can vscode be used for mac
Apr 15, 2025 pm 07:36 PM
VS Code is available on Mac. It has powerful extensions, Git integration, terminal and debugger, and also offers a wealth of setup options. However, for particularly large projects or highly professional development, VS Code may have performance or functional limitations.
 Can vscode run ipynb
Apr 15, 2025 pm 07:30 PM
The key to running Jupyter Notebook in VS Code is to ensure that the Python environment is properly configured, understand that the code execution order is consistent with the cell order, and be aware of large files or external libraries that may affect performance. The code completion and debugging functions provided by VS Code can greatly improve coding efficiency and reduce errors.
 What is vscode What is vscode for?
Apr 15, 2025 pm 06:45 PM
VS Code is the full name Visual Studio Code, which is a free and open source cross-platform code editor and development environment developed by Microsoft. It supports a wide range of programming languages and provides syntax highlighting, code automatic completion, code snippets and smart prompts to improve development efficiency. Through a rich extension ecosystem, users can add extensions to specific needs and languages, such as debuggers, code formatting tools, and Git integrations. VS Code also includes an intuitive debugger that helps quickly find and resolve bugs in your code.


