

This time we will introduce celery, a third-party module of Python. So what is celery?
So celery is essentially a task scheduling framework, similar to Apache's airflow. Of course, airflow is also written based on the Python language.
However, one thing to note is that celery is used to schedule tasks, but it does not have the function of storing tasks. When scheduling tasks, the tasks must be stored. Therefore, if you want to use celery, you also need to use some tools with storage and access functions, such as: message queue, Redis cache, database, etc. The official recommendation is the message queue RabbitMQ. I personally think that using Redis is also a good choice sometimes. Of course, we will introduce it.
So in what scenarios can celery be used?
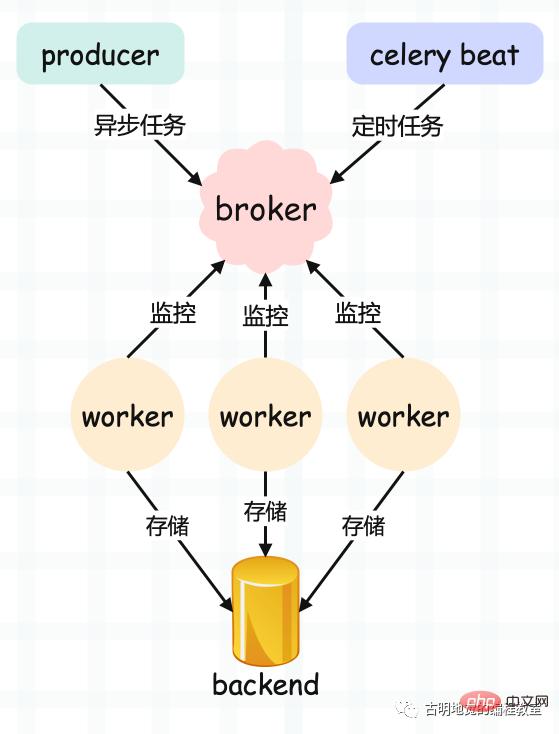
Let’s take a look at celery’s architecture:
Let’s install celery. The installation is relatively simple, just pip directly Just install celery. My local celery version here is 5.2.7, and the Python version is 3.8.10.
In addition, since celery itself does not provide the task storage function, here we use Redis as the message queue to store tasks. Therefore, you also need to install Redis on the machine. I have a cloud server here and it has been installed.
Subsequently, celery will store the task in the broker. Of course, in order to achieve this, there must be a driver that can operate the corresponding broker. The driver for Python to operate Redis is also called redis, and the driver for operating RabbitMQ is called pika. Just install it with pip install...
We create a new project, called celery_demo, and then create a new app.py file in it.
# 文件名:app.py
import time
# 这个 Celery 就类似于 flask.Flask
# 然后实例化得到一个app
from celery import Celery
# 指定一个 name、以及 broker 的地址、backend 的地址
app = Celery(
 "satori",
 # 这里使用我服务器上的 Redis
 # broker 用 1 号库, backend 用 2 号库
 broker="redis://:maverick@82.157.146.194:6379/1",
 backend="redis://:maverick@82.157.146.194:6379/2")
# 这里通过 @app.task 对函数进行装饰
# 那么之后我们便可调用 task.delay 创建一个任务
@app.task
def task(name, age):
 print("准备执行任务啦")
 time.sleep(3)
return f"name is {name}, age is {age}"We say that the object that performs tasks is a worker, so do we need to create a worker? Obviously it is needed, and creating a worker can be created using the following command:
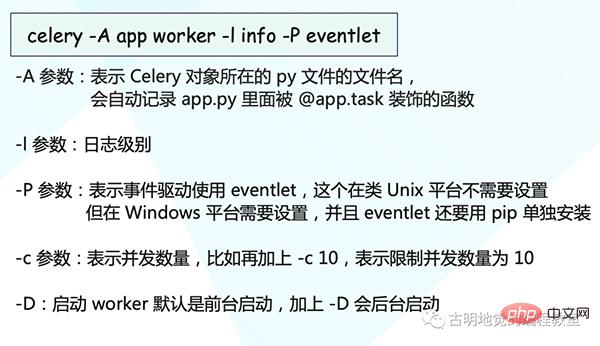
Note: Before 5.0, we could write celery worker -A app..., also Just put all the parameters after the subcommand celery worker. But starting from 5.0, this approach is not allowed. It must be written as celery -A app worker..., because -A becomes a global parameter, so it should not be placed after the worker, but in the worker. Front.
Execute the command below:
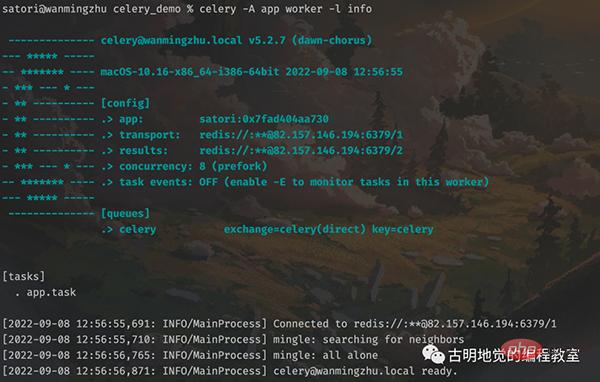
#The above has started a worker in the foreground and is waiting to get tasks from the queue, as shown in the figure The corresponding information is also displayed. However, there is no task in the queue at this time, so we need to create a task in another file and send it to the queue.
import time
from app import task
# 从 app 导入 task, 创建任务, 但是注意: 不要直接调用 task
# 因为那样的话就在本地执行了, 我们的目的是将任务发送到队列里面去
# 然后让监听队列的 worker 从队列里面取任务并执行
# 而 task 被 @app.task 装饰, 所以它不再是原来的 task 了
# 我们需要调用它的 delay 方法
# 调用 delay 之后, 就会创建一个任务
# 然后发送到队列里面去, 也就是我们这里的 Redis
# 至于参数, 普通调用的时候怎么传, 在 delay 里面依旧怎么传
start = time.perf_counter()
task.delay("古明地觉", 17)
print(
 time.perf_counter() - start
)# 0.11716766700000003然后执行该文件,发现只用了 0.12 秒,而 task 里面明明 sleep 了 3 秒。所以说明这一步是不会阻塞的,调用 task.delay 只是创建一个任务并发送至队列。我们再看一下 worker 的输出信息:

可以看到任务已经被消费者接收并且消费了,而且调用 delay 方法是不会阻塞的,花费的那 0.12 秒是用在了其它地方,比如连接 Redis 发送任务等等。
另外需要注意,函数被 @app.task 装饰之后,可以理解为它就变成了一个任务工厂,因为被装饰了嘛,然后调用任务工厂的 delay 方法即可创建任务并发送到队列里面。我们也可以创建很多个任务工厂,但是这些任务工厂必须要让 worker 知道,否则不会生效。所以如果修改了某个任务工厂、或者添加、删除了某个任务工厂,那么一定要让 worker 知道,而做法就是先停止 celery worker 进程,然后再重新启动。
如果我们新建了一个任务工厂,然后在没有重启 worker 的情况下,就用调用它的 delay 方法创建任务、并发送到队列的话,那么会抛出一个 KeyError,提示找不到相应的任务工厂。
然后我们再来看看 Redis 中存储的信息,1 号库用作 broker,负责存储任务;2 号库用作 backend,负责存储执行结果。我们来看 2 号库:
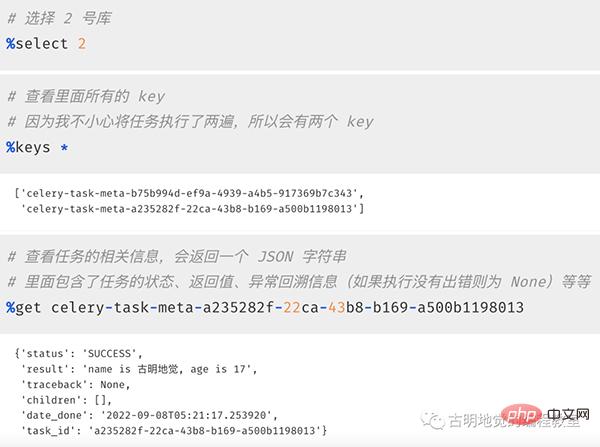
以上我们就启动了一个 worker 并成功消费了队列中的任务,并且还从 Redis 里面拿到了执行信息。当然啦,如果只能通过查询 backend 才能拿到信息的话,那 celery 就太不智能了。我们也可以直接从程序中获取。
Redis(backend)里面存储了很多关于任务的信息,这些信息我们可以直接在程序中获取。
from app import task
res = task.delay("古明地觉", 17)
print(type(res))
"""
<class 'celery.result.AsyncResult'>
"""
# 直接打印,显示任务的 id
print(res)
"""
4bd48a6d-1f0e-45d6-a225-6884067253c3
"""
# 获取状态, 显然此刻没有执行完
# 因此结果是PENDING, 表示等待状态
print(res.status)
"""
PENDING
"""
# 获取 id,两种方式均可
print(res.task_id)
print(res.id)
"""
4bd48a6d-1f0e-45d6-a225-6884067253c3
4bd48a6d-1f0e-45d6-a225-6884067253c3
"""
# 获取任务执行结束时的时间
# 任务还没有结束, 所以返回None
print(res.date_done)
"""
None
"""
# 获取任务的返回值, 可以通过 result 或者 get()
# 注意: 如果是 result, 那么任务还没有执行完的话会直接返回 None
# 如果是 get(), 那么会阻塞直到任务完成
print(res.result)
print(res.get())
"""
None
name is 古明地觉, age is 17
"""
# 再次查看状态和执行结束时的时间
# 发现 status 变成SUCCESS
# date_done 变成了执行结束时的时间
print(res.status)
# 但显示的是 UTC 时间
print(res.date_done)
"""
SUCCESS
2022-09-08 06:40:34.525492
"""另外我们说结果需要存储在 backend 中,如果没有配置 backend,那么获取结果的时候会报错。至于 backend,因为它是存储结果的,所以一般会保存在数据库中,因为要持久化。我这里为了方便,就还是保存在 Redis 中。
调用完任务工厂的 delay 方法之后,会创建一个任务并发送至队列,同时返回一个 AsyncResult 对象,基于此对象我们可以拿到任务执行时的所有信息。但是 AsyncResult 对象我们也可以手动构造,举个例子:
import time
# 我们不光要导入 task, 还要导入里面的 app
from app import app, task
# 导入 AsyncResult 这个类
from celery.result import AsyncResult
# 发送任务到队列当中
res = task.delay("古明地觉", 17)
# 传入任务的 id 和 app, 创建 AsyncResult 对象
async_result = AsyncResult(res.id, app=app)
# 此时的这个 res 和 async_result 之间是等价的
# 两者都是 AsyncResult 对象, 它们所拥有的方法也是一样的
# 下面用谁都可以
while True:
 # 等价于async_result.state == "SUCCESS"
 if async_result.successful():
 print(async_result.get())
 break
 # 等价于async_result.state == "FAILURE"
 elif async_result.failed():
 print("任务执行失败")
 elif async_result.status == "PENDING":
 print("任务正在被执行")
 elif async_result.status == "RETRY":
 print("任务执行异常正在重试")
 elif async_result.status == "REJECTED":
 print("任务被拒绝接收")
 elif async_result.status == "REVOKED":
 print("任务被取消")
 else:
 print("其它的一些状态")
 time.sleep(0.8)
"""
任务正在被执行
任务正在被执行
任务正在被执行
任务正在被执行
name is 古明地觉, age is 17
"""以上就是任务可能出现的一些状态,通过轮询的方式,我们也可以查看任务是否已经执行完毕。当然 AsyncResult 还有一些别的方法,我们来看一下:
from app import task
res = task.delay("古明地觉", 17)
# 1. ready():查看任务状态,返回布尔值。
# 任务执行完成返回 True,否则为 False
# 那么问题来了,它和 successful() 有什么区别呢?
# successful() 是在任务执行成功之后返回 True, 否则返回 False
# 而 ready() 只要是任务没有处于阻塞状态就会返回 True
# 比如执行成功、执行失败、被 worker 拒收都看做是已经 ready 了
print(res.ready())
"""
False
"""
# 2. wait():和之前的 get 一样, 因为在源码中写了: wait = get
# 所以调用哪个都可以, 不过 wait 可能会被移除,建议直接用 get 就行
print(res.wait())
print(res.get())
"""
name is 古明地觉, age is 17
name is 古明地觉, age is 17
"""
# 3. trackback:如果任务抛出了一个异常,可以获取原始的回溯信息
# 执行成功就是 None
print(res.traceback)
"""
None
"""以上就是获取任务执行结果相关的部分。
celery 的配置不同,所表现出来的性能也不同,比如序列化的方式、连接队列的方式,单线程、多线程、多进程等等。那么 celery 都有那些配置呢?
# 将 RabbitMQ 作为 broker 时需要使用
task_queues = {
 # 这是指定的默认队列
"default": {
 "exchange": "default",
 "exchange_type": "direct",
 "routing_key": "default"
 },
 # 凡是 topic 开头的 routing key
 # 都会被放到这个队列
"topicqueue": {
 "routing_key": "topic.#",
 "exchange": "topic_exchange",
 "exchange_type": "topic",
 },
 "task_eeg": { # 设置扇形交换机
 "exchange": "tasks",
 "exchange_type": "fanout",
 "binding_key": "tasks",
 },
}celery 的配置非常多,不止我们上面说的那些,更多配置可以查看官网,写的比较详细。
值得一提的是,在 5.0 之前配置项都是大写的,而从 5.0 开始配置项改成小写了。不过老的写法目前仍然支持,只是启动的时候会抛警告,并且在 6.0 的时候不再兼容老的写法。
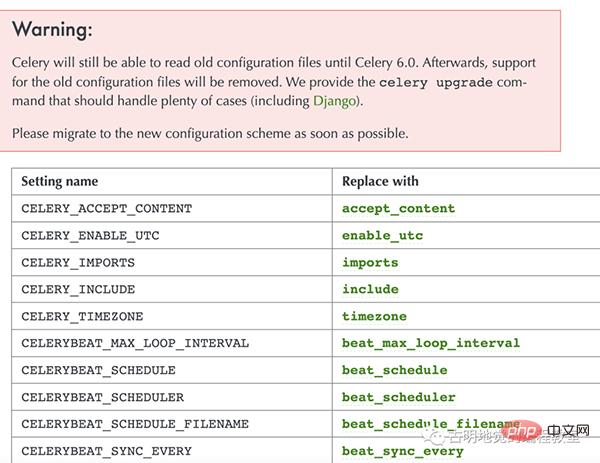
官网也很贴心地将老版本的配置和新版本的配置罗列了出来,尽管配置有很多,但并不是每一个都要用,可以根据自身的业务合理选择。
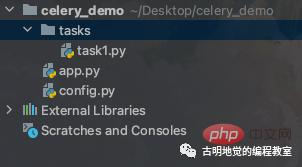
然后下面我们就根据配置文件的方式启动 celery,当前目录结构如下:
celery_demo/config.py
broker_url = "redis://:maverick@82.157.146.194:6379/1"
result_backend = "redis://:maverick@82.157.146.194:6379"
# 写俩就完事了
celery_demo/tasks/task1.py
celery 可以支持非常多的定时任务,而不同种类的定时任务我们一般都会写在不同的模块中(当然这里目前只有一个),然后再将这些模块组织在一个单独的目录中。
当前只有一个 task1.py,我们随便往里面写点东西,当然你也可以创建更多的文件。
def add(x, y):
return x + y
def sub(x, y):
 return x - y
def mul(x, y):
return x * y
def div(x, y):
 return x / y
celery_demo/app.py
from celery import Celery
import config
from tasks.task1 import (
 add, sub, mul, div
)
# 指定一个 name 即可
app = Celery("satori")
# 其它参数通过加载配置文件的方式指定
# 和 flask 非常类似
app.config_from_object(config)
# 创建任务工厂,有了任务工厂才能创建任务
# 这种方式和装饰器的方式是等价的
add = app.task(add)
sub = app.task(sub)
mul = app.task(mul)
div = app.task(div)然后重新启动 worker:
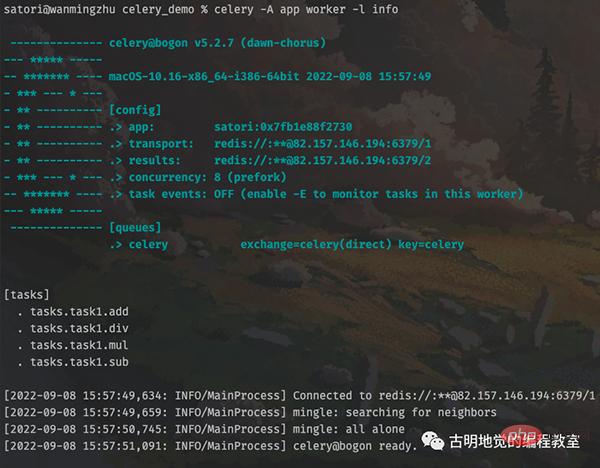
输出结果显示,任务工厂都已经被加载进来了,然后我们创建任务并发送至队列。
# 在 celery_demo 目录下
# 将 app.py 里面的任务工厂导入进来
>>> from app import add, sub, mul, div
# 然后创建任务发送至队列,并等待结果
>>> add.delay(3, 4).get()
7
>>> sub.delay(3, 4).get()
-1
>>> mul.delay(3, 4).get()
12
>>> div.delay(3, 4).get()
0.75
>>>
结果正常返回了,再来看看 worker 的输出,

多个任务都被执行了。
我们在发送任务到队列的时候,使用的是 delay 方法,里面直接传递函数所需的参数即可,那么除了函数需要的参数之外,还有没有其它参数呢?
首先 delay 方法实际上是调用的 apply_async 方法,并且 delay 方法里面只接收函数的参数,但是 apply_async 接收的参数就很多了,我们先来看看它们的函数原型:
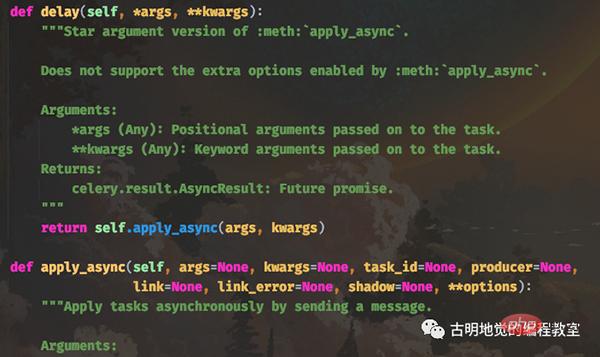
delay 方法的 *args 和 **kwargs 就是函数的参数,它会传递给 apply_async 的 args 和 kwargs。而其它的参数就是发送任务时所设置的一些参数,我们这里重点介绍一下 apply_async 的其它参数。
我们随便挑几个举例说明:
>>> from app import add
# 使用 apply_async,要注意参数的传递
# 位置参数使用元组或者列表,关键字参数使用字典
# 因为是args和kwargs, 不是 *args和 **kwargs
>>> add.apply_async([3], {"y": 4},
... task_,
... countdown=5).get()
7
>>>查看一下 worker 的输出:

注意左边的时间,16:25:16 收到的消息,但 5 秒后才执行完毕,因为我们将 countdown 参数设置为 5。并且任务的 id 也被我们修改了。
另外还需要注意一下那些接收时间的参数,比如 eta。如果我们手动指定了eta,那么一定要注意时区的问题,要保证 celery 所使用的时区和你传递的 datetime 的时区是统一的。
其它的参数可以自己手动测试一下,这里不细说了,根据自身的业务选择合适的参数即可。
之前在创建任务工厂的时候,是将函数导入到 app.py 中,然后通过 add = app.task(add) 的方式手动装饰,因为有哪些任务工厂必须要让 worker 知道,所以一定要在 app.py 里面出现。但是这显然不够优雅,那么可不可以这么做呢?
# celery_demo/tasks/task1.py
from app import app
# celery_demo 所在路径位于 sys.path 中
# 因此这里可以直接 from app import app
@app.task
def add(x, y):
 return x + y
@app.task
def sub(x, y):
 return x - y
# celery_demo/app.py
from tasks.task1 import add, sub
按照上面这种做法,理想上可以,但现实不行,因为会发生循环导入。
所以 celery 提供了一个办法,我们依旧在 task1.py 中 import app,但在 app.py 中不再使用 import,而是通过 include 加载的方式,我们看一下:
# celery_demo/tasks/task1.py
from app import app
@app.task
def add(x, y):
 return x + y
@app.task
def sub(x, y):
 return x - y
# celery_demo/app.py
from celery import Celery
import config
# 通过 include 指定存放任务的 py 文件
# 注意它和 worker 启动路径之间的关系
# 我们是在 celery_demo 目录下启动的 worker
# 所以应该写成 "tasks.task1"
# 如果是在 celery_demo 的上一级目录启动 worker
# 那么这里就要指定为 "celery_demo.tasks.task1"
# 当然启动时的 -A app 也要换成 -A celery_demo.app
app = Celery(__name__, include=["tasks.task1"])
# 如果还有其它文件,比如 task2.py, task3.py
# 那么就把 "tasks.task2", "tasks.task3" 加进去
app.config_from_object(config)
在 celery_demo 目录下重新启动 worker。
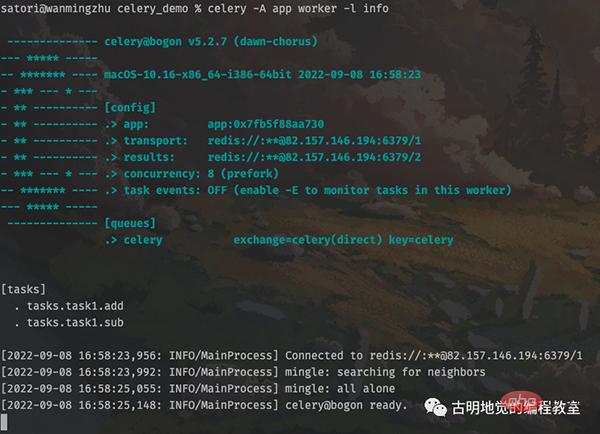
为了方便,我们只保留了两个任务工厂。可以看到此时就成功启动了,并且也更加方便和优雅一些。之前是在 task1.py 中定义函数,然后再把 task1.py 中的函数导入到 app.py 里面,然后手动进行装饰。虽然这么做是没问题的,但很明显这种做法不适合管理。
所以还是要将 app.py 中的 app 导入到 task1.py 中直接创建任务工厂,但如果再将 task1.py 中的任务工厂导入到 app.py 中就会发生循环导入。于是 celery 提供了一个 include 参数,可以在创建 app 的时候自动将里面所有的任务工厂加载进来,然后启动并告诉 worker。
我们来测试一下:
# 通过 tasks.task1 导入任务工厂
# 然后创建任务,发送至队列
>>> from tasks.task1 import add, sub
>>> add.delay(11, 22).get()
33
>>> sub.delay(11, 22).get()
-11
>>>
查看一下 worker 的输出:

结果一切正常。
我们之前通过对一个函数使用 @app.task 即可将其变成一个任务工厂,而这个任务工厂就是一个 Task 实例对象。而我们在使用 @app.task 的时候,其实是可以加上很多的参数的,常用参数如下:
name:默认的任务名是一个uuid,我们可以通过 name 参数指定任务名,当然这个 name 就是 apply_async 的参数 name。如果在 apply_async 中指定了,那么以 apply_async 指定的为准;
当然 app.task 还有很多不常用的参数,这里就不说了,有兴趣可以去查看官网或源码,我们演示一下几个常用的参数:
# celery_demo/tasks/task1.py
from app import app
@app.task(name="你好")
def add(x, y):
 return x + y
@app.task(name="我不好", bind=True)
def sub(self, x, y):
 """
 如果 bind=True,则需要多指定一个 self
 这个 self 就是对应的任务工厂
 """
 # self.request 是一个 celery.task.Context 对象
 # 获取它的属性字典,即可拿到该任务的所有属性
 print(self.request.__dict__)
 return x - y
其它代码不变,我们重新启动 worker:
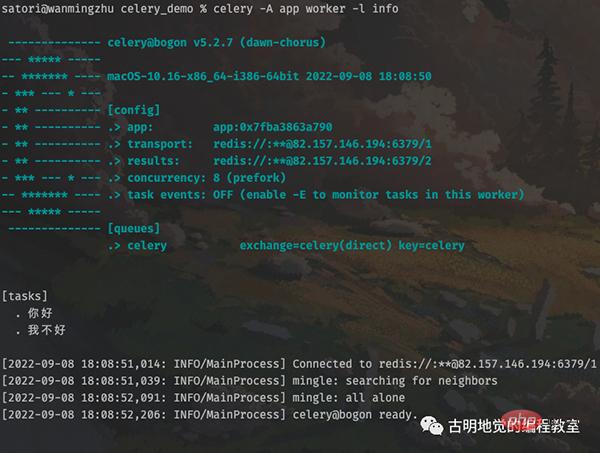
然后创建任务发送至队列,再由 worker 取出执行:
>>> from tasks.task1 import add, sub
>>> add.delay(111, 222).get()
333
>>> sub.delay(111, 222).get()
-111
>>>
执行没有问题,然后看看 worker 的输出:

创建任务工厂时,如果指定了 bind=True,那么执行任务时会将任务工厂本身作为第一个参数传过去。任务工厂本质上就是 Task 实例对象,调用它的 delay 方法即可创建任务。
所以如果我们在 sub 内部继续调用 self.delay(11, 22),会有什么后果呢?没错,worker 会进入无限递归。因为执行任务的时候,在任务的内部又创建了任务,所以会死循环下去。
当然 self 还有很多其它属性和方法,具体有哪些可以通过 Task 这个类来查看。这里面比较重要的是 self.request,它包含了某个具体任务的相关信息,而且信息非常多。

比如当前传递的参数是什么,就可以通过 self.request 拿到。当然啦,self.request 是一个 Context 对象,因为不同任务获取 self.request 的结果肯定是不同的,但 self(任务工厂)却只有一个,所以要基于 Context 进行隔离。
我们可以通过 __dict__ 拿到 Context 对象的属性字典,然后再进行操作。
最后再来说一说 @app.task 里面的 base 参数。
# celery_demo/tasks/task1.py
from celery import app
from app import Task
class MyTask(Task):
 """
 自定义一个类,继承自celery.Task
 exc: 失败时的错误的类型;
 task_id: 任务的id;
 args: 任务函数的位置参数;
 kwargs: 任务函数的关键字参数;
 einfo: 失败时的异常详细信息;
 retval: 任务成功执行的返回值;
 """
 def on_failure(self, exc, task_id, args, kwargs, einfo):
 """任务失败时执行"""
 def on_success(self, retval, task_id, args, kwargs):
 """任务成功时执行"""
 print("任务执行成功")
 def on_retry(self, exc, task_id, args, kwargs, einfo):
 """任务重试时执行"""
# 使用 @app.task 的时候,指定 base 即可
# 然后任务在执行的时候,会触发 MyTask 里面的回调函数
@app.task(name="地灵殿", base=MyTask)
def add(x, y):
 print("加法计算")
return x + y重新启动 worker,然后创建任务。

指定了 base,任务在执行的时候会根据执行状态的不同,触发 MyTask 里面的不同方法。
有时候我们也可以将执行的多个任务,划分到一个组中。
<span style="color: rgb(106, 115, 125); margin: 0px; padding: 0px; background: none 0% 0% / auto repeat scroll padding-box border-box rgba(0, 0, 0, 0);"># celery_demo/tasks/task1.py</span><br><span style="color: rgb(215, 58, 73); margin: 0px; padding: 0px; background: none 0% 0% / auto repeat scroll padding-box border-box rgba(0, 0, 0, 0);">from</span> <span style="color: rgb(89, 89, 89); margin: 0px; padding: 0px; background: none 0% 0% / auto repeat scroll padding-box border-box rgba(0, 0, 0, 0);">app</span> <span style="color: rgb(215, 58, 73); margin: 0px; padding: 0px; background: none 0% 0% / auto repeat scroll padding-box border-box rgba(0, 0, 0, 0);">import</span> <span style="color: rgb(89, 89, 89); margin: 0px; padding: 0px; background: none 0% 0% / auto repeat scroll padding-box border-box rgba(0, 0, 0, 0);">app</span><br><span style="color: rgb(31, 127, 154); margin: 0px; padding: 0px; background: none 0% 0% / auto repeat scroll padding-box border-box rgba(0, 0, 0, 0);">@</span><span style="color: rgb(31, 127, 154); margin: 0px; padding: 0px; background: none 0% 0% / auto repeat scroll padding-box border-box rgba(0, 0, 0, 0);">app</span>.<span style="color: rgb(0, 92, 197); margin: 0px; padding: 0px; background: none 0% 0% / auto repeat scroll padding-box border-box rgba(0, 0, 0, 0);">task</span>()<br><span style="color: rgb(215, 58, 73); margin: 0px; padding: 0px; background: none 0% 0% / auto repeat scroll padding-box border-box rgba(0, 0, 0, 0);">def</span> <span style="color: rgb(0, 92, 197); margin: 0px; padding: 0px; background: none 0% 0% / auto repeat scroll padding-box border-box rgba(0, 0, 0, 0);">add</span>(<span style="color: rgb(89, 89, 89); margin: 0px; padding: 0px; background: none 0% 0% / auto repeat scroll padding-box border-box rgba(0, 0, 0, 0);">x</span>, <span style="color: rgb(89, 89, 89); margin: 0px; padding: 0px; background: none 0% 0% / auto repeat scroll padding-box border-box rgba(0, 0, 0, 0);">y</span>):<br> <span style="color: rgb(111, 66, 193); margin: 0px; padding: 0px; background: none 0% 0% / auto repeat scroll padding-box border-box rgba(0, 0, 0, 0);">print</span>(<span style="color: rgb(102, 153, 0); margin: 0px; padding: 0px; background: none 0% 0% / auto repeat scroll padding-box border-box rgba(0, 0, 0, 0);">"加法计算"</span>)<br> <span style="color: rgb(255, 0, 0); margin: 0px; padding: 0px; background: none 0% 0% / auto repeat scroll padding-box border-box rgba(0, 0, 0, 0);">return</span> <span style="color: rgb(89, 89, 89); margin: 0px; padding: 0px; background: none 0% 0% / auto repeat scroll padding-box border-box rgba(0, 0, 0, 0);">x</span> <span style="color: rgb(215, 58, 73); margin: 0px; padding: 0px; background: none 0% 0% / auto repeat scroll padding-box border-box rgba(0, 0, 0, 0);">+</span> <span style="color: rgb(89, 89, 89); margin: 0px; padding: 0px; background: none 0% 0% / auto repeat scroll padding-box border-box rgba(0, 0, 0, 0);">y</span><br><span style="color: rgb(31, 127, 154); margin: 0px; padding: 0px; background: none 0% 0% / auto repeat scroll padding-box border-box rgba(0, 0, 0, 0);">@</span><span style="color: rgb(31, 127, 154); margin: 0px; padding: 0px; background: none 0% 0% / auto repeat scroll padding-box border-box rgba(0, 0, 0, 0);">app</span>.<span style="color: rgb(0, 92, 197); margin: 0px; padding: 0px; background: none 0% 0% / auto repeat scroll padding-box border-box rgba(0, 0, 0, 0);">task</span>()<br><span style="color: rgb(215, 58, 73); margin: 0px; padding: 0px; background: none 0% 0% / auto repeat scroll padding-box border-box rgba(0, 0, 0, 0);">def</span> <span style="color: rgb(0, 92, 197); margin: 0px; padding: 0px; background: none 0% 0% / auto repeat scroll padding-box border-box rgba(0, 0, 0, 0);">sub</span>(<span style="color: rgb(89, 89, 89); margin: 0px; padding: 0px; background: none 0% 0% / auto repeat scroll padding-box border-box rgba(0, 0, 0, 0);">x</span>, <span style="color: rgb(89, 89, 89); margin: 0px; padding: 0px; background: none 0% 0% / auto repeat scroll padding-box border-box rgba(0, 0, 0, 0);">y</span>):<br> <span style="color: rgb(111, 66, 193); margin: 0px; padding: 0px; background: none 0% 0% / auto repeat scroll padding-box border-box rgba(0, 0, 0, 0);">print</span>(<span style="color: rgb(102, 153, 0); margin: 0px; padding: 0px; background: none 0% 0% / auto repeat scroll padding-box border-box rgba(0, 0, 0, 0);">"减法计算"</span>)<br> <span style="color: rgb(255, 0, 0); margin: 0px; padding: 0px; background: none 0% 0% / auto repeat scroll padding-box border-box rgba(0, 0, 0, 0);">return</span> <span style="color: rgb(89, 89, 89); margin: 0px; padding: 0px; background: none 0% 0% / auto repeat scroll padding-box border-box rgba(0, 0, 0, 0);">x</span> <span style="color: rgb(215, 58, 73); margin: 0px; padding: 0px; background: none 0% 0% / auto repeat scroll padding-box border-box rgba(0, 0, 0, 0);">-</span> <span style="color: rgb(89, 89, 89); margin: 0px; padding: 0px; background: none 0% 0% / auto repeat scroll padding-box border-box rgba(0, 0, 0, 0);">y</span><br><span style="color: rgb(31, 127, 154); margin: 0px; padding: 0px; background: none 0% 0% / auto repeat scroll padding-box border-box rgba(0, 0, 0, 0);">@</span><span style="color: rgb(31, 127, 154); margin: 0px; padding: 0px; background: none 0% 0% / auto repeat scroll padding-box border-box rgba(0, 0, 0, 0);">app</span>.<span style="color: rgb(0, 92, 197); margin: 0px; padding: 0px; background: none 0% 0% / auto repeat scroll padding-box border-box rgba(0, 0, 0, 0);">task</span>()<br><span style="color: rgb(215, 58, 73); margin: 0px; padding: 0px; background: none 0% 0% / auto repeat scroll padding-box border-box rgba(0, 0, 0, 0);">def</span> <span style="color: rgb(0, 92, 197); margin: 0px; padding: 0px; background: none 0% 0% / auto repeat scroll padding-box border-box rgba(0, 0, 0, 0);">mul</span>(<span style="color: rgb(89, 89, 89); margin: 0px; padding: 0px; background: none 0% 0% / auto repeat scroll padding-box border-box rgba(0, 0, 0, 0);">x</span>, <span style="color: rgb(89, 89, 89); margin: 0px; padding: 0px; background: none 0% 0% / auto repeat scroll padding-box border-box rgba(0, 0, 0, 0);">y</span>):<br> <span style="color: rgb(111, 66, 193); margin: 0px; padding: 0px; background: none 0% 0% / auto repeat scroll padding-box border-box rgba(0, 0, 0, 0);">print</span>(<span style="color: rgb(102, 153, 0); margin: 0px; padding: 0px; background: none 0% 0% / auto repeat scroll padding-box border-box rgba(0, 0, 0, 0);">"乘法计算"</span>)<br> <span style="color: rgb(255, 0, 0); margin: 0px; padding: 0px; background: none 0% 0% / auto repeat scroll padding-box border-box rgba(0, 0, 0, 0);">return</span> <span style="color: rgb(89, 89, 89); margin: 0px; padding: 0px; background: none 0% 0% / auto repeat scroll padding-box border-box rgba(0, 0, 0, 0);">x</span> <span style="color: rgb(215, 58, 73); margin: 0px; padding: 0px; background: none 0% 0% / auto repeat scroll padding-box border-box rgba(0, 0, 0, 0);">*</span> <span style="color: rgb(89, 89, 89); margin: 0px; padding: 0px; background: none 0% 0% / auto repeat scroll padding-box border-box rgba(0, 0, 0, 0);">y</span><br><span style="color: rgb(31, 127, 154); margin: 0px; padding: 0px; background: none 0% 0% / auto repeat scroll padding-box border-box rgba(0, 0, 0, 0);">@</span><span style="color: rgb(31, 127, 154); margin: 0px; padding: 0px; background: none 0% 0% / auto repeat scroll padding-box border-box rgba(0, 0, 0, 0);">app</span>.<span style="color: rgb(0, 92, 197); margin: 0px; padding: 0px; background: none 0% 0% / auto repeat scroll padding-box border-box rgba(0, 0, 0, 0);">task</span>()<br><span style="color: rgb(215, 58, 73); margin: 0px; padding: 0px; background: none 0% 0% / auto repeat scroll padding-box border-box rgba(0, 0, 0, 0);">def</span> <span style="color: rgb(0, 92, 197); margin: 0px; padding: 0px; background: none 0% 0% / auto repeat scroll padding-box border-box rgba(0, 0, 0, 0);">div</span>(<span style="color: rgb(89, 89, 89); margin: 0px; padding: 0px; background: none 0% 0% / auto repeat scroll padding-box border-box rgba(0, 0, 0, 0);">x</span>, <span style="color: rgb(89, 89, 89); margin: 0px; padding: 0px; background: none 0% 0% / auto repeat scroll padding-box border-box rgba(0, 0, 0, 0);">y</span>):<br> <span style="color: rgb(111, 66, 193); margin: 0px; padding: 0px; background: none 0% 0% / auto repeat scroll padding-box border-box rgba(0, 0, 0, 0);">print</span>(<span style="color: rgb(102, 153, 0); margin: 0px; padding: 0px; background: none 0% 0% / auto repeat scroll padding-box border-box rgba(0, 0, 0, 0);">"除法计算"</span>)<br> <span style="color: rgb(255, 0, 0); margin: 0px; padding: 0px; background: none 0% 0% / auto repeat scroll padding-box border-box rgba(0, 0, 0, 0);">return</span> <span style="color: rgb(89, 89, 89); margin: 0px; padding: 0px; background: none 0% 0% / auto repeat scroll padding-box border-box rgba(0, 0, 0, 0);">x</span> <span style="color: rgb(215, 58, 73); margin: 0px; padding: 0px; background: none 0% 0% / auto repeat scroll padding-box border-box rgba(0, 0, 0, 0);">/</span><span style="color: rgb(215, 58, 73); margin: 0px; padding: 0px; background: none 0% 0% / auto repeat scroll padding-box border-box rgba(0, 0, 0, 0);">/</span> <span style="color: rgb(89, 89, 89); margin: 0px; padding: 0px; background: none 0% 0% / auto repeat scroll padding-box border-box rgba(0, 0, 0, 0);">y</span>
老规矩,重启 worker,因为我们修改了任务工厂。
然后来导入它们,创建任务,并将这些任务划分到一个组中。
>>> from tasks.task1 import add, sub, mul, div
>>> from celery import group
# 调用 signature 方法,得到 signature 对象
# 此时 t1.delay() 和 add.delay(2, 3) 是等价的
>>> t1 = add.signature(args=(2, 3))
>>> t2 = sub.signature(args=(2, 3))
>>> t3 = mul.signature(args=(2, 3))
>>> t4 = div.signature(args=(4, 2))
# 但是变成 signature 对象之后,
# 我们可以将其放到一个组里面
>>> gp = group(t1, t2, t3, t4)
# 执行组任务
# 返回 celery.result.GroupResult 对象
>>> res = gp()
# 每个组也有一个唯一 id
>>> print("组id:", res.id)
组id: 65f32cc4-b8ce-4bf8-916b-f5cc359a901a
# 调用 get 方法也会阻塞,知道组里面任务全部完成
>>> print("组结果:", res.get())
组结果: [5, -1, 6, 2]
>>>可以看到整个组也是有唯一 id 的,另外 signature 也可以写成 subtask 或者 s,在源码里面这几个是等价的。
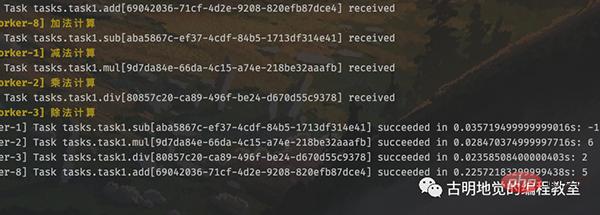
我们观察一下 worker 的输出,任务是并发执行的,所以哪个先完成不好说。但是调用组的 get 方法时,里面的返回值顺序一定和任务添加时候的顺序保持一致。
除此之外,celery 还支持将多个任务像链子一样串起来,第一个任务的输出会作为第二个任务的输入,传递给下一个任务的第一个参数。
# celery_demo/tasks/task1.py
from app import app
@app.task
def task1():
 l = []
 return l
@app.task
# task1 的返回值会传递给这里的 task1_return
def task2(task1_return, value):
 task1_return.append(value)
 return task1_return
@app.task
# task2 的返回值会传递给这里的 task2_return
def task3(task2_return, num):
 return [i + num for i in task2_return]
@app.task
# task3 的返回值会传递给这里的 task3_return
def task4(task3_return):
 return sum(task3_return)
然后我们看怎么将这些任务像链子一样串起来。
>>> from tasks.task1 import *
>>> from celery import chain
# 将多个 signature 对象进行与运算
# 当然内部肯定重写了 __or__ 这个魔法方法
>>> my_chain = chain(
... task1.s() | task2.s(123) | task3.s(5) | task4.s())
>>>
# 执行任务链
>>> res = my_chain()
# 获取返回值
>>> print(res.get())
128
>>>
这种链式处理的场景非常常见,比如 MapReduce。
既然是定时任务,那么就意味着 worker 要后台启动,否则一旦远程连接断开,就停掉了。因此 celery 是支持我们后台启动的,并且可以启动多个。
# 启动 worker
celery multi start w1 -A app -l info
# 可以同时启动多个
celery multi start w2 w3 -A app -l info
# 以上我们就启动了 3 个 worker
# 如果想停止的话
celery multi stop w1 w2 w3 -A app -l info
但是注意,这种启动方式在 Windows 上面不支持,因为 celery 会默认创建两个目录,分别是 /var/log/celery 和 /var/run/celery,显然这是类 Unix 系统的目录结构。
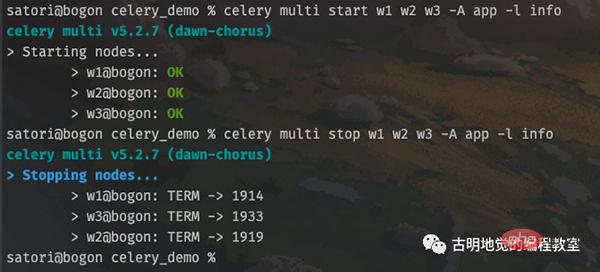
显然启动和关闭是没有问题的,不过为了更好地观察到输出,我们还是用之前的方式,选择前台启动。
然后回顾一下 celery 的架构,里面除了 producer 之外还有一个 celery beat,也就是调度器。我们调用任务工厂的 delay 方法,手动将任务发送到队列,此时就相当于 producer。如果是设置定时任务,那么会由调度器自动将任务添加到队列。
我们在 tasks 目录里面再创建一个 period_task1.py 文件。
# celery_demo/tasks/period_task1.py
from celery.schedules import crontab
from app import app
from .task1 import task1, task2, task3, task4
@app.on_after_configure.connect
def period_task(sender, **kwargs):
 # 第一个参数为 schedule,可以是 float,或者 crontab
 # crontab 后面会说,第二个参数是任务,第三个参数是名字
 sender.add_periodic_task(10.0, task1.s(),
name="每10秒执行一次")
 sender.add_periodic_task(15.0, task2.s("task2"),
name="每15秒执行一次")
 sender.add_periodic_task(20.0, task3.s(),
name="每20秒执行一次")
 sender.add_periodic_task(
 crontab(hour=18, minute=5, day_of_week=0),
 task4.s("task4"),
 name="每个星期天的18:05运行一次"
 )
# celery_demo/tasks/task1.py
from app import app
@app.task
def task1():
 print("我是task1")
 return "task1你好"
@app.task
def task2(name):
 print(f"我是{name}")
 return f"{name}你好"
@app.task
def task3():
 print("我是task3")
 return "task3你好"
@app.task
def task4(name):
 print(f"我是{name}")
return f"{name}你好"既然使用了定时任务,那么一定要设置时区。
# celery_demo/config.py
broker_url = "redis://:maverick@82.157.146.194:6379/1"
result_backend = "redis://:maverick@82.157.146.194:6379/2"
# 之前说过,celery 默认使用 utc 时间
# 其实我们是可以手动禁用的,然后手动指定时区
enable_utc = False
timezone = "Asia/Shanghai"
最后是修改 app.py,将定时任务加进去。
from celery import Celery
import config
app = Celery(
 __name__,
 include=["tasks.task1", "tasks.period_task1"])
app.config_from_object(config)
下面就来启动任务,先来启动 worker,生产上应该后台启动,这里为了看到信息,选择前台启动。
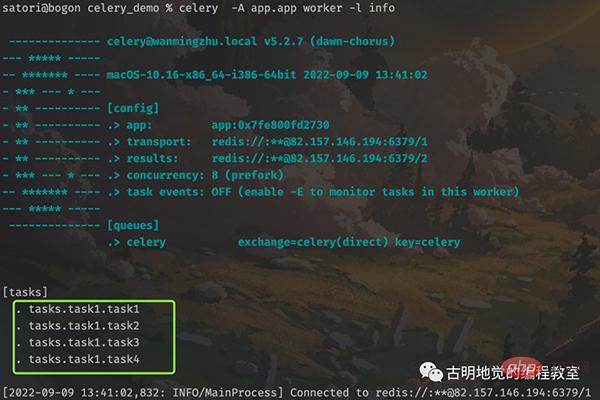
tasks.task1 里面的 4 个任务工厂都被添加进来了,然后再来启动调度器。
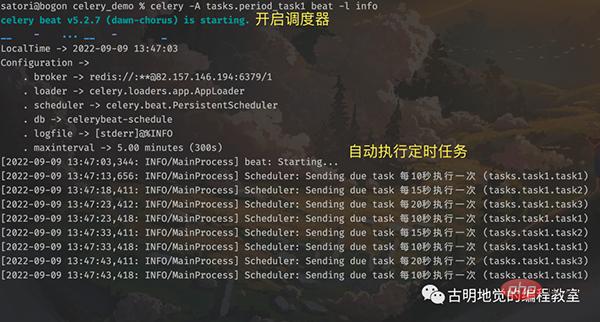
调度器启动之后会自动检测定时任务,如果到时间了,就发送到队列。而启动调度器的命令如下:
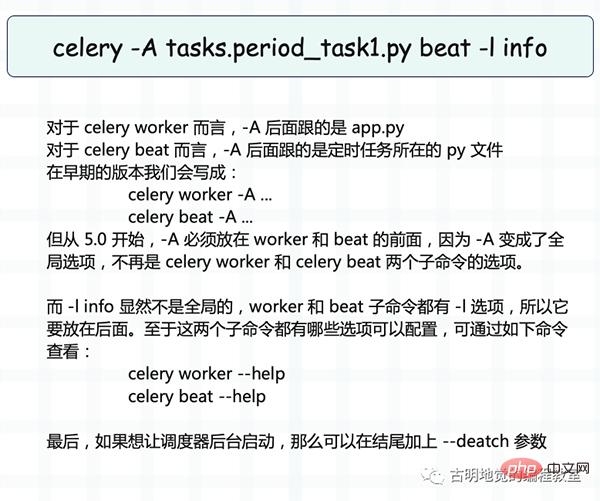
根据调度器的输出内容,我们知道定时任务执行完了,但很明显定时任务本质上也是任务,只不过有定时功能,但也要发到队列里面。然后 worker 从队列里面取出任务,并执行,那么 worker 必然会有信息输出。

调度器启动到现在已经有一段时间了,worker 在终端中输出了非常多的信息。
此时我们就成功实现了定时任务,并且是通过定义函数、打上装饰器的方式实现的。除此之外,我们还可以通过配置的方式实现。
# celery_demo/tasks/period_task1.py
from celery.schedules import crontab
from app import app
# 此时也不需显式导入任务工厂了
# 直接以字符串的方式指定即可
app.conf.beat_schedule = {
 # 参数通过 args 和 kwargs 指定
 "每10秒执行一次": {"task": "tasks.task1.task1",
"schedule": 10.0},
 "每15秒执行一次": {"task": "tasks.task1.task2",
"schedule": 15.0,
"args": ("task2",)},
 "每20秒执行一次": {"task": "tasks.task1.task3",
"schedule": 20.0},
 "每个星期天的18:05运行一次": {"task": "tasks.task1.task4",
 "schedule": crontab(hour=18,
 minute=5,
 day_of_week=0),
 "args": ("task4",)}
}需要注意:虽然我们不用显式导入任务工厂,但其实是 celery 自动帮我们导入。由于这些任务工厂都位于 celery_demo/tasks/task1.py 里面,而 worker 也是在 celery_demo 目录下启动的,所以需要指定为 tasks.task1.task{1234}。
这种启动方式也是可以成功的,貌似还更方便一些,但是会多出一个文件,用来存储配置信息。
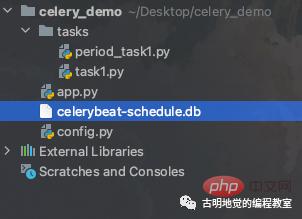
定时任务除了指定一个浮点数之外(表示每隔多少秒执行一次),还可以指定 crontab。关于 crontab 应该都知道是什么,我们在 Linux 上想启动定时任务的话,直接 crontab -e 然后添加即可。
而 celery 的 crontab 和 Linux 高度相似,我们看一下函数原型就知道了。
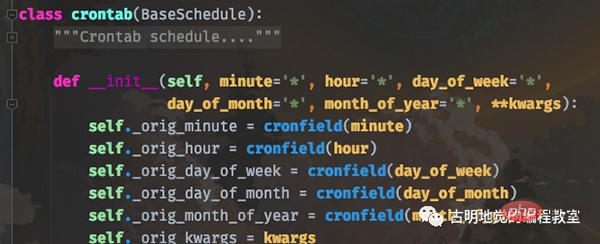
简单解释一下:
以上就是这些参数的含义,并且参数接收的值还可以是一些特殊的通配符:
通配符之间是可以自由组合的,比如 */3,8-17 就表示能被 3 整除,或范围处于 8-17 的时候触发。
除此之外,还可以根据天色来设置定时任务(有点离谱)。
from celery.schedules import solar
app.conf.beat_schedule = {
"日落": {"task": "task1",
 "schedule": solar("sunset",
 -37.81753,
144.96715)
 },
}solar 里面接收三个参数,分别是 event、lat、lon,后两个比较简单,表示观测者所在的纬度和经度。值大于 0,则对应东经/北纬,小于 0,则对应西经/南纬。
我们重点看第一个参数 event,可选值如下:
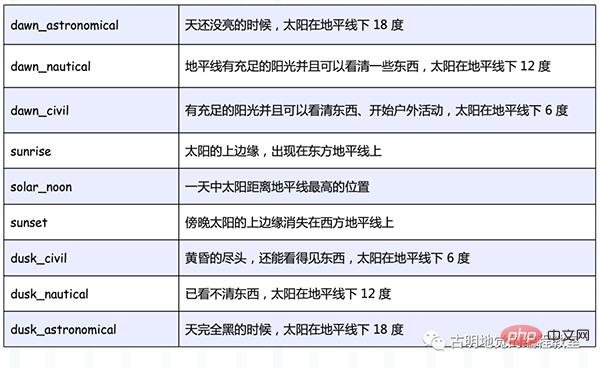
比如代码中的 "sunset", -37.81753, 144.96715 就表示,当站在南纬 37.81753、东经 144.96715 的地方观察,发现傍晚太阳的上边缘消失在西方地平线上的时候,触发任务执行。
个人觉得这个功能有点强悍,但估计绝大部分人应该都用不到,可能气象领域相关的会用的比较多。
以上就是 celery 的使用,另外这里的 broker 和 backend 用的都是 Redis,其实还可以使用 RabbitMQ 和数据库。
broker_url = "amqp://admin:123456@82.157.146.194:5672//"
result_backend = "mysql+pymysql://root:123456@82.157.146.194:3306/store"
可以自己测试一下,但不管用的是哪种存储介质,对于我们使用 celery 而言,都是没有区别的。
celery 在工作中用的还是比较多的,而且有一个调度工具 Apache airflow,它的核心调度功能也是基于 celery 实现的。
The above is the detailed content of Python's powerful task scheduling framework Celery!. For more information, please follow other related articles on the PHP Chinese website!


