
 Backend Development
Python Tutorial
Super complete! Common ways to write configuration files in Python
Backend Development
Python Tutorial
Super complete! Common ways to write configuration files in Python
Super complete! Common ways to write configuration files in Python


Why write configuration files
During the development process, we often use some fixed parameters or constants. For these more fixed and commonly used parts, they are often written into a fixed file to avoid repetition in different module codes and keep the core code clean.
We can write this fixed file directly into a .py file, such as settings.py or config.py. The advantage of this is that we can directly import parts of it through import in the same project; but if we need to When sharing configuration files on other non-Python platforms, writing a single .py is not a good choice.
At this time we should choose a common configuration file type to store these fixed parts. Currently, the commonly used and popular configuration file format types mainly include ini, json, toml, yaml, xml, etc. We can parse these types of configuration files through standard libraries or third-party libraries.
ini
ini means Initialize. In the early days, it was the storage format of configuration files on Windows. The writing method of ini files is easy to understand and is often relatively simple. It usually consists of section, key and value, like the following form:
[localdb]
host = 127.0.0.1
user = root
password = 123456
port = 3306
database = mysql
Python's own built-in configparser standard library, We can directly use it to parse the ini file. For example, we save the above content in a file named db.ini, then use the read() method to parse and read, and finally use the items() method to obtain all key-value pairs under the specified node.
>>> from configparser import ConfigParser
>>> cfg = ConfigParser()
>>> cfg.read("/Users/Bobot/db.ini")
['/Users/Bobot/db.ini']
>>> cfg.items("localdb")
[('host', '127.0.0.1'), ('user', 'root'), ('password', '123456'), ('port', '3306'), ('database', 'mysql')]It should be noted that configparser presents the value in the form of a string by default, so this is why we do not add quotation marks in the db.ini file but directly write the literal above.
After obtaining the key-value pair, I actually converted it directly into a dictionary, and then unpacked the parameters to keep the code simple:
#!pip install pymysql
import pymysql
from configparser import ConfigParser
cfg = ConfigParser()
cfg.read("/Users/Bobot/db.ini")
db_cfg = dict(cfg.items("localdb"))
con = pymysql.connect(**db_cfg)json
## The #json format can be said to be a common file format for us, and it is also a popular data exchange format on the Internet. In addition, json is sometimes also a type of configuration file. For example, npm (a JavaScript package management tool similar to Python's pip) and the widely used VSCode editor produced by Microsoft all use json to write configuration parameters. Like configparser, Python also has a built-in json standard library, which can import file and string json content through the load() and loads() methods.{
"localdb":{
"host": "127.0.0.1",
"user": "root",
"password": "123456",
"port": 3306,
"database": "mysql"
}
}>>> import json
>>> from pprint import pprint
>>>
>>> with open('/Users/Bobot/db.json') as j:
... cfg = json.load(j)['localdb']
...
>>> pprint(cfg)
{'database': 'mysql',
'host': '127.0.0.1',
'password': '123456',
'port': 3306,
'user': 'root'}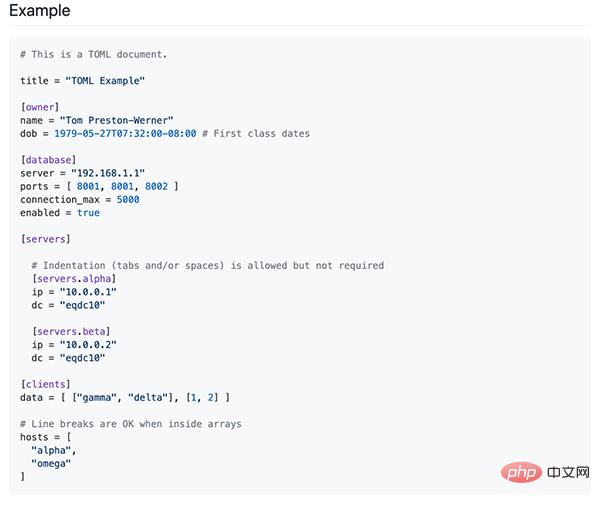
pip install toml
[mysql]
host = "127.0.0.1"
user = "root"
port = 3306
database = "test"
 [mysql.parameters]
 pool_size = 5
 charset = "utf8"
 [mysql.fields]
 pandas_cols = [ "id", "name", "age", "date"]
紧接着我们就可以通过 toml 库中的 load() 方法来进行读取:
>>> import toml
>>> import os
>>> from pprint import pprint
>>> cfg = toml.load(os.path.expanduser("~/Desktop/config.toml"))
>>> pprint(cfg)
{'mysql': {'database': 'test',
'fields': {'pandas_cols': ['id', 'name', 'age', 'date']},
'host': '127.0.0.1',
'parameters': {'charset': 'utf8', 'pool_size': 5},
'port': 3306,
'user': 'root'}}可以看到 toml 文件被间接地转化成了字典类型,当然这也就是 json 版的写法(将单引号替换成双引号即可),方便我们后续调用或者传参。
yaml
yaml 格式(或 yml 格式)是目前较为流行的一种配置文件,它早在 2001 由一个名为 Clark Evans 的人提出;同时它也是目前被广泛使用的配置文件类型,典型的就是 Docker 容器里的 docker-compose.yml 配置文件,如果经常使用 Docker 进行部署的人对此不会陌生。
yaml 文件的设计从 Python、XML 等地方获取灵感,所以在使用时能很清楚地看到这些部分的影子。
在上一节 toml 内容里我曾提到,yaml 的规范内容可以说是冗长和复杂,足足有80页之多(斗尊强者,恐怖如斯……)。
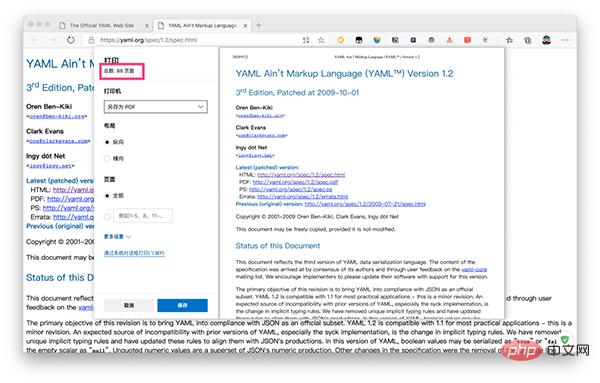
02-yaml规范页数
所以感兴趣的朋友可以再自行了解相关用法。
YAML 官方早已经提供了相应的 Python 库进行支持,即 PyYAML;当然也同样需要我们事先进行安装:
pip install pyyaml
同 json 库和 toml 库一样,通过 load() 方法来进行加载。
需要注意的是,使用 load() 方法会存在一定的安全隐患,从思科 Talos 的这份报告中我们可以看到,如果加载了未知或不信任的 yaml 文件,那么有可能会存在被攻击的风险和网络安全隐患,因为它能够直接调用相应的 Python 函数来执行为攻击者所需要的命令,比如说在 yaml 文件中写入这么一段:
# 使用Linux和macOS的朋友不要轻易尝试
!!python/object/apply:os.system ["rm -rf /"]
因此最好是使用 safe_load() 来代替 load() 方法。
这和 Python 内置的 string 标准库中 Template 类的 substitute() 模板方法一样存在着同样的安全隐患,所以使用 safe_substitute() 来替代是一样的道理。
如我们现在将之前的一些配置信息写入 config.yaml 文件中:
mysql:
 host: "127.0.0.1"
 port: 3306
 user: "root"
 password: "123456"
 database: "test"
 parameter:
 pool_size: 5
 charset: "utf8"
 fields:
pandas_cols:
 - id
 - name
 - age
 - date
然后我们通过 safe_load() 方法进行解析:
>>> import os
>>> from pprint import pprint
>>>
>>> with open(os.path.expanduser("~/config.yaml"), "r") as config:
... cfg = yaml.safe_load(config)
...
>>> pprint(cfg)
{'mysql': {'database': 'test',
'fields': {'pandas_cols': ['id', 'name', 'age', 'date']},
'host': '127.0.0.1',
'parameter': {'charset': 'utf8', 'pool_size': 5},
'password': '123456',
'port': 3306,
'user': 'root'}}可以看到最后结果和前面的 toml 库的解析结果基本一致。
结尾
本文列举了一些主流且常见的配置文件类型及其 Python 的读取方法,可能有的读者会发现当中没有 xml 格式类型的内容。对于 xml 配置文件可能与 Java 系语言打交道的朋友遇见得会多一些,但 xml 文件的可读性实在是让人望而生畏;对 xml 文件不了解的朋友可以使用 Chrome 浏览器随便进入一个网站然后按下 F12 进入开发者后查看那密密麻麻的 html 元素便是 .xml 的缩影。
除了这些主流的配置文件类型之外,像一些 .cfg、.properties 等都可以作为配置文件,甚至和开头提到的那样,你单独用一个 .py 文件来书写各类配置信息作为配置文件进行导入都是没问题,只是在跨语言共享时可能会有些障碍。因此本文就不过多介绍,感兴趣的朋友可以进一步自行了解。
在本文里列举的配置文件类型其复杂性由上到下依次增加:ini
The above is the detailed content of Super complete! Common ways to write configuration files in Python. For more information, please follow other related articles on the PHP Chinese website!

Hot AI Tools

Undresser.AI Undress
AI-powered app for creating realistic nude photos

AI Clothes Remover
Online AI tool for removing clothes from photos.

Undress AI Tool
Undress images for free

Clothoff.io
AI clothes remover

AI Hentai Generator
Generate AI Hentai for free.

Hot Article
Hot Tools

Notepad++7.3.1
Easy-to-use and free code editor

SublimeText3 Chinese version
Chinese version, very easy to use

Zend Studio 13.0.1
Powerful PHP integrated development environment

Dreamweaver CS6
Visual web development tools

SublimeText3 Mac version
God-level code editing software (SublimeText3)
Hot Topics
 1376
1376
 52
52

 Do mysql need to pay
Apr 08, 2025 pm 05:36 PM
Do mysql need to pay
Apr 08, 2025 pm 05:36 PM
MySQL has a free community version and a paid enterprise version. The community version can be used and modified for free, but the support is limited and is suitable for applications with low stability requirements and strong technical capabilities. The Enterprise Edition provides comprehensive commercial support for applications that require a stable, reliable, high-performance database and willing to pay for support. Factors considered when choosing a version include application criticality, budgeting, and technical skills. There is no perfect option, only the most suitable option, and you need to choose carefully according to the specific situation.
 How does PS feathering control the softness of the transition?
Apr 06, 2025 pm 07:33 PM
How does PS feathering control the softness of the transition?
Apr 06, 2025 pm 07:33 PM
The key to feather control is to understand its gradual nature. PS itself does not provide the option to directly control the gradient curve, but you can flexibly adjust the radius and gradient softness by multiple feathering, matching masks, and fine selections to achieve a natural transition effect.
 How to use mysql after installation
Apr 08, 2025 am 11:48 AM
How to use mysql after installation
Apr 08, 2025 am 11:48 AM
The article introduces the operation of MySQL database. First, you need to install a MySQL client, such as MySQLWorkbench or command line client. 1. Use the mysql-uroot-p command to connect to the server and log in with the root account password; 2. Use CREATEDATABASE to create a database, and USE select a database; 3. Use CREATETABLE to create a table, define fields and data types; 4. Use INSERTINTO to insert data, query data, update data by UPDATE, and delete data by DELETE. Only by mastering these steps, learning to deal with common problems and optimizing database performance can you use MySQL efficiently.
 How to set up PS feathering?
Apr 06, 2025 pm 07:36 PM
How to set up PS feathering?
Apr 06, 2025 pm 07:36 PM
PS feathering is an image edge blur effect, which is achieved by weighted average of pixels in the edge area. Setting the feather radius can control the degree of blur, and the larger the value, the more blurred it is. Flexible adjustment of the radius can optimize the effect according to images and needs. For example, using a smaller radius to maintain details when processing character photos, and using a larger radius to create a hazy feeling when processing art works. However, it should be noted that too large the radius can easily lose edge details, and too small the effect will not be obvious. The feathering effect is affected by the image resolution and needs to be adjusted according to image understanding and effect grasp.
 MySQL download file is damaged and cannot be installed. Repair solution
Apr 08, 2025 am 11:21 AM
MySQL download file is damaged and cannot be installed. Repair solution
Apr 08, 2025 am 11:21 AM
MySQL download file is corrupt, what should I do? Alas, if you download MySQL, you can encounter file corruption. It’s really not easy these days! This article will talk about how to solve this problem so that everyone can avoid detours. After reading it, you can not only repair the damaged MySQL installation package, but also have a deeper understanding of the download and installation process to avoid getting stuck in the future. Let’s first talk about why downloading files is damaged. There are many reasons for this. Network problems are the culprit. Interruption in the download process and instability in the network may lead to file corruption. There is also the problem with the download source itself. The server file itself is broken, and of course it is also broken when you download it. In addition, excessive "passionate" scanning of some antivirus software may also cause file corruption. Diagnostic problem: Determine if the file is really corrupt
 Solutions to the service that cannot be started after MySQL installation
Apr 08, 2025 am 11:18 AM
Solutions to the service that cannot be started after MySQL installation
Apr 08, 2025 am 11:18 AM
MySQL refused to start? Don’t panic, let’s check it out! Many friends found that the service could not be started after installing MySQL, and they were so anxious! Don’t worry, this article will take you to deal with it calmly and find out the mastermind behind it! After reading it, you can not only solve this problem, but also improve your understanding of MySQL services and your ideas for troubleshooting problems, and become a more powerful database administrator! The MySQL service failed to start, and there are many reasons, ranging from simple configuration errors to complex system problems. Let’s start with the most common aspects. Basic knowledge: A brief description of the service startup process MySQL service startup. Simply put, the operating system loads MySQL-related files and then starts the MySQL daemon. This involves configuration
 MySQL can't be installed after downloading
Apr 08, 2025 am 11:24 AM
MySQL can't be installed after downloading
Apr 08, 2025 am 11:24 AM
The main reasons for MySQL installation failure are: 1. Permission issues, you need to run as an administrator or use the sudo command; 2. Dependencies are missing, and you need to install relevant development packages; 3. Port conflicts, you need to close the program that occupies port 3306 or modify the configuration file; 4. The installation package is corrupt, you need to download and verify the integrity; 5. The environment variable is incorrectly configured, and the environment variables must be correctly configured according to the operating system. Solve these problems and carefully check each step to successfully install MySQL.
 How to optimize database performance after mysql installation
Apr 08, 2025 am 11:36 AM
How to optimize database performance after mysql installation
Apr 08, 2025 am 11:36 AM
MySQL performance optimization needs to start from three aspects: installation configuration, indexing and query optimization, monitoring and tuning. 1. After installation, you need to adjust the my.cnf file according to the server configuration, such as the innodb_buffer_pool_size parameter, and close query_cache_size; 2. Create a suitable index to avoid excessive indexes, and optimize query statements, such as using the EXPLAIN command to analyze the execution plan; 3. Use MySQL's own monitoring tool (SHOWPROCESSLIST, SHOWSTATUS) to monitor the database health, and regularly back up and organize the database. Only by continuously optimizing these steps can the performance of MySQL database be improved.
