
 Backend Development
Python Tutorial
Super complete! Python graphical interface framework PyQt5 usage guide!
Backend Development
Python Tutorial
Super complete! Python graphical interface framework PyQt5 usage guide!
Super complete! Python graphical interface framework PyQt5 usage guide!


Common GUI framework
- PyQt5: Qt is a cross-platform C graphical user interface library. QT was once owned by Nokia and later sold to Digia Oyj, a Finnish software company. PyQt5 is a Python interface based on Digia's Qt5 and consists of a set of Python modules. PyQt5 itself has more than 620 classes and 6000 functions and methods. Can run on multiple platforms, including: Unix, Windows, and Mac OS.
- Pyside6: Pyside is the Python package officially provided by QT Company. The previous version was Pyside2, which corresponds to QT5. The naming rules of the latest version have been adjusted and changed to Pyside6, which corresponds to the QT6 version. Since the official product is relatively promising, the disadvantage is that it was released late and there is not as much information on the Internet as PyQt5.
- Tkinter: Python's built-in GUI framework, implemented using TCL. The TCL interpreter is embedded in Python. When using it, there is no need to install additional expansion packages, it is directly imported and cross-platform. The disadvantage is that the UI layout is entirely implemented by code, there are only 15 common components, and the display effect is simple.
- PySimpleGUI: PySimpleGUI is a wrapper for Tkinter. Implementing a custom GUI using PySimpleGUI requires much less code than writing the same GUI directly using Tkinter.
- WxPython: wxPython is a Python language binding for the popular wxWidgets cross-platform GUI tool library. It is widely used, cross-platform, written in C, and has few documents. Users may need to make some adjustments to the GUI code in different platforms based on the programming content. It is difficult to solve problems when encountering them. The code layout control is not intuitive.
- Wax: Based on wxPython, a package made to overcome the problems of wxPython.
- Kivy: Mainly for multi-touch programs, smartphones, tablets, etc. It can also be used on systems without touch screen functions, supporting all platforms (Windows, Linux, Mac OS X, Android and iOS .) Written in Python and cython, Chinese support is poor. You need to download the Chinese library yourself and formulate the path.
- BeeWare: Write once. Deploy everywhere. Needs to be used in conjunction with Kivy.
- Toga: A GUI toolkit for developing native APPs using Python. Toga consists of a base component library with shared interfaces to simplify platform-independent GUI development. Toga is available for Mac OS, Windows, Linux (GTK), and mobile platforms such as Android and iOS.
- Eel: A lightweight Python library for making simple offline HTML/JS GUI applications similar to Electron (but more lightweight than it), and has the capabilities of Python ) and full access to the library.
- Flexx: A pure Python toolkit for creating graphical interface applications. It uses web technology for interface rendering. You can use Flexx to create desktop applications, and you can also export an application to a standalone HTML document. Because it is developed in pure Python, Flexx is cross-platform. All you need is Python and a browser to run.
- pywebview is a lightweight cross-platform wrapper around the webview component, which allows HTML content to be displayed in its own native GUI window. It allows you to use web technologies in desktop applications while hiding as much as possible the fact that a browser is used to build the GUI.
- enaml: A Python framework that allows you to implement high-quality GUI interfaces with minimal effort. It is also a unique programming language. enaml combines a declarative language with a constraint-based layout system, allowing users to easily define flexible layouts of UI. enaml applications can run on any platform that supports Python and Qt.
Personal thoughts: There is too much to learn, so learn PyQt5 first, because there is a lot of information, and then learn pyside6 if you have enough energy. Finally, take a look at PySimpleGUI to see if you can solve some simple problems.
PyQt5 Introduction
PyQt is a Python language implementation of the Qt framework. It was developed by Riverbank Computing and is one of the most powerful GUI libraries. PyQt provides a well-designed collection of window controls. Each PyQt control corresponds to a Qt control, so PyQt's API interface is very close to Qt's API interface, but PyQt no longer uses the QMake system and the Q_OBJECT macro.
PyQt5 provides GPL version and commercial version certificates. Free developers can use the free GPL license. If you need to use PyQt for commercial applications, you must purchase a commercial license.
PyQt5 features are as follows:
- GUI control set based on high-performance Qt.
- Can run cross-platform on Linux, Window and Mac OS systems.
- Use signal and slot mechanism for communication.
- Completely encapsulate the Qt library.
- You can use a mature IDE for interface design and automatically generate executable Python code.
- Provides a complete set of window controls.
- PyQt5 is composed of a series of Python modules, with more than 620 classes, 6000 functions and methods. The main modules are as follows:
- QtCore: Contains core non- GUI functionality. Mainly used with time, files and folders, various data, streams, URLs, mime class files, processes and threads.
- QtGui: Contains window system, event handling, 2D images, basic painting, fonts and text classes.
- QtWidgets: Contains a series of UI elements for creating desktop applications.
- QtMultimedia: Contains classes for processing multimedia content and calling the camera API.
- QtBluetooth: Contains classes for finding and connecting to Bluetooth.
- QtNetwork: Contains network programming classes. These tools can make TCP/IP and UDP development more convenient and reliable.
- QtPositioning: Contains positioning classes that can use satellites, WiFi or even text.
- Enginio: Contains classes for entering and managing Qt Cloud through the client.
- QtWebSockets: Contains the class of WebSocket protocol.
- QtWebKit: Contains a web browser based on WebKit2.
- QtWebKitWidgets: Contains classes based on WebKit1 of QtWidgets.
- QtXml: Contains classes for processing xml and provides tools for SAX and DOM APIs.
- QtSvg: Provides a class for displaying SVG content. Scalable Vector Graphics (SVG) is a graphics format based on Extensible Markup Language (XML) for describing two-dimensional vector graphics. (This sentence comes from Wikipedia).
- QtSql: Provides tools for processing databases.
- QtTest: Provides tools for testing PyQt5 applications.
Installation of PyQt5
Since fbs will be used for packaging later, fbs may have compatibility issues with Python 3.7 and later versions, so I chose Python 3.6 .8 The entire environment was built. The main content is: Python PyCharm PyQt5
Install PyQt5
pip install pyqt5
pip install pyqt5-tools
Among them, pyqt5-tools is the Qt Designer drag-and-drop interface design tool. The following error may be reported during the installation process:
qt5-tools 5.15.2.1.2 has requirement click~=7.0, but you'll have click 8.0.1 which is incompatible.
Solution:
pip install click~=7.0
Qt Designer configuration
Qt Designer is configured by dragging Place controls by dragging them, and view the control effects in real time for quick UI design.
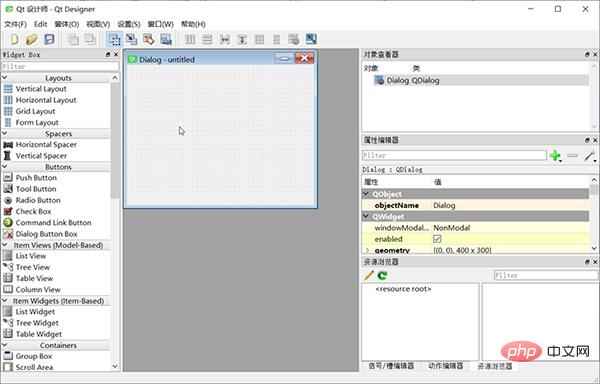
The composition of the entire screen:
- The "Widget Box" on the left is a variety of items that can be freely dragged Component
- The "MainWindow - untitled" form in the middle is the canvas
- The "Object Inspector" in the upper right can view the structure of the current ui
- Right The "Property Editor" in the middle side can set the properties of the currently selected component
- The "Resource Browser" in the lower right can add various materials, such as pictures, backgrounds, etc.
Finally generate a .ui file (essentially a file in XML format), which can be used directly or converted into a .py file through the pyuic5 tool.
QtDisigner configuration
In Pycharm, open File – Settings – Tools – External Tools, click Create Tool, the configuration is as follows:
Name: QtDisigner
Program : D:Program FilesPython36Libsite-packagesqt5_applicationsQtbindesigner.exe # 请根据实际修改
Working directory: $FileDir$
PyUIC Configuration
PyUIC mainly replaces the .ui file generated by Qt Designer with a .py file.
In Pycharm, open File – Settings – Tools – External Tools, click Create Tool, and configure it as follows:
Name: PyUIC
Program : D:Program FilesPython36python.exe # 当前Python目录,请根据实际修改
Arguments: -m PyQt5.uic.pyuic $FileName$ -o $FileNameWithoutExtension$.py
Working directory: $FileDir$
PyRCC configuration
PyRCC The main thing is to replace the written .qrc resource file with a .py file. In Pycharm, open File – Settings – Tools – External Tools, click Create Tool, and configure it as follows:
Name: PyRCC
Program: D:Program FilesPython36pyrcc5.exe # 当前rcc工具目录,请根据实际修改
Arguments: $FileName$ -o $FileNameWithoutExtension$_rc.py
Working directory: $FileDir$
PyQt5 usage example
Create a blank interface:
import sys
from PyQt5.QtWidgets import QApplication, QMainWindow, QLabel
app = QApplication(sys.argv)
win = QMainWindow()
win.setGeometry(400, 400, 400, 300)
win.setWindowTitle("Pyqt5 Tutorial")
win.show()
sys.exit(app.exec_())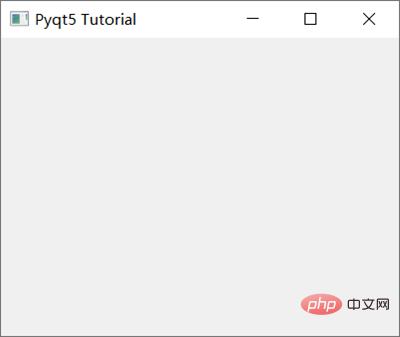
where:
- Qapplication():每个GUI都必须包含一个Qapplication,argv表示获取命令行参数,如果不用获取,则可以使用[]代替。
- QMainWindow():类似一个容器(窗口)用来包含按钮、文本、输入框等widgets。arg标识可以获取命令行执行时的参数。
- SetGeometry是用来定义 QMainWindow() 窗口的尺寸, 语法:setGeometry(x, y, width, height ),其中x,y为屏幕上的坐标点。
- show():用来显示窗口
- exit(app.exec_()):设置窗口一直运行指导使用关闭按钮进行关闭
PyQt5支持的常见Widgets有:
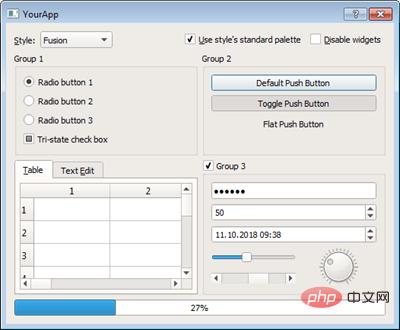
从上到下,从左到右依次为:Qlabel、QcomboBox、QcheckBox、QradioButton、QpushButton、QtableWidget、QlineEdit、Qslider、QProgressBar
对于使用Pyqt5设置文本内容,我们使用Qlabel:
import sys
from PyQt5.QtWidgets import QApplication, QMainWindow, QLabel
app = QApplication(sys.argv)
win = QMainWindow()
win.setGeometry(400, 400, 400, 300)
win.setWindowTitle("Pyqt5 Tutorial")
# Label Text
label = QLabel(win)
label.resize(200, 100)
label.setText("Hi this is Pyqt5")
label.move(100, 100)
win.show()
sys.exit(app.exec_())
按钮与事件:
import sys
from PyQt5.QtWidgets import QApplication, QMainWindow, QPushButton
def click():
 print("Hy Button is clicked!")
app = QApplication(sys.argv)
win = QMainWindow()
win.setGeometry(400, 400, 400, 300)
win.setWindowTitle("Pyqt5 Tutorial")
# Button
button = QPushButton(win)
button.resize(200, 100)
button.setText("Hi! Click Me")
button.move(100, 100)
button.clicked.connect(click)
win.show()
sys.exit(app.exec_())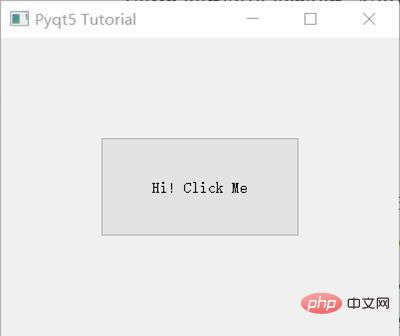
button.clicked.connect() 在按钮点击后执行特定的事件。
PyQt5实战
实战项目:简易的天气查询软件
1、使用Qt Designer设计一个界面
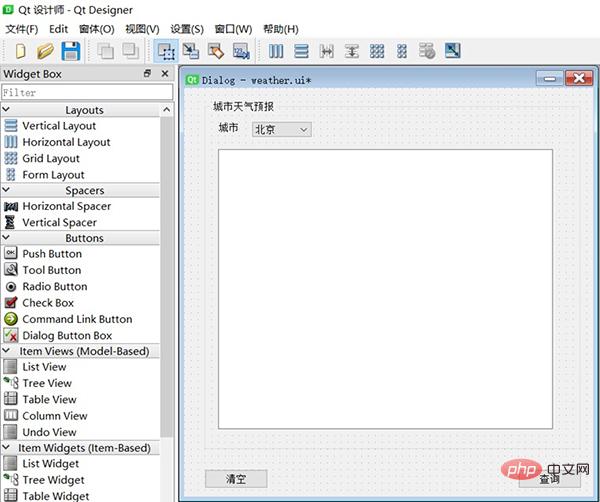
用到的控件有Button, GroupBox, Label,ComboBox,TextEdit,同时定义了两个按钮queryBtn及clearBtn,分别用来查询及清空天气数据。我们需要绑定槽函数,方法如下:
- 在Qt Designer右下角选择 信号/槽编辑器,点击+号新增
- 分别选择queryBtn及clearBtn,选择信号 clicked(), 接收者 Dialog 及槽 accept(),(槽函数这里不知道如何定义,后期在代码里再进行修改)
以上完成后保存为Weather.ui文件。
2、转换.ui文件为.py文件
PyQt5支持直接使用.ui文件:
import sys
from PyQt5 import QtWidgets, uic
app = QtWidgets.QApplication(sys.argv)
window = uic.loadUi("mainwindow.ui")
window.show()
app.exec()但是为了更好的自定义及修改上面的槽函数,可以使用External Tools – PyUIC,即可生成Weather.py,实际运行命令如下:
D:Program FilesPython36python.exe -m PyQt5.uic.pyuic Weather.ui -o Weather.py
其中,我们需要把两个按钮绑定的槽函数:
# self.queryBtn.clicked.connect(Dialog.accept)
# self.clearBtn.clicked.connect(Dialog.accept)
# 修改为:
self.queryBtn.clicked.connect(Dialog.queryWeather)
self.clearBtn.clicked.connect(Dialog.clearText)
最终的Weather.py内容如下:
# -*- coding: utf-8 -*-
# Form implementation generated from reading ui file 'Weather.ui'
#
# Created by: PyQt5 UI code generator 5.15.4
#
# WARNING: Any manual changes made to this file will be lost when pyuic5 is
# run again.Do not edit this file unless you know what you are doing.
from PyQt5 import QtCore, QtGui, QtWidgets
class Ui_Dialog(object):
 def setupUi(self, Dialog):
 Dialog.setObjectName("Dialog")
 Dialog.resize(600, 600)
 self.groupBox = QtWidgets.QGroupBox(Dialog)
 self.groupBox.setGeometry(QtCore.QRect(30, 20, 551, 511))
 self.groupBox.setObjectName("groupBox")
 self.label_2 = QtWidgets.QLabel(self.groupBox)
 self.label_2.setGeometry(QtCore.QRect(20, 30, 31, 16))
 self.label_2.setObjectName("label_2")
 self.comboBox = QtWidgets.QComboBox(self.groupBox)
 self.comboBox.setGeometry(QtCore.QRect(70, 30, 87, 22))
 self.comboBox.setObjectName("comboBox")
 self.comboBox.addItem("")
 self.comboBox.addItem("")
 self.comboBox.addItem("")
 self.textEdit = QtWidgets.QTextEdit(self.groupBox)
 self.textEdit.setGeometry(QtCore.QRect(20, 70, 491, 411))
 self.textEdit.setObjectName("textEdit")
 self.queryBtn = QtWidgets.QPushButton(Dialog)
 self.queryBtn.setGeometry(QtCore.QRect(490, 560, 93, 28))
 self.queryBtn.setObjectName("queryBtn")
 self.clearBtn = QtWidgets.QPushButton(Dialog)
 self.clearBtn.setGeometry(QtCore.QRect(30, 560, 93, 28))
 self.clearBtn.setObjectName("clearBtn")
 self.retranslateUi(Dialog)
 self.clearBtn.clicked.connect(Dialog.clearText)
 self.queryBtn.clicked.connect(Dialog.queryWeather)
 QtCore.QMetaObject.connectSlotsByName(Dialog)
 def retranslateUi(self, Dialog):
 _translate = QtCore.QCoreApplication.translate
 Dialog.setWindowTitle(_translate("Dialog", "Dialog"))
 self.groupBox.setTitle(_translate("Dialog", "城市天气预报"))
 self.label_2.setText(_translate("Dialog", "城市"))
 self.comboBox.setItemText(0, _translate("Dialog", "北京"))
 self.comboBox.setItemText(1, _translate("Dialog", "苏州"))
 self.comboBox.setItemText(2, _translate("Dialog", "上海"))
 self.queryBtn.setText(_translate("Dialog", "查询"))
self.clearBtn.setText(_translate("Dialog", "清空"))3、调用MainDialog
在MainDialog中调用界面类Ui_Dialog,然后在其中中添加查询天气的业务逻辑代码,这样就做到了界面显示和业务逻辑的分离。新增demo.py文件, 在MainDialog类中定义了两个槽函数queryWeather()和clearText(),以便在界面文件Weather.ui中定义的两个按钮(queryBtn 和clearBtn) 触发clicked 信号与这两个槽函数进行绑定。
完整代码如下:
import sys
import Weather
from PyQt5.QtWidgets import QApplication, QDialog
import requests
class MainDialog(QDialog):
 def __init__(self, parent=None):
 super(QDialog, self).__init__(parent)
 self.ui = Weather.Ui_Dialog()
 self.ui.setupUi(self)
 def queryWeather(self):
 cityName = self.ui.comboBox.currentText()
 cityCode = self.getCode(cityName)
 r = requests.get(
 "https://restapi.amap.com/v3/weather/weatherInfo?key=f4fd5b287b6d7d51a3c60fee24e42002&city={}".format(
 cityCode))
 if r.status_code == 200:
 data = r.json()['lives'][0]
 weatherMsg = '城市:{}n天气:{}n温度:{}n风向:{}n风力:{}n湿度:{}n发布时间:{}n'.format(
 data['city'],
 data['weather'],
 data['temperature'],
 data['winddirection'],
 data['windpower'],
 data['humidity'],
 data['reporttime'],
 )
 else:
 weatherMsg = '天气查询失败,请稍后再试!'
 self.ui.textEdit.setText(weatherMsg)
 def getCode(self, cityName):
 cityDict = {"北京": "110000",
 "苏州": "320500",
 "上海": "310000"}
 **return** cityDict.get(cityName, '101010100')
 def clearText(self):
 self.ui.textEdit.clear()
if __name__ == '__main__':
 myapp = QApplication(sys.argv)
 myDlg = MainDialog()
 myDlg.show()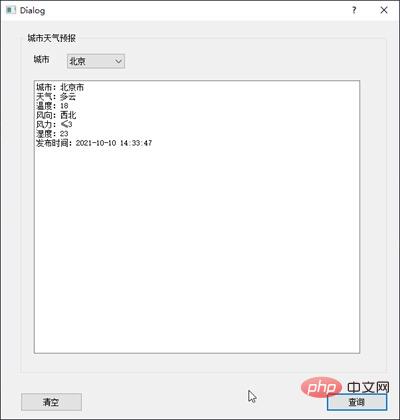
sys.exit(myapp.exec_())运行demo.py并执行查询后的效果:
4、将代码打包成exe文件
将.py文件打包成可执行的exe在Python中称为freezing,常用的工具有:PyInstaller, py2exe, cx_Freeze, bbfreze, py2app等。功能对比:
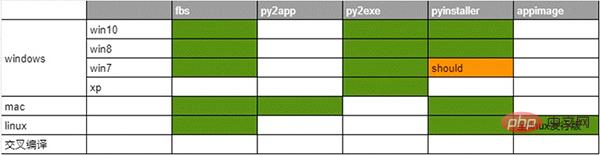
- py2exe:软件更新已经不活跃,因此也就略过。
- pyinstaller:明确支持win8、win10、理论上支持win7,,支持apple Macos, linux。pyinsaller可以打包成文件夹形式内含exe入口执行文件的形式,也可以是一个单独的exe文件。
- fbs:基于PyInstaller,使用起来更加方便
这里选择了fbs来打包。fbs的安装方法:
pip install fbs
使用方法,在命令行中输入:
fbs startproject
执行完成后需要输入一些APP的名称等。完成后会生成如下目录:

将刚才编写的PyQt5的代码(demo.py和Weather.py)拖到src/main/python文件夹下,删除原有的main.py,并将demo.py修改为main.py。然后打开 main.py,在文件头部添加如下代码:
from fbs_runtime.application_context.PyQt5 import ApplicationContext
```
完成后执行:
```
fbs freeze
```
即可实现打包。生成的exe可执行文件在targetMyApp文件下。
The above is the detailed content of Super complete! Python graphical interface framework PyQt5 usage guide!. For more information, please follow other related articles on the PHP Chinese website!

Hot AI Tools

Undresser.AI Undress
AI-powered app for creating realistic nude photos

AI Clothes Remover
Online AI tool for removing clothes from photos.

Undress AI Tool
Undress images for free

Clothoff.io
AI clothes remover

AI Hentai Generator
Generate AI Hentai for free.

Hot Article
Hot Tools

Notepad++7.3.1
Easy-to-use and free code editor

SublimeText3 Chinese version
Chinese version, very easy to use

Zend Studio 13.0.1
Powerful PHP integrated development environment

Dreamweaver CS6
Visual web development tools

SublimeText3 Mac version
God-level code editing software (SublimeText3)
Hot Topics
 1385
1385
 52
52

 PHP and Python: Code Examples and Comparison
Apr 15, 2025 am 12:07 AM
PHP and Python: Code Examples and Comparison
Apr 15, 2025 am 12:07 AM
PHP and Python have their own advantages and disadvantages, and the choice depends on project needs and personal preferences. 1.PHP is suitable for rapid development and maintenance of large-scale web applications. 2. Python dominates the field of data science and machine learning.
 Python vs. JavaScript: Community, Libraries, and Resources
Apr 15, 2025 am 12:16 AM
Python vs. JavaScript: Community, Libraries, and Resources
Apr 15, 2025 am 12:16 AM
Python and JavaScript have their own advantages and disadvantages in terms of community, libraries and resources. 1) The Python community is friendly and suitable for beginners, but the front-end development resources are not as rich as JavaScript. 2) Python is powerful in data science and machine learning libraries, while JavaScript is better in front-end development libraries and frameworks. 3) Both have rich learning resources, but Python is suitable for starting with official documents, while JavaScript is better with MDNWebDocs. The choice should be based on project needs and personal interests.
 Detailed explanation of docker principle
Apr 14, 2025 pm 11:57 PM
Detailed explanation of docker principle
Apr 14, 2025 pm 11:57 PM
Docker uses Linux kernel features to provide an efficient and isolated application running environment. Its working principle is as follows: 1. The mirror is used as a read-only template, which contains everything you need to run the application; 2. The Union File System (UnionFS) stacks multiple file systems, only storing the differences, saving space and speeding up; 3. The daemon manages the mirrors and containers, and the client uses them for interaction; 4. Namespaces and cgroups implement container isolation and resource limitations; 5. Multiple network modes support container interconnection. Only by understanding these core concepts can you better utilize Docker.
 How to run programs in terminal vscode
Apr 15, 2025 pm 06:42 PM
How to run programs in terminal vscode
Apr 15, 2025 pm 06:42 PM
In VS Code, you can run the program in the terminal through the following steps: Prepare the code and open the integrated terminal to ensure that the code directory is consistent with the terminal working directory. Select the run command according to the programming language (such as Python's python your_file_name.py) to check whether it runs successfully and resolve errors. Use the debugger to improve debugging efficiency.
 Python: Automation, Scripting, and Task Management
Apr 16, 2025 am 12:14 AM
Python: Automation, Scripting, and Task Management
Apr 16, 2025 am 12:14 AM
Python excels in automation, scripting, and task management. 1) Automation: File backup is realized through standard libraries such as os and shutil. 2) Script writing: Use the psutil library to monitor system resources. 3) Task management: Use the schedule library to schedule tasks. Python's ease of use and rich library support makes it the preferred tool in these areas.
 Is the vscode extension malicious?
Apr 15, 2025 pm 07:57 PM
Is the vscode extension malicious?
Apr 15, 2025 pm 07:57 PM
VS Code extensions pose malicious risks, such as hiding malicious code, exploiting vulnerabilities, and masturbating as legitimate extensions. Methods to identify malicious extensions include: checking publishers, reading comments, checking code, and installing with caution. Security measures also include: security awareness, good habits, regular updates and antivirus software.
 How to install nginx in centos
Apr 14, 2025 pm 08:06 PM
How to install nginx in centos
Apr 14, 2025 pm 08:06 PM
CentOS Installing Nginx requires following the following steps: Installing dependencies such as development tools, pcre-devel, and openssl-devel. Download the Nginx source code package, unzip it and compile and install it, and specify the installation path as /usr/local/nginx. Create Nginx users and user groups and set permissions. Modify the configuration file nginx.conf, and configure the listening port and domain name/IP address. Start the Nginx service. Common errors need to be paid attention to, such as dependency issues, port conflicts, and configuration file errors. Performance optimization needs to be adjusted according to the specific situation, such as turning on cache and adjusting the number of worker processes.
 What is vscode What is vscode for?
Apr 15, 2025 pm 06:45 PM
What is vscode What is vscode for?
Apr 15, 2025 pm 06:45 PM
VS Code is the full name Visual Studio Code, which is a free and open source cross-platform code editor and development environment developed by Microsoft. It supports a wide range of programming languages and provides syntax highlighting, code automatic completion, code snippets and smart prompts to improve development efficiency. Through a rich extension ecosystem, users can add extensions to specific needs and languages, such as debuggers, code formatting tools, and Git integrations. VS Code also includes an intuitive debugger that helps quickly find and resolve bugs in your code.
