 Backend Development
 Python Tutorial
 Take stock of a tutorial on converting JS reverse code to Python code
Take stock of a tutorial on converting JS reverse code to Python code

Preface
A few days ago in the Python Xingyao and The Strongest King exchange group, several people were asking about JS reverse engineering videos and related codes. It seemed that they were all I’m learning advanced knowledge and I really can’t get enough of it. It just so happens that I have been reading some JS learning materials these days and saw a pretty good case. I will share it with you here and record it as well.
JS code
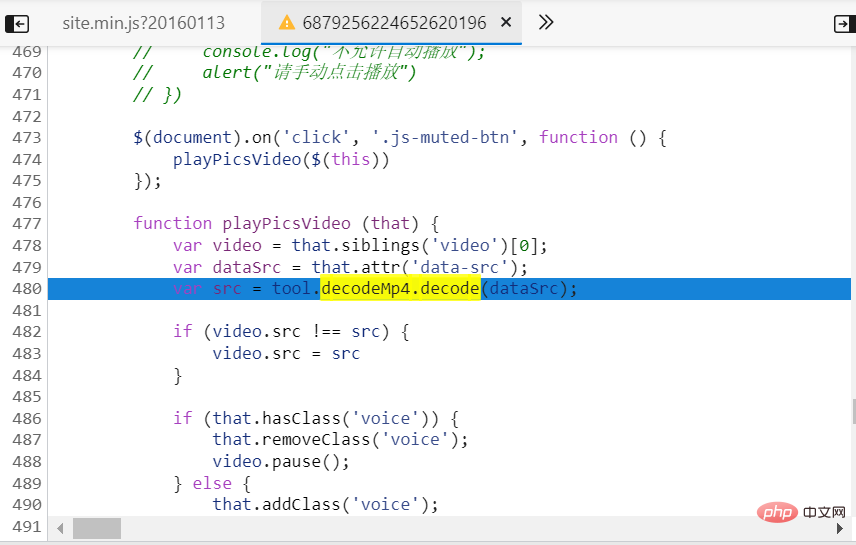
Regarding the search for JS code, it is quite difficult to write an article and explain it. It would be better to record a video explanation. Here, the ready-made JS code is directly arranged. It is quite difficult to find this JS encryption code at first. You need to constantly break points, find the encryption rules, and peel the onion layer by layer to find out. The JS encryption code used in this article comes from a small video website. The encryption function presented on the web page is as shown below:

The encryption method is not too difficult, among which decodeMp4. The core code of the decode() encryption function is as follows.
define("tool", function(a, b, c) {
var d = a("jquery")
, e = a("support")
, f = a("constants")
, g = a("base64")
, h = "substring"
, i = "split"
, j = "replace"
, k = "substr";
b.decodeMp4 = {
getHex: function(a) {
return {
str: a[h](4),
hex: a[h](0, 4)[i]("").reverse().join("")
}
},
getDec: function(a) {
var b = parseInt(a, 16).toString();# 对应Python中的str(int(a, 16))
return {
pre: b[h](0, 2)[i](""),
tail: b[h](2)[i]("")
}
},
substr: function(a, b) {
var c = a[h](0, b[0])
, d = a[k](b[0], b[1]);
return c + a[h](b[0])[j](d, "")
},
getPos: function(a, b) {
return b[0] = a.length - b[0] - b[1],
b
},
decode: function(a) {
var b = this.getHex(a)
, c = this.getDec(b.hex)
, d = this[k](b.str, c.pre);
return g.atob(this[k](d, this.getPos(d, c.tail)))
}
};You can see that the decode() function in decodeMp4 is called, and the decode() function calls getHex(a), getDec(b.hex), g.atob(), getPos( d, c.tail) and other functions, and what we have to do is to convert these functions into Python writing, then construct the corresponding encryption method, obtain the encrypted result, and then complete the reverse effect.
Conversion process
The variable a here is obtained by breaking points and is a long string. Here, the following variable is used as an example.
a = "c0b1Ly9tdnPflQ3cQpPZpZGVvMTAubWVpdHVkYXRhLmNvbS82MWM0NDNlOGI1MmFmMTYzMi5tcDkBOyQ"
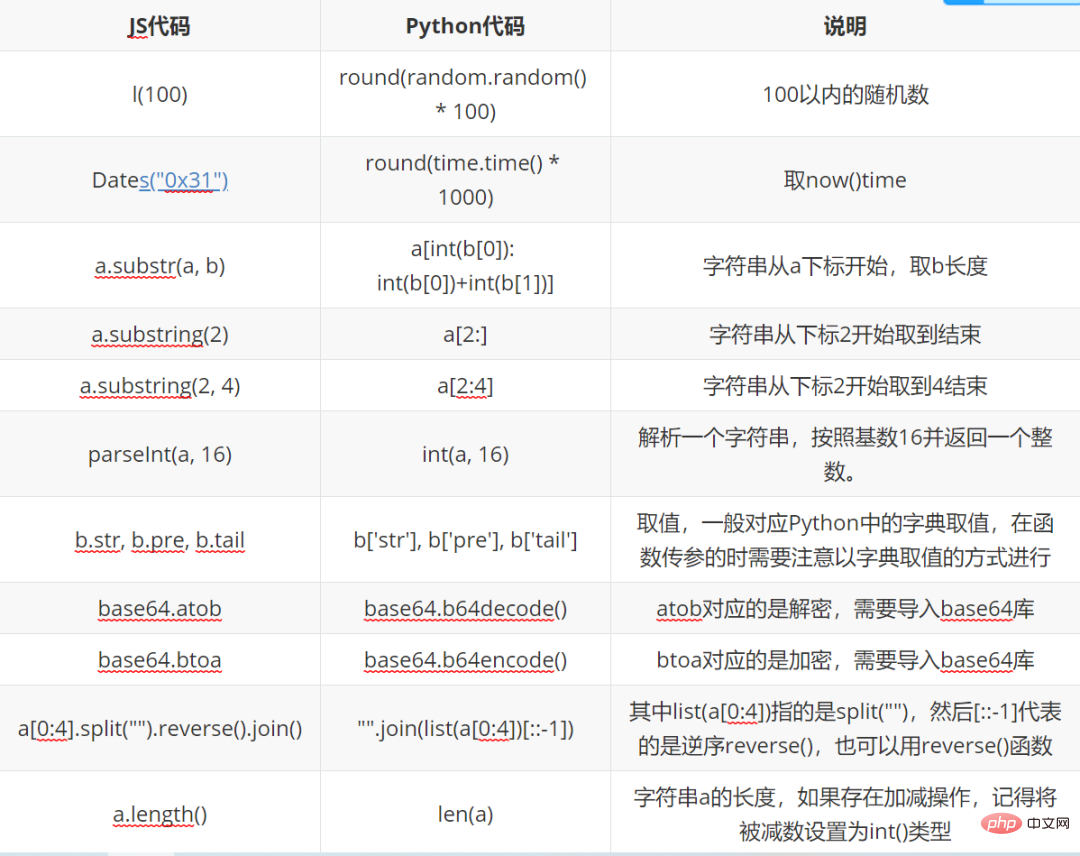
Let’s briefly organize the functions that will be used later in advance, so that it will be easier for everyone to check later.

Let’s break down each function in turn, as follows:
1. getHex(a) function
var h = "substring",i = "split";
getHex: function(a) {
return {
str: a[h](4),
hex: a[h](0, 4)[i]("").reverse().join("")
}
},The above Is the corresponding getHex() function JS code. You can see that a dictionary is directly returned. The keys of the dictionary are str and hex respectively. The corresponding value of str is a[h](4). The definition of h is substring. This function means that the string starts from the specified subscript until it reaches the end of the string. The translation here is a.substring(4), that is, the string a starts from the subscript 4 and ends at the end; a[h](0, 4)[i]("").reverse().join("") This is a bit more complicated to understand. First, the value of the string is taken, and the position is from 0 to 4. Then the function i, which is the split function, is called. Use spaces ("") as separation, call the reverse() function to sort in reverse order, and then call join("") to connect strings. After disassembly, it is much simpler. The next step is to construct the Python code. After writing the comparison, it will look like this:
def getHex(a):
return {
"str": a[4:],# JS中的substring(4)指的是从4开始取值到字符串末尾
"hex": "".join(list(a[0:4])[::-1])# [::-1]代表的是反向取值
}Does it look familiar? It is exactly the same as the JS code above.
2. getDec(a) function
The JS code is as follows:
 getDec: function(a) {
var b = parseInt(a, 16).toString();
return {
pre: b[h](0, 2)[i](""),
tail: b[h](2)[i]("")
}
},According to the corresponding relationship, the corresponding Python code can be written as follows:
def getDec(a):
b = str(int(a, 16))
print(b)
return {
"pre": list(b[:2]),
"tail": list(b[2:])
}3. substr(a, b) function
The JS code is as follows:
substr: function(a, b) {
var c = a[h](0, b[0])
, d = a[k](b[0], b[1]);
return c + a[h](b[0])[j](d, "")
},According to the corresponding relationship, the corresponding Python code can be written as follows:
def substr(a, b):
c = a[0: int(b[0])]
print(c)
d = a[int(b[0]):int(b[0])+int(b[1])]
print(d)
return c + a[int(b[0]):].replace(d, '')
4. getPos(a, b) function
The JS code is as follows:
getPos: function(a, b) {
return b[0] = a.length - b[0] - b[1],
b
},According to the corresponding relationship, the corresponding Python code can be written as follows:
def getPos(a, b):
b[0] = len(a) - int(b[0]) - int(b[1])
print(b[0])
return b
5. decode(a, b) function
The JS code is as follows:
decode: function(a) {
var b = this.getHex(a)
, c = this.getDec(b.hex)
, d = this[k](b.str, c.pre);
return g.atob(this[k](d, this.getPos(d, c.tail)))
}According to the corresponding relationship, the corresponding Python code can be written as follows:
 b = getHex(a)
# print(b)
c = getDec(b['hex'])
print(c)
# d = k(str(b), c.pre)
d = substr(b['str'], c['pre'])
# print(d)
return base64.b64decode(substr(d, getPos(d, c['tail'])))
Effect display
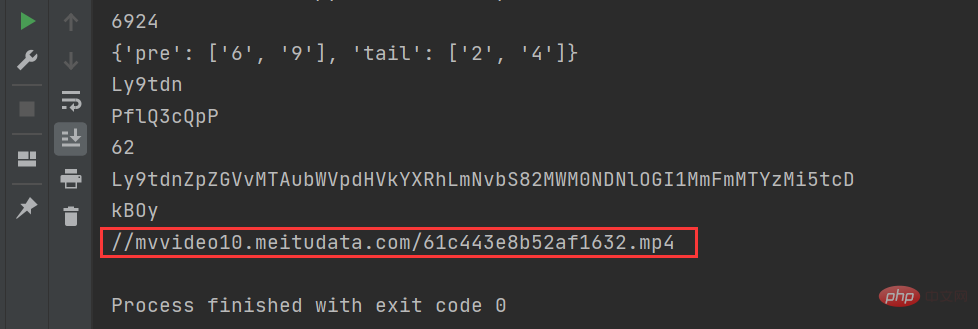
Request directly through a web crawler. You cannot get the final encrypted address. No matter how you request, you cannot get it. You can only get the data-src, that is The string variable a mentioned above can only be reversed through the above analysis and run the code to get the same request address as on the web page, as shown in the figure below, the reverse is successful!

Put this address in the browser and it can be played. Then make a download request and the video can be downloaded.
Summary
Hello everyone, I am a Python advanced user. This article is mainly based on the JS reverse problem in Python web crawler and makes a case explanation. If the web page is loaded with JS, if you request it directly through a web crawler, you will not be able to get the final encrypted address. To address this reverse problem, we have made a simple reverse example implementation process.
The above is the detailed content of Take stock of a tutorial on converting JS reverse code to Python code. For more information, please follow other related articles on the PHP Chinese website!

Hot AI Tools

Undresser.AI Undress
AI-powered app for creating realistic nude photos

AI Clothes Remover
Online AI tool for removing clothes from photos.

Undress AI Tool
Undress images for free

Clothoff.io
AI clothes remover

AI Hentai Generator
Generate AI Hentai for free.

Hot Article

Hot Tools

Notepad++7.3.1
Easy-to-use and free code editor

SublimeText3 Chinese version
Chinese version, very easy to use

Zend Studio 13.0.1
Powerful PHP integrated development environment

Dreamweaver CS6
Visual web development tools

SublimeText3 Mac version
God-level code editing software (SublimeText3)

Hot Topics
 1385
1385
 52
52
 PHP and Python: Code Examples and Comparison
Apr 15, 2025 am 12:07 AM
PHP and Python have their own advantages and disadvantages, and the choice depends on project needs and personal preferences. 1.PHP is suitable for rapid development and maintenance of large-scale web applications. 2. Python dominates the field of data science and machine learning.
 Python vs. JavaScript: Community, Libraries, and Resources
Apr 15, 2025 am 12:16 AM
Python and JavaScript have their own advantages and disadvantages in terms of community, libraries and resources. 1) The Python community is friendly and suitable for beginners, but the front-end development resources are not as rich as JavaScript. 2) Python is powerful in data science and machine learning libraries, while JavaScript is better in front-end development libraries and frameworks. 3) Both have rich learning resources, but Python is suitable for starting with official documents, while JavaScript is better with MDNWebDocs. The choice should be based on project needs and personal interests.
 Detailed explanation of docker principle
Apr 14, 2025 pm 11:57 PM
Docker uses Linux kernel features to provide an efficient and isolated application running environment. Its working principle is as follows: 1. The mirror is used as a read-only template, which contains everything you need to run the application; 2. The Union File System (UnionFS) stacks multiple file systems, only storing the differences, saving space and speeding up; 3. The daemon manages the mirrors and containers, and the client uses them for interaction; 4. Namespaces and cgroups implement container isolation and resource limitations; 5. Multiple network modes support container interconnection. Only by understanding these core concepts can you better utilize Docker.
 Python: Automation, Scripting, and Task Management
Apr 16, 2025 am 12:14 AM
Python excels in automation, scripting, and task management. 1) Automation: File backup is realized through standard libraries such as os and shutil. 2) Script writing: Use the psutil library to monitor system resources. 3) Task management: Use the schedule library to schedule tasks. Python's ease of use and rich library support makes it the preferred tool in these areas.
 How to run programs in terminal vscode
Apr 15, 2025 pm 06:42 PM
In VS Code, you can run the program in the terminal through the following steps: Prepare the code and open the integrated terminal to ensure that the code directory is consistent with the terminal working directory. Select the run command according to the programming language (such as Python's python your_file_name.py) to check whether it runs successfully and resolve errors. Use the debugger to improve debugging efficiency.
 What is vscode What is vscode for?
Apr 15, 2025 pm 06:45 PM
VS Code is the full name Visual Studio Code, which is a free and open source cross-platform code editor and development environment developed by Microsoft. It supports a wide range of programming languages and provides syntax highlighting, code automatic completion, code snippets and smart prompts to improve development efficiency. Through a rich extension ecosystem, users can add extensions to specific needs and languages, such as debuggers, code formatting tools, and Git integrations. VS Code also includes an intuitive debugger that helps quickly find and resolve bugs in your code.
 Can visual studio code be used in python
Apr 15, 2025 pm 08:18 PM
VS Code can be used to write Python and provides many features that make it an ideal tool for developing Python applications. It allows users to: install Python extensions to get functions such as code completion, syntax highlighting, and debugging. Use the debugger to track code step by step, find and fix errors. Integrate Git for version control. Use code formatting tools to maintain code consistency. Use the Linting tool to spot potential problems ahead of time.
 Is the vscode extension malicious?
Apr 15, 2025 pm 07:57 PM
VS Code extensions pose malicious risks, such as hiding malicious code, exploiting vulnerabilities, and masturbating as legitimate extensions. Methods to identify malicious extensions include: checking publishers, reading comments, checking code, and installing with caution. Security measures also include: security awareness, good habits, regular updates and antivirus software.


