

How to enable or disable Data Execution Prevention (DEP) on Windows 10/11

Data Execution Prevention (DEP) is a memory protection feature in Windows. It checks and protects several areas of memory and helps prevent them from executing malicious code. In turn, it can help prevent viruses and other security threats from causing damage to your computer. It prevents code from running from the default heap, stack and memory pool. If an application attempts to execute or run code from a protected page, the application receives an exception error with a status code. DEP is helpful, but sometimes problems can arise when it doesn't work as expected. DEP is established in 64-bit programs. Most programs that cause DEP problems are 32-bit programs. In this article, let us see how to enable or disable DEP feature in Windows.
Disable DEP (Data Execution Prevention) for selected programs
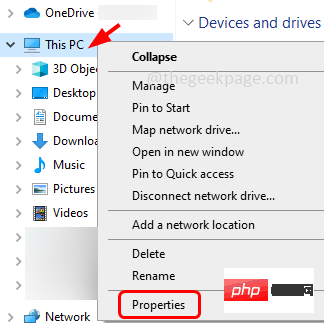
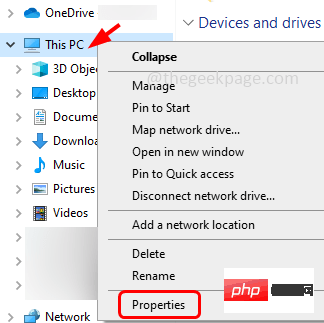
Step 1: Use Windows E keys together to open Windows Explorer (File Explorer)
Step 2: On the left, right-click "This PC"
Step 3: Click from the list that appears Properties
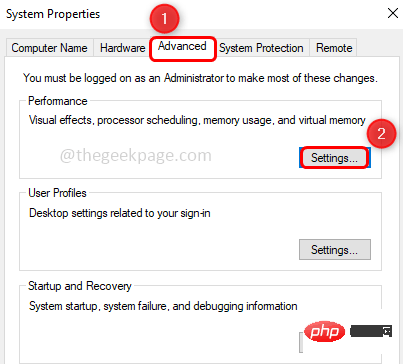
Step 4: In the settings window that opens, click Advanced System Settings
# on the right side of 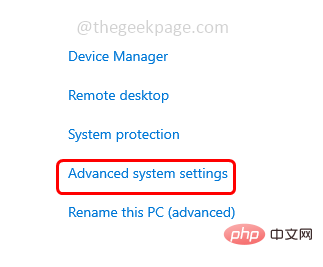
Data Execution Prevention tab
Step 8: To turn on DEP for Windows Services and Programs, click the radio button next toStep 9: To turn on DEP for all programs except a few selected programs, click the radio button next to Turn on DEP for all programs except the ones I selected
 Step 10:
" button will be enabled, click on it
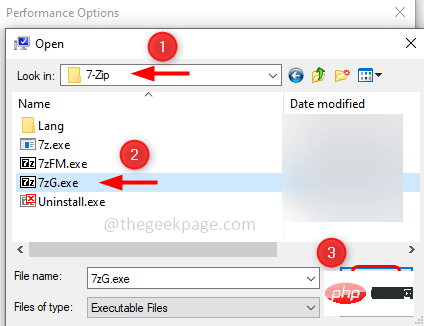
Step 11: InFind range In the drop-down list, select the local disk of C drive (C:)
Step 12: Double-click the
program file 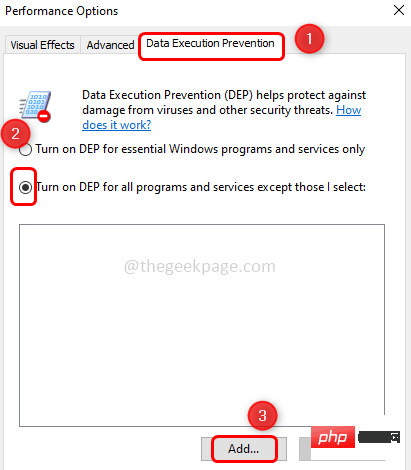 (wherever you want to How to enable or disable Data Execution Prevention (DEP) on Windows 10/11 the program How is the path)
Step 13: You can scroll and select the required program.
ClickProgram Executable file, then click
to open.For example, I selected the 7-zip application as an exception here. After applying the settings, 7-zip will run outside DEP protection, while all other compression will run inside DEP protection. Step 14: The selected program will be listed in the Performance Options window Step 15: If you want to How to enable or disable Data Execution Prevention (DEP) on Windows 10/11 another program to the exceptions list, please Click Add again and follow the same steps [Steps 11-14]Step 16: ClickApply and then clickOK
” Step 17:
the computer and turn on/enable DEP for the program.
Note: The methods mentioned below should only be used during troubleshooting or debuggingDisable or turn off DEP (Data Execution Prevention) completely
Step 1: Open Command Prompt as
administrator. To do this, type cmd in the window search bar, then hold down the
Ctrl Shiftkey and press Enter
Step 2: The User Account Control window will open, click Yes Step 3: In the command prompt type the following command and press Enter key bcdedit.exe /set {current} How to enable or disable Data Execution Prevention (DEP) on Windows 10/11 AlwaysOff
Step 4: Restart the
computer, DEP will disable all programs.Enable or turn on DEP (Data Execution Prevention)
Step 1: OpenCommand Prompt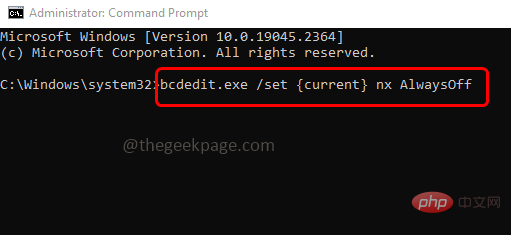 as
as
. To do this, type cmd in the window search bar, then hold down the
Ctrl Shiftkey and press Enter
Step 2: The User Account Control window will open, click Yes Step 3: Type the following command in the command prompt and press Enter keybcdedit.exe /set {current} How to enable or disable Data Execution Prevention (DEP) on Windows 10/11 AlwaysOn
Restart the computer and DEP will be enabled for all programs.
Note: Once DEP is set to always on or always off, it cannot be changed using the Data Execution Prevention tab in System Settings. So let's see how we can bring the radio button back into the DEP tab and make it available again
将 DEP 设置为其默认行为(可使用系统设置进行管理)
步骤1:以管理员身份打开命令提示符。为此,请在窗口搜索栏中键入cmd,然后按住Ctrl + Shift键并按回车键
步骤2:用户帐户控制窗口将打开,单击是
步骤3:在命令提示符下键入以下命令并按回车键
bcdedit.exe /set {current} How to enable or disable Data Execution Prevention (DEP) on Windows 10/11 OptIn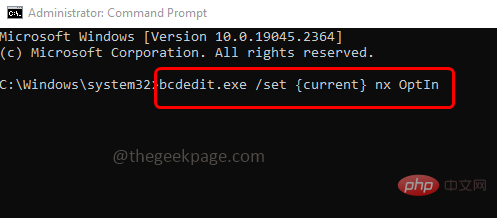
步骤4: 重新启动计算机,DEP选项卡中的单选按钮将再次访问。
有关信息:
BCDedit.exe 是用于编辑启动配置数据的主要工具。
/set 命令在 Windows 启动配置数据中设置启动项选项值。
{当前} 当前启动项的标识符为 {current},它告知 bcdedit 使用当前正在使用的启动配置。
How to enable or disable Data Execution Prevention (DEP) on Windows 10/11 是 no-execute 的缩写形式,是引导配置中 DEP 的设置名称。
选择加入仅为操作系统组件启用 DEP。
始终关闭禁用 DEP。
始终在线为操作系统和所有进程启用 DEP。
The above is the detailed content of How to enable or disable Data Execution Prevention (DEP) on Windows 10/11. For more information, please follow other related articles on the PHP Chinese website!

Hot AI Tools

Undresser.AI Undress
AI-powered app for creating realistic nude photos

AI Clothes Remover
Online AI tool for removing clothes from photos.

Undress AI Tool
Undress images for free

Clothoff.io
AI clothes remover

AI Hentai Generator
Generate AI Hentai for free.

Hot Article
Hot Tools

Notepad++7.3.1
Easy-to-use and free code editor

SublimeText3 Chinese version
Chinese version, very easy to use

Zend Studio 13.0.1
Powerful PHP integrated development environment

Dreamweaver CS6
Visual web development tools

SublimeText3 Mac version
God-level code editing software (SublimeText3)
Hot Topics


 How to sort photos by favorites on Windows 10 and 11
Apr 30, 2023 pm 12:19 PM
How to sort photos by favorites on Windows 10 and 11
Apr 30, 2023 pm 12:19 PM
Windows Photos has been overhauled in Windows 11, so you'll enjoy new features and improvements. One of them is to sort photos by favorites. Windows has a special folder for photos that have been marked as favorites. The Favorites list is useful if you have many photos in an album or folder, as it makes it easy to find the photos you want to display on the screen. If you don't know this feature or how to add photos to your Favorites folder, we'll show you how. How to sort favorite photos in Windows? Windows 11 launches the Photos app by clicking the key, typing photos in the search bar, and clicking Open. Windows Phone
 How to enable or disable Data Execution Prevention (DEP) on Windows 10/11
Apr 13, 2023 am 11:37 AM
How to enable or disable Data Execution Prevention (DEP) on Windows 10/11
Apr 13, 2023 am 11:37 AM
Data Execution Prevention (DEP) is a memory protection feature in Windows. It checks and protects several areas of memory and helps prevent them from executing malicious code. In turn, it can help prevent viruses and other security threats from causing damage to your computer. It prevents code from running from the default heap, stack and memory pool. If an application attempts to execute or run code from a protected page, the application receives an exception error with a status code. DEP is helpful, but sometimes problems can arise when it doesn't work as expected. DEP is established in 64-bit programs. Most programs that cause DEP problems are 32-bit programs. In this article, let us see how to
![Automatically setting time zone not working on Windows 10 [Fixed]](https://img.php.cn/upload/article/000/887/227/168136135759894.png?x-oss-process=image/resize,m_fill,h_207,w_330) Automatically setting time zone not working on Windows 10 [Fixed]
Apr 13, 2023 pm 12:49 PM
Automatically setting time zone not working on Windows 10 [Fixed]
Apr 13, 2023 pm 12:49 PM
Manually changing the date and time based on the time zone is a bit time-consuming and can also cause confusion if someone forgets to change the computer's time, especially if you are traveling for business purposes. It is the best and wisest option to set the time automatically so that it can automatically update your computer's time based on your location. In this article, let’s see how to set time zone automatically on Windows 10. Method 1: Enable the Automatically set time and time zone option Step 1: Use Windows + I keys simultaneously to open Windows Settings Step 2: Click Time and Language Step 3: Enable the Automatically set time option by clicking the toggle bar below Step 4 : You can also enable automatic settings by clicking the toggle bar below
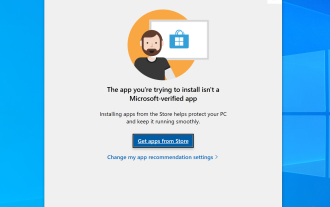 How to fix The app you are trying to install is not a Microsoft verified app on Windows
Apr 13, 2023 pm 05:52 PM
How to fix The app you are trying to install is not a Microsoft verified app on Windows
Apr 13, 2023 pm 05:52 PM
Microsoft Windows 10 and 11 may be configured to only allow certain types of applications to be installed on the device. This restriction may be intentional, such as when policies are in place to restrict what can be installed on the device, but it is also sometimes unintentional. The following guide provides easy-to-follow, step-by-step instructions for resolving unexpected error messages. Windows users who try to install certain types of applications may receive the error message "The application you are trying to install is not a Microsoft-validated application." The dialog box provides little information about why the installation was blocked. It states that "Installing apps from the Store can help protect your PC and keep it running smoothly" and links to
 How to fix Registry Editor not opening in Windows 11, 10
May 23, 2023 pm 11:31 PM
How to fix Registry Editor not opening in Windows 11, 10
May 23, 2023 pm 11:31 PM
Registry Editor is the tool we use to fix Windows system errors. It is the center of registry keys and, with appropriate adjustments, can solve most problems. But in rare cases, Registry Editor may also hang. Many users have reported seeing errors when trying to search for a key that does not exist on their system. If you try to cancel the search the application will hang and even if you don't cancel the search the application will freeze with the following message. Registry Editor has stopped working. The root cause of the problem is the length of the subkey. This error occurs if the length of the subkey exceeds 255 bytes. However, sometimes, it can also be because of a virus or malware. If you notice this issue on your system, don't panic. In this article, let us discuss solving
 How to set a default folder view for all folders in Windows 10
Apr 15, 2023 am 09:31 AM
How to set a default folder view for all folders in Windows 10
Apr 15, 2023 am 09:31 AM
In File Explorer, there are many options to change the folder layout, such as extra large icons, small icons, lists, tiles, etc., and each option has a different view. By default, Windows will set the folder view based on the folder contents. For example, folders containing videos have different views, similarly folders such as images, documents, etc. have different folder views. If there are different types of files in a folder, meaning a mix of images, documents, videos, music, etc., then it has a common template. That said, you can also set a default folder view for all folders. In this article, let’s see how to set a default folder view for all folders on your computer. To set a default folder view for all folders
 How to hide and unhide the navigation pane in File Explorer in Windows 10
Apr 13, 2023 pm 02:16 PM
How to hide and unhide the navigation pane in File Explorer in Windows 10
Apr 13, 2023 pm 02:16 PM
The navigation pane is located on the left side of File Explorer/Windows Explorer. It shows Quick Access, This PC, Folders, etc. Some folders and locations can be accessed quickly and easily from this navigation pane. But few users are willing to hide this and do it. In this article, we will learn how to hide and unhide/enable the Navigation Pane from File Explorer. How to Hide the Navigation Pane Step 1: Open File Explorer and press Windows + E keys simultaneously. Step 2: Click the View tab in the upper left corner. By default, the navigation pane will be enabled on the system. Advertisement Step 3: Click the Navigation Pane button and a drop-down menu will appear. Step 4: Click Next
 How to disable Internet connection sharing in Windows 10
Apr 20, 2023 pm 12:46 PM
How to disable Internet connection sharing in Windows 10
Apr 20, 2023 pm 12:46 PM
Internet Connection Sharing (ICS) is a feature that allows you to share your computer's Internet with multiple other computers on a local area network (LAN). Therefore, if this feature is enabled, any computer or device connected to the host computer can use the network without installing any additional software. Some of you may want to disable the Internet connection sharing feature. This article tells you some ways on how to disable it. let's start! Method 1: Disable Internet Connection Sharing using Control Panel Step 1: Use Windows+R keys simultaneously to open the Run prompt. Type ncpa.cpl and press Enter Step 2: In the window that opens, right-click on the adapter or your