

Fix: Microsoft Teams camera not detected and not working properly

Microsoft Teams is a collaboration tool provided by Microsoft, providing a platform for communication between users such as chat and video, file sharing and conferencing. Many users have noticed that the camera suddenly stopped working with Microsoft Teams, which in turn did not allow them to join any video conference calls.
If you are having issues with Teams not detecting your camera, you have found the right article. In this article, we have listed some troubleshooting methods that can help you fix this camera not working issue in MS Teams on Windows 11/10 PC. Before proceeding with the fixes in this article, we recommend that you try the workarounds to see if they resolve the issue for you.
Solution
1.Restart the system and check if the problem is resolved.
2. Completely quit Microsoft Teams using the icon in the system tray on the right side of the taskbar. Restart and check if the camera issue is resolved.

3. If you are using an external camera connected via USB, please unplug it from the system, and then re- insert. Check if this resolves the camera issue with Teams.
4. Open the defaultCamera application and check if it is working to make sure the camera is working properly. If it doesn't work, it means there is something else that needs to be fixed.
4. If you have3rd party security software installed on your PC, try temporarily disabling it to check if it helps resolve the issue.
5. Check if anyother applications (such as Skype, Discord or Zoom) are controlling the camera on your system. Try closing these apps and check if the camera works with Teams. Fix 1 – Reinstall the camera driver
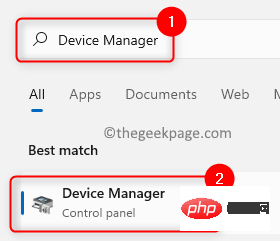
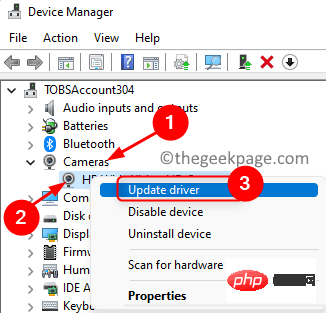
1. Click the
Windowskey and enter Device Manager in the search box. 2. Select
Device Manager from the displayed search results.
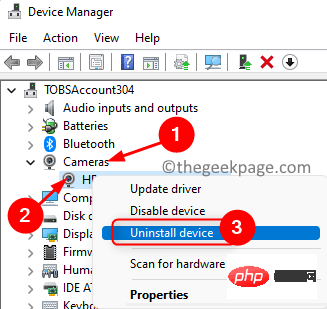
 3. Expand the
header in Device Manager to view the different cameras available. Note that it can be under any section, just go ahead and expand and check the camera device to find out where it is. 4. Once you find it,
right-click on thecamera device and select the Uninstall device option.
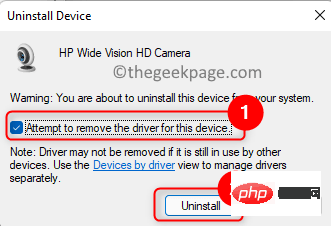
 5. In the window that opens,
Try to remove the driver for this device. 6. Then, click
Uninstallto remove the driver from the system.
 7. Click the
Device Manager. 8. Select
Scan for hardware changes.
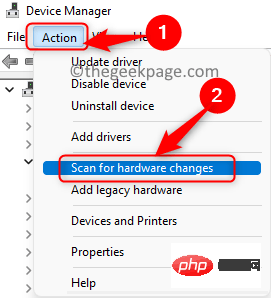 9. It will scan and install any missing drivers. The camera will now start using Teams.
Fix 2 – Enable Privacy Settings
Change settings to allow camera access
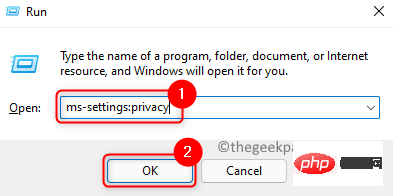
1. Simply press the
Windows and Rkeys simultaneously to open "Run"dialog box. 2. Enter
ms-settings:privacyand click OK to open privacy and security settings.
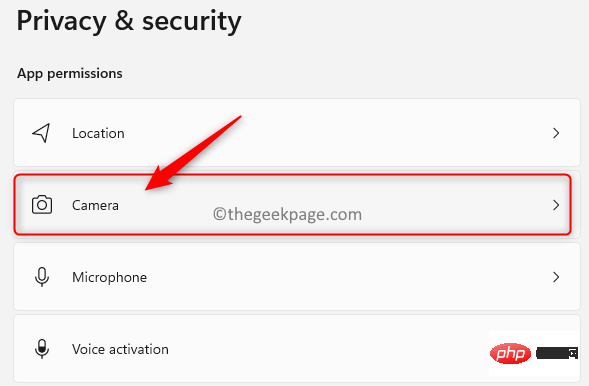
 3. Find the
section. 4. Here, click
Camerato open camera related settings.
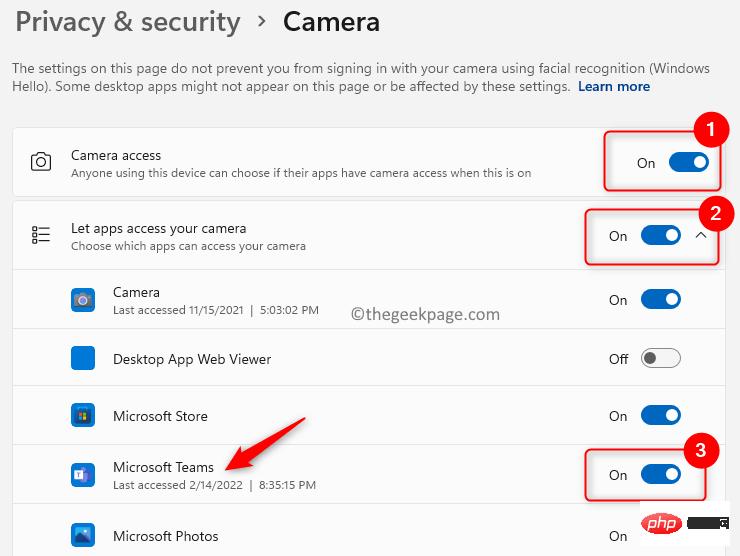
 5.
5.
switch related to camera access.
6. Under the "Let apps access your camera" section, look for Microsoft Teams. 7. Make sure the toggle associated with
Microsoft Teamsis turned on .
 #8. Also,
next to Let desktop apps access your camera.
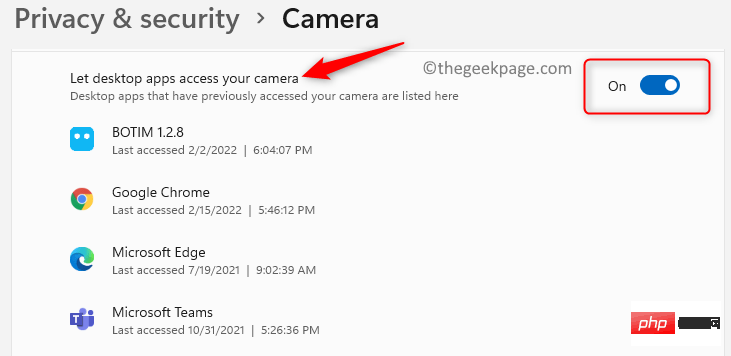 #9. Check if you can access the camera using Teams.
Change settings to allow access to microphone
1. Perform steps 1 -3 above.
2. Click Microphone in the App permissions section.
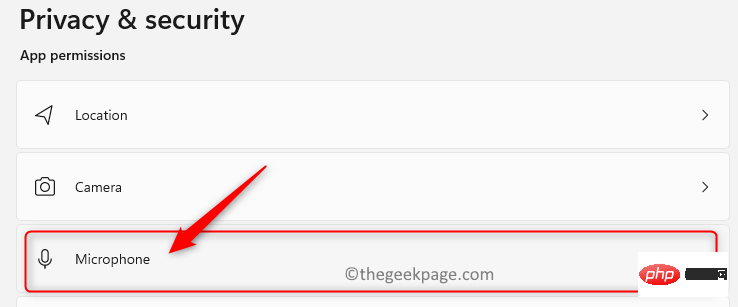
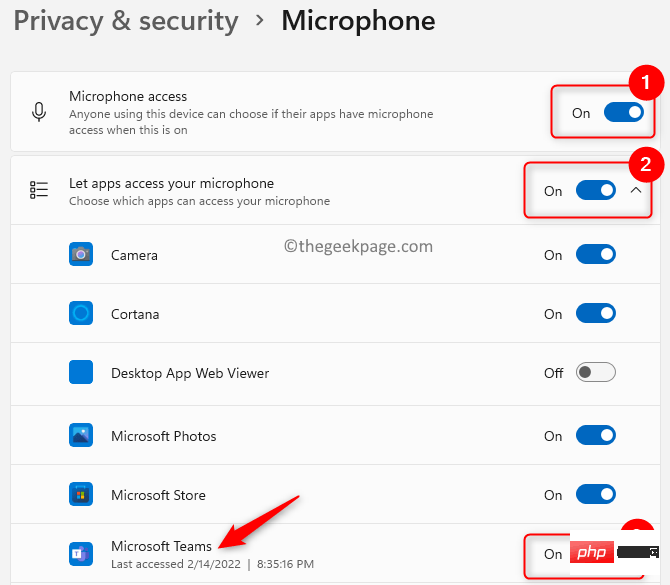
3. Check whether the switch next to Microphone Access is turned on .
4. In the Allow apps to access your microphone section, turn on the toggle switch associated with Microsoft Teams.
5.Turn on the switch next to Let desktop apps access your microphone.
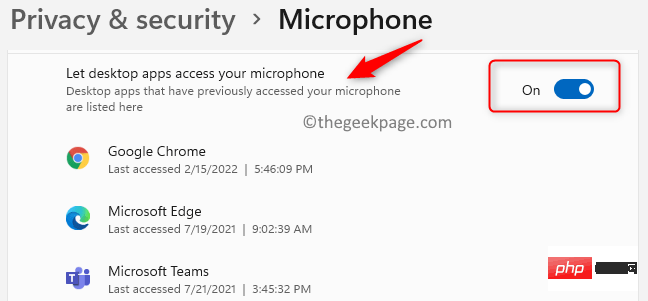
#6. Check whether the Teams camera issue has been resolved.
Fix 3 – Configure camera settings in Microsoft Teams
1. Open Microsoft Teams.
2. Start a meeting with the selected contact.
3. In the Teams Meeting window, click the three vertical dots in the upper right corner and select Device set up.
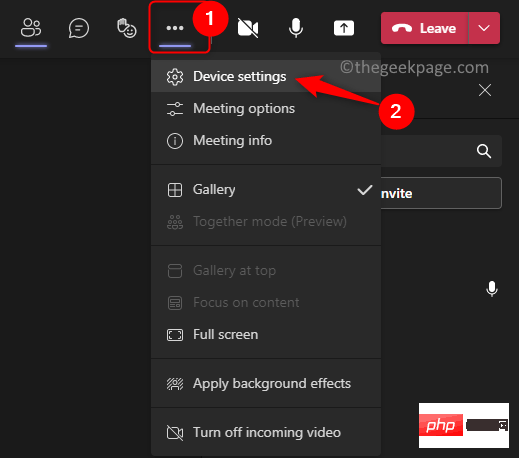
4. In the Device Settings pane that opens, make sure is selected correctly in the Camera section device of.
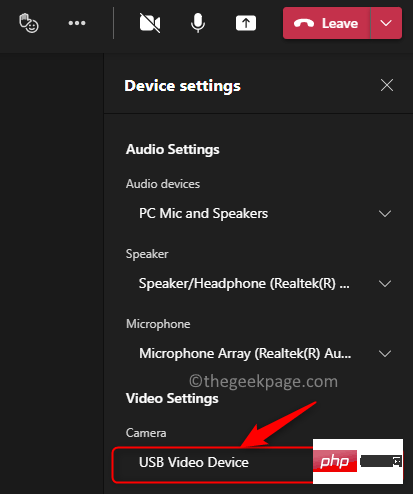
#5. Make a test call and check if the camera works with Teams.
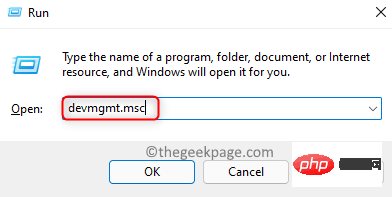
Fix 4 – Disable other devices
If your system has multiple cameras, try disabling the USB camera to check if Teams works with the system’s built-in camera. If you want to use a USB camera, you can disable the built-in camera and check if the issue is resolved.
1. To open the Run dialog box, use the Windows and R key combination.
2. Enter devmgmt.msc to open the device manager.
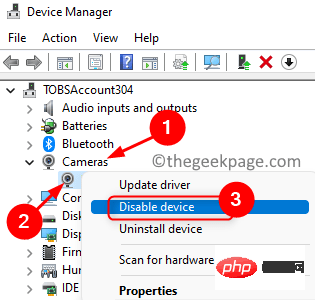
3. Expand the Camera branch.
4.Right-click on the device you want to disable and select Disable Device.
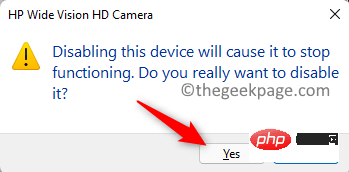
#5. Click Yes to confirm disabling the device.
#6. Open Teams and try a video call to check if the other camera is working.
Fix 5 – Update Camera Driver
1. Open Run (Windows R) and type devmgmt.msc to open the device Manager.
2. Click the arrow next to Camera to expand it.
3.Right-click on the camera and select Update Driver.
4. In the Update Driver window of the opened camera, click Search automatically for driver.
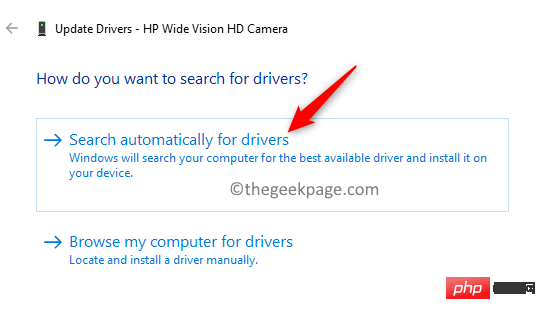
#5. If there are any new updates, Windows will search for any drivers and install them.
6. After the update, your camera should now work with the Teams app.
Fix 6 – Update Teams
1. Launch the Microsoft Teams application.
2. Click the three horizontal dots next to your profile icon.
3. Select Settings in the menu that appears.
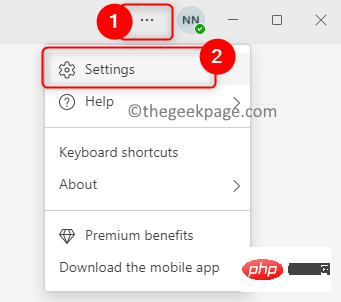
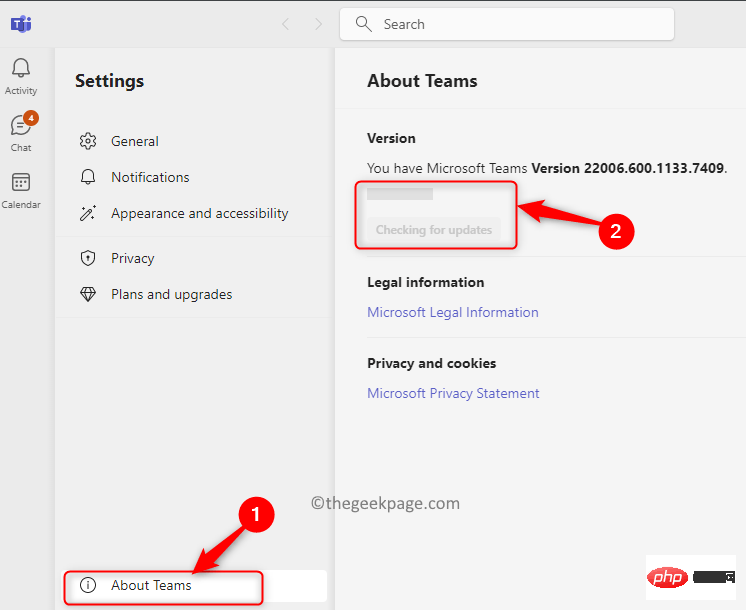
4. Click SettingsAbout Team in the lower left corner of the screen.
5. Once clicked, you will see that it will start checking Teams for updates. If any updates are available, they will be installed.
6.Restart the Teams app and check if the camera issue is fixed.
Fix 7 – Reinstall Team
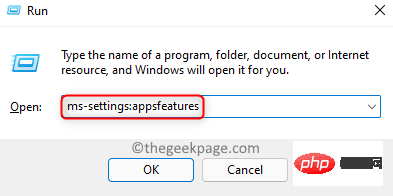
1. Press Windows R and type ms-settings:appsfeaturesOpen Apps and Features Settings .
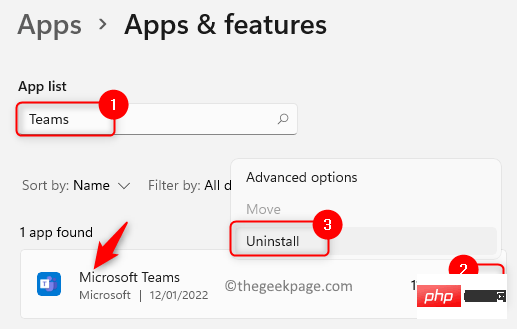
#2. Find Microsoft Teams in the application list.
3. Click the three vertical dots associated with Microsoft Teams and select Uninstall.
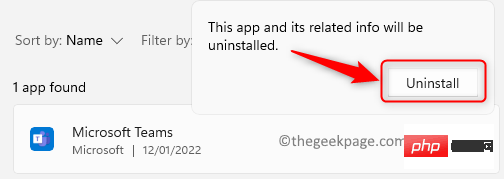
#4. In the confirmation, click Uninstall again.
#5. Wait for the application to be completely uninstalled.
6.Restart your system.
7.Download The latest version of Microsoft Teams.
8. Use the installer and follow the on-screen instructions to complete the installation of Teams.
9. Launch Teams and log in with your credentials. Check if the camera is working properly.
Fix 8 – Run the Hardware and Devices Troubleshooter
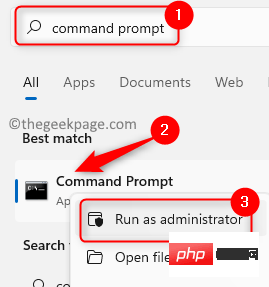
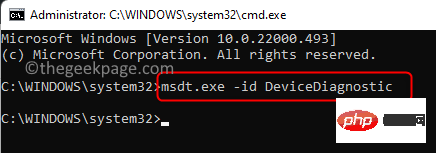
1. Press the Windows key and type Command Prompt in the search box.
2.Right-click on the command in the results Prompt and select Run as administrator .
3. When User Account Control prompts, click Yes to grant permissions.
4. Type the following command and press Enter.
msdt.exe -id DeviceDiagnostic
5.Hardware and Device TroubleshooterOpen. Here, click Next to start the troubleshooting process.
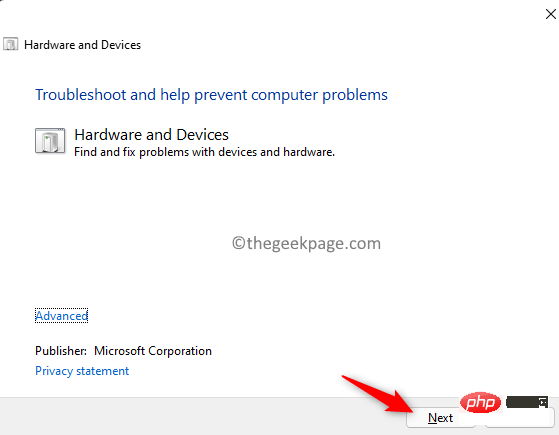
# 6. Wait for the troubleshooter to find and fix device and hardware issues. If there are any issues, they will be fixed automatically after troubleshooting is complete.
7. Open Teams and check if the camera is handling the video call.
Fix 9 – Check for Windows Updates
1. Press Windows R to openRun.
2. Type ms-settings:windowsupdate and press Enter to open Windows Update in Settings.
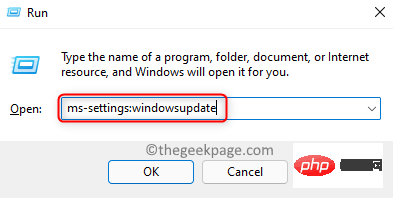
3. Here, click the Check for Updates button.

#4. Windows will check for new updates available. If available, they will be downloaded and installed on your PC.
5. After updating Windows to the latest versionRestart your PC.
6. Open Teams and check if the camera is working properly during the video call.
Fix 10 – Use a Browser
If none of the above fixes help you resolve the issue, use the web version of Teams to attend meetings.
1. Use your browser to go to Teams on the Web.
2. Log in using your user credentials .
3. Click the link to use the web app instead of .

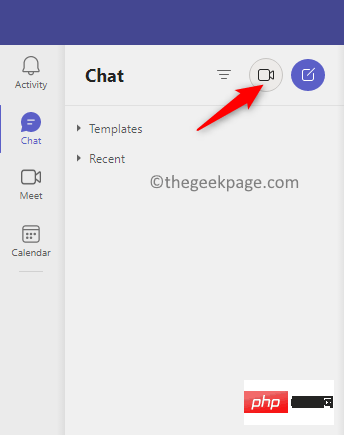
4. Now, select Chat on the left pane.
5. Select a contact from the list and use the Video Call button to start a video call.
#6. You will see a notification Allow camera access to the browser. Click the Allow button.
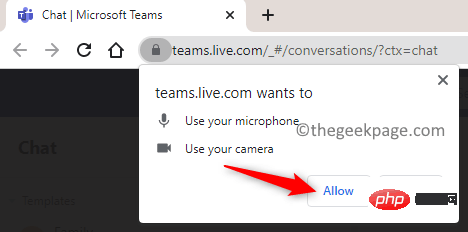
#7. The camera must now be used with Teams calls on the web.
If the browser does not request permission, you will need to configure the settings for your specific browser.
Google Chrome
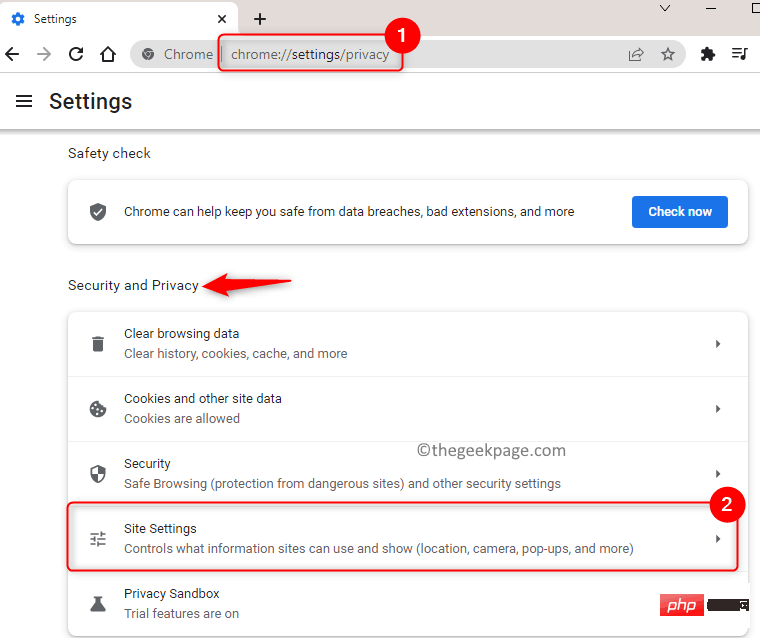
1. Enter chrome://settings/privacy in Chrome’s address bar.
2. Click Site Settings in the Security and Privacy section on the right.
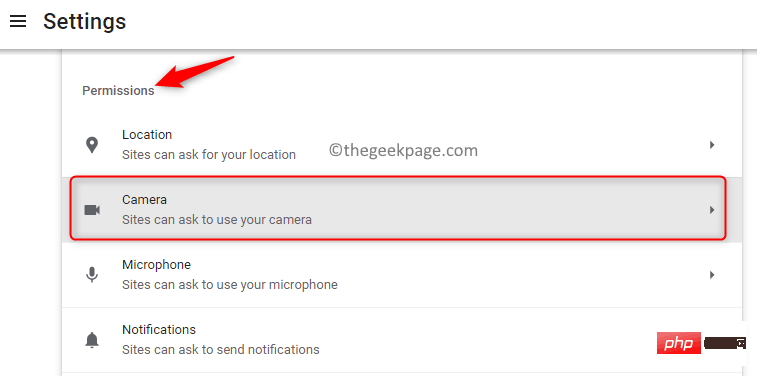
#3. Go to the Permissions section. Select Camera to change camera permissions.
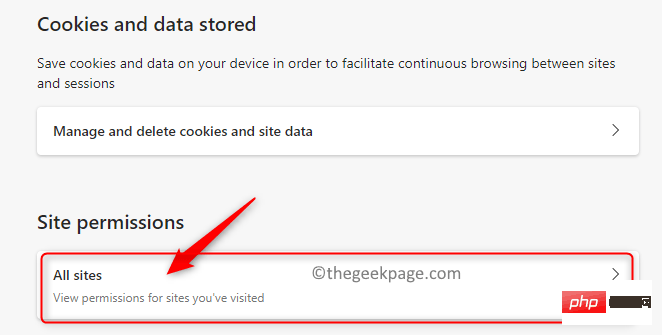
4. Here, click the Microsoft Teams Site link.
5. Use the drop-down menu next to Camera and select Allow.
6. Make sure Microphone is also allowed access. Cameras with built-in microphones require access.

Microsoft Edge
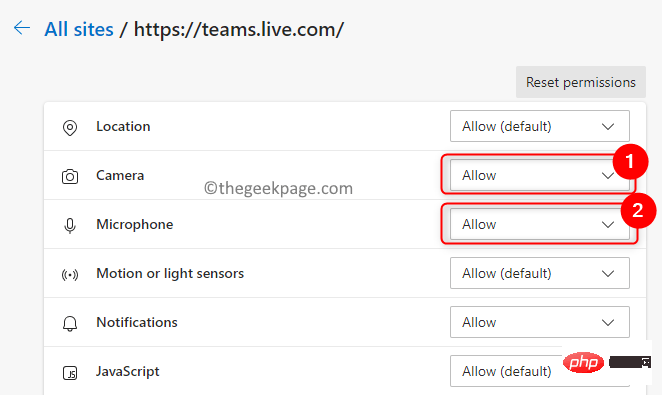
1. Enter edge://settings/contentin the address bar of the Edge browser to enterCookies and Site Permissions Settings.
2. On the right, select All Sites under the Site Permissions section.
#3. Select the Microsoft Teams site in the site list.
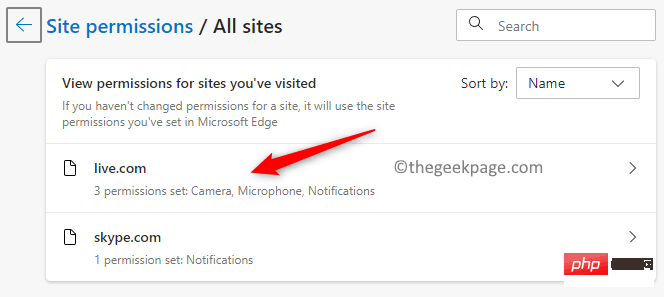
4. Make sure Allow is selected in the drop-down lists next to Camera and Microphone.
That's it!
The camera can now be used with Teams video calls without any issues. We hope this article has provided you with enough information to troubleshoot Teams camera issues. Let us know what fix worked for you in the comments below.
The above is the detailed content of Fix: Microsoft Teams camera not detected and not working properly. For more information, please follow other related articles on the PHP Chinese website!

Hot AI Tools

Undresser.AI Undress
AI-powered app for creating realistic nude photos

AI Clothes Remover
Online AI tool for removing clothes from photos.

Undress AI Tool
Undress images for free

Clothoff.io
AI clothes remover

AI Hentai Generator
Generate AI Hentai for free.

Hot Article
Hot Tools

Notepad++7.3.1
Easy-to-use and free code editor

SublimeText3 Chinese version
Chinese version, very easy to use

Zend Studio 13.0.1
Powerful PHP integrated development environment

Dreamweaver CS6
Visual web development tools

SublimeText3 Mac version
God-level code editing software (SublimeText3)
Hot Topics
 1378
1378
 52
52

 Hyperx headset microphone has no sound
Feb 16, 2024 am 09:12 AM
Hyperx headset microphone has no sound
Feb 16, 2024 am 09:12 AM
The quality of hyperx headphones has always been very good, but some users find that the microphone of the headphones has no sound when using it. There are many possible reasons for this situation. Here are some of them. Several kinds. There is no sound from the hyperx headset microphone. 1. Connect and check whether the microphone is fully inserted into the headphone jack. You can try plugging and unplugging it a few times. 2. If other equipment conditions permit, you can plug the headset into other normally operating equipment to see if it can be used normally and whether the audio link is normal. 3. Audio settings Check the audio settings to make sure that the speakers and microphone are enabled normally and not muted or at a low volume. 4. To disable the software, you can try disabling the audio adapter.
 How to enable Douyin camera permission? What should I do if the screen on TikTok camera is black?
Mar 22, 2024 am 10:42 AM
How to enable Douyin camera permission? What should I do if the screen on TikTok camera is black?
Mar 22, 2024 am 10:42 AM
As one of the most popular short video platforms in the world, Douyin allows many users to record their lives and showcase their talents here. When using Douyin to shoot works, we need to enable camera permissions to ensure normal use of Douyin's shooting function. So, how to open Douyin camera permission? This article will introduce in detail how to open Douyin Camera permissions and solve the black screen problem encountered when opening Douyin Camera. 1. How to enable Douyin camera permission? 1. Open the phone settings and find the "Privacy" or "Permission Management" option. 2. In the privacy settings, find "App Permissions" or "App Management". 3. Find Douyin APP and click to enter Douyin’s permission setting interface. 4. In the permission setting interface, find the "Camera" permission and make sure it is turned on. 5. If necessary, you can also
 How to set Apple camera watermark
Feb 25, 2024 pm 04:37 PM
How to set Apple camera watermark
Feb 25, 2024 pm 04:37 PM
How to set an Apple camera watermark? You can also have an exclusive watermark when shooting with the camera in an Apple phone, but most users don’t know how to set the camera watermark. Next, the editor brings you a graphic tutorial on how to set the Apple camera watermark. , interested users come and take a look! Apple mobile phone tutorial: How to set the Apple camera watermark 1. First open the shortcut command in the Apple mobile phone and select the [iPhone Camera Watermark] icon in the lower left corner; 2. Then jump to the album to select the photo that needs to be added with a watermark, and click the [iPhone Camera Watermark] icon in the upper right corner. Add]; 3. Then select the required Apple phone model; 4. Finally, go to the page below and select the required watermark style to complete the setting.
 Logitech headset microphone is silent, please fix it
Jan 18, 2024 am 08:03 AM
Logitech headset microphone is silent, please fix it
Jan 18, 2024 am 08:03 AM
Some users may encounter the problem of no sound from the headset microphone when using Logitech drivers. Check whether the headset microphone cable is plugged in properly or whether the headset is muted. This can be solved by turning it on in the settings. There is no sound from the Logitech-driven headset microphone: 1. Users need to first check whether the headset microphone is plugged into the wrong wire. 2. If it is wrong, just plug it in again. If not, then you need to check whether the headset microphone is broken. 3. Open "Settings" and search for "Control Panel" in "Settings". 4. Select "Hardware and Sound". 5. Click "Manage Audio Devices". 6. After entering the interface, click the "Recording" option and double-click "Microphone". 7. After entering, click "Level" to increase the microphone volume to the maximum. If it is not loud enough, you can strengthen the microphone settings. 8. Last look
 How to solve the microphone mute problem in Win10 Knives Out
Jan 11, 2024 am 10:24 AM
How to solve the microphone mute problem in Win10 Knives Out
Jan 11, 2024 am 10:24 AM
Knives Out is a very popular game on Windows 10 computers. Many friends like to play it with their friends, but many of them encounter the situation where the microphone has no sound, so what should I do? Let’s take a look at the solution below. What to do if there is no sound from the Knives Out microphone in Windows 10: 1. Enter the Knives Out game interface and turn on the microphone switch. 2. Enter the game settings and check "My Microphone" in the sound settings. 3. If it still doesn’t work, click Start in the lower left corner and open the “Control Panel”. 4. After opening, click "Hardware and Sound" and then "Manage Audio Devices". 5. Select the "Recording" tab and double-click "Microphone". 6. Click "Use this device". 7. Then turn up the volume.
 Solve the problem that the microphone is connected but not recognized in win11
Jan 29, 2024 pm 06:57 PM
Solve the problem that the microphone is connected but not recognized in win11
Jan 29, 2024 pm 06:57 PM
Nowadays, when many users use win11 system, they may encounter the problem that the microphone is connected to the computer but shows that it is not plugged in, causing the device to not work properly. For this situation, I will share with you two solutions. If you need detailed operation steps, please visit this site. What to do if the win11 microphone is connected but it says not plugged in: Method 1: 1. Click the start menu or search button below. 3. Open Hardware and Sound in the Control Panel. 5. After opening, click Advanced Device Settings in the upper right corner. Method 2: 1. There are also cases where your microphone is not connected properly. 2. You can try to replug and unplug the microphone cable to see if it can solve the problem.
 This time, Xiaomi's gun is aimed at Polaroid
Jul 24, 2024 pm 12:10 PM
This time, Xiaomi's gun is aimed at Polaroid
Jul 24, 2024 pm 12:10 PM
On July 19, Xiaomi held a new product launch conference in Beijing. At the meeting, Lei Jun not only talked about his journey of building a car, but also brought a number of blockbuster new products such as XiaomiMIX Flip, XiaomiMIX Fold4, Xiaomi Band 9, and Redmi K70 Extreme Edition. In Xiaolei's expectation, Xiaomi MIX Flip, as Xiaomi's first small folding screen mobile phone, is a high-probability event that attracts a lot of attention. Unexpectedly, the first thing to become popular was the accessory that debuted at the same time as MIXFlip - the MIXFlip portable camera set, which has a sense of "reversing the sky". Recently, social platforms have been filled with a large number of posts related to Xiaomi Polaroid. If you don’t follow the digital circle, you may be wondering: when will Xiaomi start making it too?
 Can't allow access to camera and microphone in iPhone
Apr 23, 2024 am 11:13 AM
Can't allow access to camera and microphone in iPhone
Apr 23, 2024 am 11:13 AM
Are you getting "Unable to allow access to camera and microphone" when trying to use the app? Typically, you grant camera and microphone permissions to specific people on a need-to-provide basis. However, if you deny permission, the camera and microphone will not work and will display this error message instead. Solving this problem is very basic and you can do it in a minute or two. Fix 1 – Provide Camera, Microphone Permissions You can provide the necessary camera and microphone permissions directly in settings. Step 1 – Go to the Settings tab. Step 2 – Open the Privacy & Security panel. Step 3 – Turn on the “Camera” permission there. Step 4 – Inside, you will find a list of apps that have requested permission for your phone’s camera. Step 5 – Open the “Camera” of the specified app