

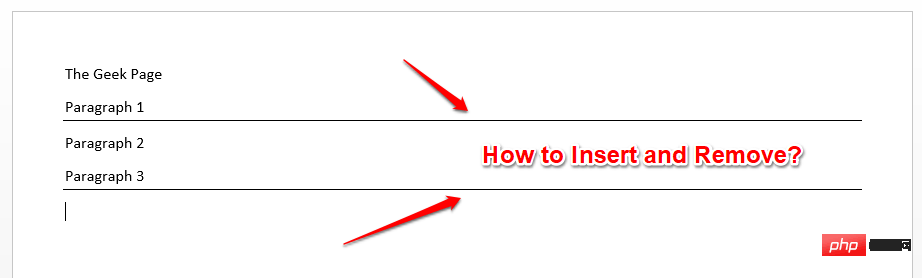
How to insert and delete horizontal lines in Microsoft Word

For Microsoft Word, inserting horizontal lines is very useful. You can use it to separate different sections. But many users don’t know how to insert horizontal lines in Microsoft Word. Many people are still confused whether it is a shape or something else. Well, the horizontal line that separates different sections in Word is actually a section break.
In this article, let’s see how to easily insert horizontal lines and how to delete them. Hope you enjoyed reading this article.
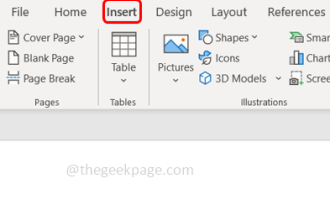
Section 1: How to Insert a Horizontal Line in Microsoft Word
Inserting a horizontal line in Microsoft Word is very easy and can be done in just 2 steps. Let’s see what these two steps are!
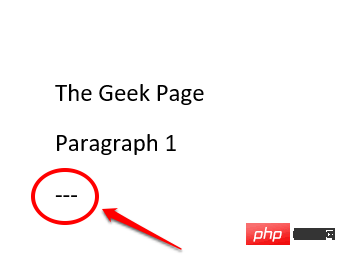
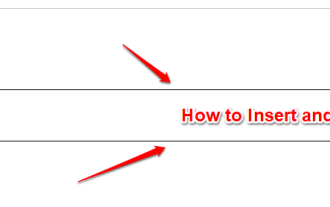
Step 1: First, click where you want to insert the horizontal line and press the hyphen key3 on your keyboard Second-rate(-).
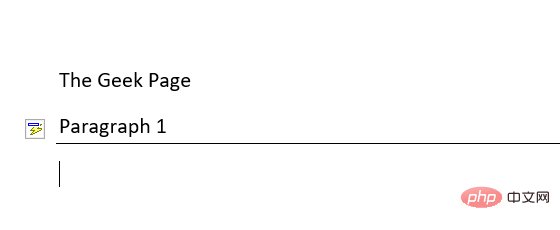
Step 2: After pressing the Enter key, you will see a beautiful horizontal line inserted into your Word document middle. enjoy!
Part 2: How to Remove Horizontal Lines in Microsoft Word
While inserting a horizontal line is sweet, you may find that deleting the line part is not so sweet . You can definitely undo row insertion by pressing the C TRL Z keys simultaneously. However, this is only possible if you haven't made many changes to the document after inserting the rows. If you make a lot of changes, CTRL Z may not be affordable for you. Well, don’t worry, we are here to provide you with the perfect solution.
In Microsoft Word, when you insert a horizontal line, it is not actually considered a horizontal line. Actually, it's a paragraph separator. So if you could somehow remove the border from the paragraph, you could get rid of the inserted horizontal line. Want to know how? So, read on.
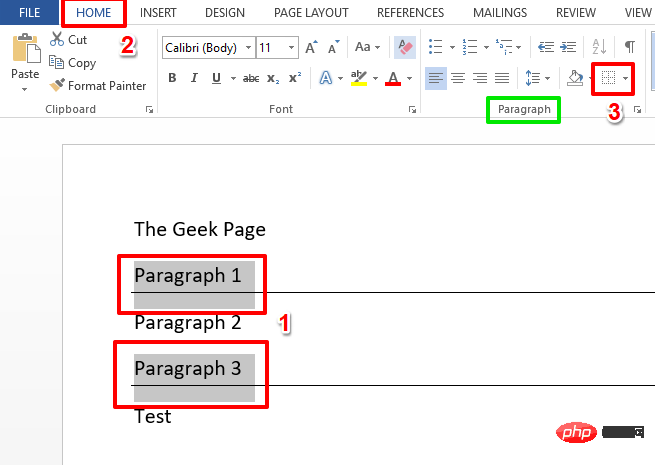
Step 1: Start by selecting the text directly above the horizontal line . If you want to delete multiple horizontal lines at once, just press the CTRL key and continue selecting the text.
After making your selection, click the HOME tab at the top.
Now look for the section named Paragraph.
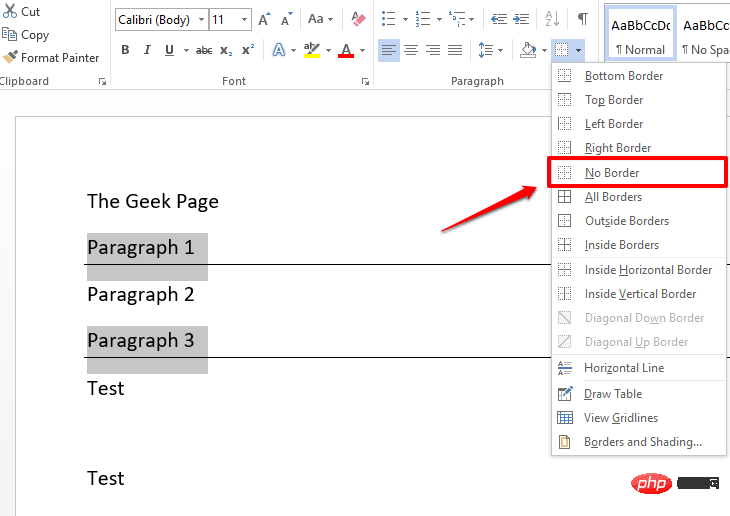
Under the Paragraph option, click the Border settings icon.
Step 2: Now from the expanded list of options, click on the option that says Borderless.
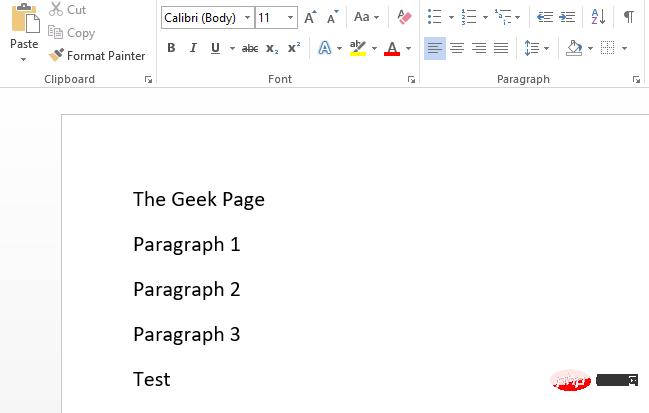
Step 3: That’s it. If you look at your Word document now, you'll see that all line breaks are gone! Yes, it can't get any simpler than that and we agree!
The above is the detailed content of How to insert and delete horizontal lines in Microsoft Word. For more information, please follow other related articles on the PHP Chinese website!

Hot AI Tools

Undresser.AI Undress
AI-powered app for creating realistic nude photos

AI Clothes Remover
Online AI tool for removing clothes from photos.

Undress AI Tool
Undress images for free

Clothoff.io
AI clothes remover

AI Hentai Generator
Generate AI Hentai for free.

Hot Article
Hot Tools

Notepad++7.3.1
Easy-to-use and free code editor

SublimeText3 Chinese version
Chinese version, very easy to use

Zend Studio 13.0.1
Powerful PHP integrated development environment

Dreamweaver CS6
Visual web development tools

SublimeText3 Mac version
God-level code editing software (SublimeText3)
Hot Topics
 1371
1371
 52
52

 How to remove author and last modified information in Microsoft Word
Apr 15, 2023 am 11:43 AM
How to remove author and last modified information in Microsoft Word
Apr 15, 2023 am 11:43 AM
Microsoft Word documents contain some metadata when saved. These details are used for identification on the document, such as when it was created, who the author was, date modified, etc. It also has other information such as number of characters, number of words, number of paragraphs, and more. If you might want to remove the author or last modified information or any other information so that other people don't know the values, then there is a way. In this article, let’s see how to remove a document’s author and last modified information. Remove author and last modified information from Microsoft Word document Step 1 – Go to
 How to write fractions in Microsoft Word
Apr 13, 2023 pm 02:04 PM
How to write fractions in Microsoft Word
Apr 13, 2023 pm 02:04 PM
We all know that Microsoft Word is very flexible and has many features. The most important thing is that we know how to make the most of what Microsoft Word has to offer. One of the amazing features is to insert a fractional value into your Word document. Fractions are used in many places. But when we insert a fraction into a Word document, it doesn't always format like a fraction. In this article, we explain how to easily insert well-formatted fractional numbers into a Microsoft Word document in some very simple steps. Read on to learn how to easily master this super handy Word trick. In Microsoft W
 How to make an image look transparent in Microsoft Word
May 29, 2023 pm 02:01 PM
How to make an image look transparent in Microsoft Word
May 29, 2023 pm 02:01 PM
Changing the transparency of an image or fading an image into the background can also be done using Microsoft Word. It lets you adjust color and transparency, apply background effects, and more. In this article, we will see how easy and simple it is to make an image transparent in Word. How to make an image look transparent Step 1: Open Microsoft Word and click on the Insert option at the top Step 2: Click on the Shape drop-down menu and select the shape of your choice. Here I'm going to select the rectangle. Step 3: Draw a rectangle to select an area on the word page, then right-click on it. Step 4: Click the "Fill" drop-down menu from the options that appear and select "Picture" to add an image. Step 5: Click Stock
 How to create user input prompts in Microsoft Word
Apr 14, 2023 pm 04:40 PM
How to create user input prompts in Microsoft Word
Apr 14, 2023 pm 04:40 PM
Let's say you have a requirement where you have to collect data from 50 people. You can send them a Word file and they can fill it out easily. But you need the formatting and alignment and everything else to be the same in all 50 documents. Well, if you gave the original Word file to these 50 people, instead of 50 identical documents, you would get 50 completely different documents, needless to say. So, is there a solution? Of course, you know we have a solution for you! Let’s talk templates! Word templates are the perfect solution for your tasks. By using a Word template, you can prompt users to enter some data when they open the template document. They can be provided by the user
 How to insert and delete horizontal lines in Microsoft Word
Apr 13, 2023 pm 03:46 PM
How to insert and delete horizontal lines in Microsoft Word
Apr 13, 2023 pm 03:46 PM
For Microsoft Word, inserting horizontal lines is very useful. You can use it to separate different sections. But many users don’t know how to insert horizontal lines in Microsoft Word. Many people are still confused whether it is a shape or something else. Well, the horizontal line that separates different sections in Word is actually a section break. In this article, let's see how to easily insert horizontal lines and how to delete them. Hope you enjoyed reading this article. Section 1: How to Insert a Horizontal Line in Microsoft Word Inserting a horizontal line in Microsoft Word is very easy and can be done in just 2 steps. Let's look at these two steps
 How to generate placeholder text in Microsoft Word?
Apr 26, 2023 pm 03:58 PM
How to generate placeholder text in Microsoft Word?
Apr 26, 2023 pm 03:58 PM
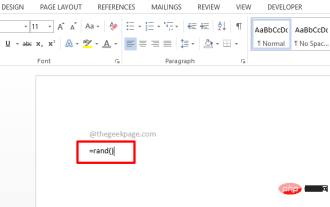
Wondering how to quickly and easily generate random text in a Word document for various purposes? Tired of copying and pasting text from somewhere else all the time? How about you press Enter and Word instantly generates random text for you? Sound cool? So, get ready for the surprises in your life. Read on to learn a cool Word trick that can save you tons of time. Hope you enjoyed reading this article! Section 1: Generate Random Text Using Rand() Formula The rand() formula function can be used to easily generate random text in Word documents. Let's see how to do this. The Rand() function without any parameters. If the rand() function is called without any parameters within the curly braces,
 How to lock a Microsoft Word document to prevent editing
Apr 14, 2023 pm 09:52 PM
How to lock a Microsoft Word document to prevent editing
Apr 14, 2023 pm 09:52 PM
If you don't lock and protect your Word document, the possibility of someone else opening your Word document and overwriting it is very high. Well, one way to make sure no one else is editing your Word document is to print it. But to be sure, this option is not always practical since it involves physical copies. Another option is to convert your Word document to PDF and then share the PDF. But there are indeed PDF editors available, and editing PDFs is easy. So are there any other solutions? How do you lock your document and set a password so that anyone who wants to edit your document must enter this password? Sound cool? So, read on. How to Lock and Secure Microsoft W
 How to convert Microsoft Word files to PowerPoint slides
Apr 13, 2023 pm 03:52 PM
How to convert Microsoft Word files to PowerPoint slides
Apr 13, 2023 pm 03:52 PM
So, you have a Word document with different header sections, you need to open it in Microsoft PowerPoint, make some modifications and then finally save it as a PowerPoint file. Well, you must have tried many solutions but maybe you haven't found the right one yet. Look no further, you've finally arrived at the right place. In this article, we detail how to easily convert Microsoft Word files to PowerPoint files with some very simple steps. Read on to master this nifty trick! Part 1: Format a Word Document Step 1: In Microsoft