

14 Ways to Fix Bluetooth Audio Not Working Issue on Windows 11

Bluetooth is one of the best ways to connect audio peripherals and play audio seamlessly on your device. Although inferior in quality compared to wired connections, Bluetooth connections allow you to stream audio wirelessly, which is often the preferred method.
How to Fix Bluetooth Audio on Windows 11
You can use the following fixes to fix Bluetooth audio on Windows 11. Since Bluetooth audio problems can have multiple causes, we recommend that you start with the first fix and work your way through the list until you manage to resolve the issue. let's start.
Fix 1: Run the Windows Troubleshooter
The Windows Troubleshooter program has come a long way since it was first introduced nearly a decade ago. Troubleshooters can now scan your device and reference large amounts of data on Microsoft servers to find fixes specific to your system. We recommend that you run relevant troubleshooters on Windows 11 to see if they can fix Bluetooth audio issues. Please follow the steps below to help you through the process.
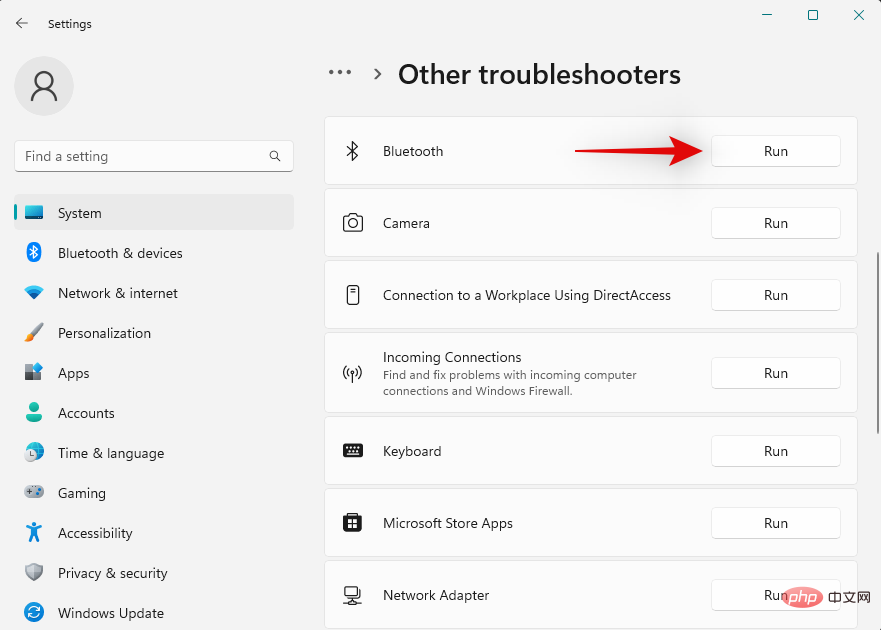
Press Windows i to open the Settings application. Now click on Troubleshoot.

Click Additional Troubleshooting.
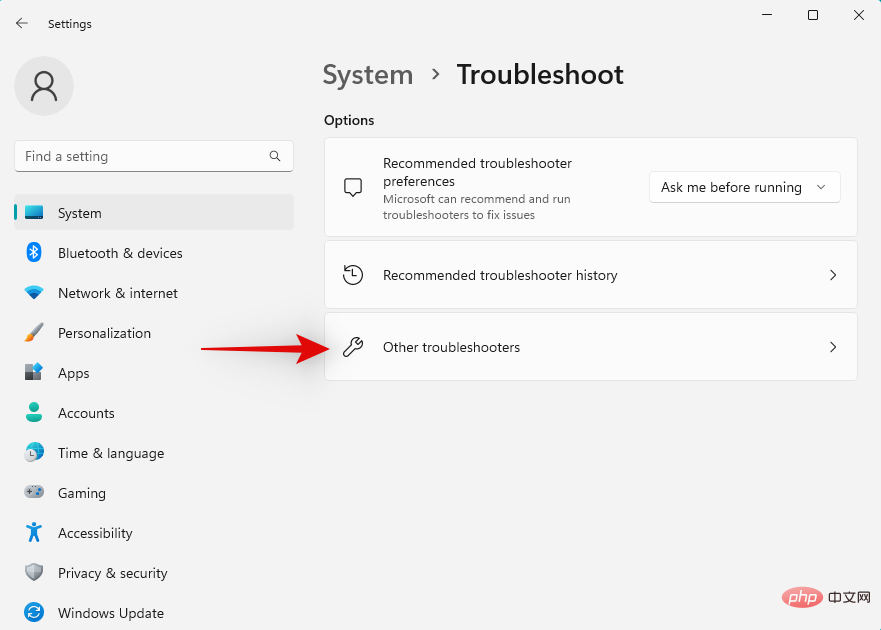
Now click Run next to Play Audio.
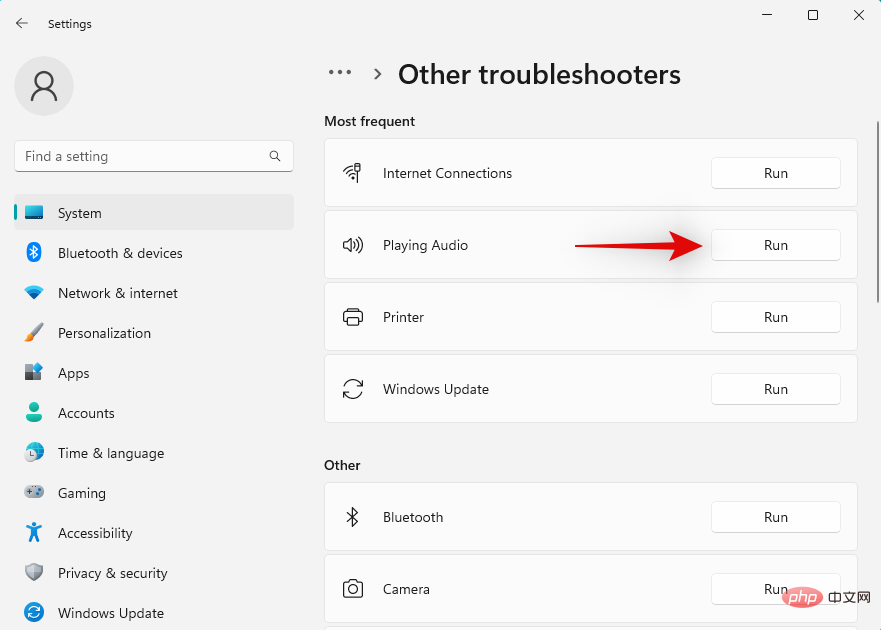
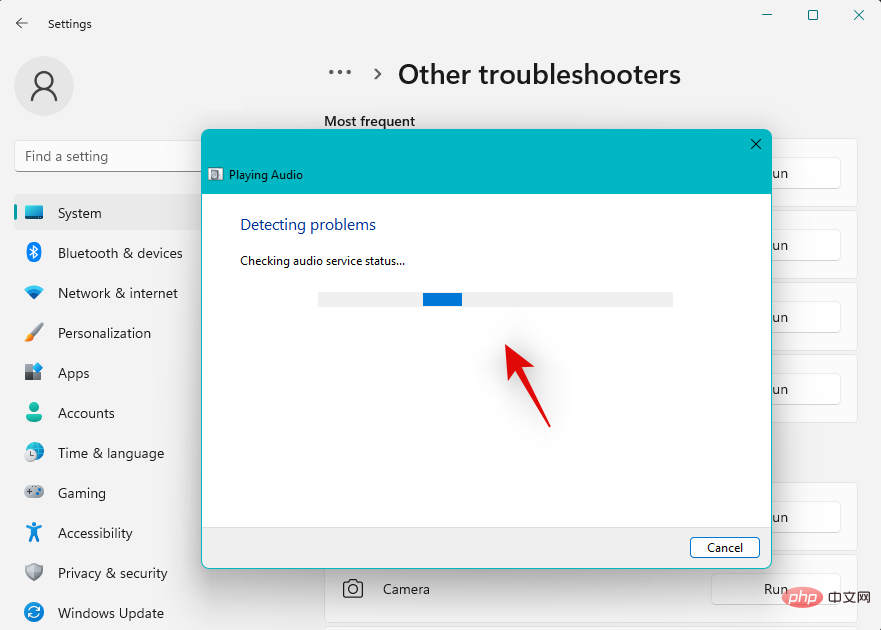
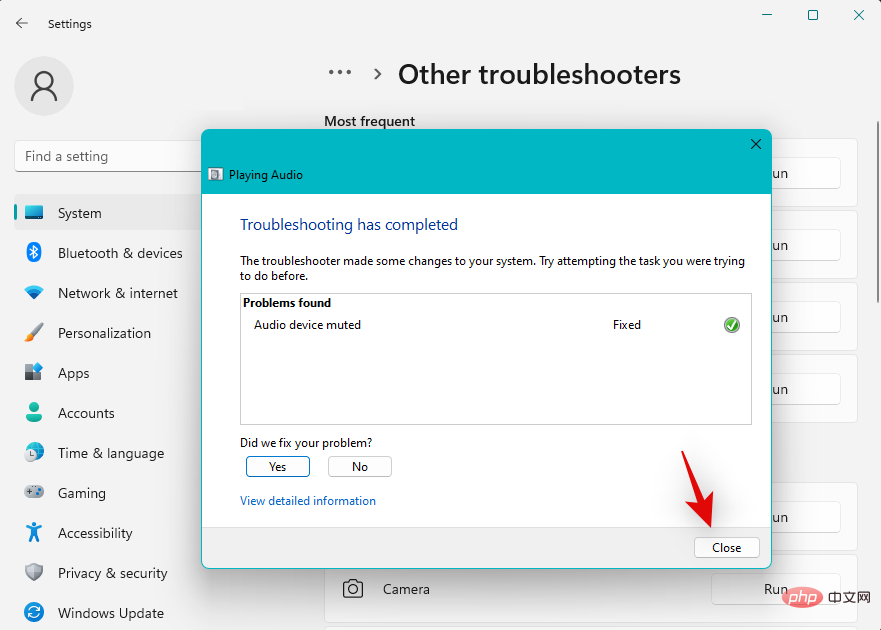
Follow the on-screen instructions to apply the troubleshooter's recommended fixes.
Click Close when finished.
Likewise, run the following troubleshooter once completed.
- Bluetooth
- ##Power

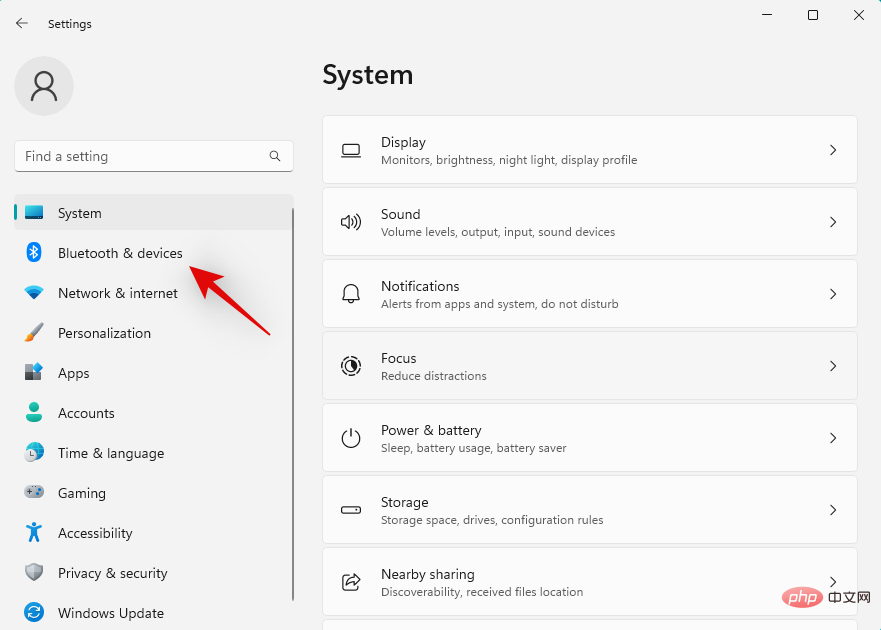
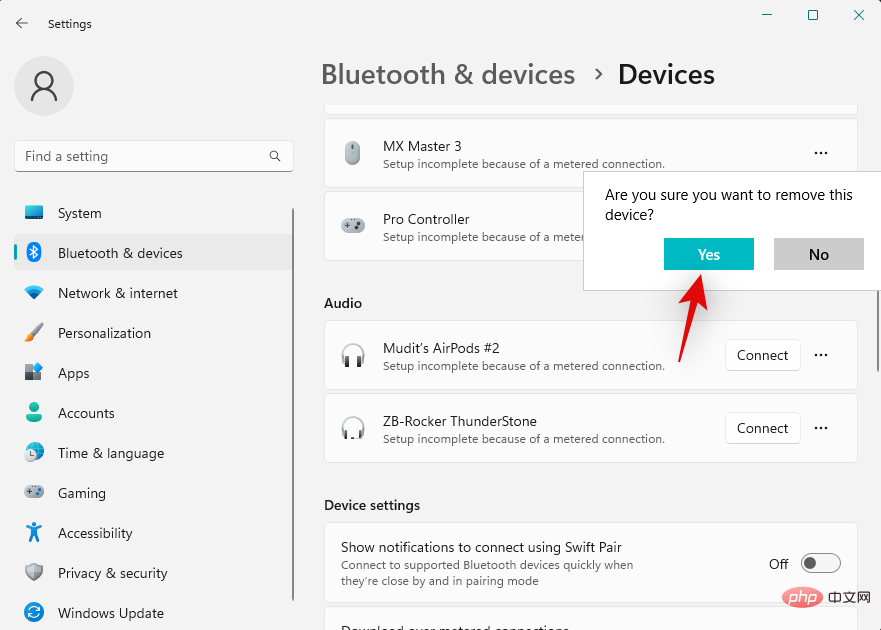
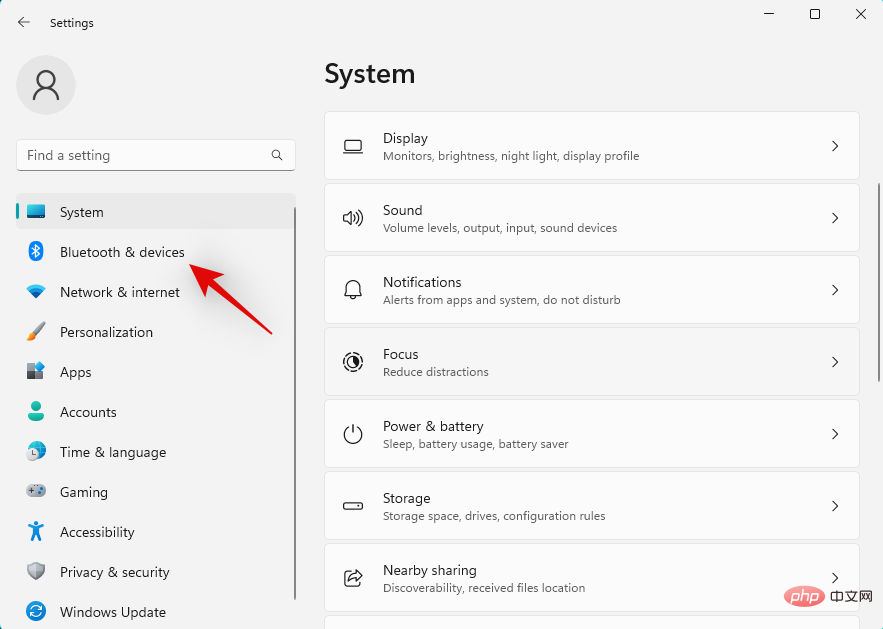
Windows i and click Bluetooth and Devices.
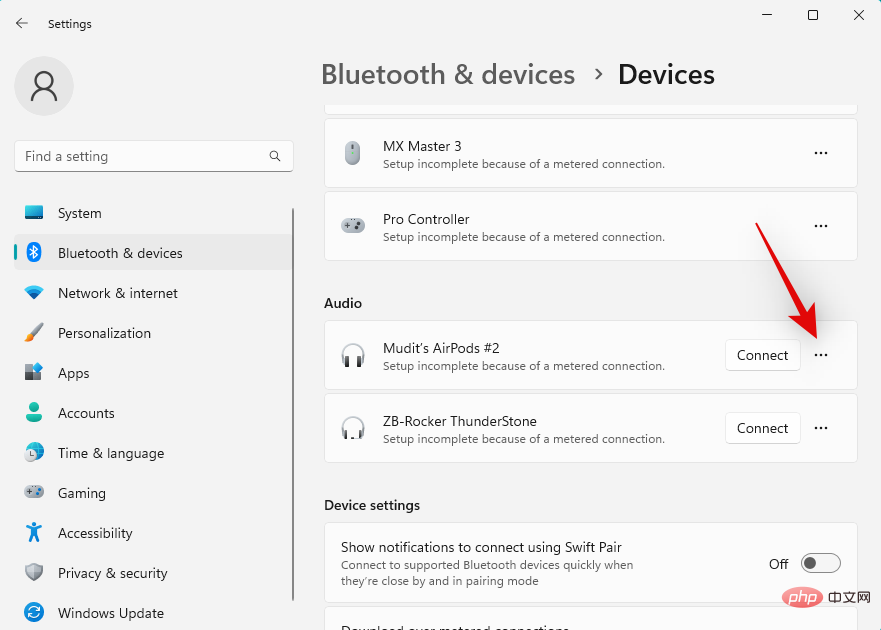
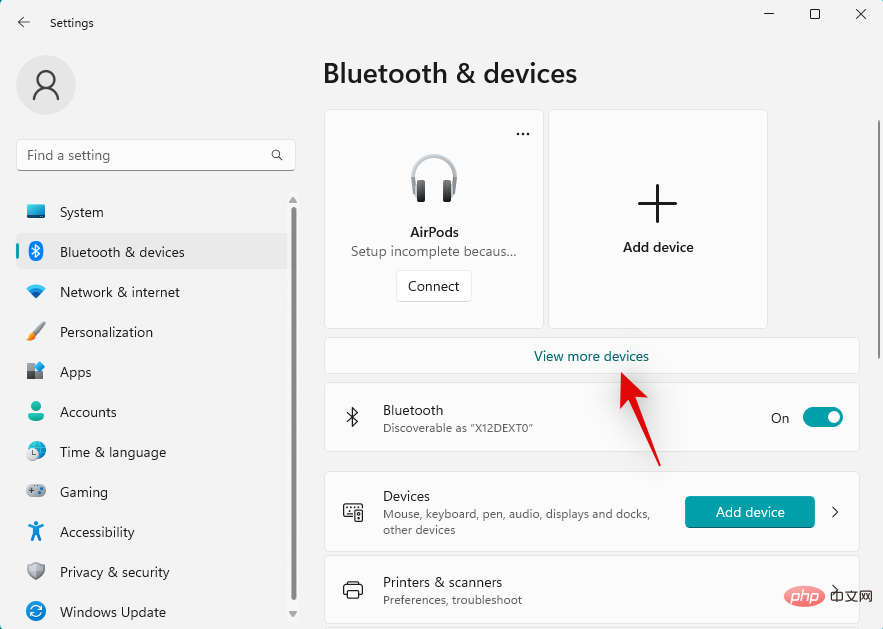
View more devices.

three-dot ( ) icon next to the relevant device. 
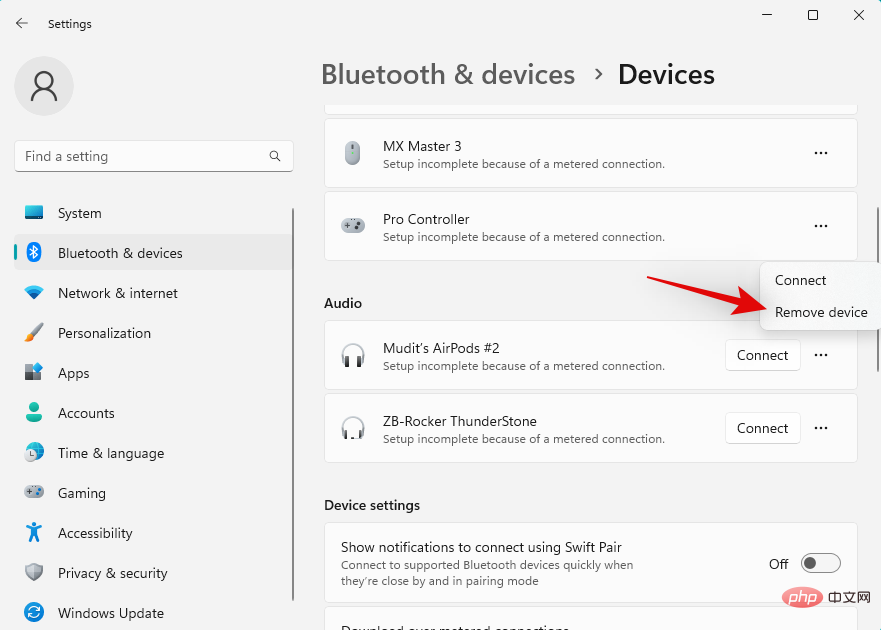
Delete Device.
Yes to confirm your choice.
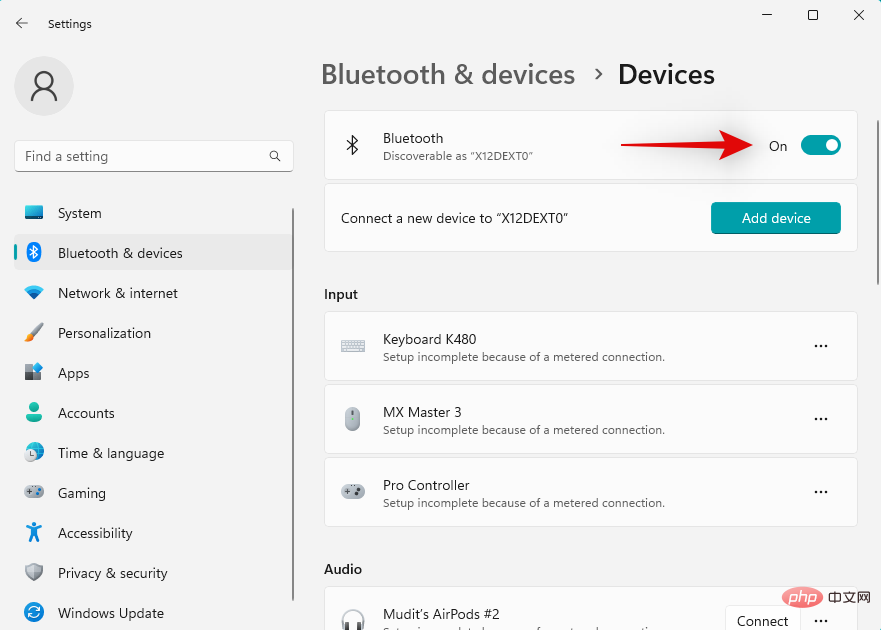
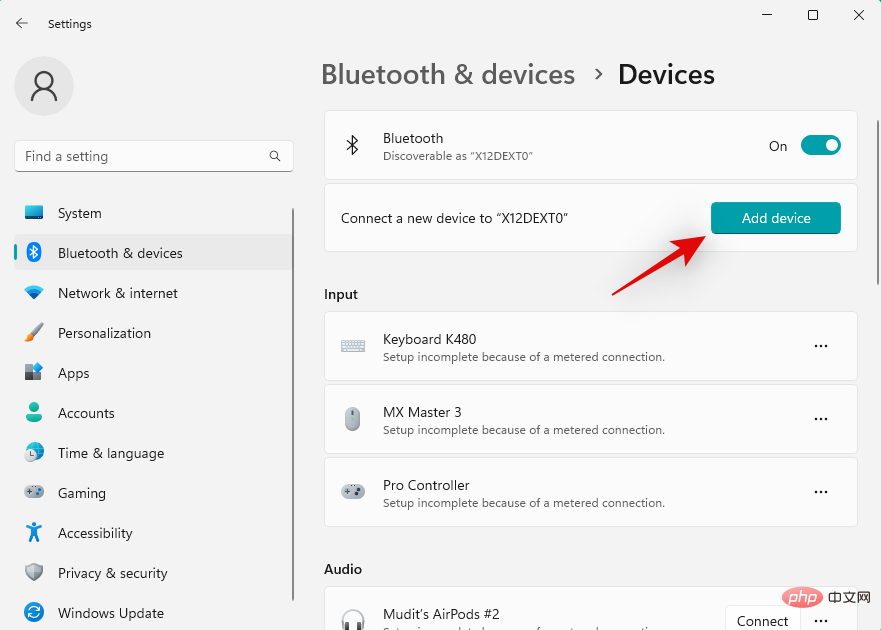
Add Device.
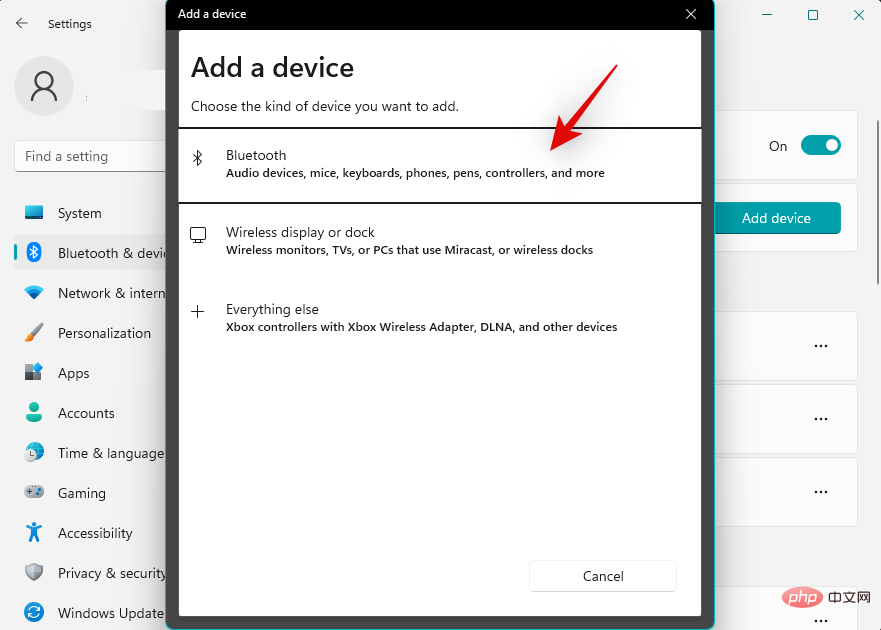
Bluetooth.
Windows will now scan for nearby Bluetooth devices. Once it appears on your screen, click on and select the relevant audio device.
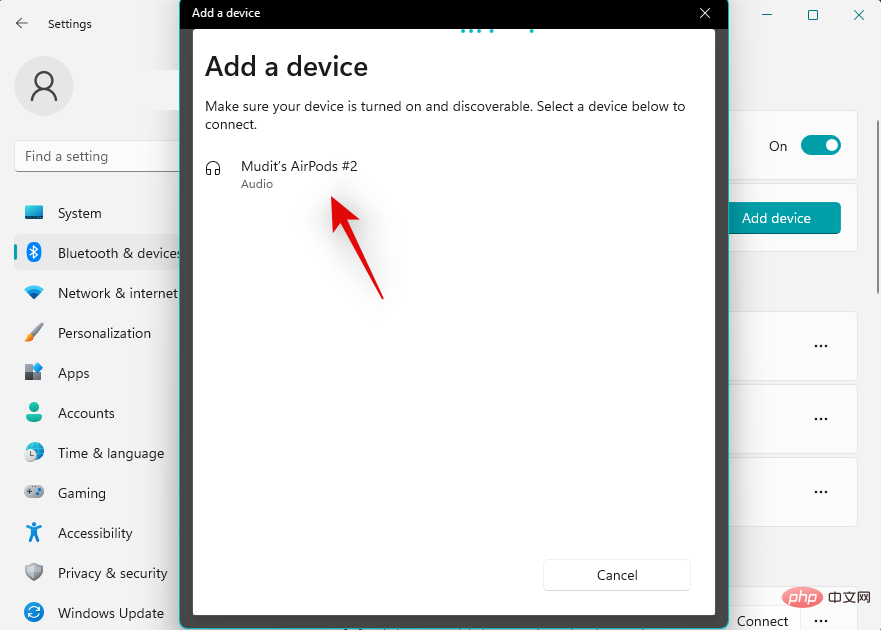
That's it! You will now re-pair your device. If you're having connection issues, you should now be able to play audio over Bluetooth.
Fix 3: Force delete and reinstall your Bluetooth driver
At this point, we recommend that you try to reinstall the relevant Bluetooth driver. Please follow the steps below to get started.
First download the relevant Bluetooth driver for your network card. We recommend that you first try downloading the latest version to ensure compatibility with Windows 11.
Once completed, use the link below to download DriverStoreExplorer.
- DriverStoreExplorer | Download Link
Extract the archive and use the .exe file to launch DriverStoreExplorer.
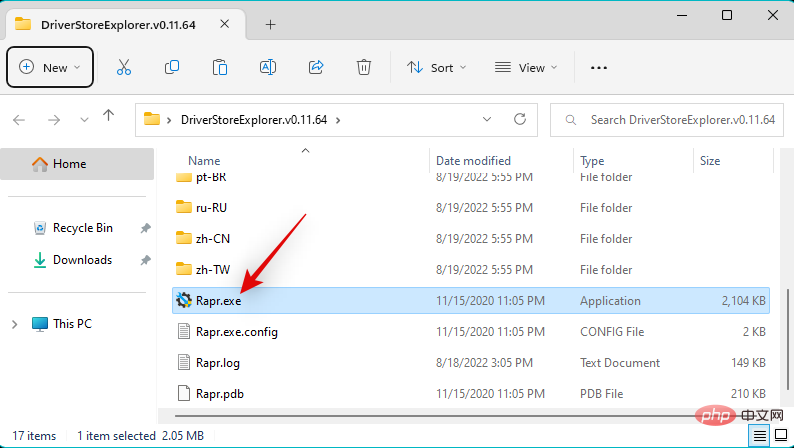
The tool will now scan your device and display all drivers installed on your system. Click the Driver class at the top.
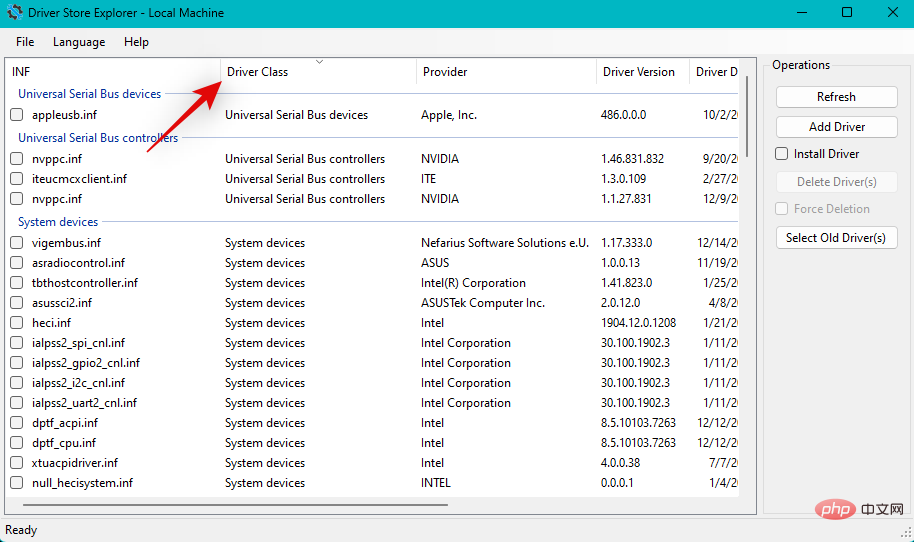
# Now check the boxes for all Bluetooth drivers.
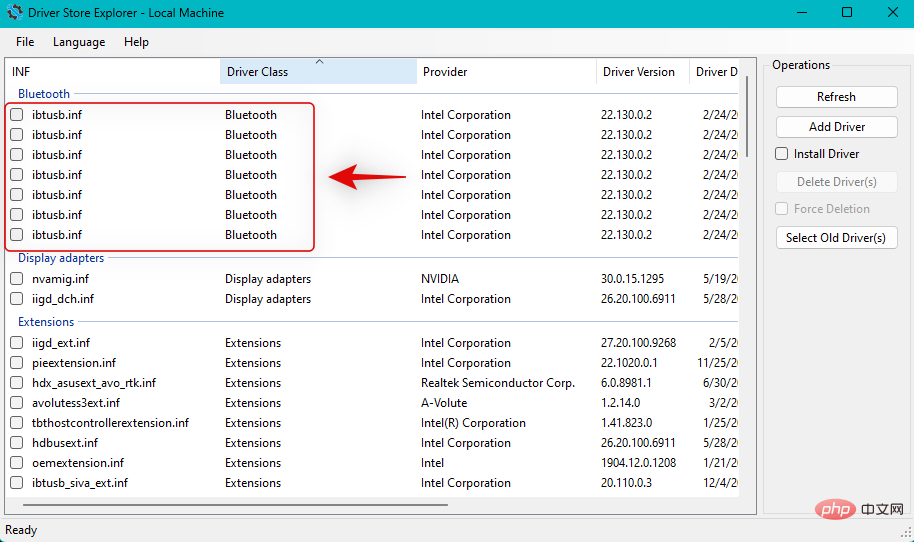
When finished, click and check the Force Delete box.
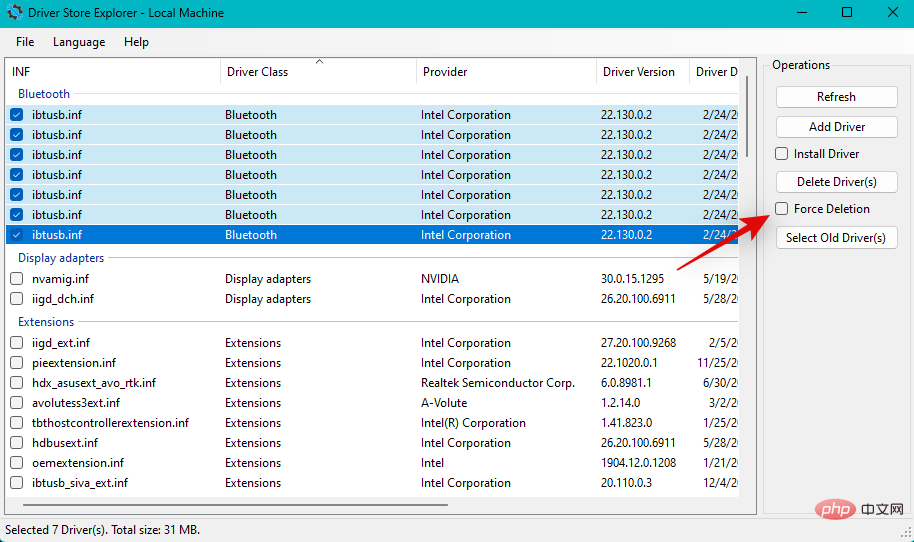
Now click Remove Driver.
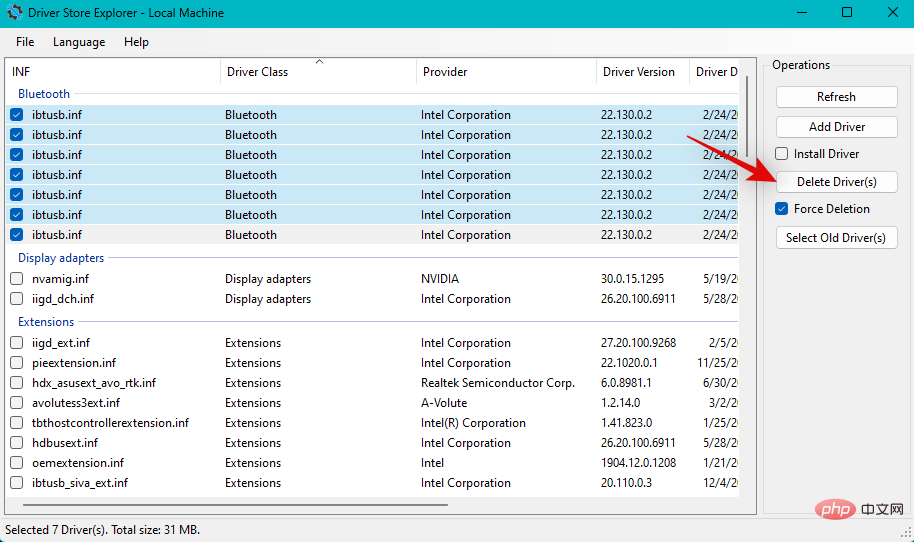
Click Yes to confirm your choice.
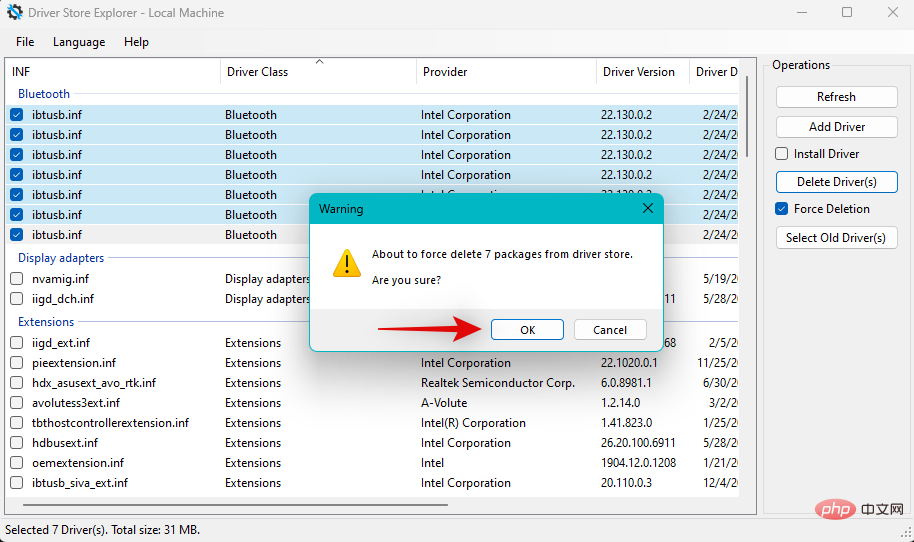
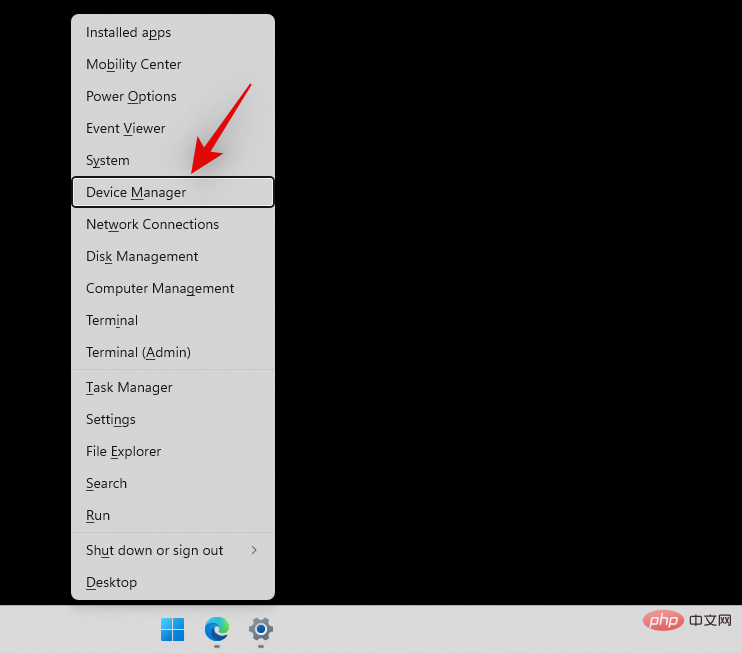
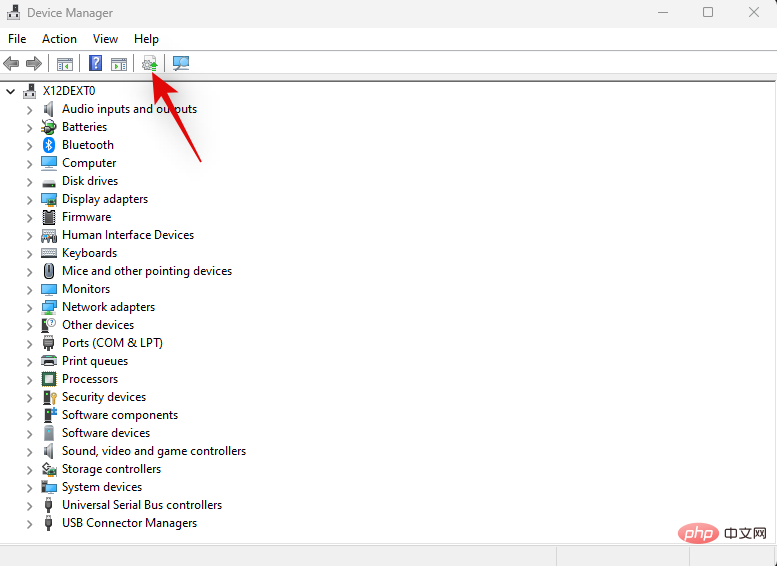
The Bluetooth driver will now be uninstalled and removed from your system. Once done, press Windows X and click Device Manager.
Now click on the Add driver icon at the top.
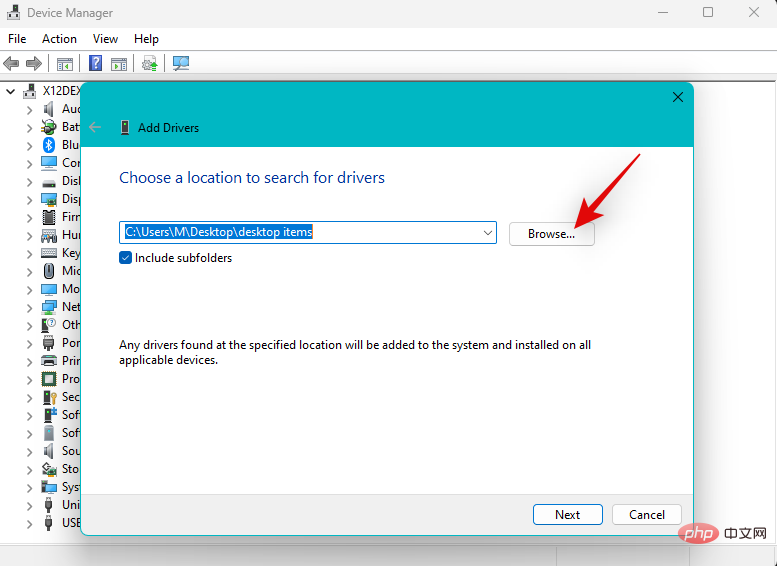
Click Browse and select the Bluetooth driver you downloaded earlier. If you have multiple files, you can select the folder that contains all Bluetooth drivers.
Click Next.
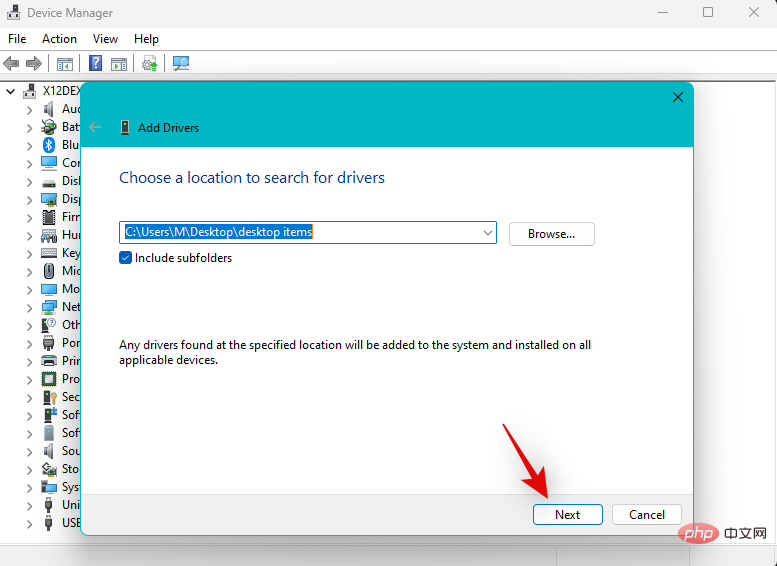
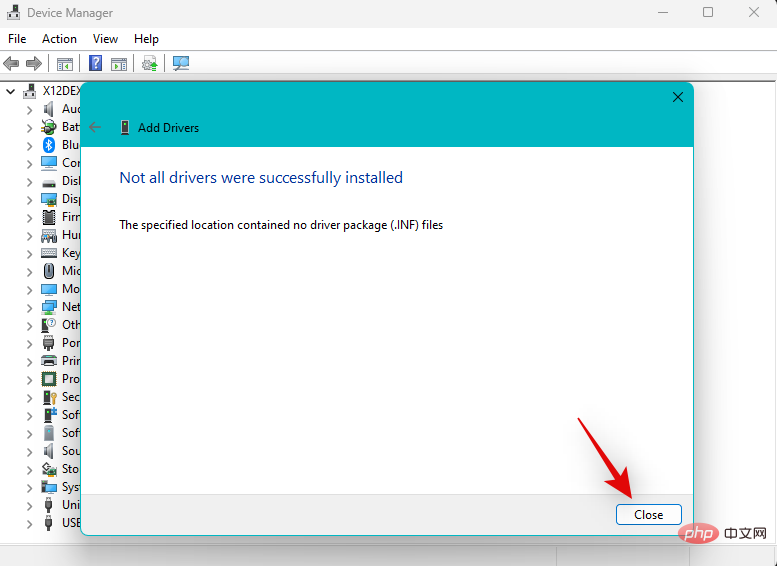
#Windows will now install the necessary Bluetooth drivers from the selected folder. When finished, click Close.
Restart your PC at this point to get a good measurement. If you are facing Bluetooth issues due to outdated or incompatible drivers, the same should be fixed on your system by now.
Fix 4: Switch other services for secondary Bluetooth devices
Bluetooth devices, especially headsets, work completely differently on Windows because of how they are handled and connected to the system necessary agreements and services. However, this may cause issues on some models where the microphone is always active or where applied effects don't work as expected on Windows.
This may result in no audio from your headphones or very low audio volume. Disabling such services can help you get your Bluetooth device's audio working properly again. Please follow the steps below to help you through the process.
Note: While this works great for Bluetooth headsets, unfortunately you will not be able to use the headset microphone after disabling the related service.
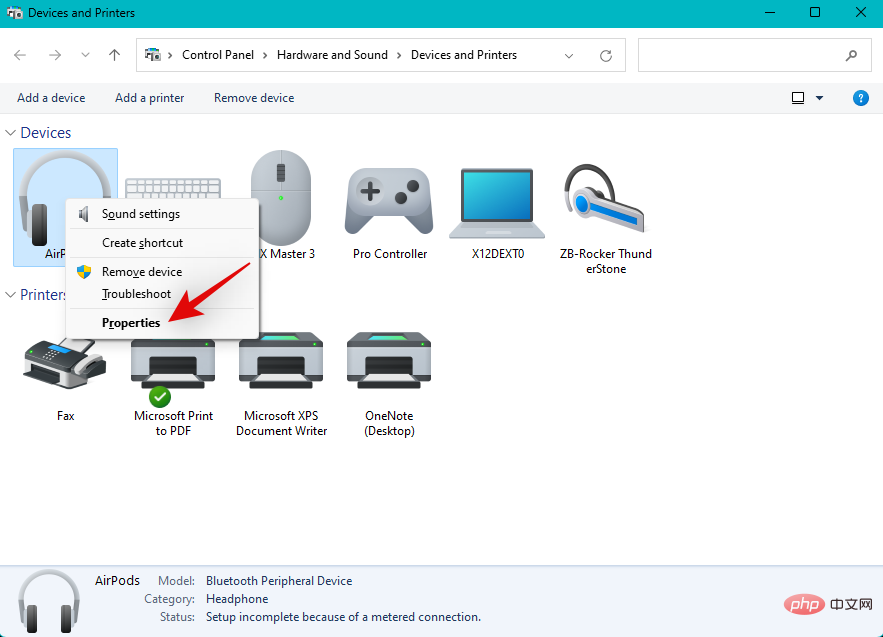
Press the keyboard to open the Settings app. Windows iClick Bluetooth and Devices on the left.
Click now View more devices.
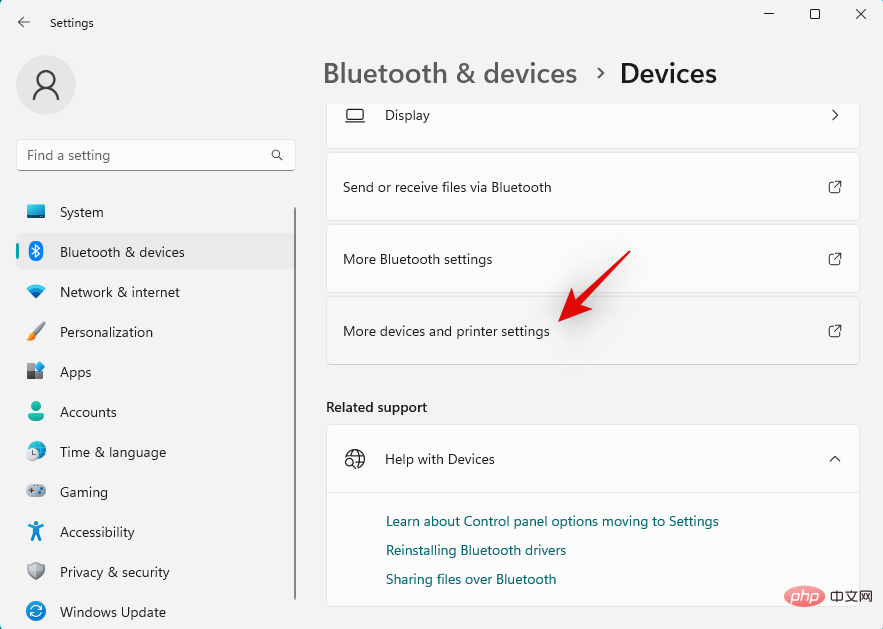
Scroll to the bottom and click More device and printer settings.
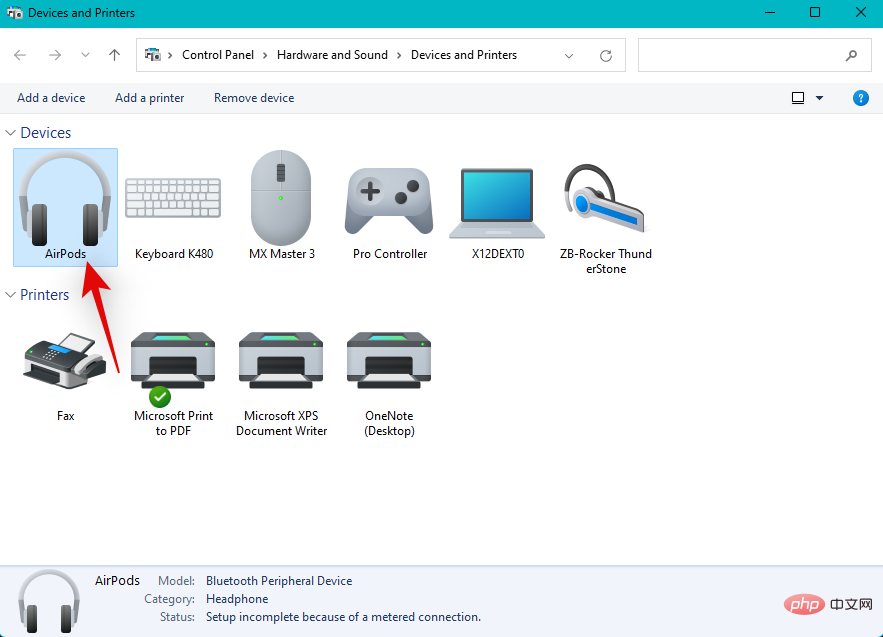
Now, right-click on the relevant Bluetooth device you are having issues with from the list on the screen.
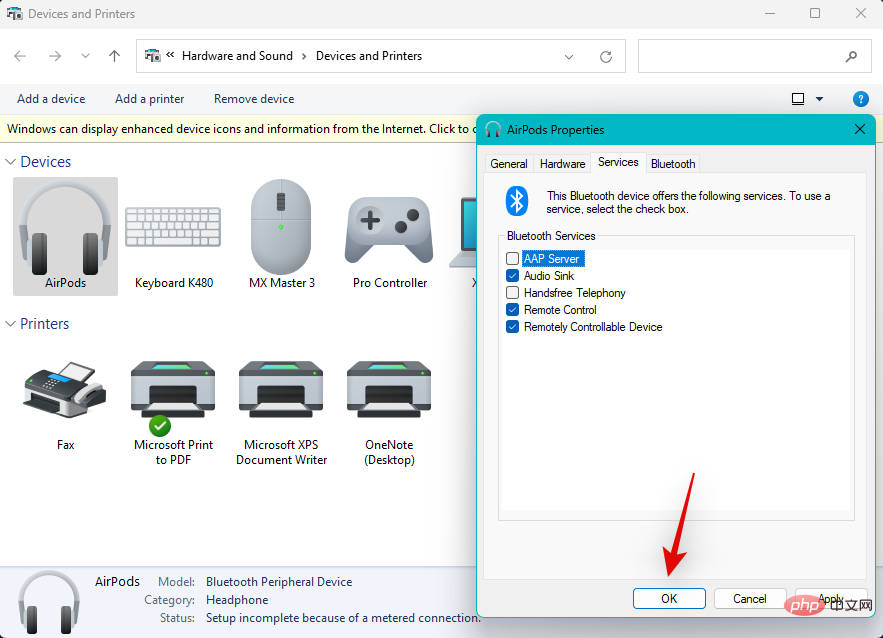
Click and select Properties.
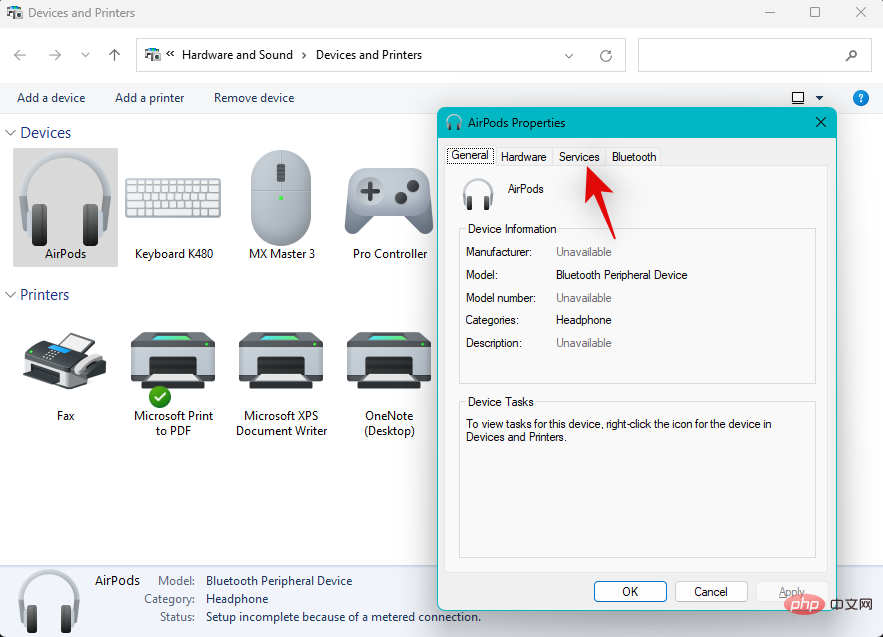
Now click and switch to the Services tab.
If the Bluetooth audio device you selected exists and is currently active, turn off the following services by unchecking their respective boxes. You will lose functionality while doing this, you can use the following options to know more about the same functionality.
- AAP Server: This will allow Windows to create management access points for selected Bluetooth devices.
- Hands-free calling: This service allows you to use a microphone on audio devices that have an onboard microphone.
- Remote Control: This service can also help if your Bluetooth audio device has controls and buttons to remotely control audio playback.
- Remote control device: This is a support service for remote control , allows you to remotely control the playback of audio devices.
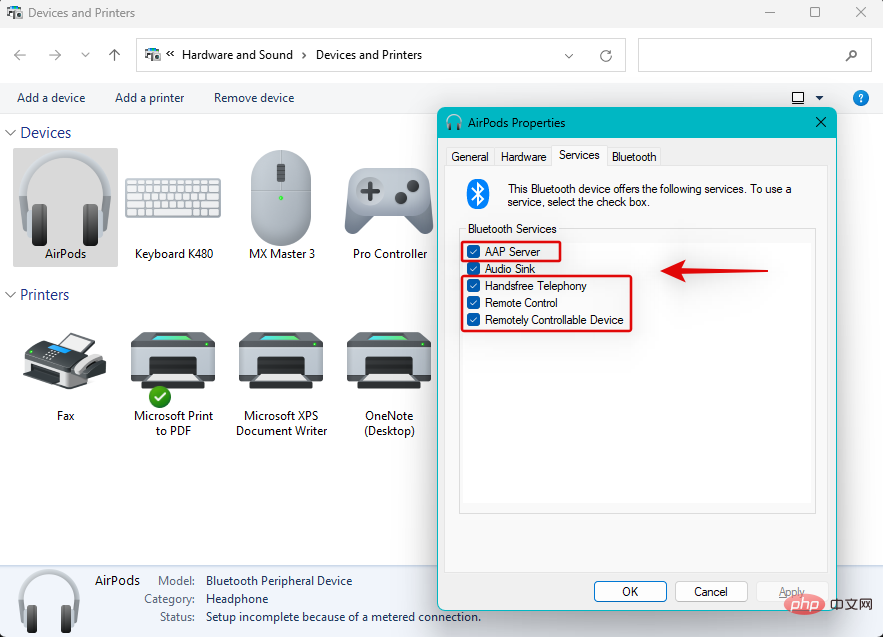
Note: You only need the Audio Sink service for audio output via Bluetooth audio. If you're still having issues after disabling these services, then we recommend disabling other services specific to your device to see if it resolves the issue for you.
When finished, click Apply.
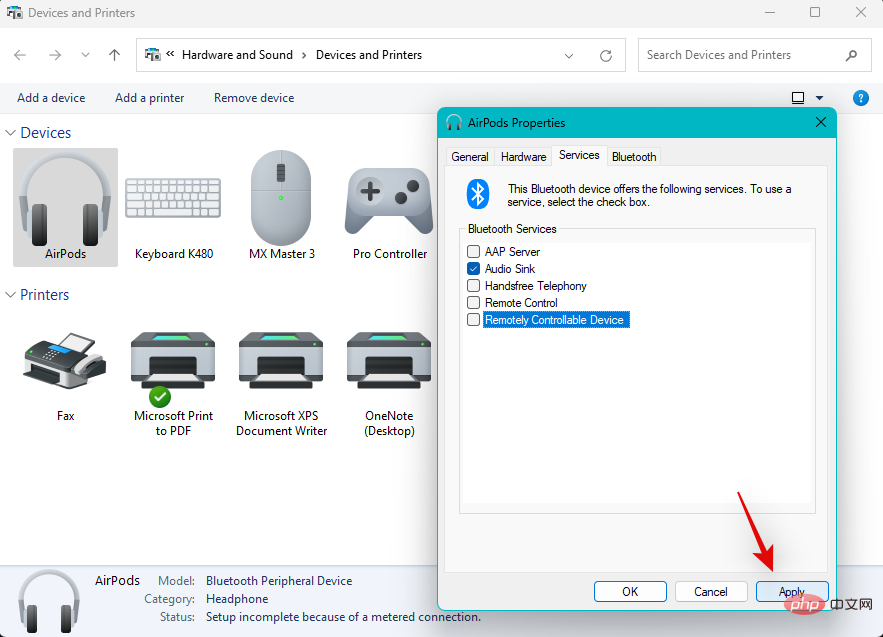
Click OK.
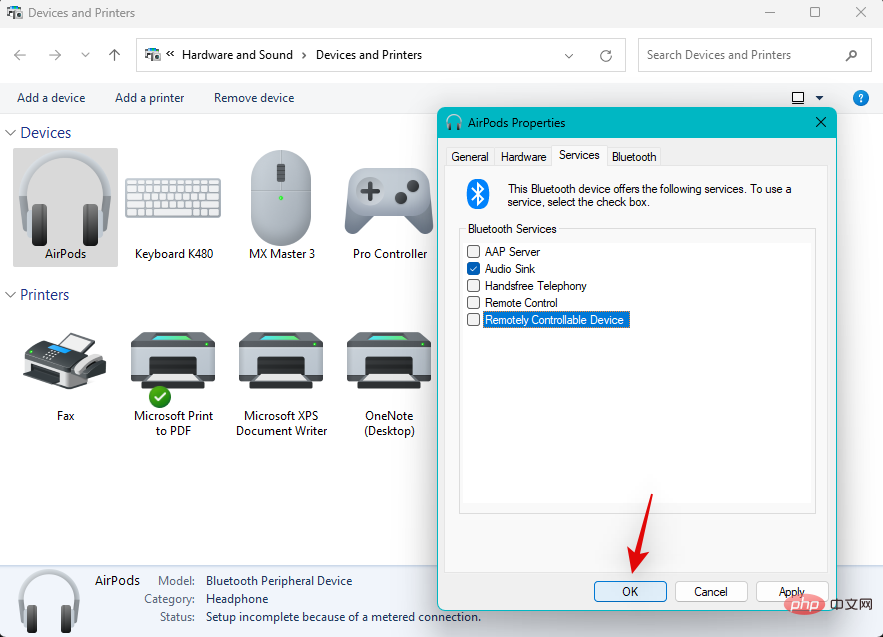
#If the Bluetooth service is causing issues with your audio device, your system should now have the issue resolved.
Fix 5: Restart your PC
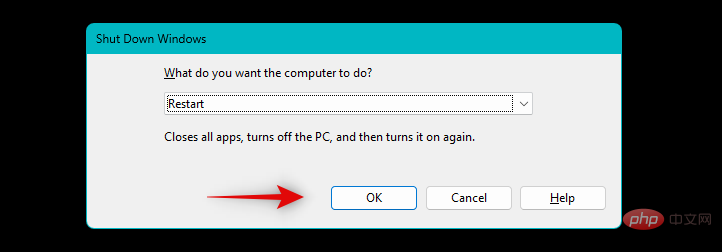
We have now re-paired, reinstalled and customized your Bluetooth audio device. If you have not restarted your PC at this point, we strongly recommend that you do so at the earliest opportunity. This will help clear cache files on the fly, establish connections, restart services and reload drivers.
This will help identify the changes you made, which will also help get the audio back on your Bluetooth device. This is especially true for PCs with older network cards made before 2015. Make sure to disable fast startup on your system to avoid conflicts with preloaded services and applications.
Fix 6: Check and install optional drivers if available
Networking and dedicated Bluetooth cards come with multiple drivers to support all variants and models while ensuring Compatibility with most hardware components. Optional drivers that can help solve some problems with network cards appear in Windows Update. If you are still unable to fix Bluetooth audio for your device, then we recommend that you try checking for any optional drivers that may work for your device. Use the following steps to help you through the process.
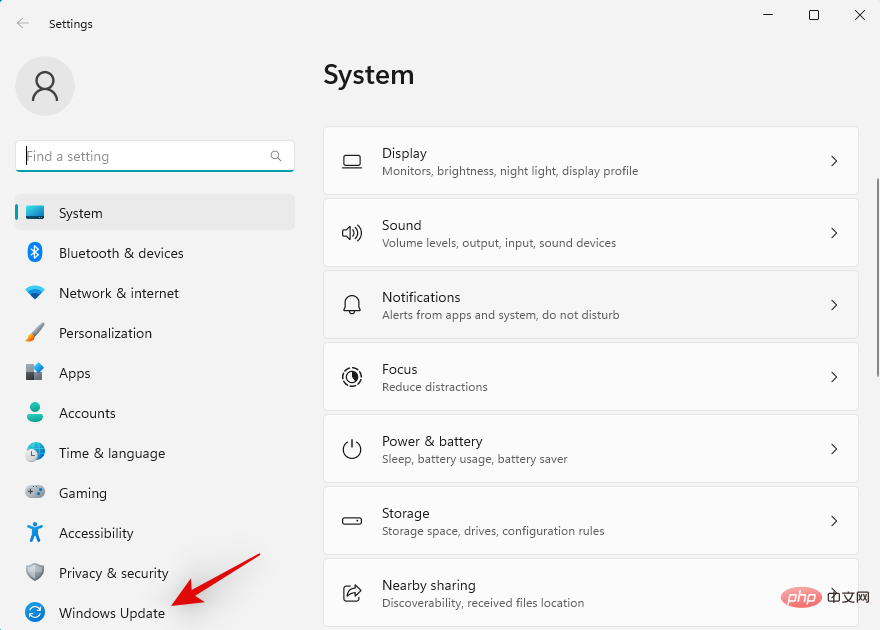
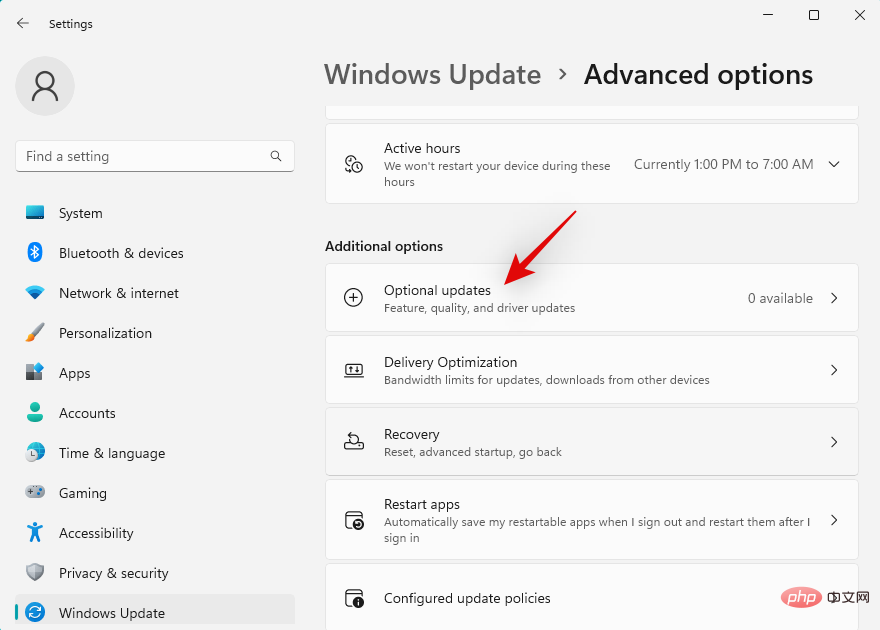
Press Windows i to open the Settings app and click Windows Update.
Click Advanced Options.
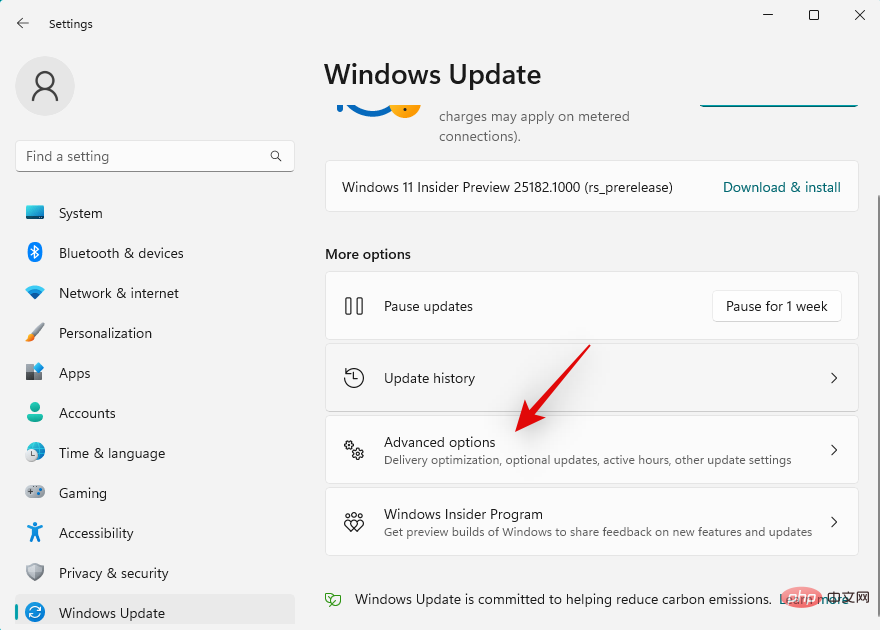
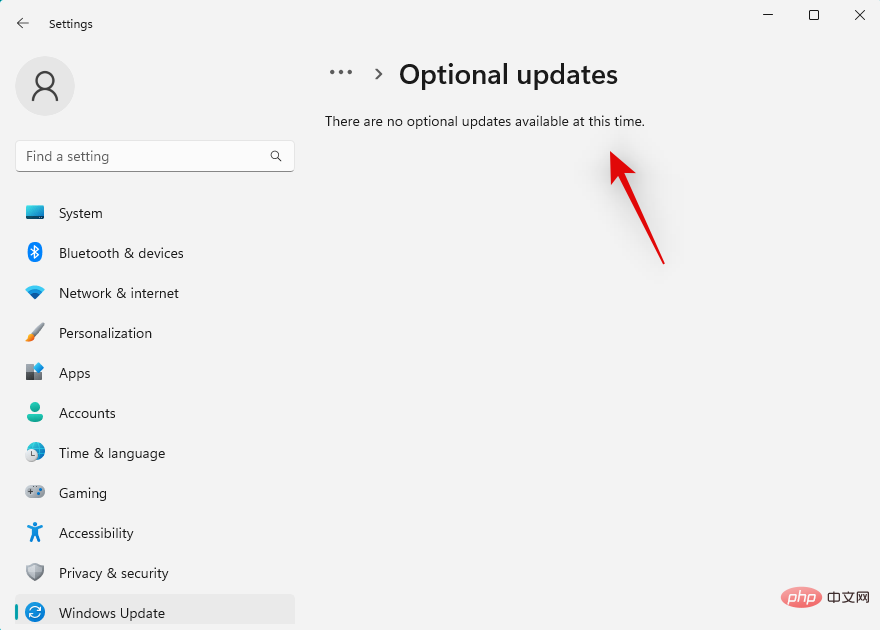
Now click Optional Update.
If you find any drivers related to your Bluetooth or network card, just install them on your PC.
Once completed, restart your PC.
You should now be able to get your Bluetooth audio device working again using the recently installed optional driver on your system.
Fix 7: Change Bluetooth Power Management
Power management options can also interfere with some Bluetooth audio devices. We recommend that you turn off Bluetooth power saving for your current power plan and see if this resolves your issue. Please follow the steps below to help you through the process. let's start.
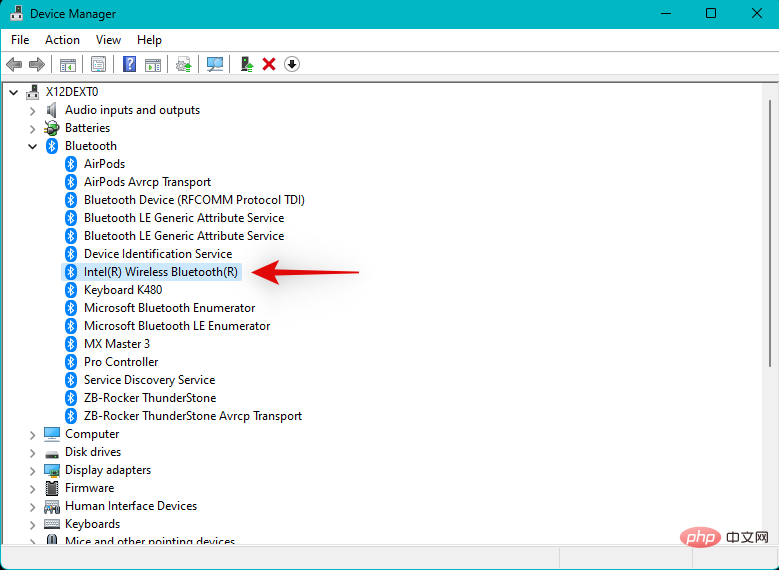
Press Windows X and click Device Manager.
Double-click Bluetooth at the top.

#Now double click on your Bluetooth adapter from the list. Your Bluetooth adapter will contain Wireless, Radio, or Adapter in its name. This should help you easily identify your adapter from the list of paired devices on the screen.
Click Power Management at the top.
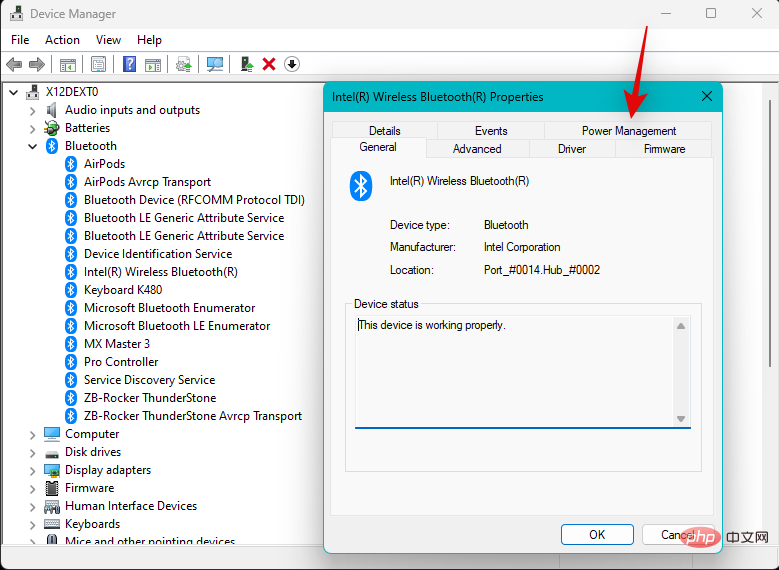
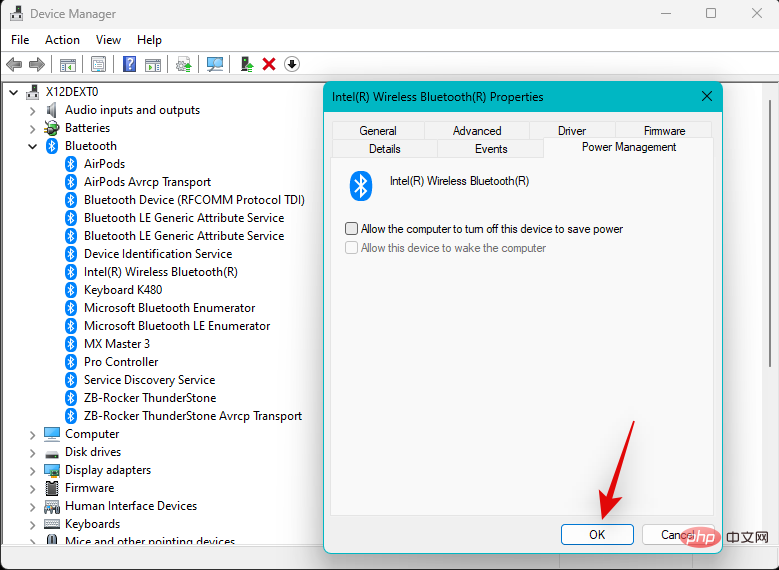
Now uncheck the Allow the computer to turn off this device to save power option.
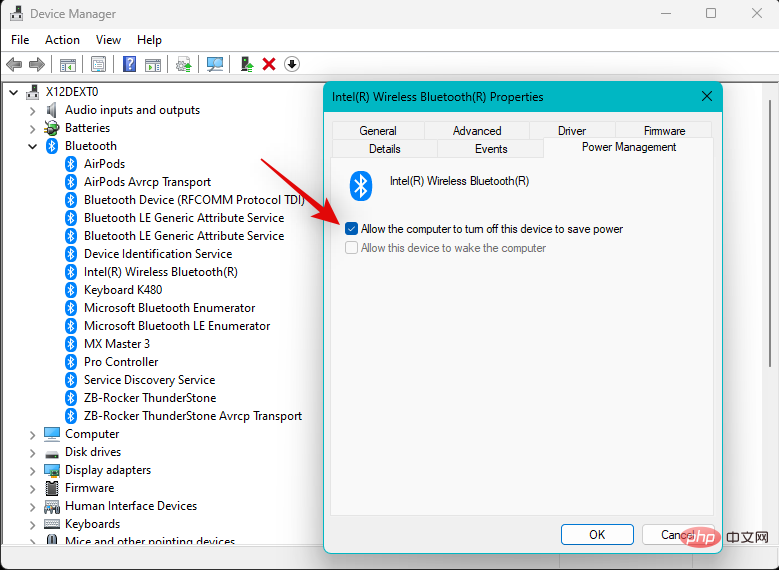
Click OK when finished.
# Restart your PC and you will now fix your Bluetooth audio if power management is the cause of your system issues.
Fix 8: Ensure Bluetooth Compatibility
At this point, if you are still unable to play audio over Bluetooth, then we recommend that you check the compatibility of both devices, especially if one of them Any kind made before 2015. The Bluetooth standard has come a long way, with different versions bundling additional features in newer devices. You will find Bluetooth devices currently on the market with the following Bluetooth versions.
- Bluetooth 1.2 (2003)
- Bluetooth 2 (2004)
- Bluetooth 2.1 (2007)
- Bluetooth 3 HS (2009)
- Bluetooth 4 (2010)
- Bluetooth 4.1 (2013)
- Bluetooth 4.2 (2014)
- Bluetooth 5 (2016)
- Bluetooth 5.1 (2019)
- Bluetooth 5.2 (2020)
- Bluetooth 5.3 (2021)
Each of these versions is backwards compatible, but not higher version of Bluetooth offers some modern features. This in turn means that if either of your devices relies on such proprietary functionality to transmit audio that is not supported by the version of Bluetooth on the other device, you will not be able to play the audio on the same device.
We recommend that you check your device specifications and then refer to the compatibility chart for more information. Generally, the device you want to connect to via Bluetooth should use the same or higher version of Bluetooth that your PC uses.
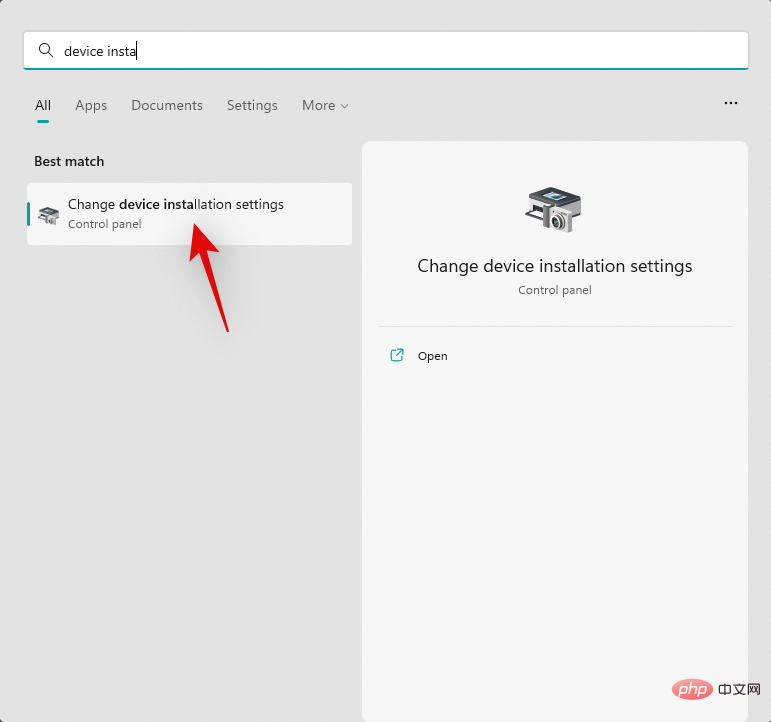
Fix 9: Force Remove and Downgrade Bluetooth Drivers
We now recommend that you try force removing your drivers and then downgrade them to an older version to get everything back up and running again. You may encounter bugs or compatibility issues with the latest drivers released by OEMs.
In this case, downgrading to an older version or the initial version that was bundled with your PC at the time of manufacture can help fix the same issue. Please follow the steps below to help you through the process.
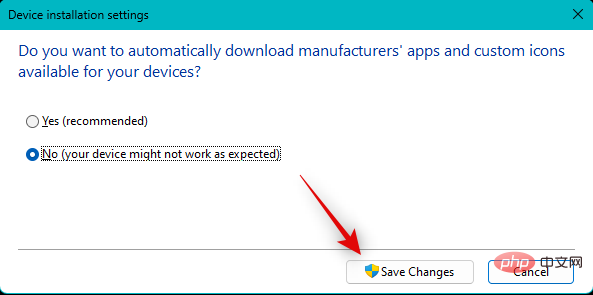
Open the Start menu, search for Device Installation Settings, and launch it from the search results.
Click and select No.
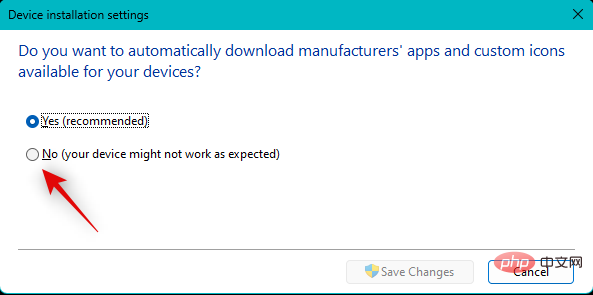
Click to save changes.
- DriverStoreExplorer | Download Link
Now use the link above to download and unzip DriverStoreExplorer. Once completed, launch the same program using the .exe file in the unzipped folder.
The tool will now scan all drivers installed on your system. Click the Driver class at the top to sort drivers by device type.
Check the checkboxes for all Bluetooth drivers that appear at the top of the screen.
Now check the Force Delete box.
Click Remove Driver.
Click Yes to confirm your choice.
Close DriverStoreExplorer when finished. Now it’s time to install older Bluetooth drivers for your PC. If they are provided by your OEM in an .exe or .msi package, simply double-click the file and follow the on-screen instructions to install and update your drivers.
However, if you have the .INF file handy, press Windows X and select Device Manager.
Click the Add driver icon at the top.
Click now Browse.
Select the relevant driver from local storage and click OK.
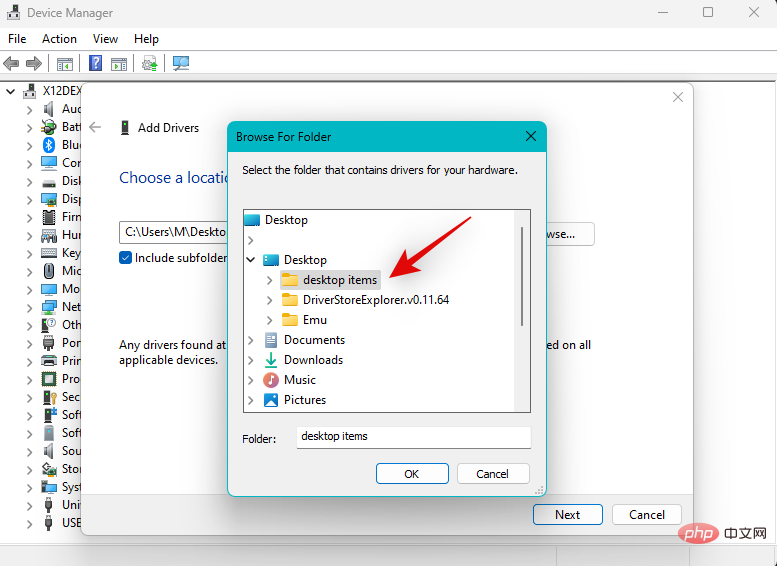
Now click Next.
Windows will now install the selected driver on your device. Click Close when finished.
Restart your PC now to get the good results.
The older driver should now help you get everything up and running on your system. You should now be able to easily stream audio to the device in question via Bluetooth.
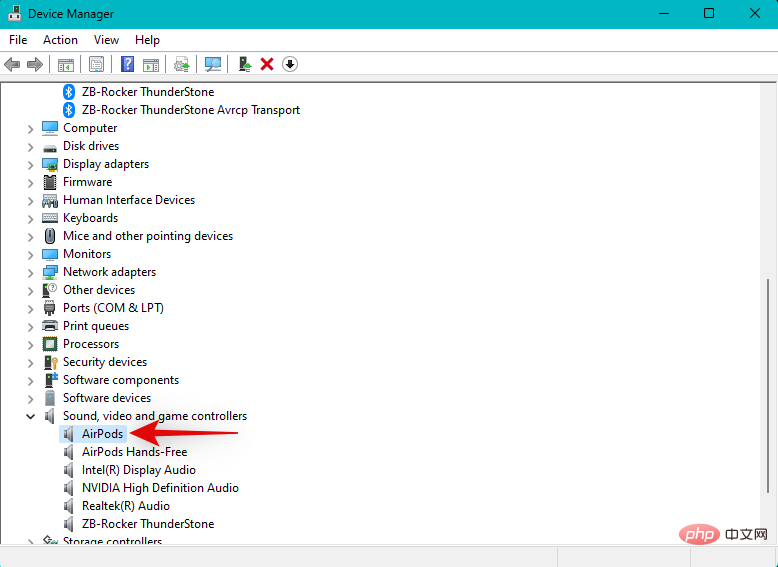
Fix 10: Remove the device from Device Manager and re-pair it
This is the recommended fix for audio devices with speakers, including smart speakers and headphones. Windows uses different services to handle microphone and audio output. This often results in background conflicts, preventing the audio output from fully working for your device. Removing the device in question from Device Manager and then pairing it again can help resolve such issues. Please follow the steps below to help you through the process.
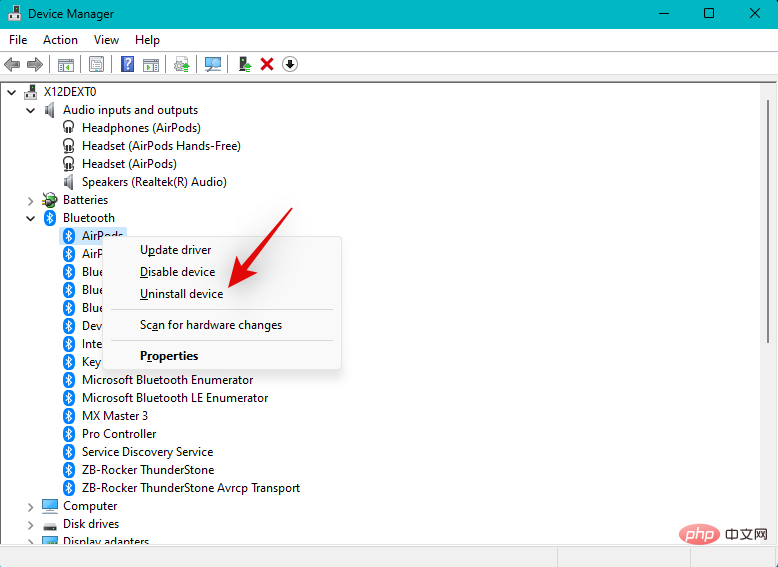
Press Windows X and click Device Manager.
Now check your Bluetooth devices under the following categories.
- Bluetooth
- Audio input and output
- Sound, video and game controller

Right-click your device in each category once found and select Uninstall Device.
Click Uninstall to confirm your choice.
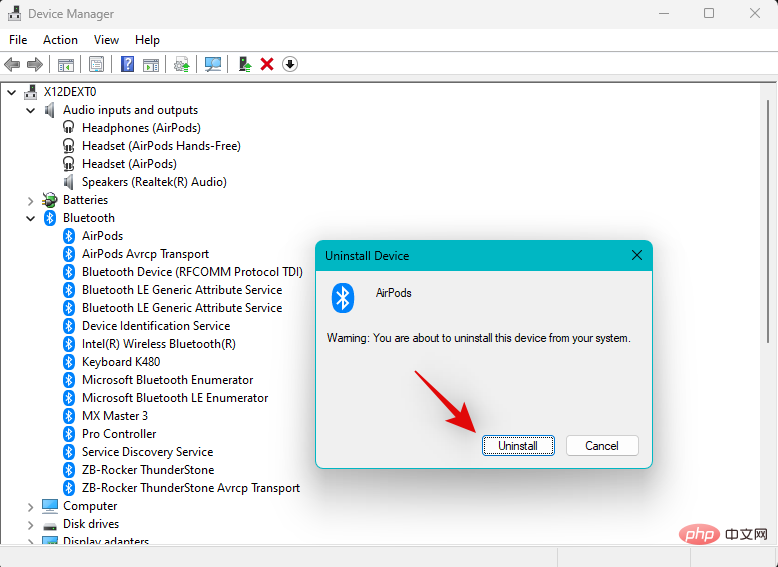
Note: If available, select the Attempt to remove the driver for this device checkbox.
Repeat the above steps to uninstall all instances of related devices in these categories. Once completed, restart your PC. When you remove a device from the Sound, Video, and Game Controllers category, you will be prompted to restart the device.
After the device restarts, press Windows i to open the Settings application. Click on Bluetooth and Devices.
Click now View more devices.
Click the three-dot ( ) menu icon next to the relevant Bluetooth device.
Select Delete.
Click Yes to confirm your choice.
Once your device is not paired, wait a few minutes and click Add Device. At the same time, your Bluetooth audio device is in pairing mode.
Click and select Bluetooth.
Now click on your audio device once it appears on your screen.
Your device will now be re-paired on your system. If you are experiencing issues due to driver errors and connection errors, you should now be able to play audio from your device.
Tip: You may need to disable the microphone or other services for your audio device to improve quality and volume or to get the audio to work completely properly. After completing this tutorial, we recommend that you refer to the section at the top to disable additional services.
Fix 11: Disable the headphone's microphone
If you still can't play audio through your Bluetooth device, we recommend that you try disabling the headphone component of your device. This is a fix for devices with onboard microphones. If your device does not have a microphone, you can skip this fix and continue with the fixes mentioned below.
Windows 11 handles microphone and audio output separately, even though these components may be used on the same device. This can cause a known bug where the microphone is always active, preventing audio from playing on your device. Disabling the microphone can help resolve this issue on your system. Please follow the steps below to help you through the process.
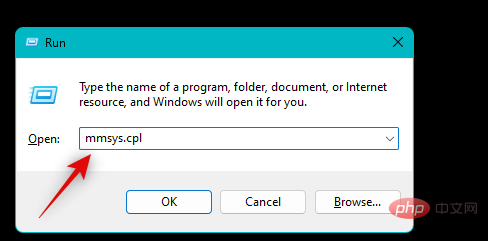
Press Windows R to start Run.
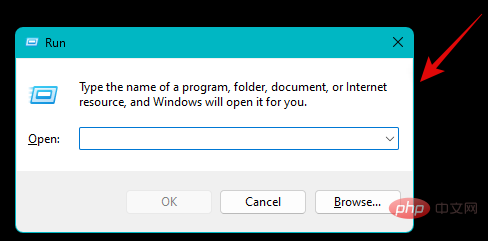
Now enter the following and press Enter. You can also click "OK" if necessary.
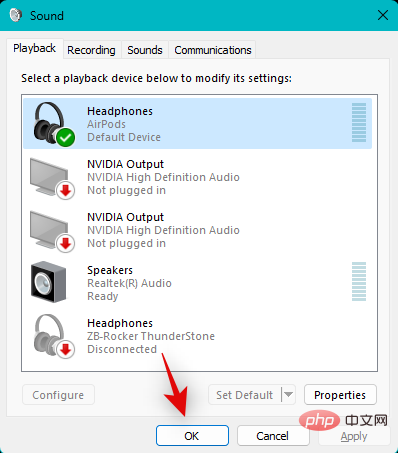
mmsys.cpl
Click and switch to the Recording tab at the top.
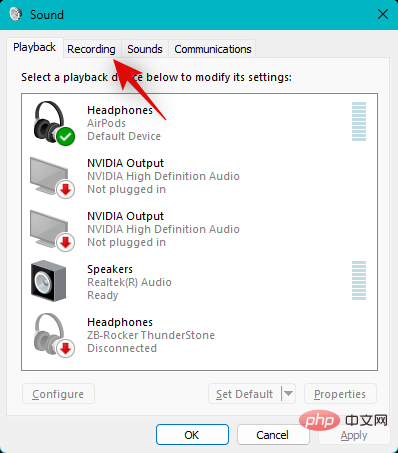
#Your headset will now be listed on your screen. Right click on the microphone.
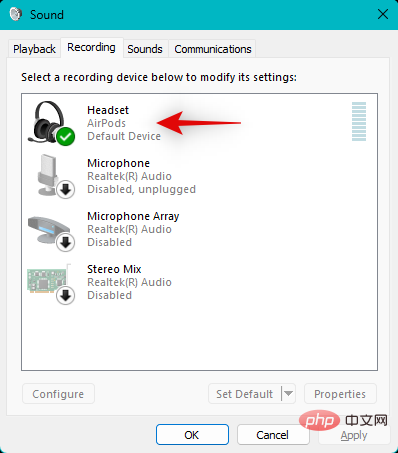
Select Disable.
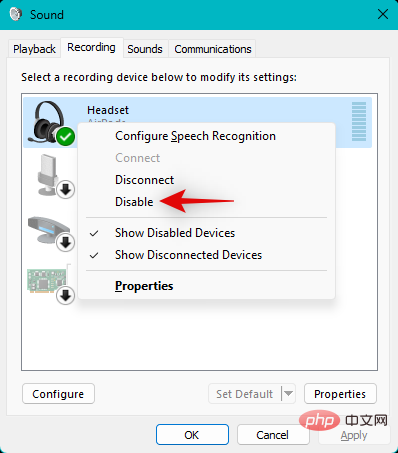
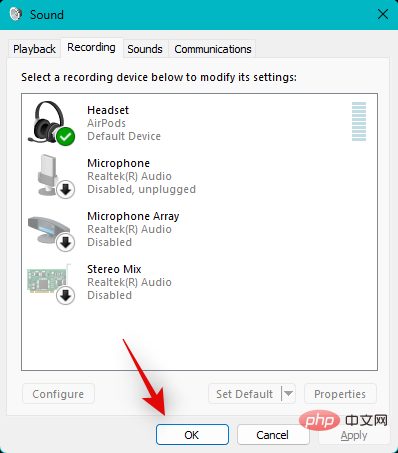
Click OK.
When finished, press Windows i to open the Settings app and click Bluetooth & Devices .
Click to see more devices.
Scroll to the bottom and click More device and printer settings.
Now right-click on your headset from Devices on the screen and select Properties.
Click and switch to the "Services" tab at the top.
# Now uncheck the checkboxes for the following services, depending on the services available for your device.
- AAP Server
- Hands-free Phone
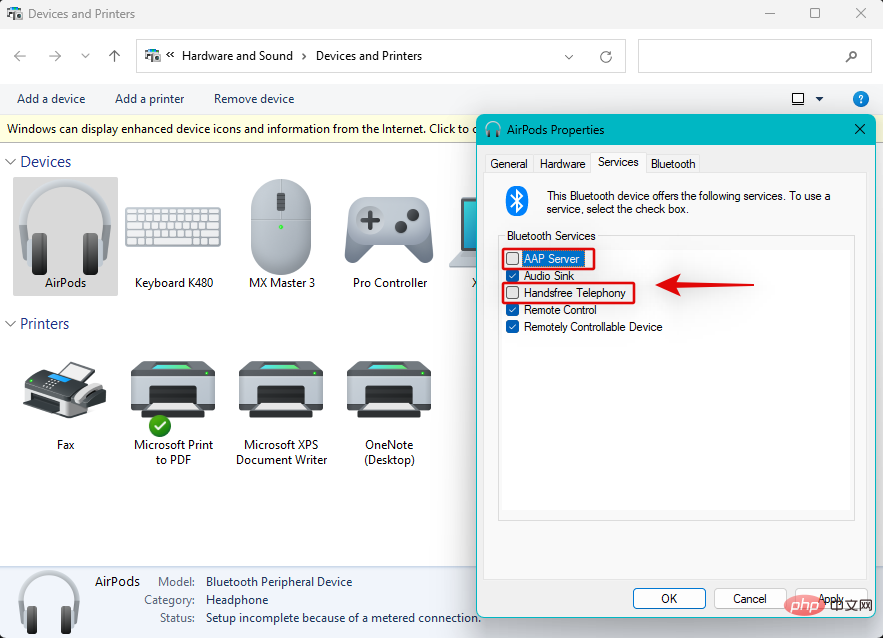
OK when finished.
Windows R to start Run.
OK" if necessary. <strong></strong>
mmsys.cpl
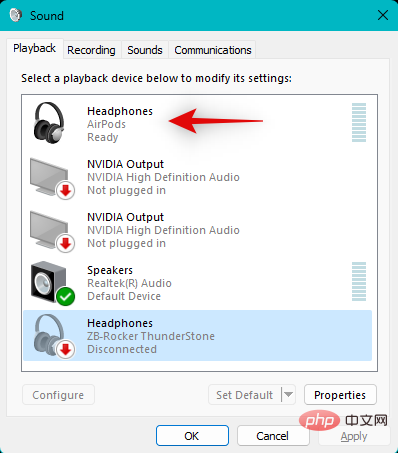
at the bottom to set the default. The gray option indicates that the selected device is already your default device.
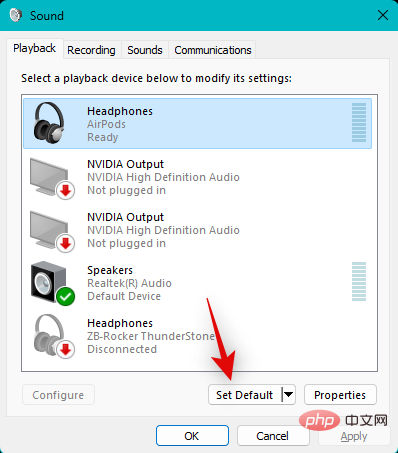
OK.
NOTE: Before continuing with any of the following tutorials, please make sure your Bluetooth device is paired and connected to your device.
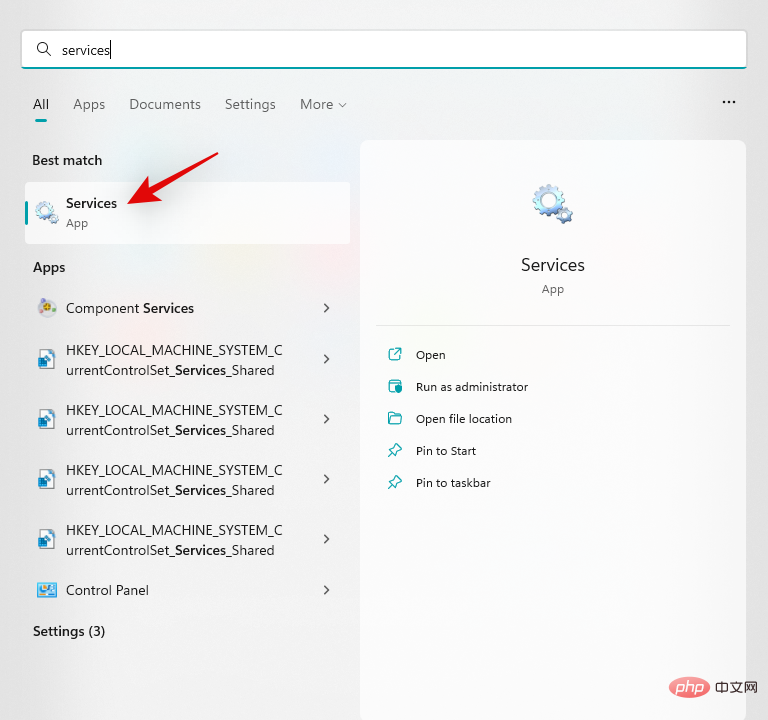
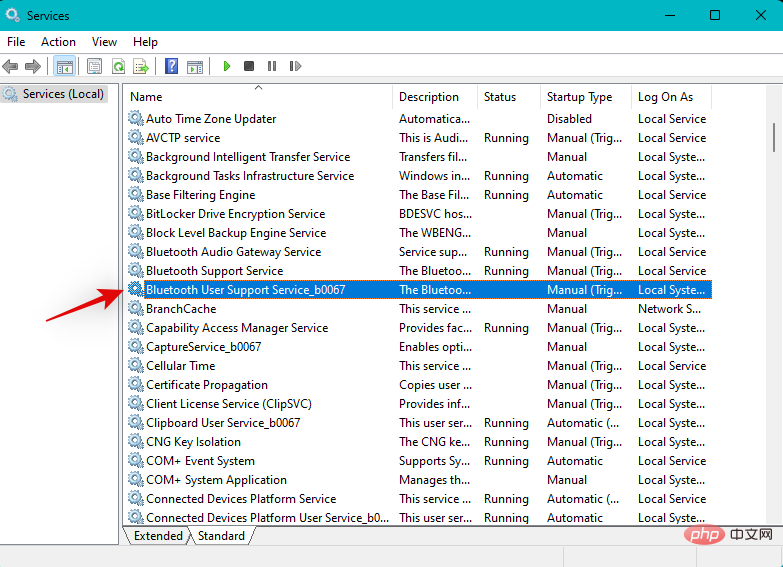
Method 1: Using Services AppOpen the Start menu, search for "Services" and launch it from the search results.
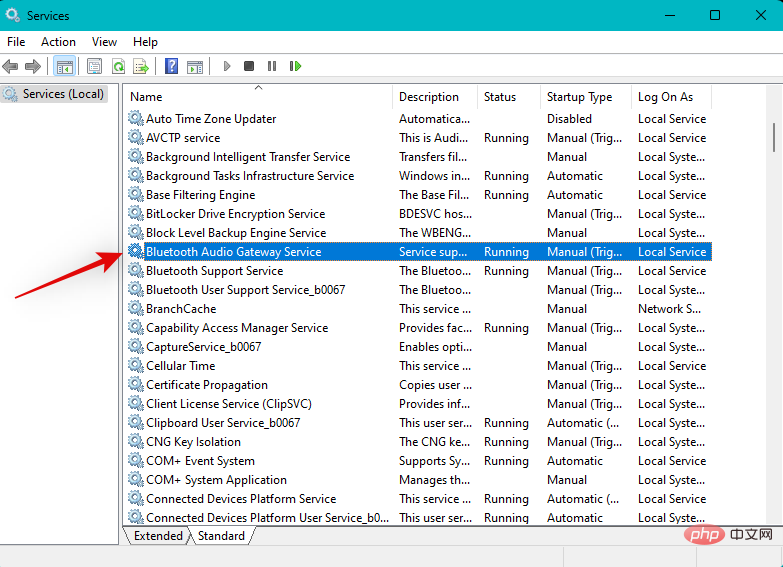
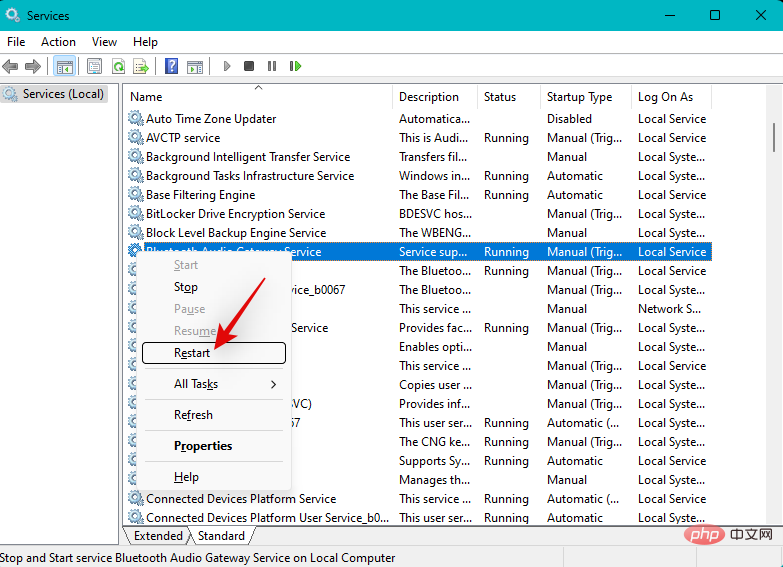
Bluetooth Audio Gateway Service.
Restart.
- Bluetooth Support Service
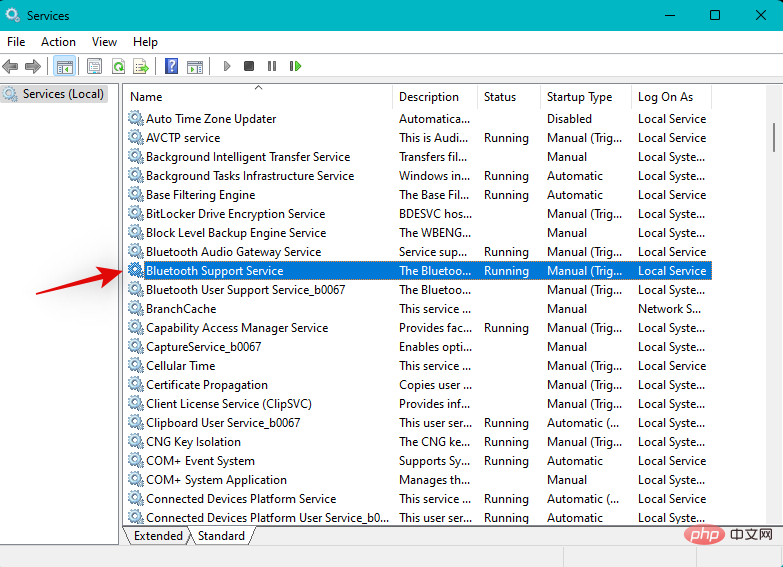
- Bluetooth User Support Service (if any)
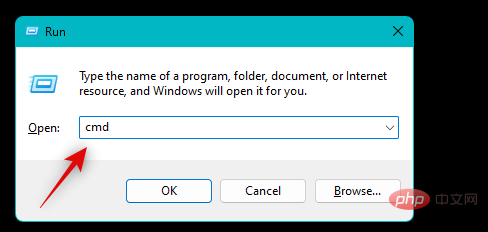
Windows R to start Run.
Type the following and press Ctrl Shift Enter.
cmd
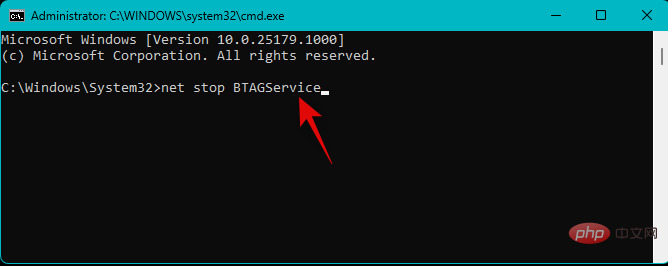
Now use the following command to restart the Bluetooth Audio Gateway Service.
net stop BTAGService
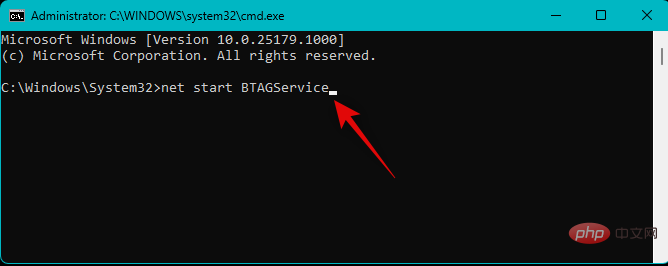
- ##net start BTAGService
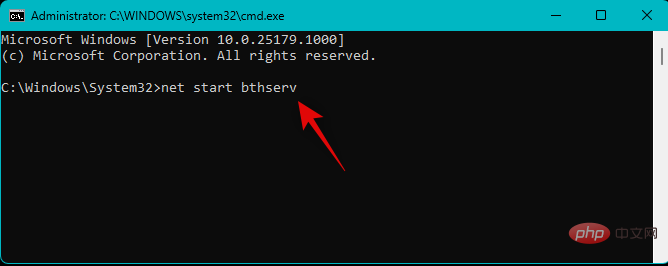
Bluetooth Support Service.
- net stop bthserv
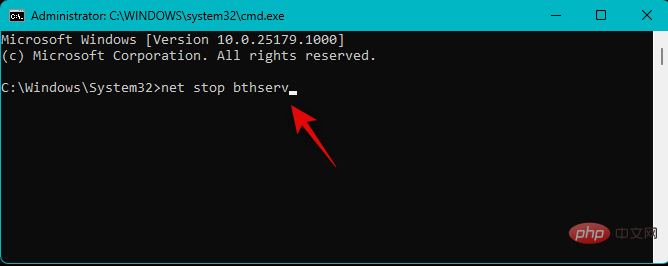
- ##net start bthserv
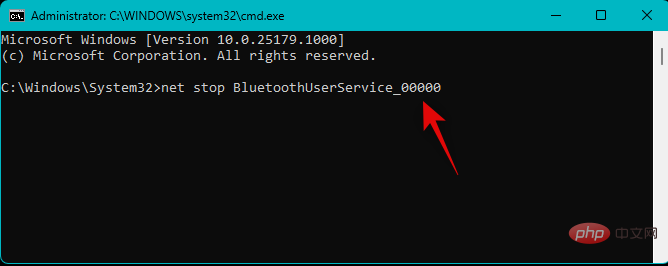
 Finally use the following command to restart
. Replace the numbers with the relevant numbers for your PC. <strong></strong>
- net stop BluetoothUserService_
- Number
<strong></strong>
- Number
<strong></strong>
Once completed, use the following command to close CMD. 
exit
That’s it! You should now be able to easily play audio through your Bluetooth device. 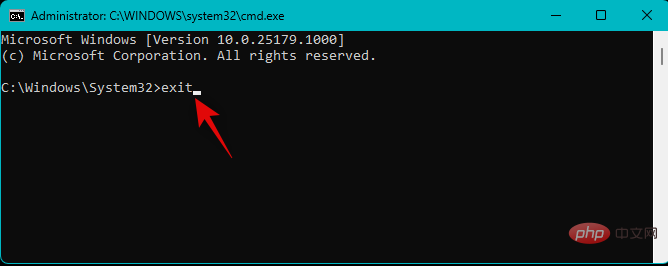
NOTE:
Disabling the enumerator may cause problems with other Bluetooth devices you use on your PC. If this happens, you will have to manually disable and enable the enumerator each time you wish to use the audio device, if this fix applies to you.Press Windows X
keyboard and clickDevice Manager. <strong></strong>
Now double click and expand Bluetooth
<strong></strong>
Right-click  Microsoft Bluetooth LE Enumerator
<strong></strong>
Select 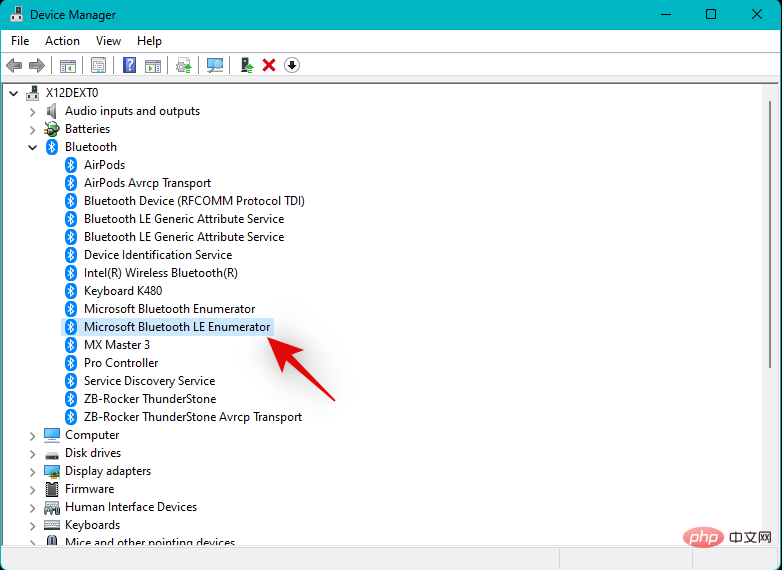 Disable device
<strong></strong>
Click 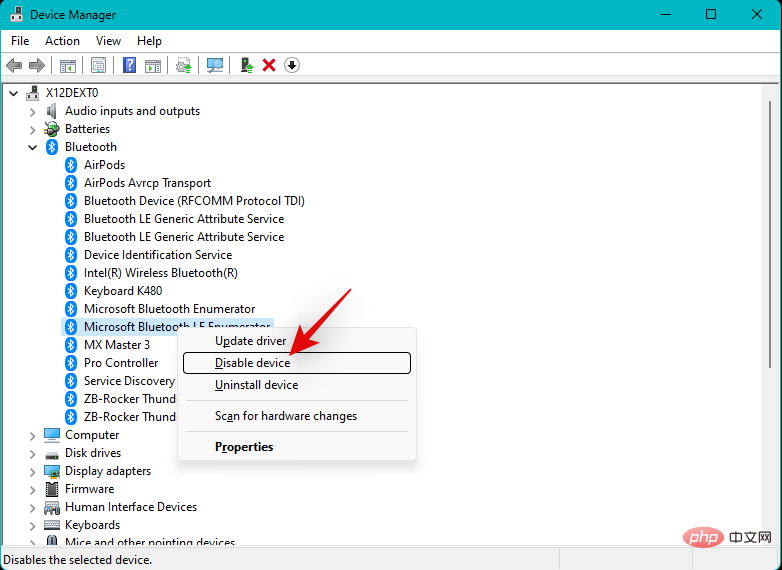 Yes
Yes
<strong></strong>
You should now be able to use your Bluetooth device to stream audio as expected. 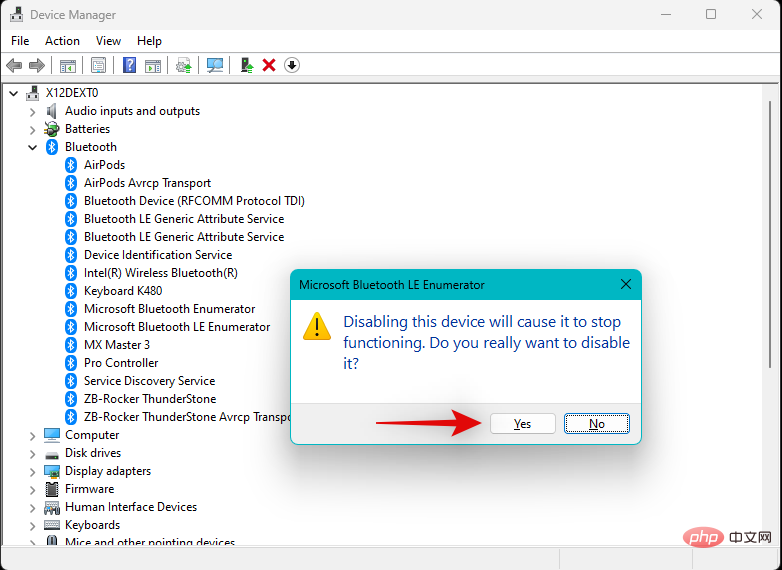
If your Bluetooth audio device is supported in Windows 10, you can continue to use the same device until 2025 if you wish. You can also try upgrading to Windows 11 in the future once Microsoft releases a feature update for the operating system, which may help resolve Bluetooth issues.
The above is the detailed content of 14 Ways to Fix Bluetooth Audio Not Working Issue on Windows 11. For more information, please follow other related articles on the PHP Chinese website!

Hot AI Tools

Undresser.AI Undress
AI-powered app for creating realistic nude photos

AI Clothes Remover
Online AI tool for removing clothes from photos.

Undress AI Tool
Undress images for free

Clothoff.io
AI clothes remover

Video Face Swap
Swap faces in any video effortlessly with our completely free AI face swap tool!

Hot Article
Hot Tools

Notepad++7.3.1
Easy-to-use and free code editor

SublimeText3 Chinese version
Chinese version, very easy to use

Zend Studio 13.0.1
Powerful PHP integrated development environment

Dreamweaver CS6
Visual web development tools

SublimeText3 Mac version
God-level code editing software (SublimeText3)
Hot Topics


 Solve the problem of playing headphones and speakers at the same time in win11
Jan 06, 2024 am 08:50 AM
Solve the problem of playing headphones and speakers at the same time in win11
Jan 06, 2024 am 08:50 AM
Generally speaking, we only need to use one of the headphones or speakers at the same time. However, some friends have reported that in the win11 system, they encountered the problem of headphones and speakers sounding at the same time. In fact, we can turn it off in the realtek panel and it will be fine. , let’s take a look below. What should I do if my headphones and speakers sound together in win11? 1. First find and open the "Control Panel" on the desktop. 2. Enter the control panel, find and open "Hardware and Sound" 3. Then find the "Realtek High Definition" with a speaker icon. Audio Manager" 4. Select "Speakers" and click "Rear Panel" to enter the speaker settings. 5. After opening, we can see the device type. If you want to turn off the headphones, uncheck "Headphones".
 Hyperx headset microphone has no sound
Feb 16, 2024 am 09:12 AM
Hyperx headset microphone has no sound
Feb 16, 2024 am 09:12 AM
The quality of hyperx headphones has always been very good, but some users find that the microphone of the headphones has no sound when using it. There are many possible reasons for this situation. Here are some of them. Several kinds. There is no sound from the hyperx headset microphone. 1. Connect and check whether the microphone is fully inserted into the headphone jack. You can try plugging and unplugging it a few times. 2. If other equipment conditions permit, you can plug the headset into other normally operating equipment to see if it can be used normally and whether the audio link is normal. 3. Audio settings Check the audio settings to make sure that the speakers and microphone are enabled normally and not muted or at a low volume. 4. To disable the software, you can try disabling the audio adapter.
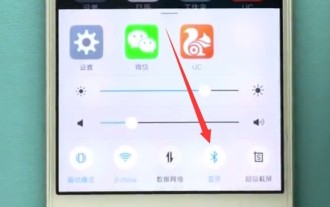 How to turn on Bluetooth in vivo phone
Mar 23, 2024 pm 04:26 PM
How to turn on Bluetooth in vivo phone
Mar 23, 2024 pm 04:26 PM
1. Swipe up at the bottom of the screen to bring up the control center, as shown below. Click the Bluetooth switch to turn on Bluetooth. 2. We can connect to other paired Bluetooth devices or click [Search Bluetooth Device] to connect to a new Bluetooth device. Remember to turn on [Detectability] when you want other friends to search for your phone and connect to Bluetooth. Switch. Method 2. 1. Enter the mobile phone desktop, find and open settings. 2. Pull down the [Settings] directory to find [More Settings] and click to enter. 3. Click to open [Bluetooth] and turn on the Bluetooth switch to turn on Bluetooth.
 Logitech headset microphone is silent, please fix it
Jan 18, 2024 am 08:03 AM
Logitech headset microphone is silent, please fix it
Jan 18, 2024 am 08:03 AM
Some users may encounter the problem of no sound from the headset microphone when using Logitech drivers. Check whether the headset microphone cable is plugged in properly or whether the headset is muted. This can be solved by turning it on in the settings. There is no sound from the Logitech-driven headset microphone: 1. Users need to first check whether the headset microphone is plugged into the wrong wire. 2. If it is wrong, just plug it in again. If not, then you need to check whether the headset microphone is broken. 3. Open "Settings" and search for "Control Panel" in "Settings". 4. Select "Hardware and Sound". 5. Click "Manage Audio Devices". 6. After entering the interface, click the "Recording" option and double-click "Microphone". 7. After entering, click "Level" to increase the microphone volume to the maximum. If it is not loud enough, you can strengthen the microphone settings. 8. Last look
 There is no Bluetooth module in win11 system device manager
Mar 02, 2024 am 08:01 AM
There is no Bluetooth module in win11 system device manager
Mar 02, 2024 am 08:01 AM
There is no Bluetooth module in the device manager of win11 system. When using Windows 11 system, sometimes you will encounter the situation that there is no bluetooth module in the device manager. This may bring inconvenience to our daily use, because Bluetooth technology has become very common in modern society, and we often need to use it to connect wireless devices. If you can't find the Bluetooth module in the device manager, don't worry, here are some possible solutions for you: 1. Check the hardware connection: First, make sure you actually have a Bluetooth module on your computer or laptop. Some devices may not have built-in Bluetooth functionality, in which case you need to purchase an external Bluetooth adapter to connect. 2. Update the driver: Sometimes the reason why there is no Bluetooth module in the device manager is because of the driver.
 How to solve the microphone mute problem in Win10 Knives Out
Jan 11, 2024 am 10:24 AM
How to solve the microphone mute problem in Win10 Knives Out
Jan 11, 2024 am 10:24 AM
Knives Out is a very popular game on Windows 10 computers. Many friends like to play it with their friends, but many of them encounter the situation where the microphone has no sound, so what should I do? Let’s take a look at the solution below. What to do if there is no sound from the Knives Out microphone in Windows 10: 1. Enter the Knives Out game interface and turn on the microphone switch. 2. Enter the game settings and check "My Microphone" in the sound settings. 3. If it still doesn’t work, click Start in the lower left corner and open the “Control Panel”. 4. After opening, click "Hardware and Sound" and then "Manage Audio Devices". 5. Select the "Recording" tab and double-click "Microphone". 6. Click "Use this device". 7. Then turn up the volume.
 Solve the problem that the microphone is connected but not recognized in win11
Jan 29, 2024 pm 06:57 PM
Solve the problem that the microphone is connected but not recognized in win11
Jan 29, 2024 pm 06:57 PM
Nowadays, when many users use win11 system, they may encounter the problem that the microphone is connected to the computer but shows that it is not plugged in, causing the device to not work properly. For this situation, I will share with you two solutions. If you need detailed operation steps, please visit this site. What to do if the win11 microphone is connected but it says not plugged in: Method 1: 1. Click the start menu or search button below. 3. Open Hardware and Sound in the Control Panel. 5. After opening, click Advanced Device Settings in the upper right corner. Method 2: 1. There are also cases where your microphone is not connected properly. 2. You can try to replug and unplug the microphone cable to see if it can solve the problem.
 Can't allow access to camera and microphone in iPhone
Apr 23, 2024 am 11:13 AM
Can't allow access to camera and microphone in iPhone
Apr 23, 2024 am 11:13 AM
Are you getting "Unable to allow access to camera and microphone" when trying to use the app? Typically, you grant camera and microphone permissions to specific people on a need-to-provide basis. However, if you deny permission, the camera and microphone will not work and will display this error message instead. Solving this problem is very basic and you can do it in a minute or two. Fix 1 – Provide Camera, Microphone Permissions You can provide the necessary camera and microphone permissions directly in settings. Step 1 – Go to the Settings tab. Step 2 – Open the Privacy & Security panel. Step 3 – Turn on the “Camera” permission there. Step 4 – Inside, you will find a list of apps that have requested permission for your phone’s camera. Step 5 – Open the “Camera” of the specified app