
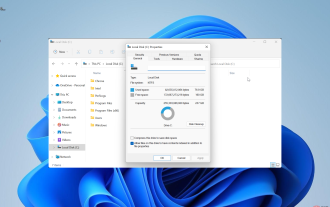
 Common Problem
How to remove the 'Open in Windows Terminal' option from the right-click context menu in Windows 11
Common Problem
How to remove the 'Open in Windows Terminal' option from the right-click context menu in Windows 11
How to remove the 'Open in Windows Terminal' option from the right-click context menu in Windows 11

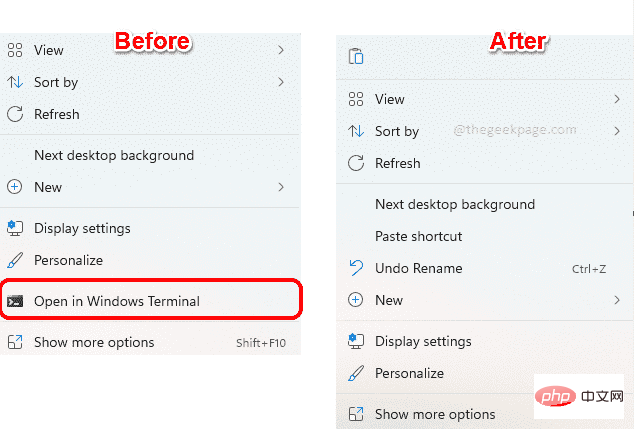
By default, the Windows 11 right-click context menu has an option called Open in Windows Terminal. This is a very useful feature that allows users to open Windows Terminal at a specific location. For example, if you right-click a folder and select the Open in Windows Terminal option, Windows Terminal will launch and set that specific location as its current working directory.
Although this is an awesome feature, not everyone finds a use for this feature. Some users may simply not want this option in their right-click context menu and want to remove it to tidy up their right-click context menu.
Read on to learn how to easily remove the Open in Windows Terminal option from the Windows 11 right-click context menu.
Note: This method involves changing your registry settings. You must be careful when changing registry settings as incorrect registry settings can even cause your system to crash. Therefore, it is highly recommended that you back up your registry settings before proceeding.
If something goes wrong during this process, you can restore the registry settings using the backup you created.
Remove the "Open in Windows Terminal" option from the right-click context menu
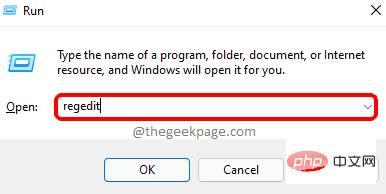
Step 1: Press the Win R keys simultaneously Start the run window. Type regedit and press Enter.
Step 2: Next, in the Registry Editor Navigation bar, copy and paste the following Position , and then press the Enter key.
计算机\HKEY_LOCAL_MACHINE\SOFTWARE\Microsoft\Windows\CurrentVersion\Shell Extensions
Nowright click on the Shell Extensions folder, click New and then click Key.
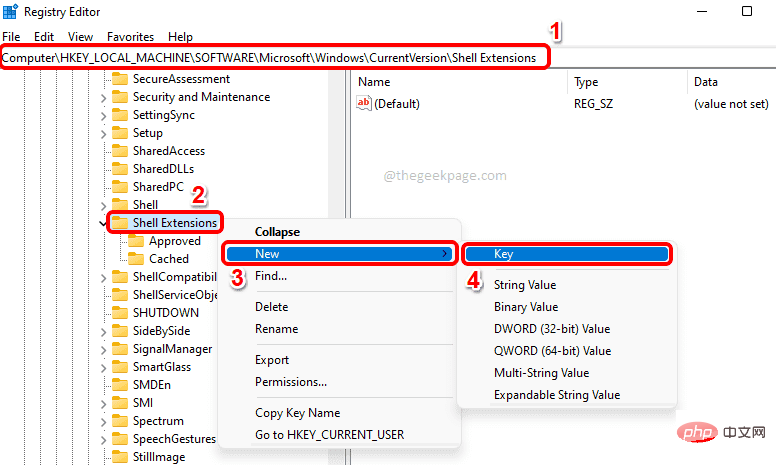
Step 3: Right click on the newly created key and select the Rename option .
Name the new key Blocked.
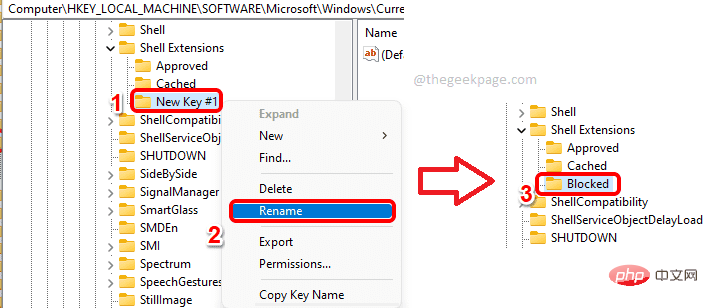
Step 4: Now, in the left pane, make sure you click The Blocked folder is selected.
In an empty space in the right window pane, just right-click and click New, then Click String value.
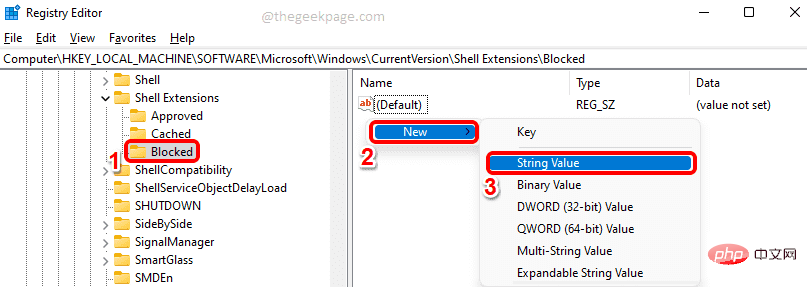
Step 5: Click on the newly created key and press the F2 keyRename it. Give the new name {9F156763-7844-4DC4-B2B1-901F640F5155}.
Note: Please make sure to include braces. See screenshot below.

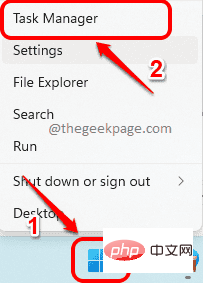
Now you just need torestart your computerorrestart Windows Explorer The changes take effect.
Step 6: To restart Windows Explorer, right-click the WindowsStart Menu icon and select Tasks Manageroptions.
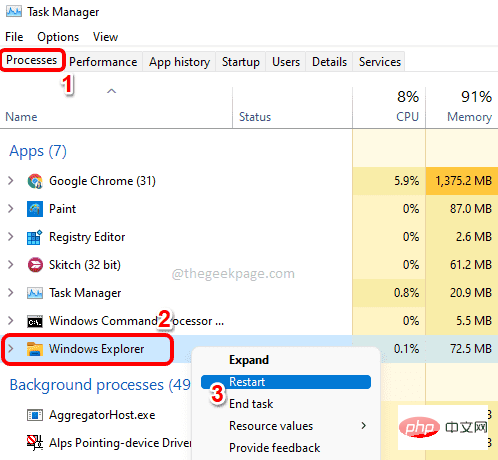
Step 7: In the Task Manager window, click the Processes tab.
Next, under the "Apps" section, find and right-click the application named Windows Explorer and click Click the "Restart" option.
NOTE: If you cannot find Windows Explorer under the Applications section, you can find it under Windows Processes by scrolling down Find it under the section.
That’s all. If you check the Windows right-click context menu now, you'll see that the "Open in Windows Terminal" option is long gone.
Note: If you change your mind and want to restore the Open in Windows Terminal option in the right-click context menu, you can follow the steps below.
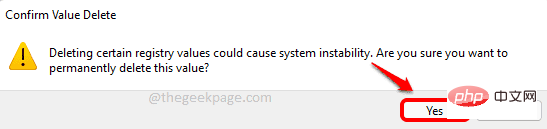
Go to the exact same location where you created the string value in step 5. NowRight click on the { 9F156763-7844-4DC4-B2B1-901F640F5155} string value and click Delete option.
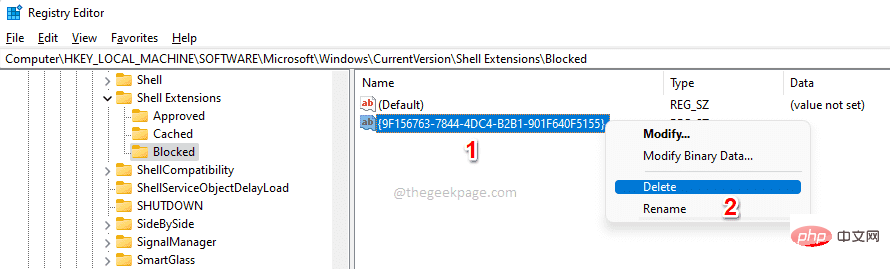
You will now see a Confirm Value Delete dialog box on which you must click the Yes button to Continue the deletion operation.
#After you delete the key, you should get the "Open in Windows Terminal" option back in the Windows right-click context menu. If you still don't see it, Restart your computer or Restart Windows Explorer (steps 6 and 7).
The above is the detailed content of How to remove the 'Open in Windows Terminal' option from the right-click context menu in Windows 11. For more information, please follow other related articles on the PHP Chinese website!

Hot AI Tools

Undresser.AI Undress
AI-powered app for creating realistic nude photos

AI Clothes Remover
Online AI tool for removing clothes from photos.

Undress AI Tool
Undress images for free

Clothoff.io
AI clothes remover

AI Hentai Generator
Generate AI Hentai for free.

Hot Article
Hot Tools

Notepad++7.3.1
Easy-to-use and free code editor

SublimeText3 Chinese version
Chinese version, very easy to use

Zend Studio 13.0.1
Powerful PHP integrated development environment

Dreamweaver CS6
Visual web development tools

SublimeText3 Mac version
God-level code editing software (SublimeText3)
Hot Topics
 1371
1371
 52
52

 7 Ways to Fix Printer Access Denied Error in Windows 11
May 10, 2023 pm 03:43 PM
7 Ways to Fix Printer Access Denied Error in Windows 11
May 10, 2023 pm 03:43 PM
Connecting your Windows computer to external devices such as printers can make things easier for you. However, you may encounter several problems when trying to collect computers from external devices such as printers. Users complain about Windows 11 printer access denied error. Many situations can cause this issue, including hardware issues, driver issues, and more. Therefore, this article will discuss the cause of the problem and how to solve it. Windows 11 printer access denied error prevents you from using the printer to perform any action on your computer. This indicates that there is not a good connection between the computer and the printer. Likewise, printer errors may cause Windows to be unable to connect to the printer Access Denied error 0x0000011b.
 How to fix preview pane not working in Windows 11
Apr 24, 2023 pm 06:46 PM
How to fix preview pane not working in Windows 11
Apr 24, 2023 pm 06:46 PM
One of the features that comes with Windows File Explorer is the preview pane, which displays a preview of the file you selected. This means you can view the contents of the file before opening it. The preview pane of File Explorer provides previews for different types of files such as Office-related documents, PDFs, text files, images, and videos. It usually works fine, but sometimes the file preview isn't available. Recently, many Windows 11 users have raised the issue that File Explorer’s preview pane is not working and they are unable to view file previews. Are you facing the issue of preview pane not working on your Windows computer? Then, continue reading this article. Here we have compiled a list of fixes that can help you fix
 Fix: Snipping Tool notification missing in Windows 11, 10
May 16, 2023 pm 06:34 PM
Fix: Snipping Tool notification missing in Windows 11, 10
May 16, 2023 pm 06:34 PM
Snip&Sketch is an excellent Windows screenshot tool. Microsoft has added tons of new cool features and shortcuts to make this tool almost indispensable for users. However, you may have noticed an issue after taking the screenshot, the preview notification does not appear in the notification panel! There are many reasons that could be the source of the problem. So, no need to waste more time, just follow these solutions to find a quick solution. Fix 1 – Check notification settings You may have blocked Snip & Sketch notification settings. 1. You have to open settings. So, press Windows key + I key at the same time. 2. Now, go to “System” from the left pane. 3. On the right side, click All Options
 How to enable developer mode in Windows 11
Apr 25, 2023 pm 10:58 PM
How to enable developer mode in Windows 11
Apr 25, 2023 pm 10:58 PM
Microsoft has announced a new feature alongside Windows 10 called Developer Mode, which is also present in Windows 11. This is very important for all developers who code software development on Windows PC and want to deploy it to other devices. To improve the coding environment, users must enable developer mode on Windows systems, which allows users to benefit from enhanced assistance in writing, testing, and deploying code. Users must ensure that developer mode is enabled not only on the Windows machine where coding is done, but also on the device where it is deployed and tested. If you are new to coding and want to make the most of this feature, continue reading this article which will guide you how
 Windows 11: The easy way to import and export start layouts
Aug 22, 2023 am 10:13 AM
Windows 11: The easy way to import and export start layouts
Aug 22, 2023 am 10:13 AM
In Windows 11, the Start menu has been redesigned and features a simplified set of apps arranged in a grid of pages, unlike its predecessor, which had folders, apps, and apps on the Start menu. Group. You can customize the Start menu layout and import and export it to other Windows devices to personalize it to your liking. In this guide, we’ll discuss step-by-step instructions for importing Start Layout to customize the default layout on Windows 11. What is Import-StartLayout in Windows 11? Import Start Layout is a cmdlet used in Windows 10 and earlier versions to import customizations for the Start menu into
 Ghost Specter Windows 11 Superlite: Download and Installation Guide
May 05, 2023 am 09:10 AM
Ghost Specter Windows 11 Superlite: Download and Installation Guide
May 05, 2023 am 09:10 AM
Updating the operating system to the latest Windows 11 poses a challenge for many PCs due to insufficient system requirements. Therefore, Microsoft released a modified version, GhostSpectreWindows11Superlite, compatible with every PC. Therefore, we will discuss how to download and install it. Likewise, if your PC meets the Windows 11 system requirements, you can read further about obtaining a Windows 11 custom ISO. What is Ghost Windows 11? GhostSpectreWindows11 is a modified version called LightWindows11. This is because of the installed
 Windows 11 doesn't recognize Bootrec? Apply this simple fix
May 20, 2023 pm 01:50 PM
Windows 11 doesn't recognize Bootrec? Apply this simple fix
May 20, 2023 pm 01:50 PM
The boot sector is a critical part of the drive that takes over shortly after the computer boots. When you have a problem, bootrec is here to help. But what should you do if bootrec is not recognized in Windows 11? The boot sector contains the MBR or Master Boot Record, which helps locate the operating system on the drive and load it. Moreover, its issues may prevent you from booting Windows 11 efficiently or at all. Speaking of issues, many are reporting Bootrec/Fixboot access denied messages and we have detailed this issue in a separate tutorial. In this case, it is recommended that you run the bootrec command to eliminate this issue. If you encounter when running the command
 Which one is better? What are the differences, advantages and disadvantages of NTFS and ReFS in Windows 11?
May 10, 2023 am 08:06 AM
Which one is better? What are the differences, advantages and disadvantages of NTFS and ReFS in Windows 11?
May 10, 2023 am 08:06 AM
NTFS has always been the default file system for Windows PCs, but Microsoft is introducing some juicy stuff with ReFS. This new file system may be coming to Windows 11, and users are eager to know how NTFS will compare to ReFS. In this detailed guide, we will show you the better choice between these two file systems. Does Windows 11 support ReFS? Discussions about Windows 11 supporting ReFS (Resilient File System) are still tentative and ongoing. This file system is not officially available on Windows 11 PCs yet. However, DevsChannel and WindowsServe