

How to start or repair a Windows computer using installation media

Want to know what to do when there are no troubleshooting methods to resolve Windows issues or you can't access Windows advanced options from the Settings app. This is when using bootable installation media may help you. So, whether you want to install or repair Windows 11/10, you can easily do it by creating a bootable installation media, such as using a USB or DVD. Best of all, you won't lose any data in the process.
So, if your Windows 11/10 PC is not booting properly or no troubleshooting solutions help to solve the problem, it may be due to the system hardware being damaged and therefore needs to be repaired or the Windows operating system needs to be repaired completely Install. In this case, you can easily create Windows 11/10 installation media using USB or DVD. Let’s see how:
Method 1: Repair Windows Computer using Installation Media
This method helps you troubleshoot and repair Wndows11/10 PC using external media devices like USB or DVD drives repair. This method is especially useful for users who cannot boot their Windows 11/10 PC or cannot open files. In such cases, you can use advanced recovery methods to resolve certain complex issues and the best part is, you won’t lose any data in the end.
Follow these steps to repair your Windows PC using the installation media:
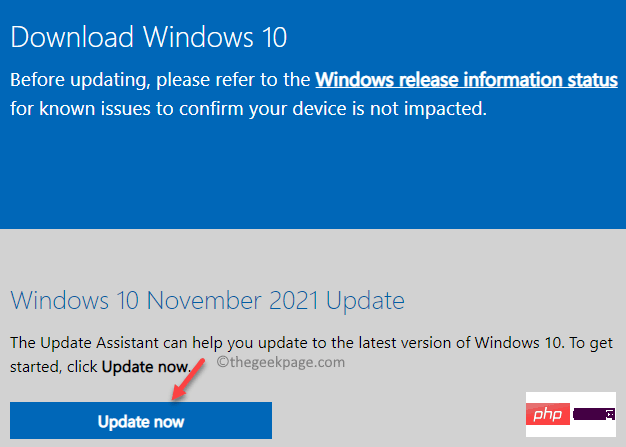
Download the Windows ISO file
It is usually preferred to download the ISO of the same version of Windows that you are using on your PC documentation, but this is not mandatory. While the Windows version isn't really connected to the Advanced Recovery Troubleshooter, it can be particularly useful when you want to do a clean install of the Windows operating system. Let’s see how:
* NOTE – Before proceeding to download the ISO file, make sure to check that your internet connection is active and you have enough storage space on your PC, And you have a blank USB drive with at least 8GB of storage or a blank DVD handy.
In addition, when using DVD to store ISO files, if you encounter the problem that the disc image is too large, you need to switch to dual-layer DVD media.
Step 1: Click the link below to visit the official Microsoft page for ISO download for Windows 10:
Download Windows 10 ISO file
*NOTE- Make sure your PC meets the basic system requirements to install Windows 10 and that the processor is 64-bit or 32-bit (read here to learn how to check your PC 32-bit or 64-bit).
Step 2: To download the Windows 11 ISO, please visit the following link:
Download Windows 11 ISO file
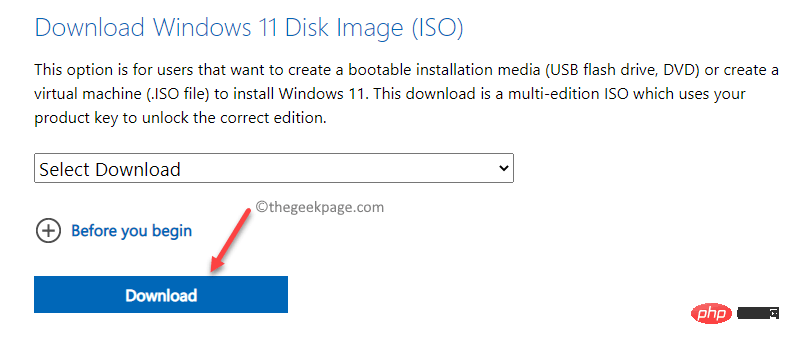
*Note – Please note that the Windows 11 ISO is currently only available for 64-bit computers, so it will only be useful for users who have installed Windows 11 on a 64-bit PC.
Considering that Windows 11 is not yet released for all types of systems, you have to download the Windows 11 Insider Preview ISO file and use the Rufus application to burn the ISO file and save it in a USB drive.
Now that you have successfully downloaded the ISO, proceed to create a bootable USB or DVD drive.
Create a bootable USB or DVD drive
Before continuing, make sure to select the same language for the new installation as you used before, select the same Windows version as before, and use the Use the same Microsoft Office product.
Now that you have the ISO file for Windows 11/10, proceed to create a bootable USB or DVD drive. While you can create Windows 11/10 installation media using a USB or DVD drive, you can also use tools like Rufus, WinToFlash, ABUSB, etc. to visit the official Microsoft page.
Since Rufus is one of the most popular Windows operating system installation tools, you can refer to this article to learn how to make a bootable USB for Windows11/10.
How to boot from installation media and repair your PC
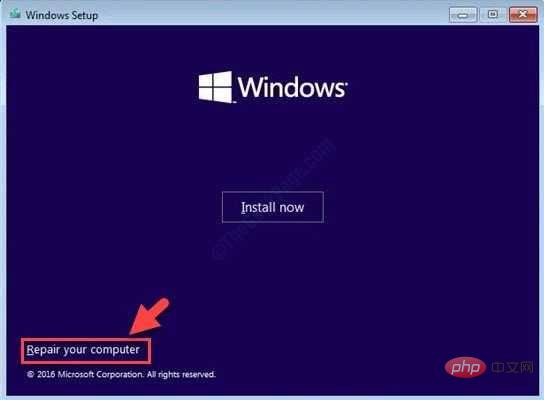
After booting your PC using the USB flash drive, the Windows 11/10 installation process will begin. Avoid pressing Next on every screen as it may end up installing Windows. So, take your time and on the first screen, click on the Repair your computer option in the lower left corner.
Your Windows PC will now boot into Advanced Recovery mode.
How to Select Startup Repair from Advanced Troubleshooting
Now, you will see the Advanced Troubleshooting screen. Follow these instructions to initiate Startup Repair:
Step 1: In the Troubleshooting screen, click Advanced Options.
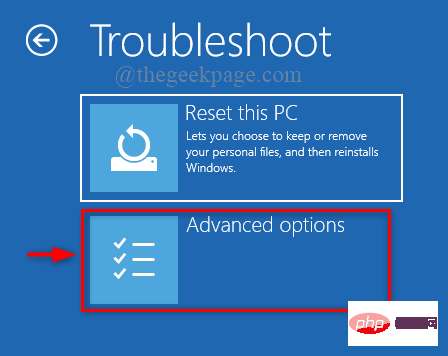
Step 2: Next, in the Select an option screen, click Troubleshoot.

Step 3:Now, in the Advanced Options screen, click on Startup Repair" option.
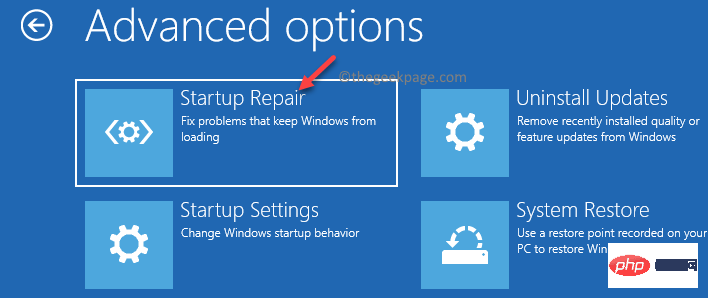
Now, follow the on-screen instructions to complete the repair process. Once completed, you will see the startup repair screen with the administrator account and its name. Just click on it and enter the administrator account password associated with the email address connected to it. Diagnostics will now begin, which will troubleshoot and fix any issues that are preventing your PC from booting.
After the process is complete, your PC should now boot normally. The best part is that you won't lose any data in the process.
Method 2: Repair Corrupt Windows 11/10 using SFC Scan and DISM
As you can see above, you can fix Unbootable with the help of a bootable drive such as USB flash drive of damaged Windows PC. After creating the bootable media, you must select USB as the boot order in the BIOS screen or UEFI screen. This will help your PC to boot with the help of USB flash drive.
Once you get to the first screen of the installation, select Options - Repair your computer. You will then be directed to advanced recovery options. Now, follow the instructions below to enter the command prompt option:
Step 1: You will see the Troubleshooting screen.
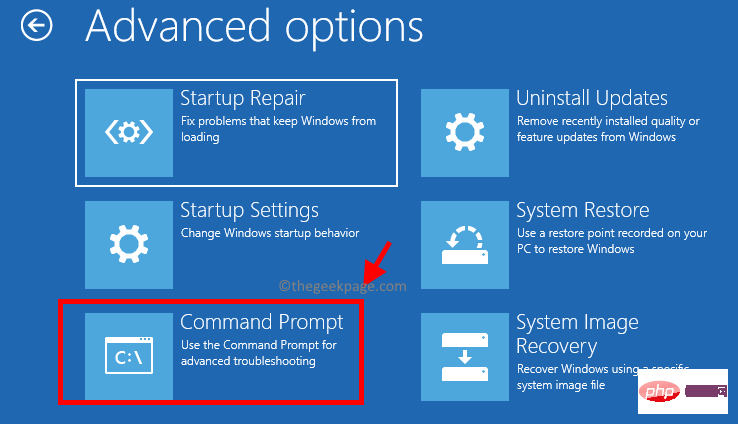
Here, click Advanced Options.
Step 2: Next, in the Select an option window, click Troubleshoot.

Step 3: Now, in the Advanced Options screen, click on Command Prompt ".
Step 4: Next, in the Command Prompt window, run the following command and press Enter :
DISM /在线 /Cleanup-Image /RestoreHealth
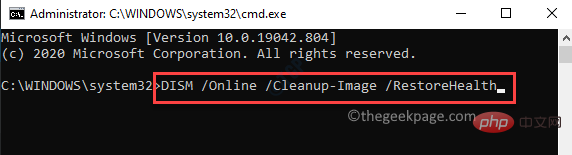
This process takes a while, so wait for it to end. It will replace any corrupted files with new files in the process.
Step 5:After the above process is successfully completed, execute the following command:
sfc /scannow
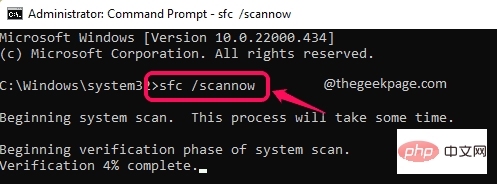
This is the system file checker command, It will check the system files for any corruption and repair them on the spot. This process also takes a while, so be patient and wait for it to complete.
*Note – If you wish to rebuild your BCD settings, run the following commands in sequence and press Enter after each command:
引导记录 /fixmbr引导记录 /fixboot引导记录 /rebuildbcd
When finished, close the command prompt window and restart your PC, your PC should now boot normally.
Method 3: Uninstall the problematic update
Sometimes, it may be a recently installed update that may cause problems with the startup process of your PC. In this case, you can uninstall the last update through the Windows Recovery Environment and check if this helps resolve the issue. Let’s see how:
Step 1: Insert the bootable USB drive into your PC and once booted to the first screen, select Repair Computer in the lower left corner Options.
Step 2: Next, you will be directed to the "Select an option" screen.
Here, click Troubleshoot.
Step 3: Now, in the Troubleshooting screen, click on Advanced Options.
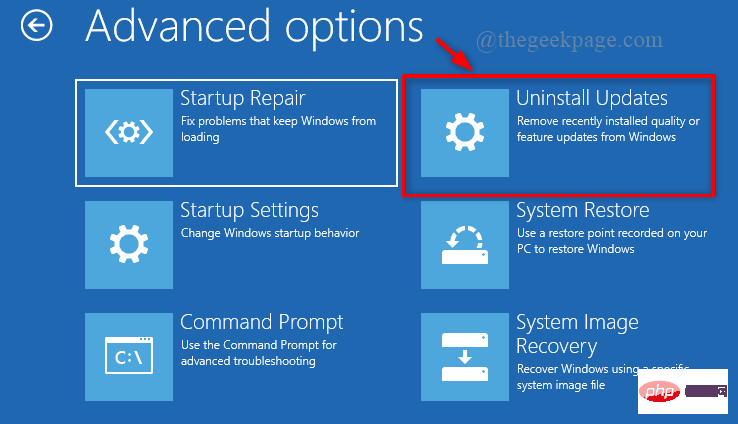
Step 4: Once you reach the "Advanced Options" screen, you will see the list of options again.
Here, click on the Uninstall Updates option.
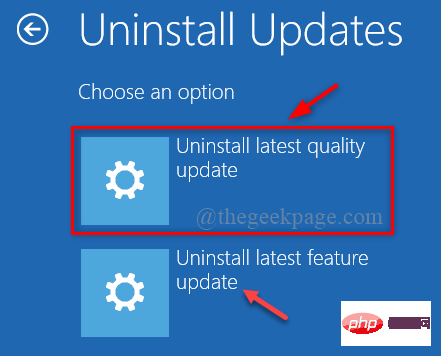
Step 5: In the next screen, you will see two options - Uninstall latest quality update and Uninstall latest feature update.
Select the appropriate option based on the type of update you recently installed.
Step 6: Now you will see Uninstall latest quality update or Uninstall latest feature update tips.
Here, click Uninstall Latest Quality Update or Uninstall Latest Feature Update to confirm the action.
Step 7: Click FinishComplete
Your Windows 11/10 PC should now restart normally.
Method 4: Perform a System Image Recovery
This method will work if you have already created a backup of the system image in your Windows PC. Using a system image copy, you can recover your PC if the hard drive crashes or the PC becomes unbootable. Follow these steps to boot your PC using the system image recovery option:
Step 1:Boot your PC using the bootable USB drive you created earlier and click on the first one at the bottom Select the Repair your computer option on the screen.
Step 2: When your Windows PC boots into the recovery environment, under "Select an option"## Select "Troubleshooting" on the # screen.
Step 3: Next, in the Troubleshooting screen, select Advanced Options.
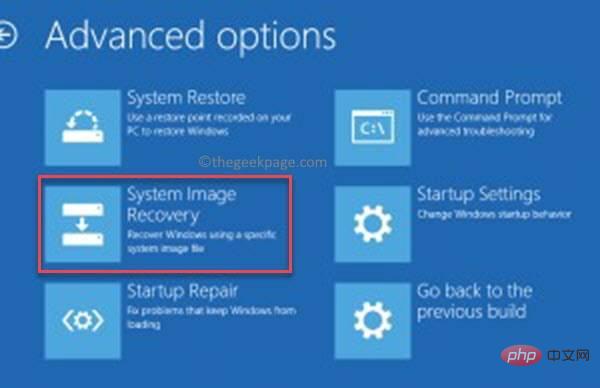
Step 4: Now, in the "Advanced Options" screen, select "System Image Recovery" .
You will now enter the reimaging screen on the PC interface. This has the most recent system image and will be selected by default. ClickNext to continue.
*Note –Alternatively, you can select Options – Select System Image and click Next. You can then choose another system mage to continue.
Now, follow the on-screen instructions to complete the system image recovery, and finally, your PC should boot normally. However, if none of the above methods work, you can also perform a system restore. Start your PC using a bootable USB device and follow steps 1 to 3 as shown in the image above. Once you reach the advanced options screen, select System Restore and perform the system restore process on Windows 11 just like you did in Windows 10. This process will take a while, please be patient and once it's complete, your system will automatically boot up and the problem should be resolved.The above is the detailed content of How to start or repair a Windows computer using installation media. For more information, please follow other related articles on the PHP Chinese website!

Hot AI Tools

Undresser.AI Undress
AI-powered app for creating realistic nude photos

AI Clothes Remover
Online AI tool for removing clothes from photos.

Undress AI Tool
Undress images for free

Clothoff.io
AI clothes remover

AI Hentai Generator
Generate AI Hentai for free.

Hot Article
Hot Tools

Notepad++7.3.1
Easy-to-use and free code editor

SublimeText3 Chinese version
Chinese version, very easy to use

Zend Studio 13.0.1
Powerful PHP integrated development environment

Dreamweaver CS6
Visual web development tools

SublimeText3 Mac version
God-level code editing software (SublimeText3)
Hot Topics
 1359
1359
 52
52

 How to run a JAR file on Windows 11 or 10
May 12, 2023 pm 06:34 PM
How to run a JAR file on Windows 11 or 10
May 12, 2023 pm 06:34 PM
Windows 11 is capable of running a large number of file types with or without external third-party applications. Not only does it allow you to perform numerous tasks from the comfort of your PC, but it also ensures that you can take advantage of your PC's raw capabilities. Today, we'll take a look at a complex file type—jar—and tell you how to open it on your Windows 11 or Windows 10 PC. What is a jar file? jar is an archive package format that may or may not contain an executable Java program. These archives can contain Java applications or source code, which can then be used to compile and run applications without having to write separate code for each application. You can use various methods
 4 Ways to Enable or Disable Microsoft Store on Windows 11 or 10
May 14, 2023 am 10:46 AM
4 Ways to Enable or Disable Microsoft Store on Windows 11 or 10
May 14, 2023 am 10:46 AM
Here are some possible reasons why you need to disable Microsoft Store: Stop unwanted notifications. Preserves data by limiting the background processes of the Microsoft Store to improve security or privacy Addresses some issues related to the Store or the apps it installs. Restrict children, family members, or other users from downloading applications without permission. Steps to Disable or Enable Windows Store Before following this tutorial, disabling the Microsoft Store will also stop the installation of any apps that require its services. To use the store, users need to enable its service in the same way as blocking it. 1. Block WindowsStore background service Let us from restricting Microsoft Store as
 How to disable driver signature enforcement in Windows 11
May 20, 2023 pm 02:17 PM
How to disable driver signature enforcement in Windows 11
May 20, 2023 pm 02:17 PM
Microsoft has built several security features into Windows to ensure your PC remains secure. One of them is driver signature enforcement in Windows 11. When this feature is enabled, it ensures that only drivers digitally signed by Microsoft can be installed on the system. This helps most of the users to a great extent as it protects them. But there is a downside to enabling driver signature enforcement. Suppose you find a driver that works for your device, but it is not signed by Microsoft, although it is completely safe. But you won't be able to install it. Therefore, you must know how to disable driver signing in Windows 11
 How to fix Windows 11 activation error 0xc004c060
May 17, 2023 pm 08:47 PM
How to fix Windows 11 activation error 0xc004c060
May 17, 2023 pm 08:47 PM
Why am I encountering Windows 11 activation error 0xc004c060? First make sure you are using genuine Windows and that the license key is valid. Also, check if it was obtained from an official source and if the key is suitable for the installed OS version. If there is an issue with any of these, you may encounter Windows 11 activation error 0xc004c060. So be sure to verify these and if you find everything is in order, move on to the next section. If you obtained the key through unreliable means or believe that the installed copy is a pirated version, you will need to purchase a valid key from Microsoft. In addition to this, misconfigured settings, missing
 How to fix runtime error 339 on Windows 11/10
May 13, 2023 pm 11:22 PM
How to fix runtime error 339 on Windows 11/10
May 13, 2023 pm 11:22 PM
There can be several reasons why runtime error 339 occurs when running a program. Some of them may be that some ocx or dll files are missing, damaged or the dll or ocx is not registered. This would be an annoying experience for the smooth execution of the application. Here are some of the possible error messages you may see for Runtime Error 339 Error – Runtime Error 339: Component DUZOCX32.OCX is not registered correctly or the file is missing. Error – Runtime Error 339. Component MSMASK32.ocx or one of its dependencies is not registered correctly; the file is missing or invalid. Error – Runtime Error '339': Component 'FM20.DLL' or one of its dependencies was not correctly noted
 0x80010105: How to fix this Windows update error
May 17, 2023 pm 05:44 PM
0x80010105: How to fix this Windows update error
May 17, 2023 pm 05:44 PM
Microsoft regularly releases Windows updates to improve functionality or increase the security of the operating system. You can ignore some of these updates, but it's important to always install security updates. While installing these updates, you may encounter error code; 0x80010105. An unstable connection usually causes most update errors, and once the connection is reestablished you're good to go. However, some require more technical troubleshooting, such as the 0x80010105 error, which is what we will see in this article. What causes WindowsUpdate error 0x80010105? This error may occur if your computer has not been updated in a while. Some users may have permanently disabled W for their reasons
 Not migrating device settings on Windows 11? This is the fix
May 13, 2023 pm 02:10 PM
Not migrating device settings on Windows 11? This is the fix
May 13, 2023 pm 02:10 PM
Obviously, not all device migrations go smoothly. Device settings not migrating is a very common issue in Windows 11 and may occur when upgrading from Windows 7 and 10. This issue may also occur if you have already installed the operating system and are installing new updates. When upgrading to Windows 11, your device also needs to meet the system requirements and other important elements required to function properly. If you wish to keep your personal data, files, photos, and apps from your previous installation of Windows, be sure to select the option Keep personal files and apps when you first upgrade to Windows 11. When you upgrade to Windows 11, the installer checks
 5 Ways to Disable Delivery Optimization Service in Windows
May 17, 2023 am 09:31 AM
5 Ways to Disable Delivery Optimization Service in Windows
May 17, 2023 am 09:31 AM
There are many reasons why you might want to disable the Delivery Optimization service on your Windows computer. However, our readers complained about not knowing the correct steps to follow. This guide discusses how to disable the Delivery Optimization service in a few steps. To learn more about services, you may want to check out our How to open services.msc guide for more information. What does Delivery Optimization Service do? Delivery Optimization Service is an HTTP downloader with cloud hosting solution. It allows Windows devices to download Windows updates, upgrades, applications and other large package files from alternative sources. Additionally, it helps reduce bandwidth consumption by allowing multiple devices in a deployment to download these packages. In addition, Windo