Windows 11 suddenly goes into Prepare Windows and loads incorrectly
Windows Insider users must always be prepared to face new challenges and difficulties in installed operating system versions. Suddenly, your computer may display "Preparing Windows" and load certain critical items incorrectly. Users also reported that Explorer.exe was not running properly. But, don't worry. There are some instant fixes you can apply to resolve the issue on your own.
Quick Fixes –
Before jumping to the main solution, there are obviously some quick fixes you should try –
1. Reboot the system. If this is just a glitch, restarting it should fix it.
2. Use a different account. This may just be an issue with local standard accounts.
Fix 1 – Remove affected values
Affected values can be removed using an elevated command prompt page.
Method 1 – Using the terminal
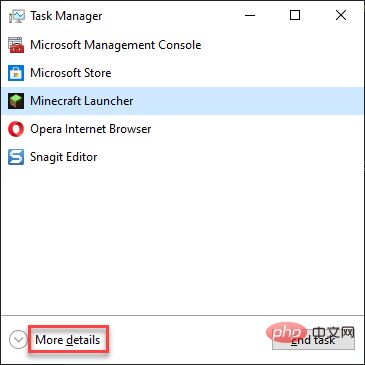
Step 1 –Open the “Task Management” page. You can easily do this using the Ctrl, Shift, and Esc keys together.
Task Manager may appear in a concise way. You can click "More Details" to display the complete list of tasks.
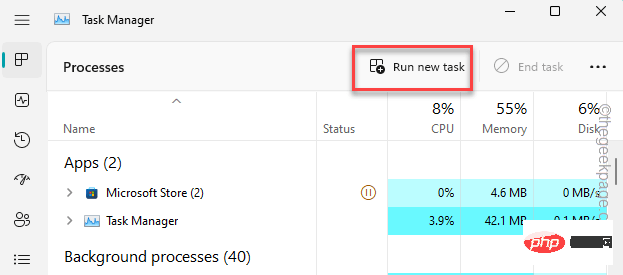
Step 2 –In the Task Manager window, click “Run new task”.
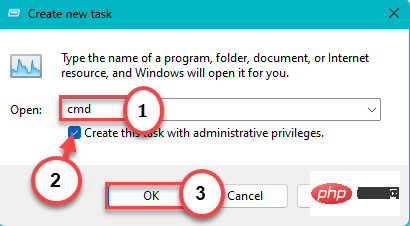
Step 3 –Then, enter this –
cmd
Step 4 –Make sure you have Check this box –
Create this task with administrative privileges
Step 5 – Then, click “OK”.
Step 6 – After that, enter this code into the terminal and press Enter to remove it from the system Specific registry.
reg delete HKCU\SOFTWARE\Microsoft\Windows\CurrentVersion\IrisService /f && shutdown -r -t 0

After deleting the registry value, exit the terminal.
Registry edits will not take effect until restarting the system. Therefore, restart the computer.
This should get everything back to normal.
Method 2 – Using the Registry Editor
If you don’t want to use the Terminal method, you can open the Registry Editor and delete specific values from it.
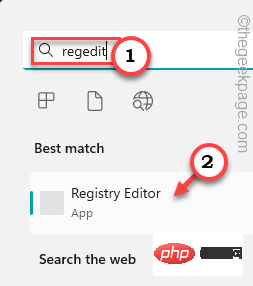
Step 1 –Use the Win key to open the search bar. Then, type "Registry Editor".
Step 2 –Then, click on “Registry Editor” to open it.
Step 3 –Now, here it comes –
HKEY_CURRENT_USER\SOFTWARE\Microsoft\Windows\CurrentVersion\IrisService
Step 4 – On the other side of the page, see if you can see the “Shutdown” value. Then, right-click on it and hit "Delete" to remove it.
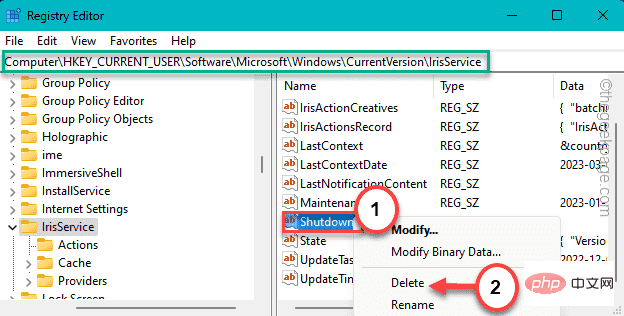
#Step 5 –You will notice a warning prompt appears. Click "is" to delete it.

After this, you must close the Registry Editor window. Then restart the computer. If you cannot delete the value in normal mode, you must boot the system into safe mode and delete it from there.
Steps to Boot the System into Safe Mode
Step 1 –Open Settings using the Win I key.
Step 2 –Then, open the “System” pane.
Step 3 –On the other end of the page, trace the “Recovery” section and open it.
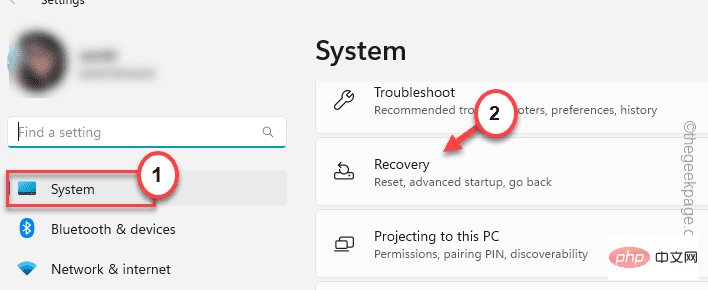
Go further down until you find the “Recover” option. In it, find Advanced Startup Settings.
Step 5 –Just click on “Restart Now” to restart the system.
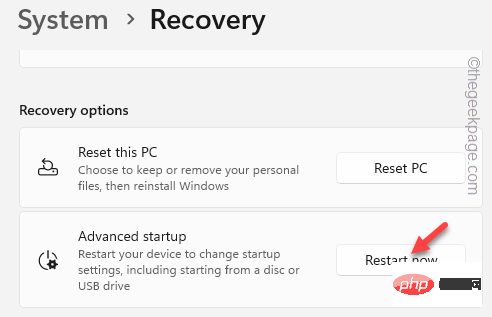 Wait for a while until the system boots in Advanced Boot Mode.
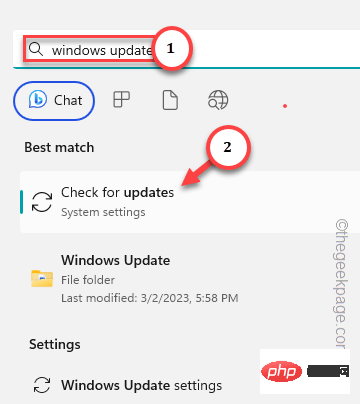
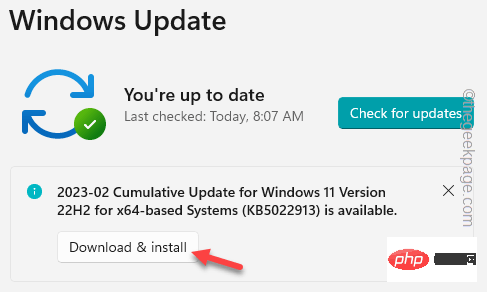
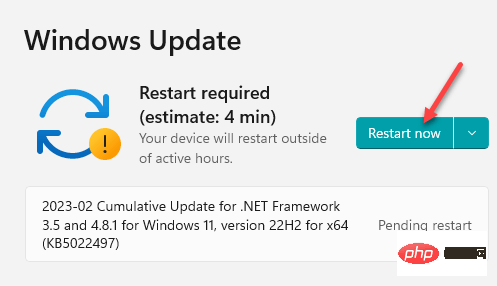
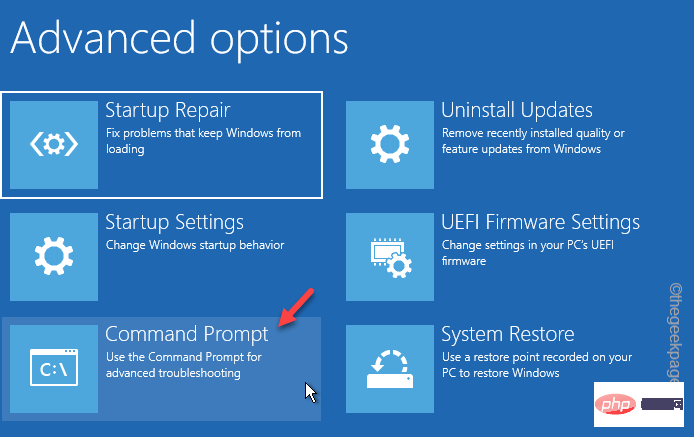
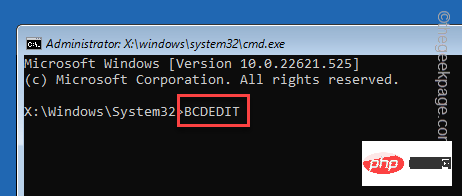
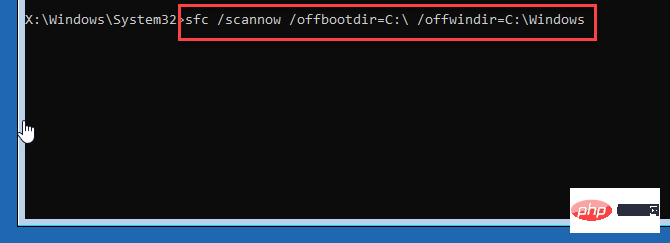
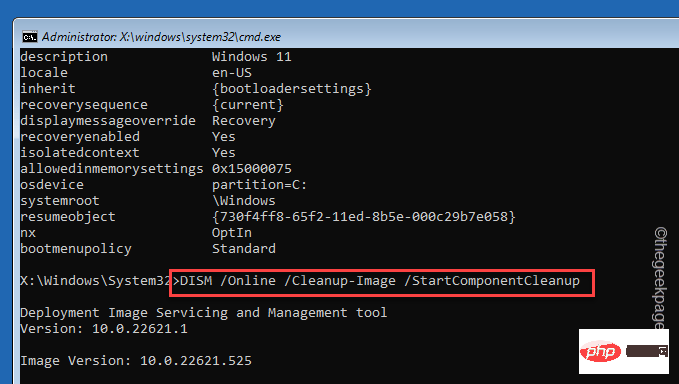
Just click Troubleshoot on the Select an Option page. Step 7 –On the following screen, click on “Advanced Options”. Step 8 –Next, select the “Startup Settings” option. Your computer will restart and display all available startup options. Now, click on "Restart". Step 9 –If you look carefully, you will notice “Enable Safe Mode” in the 4th option . So, press the F4 key on your keyboard to restart Safe Mode. Windows will boot into Safe Mode soon. Wait until this happens. After entering safe mode, try deleting the registry value from your computer. This occurs due to a bug in a recent Windows 11 Insider update. So please install all pending updates or get new versions. Step 1 –Start typing “Windows update” in the search box. Step 2 –When you see the “Check for Updates” option, click on it. This will take you to the Windows Update page. Check to see if Windows has downloaded important updates for your system. Step 3 –If this is not the case, click “Check for Updates”. Typically, Windows Insider users update more frequently than any regular user. Therefore, you should always have a preview of the "next" update ready to download and install. Step 4 –If you see any optional versions, you can click "Download and Install" to download and install the update package directly to your system. Step 5 –After downloading and installing all updates, you can simply restart your system. Otherwise, on the same Settings page, click Restart now to restart it. When the system completes the entire update process, you may see "Prepare Windows" on the first startup, but including Explorer in Everything else within works fine. There are some file checkers that may repair corrupted files on your system to eliminate this error, but you can only do so from the Advanced Startup page Run these files. Step 1 –Open Settings and go to the “System” pane. Step 2 –Go to this “Recovery” point from the opposite side and open it. Step 3 – Enter the Advanced Startup point by slowly scrolling down. There, click "Restart Now" to restart the system. Wait a moment until the system boots in Advanced startup mode. Step 4 –Just click on “Troubleshooting” on the next page. Step 5 –On the following screen, click on “Advanced Options”. Step 6 –Just click on “Command Prompt” to open the utility. Wait for the window to open the terminal interface. Step 7 –After opening it, type this word. Then, press Enter to open the startup configuration directory editor. 步骤 8 –然后,仔细写下此代码(因为您无法复制粘贴它)并按 Enter。 [“C:”驱动器表示 Windows 安装驱动器。 步骤 9 –之后,使用这些 DISM 工具启动和分析文件扫描。 步骤 10 –等待第一个 DISM 工具完成扫描。然后,运行此代码。 退出命令提示符。 检查这是否解决了问题。 列表中的最后一个选项是你选择退出 Windows 预览体验计划。否则,您也可以进行Windows更新过程的测试版轨道。 您可以在 Windows 更新中找到此设置。 在那里,您将找到离开Windows预览体验计划的选项。 The above is the detailed content of Windows 11 suddenly goes into Prepare Windows and loads incorrectly. For more information, please follow other related articles on the PHP Chinese website!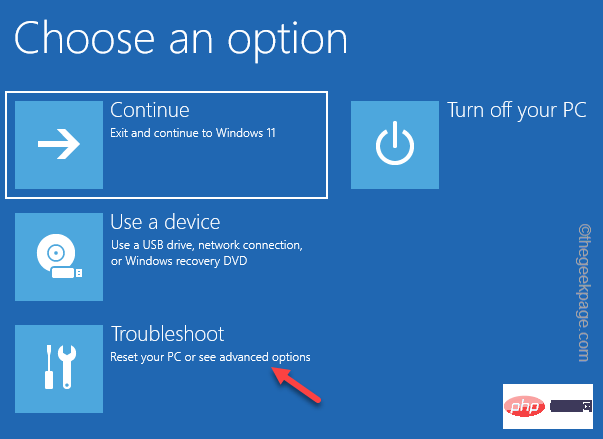
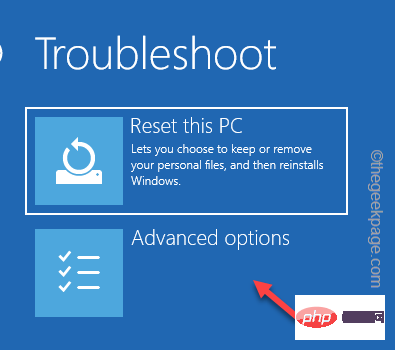
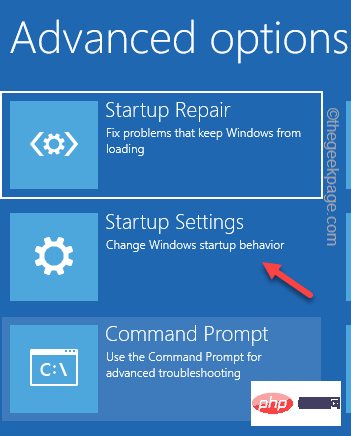
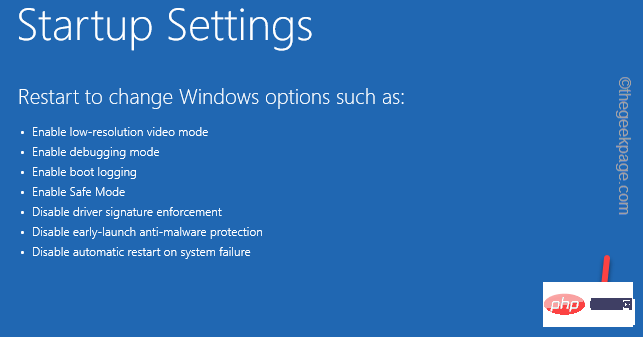
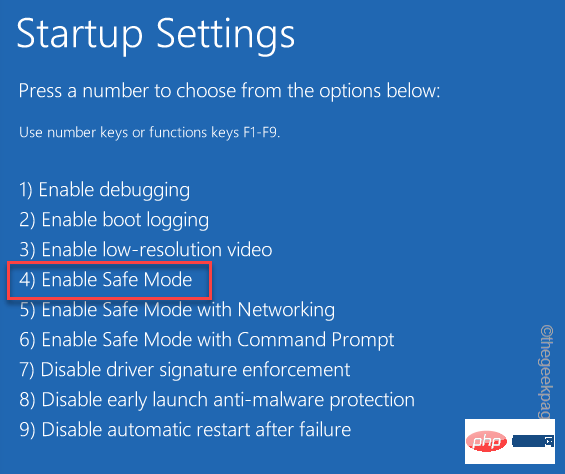
Fix 3 – Update your computer

Fix 4 – Run System Scan in Advanced Startup
Step 1 – Open Command Prompt in Recovery Mode


BCDEDIT
sfc /scannow /offbootdir=C:\ /offwindir=C:\windows
DISM /Online /Cleanup-Image /StartComponentCleanup
DISM /Online /Cleanup-Image /AnalyzeComponentStore
DISM /Online /Cleanup-Image /RestoreHealth /source:F:\Sources\Install.wim:1 /LimitAccess

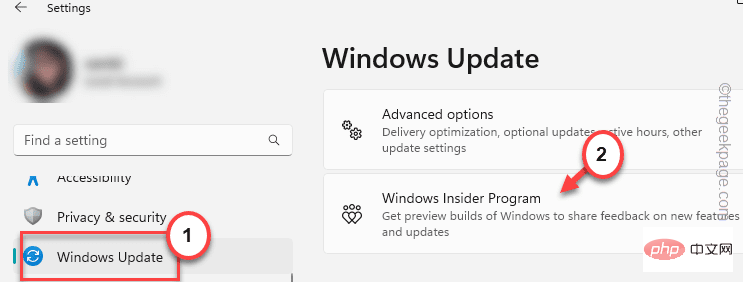
修复5 –离开Windows预览体验计划
Settings > Windows Update


Hot AI Tools

Undresser.AI Undress
AI-powered app for creating realistic nude photos

AI Clothes Remover
Online AI tool for removing clothes from photos.

Undress AI Tool
Undress images for free

Clothoff.io
AI clothes remover

AI Hentai Generator
Generate AI Hentai for free.

Hot Article

Hot Tools

Notepad++7.3.1
Easy-to-use and free code editor

SublimeText3 Chinese version
Chinese version, very easy to use

Zend Studio 13.0.1
Powerful PHP integrated development environment

Dreamweaver CS6
Visual web development tools

SublimeText3 Mac version
God-level code editing software (SublimeText3)

Hot Topics
 How to fine-tune deepseek locally
Feb 19, 2025 pm 05:21 PM
Local fine-tuning of DeepSeek class models faces the challenge of insufficient computing resources and expertise. To address these challenges, the following strategies can be adopted: Model quantization: convert model parameters into low-precision integers, reducing memory footprint. Use smaller models: Select a pretrained model with smaller parameters for easier local fine-tuning. Data selection and preprocessing: Select high-quality data and perform appropriate preprocessing to avoid poor data quality affecting model effectiveness. Batch training: For large data sets, load data in batches for training to avoid memory overflow. Acceleration with GPU: Use independent graphics cards to accelerate the training process and shorten the training time.
 deepseek image generation tutorial
Feb 19, 2025 pm 04:15 PM
DeepSeek: A powerful AI image generation tool! DeepSeek itself is not an image generation tool, but its powerful core technology provides underlying support for many AI painting tools. Want to know how to use DeepSeek to generate images indirectly? Please continue reading! Generate images with DeepSeek-based AI tools: The following steps will guide you to use these tools: Launch the AI Painting Tool: Search and open a DeepSeek-based AI Painting Tool (for example, search "Simple AI"). Select the drawing mode: select "AI Drawing" or similar function, and select the image type according to your needs, such as "Anime Avatar", "Landscape"
 Pi Node Teaching: What is a Pi Node? How to install and set up Pi Node?
Mar 05, 2025 pm 05:57 PM
Detailed explanation and installation guide for PiNetwork nodes This article will introduce the PiNetwork ecosystem in detail - Pi nodes, a key role in the PiNetwork ecosystem, and provide complete steps for installation and configuration. After the launch of the PiNetwork blockchain test network, Pi nodes have become an important part of many pioneers actively participating in the testing, preparing for the upcoming main network release. If you don’t know PiNetwork yet, please refer to what is Picoin? What is the price for listing? Pi usage, mining and security analysis. What is PiNetwork? The PiNetwork project started in 2019 and owns its exclusive cryptocurrency Pi Coin. The project aims to create a one that everyone can participate
 How to ask deepseek
Feb 19, 2025 pm 04:39 PM
The search accuracy of DeepSeek depends on the way of asking questions. To achieve ideal results, the question should contain the following key elements: Clear topic: Specific specified information objectives. Specific angles: Cut into the topic from a specific perspective. Expected output form: define the desired result type (summary, analysis, list, etc.).
 How to download deepseek
Feb 19, 2025 pm 05:45 PM
Make sure to access official website downloads and carefully check the domain name and website design. After downloading, scan the file. Read the protocol during installation and avoid the system disk when installing. Test the function and contact customer service to solve the problem. Update the version regularly to ensure the security and stability of the software.
 How to use deepseek
Feb 19, 2025 pm 04:45 PM
DeepSeek is an efficient data search and analysis tool with an indexing mechanism at its core. Factors that affect their efficiency include: data type, data size, search strategy, and DeepSeek performance. High-quality data, refined search queries and sufficient computing resources are essential to optimize search results.
 How to adjust Sesame Open Exchange into Chinese
Mar 04, 2025 pm 11:51 PM
How to adjust Sesame Open Exchange to Chinese? This tutorial covers detailed steps on computers and Android mobile phones, from preliminary preparation to operational processes, and then to solving common problems, helping you easily switch the Sesame Open Exchange interface to Chinese and quickly get started with the trading platform.
 Ouyi Exchange Download Official Portal
Feb 21, 2025 pm 07:51 PM
Ouyi, also known as OKX, is a world-leading cryptocurrency trading platform. The article provides a download portal for Ouyi's official installation package, which facilitates users to install Ouyi client on different devices. This installation package supports Windows, Mac, Android and iOS systems. Users can choose the corresponding version to download according to their device type. After the installation is completed, users can register or log in to the Ouyi account, start trading cryptocurrencies and enjoy other services provided by the platform.


