

10 Simple Tips to Fix 0xC1900101 Driver Error in Windows 11/10

Driver errors often occur when users try to upgrade their operating systems. The same goes for the 0xc1900101 driver error that we are going to solve today.
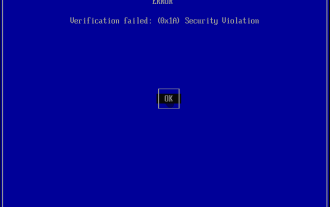
The full error message says there were some problems installing the update, but we'll try again later. If you keep seeing this and want to search the web or contact support for information, this may be helpful: (0xc1900101).
These errors are triggered by a variety of driver-related factors: users have not installed the latest driver updates on their computers, some drivers are incompatible with the latest Windows 11 versions, and more.
Many users trying to upgrade to Windows 11 reported that they were unable to complete the upgrade process due to a series of 0xC1900101 errors. As a quick reminder, the 0xC1900101 error is specific to driver issues.
What errors will you encounter when upgrading to Windows 11?
The 0xc1900101 installation error occurs on Windows 11 when there is a problem with Windows Update. Therefore, running the troubleshooter may help. See the linked article for more solutions to this problem.
Luckily, this tutorial will help you fix driver errors and many similar issues on multiple Windows platforms, so be sure to keep reading.
The following are driver-related errors you may encounter when upgrading to Windows 11:
- 0xC1900101 - 0x2000c
- 0xC1900101 - 0x20004
- 0xC1900101 - 0x20017
- ##0xC1900101 - 0x40017
- 0xC1900101 - 0x30018
- 0xC1900101 – 0x3000D
- 0xC1900101 – 0x4000D
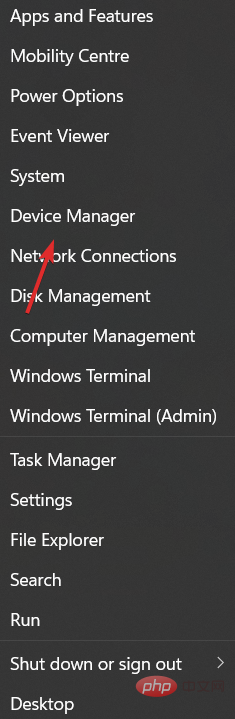
- Right click on the Start icon and select
- DeviceManager.
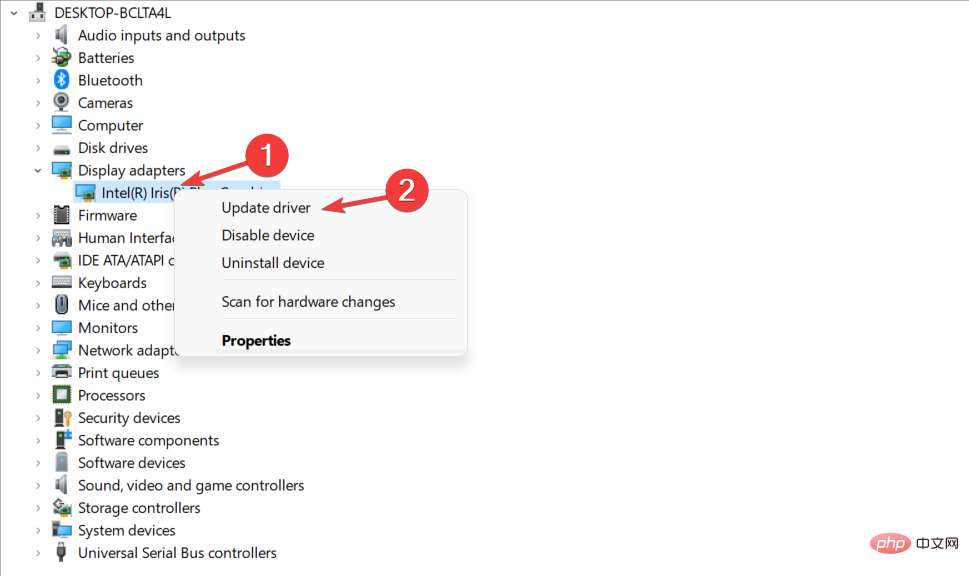
 Devices causing the 0xC1900101 Windows 11 error may appear with a yellow exclamation mark.
 - Right-click on the problematic driver and select
- Update Driver to install the latest updates. Alternatively, click
- Uninstall Device to completely remove it and restart your PC to automatically reinstall it. After this, the 0xc1900101 SYSPREP_SPECIALIZE Windows 11 error should be resolved.
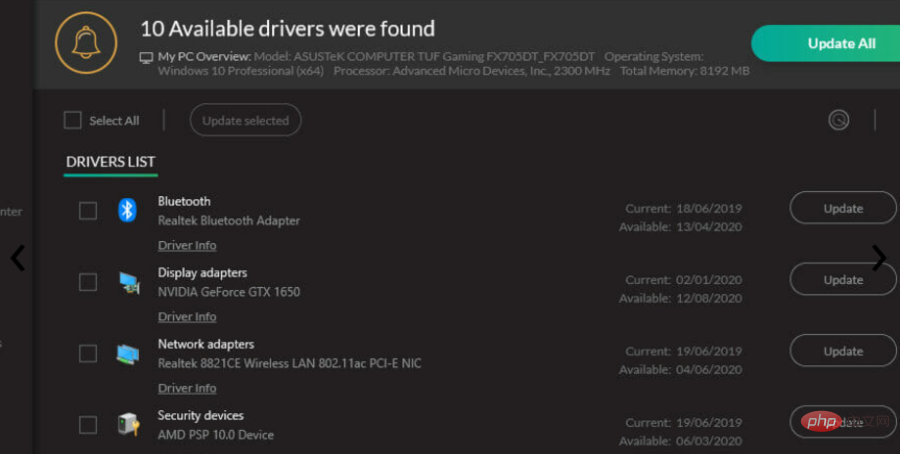
DriverFix to automate this operation.
It's much easier than using any of the methods listed above because you can just launch the program and your drivers will be as good as updated and repaired. DriverFix is almost completely automated, so it downloads and installs the correct drivers on its own, and you only have to restart your PC to apply the changes. Also, you should know that using this software will improve your PC functionality by repairing or updating old drivers, thus increasing the performance of your hardware.⇒ Get DriverFix
3. Remove your antivirus softwareIf you receive the 0xC1900101 driver error, Then the problem may be with your antivirus software. To resolve this issue, it is recommended to completely uninstall your antivirus software and try to install the update again. This issue can be caused by any third-party antivirus tool, so be sure to uninstall it and try the upgrade again. On the other hand, you can also choose antivirus software that does not interfere with the functionality of your PC and therefore does not require deactivation or removal. 4. Unplug all peripherals Some users have confirmed that they managed to install the latest version of Windows 11 after unplugging all peripherals from their computers. While this sounds like a third grade solution, you should give it a try as it has been proven to work for some users. 5. Remove the extra RAM or your network card 0XC190010 Driver errors, especially errors 0XC190010 – 0x20017, are sometimes caused by extra RAM. Try removing a RAM module and try installing Windows 11 again.Some users also reported that deleting their network card also solved the problem.
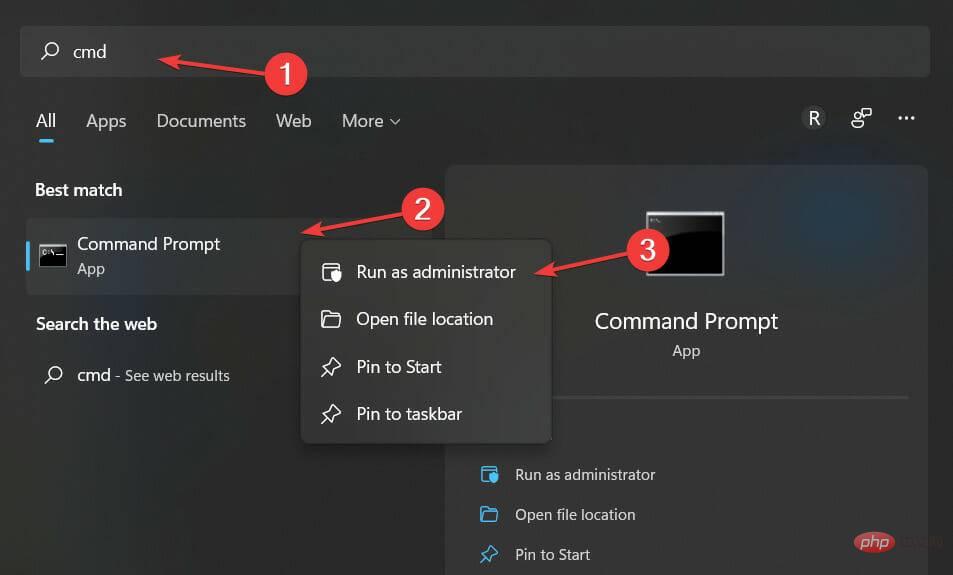
6. Run SFC scan
- Click the magnifying glass icon and enter cmd. Right-click on the top result and select Run as administrator.
- Type the following command and click, then wait for the scanning process to complete: Enter
<strong>10 Simple Tips to Fix 0xC1900101 Driver Error in Windows 11/10 /scannow</strong>
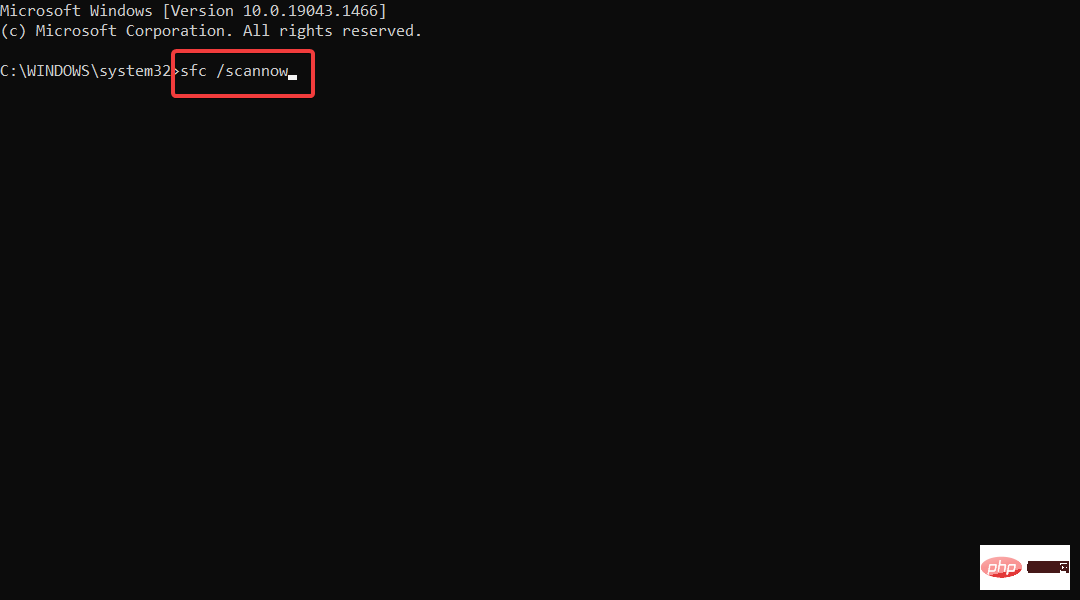
Sometimes, 0xC1900101 driver error may occur due to corrupted system files, but you can easily fix them by running an SFC scan.
After the process is complete, the issue should be resolved and you should be able to perform the upgrade.
If you can't access the command prompt as an administrator, check out how to change the administrator account in Windows 11.
7. Check your available upgrade space
To upgrade to Windows 11, you need at least 64GB of storage space. Failure to meet this requirement may also explain why you are encountering the 0xC1900101 error.
For more information on how to free up hard drive space, check out our post on the 5+ Best Ways to Free Up Hard Drive Space on Windows 10/11.
8. Remove problematic apps
Sometimes third-party applications can interfere with the upgrade process and cause the Windows 11 0xC1900101 driver error to appear. Users reported that apps like Acronis True Image and Trusteer Rapport are the main reasons for this.
If you use these applications or any other similar tools, make sure to completely remove them from your PC and then try to perform the upgrade.
Users reported that their issues were resolved after removing the problematic software, so be sure to give it a try.
If you need an expert tool that can completely remove stubborn apps from your PC, a good idea is to come across the most relevant Windows 11 uninstaller software.
9. Disable LAN Card in BIOS
As we have already mentioned, 0xC1900101 driver error can occur due to connected peripherals and devices. The most common cause of this problem is your wireless adapter, but sometimes this problem can be caused by your Ethernet adapter.
To resolve this issue, it is recommended to disable the onboard LAN from the BIOS. To do this, simply access the BIOS, find the Onboard LAN option, and disable it. To see how to access the BIOS and disable this feature, be sure to check your motherboard manual.
After disabling this feature, please try performing the upgrade again. If you manage to install the upgrade, be sure to re-enable this feature.
You can't access the BIOS because Windows skips it? Don't worry, we have the right solution for you.
10. Upgrade your BIOS
Another way to resolve this issue is to upgrade your BIOS. According to users, if your BIOS is out of date, you may not be able to install a certain update. Some users reported that updating their BIOS resolved the issue, so you might want to try that by clicking on the anchored link as well.
Remember, BIOS updates are a potentially dangerous process that can damage your PC. To learn how to properly update your BIOS, we recommend checking your motherboard's manual for detailed instructions.
0xC1900101 The driver error can be serious and it may prevent you from installing certain updates, but you should be able to fix it using one of our solutions.
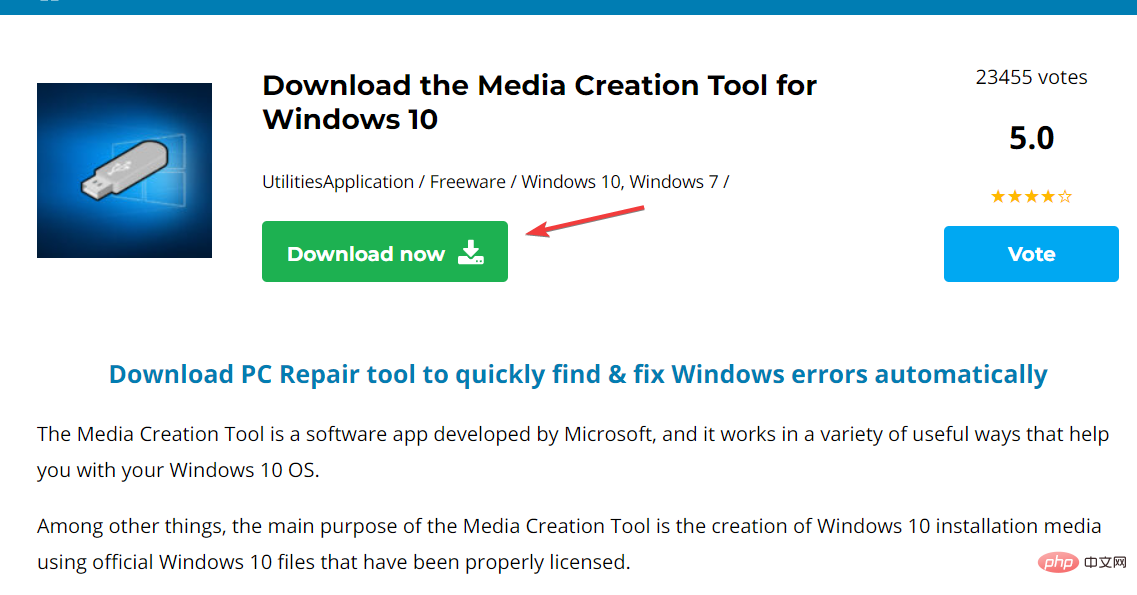
How to fix 0xC1900101 driver error in Windows 10?
- Download the Media Creation Tool for Windows 10 to complete the upgrade process.
- Follow the step-by-step tutorial on how to use the tool on the same page we linked to in the first step.
For more information, check out how to fix aoddriver2.sys blue screen error in Windows and get back to using your device.
Or, find out how to fix any Windows 11 errors you encounter after updating.
The above is the detailed content of 10 Simple Tips to Fix 0xC1900101 Driver Error in Windows 11/10. For more information, please follow other related articles on the PHP Chinese website!

Hot AI Tools

Undresser.AI Undress
AI-powered app for creating realistic nude photos

AI Clothes Remover
Online AI tool for removing clothes from photos.

Undress AI Tool
Undress images for free

Clothoff.io
AI clothes remover

Video Face Swap
Swap faces in any video effortlessly with our completely free AI face swap tool!

Hot Article
Hot Tools

Notepad++7.3.1
Easy-to-use and free code editor

SublimeText3 Chinese version
Chinese version, very easy to use

Zend Studio 13.0.1
Powerful PHP integrated development environment

Dreamweaver CS6
Visual web development tools

SublimeText3 Mac version
God-level code editing software (SublimeText3)
Hot Topics
 1392
1392
 52
36
110
52
36
110

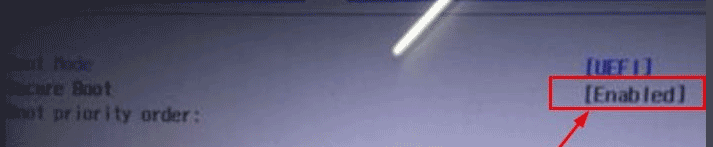
 Ventoy secure boot settingsSecure Boot
Jun 18, 2024 pm 09:00 PM
Ventoy secure boot settingsSecure Boot
Jun 18, 2024 pm 09:00 PM
Ventoy is a USB boot tool that can directly boot ISO/WIM/IMG/VHD(x)/EFI and other types of files in the USB flash drive. It is very easy to use. Laptops have secure boot turned on by default. If they are not turned off or cannot be turned off, they cannot be booted from a USB device. Ventoy also supports secure boot. The principle is to inject a GRUB installation certificate into the current computer. As long as your computer After being injected once, any USB disk PE booted based on grub can pass. The official description of Ventoy is a GIF image. The playback speed is too fast and you may not be able to remember it. The editor has divided the GIF image to make it easier to understand. Ventoy secure boot has EnrollKey and Enro
 Acer laptop disables secure boot and removes password in Bios
Jun 19, 2024 am 06:49 AM
Acer laptop disables secure boot and removes password in Bios
Jun 19, 2024 am 06:49 AM
I repaired an Acer laptop and had to turn off secure boot when entering PE. I recorded how to turn off secure boot and remove the password from Bios. Turn on the computer and when the screen is not on, keep pressing the F2 key to enter the BIOS. On Acer laptops, turn off Secure Boot and press the arrow keys to switch to Boot. If SecureBoot is gray and unclickable, switch to the Security page, select SetSupervisorPassword and press Enter to set the password. Then switch to Boot, SecureBoot can be selected as Disabled, and press F10 to save. Modify and clear the BIOS password on your Acer notebook. Switch to the Security menu and select SetSupervisorPasswo.
 What software is crystaldiskmark? -How to use crystaldiskmark?
Mar 18, 2024 pm 02:58 PM
What software is crystaldiskmark? -How to use crystaldiskmark?
Mar 18, 2024 pm 02:58 PM
CrystalDiskMark is a small HDD benchmark tool for hard drives that quickly measures sequential and random read/write speeds. Next, let the editor introduce CrystalDiskMark to you and how to use crystaldiskmark~ 1. Introduction to CrystalDiskMark CrystalDiskMark is a widely used disk performance testing tool used to evaluate the read and write speed and performance of mechanical hard drives and solid-state drives (SSD). Random I/O performance. It is a free Windows application and provides a user-friendly interface and various test modes to evaluate different aspects of hard drive performance and is widely used in hardware reviews
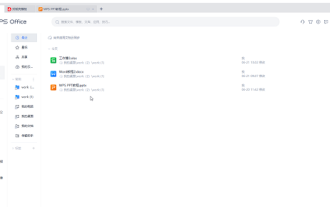 What to do if WPS Office cannot open the PPT file - What to do if WPS Office cannot open the PPT file
Mar 04, 2024 am 11:40 AM
What to do if WPS Office cannot open the PPT file - What to do if WPS Office cannot open the PPT file
Mar 04, 2024 am 11:40 AM
Recently, many friends have asked me what to do if WPSOffice cannot open PPT files. Next, let us learn how to solve the problem of WPSOffice not being able to open PPT files. I hope it can help everyone. 1. First open WPSOffice and enter the homepage, as shown in the figure below. 2. Then enter the keyword "document repair" in the search bar above, and then click to open the document repair tool, as shown in the figure below. 3. Then import the PPT file for repair, as shown in the figure below.
 The system has posted in safe mode ASUS motherboard
Jun 19, 2024 am 07:35 AM
The system has posted in safe mode ASUS motherboard
Jun 19, 2024 am 07:35 AM
After the computer is turned on, it prompts The system has posted in safe mode. You can set it in the BIOS to ignore the F1 error. Although it does not prompt, it directly enters the BIOS when it is turned on. Sometimes F1 is useless every time it is turned on. Then you need to restart the BIOS, and then exit the BIOS to enter the system. . thesystemhaspostedinsafemode=The system is in safe mode. This problem is relatively common on ASUS motherboards. As long as you turn off the XMP of the memory and adjust the memory frequency back to normal, you can boot normally without the thesystemhaspostedinsafemode error. Updating the latest motherboard BIOS should be OK.
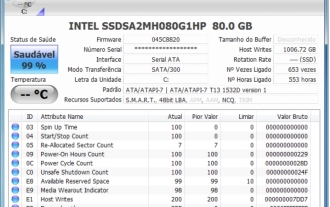 CrystalDiskinfo usage tutorial-What software is CrystalDiskinfo?
Mar 18, 2024 pm 04:50 PM
CrystalDiskinfo usage tutorial-What software is CrystalDiskinfo?
Mar 18, 2024 pm 04:50 PM
CrystalDiskInfo is a software used to check computer hardware devices. In this software, we can check our own computer hardware, such as reading speed, transmission mode, interface, etc.! So in addition to these functions, how to use CrystalDiskInfo and what exactly is CrystalDiskInfo? Let me sort it out for you! 1. The Origin of CrystalDiskInfo As one of the three major components of a computer host, a solid-state drive is the storage medium of a computer and is responsible for computer data storage. A good solid-state drive can speed up file reading and affect consumer experience. When consumers receive new devices, they can use third-party software or other SSDs to
![Windows PC keeps booting into BIOS [Fix]](https://img.php.cn/upload/article/000/887/227/171012121854600.jpg?x-oss-process=image/resize,m_fill,h_207,w_330) Windows PC keeps booting into BIOS [Fix]
Mar 11, 2024 am 09:40 AM
Windows PC keeps booting into BIOS [Fix]
Mar 11, 2024 am 09:40 AM
If your Windows PC frequently enters the BIOS interface, this may cause difficulty in use. I'm stuck with the BIOS screen every time I turn on my computer, and restarting doesn't help. If you are facing this problem, then the solutions provided in this article will help you. Why does my computer keep booting in BIOS? Your computer's frequent restarts in BIOS mode may be caused by a variety of reasons, such as improper boot sequence settings, damaged SATA cables, loose connections, BIOS configuration errors, or hard drive failures, etc. Fix Windows PC Keeps Booting into BIOS If your Windows PC keeps booting into BIOS, use the fix below. Check your boot order and re-plug the
 ASUS releases BIOS update for Z790 motherboards to alleviate instability issues with Intel's 13th/14th generation Core processors
Aug 09, 2024 am 12:47 AM
ASUS releases BIOS update for Z790 motherboards to alleviate instability issues with Intel's 13th/14th generation Core processors
Aug 09, 2024 am 12:47 AM
According to news from this website on August 8, MSI and ASUS today launched a beta version of BIOS containing the 0x129 microcode update for some Z790 motherboards in response to the instability issues in Intel Core 13th and 14th generation desktop processors. ASUS's first batch of motherboards to provide BIOS updates include: ROGMAXIMUSZ790HEROBetaBios2503ROGMAXIMUSZ790DARKHEROBetaBios1503ROGMAXIMUSZ790HEROBTFBetaBios1503ROGMAXIMUSZ790HEROEVA-02 joint version BetaBios2503ROGMAXIMUSZ790A