

You need to allow microphone calls when using Facebook on Windows 10

When trying to make a video call using Facebook Messenger in a browser, it sometimes complains about a hardware access error. An error pops up saying "You need to allow You need to allow microphone calls when using Facebook on Windows 10 and You need to allow microphone calls when using Facebook on Windows 10 access for video calls on your PC". This could be because you may want to enable You need to allow microphone calls when using Facebook on Windows 10 and You need to allow microphone calls when using Facebook on Windows 10 access on your computer, or because of outdated drivers, conflicting devices, site permission issues, etc. In this article, we have different solutions to fix this error. let's start!
Method 1: Allow desktop apps to access your You need to allow microphone calls when using Facebook on Windows 10 and You need to allow microphone calls when using Facebook on Windows 10
Step 1: Use the Windows I keys toYou need to allow microphone calls when using Facebook on Windows 10her to open Windows Settings
Step 2 :Click Privacy
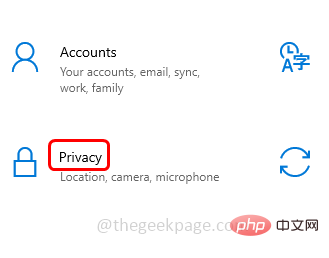
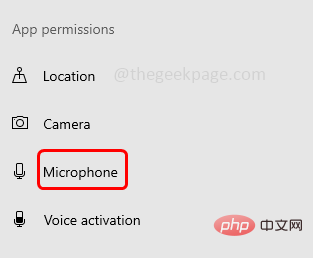
Step 3: On the left, scroll down and click Microphone
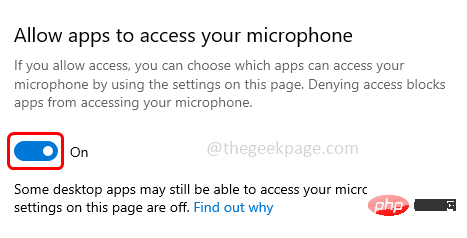
Step 4: Enable the option on the right Allow apps to access your You need to allow microphone calls when using Facebook on Windows 10 by clicking the toggle bar below it (the toggle bar should show blue)
Step 5: Scroll down and select the Which Microsoft Store Apps Can Access Your Microphone section, enable Require Microphone Access by clicking the toggle bar next to Apps
Step 6: NowEnable Allow desktop applications to access your You need to allow microphone calls when using Facebook on Windows 10 settings by clicking the toggle bar option below it

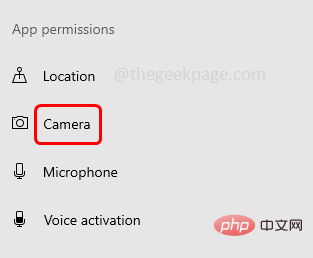
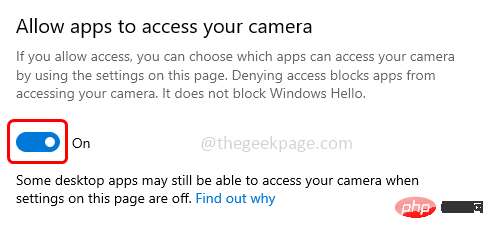
Repeat the same steps as for You need to allow microphone calls when using Facebook on Windows 10 options. Now on the left side click on the Cameraoption
enable theoption Allow Application Access your You need to allow microphone calls when using Facebook on Windows 10 byclicking the toggle bar below it (blue should appear in the toggle bar)
section, enable apps that require You need to allow microphone calls when using Facebook on Windows 10 access by clicking the toggle bar next to
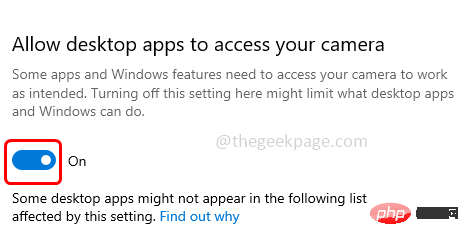
Step 10: Nowenable Allow desktop applications to access your You need to allow microphone calls when using Facebook on Windows 10 settings by clicking the toggle bar option below it
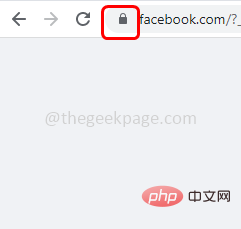
Lock symbol to the left of Facebook Address
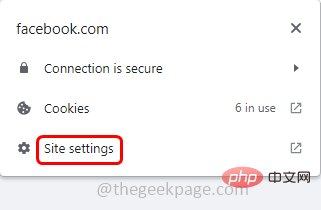
Site Settings
Reset Permissions
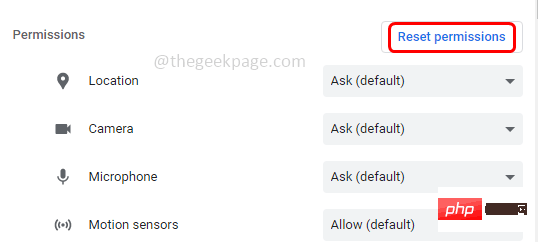
RestartBrowserand open Facebook. If it asks for access to the You need to allow microphone calls when using Facebook on Windows 10 and You need to allow microphone calls when using Facebook on Windows 10, please allow it and check if it is working properly.
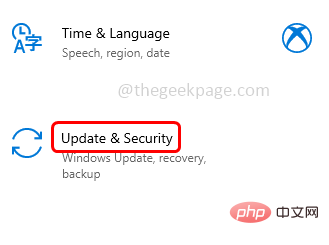
Method 3: Check for the latest Windows updatesStep 1: Use theWindows I keys toYou need to allow microphone calls when using Facebook on Windows 10her to open Window Settings
Step 2: ClickUpdate&Security
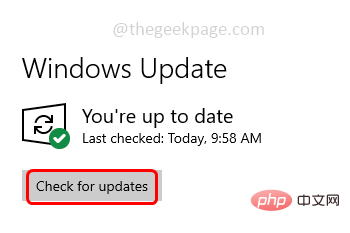
Check for Updates. If any update is available, it will be installed
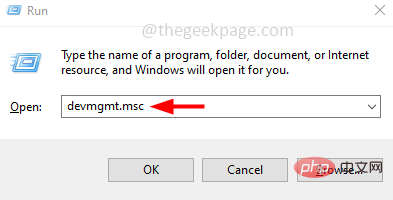
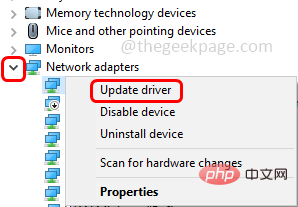
Windows R key toYou need to allow microphone calls when using Facebook on Windows 10her Run prompt
Step 2: Typedevmgmt.msc in the run prompt and press the Enter key. This will open the Device Manager window
ExpandNetwork AdaptersOptions
Step 4:Right-click on the troublesome device and select Update Driver
Automatic search driver
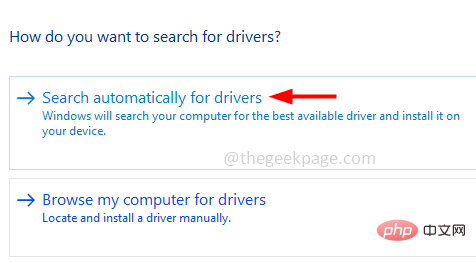
Step 6: If any new driver is available, it will be listed and you can install it and then check if everything is fine. If no driver is available, your device is up to date.
Method 5: Reinstall the problematic driver
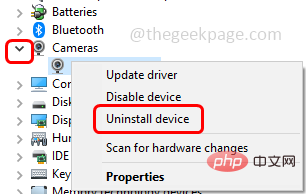
Step 1: Use the Windows R key toYou need to allow microphone calls when using Facebook on Windows 10her to open the run prompt
Step 2: In Type devmgmt.msc into the run prompt and press the Enter key. This will open the Device Manager window
Step 3: Expand the Camera option and right click Camera
Step 4: Then click Uninstall Device
Step 5: Check " Check the box next to "Remove the driver software for this device"
Step 6: Click theUninstall button and restartthe computer
Step 7: After the restart is complete, the computer will automatically install the default driver
Step 8: Repeat and follow the same steps for the Microphone option. Then check if the problem is resolved.
Method 6: Clean boot the system to remove conflicting applications
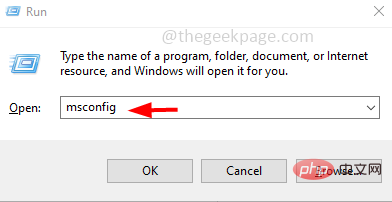
Step 1: Use the Windows R key toYou need to allow microphone calls when using Facebook on Windows 10her to open the run prompt
Step 2 : Type You need to allow microphone calls when using Facebook on Windows 10 in the run prompt and press Enter key. This will open the system configuration window
Step 3: Go to the "Service" tab
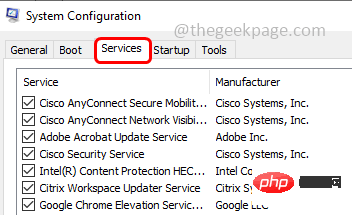
Step 4: Check the box next to the bottom Hide all Microsoft services
Step 5: Then click the "Disable All" button# on the right
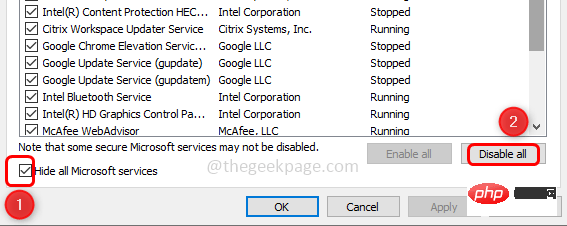
Apply and then clickOK to save changes
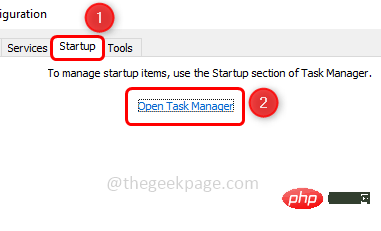
Step 7: Go toStartuptab
Step 8: ClickOpen Task ManagerLink
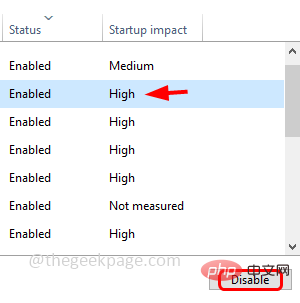
High Impact Applications, select them and click the Disable button. This will only You need to allow microphone calls when using Facebook on Windows 10 them from automatically starting when the computer is restarted
Restart the system and it will boot in clean boot mode.
Method 7: Check if they are any conflicting devices and You need to allow microphone calls when using Facebook on Windows 10 themStep 1: Use theWindows R keys toYou need to allow microphone calls when using Facebook on Windows 10her to open the run prompt
Step 2: Typedevmgmt.msc in the run prompt and press Enter
##Step 3: Conflicting devices It could be a secondary You need to allow microphone calls when using Facebook on Windows 10 or You need to allow microphone calls when using Facebook on Windows 10 or Bluetooth device in the system
Step 4: If you have them, You need to allow microphone calls when using Facebook on Windows 10 them. For example, if you have a
Secondary Camera, expand Camera Options by clicking the arrow next to it
Step 5:Right-click on Camera Options , and then click Disable Device
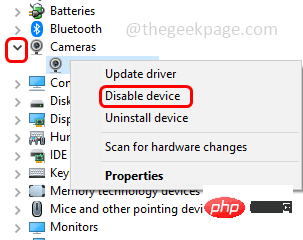
Step 6: Likewise, do the same for other secondary devices and check if everything is fine. However, if the problem persists, make sure to re-enable them.
Method 8: Create the Enable Framework Server Mode entry in the Registry Editor
Note: Please back up the You need to allow microphone calls when using Facebook on Windows 10 before continuing with the following steps
Step 1: Use the Windows R keys toYou need to allow microphone calls when using Facebook on Windows 10her to open the run prompt
Step 2: Type regedit.exe in the run prompt and press Enter key
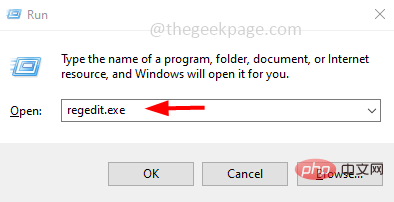
Step 3: The User Account Control window will appear, click Yes. This will open the Windows Registry Editor
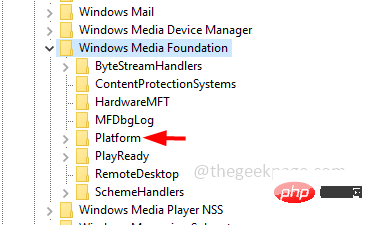
Step 4: Navigate to the following path
Computer\HKEY_LOCAL_MACHINE\SOFTWARE\WOW6432Node\Microsoft\Windows Media Foundation

Step 5: Click on Platform# from the left ##. If it doesn't exist, create one by right-clicking Windows Media Base and selecting "New"
Step 6: Click Password from the flyout options Key andKey name as Platform
Step 7: Now click Platform and then on the right side, right click on the empty space and click New
Step 8: Select the DWORD (32-bit) You need to allow microphone calls when using Facebook on Windows 10
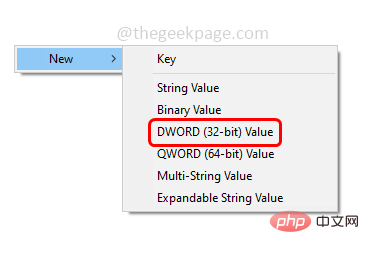
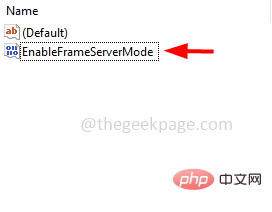
Step 9: Now give the name EnableFrameServerMode
Step 10: Double-click EnableFrameServerMode, and then set the You need to allow microphone calls when using Facebook on Windows 10 in the You need to allow microphone calls when using Facebook on Windows 10 data to 0
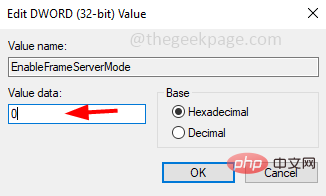
Step 11: Click OK
Step 12: Close the Registry Editor and restart the system and check if the problem is resolved.
Method 9: Use the Microsoft Store Messenger app
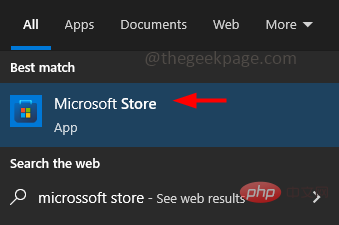
Step 1: Open the Microsoft Store. To do this, type Microsoft Store in the Windows search bar and press Enter. Click on Microsoft Store in the search results to open it
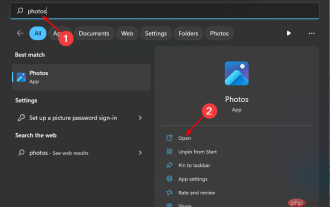
Step 2: Type Messenger in the Microsoft Store app search bar and press Enter key

Step 3: Go to Facebook Messenger and click on Get button then Install It

Step 4: Now open the You need to allow microphone calls when using Facebook on Windows 10 app and log in using your credentials
Step 5: Start a video call and check that the You need to allow microphone calls when using Facebook on Windows 10 and You need to allow microphone calls when using Facebook on Windows 10 are working as expected. Method 10: Use incognito mode or try another browserOpen the browser in incognito mode and then log in to Facebook and try everything works fine. If not, try a browser other than the one you are currently using. For example, if you're using Chrome, try Firefox, Edge, Opera, etc. Method 11: Start a voice call, then switch to a video callStep 1: If nothing works, try this, open Facebook in your browserStep 2 Step: Try making a voice call with any of your contactsStep 3: Once the call is set up and the person on the call can hear the other party, switch to the video call by clicking on the video/You need to allow microphone calls when using Facebook on Windows 10 icon.The above is the detailed content of You need to allow microphone calls when using Facebook on Windows 10. For more information, please follow other related articles on the PHP Chinese website!

Hot AI Tools

Undresser.AI Undress
AI-powered app for creating realistic nude photos

AI Clothes Remover
Online AI tool for removing clothes from photos.

Undress AI Tool
Undress images for free

Clothoff.io
AI clothes remover

AI Hentai Generator
Generate AI Hentai for free.

Hot Article
Hot Tools

Notepad++7.3.1
Easy-to-use and free code editor

SublimeText3 Chinese version
Chinese version, very easy to use

Zend Studio 13.0.1
Powerful PHP integrated development environment

Dreamweaver CS6
Visual web development tools

SublimeText3 Mac version
God-level code editing software (SublimeText3)
Hot Topics
 1377
1377
 52
52

 what is facebook
Aug 17, 2023 pm 02:05 PM
what is facebook
Aug 17, 2023 pm 02:05 PM
Facebook is a globally renowned social media platform that provides users with a platform to connect and communicate. Founded in 2004, it was founded by Mark Zuckerberg and others. It is an online social network where users can share information, photos and videos with and interact with friends, family and colleagues. Its influence is not limited to individual users, but also extends to businesses and news fields.
 How to sort photos by favorites on Windows 10 and 11
Apr 30, 2023 pm 12:19 PM
How to sort photos by favorites on Windows 10 and 11
Apr 30, 2023 pm 12:19 PM
Windows Photos has been overhauled in Windows 11, so you'll enjoy new features and improvements. One of them is to sort photos by favorites. Windows has a special folder for photos that have been marked as favorites. The Favorites list is useful if you have many photos in an album or folder, as it makes it easy to find the photos you want to display on the screen. If you don't know this feature or how to add photos to your Favorites folder, we'll show you how. How to sort favorite photos in Windows? Windows 11 launches the Photos app by clicking the key, typing photos in the search bar, and clicking Open. Windows Phone
 How to enable or disable Data Execution Prevention (DEP) on Windows 10/11
Apr 13, 2023 am 11:37 AM
How to enable or disable Data Execution Prevention (DEP) on Windows 10/11
Apr 13, 2023 am 11:37 AM
Data Execution Prevention (DEP) is a memory protection feature in Windows. It checks and protects several areas of memory and helps prevent them from executing malicious code. In turn, it can help prevent viruses and other security threats from causing damage to your computer. It prevents code from running from the default heap, stack and memory pool. If an application attempts to execute or run code from a protected page, the application receives an exception error with a status code. DEP is helpful, but sometimes problems can arise when it doesn't work as expected. DEP is established in 64-bit programs. Most programs that cause DEP problems are 32-bit programs. In this article, let us see how to
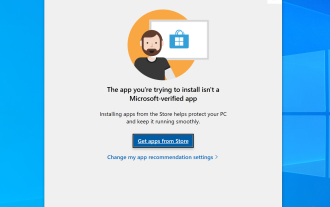 How to fix The app you are trying to install is not a Microsoft verified app on Windows
Apr 13, 2023 pm 05:52 PM
How to fix The app you are trying to install is not a Microsoft verified app on Windows
Apr 13, 2023 pm 05:52 PM
Microsoft Windows 10 and 11 may be configured to only allow certain types of applications to be installed on the device. This restriction may be intentional, such as when policies are in place to restrict what can be installed on the device, but it is also sometimes unintentional. The following guide provides easy-to-follow, step-by-step instructions for resolving unexpected error messages. Windows users who try to install certain types of applications may receive the error message "The application you are trying to install is not a Microsoft-validated application." The dialog box provides little information about why the installation was blocked. It states that "Installing apps from the Store can help protect your PC and keep it running smoothly" and links to
![Automatically setting time zone not working on Windows 10 [Fixed]](https://img.php.cn/upload/article/000/887/227/168136135759894.png?x-oss-process=image/resize,m_fill,h_207,w_330) Automatically setting time zone not working on Windows 10 [Fixed]
Apr 13, 2023 pm 12:49 PM
Automatically setting time zone not working on Windows 10 [Fixed]
Apr 13, 2023 pm 12:49 PM
Manually changing the date and time based on the time zone is a bit time-consuming and can also cause confusion if someone forgets to change the computer's time, especially if you are traveling for business purposes. It is the best and wisest option to set the time automatically so that it can automatically update your computer's time based on your location. In this article, let’s see how to set time zone automatically on Windows 10. Method 1: Enable the Automatically set time and time zone option Step 1: Use Windows + I keys simultaneously to open Windows Settings Step 2: Click Time and Language Step 3: Enable the Automatically set time option by clicking the toggle bar below Step 4 : You can also enable automatic settings by clicking the toggle bar below
 How to fix Registry Editor not opening in Windows 11, 10
May 23, 2023 pm 11:31 PM
How to fix Registry Editor not opening in Windows 11, 10
May 23, 2023 pm 11:31 PM
Registry Editor is the tool we use to fix Windows system errors. It is the center of registry keys and, with appropriate adjustments, can solve most problems. But in rare cases, Registry Editor may also hang. Many users have reported seeing errors when trying to search for a key that does not exist on their system. If you try to cancel the search the application will hang and even if you don't cancel the search the application will freeze with the following message. Registry Editor has stopped working. The root cause of the problem is the length of the subkey. This error occurs if the length of the subkey exceeds 255 bytes. However, sometimes, it can also be because of a virus or malware. If you notice this issue on your system, don't panic. In this article, let us discuss solving
 what does facebook mean
Jul 25, 2022 am 11:06 AM
what does facebook mean
Jul 25, 2022 am 11:06 AM
Facebook means an American Internet company, and also refers to the social network service website developed by the company; Facebook was founded on February 4, 2004. It is a world-famous social communication application that users can use Communicate with people around the world.
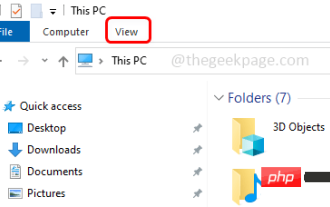 How to hide and unhide the navigation pane in File Explorer in Windows 10
Apr 13, 2023 pm 02:16 PM
How to hide and unhide the navigation pane in File Explorer in Windows 10
Apr 13, 2023 pm 02:16 PM
The navigation pane is located on the left side of File Explorer/Windows Explorer. It shows Quick Access, This PC, Folders, etc. Some folders and locations can be accessed quickly and easily from this navigation pane. But few users are willing to hide this and do it. In this article, we will learn how to hide and unhide/enable the Navigation Pane from File Explorer. How to Hide the Navigation Pane Step 1: Open File Explorer and press Windows + E keys simultaneously. Step 2: Click the View tab in the upper left corner. By default, the navigation pane will be enabled on the system. Advertisement Step 3: Click the Navigation Pane button and a drop-down menu will appear. Step 4: Click Next