

15 Ways to Fix Wi-Fi When It's Not Working in Windows 11

With the number of users growing exponentially every year, the Internet seems to have become a necessity. We are connected to the internet most of the day, whether interacting on social media, reading news, shopping on e-commerce sites and apps, or working.
Many of us rely on Wi-Fi to connect and access the web. But what if the Wi-Fi icon disappears from the system tray, settings, or control panel? However, as strange as it seems, many users are reporting that Windows 11 does not have a WiFi option.
There are also countless users complaining that their Windows 11 network adapters are missing. In the following sections, we've listed everything you need to know about these problems and the most effective ways to solve them.
Why doesn’t Wi-Fi show up in Windows 11?
Problems with your Wi-Fi can be caused by many other issues, and it can be difficult to pinpoint just one problem. For better understanding, we have listed the most common causes below:
- Problems with the Wi-Fi adapter or its driver
- Apps that conflict with Wi-Fi
- Misconfigured settings
- Hidden Wi-Fi icon
- Problems with current versions of Windows 11
And the list goes on Lift. However, the ones mentioned above are most likely to cause this inconvenience and we will list the fixes for each in the following sections.
Is the Wi-Fi problem caused by a hardware or software issue?
This can be caused by a range of hardware and software related issues. If you start experiencing it after upgrading to Windows 11 or updating to the latest version, it's most likely a software issue.
However, if you notice that your Wi-Fi strength decreases over time or you experience minor issues, it could also be a hardware fault.
It all depends on your experience and the performance of your PC, and only you can best tell whether the Wi-Fi issue is caused by a hardware or software problem based on the information above.
Software issues, such as outdated or corrupt drivers, or conflicting applications, can be easily resolved with the fixes listed here. For hardware issues, you must seek professional help.
How do you perform the fixes listed here when Wi-Fi is missing?
Due to the lack of Wi-Fi, you may experience issues connecting to the Internet. In this case, you can boot Windows 11 in Safe Mode.
If this doesn't work, switch to a wired connection, i.e. Ethernet. These are less prone to errors and provide a higher level of security. After you have secured access to the Internet, you can now start implementing the fixes listed here.
If you let Windows 11 log you in automatically and forget to enter your password after booting, you can make things easier.
What should I do if Windows 11 doesn’t have a Wi-Fi option?
1. Check the physical switch to turn on Wi-Fi
Many new computers, especially laptops, have a built-in switch to enable/disable Wi-Fi. You'll find it on the side or around the keyboard.
Once you find the switch, make sure it is turned on and check to see if the Wi-Fi icon and settings reappear.
NOTES If you cannot find the switch, check the manufacturer's website or the manual that came with your system to see its location.2. Confirm that airplane mode is disabled
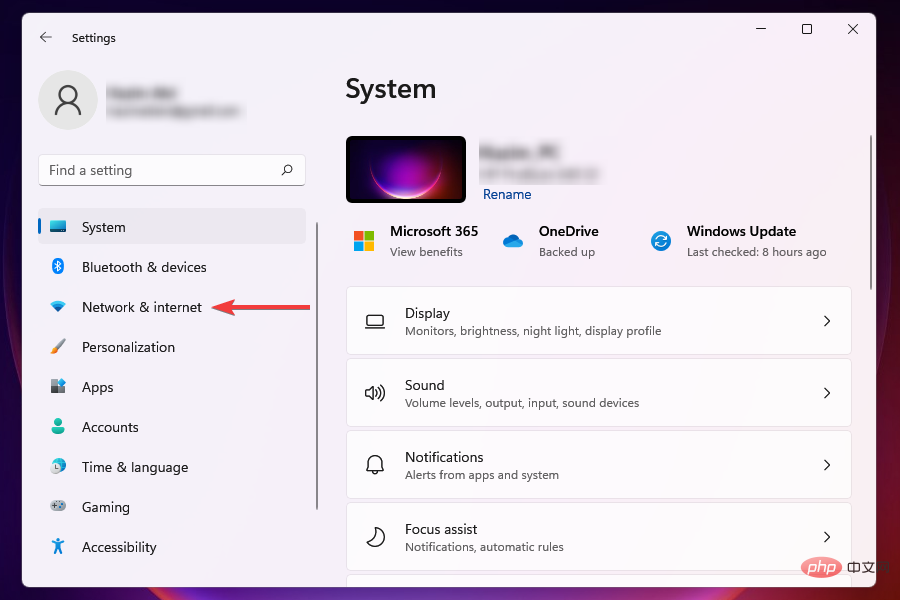
- Press Windows I to launch the Settings application.
- Select Network & Internet from the tabs listed on the left.

- Locate Airplane Mode Toggle and make sure it is disabled.

3. Turn on airplane mode and then disable it
- Click the Action Center icon on the right side of the taskbarorPress to view Quick Setup. WindowsA
- Click the Airplane Mode tile to enable it. When enabled, the tile color will change to blue.
- Wait a few minutes and click the Airplane Mode tile again to disable the setting.

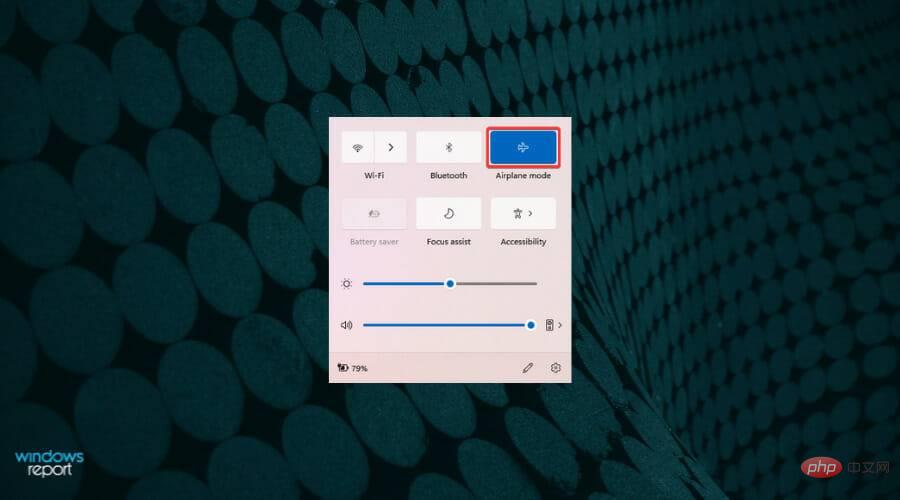

After enabling airplane mode on your PC, you will encounter Windows 11 WiFi not showing up in settings issue. Make sure you don't activate it by mistake.
Quick Settings allows you to make modifications to your system and enable or disable features without having to navigate to their actual location. You can also customize the Action Center to keep only the tiles you use frequently for a better experience.
4. Restart your computer
- Go to Desktop and press Alt F4 to activate the "Shut down Windows" box.
- Click the drop-down menu and select Restart from the list of options.
- Click at the bottom to confirm.


#We hope this helps you resolve the missing network adapter issue/Wi-Fi issue in Windows 11. If you're having trouble with your account after restarting, learn how to change your password and username in Windows 11.
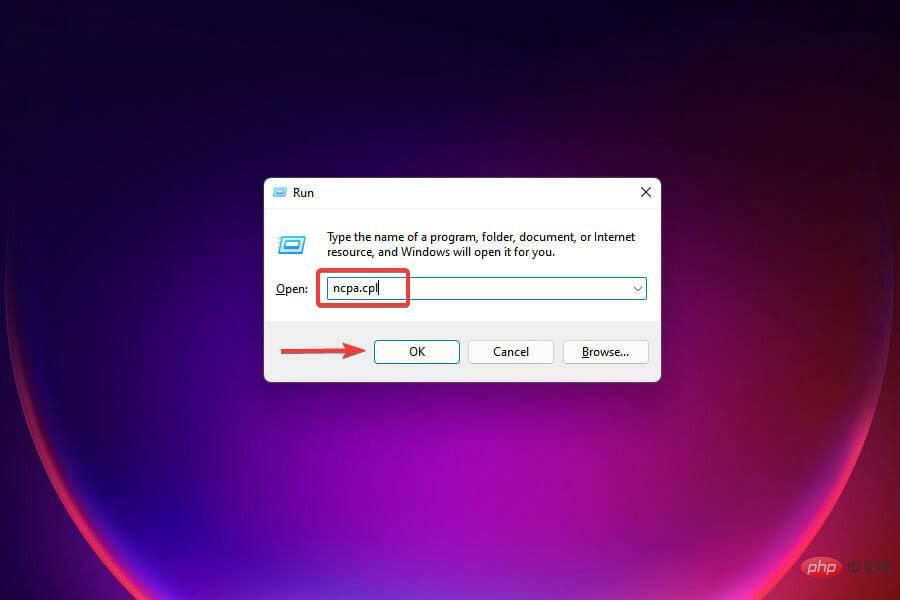
5. Check whether the Wi-Fi adapter is enabled
- Press Windows R to start the run command.
- Enter ncpa.cpl in the text field and click OK or press Enter to start Network Connections.
- Find and check if the Wi-Fi entry is grayed out. If so, you must enable it.
- Right-click on the Wi-Fi adapter and select Enable from the context menu.

If the Windows 11 WiFi adapter is disabled, you will not be able to connect to any network and the Wi-Fi icon appears to be missing due to the icon change in the system tray.
Once enabled, check if you are able to establish a secure Wi-Fi connection. This will help Windows 11 WiFi not showing up in network connections.
The icon should appear as usual and the user should be able to connect easily using the correct credentials.
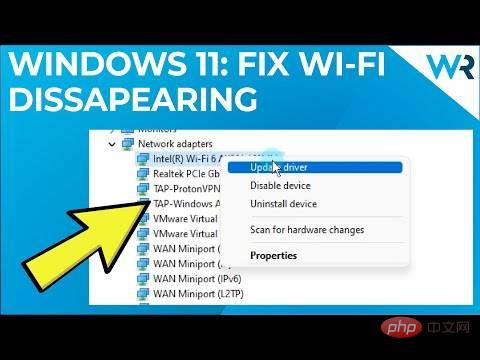
6. Update Wi-Fi Driver
The Wi-Fi issues you are experiencing may be caused by outdated drivers. If the above fixes don’t work, it’s time to try this method. .
You can update the driver in three ways, namely using Device Manager, from Windows Update settings, and by manually downloading and installing it from the official manufacturer's website.
Let’s look at all three methods:
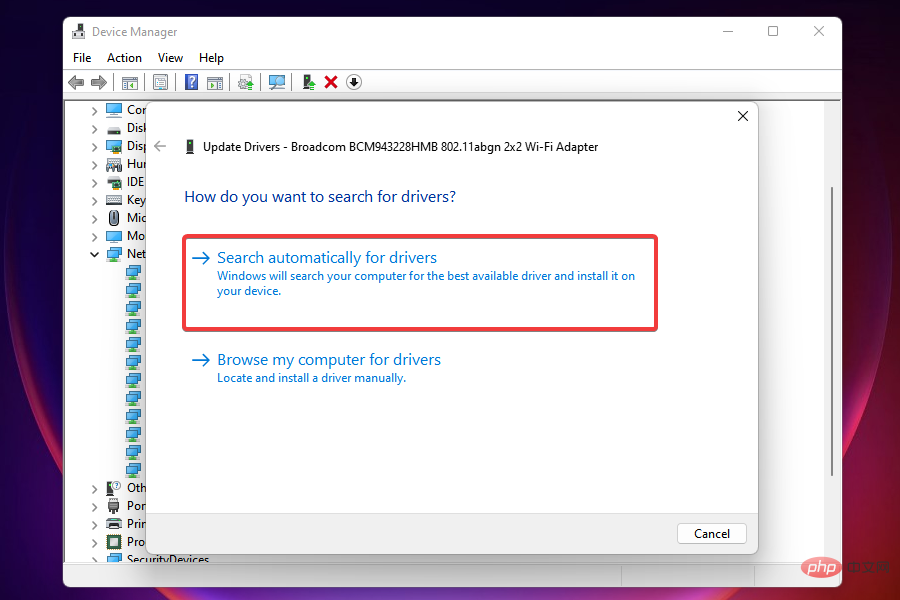
6.1 Start via Device Manager
- Press Windows X Advanced User/Quick Access Menu.
- Select Device Manager from the list of options that appears.
- Locate and double-click the Network Adapters entry to expand and view the devices beneath it.
- Right-click the Wi-Fi adapter and select Update Driver from the context menu.
- Select Automatically search for drivers to let Windows scan your system for the best available driver and install it.


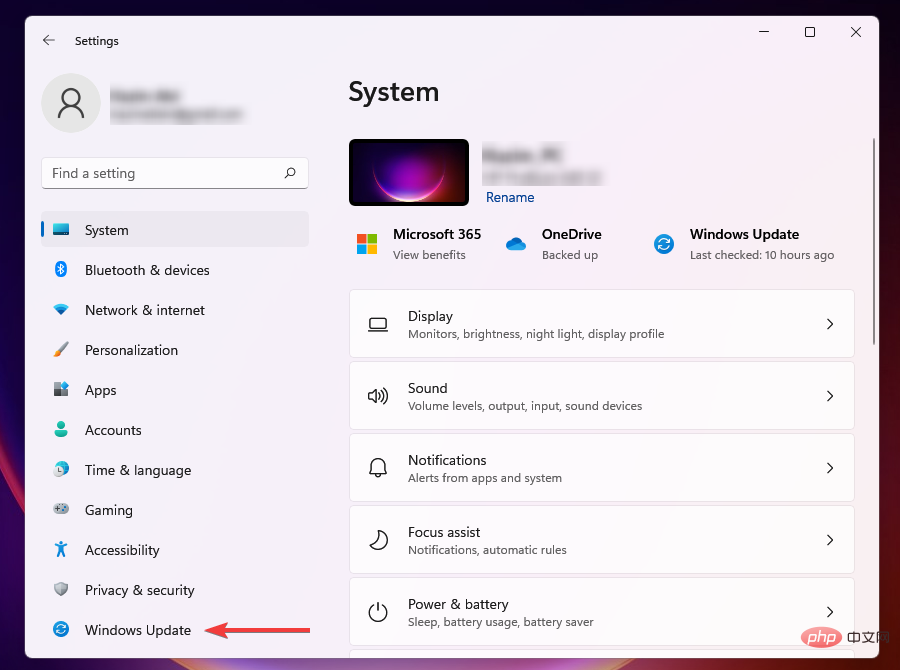
6.2 Via Windows Update
- Press Windows IStartSettings.
- SelectWindows Update from the navigation pane on the left.
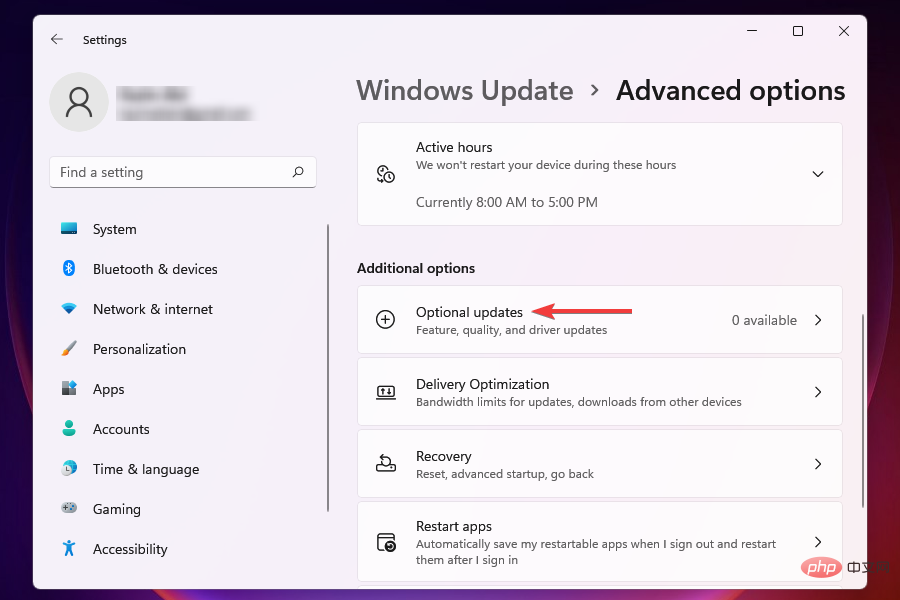
- Click Advanced Options.
- Select Optional Updates under Other Options.
- Check to see if an update is available for the Wi-Fi driver. If one exists, tick its checkbox and click the "Download and Install" button.

After installing the update, restart your computer for the changes to take effect and check if the Wi-Fi icon appears.
If a newer version of the driver is not available in Windows Update, you can always look for it on the manufacturer's website.
The latest driver version will allow you to connect to standards-compliant broadband networks. It can successfully fix 5Ghz WiFi not showing up issue in Windows 11.
6.3 Via the manufacturer's website
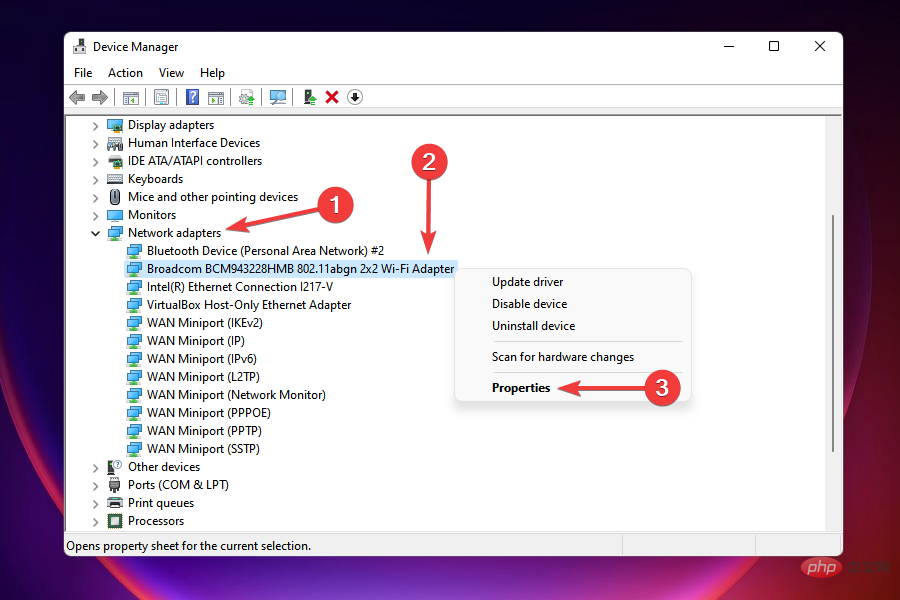
Notes To determine if a newer version of the driver is available, you must first find out the current version. So, in this method, we will first check the current driver version and then update it.- Start Device Manager.
- Double-click Network Adapters, locate and right-click the Wi-Fi Adapter, and select Properties from the context menu.
- Navigate to the Drivers tab and note the driver version.
- Once you have the current driver version, go to Google or any other search engine you like and search for updates using the driver name and operating system (Windows 11) as keywords followed by Update Driver.
- Find and open the manufacturer's website from the search results.
- On the OEM's website, determine if there is an update available based on the current driver version you mentioned earlier.
- If a newer version is available, please download it.
- Navigate to the folder where the driver update was downloaded, double-click it to launch the installer and follow the on-screen instructions to complete the installation process.
- After updating the driver, restart your computer for the changes to take effect and check that the Wi-Fi icon is now accessible.


This last process can be a bit complex and time-consuming, and carries considerable risks should you make a serious mistake. However, these three methods can be used to update any driver on your computer, and with a little care and patience, they are sure to yield results.
If you're looking for an easier way to keep your drivers up to date, we recommend using the dedicated third-party tool DriverFix. It automatically scans for driver updates and installs them on your PC, making the entire process easier and more convenient.
⇒Get DriverFix
7. Launch
Device Manager- using the rollback driver option
- .
- Locate and double-click Network Adapter, right-click the Wi-Fi adapter, and select Properties from the context menu.
- Go to the Drivers tab and select Rollback Driver.
- You will now be asked to select a reason for rolling back the update. Select the necessary response and click Yes.
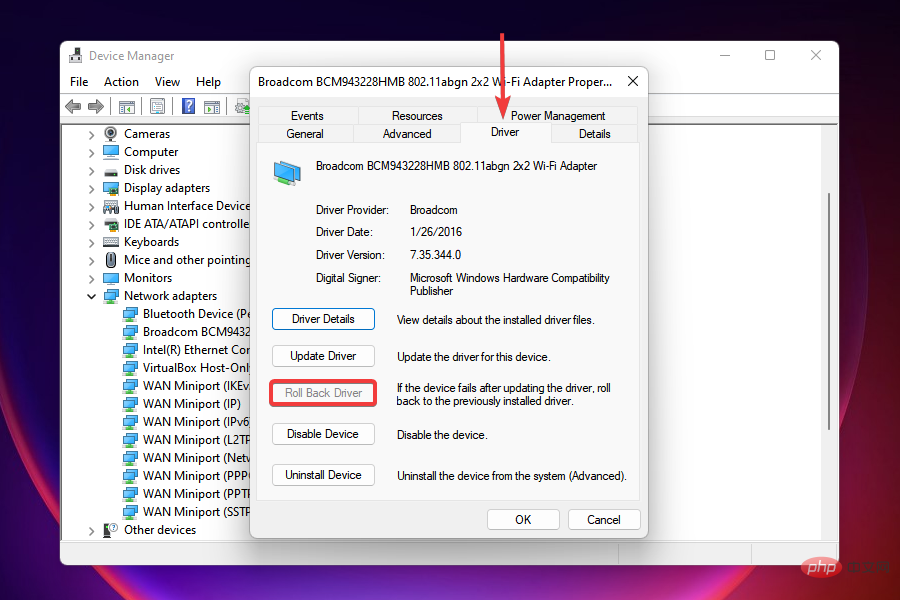
Windows will take a few seconds (or minutes, as appropriate) to reinstall the previous version of the driver, but you will not receive a prompt or confirmation when it is complete. It is recommended that you restart your computer after a few minutes for the changes to take effect.
Notes If the Rollback Driver option is grayed out, the driver has not been recently updated or Windows has not stored a previous version of the file. In this case, you have to reinstall it from the manufacturer's website, as described in the previous fix.If Wi-Fi disappears after updating the Wi-Fi driver, rolling back the update may work. If you want to revert to a previous version, Windows retains the files from the previous version.
8. Reinstall the Wi-Fi driver
- Start Device Manager.
- Double-click Network AdapterExpand and view the devices under it, right-click the Wi-Fi adapter and select Uninstall Device from the context menu.
- Check the Try to remove the driver for this device checkbox and click Uninstall at the bottom.
- After uninstalling the driver, restart the computer.
- When the computer turns on, Windows will automatically look for the best available driver and install it. Check that you are now able to connect to Wi-Fi.
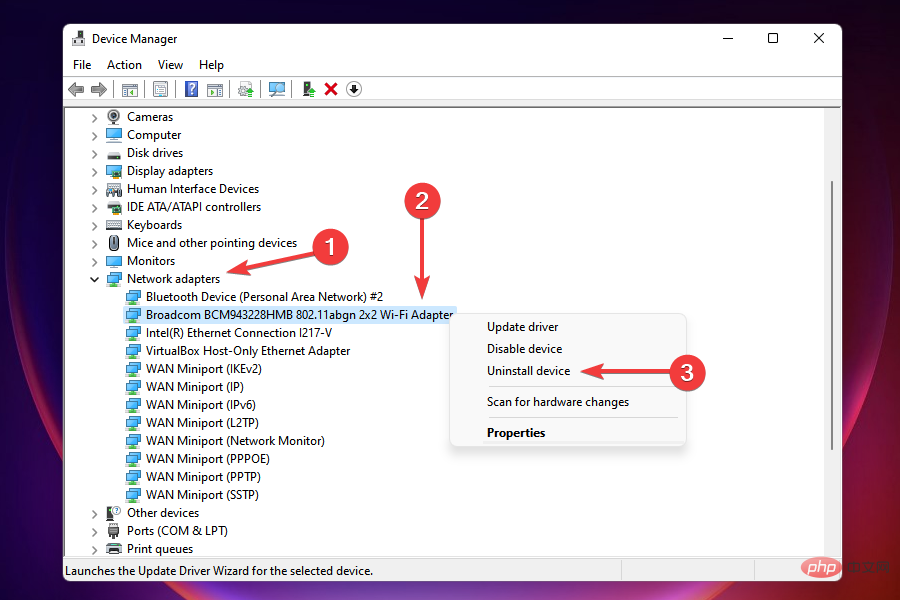
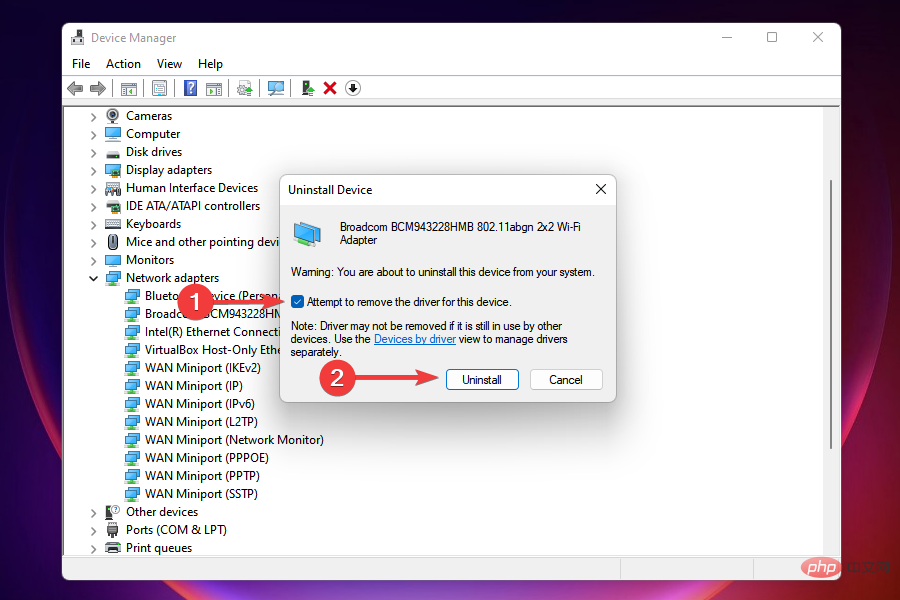
It is well known that corrupt drivers can cause a lot of problems, and your current driver is a prominent example. In this case, reinstalling the corrupt driver will resolve the issue.
If Windows 11 doesn't detect the WiFi adapter, sometimes reinstalling the driver can help, so be sure to give it a try.
9. Update Windows 11
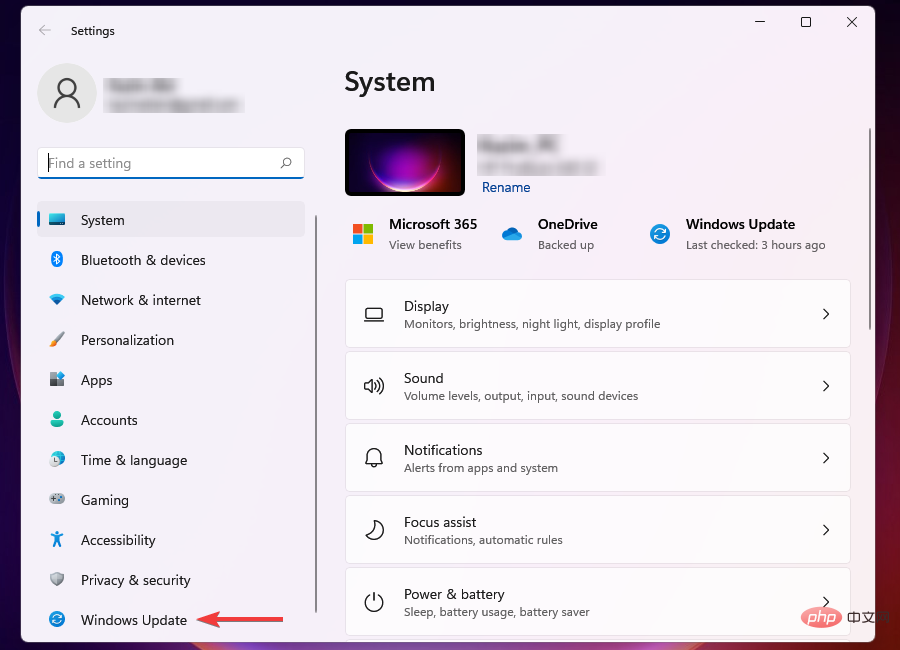
- Press Windows I to launch the Settings application.
- SelectWindows Update from the tabs listed on the left.
- Click Check for Updates and let Windows scan for any pending updates. If any are available, they will be downloaded and installed on the computer.

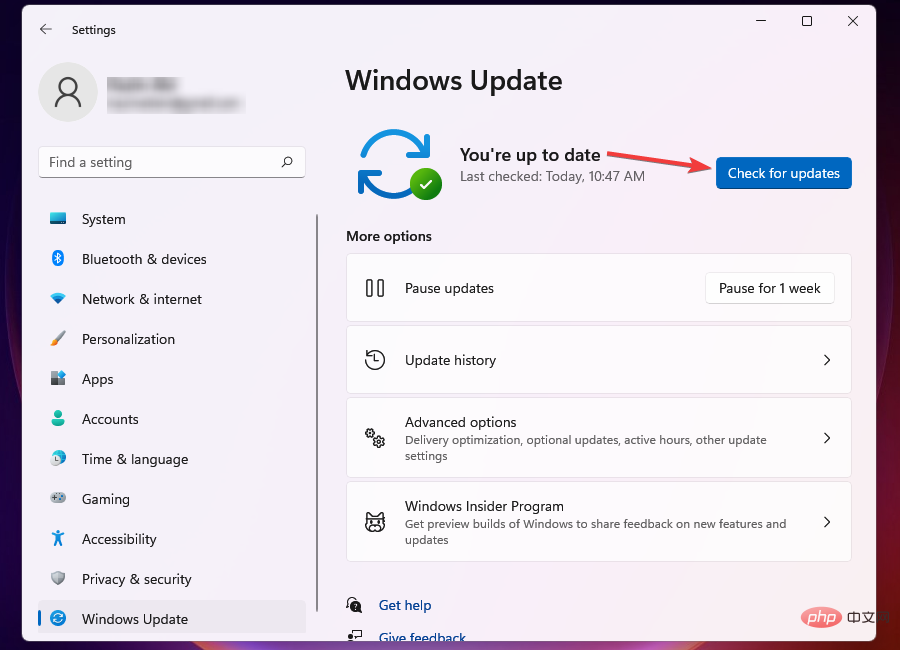
Sometimes, running an older version of Windows can also cause a series of problems. Microsoft releases updates that include patches for various issues and other new features for your computer. This is the previous part you should focus on here.
After installing the latest update, the issue of no WiFi option in Windows 11 settings should be resolved.
10. Uninstall Windows 11 Updates
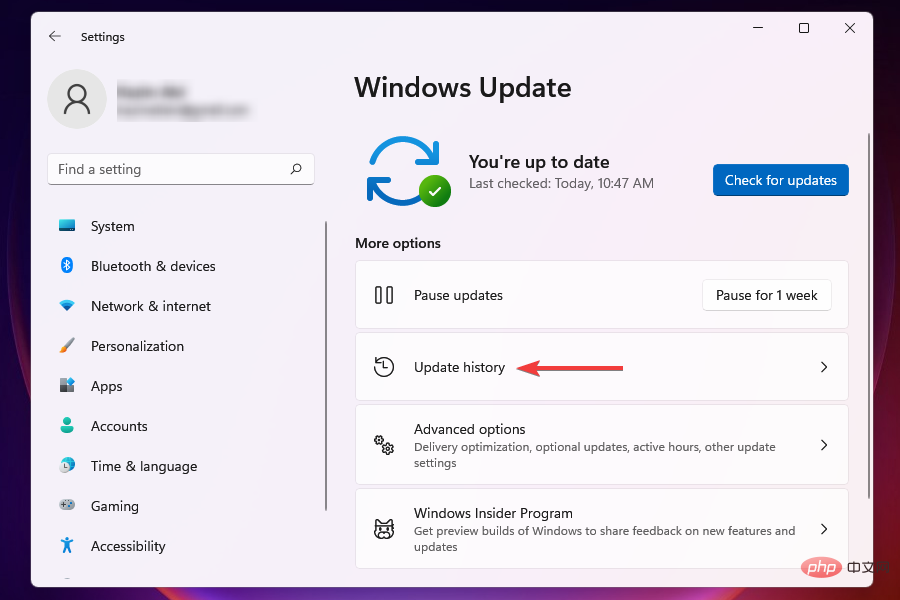
- Press Windows ILaunchSettings.
- SelectWindows Update from the tabs listed on the left.
- Click on the right to update history.
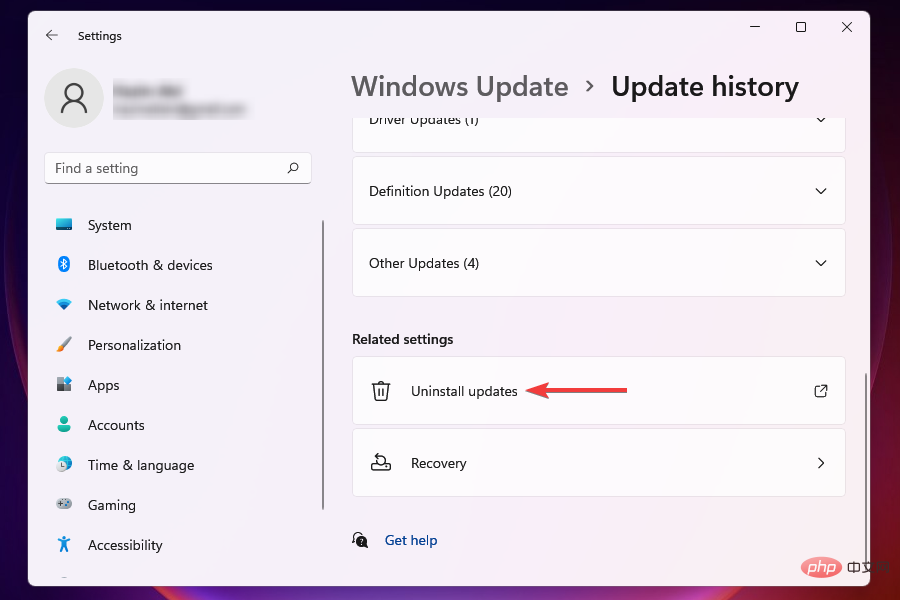
- Click Uninstall updates under the relevant settings.
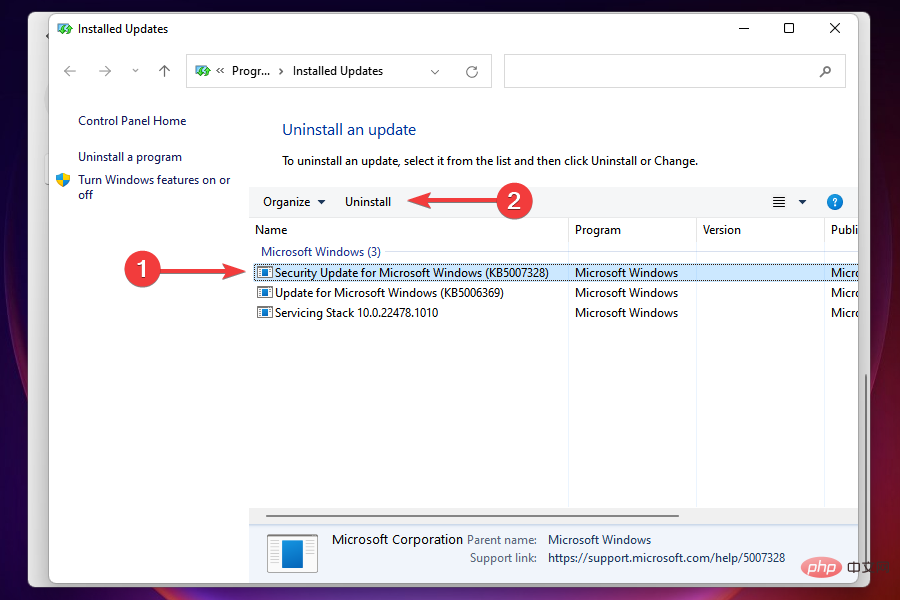
- Select the updates you want to remove and click Uninstall.
If Wi-Fi disappears on Windows 11 after updating, the problem is most likely with the current version/build itself.
If you cannot find the new update from Microsoft in the last fix, it is best to uninstall the last update and revert to the previous version, which is stable and working well.
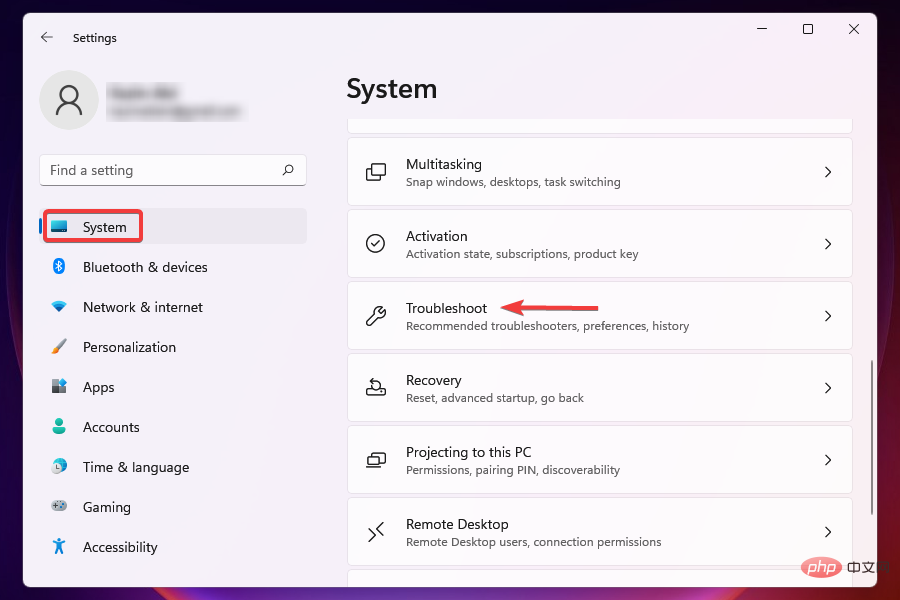
11. Run the Network Adapter Troubleshooter
- Press Windows IStart Settings.
- Scroll down and selectTroubleshoot in the System tab.
- Click Additional Troubleshooting.
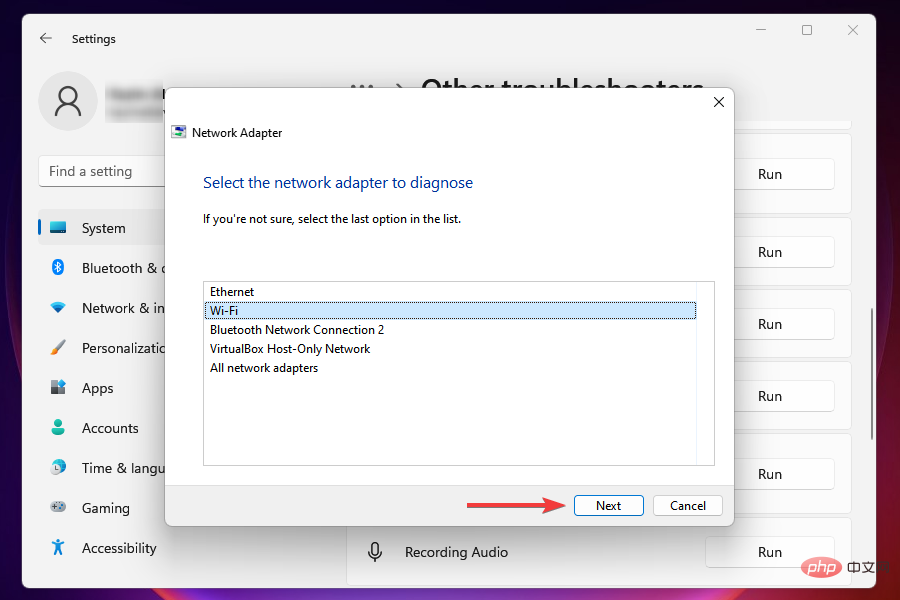
- Click the Run button next to Network Adapter Troubleshooter.
- Wait for the troubleshooter to run a scan, then select Wi-Fi from the list of network adapters.
- Wait for the troubleshooter to identify and resolve the problem.


Microsoft provides a series of built-in troubleshooters that make it easy to identify and fix problems that affect Windows performance. However, these only solve known problems.
If running the Network Adapter Troubleshooter doesn't help, move on to the next fix.
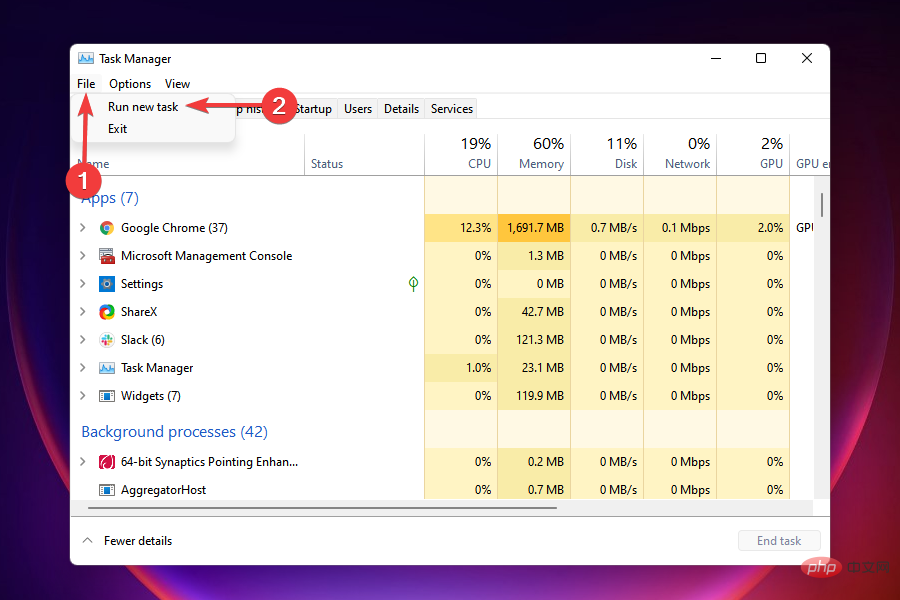
12. Run File Explorer
- Press Ctrl ShiftStart Task ManagementEsc Device.
- Click the File menu in the upper right corner and select Run New Task.
- Type explorer.exe in the text field and click OK or hit Enter to launch File Explorer.
- After the File Explorer process starts, check if the Wi-Fi icon appears again.

This is a known workaround for Wi-Fi issues in all versions of Windows. Run File Explorer to eliminate or remove any errors that are preventing the Wi-Fi icon from appearing, making it accessible.
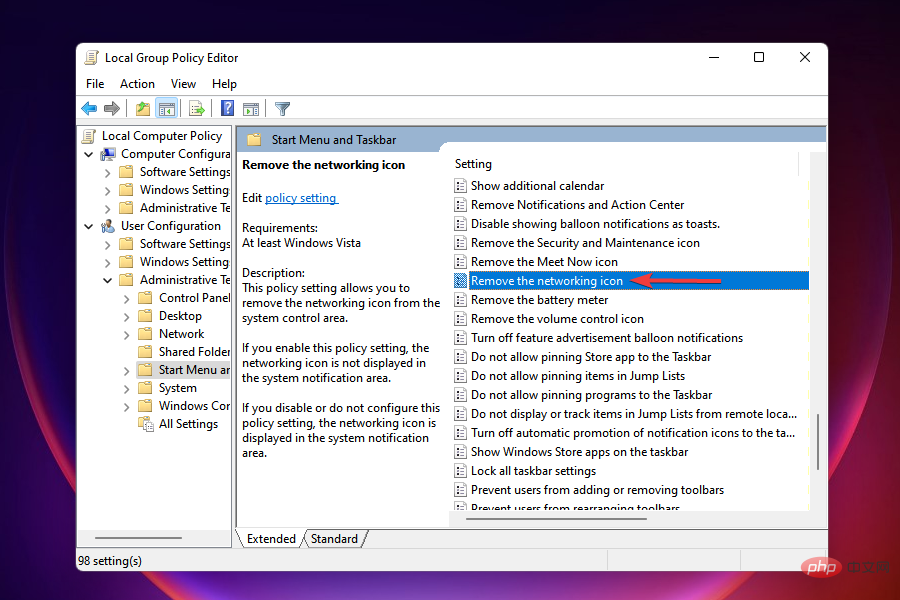
13. Modify Group Policy
- Press Windows R to start and run the command.
- Enter gpedit.msc in the text field and click OK or click Enter to launch the Group Policy Editor.
- Navigate to User Configuration, then navigate to Administrative Templates and Start Menu and Taskbar from the left navigation pane.
- Find and double-click the Delete Network icon.
- Check the Disabled checkbox and click OK to save changes.


14. Perform a clean boot
- Press Windows RStartRuncommand .
- Type msconfig in the text field and click OK or click Enter to launch the System Configuration window.
- Go to the "Services" tab.
- Check the Hide all Microsoft services checkbox and click Disable all.
- Navigate to the Startup tab and select Open Task Manager.
- Select all startup items listed here one at a time, then click to disable each time.
- Close Task Manager after disabling startup programs
- Click "OK" in the "System Configuration" window.
- Click Restart to start Windows using only critical services and startup programs.


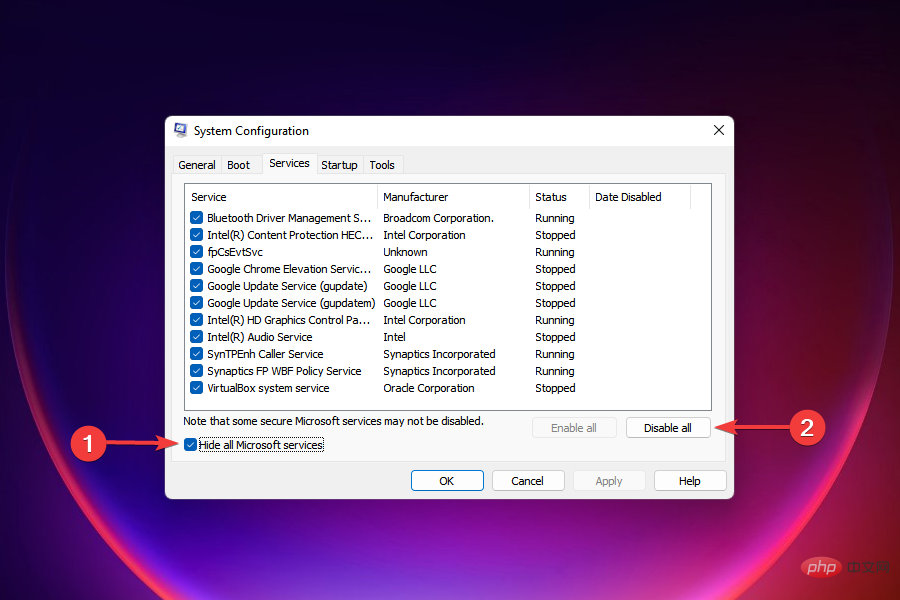


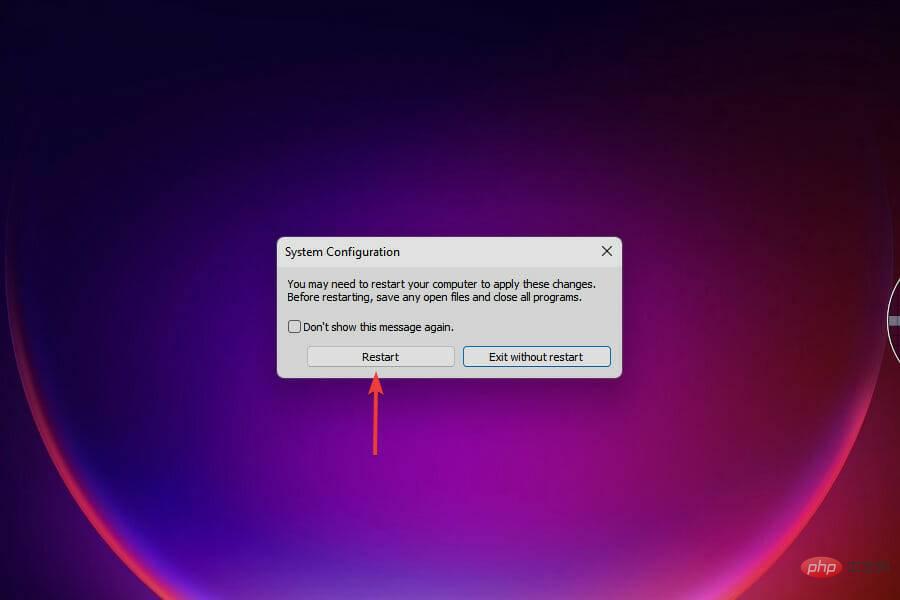
When the PC restarts, it will only load essential services, drivers, and startup programs. A clean boot environment is similar to Safe Mode, but provides more options for resolving issues.
When you clean boot Windows, you should have the Wi-Fi icon. Now, start services and programs one at a time to determine which one is causing the problem.
An application or service that you launched before the Wi-Fi icon disappeared is most likely the cause of the error.
If it is the program that caused the error, you can simply uninstall the application. If it's a service, keep it disabled until a Windows update is available for download.
After completing troubleshooting, you can safely restart/start other items that were previously disabled.
The clean boot process is quite complex and time-consuming, so it is recommended that you approach the end if there is no other way.
For any issues logging in after a clean boot, learn how to remove your login password in Windows 11.
15. Perform system restore
- Press Windows SStart Search menu.
- Type Create Restore Point in the text field at the top and click on the relevant search result.
- Click System Restore.
- Select your preferred settings and click Next. The first option here is a restore point recommended by Windows, while with other settings you can choose one manually. We will choose the second option.
- Select a restore point and click Next.
- View the details and click Finish to start the restore process.
- The computer will restart during the restore process, therefore, it is recommended that you save all open files to avoid data loss.


System Restore also occurs on previous versions of Windows and is an effective troubleshooting method.
It restores the computer to an error-free point in time by modifying settings and uninstalling applications. However, the restore process does not affect the files stored on the system.
But the condition here is that the restore point must be created before you encounter the error for the first time. If the settings are correct, then there is a good chance that such a point should exist on your computer.
Windows automatically creates a restore point before any critical task, such as updating Windows or installing a major application. This way, you can be sure that a restore point exists for you to use.
After restoring the system, be sure to check if Windows 11 still doesn’t have Wi-Fi option.
What should I do if the Wi-Fi icon is missing in Windows 11?
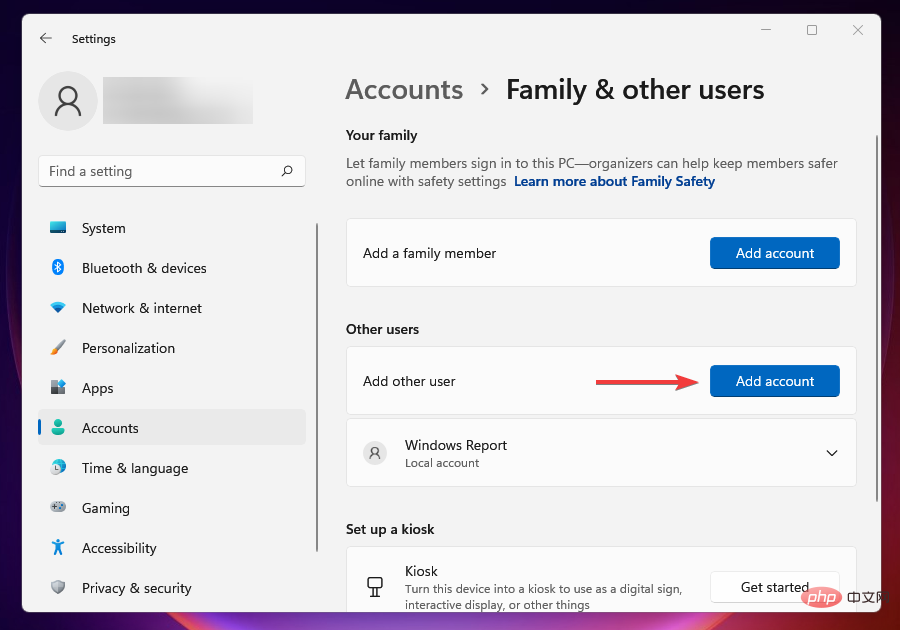
Although it is unlikely to happen, the Windows 11 Wi-Fi icon missing error can be triggered by a corrupted user account.
So the obvious solution here is to create a new one and hope that logging into it will make the Wi-Fi icon appear as expected.
- Press Windows I Start Settings.
- Select account from the left.
- Click Home & Other Users in the right pane.
- Next, click the Add account button next to Add other user.
- Enter the person's credentials to create a Microsoft account, then follow the on-screen instructions to complete the process. Alternatively, you can create a local account.


There are several ways to repair a damaged user profile. Although this tutorial is for Windows 10, the fixes listed have been duly checked and found to work in Windows 11 as well.
While some people go for fixing a corrupted profile, a simple and quick alternative is to create another profile to work efficiently without encountering any errors. Once that's done, you have time to deal with the damage.
What should I do if the fixes listed here don't work?
While the above fixes resolve various issues, there is a small chance that these fixes will resolve the disappearing Wi-Fi issue.
In this case, you can reset Windows 11 to factory settings. This should fix the problem as it will remove all files, applications, and configured settings from your computer.
If the reset does not work, the problem is most likely with the hardware, in which case it is recommended that you seek professional help.
The fixes listed above were found to have resolved the error for most users, so be sure to try them all if you don’t have the Wi-Fi option on Windows 11.
The above is the detailed content of 15 Ways to Fix Wi-Fi When It's Not Working in Windows 11. For more information, please follow other related articles on the PHP Chinese website!

Hot AI Tools

Undresser.AI Undress
AI-powered app for creating realistic nude photos

AI Clothes Remover
Online AI tool for removing clothes from photos.

Undress AI Tool
Undress images for free

Clothoff.io
AI clothes remover

AI Hentai Generator
Generate AI Hentai for free.

Hot Article
Hot Tools

Notepad++7.3.1
Easy-to-use and free code editor

SublimeText3 Chinese version
Chinese version, very easy to use

Zend Studio 13.0.1
Powerful PHP integrated development environment

Dreamweaver CS6
Visual web development tools

SublimeText3 Mac version
God-level code editing software (SublimeText3)
Hot Topics
 1377
1377
 52
52

 How to convert XML to PDF on your phone?
Apr 02, 2025 pm 10:18 PM
How to convert XML to PDF on your phone?
Apr 02, 2025 pm 10:18 PM
It is not easy to convert XML to PDF directly on your phone, but it can be achieved with the help of cloud services. It is recommended to use a lightweight mobile app to upload XML files and receive generated PDFs, and convert them with cloud APIs. Cloud APIs use serverless computing services, and choosing the right platform is crucial. Complexity, error handling, security, and optimization strategies need to be considered when handling XML parsing and PDF generation. The entire process requires the front-end app and the back-end API to work together, and it requires some understanding of a variety of technologies.
 How to jump from Word plug-in to browser for login authorization?
Apr 01, 2025 pm 08:27 PM
How to jump from Word plug-in to browser for login authorization?
Apr 01, 2025 pm 08:27 PM
How to achieve login authorization from within the application to outside the application? In some applications, we often encounter the need to jump from one application to another...
 What is the reason why PS keeps showing loading?
Apr 06, 2025 pm 06:39 PM
What is the reason why PS keeps showing loading?
Apr 06, 2025 pm 06:39 PM
PS "Loading" problems are caused by resource access or processing problems: hard disk reading speed is slow or bad: Use CrystalDiskInfo to check the hard disk health and replace the problematic hard disk. Insufficient memory: Upgrade memory to meet PS's needs for high-resolution images and complex layer processing. Graphics card drivers are outdated or corrupted: Update the drivers to optimize communication between the PS and the graphics card. File paths are too long or file names have special characters: use short paths and avoid special characters. PS's own problem: Reinstall or repair the PS installer.
 xml online formatting
Apr 02, 2025 pm 10:06 PM
xml online formatting
Apr 02, 2025 pm 10:06 PM
XML Online Format Tools automatically organizes messy XML code into easy-to-read and maintain formats. By parsing the syntax tree of XML and applying formatting rules, these tools optimize the structure of the code, enhancing its maintainability and teamwork efficiency.
 Does H5 page production require continuous maintenance?
Apr 05, 2025 pm 11:27 PM
Does H5 page production require continuous maintenance?
Apr 05, 2025 pm 11:27 PM
The H5 page needs to be maintained continuously, because of factors such as code vulnerabilities, browser compatibility, performance optimization, security updates and user experience improvements. Effective maintenance methods include establishing a complete testing system, using version control tools, regularly monitoring page performance, collecting user feedback and formulating maintenance plans.
 How to speed up the loading speed of PS?
Apr 06, 2025 pm 06:27 PM
How to speed up the loading speed of PS?
Apr 06, 2025 pm 06:27 PM
Solving the problem of slow Photoshop startup requires a multi-pronged approach, including: upgrading hardware (memory, solid-state drive, CPU); uninstalling outdated or incompatible plug-ins; cleaning up system garbage and excessive background programs regularly; closing irrelevant programs with caution; avoiding opening a large number of files during startup.
 How to convert XML to PDF on Android phone?
Apr 02, 2025 pm 09:51 PM
How to convert XML to PDF on Android phone?
Apr 02, 2025 pm 09:51 PM
Converting XML to PDF directly on Android phones cannot be achieved through the built-in features. You need to save the country through the following steps: convert XML data to formats recognized by the PDF generator (such as text or HTML); convert HTML to PDF using HTML generation libraries such as Flying Saucer.
 How to implement cross-application jump for Word plug-in login authorization?
Apr 01, 2025 pm 11:27 PM
How to implement cross-application jump for Word plug-in login authorization?
Apr 01, 2025 pm 11:27 PM
How to implement cross-application jump for Word plug-in login authorization? When using certain Word plugins, we often encounter this scenario: click on the login in the plugin...