
 Common Problem
Fix: Next and previous pictures not showing up in Microsoft Photos on Windows 11
Common Problem
Fix: Next and previous pictures not showing up in Microsoft Photos on Windows 11
Fix: Next and previous pictures not showing up in Microsoft Photos on Windows 11

The Microsoft Photos app in Windows collects all the photos on your PC and puts them in one place, making it easier to find the photos you're searching for. The application allows users to not only view photos but also make changes if desired. When you open a photo using this app, there will be controls that you can use to move to the previous or next photo without going back to the folder that contains them.
However, many users have reported problems viewing the next and previous photo in the Photos app on their Windows PCs. Some users reported that the next and previous buttons in the app stopped working, and they were unable to navigate between photos using the cursor keys on their keyboard.
Are you encountering this issue when using Microsoft applications on your Windows PC? Then, this article will help you fix this issue with Photos app using solutions that other users have successfully tried.
Fix 1 – Change Folder Search Options
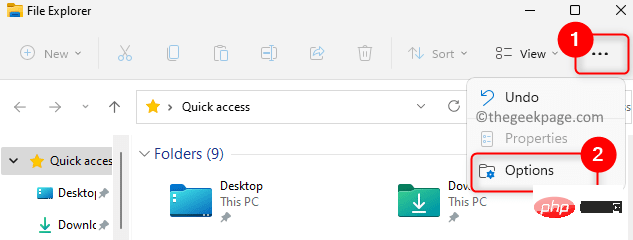
1. Simply hold down the Windows E key combination on your keyboard to open File Explorer.
At the top of File Explorer, click the three-dot menu and select the option.
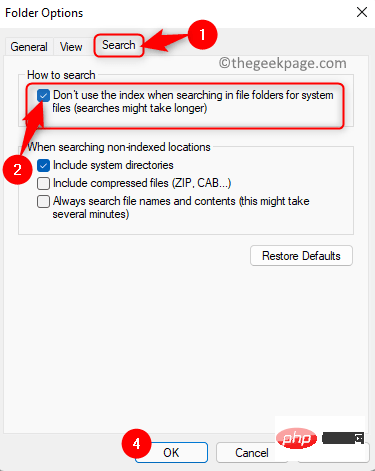
#2. This will open the Folder Options window for you.
Click the "Search" tab to select it.
3. Here, check the box related to Do not use indexes when searching for system files in folders (the search may take longer).
Click Apply and then click OK to confirm and save the changes.
#4. Now, launch the Photos application and check if you are able to navigate to the next and previous photo without any problem.
Fix 2 – Remove photo properties and personal information
1. Go to the folder that contains the photo you are trying to view.
Here, press Ctrl A to select all the pictures in this folder.
Now, right-click and select Properties in the context menu.

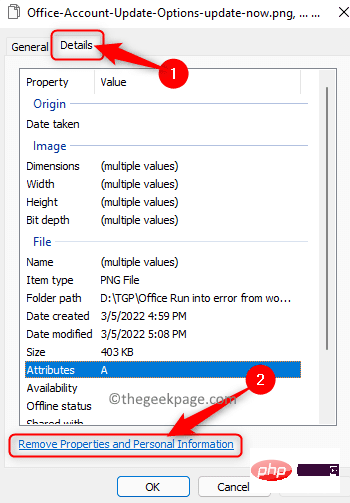
#2. You will be in the "Properties" window.
Go to the Details tab.
Here, click the Remove Properties and Personal Information link at the bottom of this window.
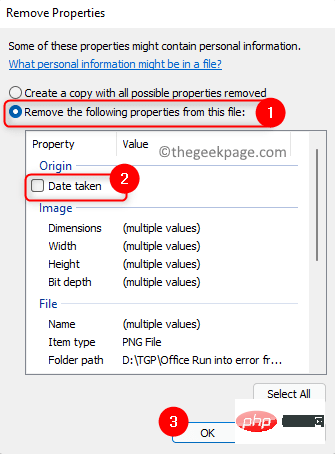
3. In the Remove Properties window, select andRemove the following properties from this file The radio button associated with the option.
If checked, make sure to uncheck the option Date.
Then, click "OK" to delete the attribute.
4. Return to the "Photo Properties" window and click "OK" to save the changes.
Open the Photos app and check if the issue is resolved.
Fix 3 – Reset Photos App
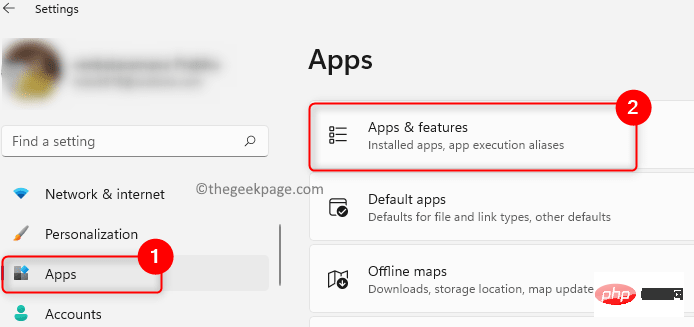
1. Press Windows I to open the Windows Settings page.
Here, select the Applications tab on the left.
Move right and select the box labeled Apps & features.
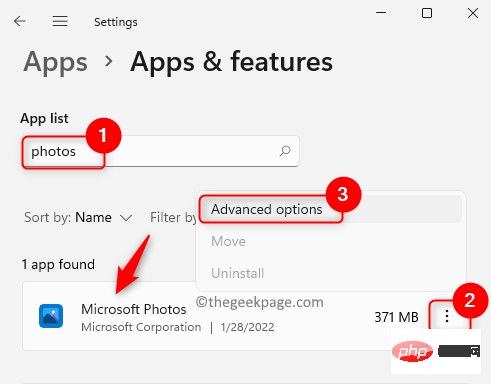
2. Scroll down on this page to find a list of apps.
In the text box below the list of applications, type Photos to search for the application in the list of applications installed on your PC.
3. Click the three vertical dots on the right end associated with the Microsoft Photos application.
In the menu that opens, select Advanced options.
4. On this Advanced Options page of the Photos app, scroll and find the Repairs section.
Here, click the Reset button.
In the pop-up prompt, click the "Reset" button again.
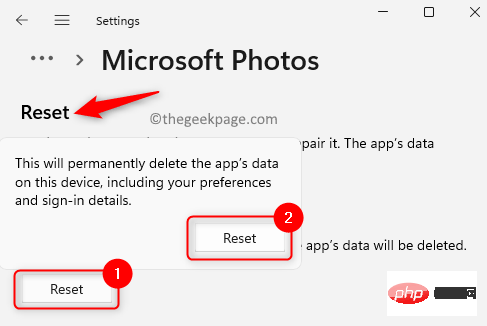
This will return the application to its default settings.
5. After the reset operation is completedRestart the computer.
Now, check if the navigation between photos is working in the Photos app.
Fix 4 – Select all photos
Select all photos within the folder and press the Enter key from your keyboard.
Fix 5 – Click on the Slideshow option and then exit
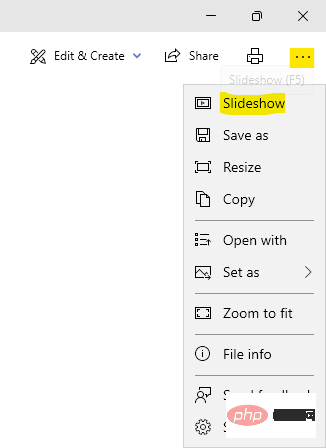
1 – In the Photos app, just click on the three horizontal dots and then click on the Slideshow piece.
2 – Now, once the slideshow is open, exit by pressing Esc key on PC.
# Navigating to the next and previous photo must now work in the Photos app. We hope this article helped you troubleshoot issues with the Microsoft Photos app on your Windows 11 PC.
The above is the detailed content of Fix: Next and previous pictures not showing up in Microsoft Photos on Windows 11. For more information, please follow other related articles on the PHP Chinese website!

Hot AI Tools

Undresser.AI Undress
AI-powered app for creating realistic nude photos

AI Clothes Remover
Online AI tool for removing clothes from photos.

Undress AI Tool
Undress images for free

Clothoff.io
AI clothes remover

AI Hentai Generator
Generate AI Hentai for free.

Hot Article
Hot Tools

Notepad++7.3.1
Easy-to-use and free code editor

SublimeText3 Chinese version
Chinese version, very easy to use

Zend Studio 13.0.1
Powerful PHP integrated development environment

Dreamweaver CS6
Visual web development tools

SublimeText3 Mac version
God-level code editing software (SublimeText3)
Hot Topics
 1386
1386
 52
52

 What software is bonjour and can it be uninstalled?
Feb 20, 2024 am 09:33 AM
What software is bonjour and can it be uninstalled?
Feb 20, 2024 am 09:33 AM
Title: Explore the Bonjour software and how to uninstall it Abstract: This article will introduce the functions, scope of use and how to uninstall the Bonjour software. At the same time, it will also be explained how to use other tools to replace Bonjour to meet the needs of users. Introduction: Bonjour is a common software in the field of computer and network technology. Although this may be unfamiliar to some users, it can be very useful in some specific situations. If you happen to have Bonjour software installed but now want to uninstall it, then
 What software is crystaldiskmark? -How to use crystaldiskmark?
Mar 18, 2024 pm 02:58 PM
What software is crystaldiskmark? -How to use crystaldiskmark?
Mar 18, 2024 pm 02:58 PM
CrystalDiskMark is a small HDD benchmark tool for hard drives that quickly measures sequential and random read/write speeds. Next, let the editor introduce CrystalDiskMark to you and how to use crystaldiskmark~ 1. Introduction to CrystalDiskMark CrystalDiskMark is a widely used disk performance testing tool used to evaluate the read and write speed and performance of mechanical hard drives and solid-state drives (SSD). Random I/O performance. It is a free Windows application and provides a user-friendly interface and various test modes to evaluate different aspects of hard drive performance and is widely used in hardware reviews
 What to do if WPS Office cannot open the PPT file - What to do if WPS Office cannot open the PPT file
Mar 04, 2024 am 11:40 AM
What to do if WPS Office cannot open the PPT file - What to do if WPS Office cannot open the PPT file
Mar 04, 2024 am 11:40 AM
Recently, many friends have asked me what to do if WPSOffice cannot open PPT files. Next, let us learn how to solve the problem of WPSOffice not being able to open PPT files. I hope it can help everyone. 1. First open WPSOffice and enter the homepage, as shown in the figure below. 2. Then enter the keyword "document repair" in the search bar above, and then click to open the document repair tool, as shown in the figure below. 3. Then import the PPT file for repair, as shown in the figure below.
![Corsair iCUE software not detecting RAM [Fixed]](https://img.php.cn/upload/article/000/465/014/170831448976874.png?x-oss-process=image/resize,m_fill,h_207,w_330) Corsair iCUE software not detecting RAM [Fixed]
Feb 19, 2024 am 11:48 AM
Corsair iCUE software not detecting RAM [Fixed]
Feb 19, 2024 am 11:48 AM
This article will explore what users can do when the CorsairiCUE software does not recognize the RAM in a Windows system. Although the CorsairiCUE software is designed to let users control their computer's RGB lighting, some users have found that the software does not function properly, resulting in an inability to detect RAM modules. Why doesn't ICUE pick up my memory? The main reason why ICUE cannot correctly identify RAM is usually related to background software conflicts. In addition, incorrect SPD write settings may also cause this problem. Fixed issue with CorsairIcue software not detecting RAM If CorsairIcue software is not detecting RAM on your Windows computer, please use the following suggestions.
 CrystalDiskinfo usage tutorial-What software is CrystalDiskinfo?
Mar 18, 2024 pm 04:50 PM
CrystalDiskinfo usage tutorial-What software is CrystalDiskinfo?
Mar 18, 2024 pm 04:50 PM
CrystalDiskInfo is a software used to check computer hardware devices. In this software, we can check our own computer hardware, such as reading speed, transmission mode, interface, etc.! So in addition to these functions, how to use CrystalDiskInfo and what exactly is CrystalDiskInfo? Let me sort it out for you! 1. The Origin of CrystalDiskInfo As one of the three major components of a computer host, a solid-state drive is the storage medium of a computer and is responsible for computer data storage. A good solid-state drive can speed up file reading and affect consumer experience. When consumers receive new devices, they can use third-party software or other SSDs to
 How to set the keyboard increment in Adobe Illustrator CS6 - How to set the keyboard increment in Adobe Illustrator CS6
Mar 04, 2024 pm 06:04 PM
How to set the keyboard increment in Adobe Illustrator CS6 - How to set the keyboard increment in Adobe Illustrator CS6
Mar 04, 2024 pm 06:04 PM
Many users are using the Adobe Illustrator CS6 software in their offices, so do you know how to set the keyboard increment in Adobe Illustrator CS6? Then, the editor will bring you the method of setting the keyboard increment in Adobe Illustrator CS6. Interested users can take a look below. Step 1: Start Adobe Illustrator CS6 software, as shown in the figure below. Step 2: In the menu bar, click the [Edit] → [Preferences] → [General] command in sequence. Step 3: The [Keyboard Increment] dialog box pops up, enter the required number in the [Keyboard Increment] text box, and finally click the [OK] button. Step 4: Use the shortcut key [Ctrl]
 What kind of software is bonjour? Is it useful?
Feb 22, 2024 pm 08:39 PM
What kind of software is bonjour? Is it useful?
Feb 22, 2024 pm 08:39 PM
Bonjour is a network protocol and software launched by Apple for discovering and configuring network services within a local area network. Its main role is to automatically discover and communicate between devices connected in the same network. Bonjour was first introduced in the MacOSX10.2 version in 2002, and is now installed and enabled by default in Apple's operating system. Since then, Apple has opened up Bonjour's technology to other manufacturers, so many other operating systems and devices can also support Bonjour.
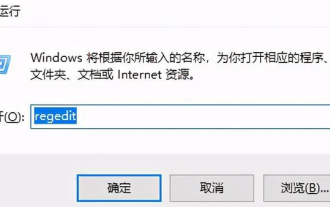 How to resolve an incompatible software attempt to load with Edge?
Mar 15, 2024 pm 01:34 PM
How to resolve an incompatible software attempt to load with Edge?
Mar 15, 2024 pm 01:34 PM
When we use the Edge browser, sometimes incompatible software attempts to be loaded together, so what is going on? Let this site carefully introduce to users how to solve the problem of trying to load incompatible software with Edge. How to solve an incompatible software trying to load with Edge Solution 1: Search IE in the start menu and access it directly with IE. Solution 2: Note: Modifying the registry may cause system failure, so operate with caution. Modify registry parameters. 1. Enter regedit during operation. 2. Find the path\HKEY_LOCAL_MACHINE\SOFTWARE\Policies\Micros