How to update graphics drivers on a Windows 11 computer
Graphics drivers are software that allow your Windows 11 computer to use the machine’s graphics hardware. This is usually in the form of a graphics card.
Graphics cards have other names, such as display adapters, video cards, and even graphics accelerators, but they all mean the same thing.
If you are a big gamer, it is important to update your graphics frequently so that you can get the best performance. This is especially important if you have an Nvidia, Intel or MAD graphics card, as these come standard.
So many modern video games require the best possible standards, and the brands mentioned above deliver that quality. Now, if you're not really into video games, updating your graphics drivers isn't that important. Most installed drivers or drivers provided through Windows Update will work fine.
Why should I update my graphics driver?
In addition to keeping your computer running at peak performance, updates can also fix bugs. It's not that common these days that new bugs appear in driver updates due to some random oversight or unseen consequences.
Additionally, companies like NVIDIA often roll out updates that significantly improve performance.
Even sometimes, older games get some much-needed attention and might get performance improvements too. Or maybe some new features will be introduced. Intel has also joined the game and often provides new tools to play with.
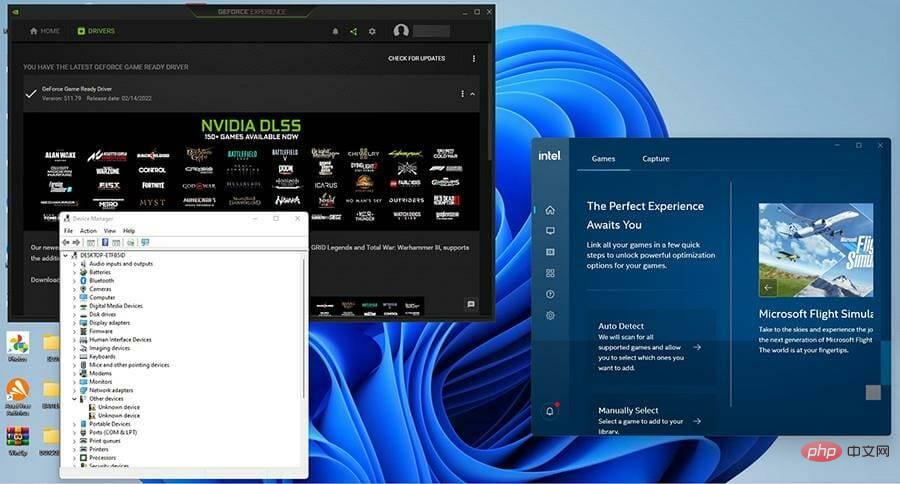
This tutorial will do a few things. It shows you how to check your graphics drivers on Windows 11 and how to update them, specifically NVIDIA and Intel drivers. It will also show you how to reinstall graphics drivers on a Windows 11 machine.
How to update graphics drivers on a Windows 11 computer?
1. Use third-party driver updates
To manage your graphics drivers, you can update the drivers on your Windows 11 PC using standard mode. However, you have specialized software to perform this job efficiently.
Using DriverFix, you can run a deep scan on your system to detect outdated drivers in just a few clicks. You should only select the drivers that need updating and let the software do the rest automatically.
The software has an extensive online database containing millions of drivers from official manufacturers.
Find and update your graphics drivers to improve game video quality and improve overall PC system performance.
Therefore, this solution is safe and guaranteed to improve system performance and update drivers without causing system failure.
2. Use the built-in tools
➡ Check for graphics drivers you already have
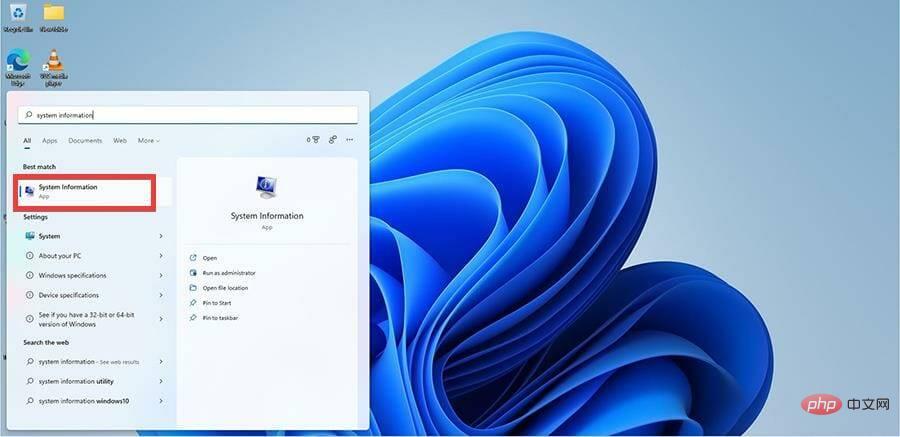
- Click the magnifying glass icon to bring up the search bar .
- Enter System Information and click on the first entry you see to open the System Information app.

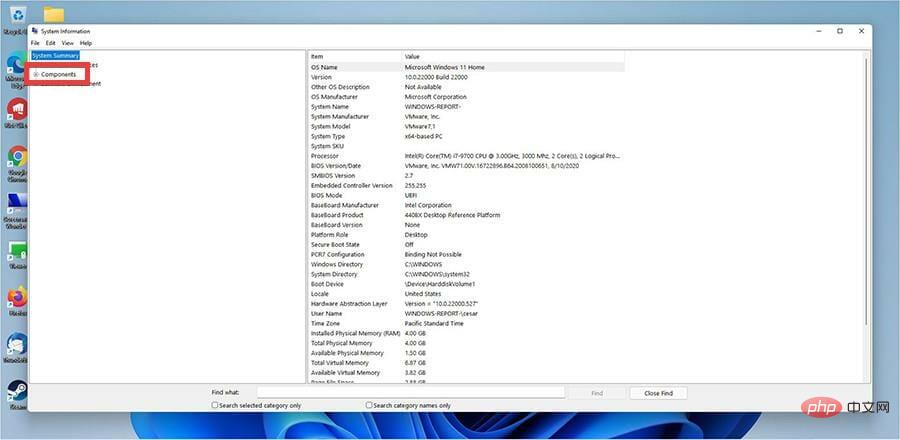
- Under System Summary, click Components.

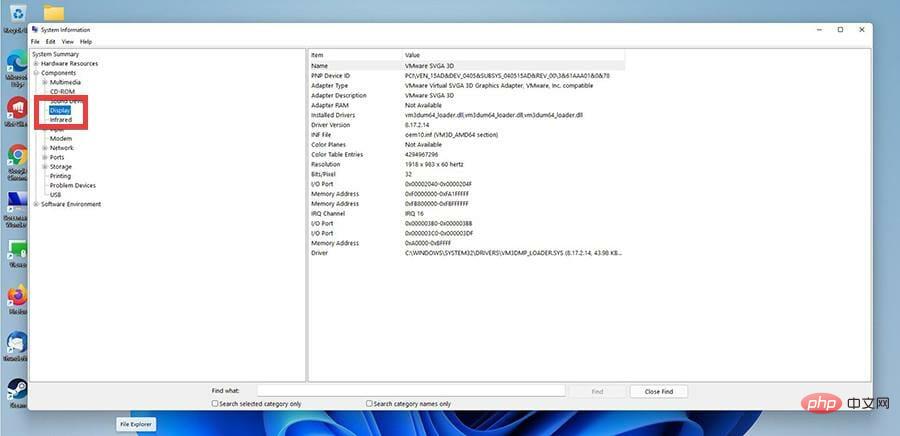
- Then click to display.

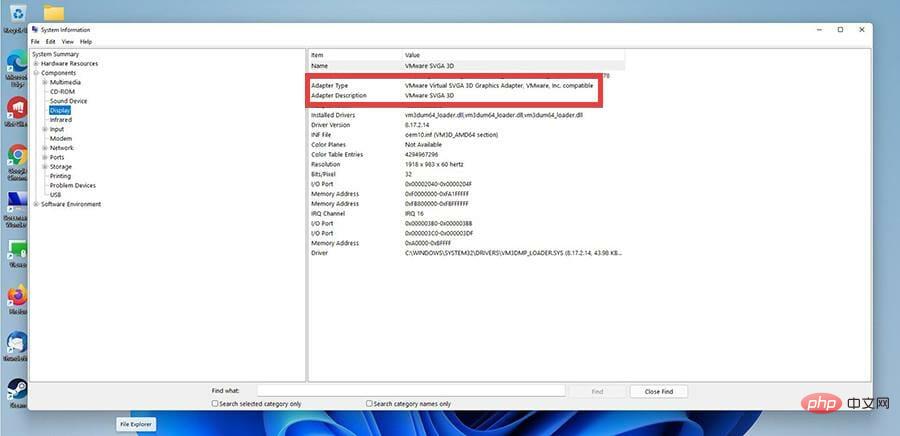
- Find the adapter type and adapter description to see which graphics card model you have. In this example, the graphics card is from the virtual machine being used, whereas you would normally see an Intel card.

➡ Update the graphics card driver through settings
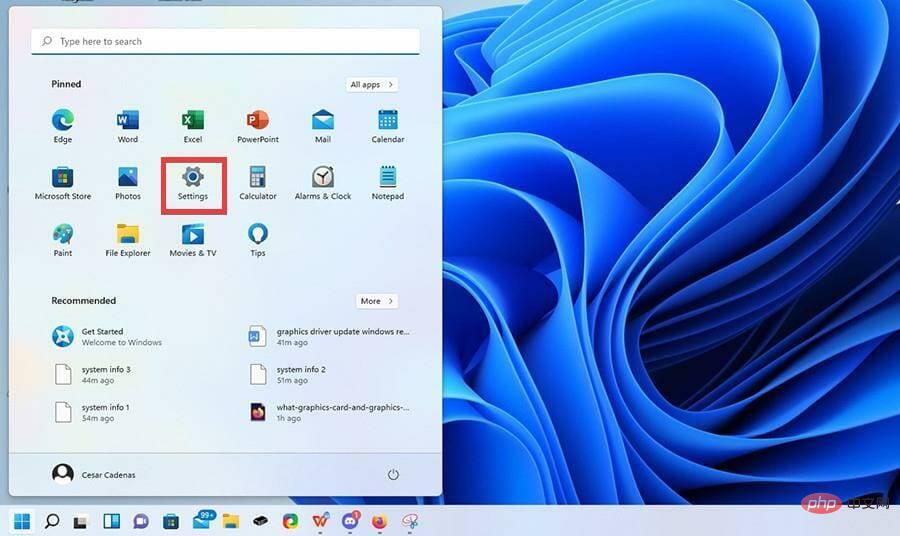
- Bring up the Start menu and click the Settings icon.

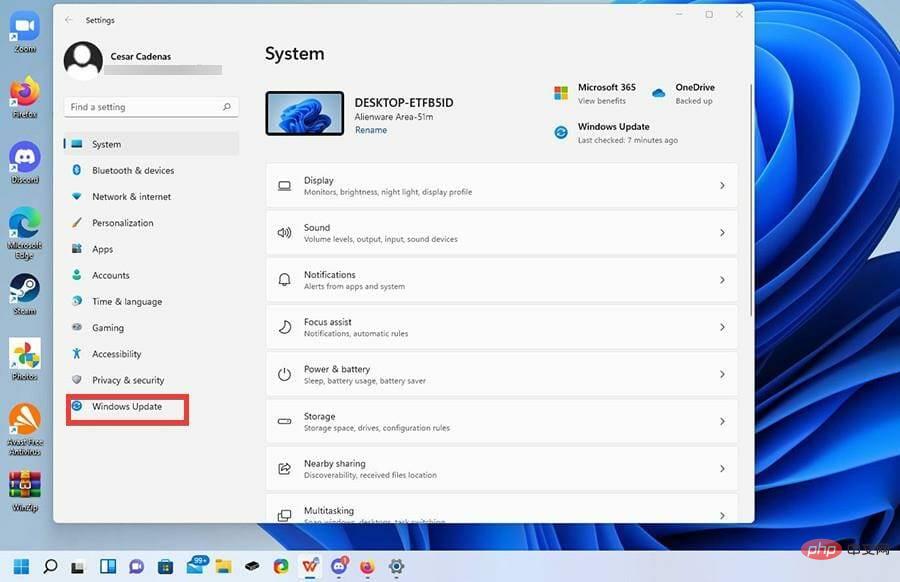
- Click the Windows Update tab on the left side of the Settings menu.

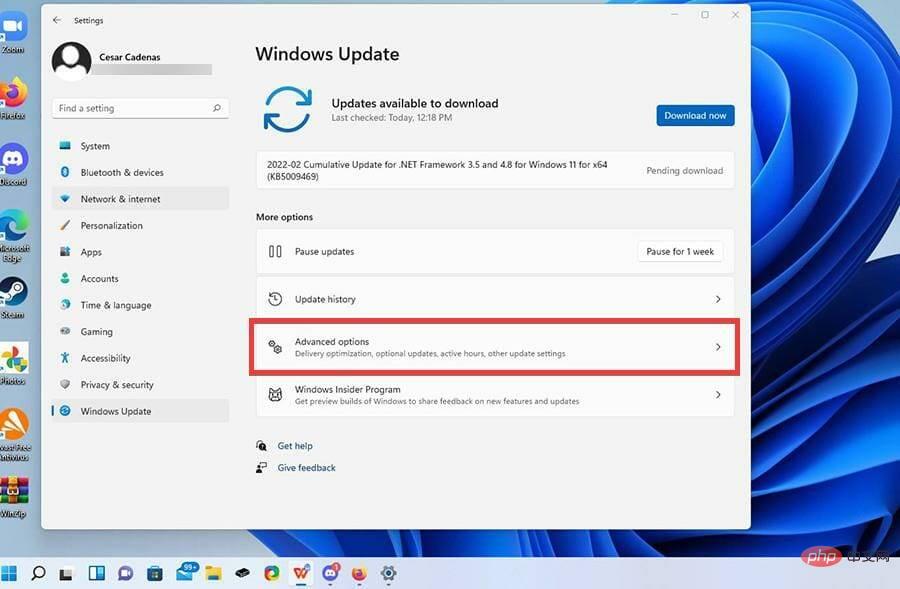
- Click Advanced Options.

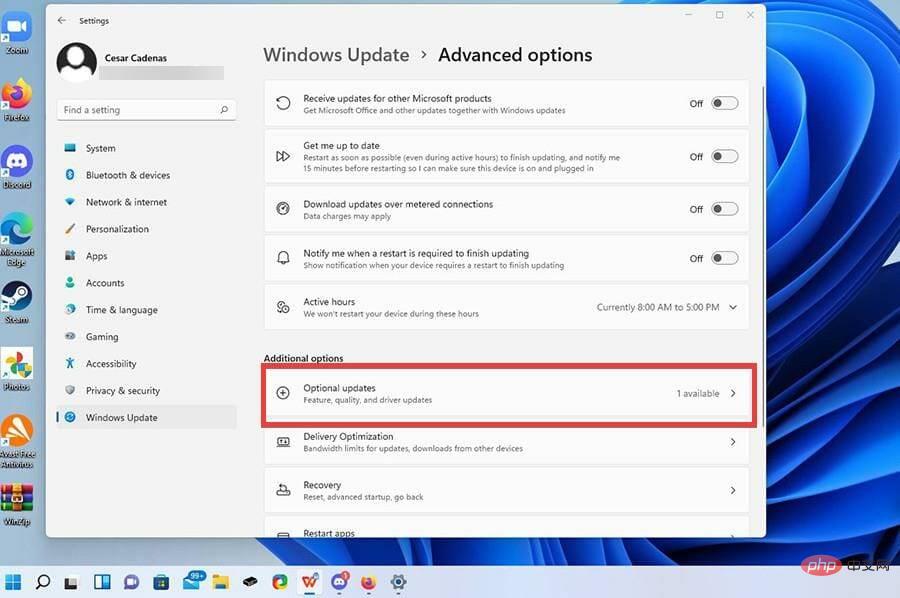
- Click Optional Update.

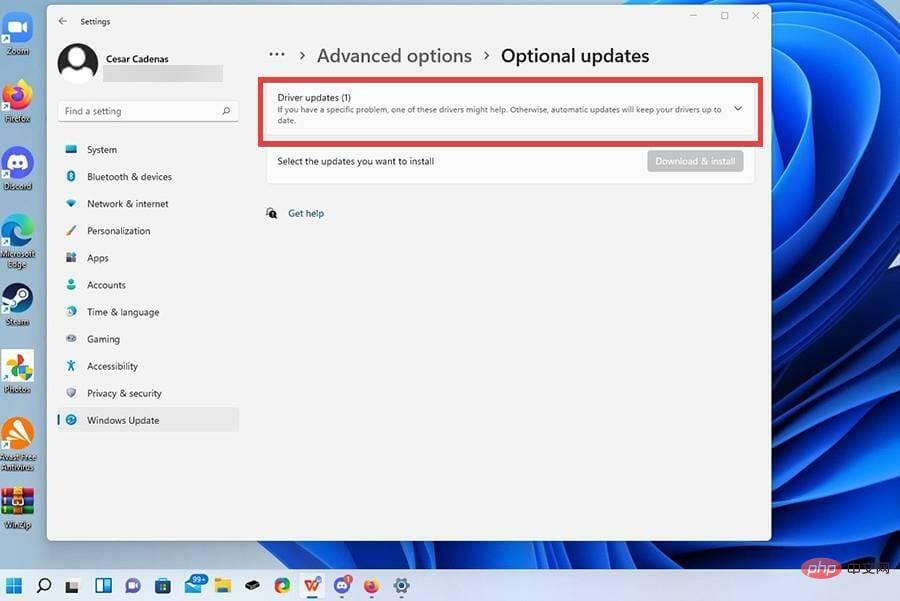
- Click the top drop-down menu to see if a driver update is available.

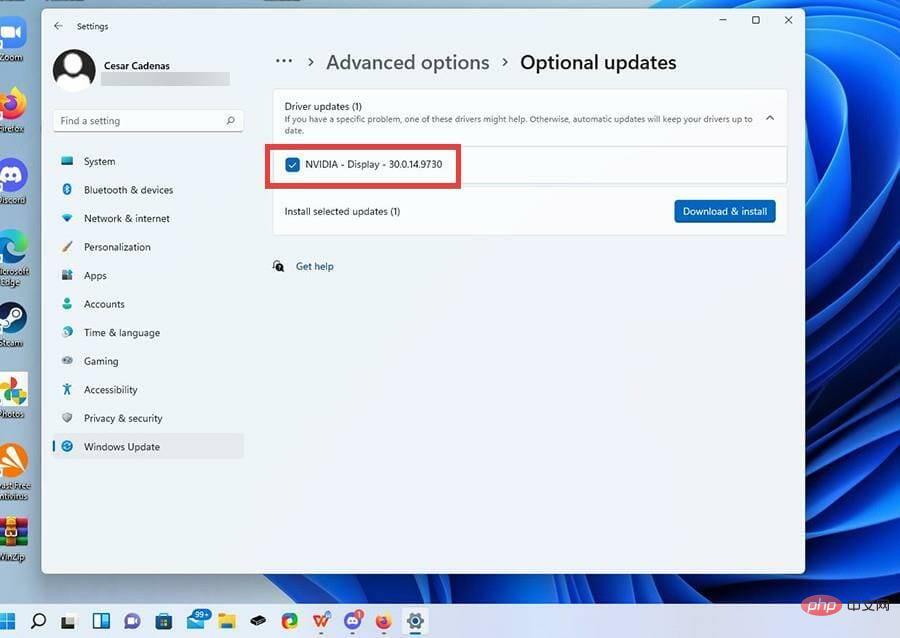
- If there are any updates, click Update to highlight it.

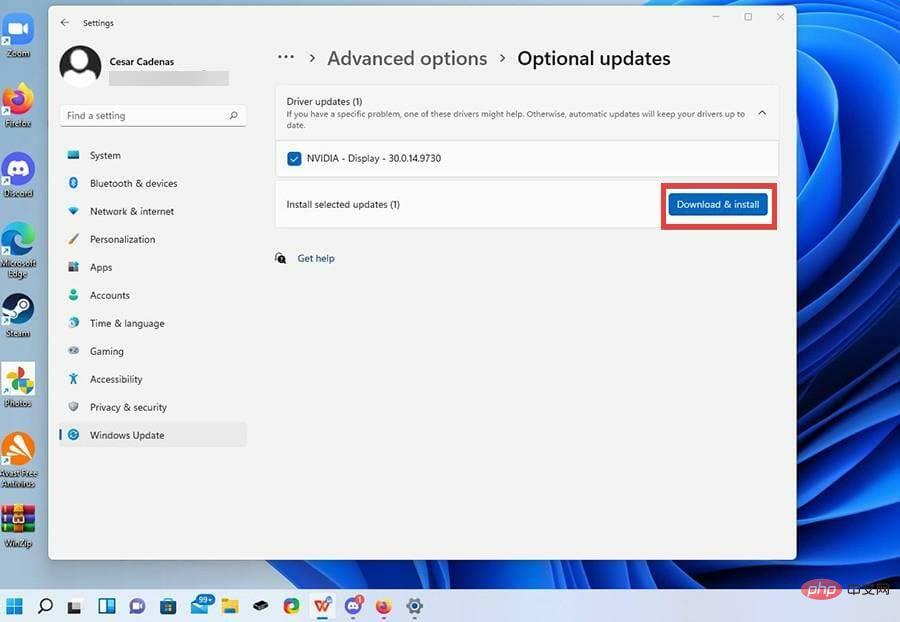
- Then click the Download and Install button.

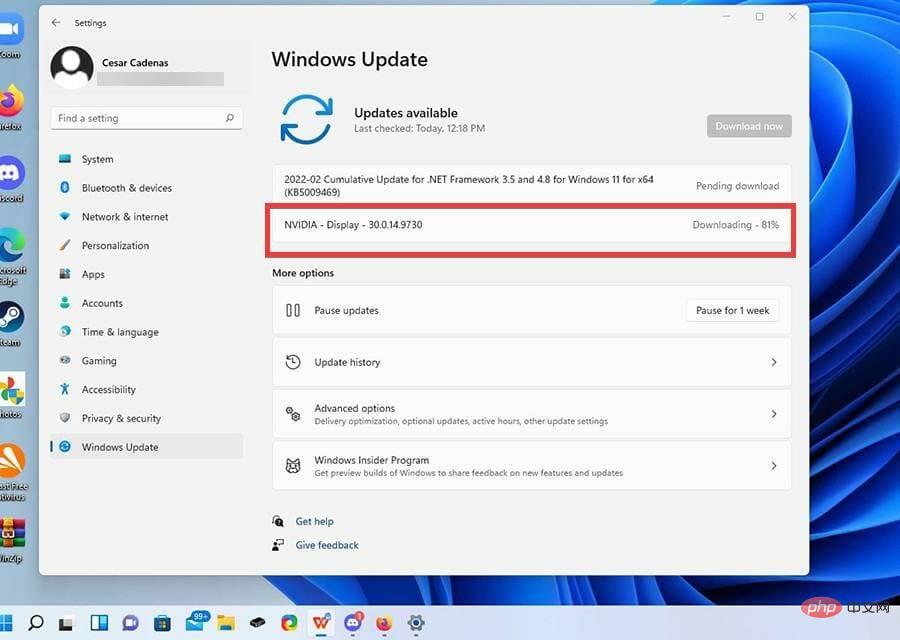
- The driver will begin downloading and complete in a few minutes.

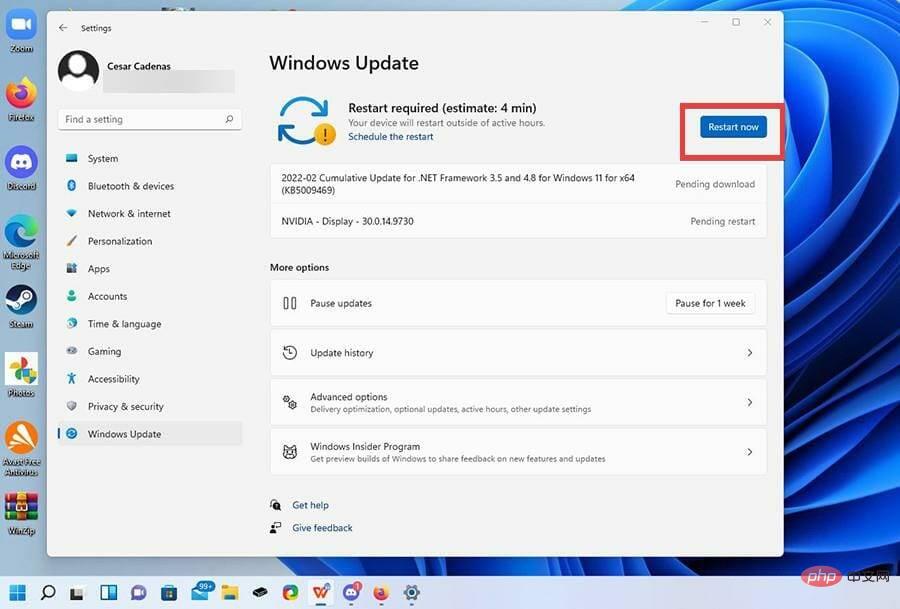
- Press the Restart now button to complete the installation.

➡ Update via Device Manager
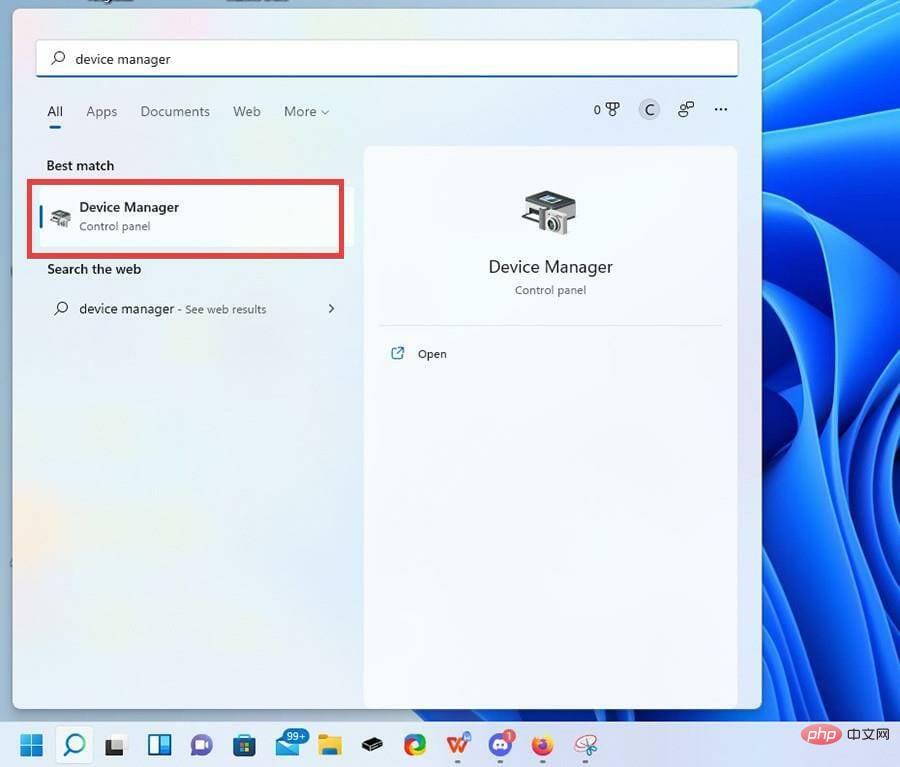
- Open the search bar and search for Device Manager.

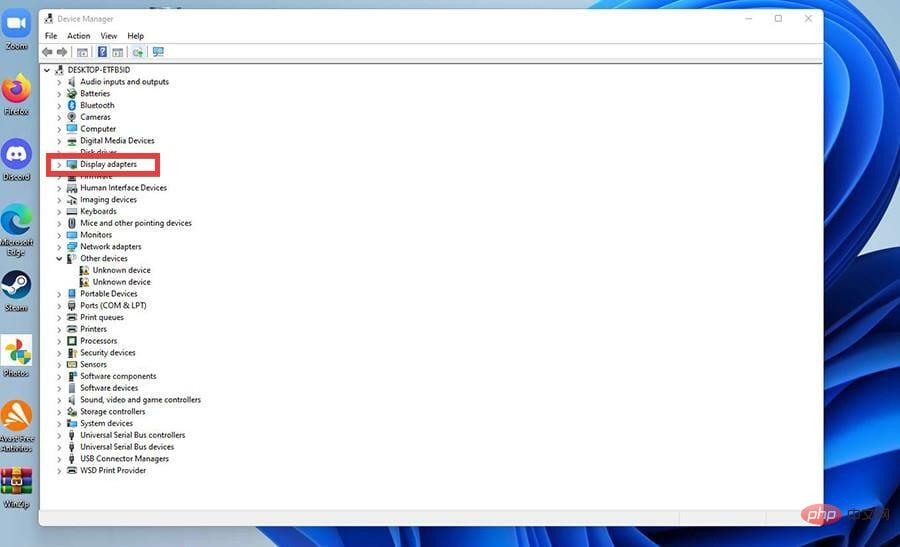
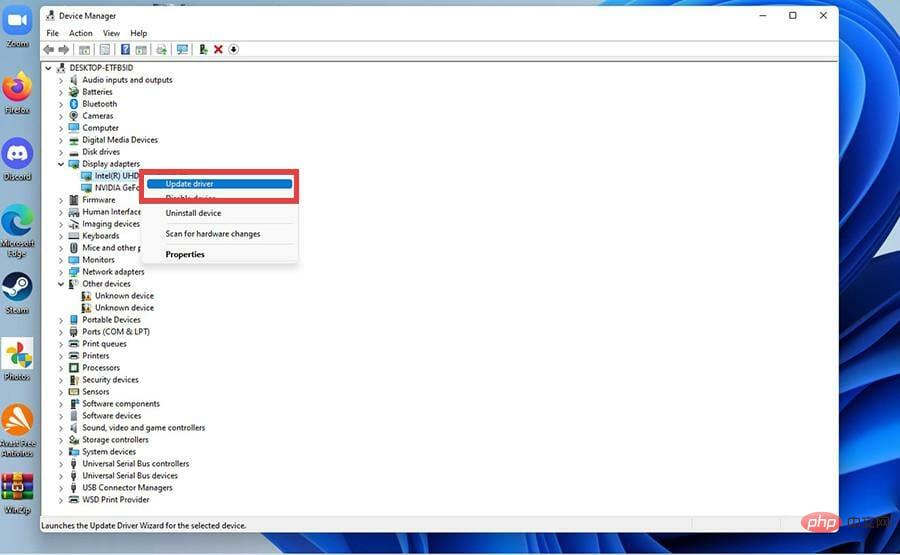
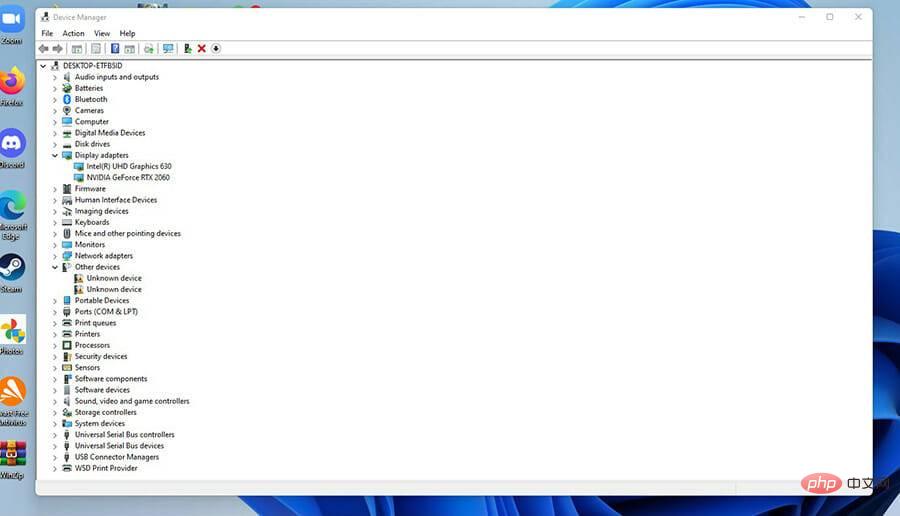
- In Device Manager, click Display Adapters.

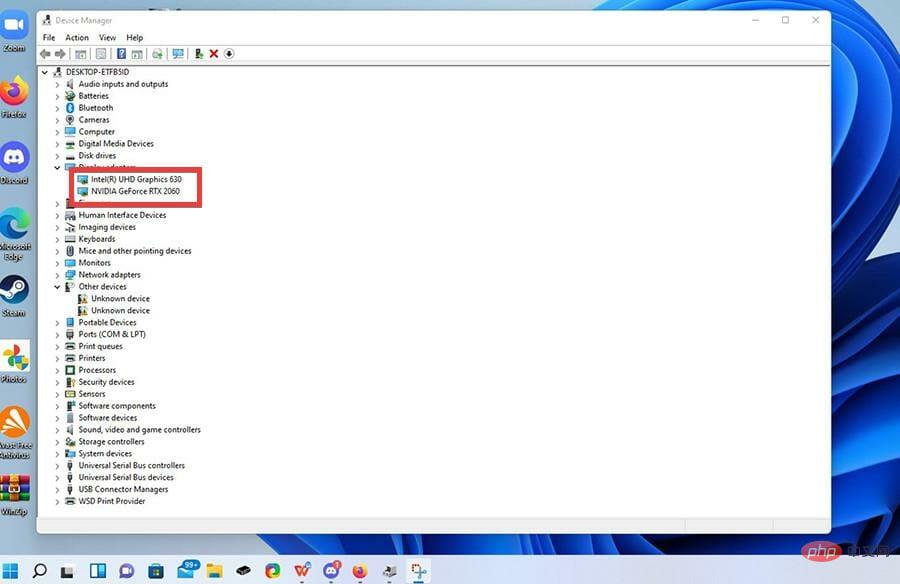
- Here you will find your Windows 11 computer’s graphics card or video card.

- To update, right-click one and select Update Driver.

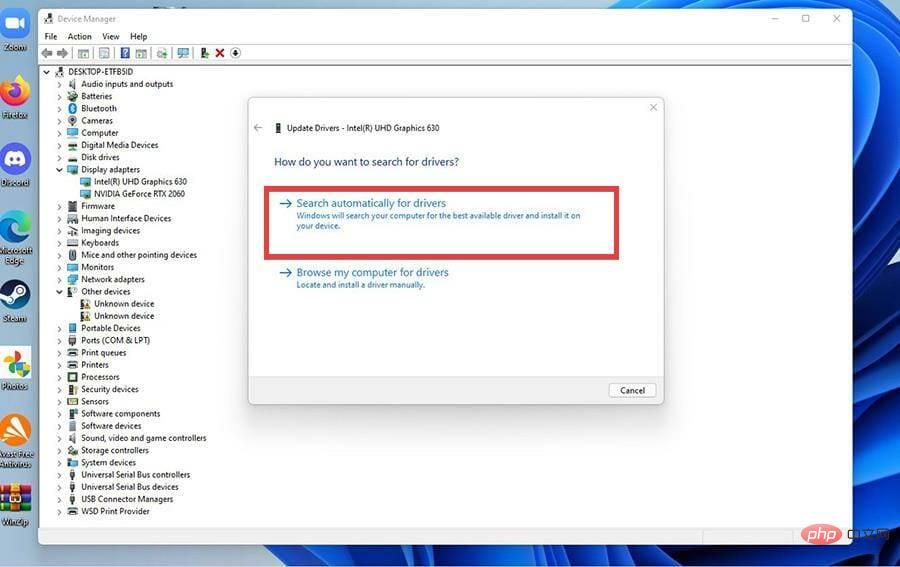
- A window will appear asking you how to search for available drivers.
- Select Automatically search for drivers to make it easy.

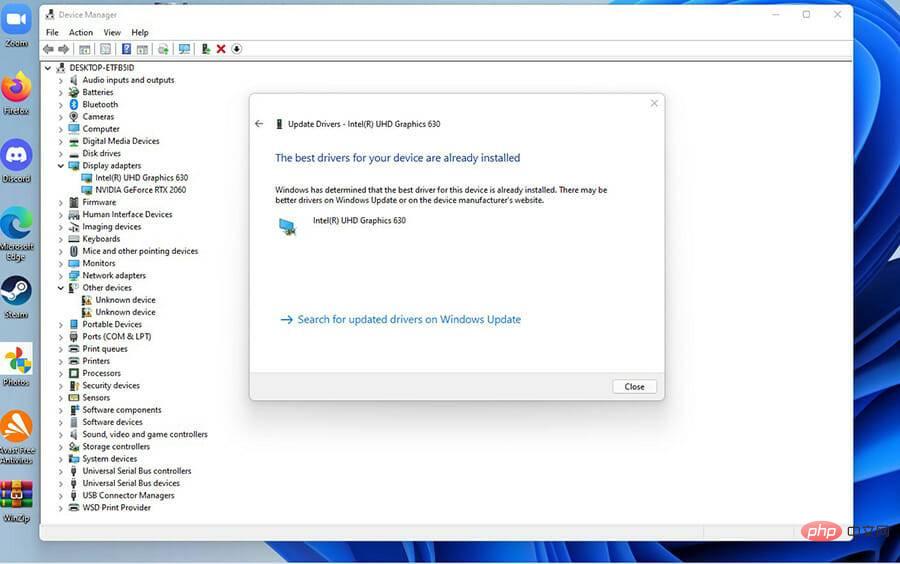
- At this point, Device Manager will automatically download and install the driver.
- This window may tell you that the best driver is already installed. In this case, just close the window.

3. Use external official tools
➡Update NVIDIA graphics driver
- In the Internet browser, Search for Nvidia GeForce Experience.

- In the GeForce Experience page, click the Download Now button.

- Click in the small window to save the file.

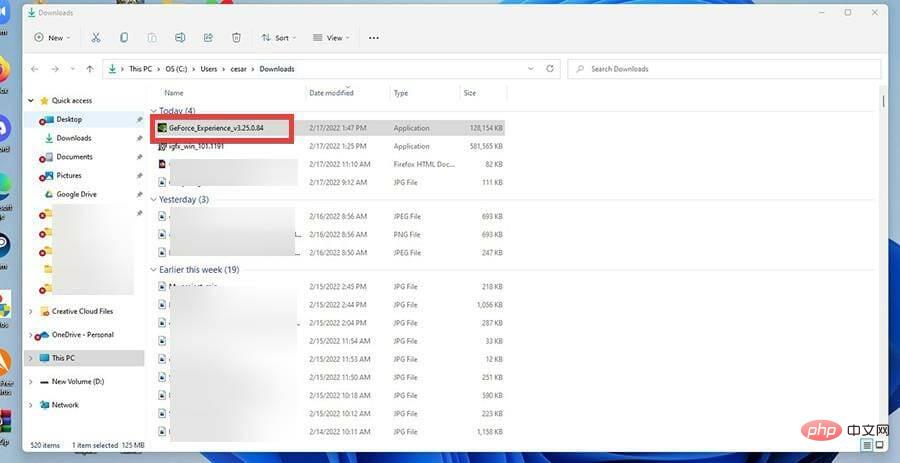
- Go to the location of the downloaded file and double-click it to install it.

- In the wizard, selectAgree and install.

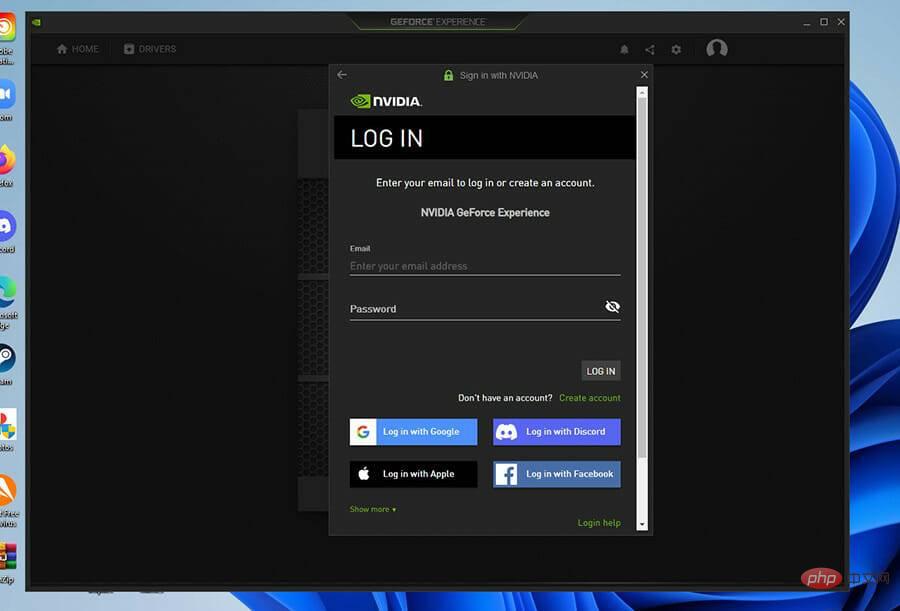
- Create an account for GeForce Experience.

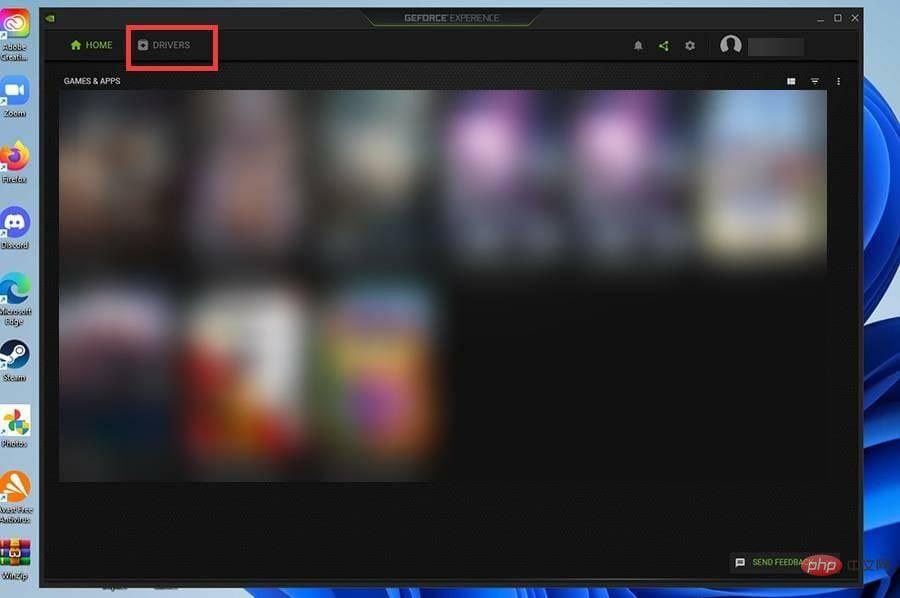
- In GeForce Experience, click Drivers at the top.

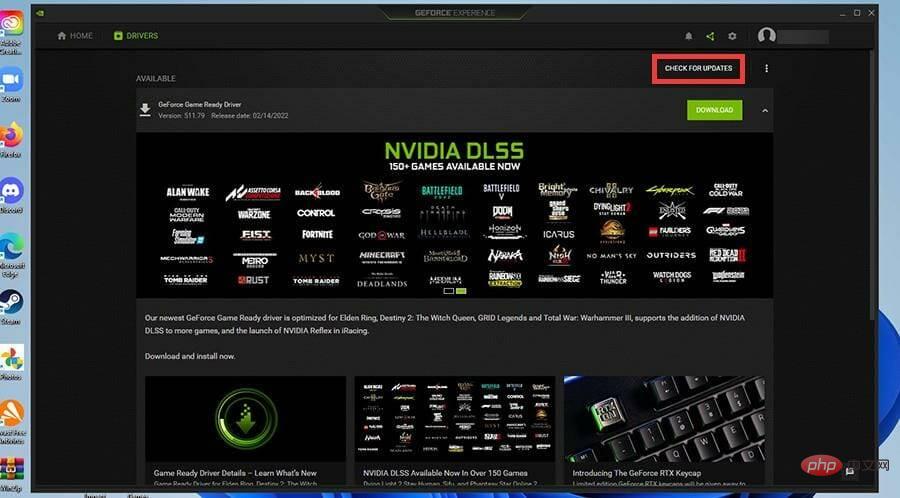
- Click the Check for Updates in the corner to see if anything is available.

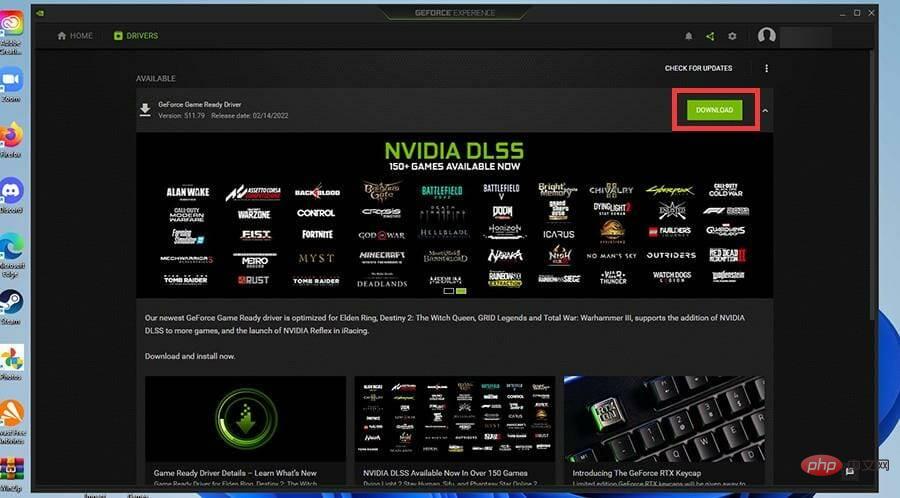
- For other drivers, click Download.

- After a while, the driver will be downloaded.

- You can click Quick Install or Custom Install.

- Installation will take a few minutes.

➡ Update Intel graphics driver
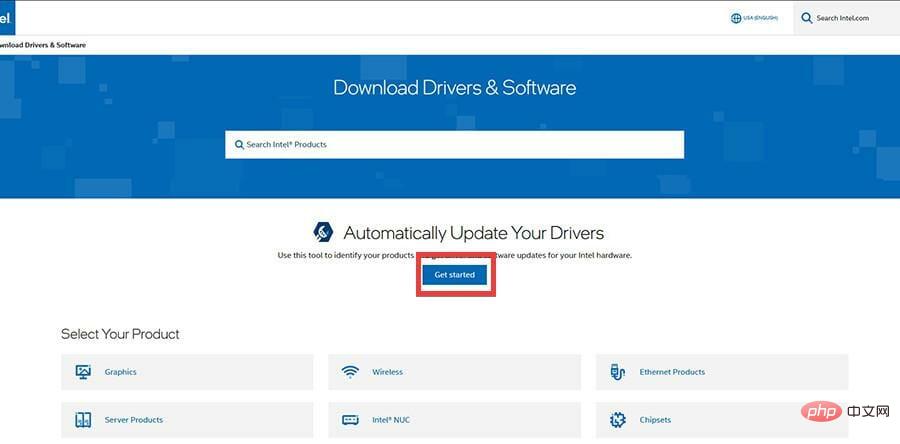
- In your Internet browser, search for Intel Graphics Driver and click on the entry that allows you to download Intel drivers and software.

- On the next page, click to get started.

- Click Download Now to download the Intel Driver and Support Assistant.

- Click in the small window that appears to save the file.

- Go to the location of the downloaded application and double-click on it.

- Click Install and run the installation wizard.

- After the installation is complete, click Restart to complete.

- Open the Intel Driver and Support Assistant application.
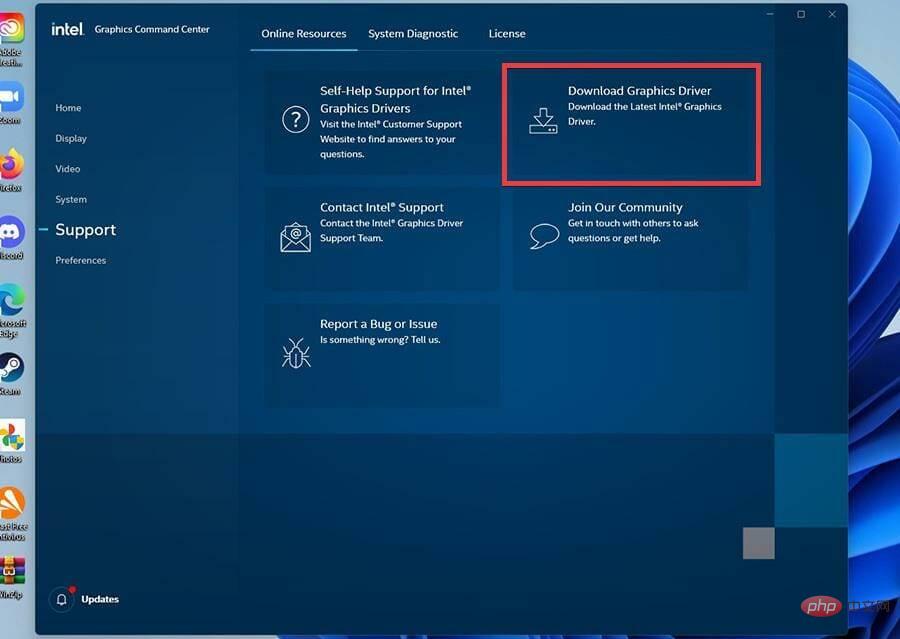
- In the application, select Support on the left.

- Select Download Graphics Driver to download the latest driver.

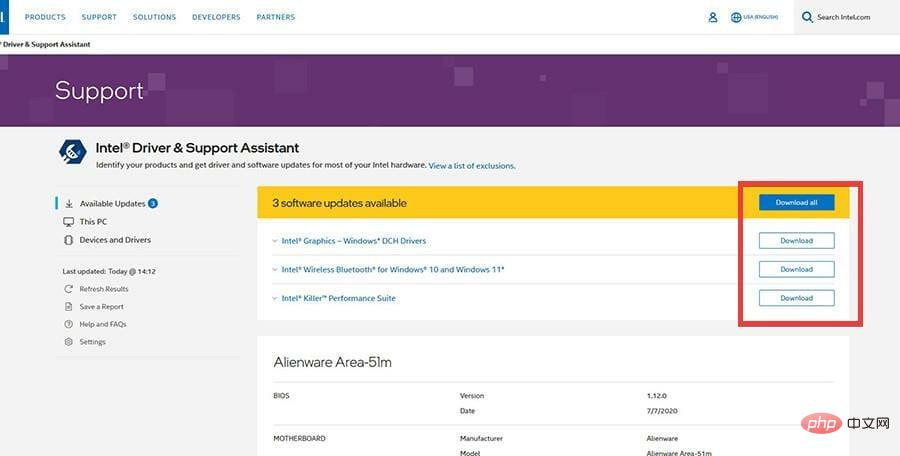
- You will be returned to the Drivers and Software page. Select ReStart.

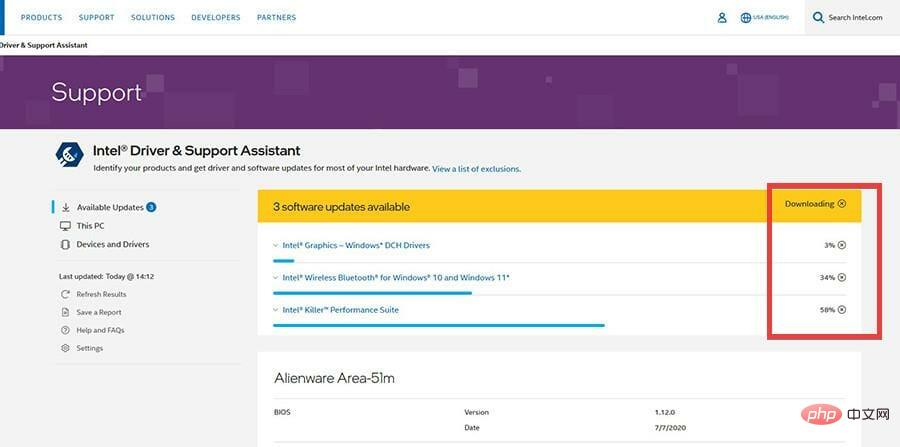
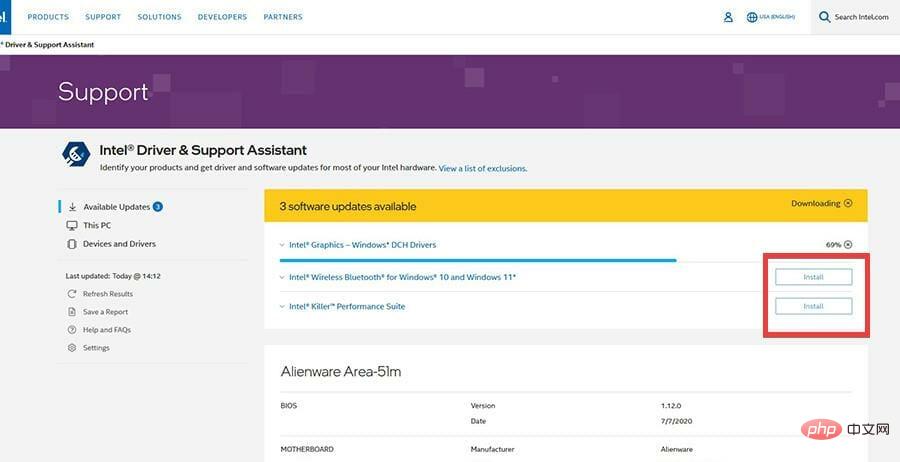
- Here you will now see all the drivers available for download. You can select the ones you want or select Download All, which is what this tutorial will select.

- Give it a few minutes to download.

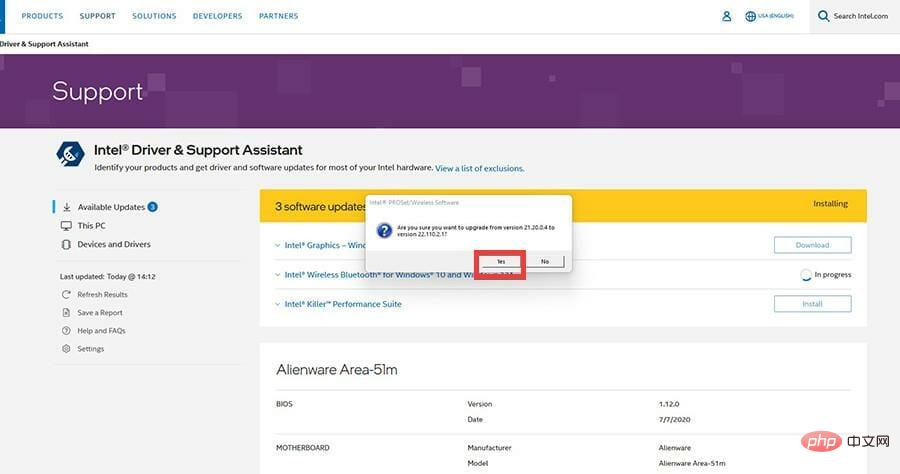
- Click Install on the driver.

- A small window will appear asking if you want to upgrade. Click Yes.

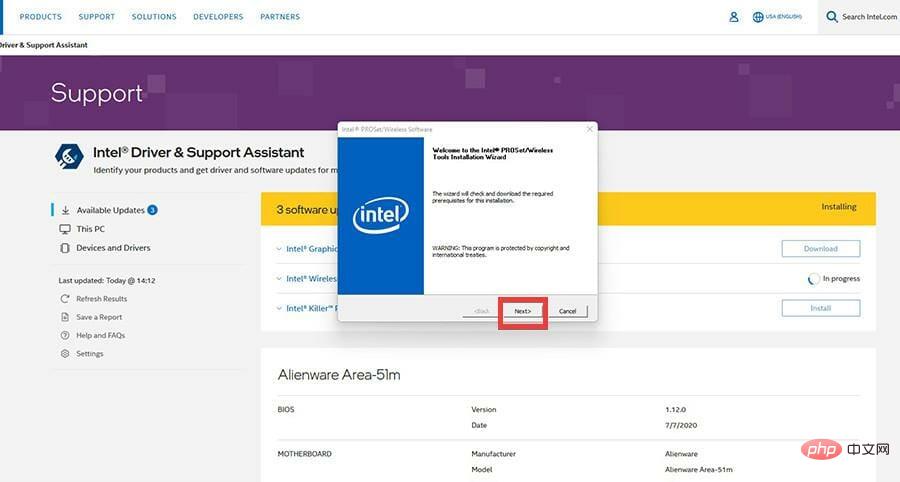
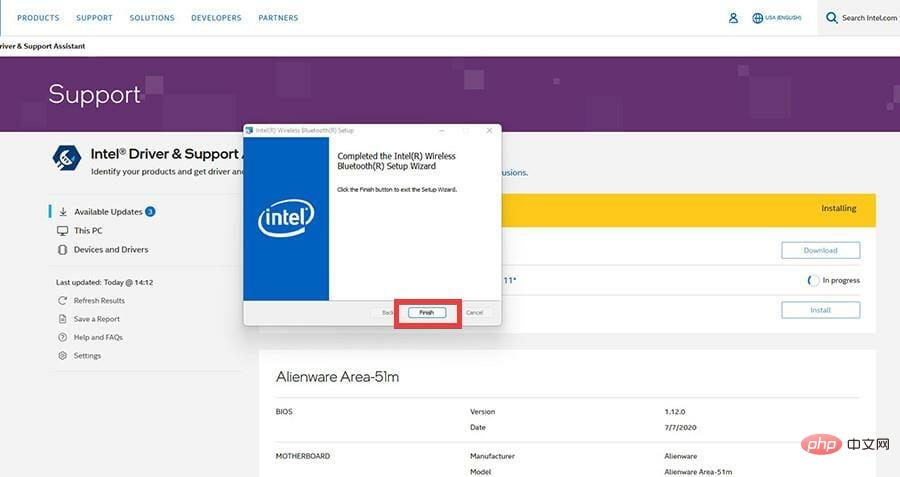
- Run the installation wizard.

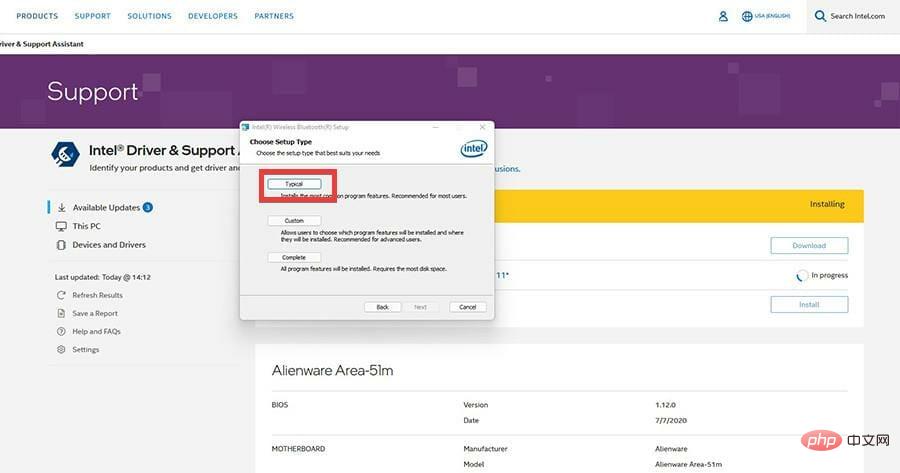
- It may ask you to select a setting type. Select Typical or you can customize the installation.

- Select Complete to complete the installation.

4. Reinstall the graphics driver
- Return to Device Manager and click Display Adapters. In this example, the tutorial reinstalls the Intel UHD Graphics 630, but the instructions are the same for all drivers.

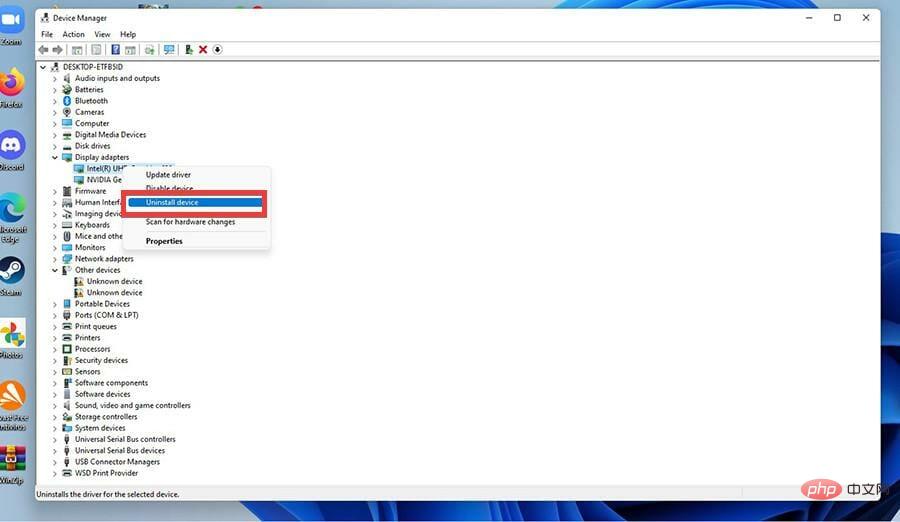
- Right-click on the graphics card and select Uninstall Device.

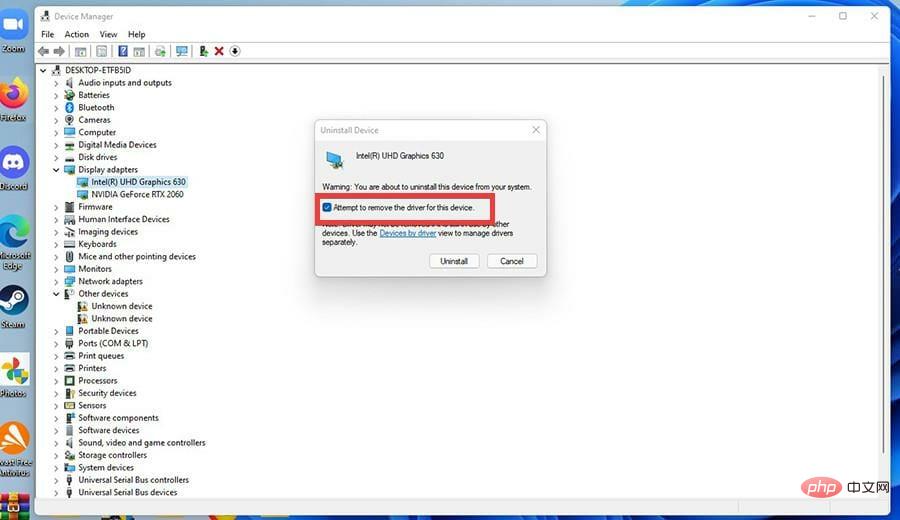
- A small window will appear. Click the box next to Try to remove the driver for this device.

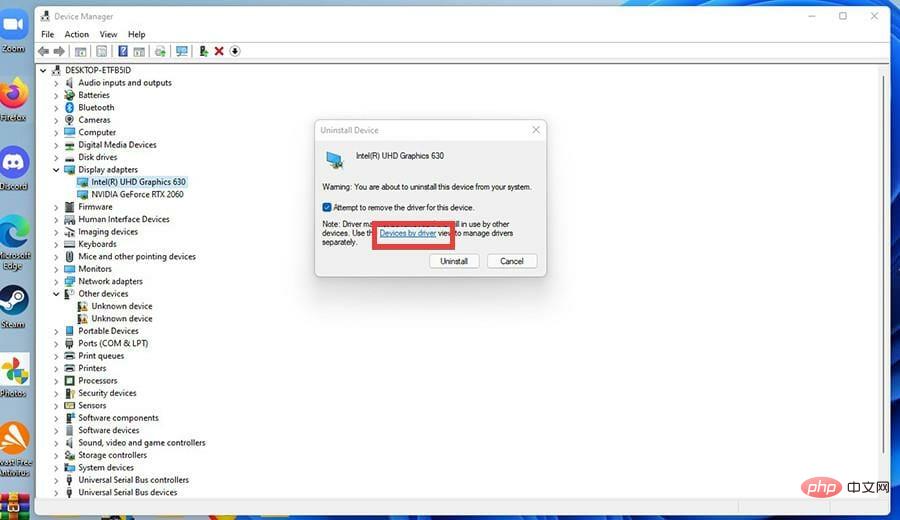
- If you want to manage drivers individually, click By Driver Device in the small window.

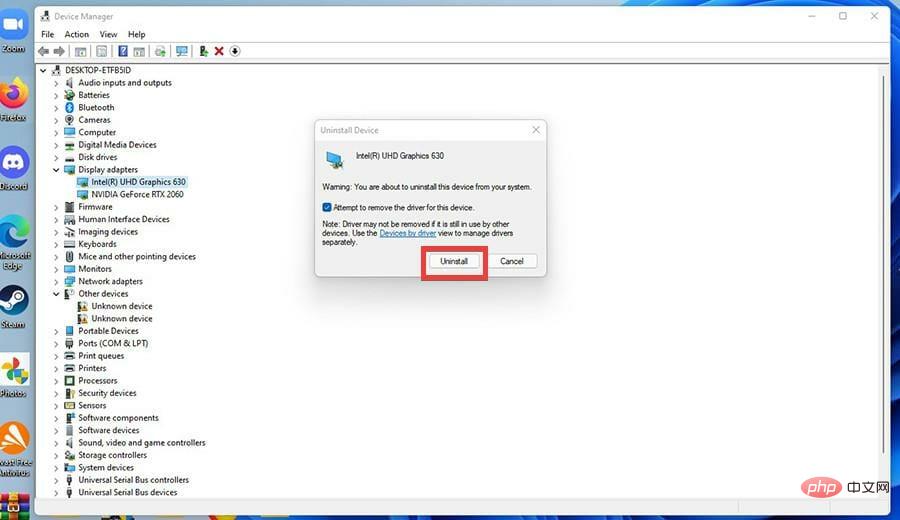
- Click the Uninstall button.

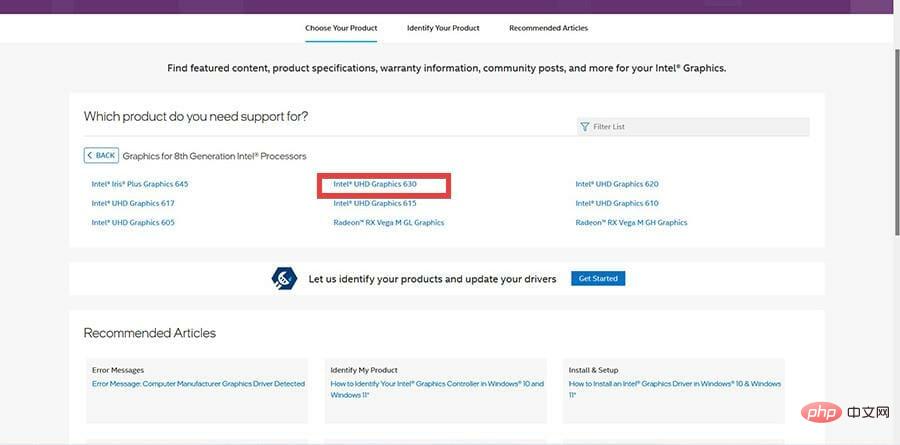
- Now head to the official download page of the driver’s respective manufacturer. This tutorial will go to Intel's page, but AMD and NVIDIA are also covered.
- Find the driver you uninstalled. In this case, it's the Intel UHD Graphics 630.

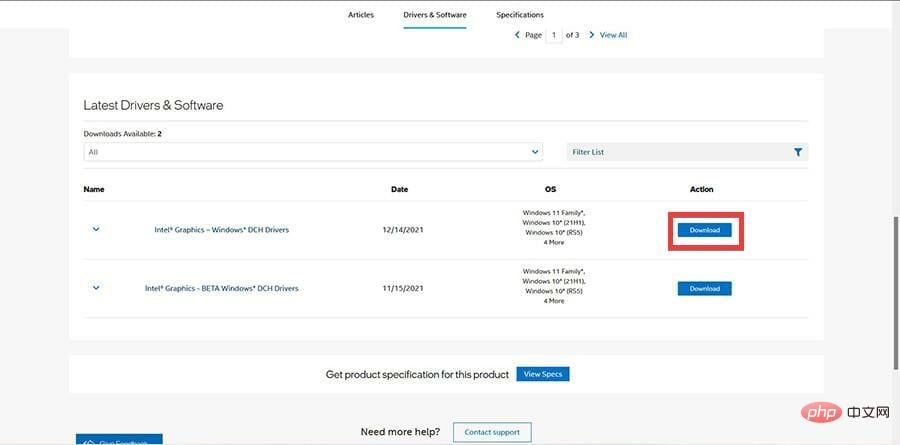
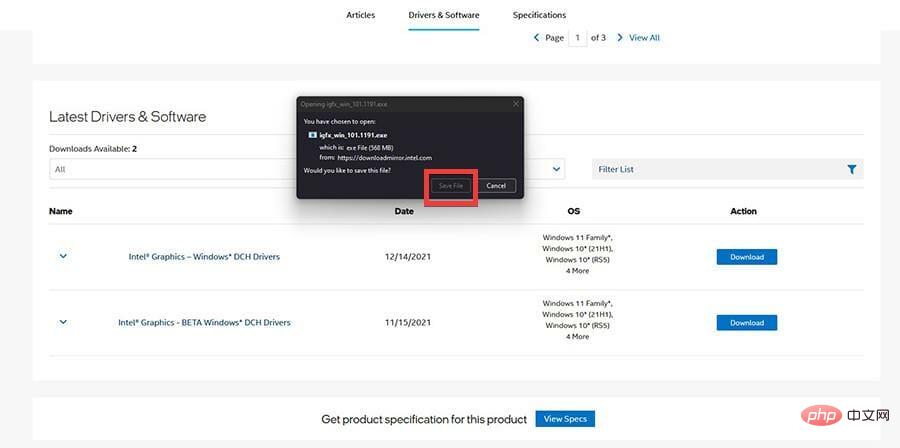
- Find the driver and click Download.

- Click when the small window appears to save the file.

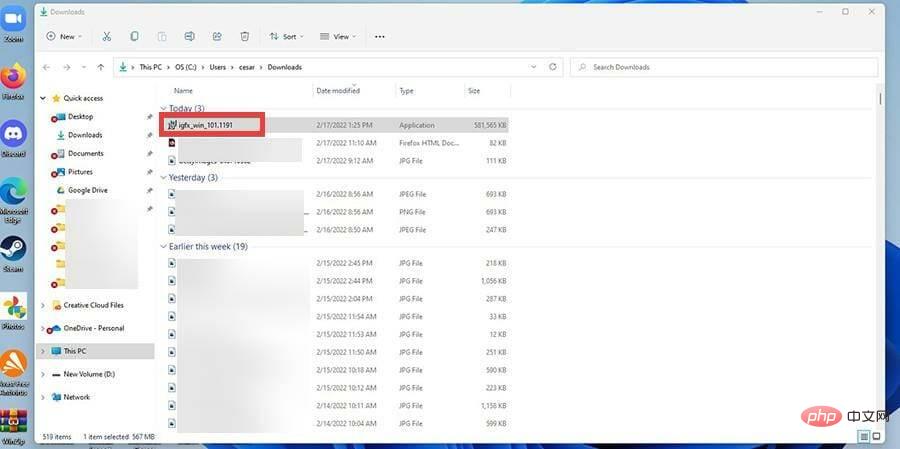
- After downloading, go to the location of the file and double-click it.

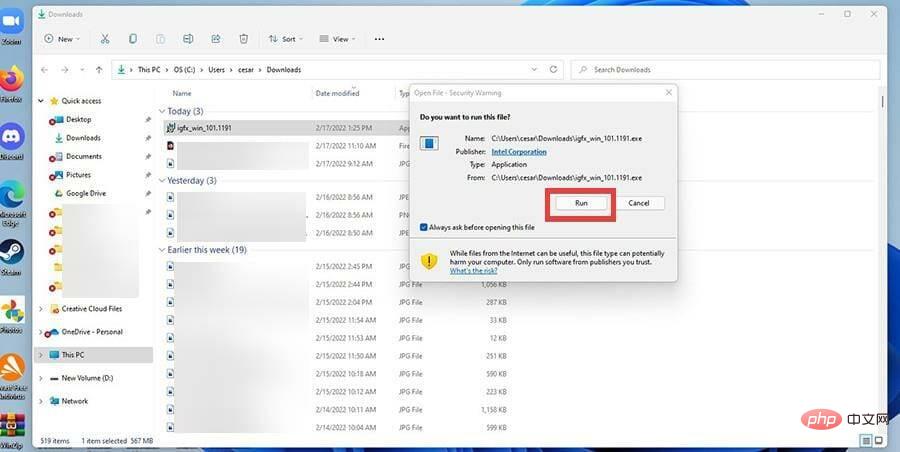
- In the small window that appears, click to run.

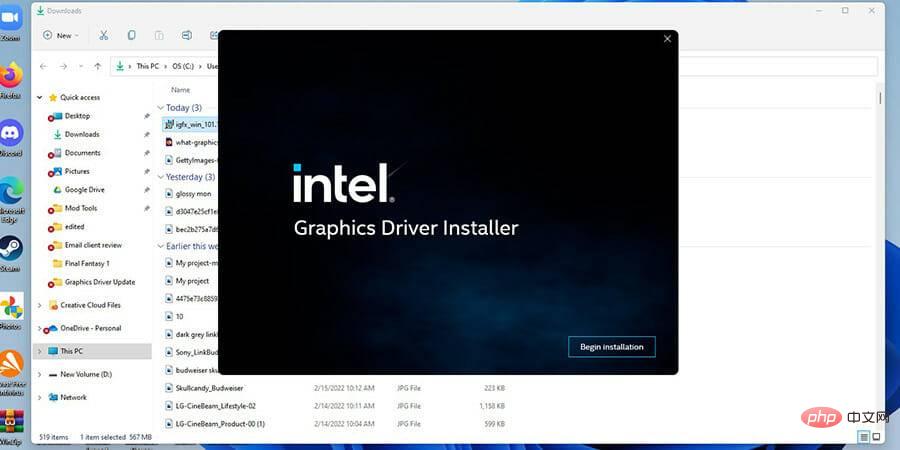
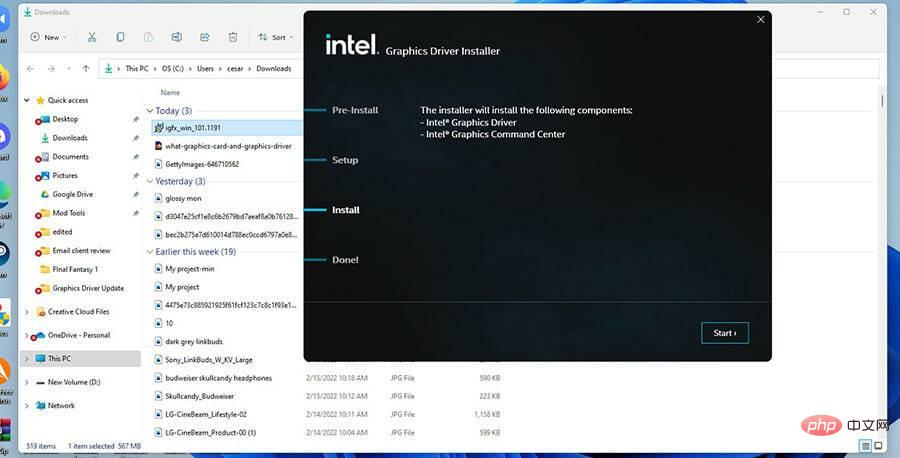
- The graphics driver installer will appear. start installation.

- Run the installation wizard and instructions for the respective drivers.

- After installation, restart your computer.
- You can return to the device manager to check whether the installation is successful.
The above is the detailed content of How to update graphics drivers on a Windows 11 computer. For more information, please follow other related articles on the PHP Chinese website!

Hot AI Tools

Undresser.AI Undress
AI-powered app for creating realistic nude photos

AI Clothes Remover
Online AI tool for removing clothes from photos.

Undress AI Tool
Undress images for free

Clothoff.io
AI clothes remover

Video Face Swap
Swap faces in any video effortlessly with our completely free AI face swap tool!

Hot Article

Hot Tools

Notepad++7.3.1
Easy-to-use and free code editor

SublimeText3 Chinese version
Chinese version, very easy to use

Zend Studio 13.0.1
Powerful PHP integrated development environment

Dreamweaver CS6
Visual web development tools

SublimeText3 Mac version
God-level code editing software (SublimeText3)

Hot Topics
 1386
1386
 52
52
 How to convert XML to PDF on your phone?
Apr 02, 2025 pm 10:18 PM
It is not easy to convert XML to PDF directly on your phone, but it can be achieved with the help of cloud services. It is recommended to use a lightweight mobile app to upload XML files and receive generated PDFs, and convert them with cloud APIs. Cloud APIs use serverless computing services, and choosing the right platform is crucial. Complexity, error handling, security, and optimization strategies need to be considered when handling XML parsing and PDF generation. The entire process requires the front-end app and the back-end API to work together, and it requires some understanding of a variety of technologies.
 What is the reason why PS keeps showing loading?
Apr 06, 2025 pm 06:39 PM
PS "Loading" problems are caused by resource access or processing problems: hard disk reading speed is slow or bad: Use CrystalDiskInfo to check the hard disk health and replace the problematic hard disk. Insufficient memory: Upgrade memory to meet PS's needs for high-resolution images and complex layer processing. Graphics card drivers are outdated or corrupted: Update the drivers to optimize communication between the PS and the graphics card. File paths are too long or file names have special characters: use short paths and avoid special characters. PS's own problem: Reinstall or repair the PS installer.
 xml online formatting
Apr 02, 2025 pm 10:06 PM
XML Online Format Tools automatically organizes messy XML code into easy-to-read and maintain formats. By parsing the syntax tree of XML and applying formatting rules, these tools optimize the structure of the code, enhancing its maintainability and teamwork efficiency.
 How to solve the problem of loading when PS is always showing that it is loading?
Apr 06, 2025 pm 06:30 PM
PS card is "Loading"? Solutions include: checking the computer configuration (memory, hard disk, processor), cleaning hard disk fragmentation, updating the graphics card driver, adjusting PS settings, reinstalling PS, and developing good programming habits.
 How to speed up the loading speed of PS?
Apr 06, 2025 pm 06:27 PM
Solving the problem of slow Photoshop startup requires a multi-pronged approach, including: upgrading hardware (memory, solid-state drive, CPU); uninstalling outdated or incompatible plug-ins; cleaning up system garbage and excessive background programs regularly; closing irrelevant programs with caution; avoiding opening a large number of files during startup.
 Does H5 page production require continuous maintenance?
Apr 05, 2025 pm 11:27 PM
The H5 page needs to be maintained continuously, because of factors such as code vulnerabilities, browser compatibility, performance optimization, security updates and user experience improvements. Effective maintenance methods include establishing a complete testing system, using version control tools, regularly monitoring page performance, collecting user feedback and formulating maintenance plans.
 The XML file is too large, can I convert PDFs on my phone?
Apr 02, 2025 pm 09:54 PM
It is difficult to directly convert super large XML to PDF on mobile phones. It is recommended to adopt a partition strategy: cloud conversion: upload to the cloud platform and processed by the server. It is efficient and stable but requires network and possible payment; segmented processing: Use programming tools to split large XML into small files and convert them one by one, requiring programming capabilities; find conversion tools that specialize in processing large files, pay attention to checking user reviews to avoid choosing software that is prone to crash.
 How to solve the problem of loading when the PS opens the file?
Apr 06, 2025 pm 06:33 PM
"Loading" stuttering occurs when opening a file on PS. The reasons may include: too large or corrupted file, insufficient memory, slow hard disk speed, graphics card driver problems, PS version or plug-in conflicts. The solutions are: check file size and integrity, increase memory, upgrade hard disk, update graphics card driver, uninstall or disable suspicious plug-ins, and reinstall PS. This problem can be effectively solved by gradually checking and making good use of PS performance settings and developing good file management habits.


