

How to temporarily/permanently rotate PDF in Google Drive

When you scan a PDF document and upload it to your Google Drive, there is a very high chance that the PDF is in an upside-down orientation or in a right-to-left orientation. Of course, reading documents that aren't in an upright position is a pain. Sometimes you just need to look at a document temporarily, close it and walk away. Sometimes, you need to permanently correct the orientation of a PDF so that you can save yourself the trouble of correcting its orientation again in the future. Well, you finally have the last laugh, we’ve got the perfect solution for your needs.
In this article, we explain in detail how to easily temporarily and permanently correct the orientation of a PDF in Google Drive. Hope you like it!

Bonus Cookie: You can open any PDF in Google Chrome and correct it as detailed in Section 1 its direction. After correcting the orientation, you can successfully save the orientation-corrected PDF to your machine by following the steps detailed in Section 2. PDF doesn’t have to be in Google Drive itself for this trick to work.
Part 1: How to Temporarily Rotate PDF in Google Drive
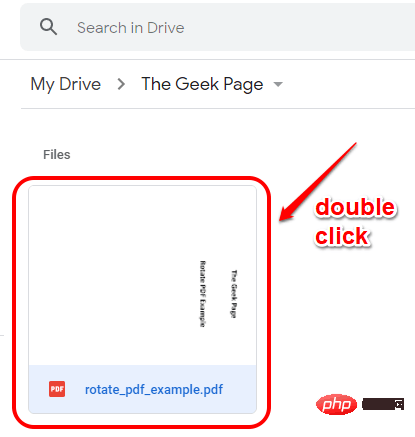
Step 1: Open Google Drive via your favorite browser. After logging in, navigate to the pdf that requires orientation correction.
Start by double-clicking on the PDF to open it on the browser itself.
Step 2: In the upper right corner of the page, find and click the "Print" icon .

Step 3: Next, click the "Rotate Counterclockwise" button and correct the orientation of the PDF.

If your browser does not have a rotate counterclockwise button, then you can right click PDFAnywhere on the empty area and click the Rotate clockwise or Rotate counterclockwise button, depending on your preference.

Step 4: Tada, you have successfully corrected the orientation of your PDF in Google Drive.
But wait, this is only temporary. This change will disappear if you refresh the page or close the tab. If you want to permanently change the orientation of your PDF, you can follow the steps detailed in Section 2.

Part 2: How to Permanently Rotate PDF in Google Drive
To permanently change the orientation of a PDF in Google Drive, first, you need to follow Section1 steps detailed in # and temporarily change its direction. That's it, we'll take it from there.
Step 1: After obtaining the PDF in the correct orientation, click "Print in the upper right corner of the window again "icon.

Step 2: Don't worry about the orientation of the PDF here, just select# from the "Destination" dropdown menu ##Microsoft Print to PDF option, then click the "Print" button at the bottom.
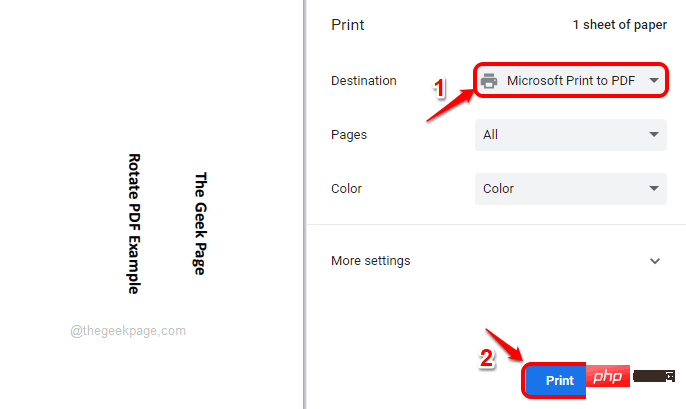
Step 3: In the "Save printout as" window, navigate to Your preferred position, give the rotated PDF a new name (you can even use the old name), and click the "Save" button.

Step 4: That’s it. You now have the orientation-corrected PDF stored locally on your computer. Next, let's upload it to your Drive.
To do this, return to Google Drive and click theNew button in the left pane.

Step 5: Next, click on the File Upload option.

Step 6:Navigate to the location where save the rotated PDF and click on it. After that, click on the "Open" button.

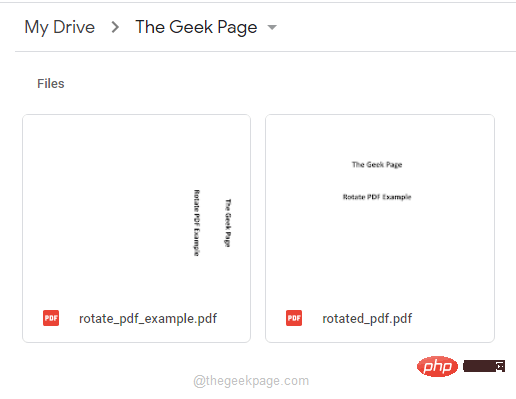
Step 7: That’s it. You have now uploaded the rotated PDF to your Google Drive. From the preview itself, you can see that the orientation of the PDF is now corrected.
NOTE: If you wish, you can now delete old PDFs from Google Drive by just right-clickingold PDF file and click the Delete option from the expanded right-click context menu.
The above is the detailed content of How to temporarily/permanently rotate PDF in Google Drive. For more information, please follow other related articles on the PHP Chinese website!

Hot AI Tools

Undresser.AI Undress
AI-powered app for creating realistic nude photos

AI Clothes Remover
Online AI tool for removing clothes from photos.

Undress AI Tool
Undress images for free

Clothoff.io
AI clothes remover

Video Face Swap
Swap faces in any video effortlessly with our completely free AI face swap tool!

Hot Article
Hot Tools

Notepad++7.3.1
Easy-to-use and free code editor

SublimeText3 Chinese version
Chinese version, very easy to use

Zend Studio 13.0.1
Powerful PHP integrated development environment

Dreamweaver CS6
Visual web development tools

SublimeText3 Mac version
God-level code editing software (SublimeText3)
Hot Topics
 1386
1386
 52
52

 How to embed a PDF document in an Excel worksheet
May 28, 2023 am 09:17 AM
How to embed a PDF document in an Excel worksheet
May 28, 2023 am 09:17 AM
It is usually necessary to insert PDF documents into Excel worksheets. Just like a company's project list, we can instantly append text and character data to Excel cells. But what if you want to attach the solution design for a specific project to its corresponding data row? Well, people often stop and think. Sometimes thinking doesn't work either because the solution isn't simple. Dig deeper into this article to learn how to easily insert multiple PDF documents into an Excel worksheet, along with very specific rows of data. Example Scenario In the example shown in this article, we have a column called ProductCategory that lists a project name in each cell. Another column ProductSpeci
 How to merge PDFs on iPhone
Feb 02, 2024 pm 04:05 PM
How to merge PDFs on iPhone
Feb 02, 2024 pm 04:05 PM
When working with multiple documents or multiple pages of the same document, you may want to combine them into a single file to share with others. For easy sharing, Apple allows you to merge multiple PDF files into one file to avoid sending multiple files. In this post, we will help you know all the ways to merge two or more PDFs into one PDF file on iPhone. How to Merge PDFs on iPhone On iOS, you can merge PDF files into one in two ways – using the Files app and the Shortcuts app. Method 1: Using Files App The easiest way to merge two or more PDFs into one file is to use the Files app. Open on iPhone
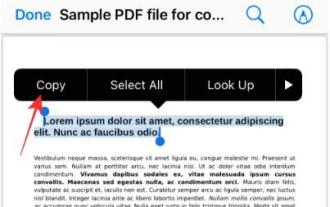 3 Ways to Get Text from PDF on iPhone
Mar 16, 2024 pm 09:20 PM
3 Ways to Get Text from PDF on iPhone
Mar 16, 2024 pm 09:20 PM
Apple's Live Text feature recognizes text, handwritten notes and numbers in photos or through the Camera app and allows you to paste that information onto any other app. But what to do when you're working with a PDF and want to extract text from it? In this post, we will explain all the ways to extract text from PDF files on iPhone. How to Get Text from PDF File on iPhone [3 Methods] Method 1: Drag Text on PDF The easiest way to extract text from PDF is to copy it, just like on any other app with text . 1. Open the PDF file you want to extract text from, then long press anywhere on the PDF and start dragging the part of the text you want to copy. 2
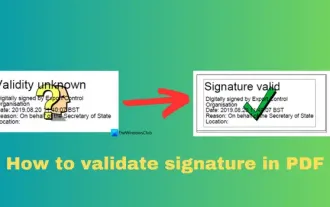 How to verify signature in PDF
Feb 18, 2024 pm 05:33 PM
How to verify signature in PDF
Feb 18, 2024 pm 05:33 PM
We usually receive PDF files from the government or other agencies, some with digital signatures. After verifying the signature, we see the SignatureValid message and a green check mark. If the signature is not verified, the validity is unknown. Verifying signatures is important, let’s see how to do it in PDF. How to Verify Signatures in PDF Verifying signatures in PDF format makes it more trustworthy and the document more likely to be accepted. You can verify signatures in PDF documents in the following ways. Open the PDF in Adobe Reader Right-click the signature and select Show Signature Properties Click the Show Signer Certificate button Add the signature to the Trusted Certificates list from the Trust tab Click Verify Signature to complete the verification Let
 How to process PDF files using PHP
Jun 19, 2023 pm 02:41 PM
How to process PDF files using PHP
Jun 19, 2023 pm 02:41 PM
As a universal file format, PDF files are widely used in various application scenarios, such as e-books, reports, contracts, etc. During the development process, we often need to generate, edit, read and other operations on PDF files. As a scripting language, PHP can also easily complete these tasks. This article will introduce how to use PHP to process PDF files. 1. Generate PDF files There are many ways to generate PDF files, the most common of which is to use the PDF library. PDF library is a tool that generates PDF documents for
 How to convert pdg files to pdf
Nov 14, 2023 am 10:41 AM
How to convert pdg files to pdf
Nov 14, 2023 am 10:41 AM
Methods include: 1. Use professional document conversion tools; 2. Use online conversion tools; 3. Use virtual printers.
 How to import and annotate PDFs in Apple Notes
Oct 13, 2023 am 08:05 AM
How to import and annotate PDFs in Apple Notes
Oct 13, 2023 am 08:05 AM
In iOS 17 and MacOS Sonoma, Apple added the ability to open and annotate PDFs directly in the Notes app. Read on to find out how it's done. In the latest versions of iOS and macOS, Apple has updated the Notes app to support inline PDFs, which means you can insert PDFs into Notes and then read, annotate, and collaborate on the document. This feature also works with scanned documents and is available on both iPhone and iPad. Annotate a PDF in Notes on iPhone and iPad If you're using an iPhone and want to annotate a PDF in Notes, the first thing to do is select the PDF file
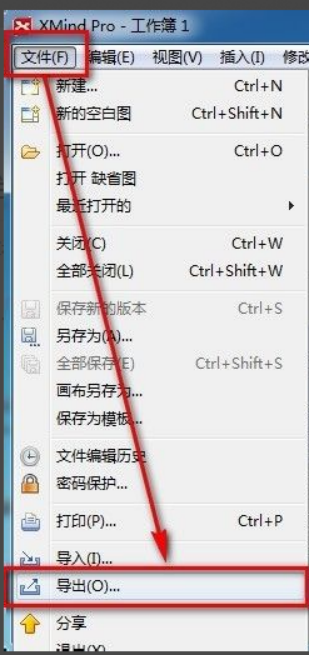 How to export xmind files to pdf files
Mar 20, 2024 am 10:30 AM
How to export xmind files to pdf files
Mar 20, 2024 am 10:30 AM
xmind is a very practical mind mapping software. It is a map form made using people's thinking and inspiration. After we create the xmind file, we usually convert it into a pdf file format to facilitate everyone's dissemination and use. Then How to export xmind files to pdf files? Below are the specific steps for your reference. 1. First, let’s demonstrate how to export the mind map to a PDF document. Select the [File]-[Export] function button. 2. Select [PDF document] in the newly appeared interface and click the [Next] button. 3. Select settings in the export interface: paper size, orientation, resolution and document storage location. After completing the settings, click the [Finish] button. 4. If you click the [Finish] button