How to add music to a Microsoft PowerPoint presentation
PowerPoint presentations can be boring. But what if you could add some custom music to your slideshows to make them more interesting? You can add specific music to specific slides, or you can play a music collection on all slides, your choice. Whatever your requirement may be, if it involves adding music to your PowerPoint slides, this article is the best to meet all your needs and answer all your queries.
Keep reading to learn everything you need to know about adding music to PowerPoint slides, editing added music, and more. Hope you enjoy reading!
Solution
Step 1: First Launch the PowerPoint presentation to which you want to add music.
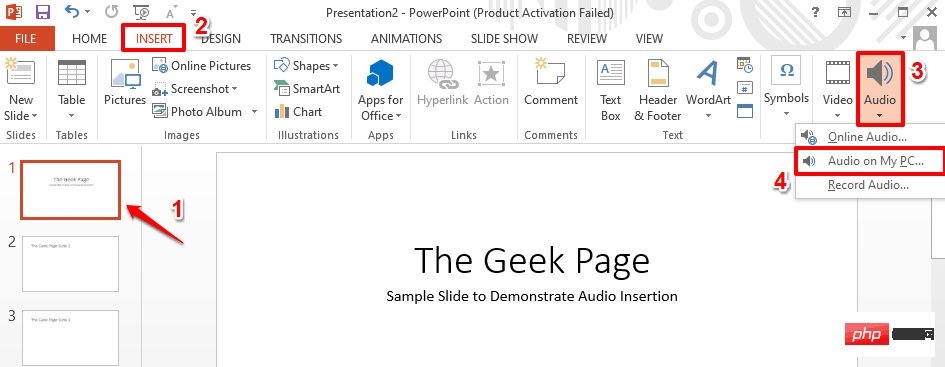
Next,click the slideshow where you want to add music. Then click the Insert tab on the top ribbon and then click the Audio drop-down button and select the option of your choice to insert music.
If you want to search for music online, click on theOnline Audio option. Otherwise, if you want to record your own audio using the microphone, click the "Record Audio" option, or if you already have music on your machine and want to use it, click "My Audio on PC" option. I already had audio in my machine, so I clicked on the Audio on my computer option.
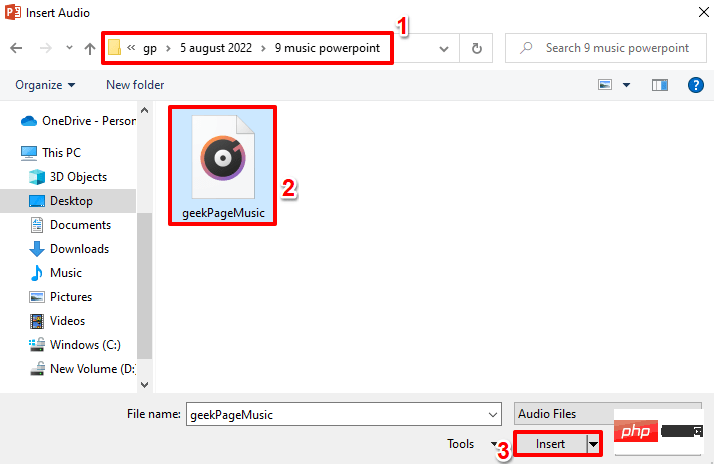
Step 2: When the "Insert Audio" window opens, navigate to your Where the audio file is located, click it to select it, then click the "Insert" button at the bottom of the window.
Note: If you want to add different music to different slides, you can do it by repeating the same steps above. First, select your slideshow and then insert music. Also, keep Step 6 - Point 2 in mind when you add multiple music files to your PowerPoint presentation.
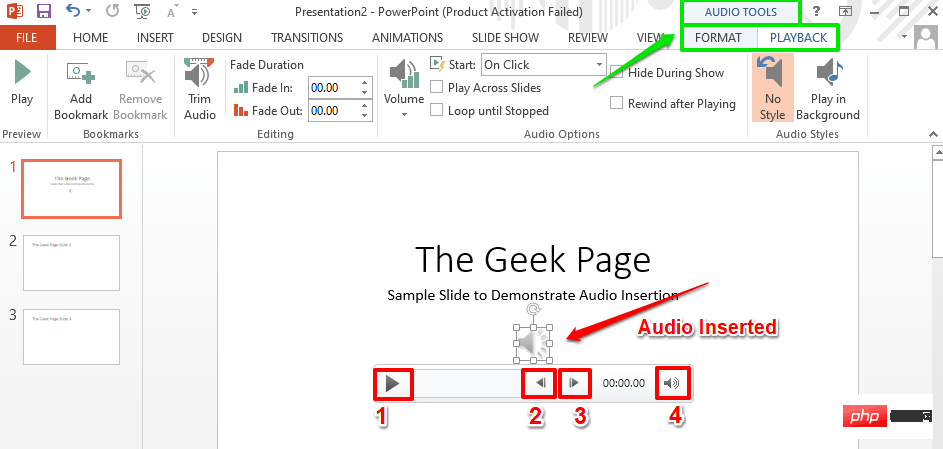
Step 3: You can now see that an audio icon has been added to your slide. If you click on it, you will be able to see the contextual tab for audio at the top of the window, i.e. AUDIO TOOLS, marked green in the screenshot below. AUDIO TOOLS The contextual tab will have 2 sub-tabs named FORMAT and PLAYBACK.
Now let's explore some quick audio controls. These are numbered in red in the screenshot below. Each numbered section is detailed in the following points.- Play button is the button used to play music. Using the
- Rewind button you can rewind your music. Apparently, you can fast forward the music using the
- Forward button.
- Volume icon can be used to increase or decrease the volume of the music.
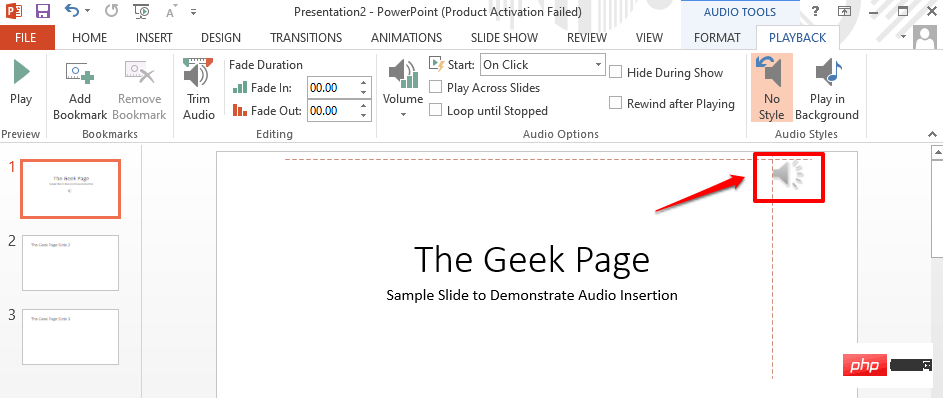
Step 4: You just click and drag the audio icon to move it anywhere within the slide. In the screenshot below, I've moved the icon to the upper right corner of the slide.
Step 5: Now, let’s explore some advanced audio control options. To do this, click on the Audioicon again. This time, from the top ribbon, click on the contextual tab named PLAYBACK.
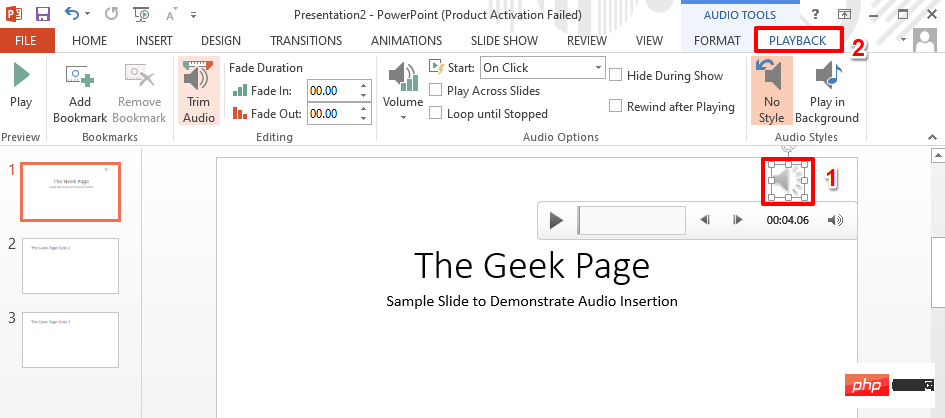
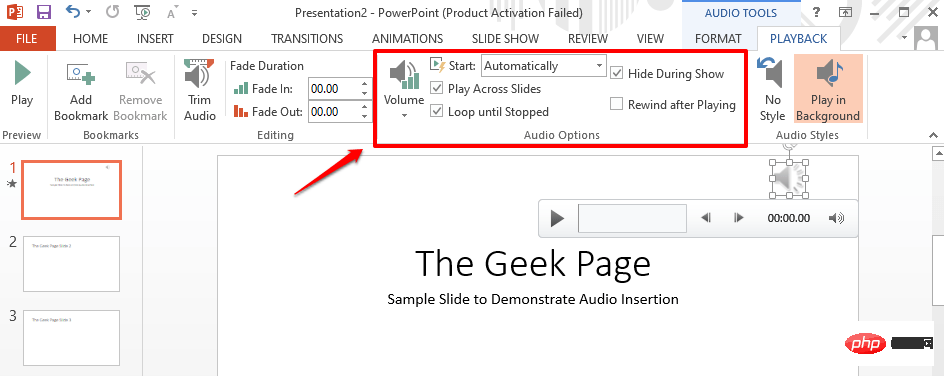
Step 6: Under the PLAYBACK tab, there will be an option called Audio Options group. Let's look at what each feature in the Audio Options group does.
- Start drop-down menu: If you click this drop-down menu, you can choose between the click and auto options. The click option will play your music on a click event when you run the slideshow. However, the Automatic option will play the song automatically without any trigger.
- Play across slides Checkbox: If you need to play music for all slides, you need to tick this checkbox. If you want the music to play only on the slide where the audio is inserted, you need to uncheck the "Play across slides" checkbox.
- Loop until stopped Checkbox: If this checkbox is checked, when your music finishes playing, it will automatically restart and loop until the slideshow stops.
- Hide during show checkbox: If you do not want the audio icon to appear on the slide while the presentation is in progress, then you need Check this checkbox.
- Rewind after playback Checkbox: If you want the audio to rewind after playback is complete, you need to make sure this checkbox is selected.
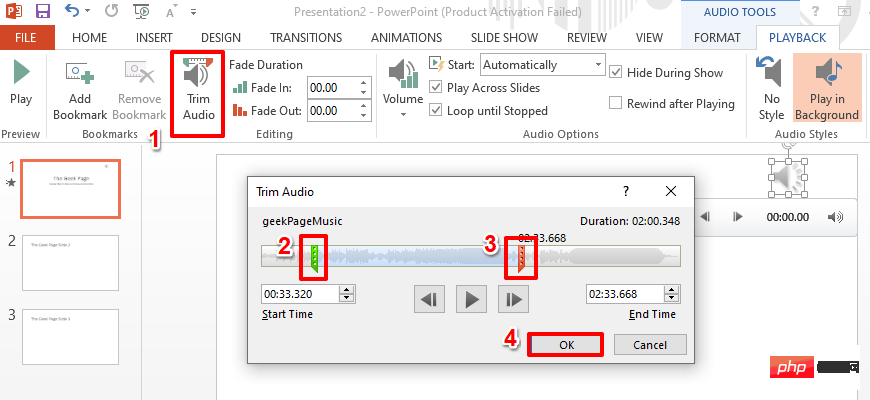
Step 7: Now, let’s see how to easily trim the inserted audio.
To do this, under the PLAYBACK tab, look for the group named Editing. Next click the "Trim Audio" button.
When the Trim Audio window pops up, you can drag the Start Slider (green) and End Slider(red) to adjust The beginning and end of music.
After completion, click the OK button to continue.
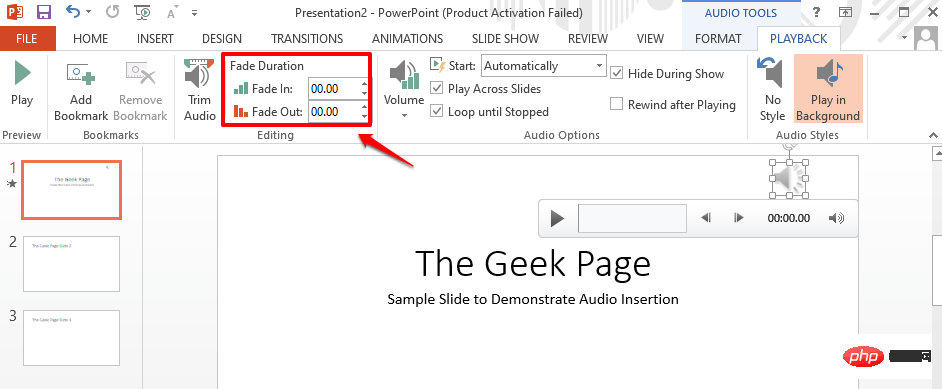
Step 8: You can also set this under the Editing group under the Fade Duration section The fade duration of the music. If you need a fade effect, you can use the FadeIn and FadeOut fields to set the fade-in and fade-out duration of the music. If the Fade In and Fade Out fields are both set to 00.00, there will be no fade effect.
Step 9: Now let’s try running the slideshow. To enter presentation mode, click on the Slide Show tab in the top ribbon, then click on Start Slide Show" under the section called "Start from the beginningStart" button.
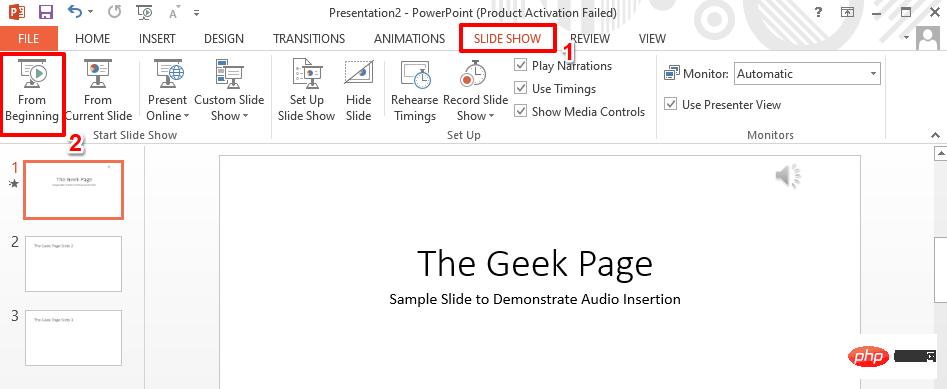
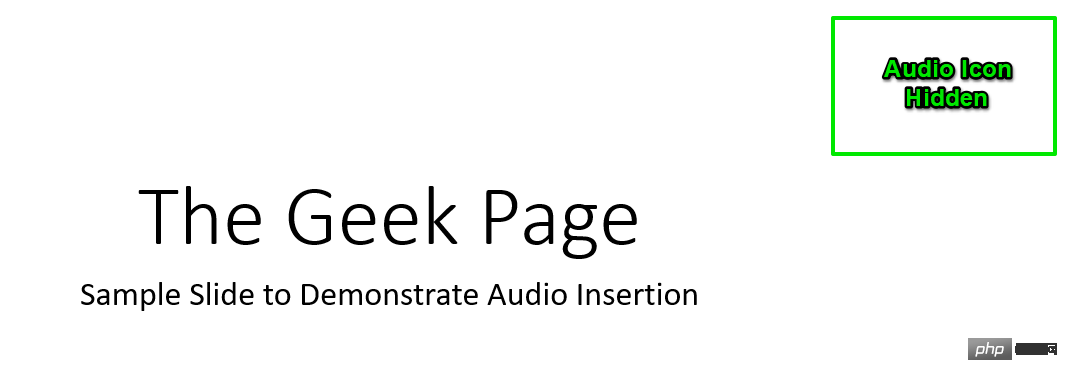
Step 10: You can now see that the music is playing, but the audio icon is nicely hidden. enjoy!
The above is the detailed content of How to add music to a Microsoft PowerPoint presentation. For more information, please follow other related articles on the PHP Chinese website!

Hot AI Tools

Undresser.AI Undress
AI-powered app for creating realistic nude photos

AI Clothes Remover
Online AI tool for removing clothes from photos.

Undress AI Tool
Undress images for free

Clothoff.io
AI clothes remover

AI Hentai Generator
Generate AI Hentai for free.

Hot Article

Hot Tools

Notepad++7.3.1
Easy-to-use and free code editor

SublimeText3 Chinese version
Chinese version, very easy to use

Zend Studio 13.0.1
Powerful PHP integrated development environment

Dreamweaver CS6
Visual web development tools

SublimeText3 Mac version
God-level code editing software (SublimeText3)

Hot Topics
 Bose Soundbar Ultra launch experience: Home theater right out of the box?
Feb 06, 2024 pm 05:30 PM
For as long as I can remember, I have had a pair of large floor-standing speakers at home. I have always believed that a TV can only be called a TV if it is equipped with a complete sound system. But when I first started working, I couldn’t afford professional home audio. After inquiring and understanding the product positioning, I found that the sound bar category is very suitable for me. It meets my needs in terms of sound quality, size and price. Therefore, I decided to go with the soundbar. After careful selection, I selected this panoramic soundbar product launched by Bose in early 2024: Bose home entertainment speaker Ultra. (Photo source: Photographed by Lei Technology) Generally speaking, if we want to experience the "original" Dolby Atmos effect, we need to install a measured and calibrated surround sound + ceiling at home.
 Why does the slideshow have black borders when playing in full screen?
Oct 20, 2023 pm 03:25 PM
There may be black borders in the full-screen slideshow due to screen resolution mismatch, image size mismatch, incorrect zoom mode settings, monitor settings issues, slide design issues, etc. Detailed introduction: 1. Screen resolution does not match. A common reason for black borders is that the screen resolution does not match the slide size. When the size of the slide is smaller than the screen resolution, black borders will appear during playback. The solution is to adjust Size the slide so that it matches the screen resolution. In PowerPoint, you can select the "Design" tab, then click "Slide Size" and so on.
 Audacity now gets AI audio editing capabilities with Intel OpenVINO plug-in
Feb 15, 2024 am 11:06 AM
Audacity is a free and open source cross-platform audio editing software. It has an open code and plug-in contribution mechanism, and anyone can participate. In addition, Intel offers a free set of OpenVINOAI plug-ins designed for music editors and podcast producers. This website noticed that the plug-in package is about 2GB in size and can be downloaded on Intel's GitHub page. It also requires the 64-bit Windows version of Audacity to run. The most intuitive thing about this AI plug-in is that it brings three advanced tools to the Audacity music editing function: The first is the "music generation" function. Users can use text to describe the music they want, and AI will generate music clips within 60 seconds to facilitate advertising. and film music
 VUE3 quick start: using Vue.js instructions to switch tabs
Jun 15, 2023 pm 11:45 PM
This article aims to help beginners quickly get started with Vue.js3 and achieve a simple tab switching effect. Vue.js is a popular JavaScript framework that can be used to build reusable components, easily manage the state of your application, and handle user interface interactions. Vue.js3 is the latest version of the framework. Compared with previous versions, it has undergone major changes, but the basic principles have not changed. In this article, we will use Vue.js instructions to implement the tab switching effect, with the purpose of making readers familiar with Vue.js
 Introduction to the method of inserting heptagons into PPT slides
Mar 26, 2024 pm 07:46 PM
1. Open the PPT slide document, and in the [Outline, Slide] column on the left side of the PPT, click to select the slide where you want to insert the basic [shape]. 2. After selecting, select the [Insert] menu in the function menu bar above the PPT and click. 3. After clicking the [Insert] menu, the [Insert] submenu bar pops up below the function menu bar. Select the [Shape] menu in the [Insert] submenu bar. 4. Click the [Shape] menu to pop up the preset shape type selection page. 5. In the shape type selection page, select the [Heptagon] shape and click. 6. After clicking, move the mouse to the slide editing interface, press the mouse to draw, and release the mouse after the drawing is completed. Complete the insertion of the [heptagon] shape.
 Steps to unify the theme color of PPT slides
Mar 26, 2024 pm 08:51 PM
1. The color scheme is naturally related to design, so we click on the design toolbar and on the right side, you can see the color options. Point the mouse up, and you can see that the current theme color is: Default design template 1. 2. Click on this option, and the first one is the current color design. To change that, we're going to go down below the panel: New Theme Colors. 3. Click in, and in the column of colors that appear, you can see that there are three accent text colors, all of which are light and almost impossible to display on a light background. Among them is the text color in this example. 4. Click the drop-down arrow on the right side of the color to display the color selection panel. In order not to destroy the overall color matching, choose a dark color in the primary color system to replace the primary color. Replace the other two colors in the same way. 5. Compare the changed color with the original color. On the left is
 How to add local music to soda music
Feb 23, 2024 pm 07:13 PM
How to add local music to Soda Music? You can add your favorite local music to Soda Music APP, but most friends don’t know how to add local music. Next is the graphic tutorial on how to add local music to Soda Music brought by the editor. , interested users come and take a look! Tutorial on using soda music. How to add local music to soda music. 1. First open the soda music APP and click on the [Music] function area at the bottom of the main page; 2. Then enter the play page and click the [three dots] icon in the lower right corner; 3. Finally Expand the function bar below and select the [Download] button to add it to local music.
 Detailed steps to view your favorite music on Douyin
Mar 26, 2024 pm 06:20 PM
1. Click [+]. 2. Click [Select Music] above. 3. Click [My Favorites]. Method 2: 1. Open Douyin and click [Me]. 2. Click [Collect] next to the avatar. 3. Click [Music]


