

Use Python to build a speech synthesis system


Text
Hello everyone, I am Python artificial intelligence technology
Background
I have always been interested in speech synthesis systems. I always want to be able to synthesize some content for myself, such as synthesizing novels, broadcasting the e-books I downloaded to me, etc.
Speech synthesis system
is actually a tool based on speech synthesis, but this thing is very difficult to develop because many manufacturers provide it in the form of API. Reduced, you only need to call a few APIs to implement your own speech synthesis tool; although the sparrow is small, it has all the internal organs. On a larger scale, this is a small speech synthesis system.
Preparation
First we need to install
- Anaconda
- Python 3.7
- visual studio code on our computer
Steps
Here we choose the WebAPI interface of the iFlytek open platform.
https://www.xfyun.cn/doc/tts/online_tts/API.html
First we go to the console to create an application

After creating it, click on the application to enter, and there will be a detailed column for the application.
Click on the speech synthesis on the left, and then go to the next level of online speech synthesis (streaming version)
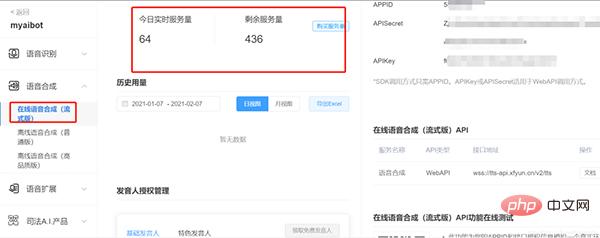
On the upper right side, we need to get 3 Something:
- APPID
- APISecret
- APIKey
Code implementation
Okay, let’s proceed to the code Implemented, first install the two libraries we need.
pip install websocket-client
pip install playsound
Next we define a class play, including 4 functions
class play:
 def __init__(self): #初始化函数
 def play_sound(self):#播放音频函数
 def select_vcn(self,*arg):#选择下拉框设置发音人
 def xfyun_tts(self):#进行语音合成
Here, you need to fill in the appid, appkey and appsecret you just obtained from the iFlytek open platform console
def __init__(self):
self.APP_ID = 'xxx' #请填上自己的appid
self.API_KEY = 'xxx'#请填上自己的appkey
self.SECRET_KEY = 'xxx' #请填上自己的appsecret
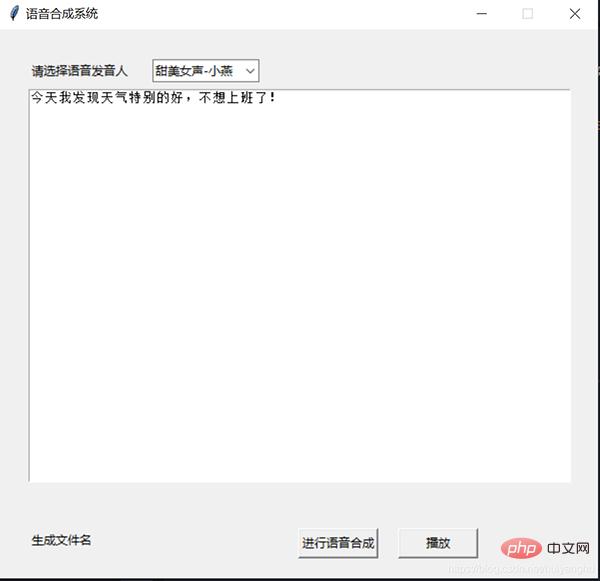
self.root=tk.Tk() #初始化窗口
self.root.title("语音合成系统") #窗口名称
self.root.geometry("600x550") #设置窗口大小
self.root.resizable(0,0)
#self.root.resizable(width=True,height=True)#设置窗口是否可变,宽不可变,高可变,默认为True
self.lb=tk.Label(self.root,text='请选择语音发音人')#标签
self.tt=tk.Text(self.root,width=77,height=30) #多行文本框
self.cb=ttk.Combobox(self.root, width=12)#下拉列表框
#设置下拉列表框的内容
self.cb['values']=("甜美女声-小燕","亲切男声-许久","知性女声-小萍", "可爱童声-许小宝","亲切女声-小婧")
self.cb.current(0)#将当前选择状态置为0,也就是第一项
self.cb.bind("<<ComboboxSelected>>", self.select_vcn)
self.tk_tts_file=tk.Label(self.root,text='生成文件名')
self.b1=tk.Button(self.root, text='进行语音合成', width=10,height=1,command=self.xfyun_tts) #按钮
self.tk_play=tk.Button(self.root, text='播放', width=10,height=1,command=self.play_sound) #按钮
#各个组件的位置
self.tk_tts_file.place(x=30,y=500)
self.b1.place(x=300,y=500)
self.tk_play.place(x=400,y=500)
self.lb.place(x=30,y=30)
self.cb.place(x=154,y=30)
self.tt.place(x=30,y=60)
self.root.mainloop()When the drop-down list is selected, set the corresponding pronunciator
def select_vcn(self,*arg):
 if self.cb.get()=='甜美女声-小燕':
 self.vcn="xiaoyan"
 elif self.cb.get()=='亲切男声-许久':
 self.vcn="aisjiuxu"
 elif self.cb.get()=='知性女声-小萍':
 self.vcn="aisxping"
 elif self.cb.get()=='可爱童声-许小宝':
 self.vcn="aisbabyxu"
 elif self.cb.get()=='亲切女声-小婧':
 self.vcn="aisjinger"
 print(self.vcn)
Next we will modify the Python demo that comes with iFlytek to make it more convenient to use. In addition, search the public account programmer Xiaole's backend and reply "make money" to get a surprise gift package.
# -*- coding:utf-8 -*-
#
# author: iflytek
#
#本demo测试时运行的环境为:Windows + Python3.7
#本demo测试成功运行时所安装的第三方库及其版本如下:
# cffi==1.12.3
# gevent==1.4.0
# greenlet==0.4.15
# pycparser==2.19
# six==1.12.0
# websocket==0.2.1
# websocket-client==0.56.0
# 合成小语种需要传输小语种文本、使用小语种发音人vcn、tte=unicode以及修改文本编码方式
#错误码链接:https://www.xfyun.cn/document/error-code (code返回错误码时必看)
# # # # # # # # # # # # # # # # # # # # # # # # # # # # # # # # # # # # # # # # # # # # # # # # # # # # # # # # # # # #
import websocket
import datetime
import hashlib
import base64
import hmac
import json
from urllib.parse import urlencode
import time
import ssl
from wsgiref.handlers import format_date_time
from datetime import datetime
from time import mktime
import _thread as thread
import os
import wave
STATUS_FIRST_FRAME = 0# 第一帧的标识
STATUS_CONTINUE_FRAME = 1# 中间帧标识
STATUS_LAST_FRAME = 2# 最后一帧的标识
PCM_PATH = "./demo.pcm"
class Ws_Param(object):
 # 初始化
 def __init__(self):
 pass
 def set_tts_params(self, text, vcn):
 if text != "":
 self.Text = text
 if vcn != "":
 self.vcn = vcn
 # 业务参数(business),更多个性化参数可在官网查看
 self.BusinessArgs = {"bgs":1,"aue": "raw", "auf": "audio/L16;rate=16000", "vcn": self.vcn, "tte": "utf8"}
 #使用小语种须使用以下方式,此处的unicode指的是 utf16小端的编码方式,即"UTF-16LE"”
 #self.Data = {"status": 2, "text": str(base64.b64encode(self.Text.encode('utf-16')), "UTF8")}
 self.Data = {"status": 2, "text": str(base64.b64encode(self.Text.encode('utf-8')), "UTF8")}
 def set_params(self, appid, apiSecret, apiKey):
 if appid != "":
 self.APPID = appid
 # 公共参数(common)
 self.CommonArgs = {"app_id": self.APPID}

 if apiKey != "":
 self.APIKey = apiKey

 if apiSecret != "":
 self.APISecret = apiSecret
 # 生成url
 def create_url(self):
 url = 'wss://tts-api.xfyun.cn/v2/tts'
 # 生成RFC1123格式的时间戳
 now = datetime.now()
 date = format_date_time(mktime(now.timetuple()))
 # 拼接字符串
 signature_origin = "host: " + "ws-api.xfyun.cn" + "n"
 signature_origin += "date: " + date + "n"
 signature_origin += "GET " + "/v2/tts " + "HTTP/1.1"
 # 进行hmac-sha256进行加密
 signature_sha = hmac.new(self.APISecret.encode('utf-8'), signature_origin.encode('utf-8'),
digestmod=hashlib.sha256).digest()
 signature_sha = base64.b64encode(signature_sha).decode(encoding='utf-8')
 authorization_origin = "api_key="%s", algorithm="%s", headers="%s", signature="%s"" % (
 self.APIKey, "hmac-sha256", "host date request-line", signature_sha)
 authorization = base64.b64encode(authorization_origin.encode('utf-8')).decode(encoding='utf-8')
 # 将请求的鉴权参数组合为字典
 v = {
 "authorization": authorization,
 "date": date,
 "host": "ws-api.xfyun.cn"
 }

 url = url + '?' + urlencode(v)

 return url
def on_message(ws, message):
 try:
 #print(message)
 try:
 message =json.loads(message)
 except Exception as e:
 print("111",e)
 code = message["code"]
 sid = message["sid"]
 audio = message["data"]["audio"]
 audio = base64.b64decode(audio)
 status = message["data"]["status"]
 print(code, sid, status)
 if status == 2:
 print("ws is closed")
 ws.close()
 if code != 0:
 errMsg = message["message"]
 print("sid:%s call error:%s code is:%s" % (sid, errMsg, code))
 else:
 with open(PCM_PATH, 'ab') as f:
 f.write(audio)
 except Exception as e:
 print("receive msg,but parse exception:", e)
# 收到websocket错误的处理
def on_error(ws, error):
 print("### error:", error)
# 收到websocket关闭的处理
def on_close(ws):
 print("### closed ###")
# 收到websocket连接建立的处理
def on_open(ws):
 def run(*args):
 d = {"common": wsParam.CommonArgs,
"business": wsParam.BusinessArgs,
"data": wsParam.Data,
}
 d = json.dumps(d)
 print("------>开始发送文本数据")
 ws.send(d)
 if os.path.exists(PCM_PATH):
 os.remove(PCM_PATH)
 thread.start_new_thread(run, ())
def text2pcm(appid, apiSecret, apiKey, text, vcn, fname):
 wsParam.set_params(appid, apiSecret, apiKey)
 wsParam.set_tts_params(text, vcn)
 websocket.enableTrace(False)
 wsUrl = wsParam.create_url()
 ws = websocket.WebSocketApp(wsUrl, on_message=on_message, on_error=on_error, on_close=on_close)
 ws.on_open = on_open
 ws.run_forever(sslopt={"cert_reqs": ssl.CERT_NONE})
 pcm2wav(PCM_PATH, fname)
def pcm2wav(fname, dstname):
 with open(fname, 'rb') as pcmfile:
 pcmdata = pcmfile.read()
 print(len(pcmdata))
 with wave.open(dstname, "wb") as wavfile:
 wavfile.setparams((1, 2, 16000, 0, 'NONE', 'NONE'))
 wavfile.writeframes(pcmdata)
wsParam = Ws_Param()The final speech synthesis system was implemented in this way.
Currently, various cloud computing and cloud services are developing rapidly, and major companies have provided abundant resources, which has greatly lowered the threshold for artificial intelligence development and does not require knowledge of speech synthesis. Based on the principle, a speech synthesis tool can be quickly developed!
The above is the detailed content of Use Python to build a speech synthesis system. For more information, please follow other related articles on the PHP Chinese website!

Hot AI Tools

Undresser.AI Undress
AI-powered app for creating realistic nude photos

AI Clothes Remover
Online AI tool for removing clothes from photos.

Undress AI Tool
Undress images for free

Clothoff.io
AI clothes remover

AI Hentai Generator
Generate AI Hentai for free.

Hot Article
Hot Tools

Notepad++7.3.1
Easy-to-use and free code editor

SublimeText3 Chinese version
Chinese version, very easy to use

Zend Studio 13.0.1
Powerful PHP integrated development environment

Dreamweaver CS6
Visual web development tools

SublimeText3 Mac version
God-level code editing software (SublimeText3)
Hot Topics
 1378
1378
 52
52

 The 2-Hour Python Plan: A Realistic Approach
Apr 11, 2025 am 12:04 AM
The 2-Hour Python Plan: A Realistic Approach
Apr 11, 2025 am 12:04 AM
You can learn basic programming concepts and skills of Python within 2 hours. 1. Learn variables and data types, 2. Master control flow (conditional statements and loops), 3. Understand the definition and use of functions, 4. Quickly get started with Python programming through simple examples and code snippets.
 Python: Exploring Its Primary Applications
Apr 10, 2025 am 09:41 AM
Python: Exploring Its Primary Applications
Apr 10, 2025 am 09:41 AM
Python is widely used in the fields of web development, data science, machine learning, automation and scripting. 1) In web development, Django and Flask frameworks simplify the development process. 2) In the fields of data science and machine learning, NumPy, Pandas, Scikit-learn and TensorFlow libraries provide strong support. 3) In terms of automation and scripting, Python is suitable for tasks such as automated testing and system management.
 Navicat's method to view MongoDB database password
Apr 08, 2025 pm 09:39 PM
Navicat's method to view MongoDB database password
Apr 08, 2025 pm 09:39 PM
It is impossible to view MongoDB password directly through Navicat because it is stored as hash values. How to retrieve lost passwords: 1. Reset passwords; 2. Check configuration files (may contain hash values); 3. Check codes (may hardcode passwords).
 How to use AWS Glue crawler with Amazon Athena
Apr 09, 2025 pm 03:09 PM
How to use AWS Glue crawler with Amazon Athena
Apr 09, 2025 pm 03:09 PM
As a data professional, you need to process large amounts of data from various sources. This can pose challenges to data management and analysis. Fortunately, two AWS services can help: AWS Glue and Amazon Athena.
 How to start the server with redis
Apr 10, 2025 pm 08:12 PM
How to start the server with redis
Apr 10, 2025 pm 08:12 PM
The steps to start a Redis server include: Install Redis according to the operating system. Start the Redis service via redis-server (Linux/macOS) or redis-server.exe (Windows). Use the redis-cli ping (Linux/macOS) or redis-cli.exe ping (Windows) command to check the service status. Use a Redis client, such as redis-cli, Python, or Node.js, to access the server.
 How to read redis queue
Apr 10, 2025 pm 10:12 PM
How to read redis queue
Apr 10, 2025 pm 10:12 PM
To read a queue from Redis, you need to get the queue name, read the elements using the LPOP command, and process the empty queue. The specific steps are as follows: Get the queue name: name it with the prefix of "queue:" such as "queue:my-queue". Use the LPOP command: Eject the element from the head of the queue and return its value, such as LPOP queue:my-queue. Processing empty queues: If the queue is empty, LPOP returns nil, and you can check whether the queue exists before reading the element.
 How to view server version of Redis
Apr 10, 2025 pm 01:27 PM
How to view server version of Redis
Apr 10, 2025 pm 01:27 PM
Question: How to view the Redis server version? Use the command line tool redis-cli --version to view the version of the connected server. Use the INFO server command to view the server's internal version and need to parse and return information. In a cluster environment, check the version consistency of each node and can be automatically checked using scripts. Use scripts to automate viewing versions, such as connecting with Python scripts and printing version information.
 How secure is Navicat's password?
Apr 08, 2025 pm 09:24 PM
How secure is Navicat's password?
Apr 08, 2025 pm 09:24 PM
Navicat's password security relies on the combination of symmetric encryption, password strength and security measures. Specific measures include: using SSL connections (provided that the database server supports and correctly configures the certificate), regularly updating Navicat, using more secure methods (such as SSH tunnels), restricting access rights, and most importantly, never record passwords.
