How to use device encryption on Windows 11
If you want to protect sensitive data, be sure to use drive encryption on Windows 11.
The good news is that operating systems (except Home Edition) come with a built-in tool to do this called BitLocker.
Here we explain how to encrypt your hard drive on Windows 11 and how to use BitLocker on Microsoft operating systems.
But first, we will tell you a few things you should know about drive encryption and security.
What is drive encryption and why do we need it?
Hard drive encryption is the process of using mathematical functions to encrypt data stored on a hard drive.
This way anyone without access to the key or password you set won't see the important data. This is an important layer of security against ransomware and other online attacks.
Here's how it works: When a file is written to the drive, it is automatically encrypted with the help of specialized software.
Similarly, when you access files on the drive, the same tools will decrypt them, but only if you can provide the password you set when you encrypted the drive.
there is a question! If your PC does not have a TPM 2.0 chip installed, you cannot use BitLocker. However, we also have a solution, so read on.
How do I manage encryption of my hard drive on Windows 11?
1. Enable hard disk encryption
You can encrypt the disk on your Windows 11 device using the built-in BitLocker tool in Control Panel. The tool allows users to encrypt their data so that only those who insert a designated USB drive or enter the required password at startup can access it.
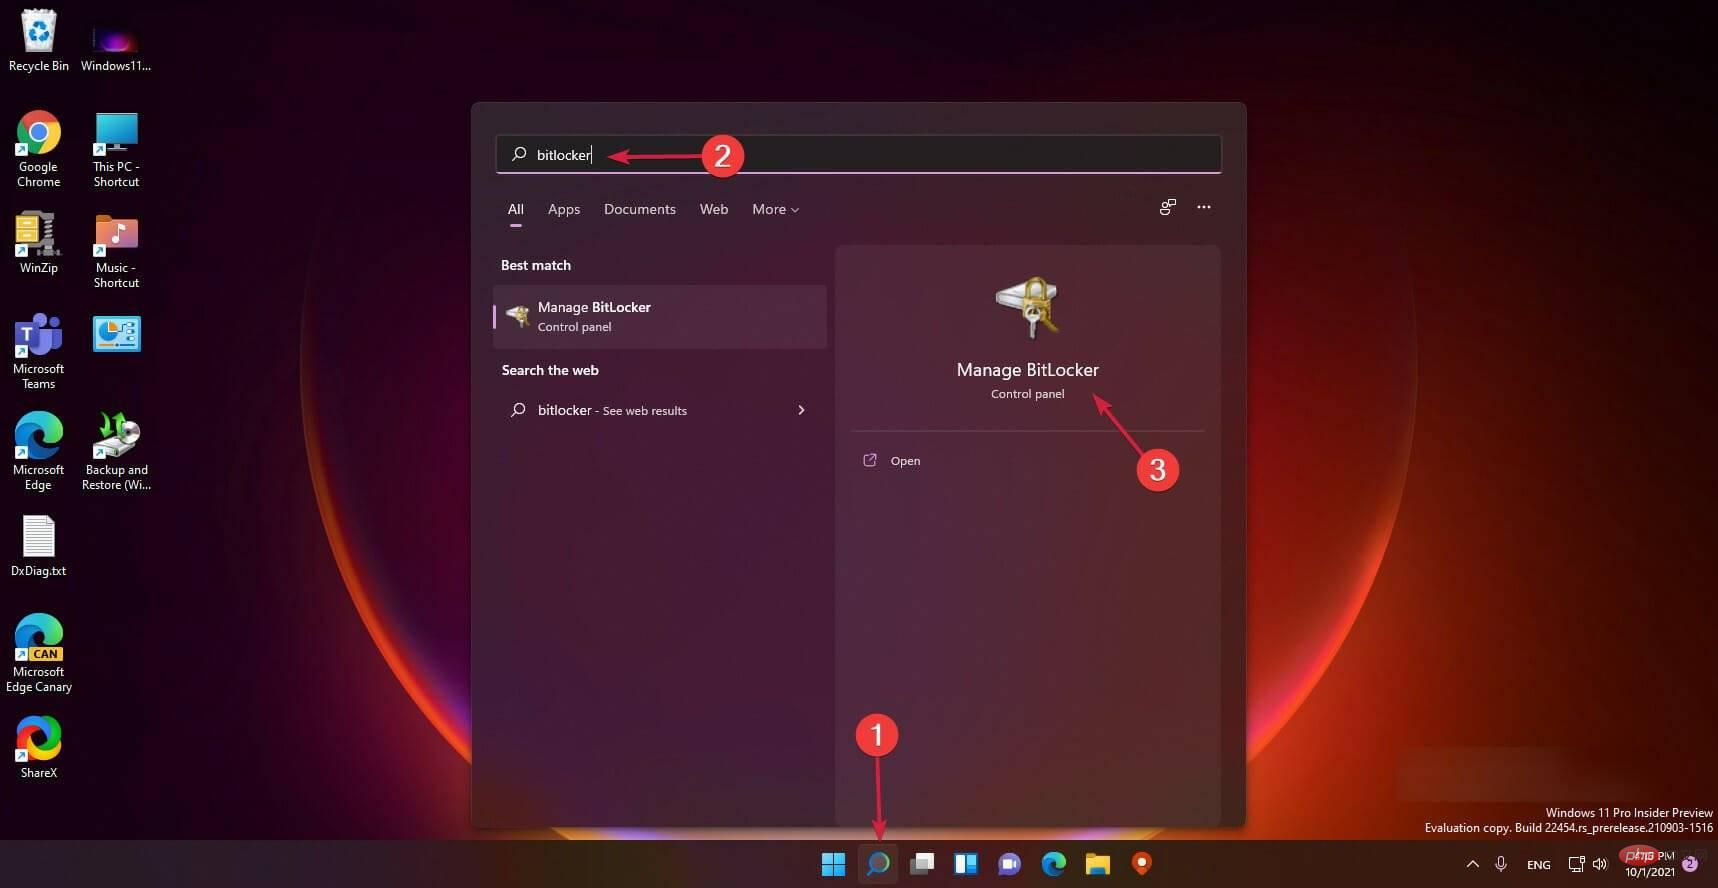
1. Click the Search icon on the taskbar.
2.Type BitLocker in the search box that opens and click the application from the results.
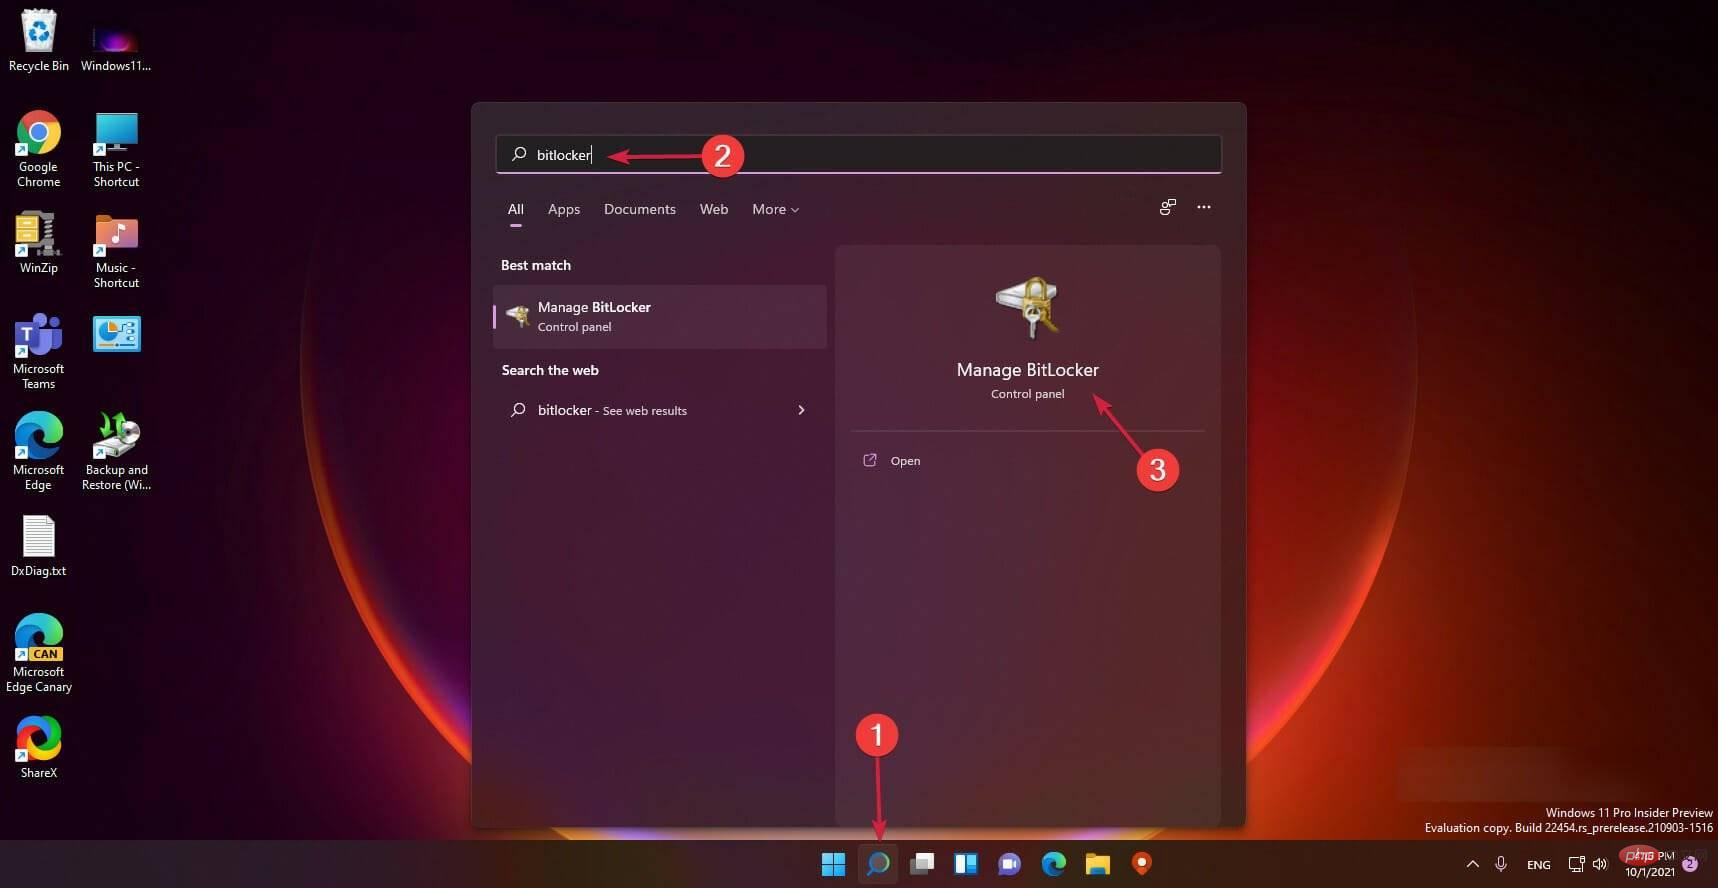
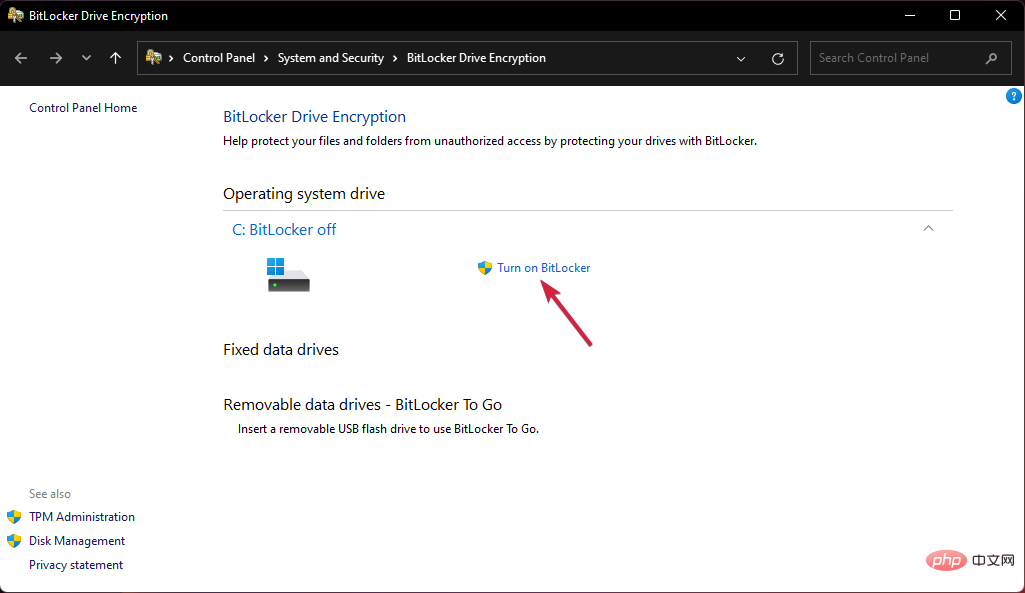
3. Select to open BitLocker .
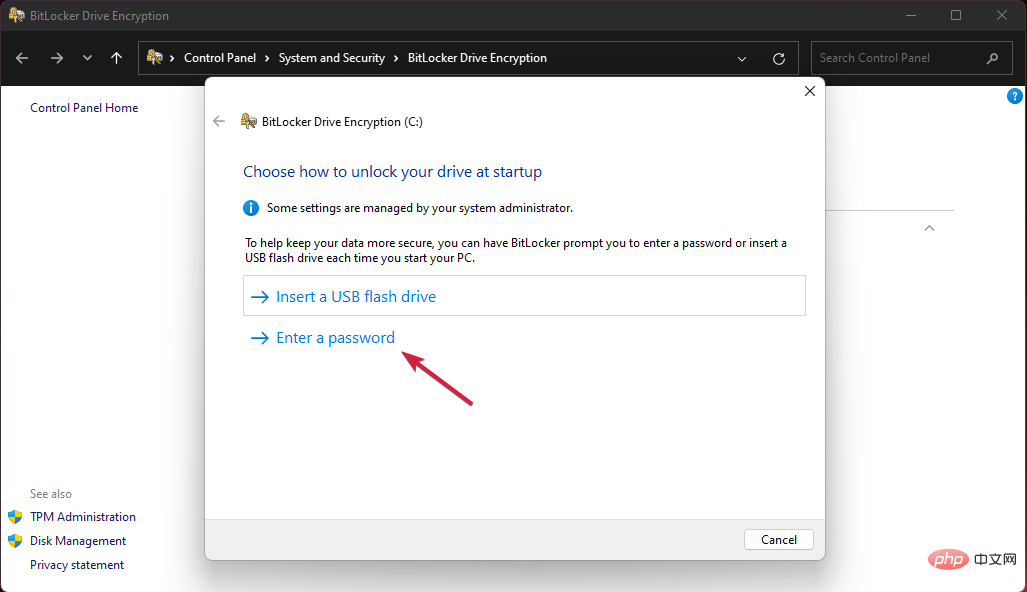
#4. You will be prompted to choose a method to unlock the drive on startup. We recommend using the password method, but you can also use a USB key that you need to provide.
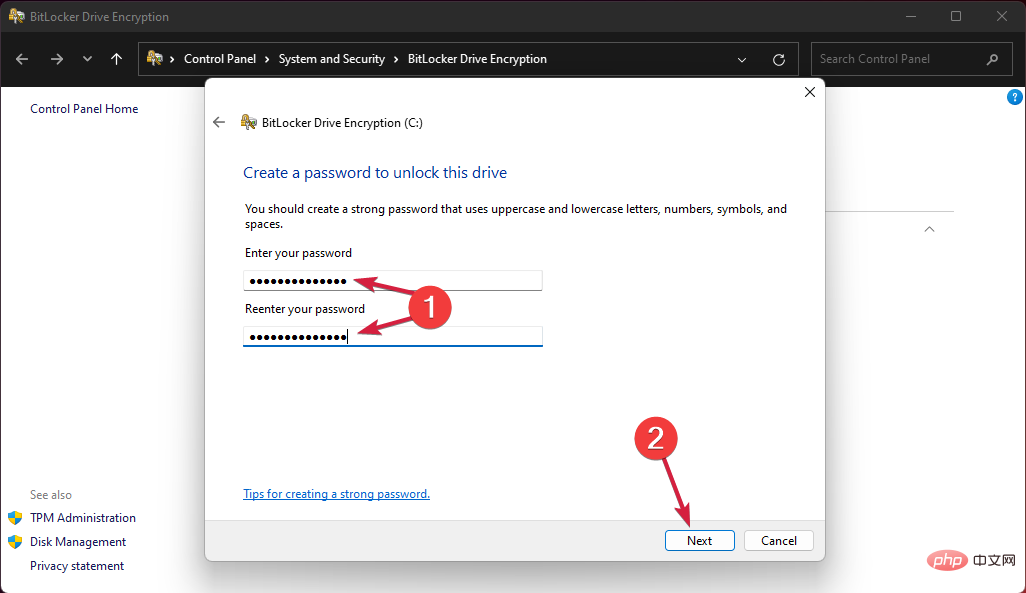
5. Enter your password and re-enter it, then click Next.
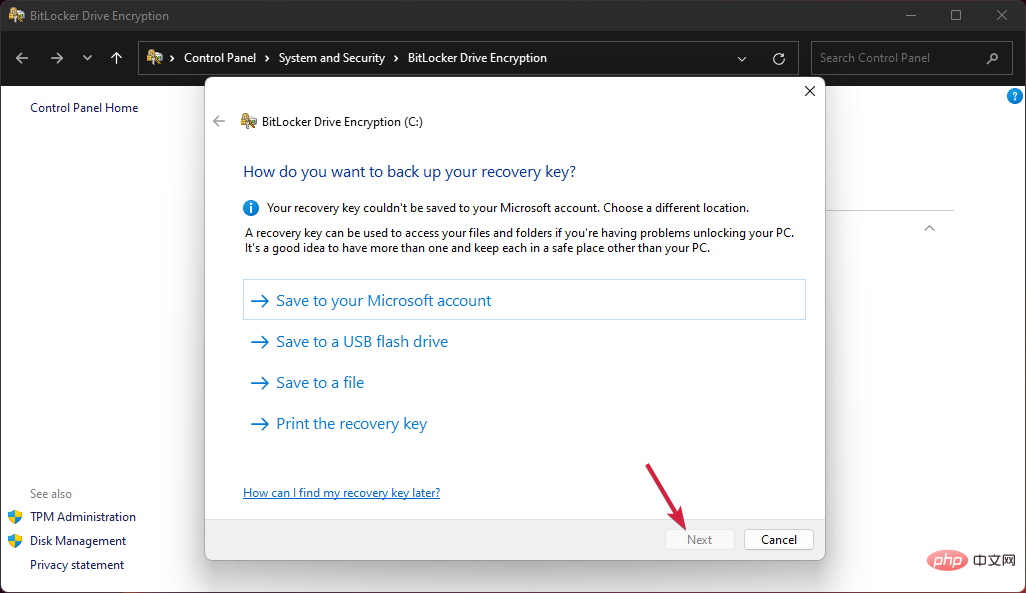
6. After that, you will be asked to save the key in another way. You can save it to your Microsoft account, a file, a USB stick or print it directly.
# 7. The next step is to choose whether you want to encrypt the entire drive or just the used portion.
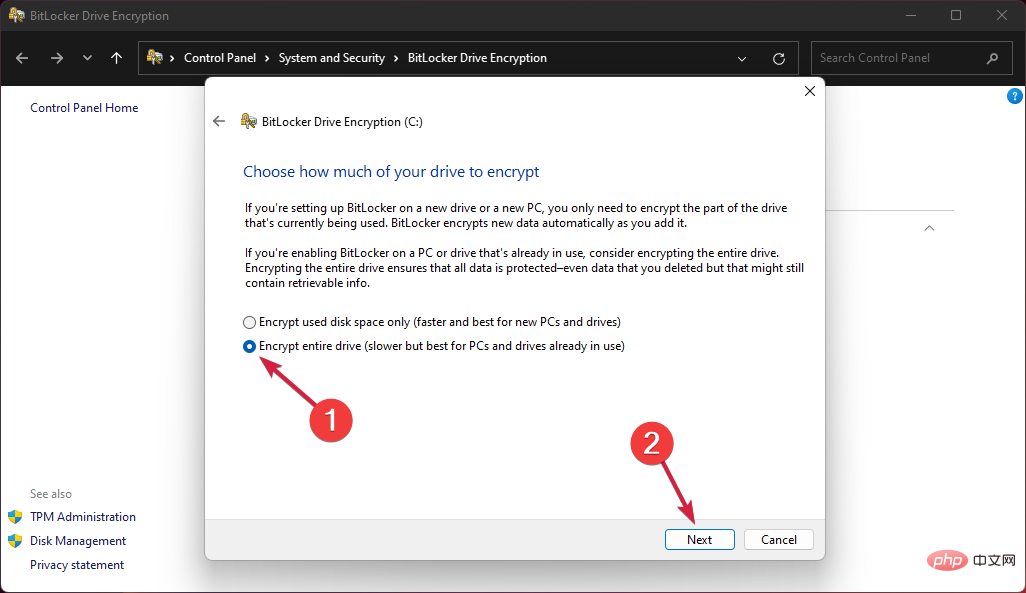
8. Make your selections and click Next.
9. Now you need to select the encryption mode you want to use. When you're using Windows 11, you can choose the first option, for a fixed drive, but you can also choose the second option if you plan to move the drive.
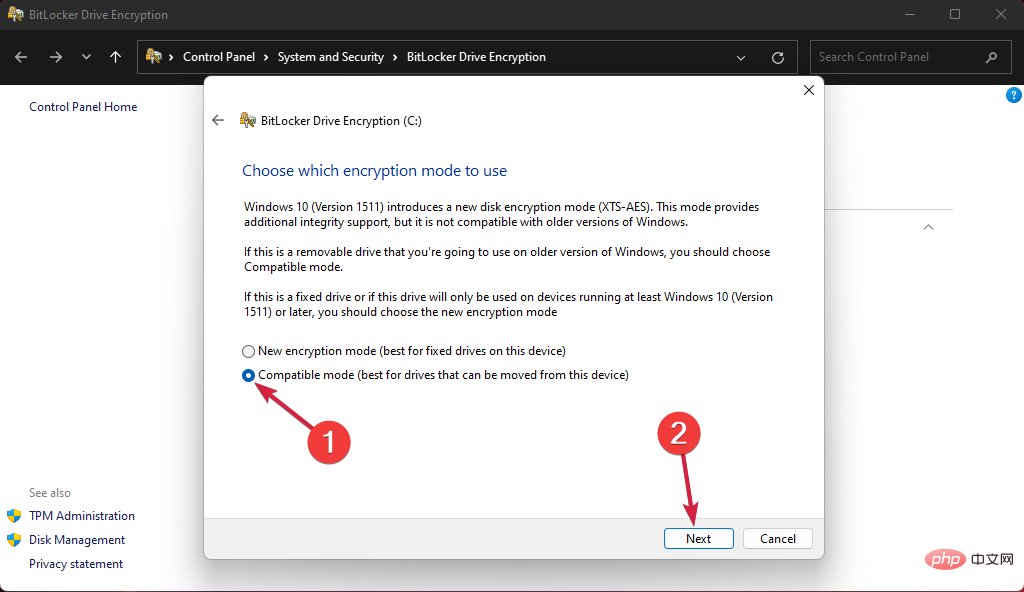
10. Finally, select the Run BitLocker System checkbox and click Continue.
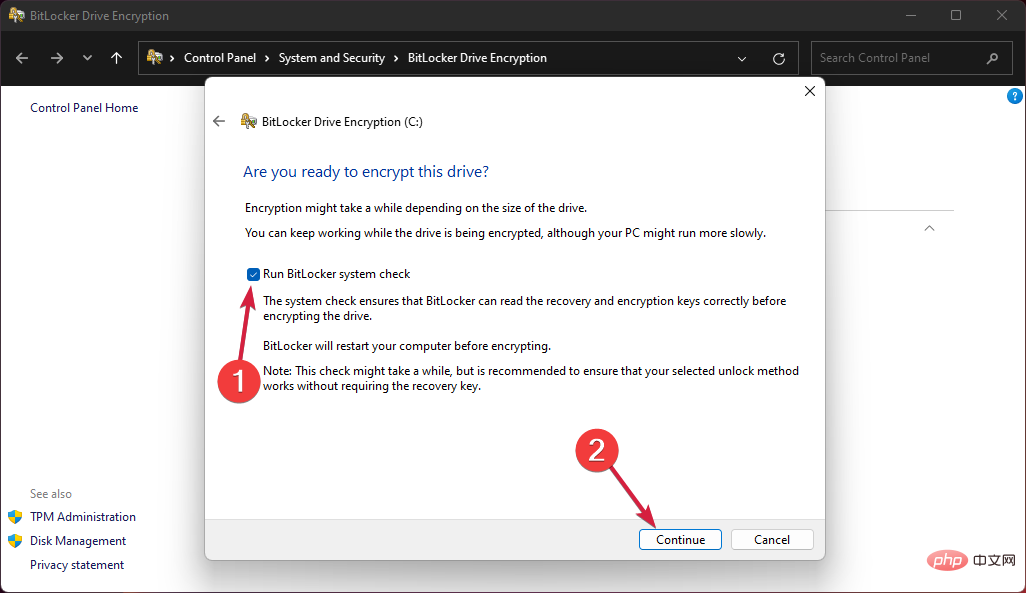
11. You will now be prompted to restart.
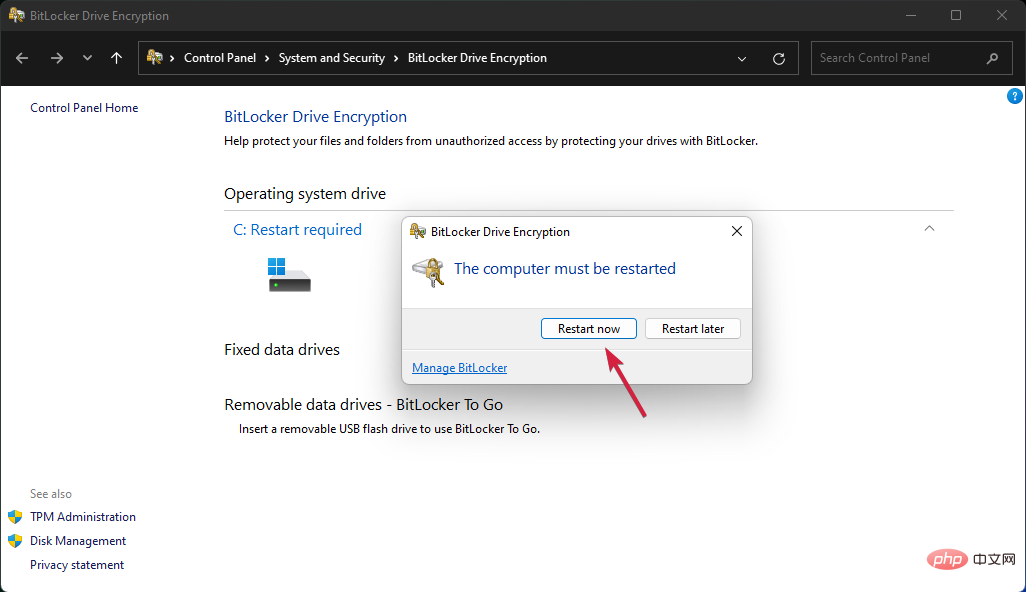
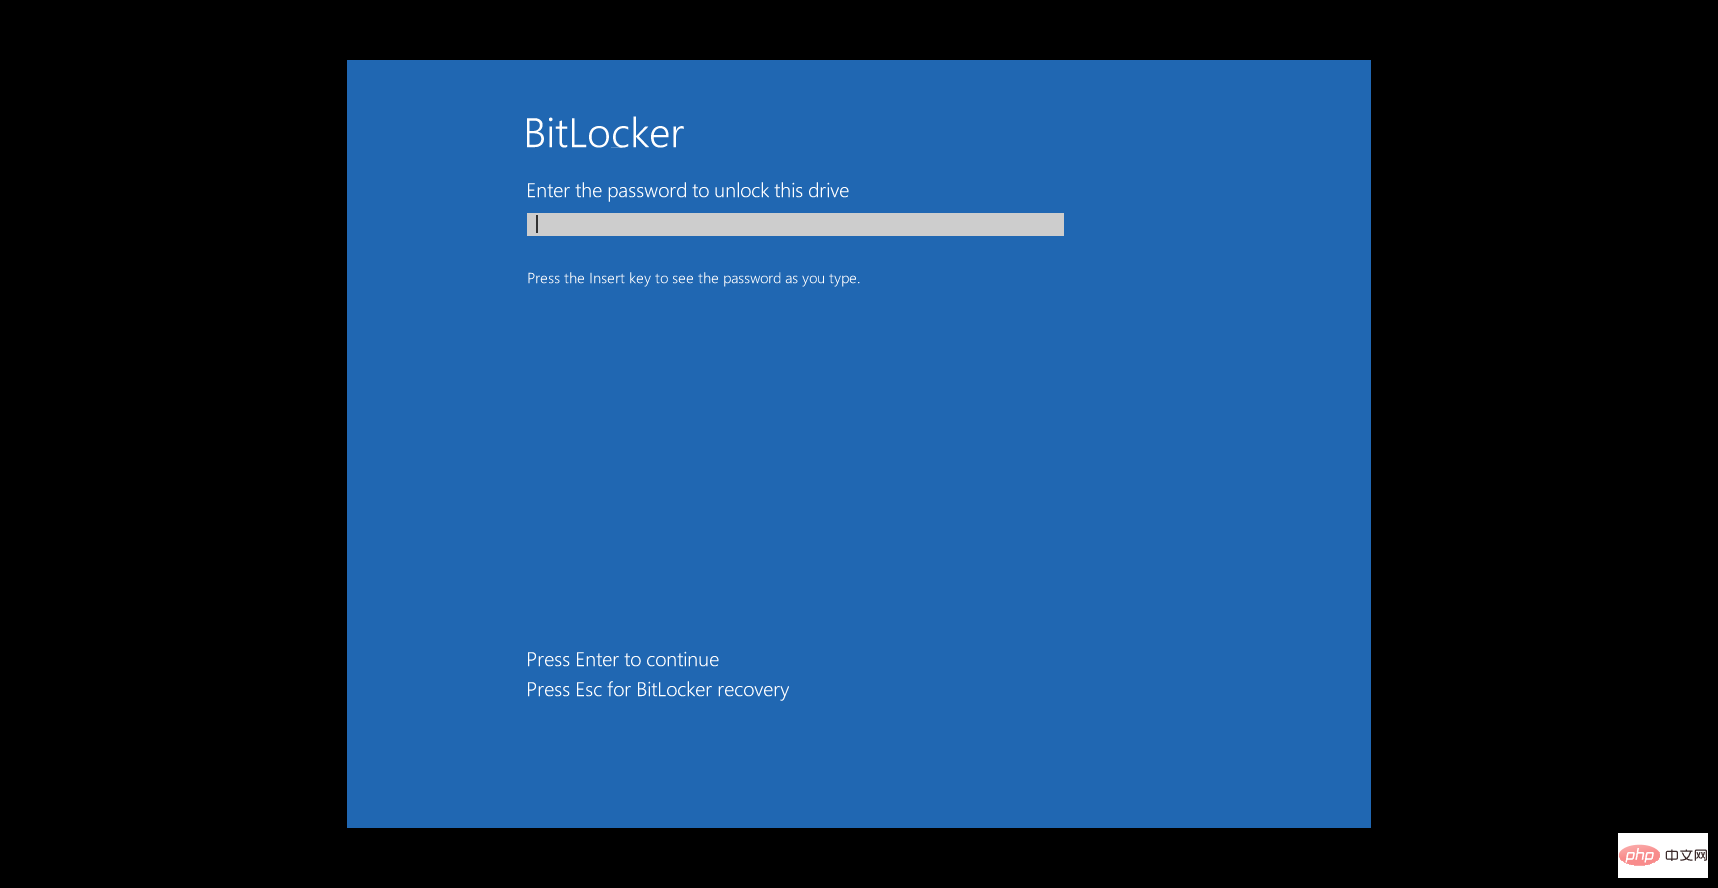
#12. After restarting, you will be prompted to enter your password to unlock your drive.
2. If your PC is not TPM 2.0 compatible, encrypt your drive
If you click on BitLocker Drive Encryption from Device Encryption After that, you will see the message Device encryption is not available for this device, This means your PC is not TPM 2.0 ready.
Don’t worry, we can fix this problem in a few simple steps.
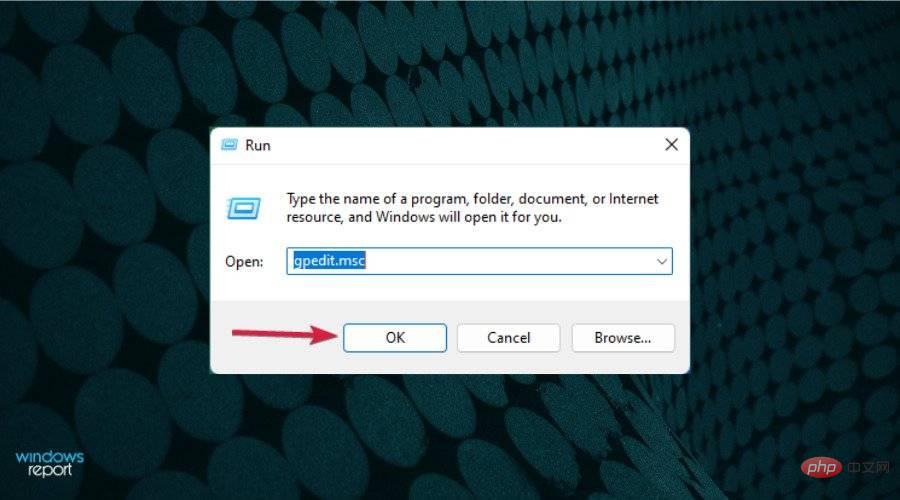
- Press the Windows R key to start Run, type gpedit.msc and press Enter or click Sure.

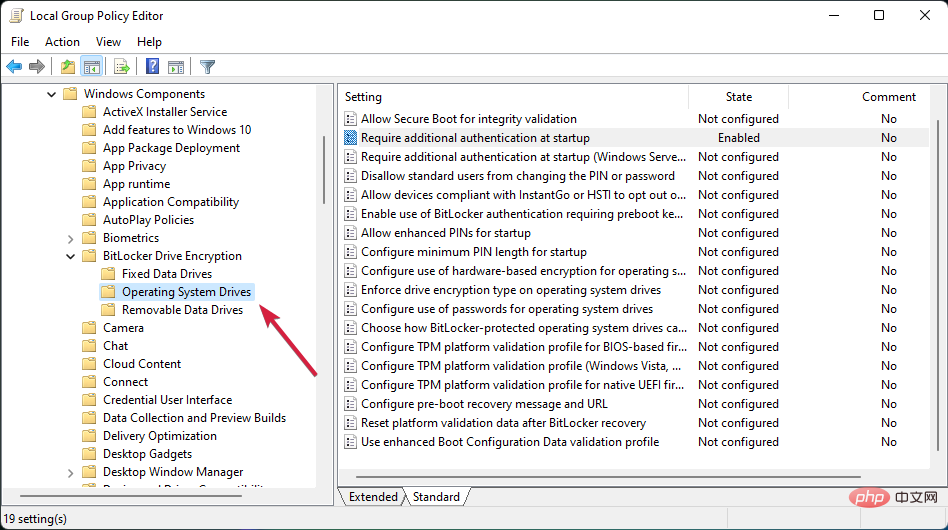
- In Group Policy Editor, go to the following path:
<strong>Local Computer Policy\Computer Configuration\Administrative Templates\Windows Components\BitLocker Drive Encryption\Operating System Drives</strong>
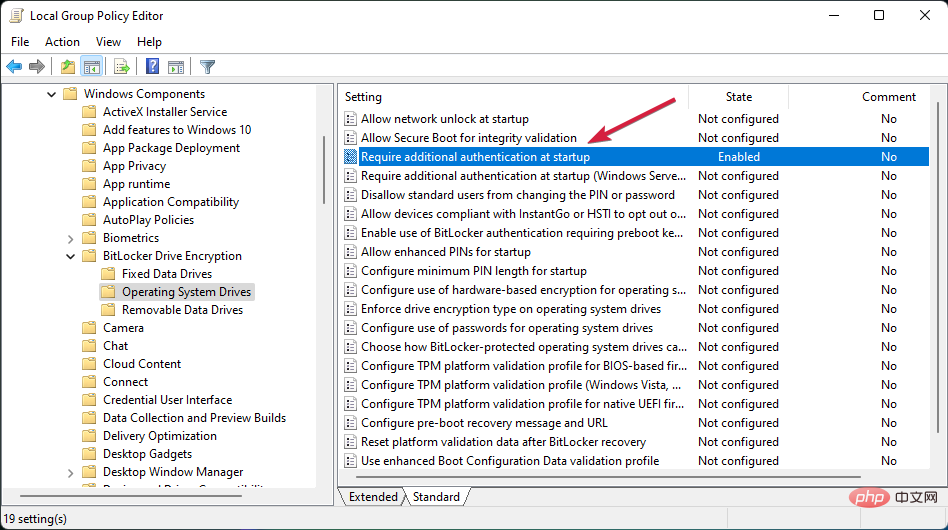
- Now double-click the Require additional authentication at startup key to open it.

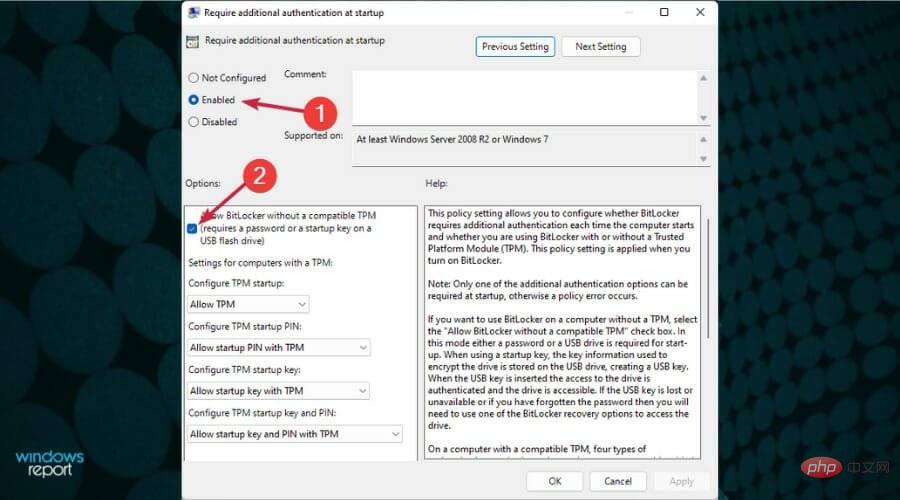
- Check the Enabled option from the top, then check the Allow BitLocker without TPM-compatible TPM (requires password or boot key on USB flash drive) box and click Sure.

- Now repeat the steps in the first solution to enable BitLocker encryption.
3. Disable Drive Encryption
If you change your mind and don’t want to use Drive Encryption on your Windows 11 PC, you can follow these steps:
- Click the search icon in the taskbar, type bitlocker and select the application from the results.

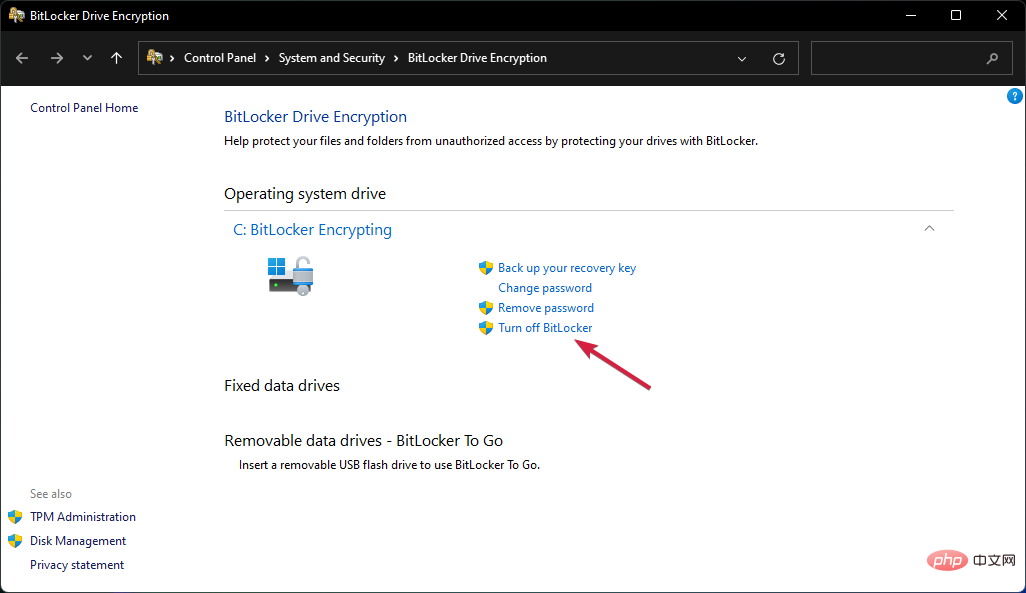
- Now click to close BitLocker.

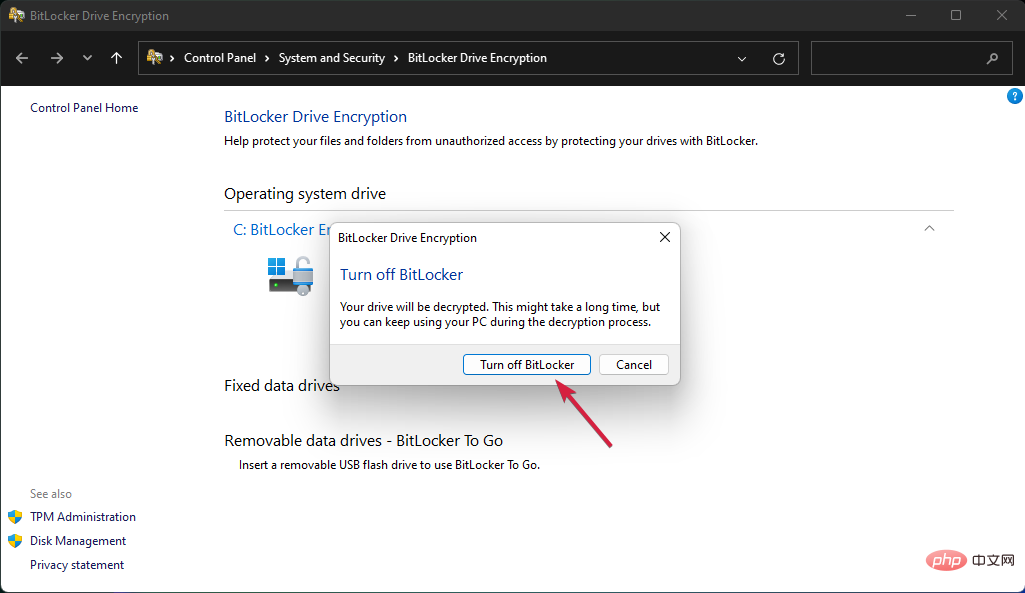
- Click Turn off BitLocker again to confirm your choice.

- Wait until BitLocker finishes decrypting your drive before restarting or shutting down your PC.
Encrypted drives are essential for all sensitive data in your PC and will implement an extra layer of protection to prevent attacks and even prying eyes.
However, this can be a two-way street, as if you don't take all precautions when managing your unlock keys or passwords, you will end up unable to access your data yourself.
You might also be interested in our tutorial on how to protect a folder and only certain files in Windows 11.
We hope our tutorial helped you enable drive encryption on Windows 11 and your data is now safe.
The above is the detailed content of How to use device encryption on Windows 11. For more information, please follow other related articles on the PHP Chinese website!

Hot AI Tools

Undresser.AI Undress
AI-powered app for creating realistic nude photos

AI Clothes Remover
Online AI tool for removing clothes from photos.

Undress AI Tool
Undress images for free

Clothoff.io
AI clothes remover

AI Hentai Generator
Generate AI Hentai for free.

Hot Article

Hot Tools

Notepad++7.3.1
Easy-to-use and free code editor

SublimeText3 Chinese version
Chinese version, very easy to use

Zend Studio 13.0.1
Powerful PHP integrated development environment

Dreamweaver CS6
Visual web development tools

SublimeText3 Mac version
God-level code editing software (SublimeText3)

Hot Topics
 The driver cannot load ene.sys on this device in Windows 11
May 05, 2023 am 09:13 AM
Many Windows 11 users have encountered the error message “The driver could not be loaded on this device (ene.sys)” which prevents the driver from loading on the system and is marked as vulnerable. However, this issue is mainly reported by users who have upgraded their PC to Windows 11. This error is closely related to drivers and files that get corrupted due to system operating system update issues. If you are encountering this “ene.sys” error every time you turn on your Windows 11 computer after an update, continue reading this article. Here you will find some troubleshooting methods that you can use if you see this error on your PC. Fix 1 – Install Optional Update Step 1. Use Windows+R group
 Fix: ERR_ADDRESS_UNREACHABLE error in Google Chrome
May 15, 2023 pm 06:22 PM
Several Windows users have complained that when they try to access some websites on Google Chrome browser on their systems, they are unable to access the web pages. It also displays a message on the browser saying "The site cannot be reached" with error code ERR_ADDRESS_UNREACHABLE. There could be many potential reasons behind this issue, it could be due to website server issues, proxy server settings, unstable internet connection, etc. If you encounter similar problems, don't panic. After deeply analyzing the problem in this article, we got a bunch of solutions. Before proceeding, try the following workarounds: Try checking if the user is trying to access the site from other devices and there are no issues, then this
 How to add a hyperlink to text or image in Gmail
May 06, 2023 pm 06:07 PM
No matter how many instant messaging apps have come and gone, email always has a completely different feel to it. Mailing is truly synonymous with Gmail. Not to mention a professional front desk, Gmail is unavoidable, just unavoidable! Since Gmail is used so frequently, no matter what, you have to know how to make your Gmail experience the smoothest and most efficient. You will most likely need to add a lot of web links in the body of your email, and it will definitely look unwieldy if you have so many links. But links are definitely necessary, even if long links will definitely make your email look ugly. So is there a way out? What about hyperlinks? How do you hide a link in text or an image? Sound cool? Oh yes, Gmail is
 What does Discord Do Not Disturb mean and how to use it?
Jun 03, 2023 pm 01:02 PM
If you have Discord Do Not Disturb enabled, you will not see any notifications on your app. This includes servers, group chats, and direct messages. Discord is a chat application that allows users to communicate through text, pictures, and video calls in games. It is designed to be a communication channel for gamers to chat and coordinate with each other in real time. DND settings allow you to disable all incoming messages you don't want to see. This is useful if you don't want to be disturbed by any messages while you are working. Additionally, you can also try the best Discord bots that can help you manage your guild while you are away. If you're wondering what Discord Do Not Disturb means and how to use it, this tutorial should help. D
 CFosSpeed driver installation error in Windows 11: 3 fixes
May 06, 2023 pm 01:40 PM
As Windows 11 is released to the public, most users are excited to upgrade to the latest version. But some people are facing a very unique problem - Windows 11 cFosSpeed driver error. When users try to upgrade to Windows 11 through Setup, they receive an error message that says Your PC has a service that is not ready for this version of Windows 11. A new version is available. When others try to install the driver and receive the message that cfosspeed driver installation failed. For most people, the cFosSpeed driver itself is a new thing and they have never heard of it before. Therefore, before we proceed
 Error code 22: How to fix graphics device driver Try updating graphics driver or clearing CMOS
May 19, 2023 pm 01:43 PM
What does graphics device error code 22 mean and what causes it? When you encounter error code 22, you will always see the error message This device is disabled. (Code 22). You can view more details about this graphics device driver error code 22 by going to the Device Status area in the device properties. We also discussed Error code 11 in Windows 43. You can also check out our guide on how to fix graphics device error code 31 on your PC. Device is actually disabled: The device in question may throw you this error code 22 and is actually disabled. There are driver issues: Incompatible or corrupted driver files can also cause multiple issues with the device program. Drivers are not the most
 How to fix Windows 11 not detecting your PS4 controller issue
May 09, 2023 pm 04:19 PM
There are many different ways you can play video games on your Windows 11 computer. A classic mouse and keyboard, Xbox controller or PlayStation 4 controller; all run on Microsoft's latest operating system. But there are reports that the PS4 controller may not be recognized on your Windows 11 PC. This may be due to outdated Bluetooth drivers not working properly or DS4Windows not working properly. What are the fixes for PS4 controller not recognized? Your PS4 can connect to your PC via Bluetooth, but many games don't support the controller and prefer Xbox devices. This is how you download and install DS4Windo
 This is how to fix WSL error on Windows 11
May 03, 2023 pm 07:19 PM
WSL errors in Windows 11 can occur due to multiple reasons. The exact message is WslRegisterDistributionFailed with a different error code. Windows Subsystem for Linux (WSL) is a feature that allows developers and typical users to install and use Linux on their Windows computers. While this feature is extremely valuable to developers, it can sometimes lead to mind-boggling complications that are difficult to fix. Fortunately, these mistakes are not insurmountable. In this article, we will discuss all the possible causes and solutions. The most common W in Windows 11


