

Here are the Windows 11 requirements for VMware and Hyper-V

A virtual machine is computer software that creates a virtual environment on a host machine with dedicated memory, hardware, storage, and network settings for different purposes. It enables users to run application, software, and cloud tests.
Most virtual machines are free to use, but others require payment to access advanced features with premium features, primarily for enterprise users.
Some common virtual machines are Hyper-V built into the Windows operating system, and VMware is an enterprise-grade virtual machine built by the VMware cloud company.
For example, VMware Workstation is a desktop management program for running virtual machines on Windows or Linux.
This tutorial will look at Windows 11 specifications to run Hyper V and Vmware virtual machines without facing any issues.
What are Hyper-V and VMware used for?
Keep in mind the following aspects about virtual machines:
- They help run multiple operating systems on a single machine.
- Easier deployment of applications and software, reducing workload, especially during cloud computing configuration.
- These virtual machines are helpful for testing applications and software that you are not sure about. You can use them to test how an application behaves before it is published or installed on your local computer or server.
How do I know if my Windows 11 specs work with VMware and Hyper-V?
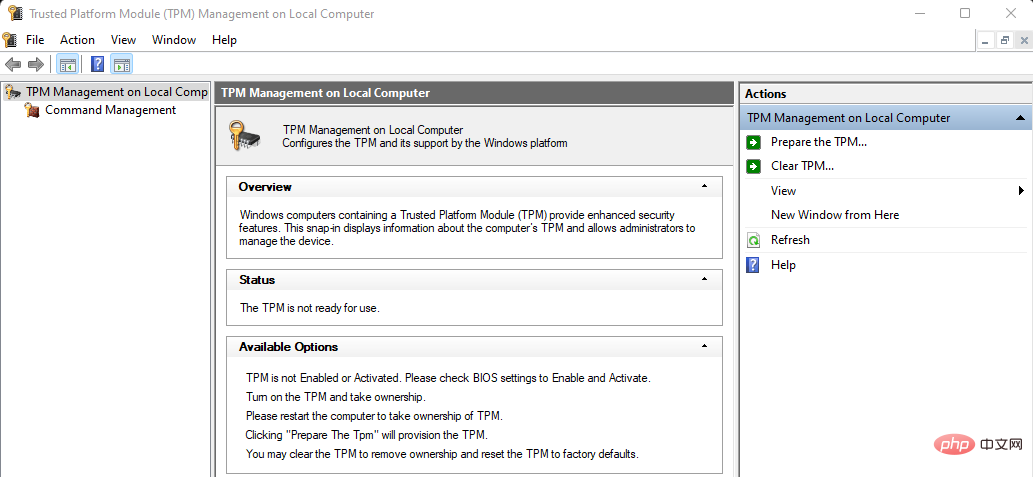
1. Enable Trusted Platform Module (TPM) version 2
Alternative 1
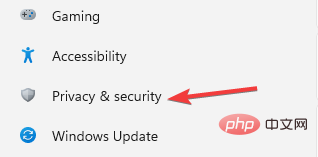
- Go to the search box and type settings and press Enter.
- Open the Settings app and go to the Privacy & Security tab.

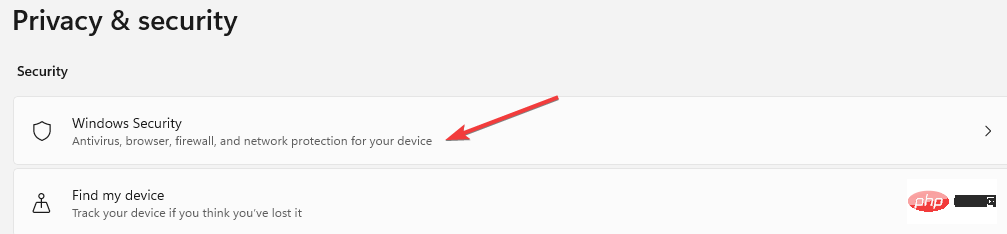
- Select Windows Security Options.
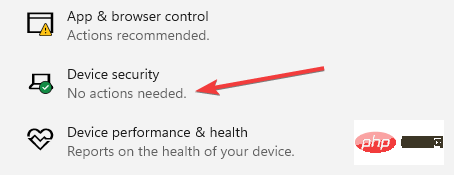
- Select the Device Security option.
- If there is a secure processor detail, select it to verify it is version 2.0, if you don't see any processor, you must enable TPM. If this step is difficult, use the next step.
Alternative 2
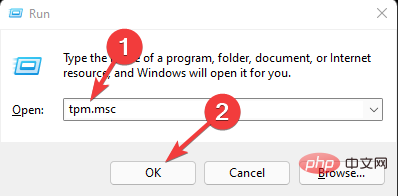
- Press Windows R to open the empty search box.
- Type tpm.msc and click OK.
- If you see a message confirming that the TPM is ready, verify the version to make sure it is 2.0. If you see that a compatible TPM is not available, you must turn it on.
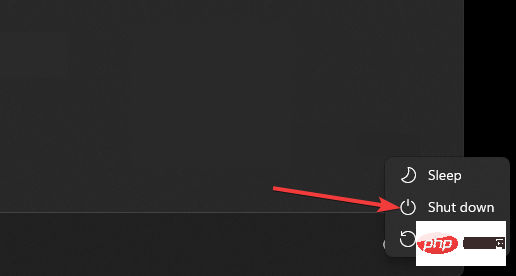
How to turn on TPM
- Restart your machine.
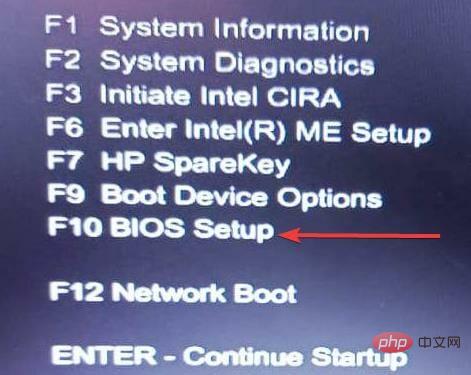
- Use your startup key to enter BIOS setup Esc, either F10, F2, F9, Then go to security settings.
- Select TPM Embedded Security and turn it on.
- Click Save to update the changes, then Exit the BIOS by restarting the computer.


TPM 2.0 ensures that Windows 11 delivers identity protection, BitLocker data protection, and other features.
It stores passwords, certificates and encryption keys from hackers. Most computers have these features, but they are turned off and you can turn them on.
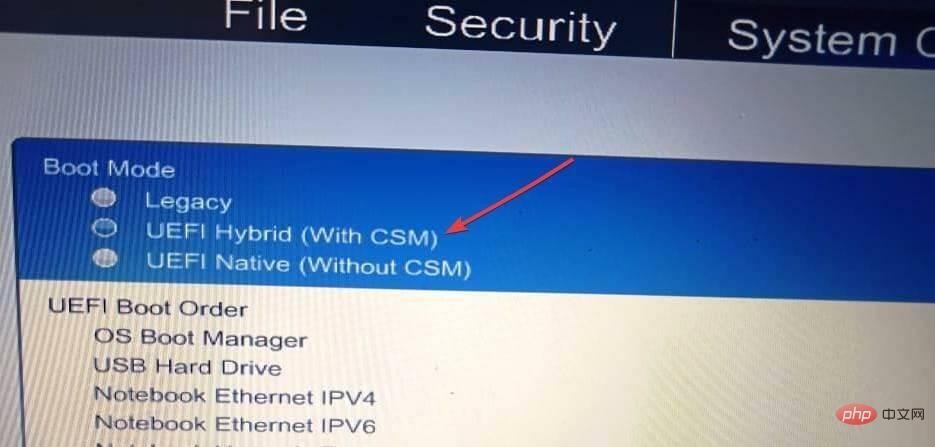
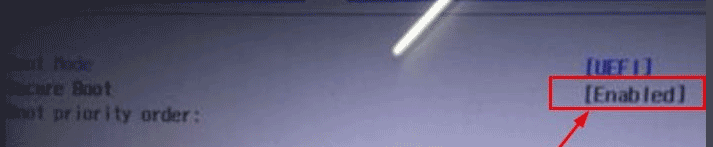
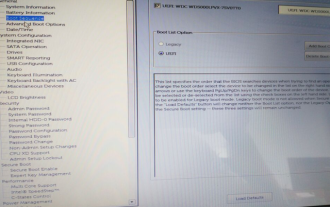
2. Enable UEFI for Secure Boot
- Restart the computer.
- Boot your computer by pressing the relevant key ( , , or F9, to enter BIOS Setup). F10F2F1
- Change the boot mode from Legacy mode to UEFI.

Secure Boot helps prevent malware attacks or software when the machine starts. Many PCs come with this feature, but if your PC doesn't support it, you'll have to do it manually.
All changes in the BIOS (Basic Input Output System) have been completed. Most of these settings vary depending on the type of PC manufacturer. If this step doesn't work for your PC, try visiting the manufacturer's website and see how to change this setting.
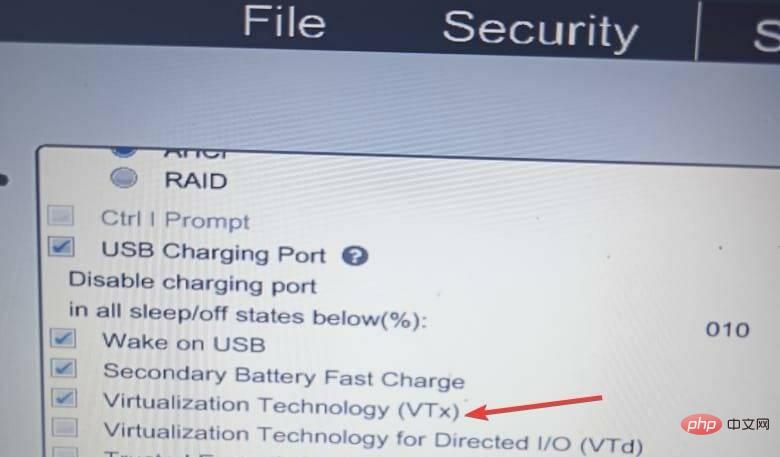
3. Enable hardware virtualization in hardware
- Turn off the computer.
- Start the computer and press F10 to enter the BIOS settings. Some computers use F9, F2, F12, F2, DEL, or Esckey.
- Select the Configuration tab.
- Select the Virtualization Technology (VTx) option by moving the down arrow key.
- Press Save and exit BIOS to save changes.
- Restart the machine and you will be able to use Hyper-V and VMware.

4. 4GB of RAM
The computer must have at least 4 GB of random access memory (RAM). Having more memory allows the machine to run quickly without hanging issues.
5. 1 GHz Processor
You must ensure that it is compatible with 64-bit processors and supports AMD, Intel, and Qualcomm processors.
The processor must have two or more cores. It should have secondary address translation to ensure that Hyper-V retrieves data that translates virtual addresses into physical memory, thus saving memory and CPU usage.
6. 60GB and above hard disk storage
Its minimum storage space should be 64GB and above. You must set up more storage space for future updates.
7. The graphics card is compatible with DirectX 12
It helps to improve the use of multimedia, namely games, audio, graphics and network graphics.
8. Good screen display
The screen display should have 720 high definition, displaying 8 bits per color channel. It makes it easier to scale the monitoring mode of running virtual machines.
How do I benefit from running Hyper-V and VMware?
They are more secure by providing an extra layer of security to avoid any cybersecurity attacks. It helps recover your servers, data, and applications more easily in the event of a malware or cybersecurity attack. They are more secure by providing an extra layer of security to avoid any cybersecurity attacks.
It reduces costs and time because there is no need to set up a physical server and applications and software can be quickly set up on virtual machines.
It improves business functionality, especially applications, due to little or no server downtime. They make it easier to move business functions from one virtual machine to another if anything goes wrong.
It increases the productivity of the business as all business products are deployed in one place.
Many people have difficulty setting up a virtual machine on Windows 11 due to its recent launch.
Everyone is embracing virtualization from businesses and individuals alike. Care must be taken when setting them up to avoid simple mistakes such as improper configuration that can lead to cyber attacks, applications running improperly, etc.
There are multiple ways to install Hyper-V on a Windows 11 PC. Hyper-V and VMware provide many opportunities to try many things from testing, deployment and more.
The above is the detailed content of Here are the Windows 11 requirements for VMware and Hyper-V. For more information, please follow other related articles on the PHP Chinese website!

Hot AI Tools

Undresser.AI Undress
AI-powered app for creating realistic nude photos

AI Clothes Remover
Online AI tool for removing clothes from photos.

Undress AI Tool
Undress images for free

Clothoff.io
AI clothes remover

AI Hentai Generator
Generate AI Hentai for free.

Hot Article
Hot Tools

Notepad++7.3.1
Easy-to-use and free code editor

SublimeText3 Chinese version
Chinese version, very easy to use

Zend Studio 13.0.1
Powerful PHP integrated development environment

Dreamweaver CS6
Visual web development tools

SublimeText3 Mac version
God-level code editing software (SublimeText3)
Hot Topics
 1378
1378
 52
52

 Ventoy secure boot settingsSecure Boot
Jun 18, 2024 pm 09:00 PM
Ventoy secure boot settingsSecure Boot
Jun 18, 2024 pm 09:00 PM
Ventoy is a USB boot tool that can directly boot ISO/WIM/IMG/VHD(x)/EFI and other types of files in the USB flash drive. It is very easy to use. Laptops have secure boot turned on by default. If they are not turned off or cannot be turned off, they cannot be booted from a USB device. Ventoy also supports secure boot. The principle is to inject a GRUB installation certificate into the current computer. As long as your computer After being injected once, any USB disk PE booted based on grub can pass. The official description of Ventoy is a GIF image. The playback speed is too fast and you may not be able to remember it. The editor has divided the GIF image to make it easier to understand. Ventoy secure boot has EnrollKey and Enro
 Acer laptop disables secure boot and removes password in Bios
Jun 19, 2024 am 06:49 AM
Acer laptop disables secure boot and removes password in Bios
Jun 19, 2024 am 06:49 AM
I repaired an Acer laptop and had to turn off secure boot when entering PE. I recorded how to turn off secure boot and remove the password from Bios. Turn on the computer and when the screen is not on, keep pressing the F2 key to enter the BIOS. On Acer laptops, turn off Secure Boot and press the arrow keys to switch to Boot. If SecureBoot is gray and unclickable, switch to the Security page, select SetSupervisorPassword and press Enter to set the password. Then switch to Boot, SecureBoot can be selected as Disabled, and press F10 to save. Modify and clear the BIOS password on your Acer notebook. Switch to the Security menu and select SetSupervisorPasswo.
 Convert VMware to VirtualBox and vice versa
Feb 19, 2024 pm 05:57 PM
Convert VMware to VirtualBox and vice versa
Feb 19, 2024 pm 05:57 PM
Virtual machines are an affordable way to experience and use multiple operating systems on a single computer. VMWare and VirtualBox are the two major brands in the virtual machine industry. You can easily convert a VMware virtual machine to a VirtualBox virtual machine and vice versa, giving you the flexibility to switch machines between them without having to recreate them. Migrating a virtual machine from VMWare to VirtualBox or vice versa is not complicated. Just follow the instructions below and it's easy to do. How to convert VMware to VirtualBoxVMwareVM is stored in .vmx format and then converted to .ovf, this is VirtualBox and VMWare
 Dell computer bios interface to set USB disk startup items
Feb 10, 2024 pm 10:09 PM
Dell computer bios interface to set USB disk startup items
Feb 10, 2024 pm 10:09 PM
How do you set up a USB drive if your computer is a Dell laptop? Many friends have found that Dell laptops will not display the USB disk option by pressing the boot hotkey, so they need to enter the BIOS to set up the USB disk boot, so what if they don't know how to operate it? Now follow the editor’s steps to demonstrate how to set up a USB flash drive on a Dell laptop. Many friends assemble Dell computers, but don't know how to use the USB boot tool after entering the USBPE interface. Many friends don't know that they need to enter the BIOS interface to set up USB boot, so pressing the boot hotkey will not appear. what should we do? Let’s see how Dell sets up USB boot! Set up Dell laptop to reinstall system bootable from USB disk
 How to install, configure and use the 'Windows Sandbox' feature
Feb 19, 2024 pm 01:00 PM
How to install, configure and use the 'Windows Sandbox' feature
Feb 19, 2024 pm 01:00 PM
Windows Sandbox is a feature built into the Windows 11 and Windows 10 operating systems that allows users to install and test unverified applications or visit websites in a lightweight virtual environment while protecting the main system from potential threats. Overall, this system provides a safe and isolated testing environment, similar to a virtual machine, but easier to use. Next, this article will introduce the detailed steps to install, configure and use the Windows Sandbox feature on Windows 11. Introduction to Windows Sandbox Features Windows Sandbox (also known as Windows Sandbox) is essentially a lightweight virtualization solution focused on providing efficient and secure virtual environments. compared to traditional
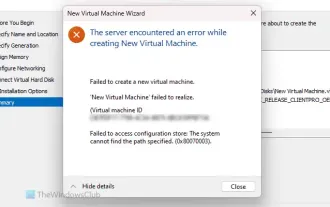 The server encountered an error, 0x80070003, while creating a new virtual machine.
Feb 19, 2024 pm 02:30 PM
The server encountered an error, 0x80070003, while creating a new virtual machine.
Feb 19, 2024 pm 02:30 PM
If you encounter error code 0x80070003 when using Hyper-V to create or start a virtual machine, it may be caused by permission issues, file corruption, or configuration errors. Solutions include checking file permissions, repairing damaged files, ensuring correct configuration, and more. This problem can be solved by ruling out the different possibilities one by one. The entire error message looks like this: The server encountered an error while creating [virtual machine name]. Unable to create new virtual machine. Unable to access configuration store: The system cannot find the path specified. (0x80070003). Some possible causes of this error include: The virtual machine file is corrupted. This can happen due to malware, virus or adware attacks. Although the likelihood of this happening is low, you can't completely
 The system has posted in safe mode ASUS motherboard
Jun 19, 2024 am 07:35 AM
The system has posted in safe mode ASUS motherboard
Jun 19, 2024 am 07:35 AM
After the computer is turned on, it prompts The system has posted in safe mode. You can set it in the BIOS to ignore the F1 error. Although it does not prompt, it directly enters the BIOS when it is turned on. Sometimes F1 is useless every time it is turned on. Then you need to restart the BIOS, and then exit the BIOS to enter the system. . thesystemhaspostedinsafemode=The system is in safe mode. This problem is relatively common on ASUS motherboards. As long as you turn off the XMP of the memory and adjust the memory frequency back to normal, you can boot normally without the thesystemhaspostedinsafemode error. Updating the latest motherboard BIOS should be OK.
![Windows PC keeps booting into BIOS [Fix]](https://img.php.cn/upload/article/000/887/227/171012121854600.jpg?x-oss-process=image/resize,m_fill,h_207,w_330) Windows PC keeps booting into BIOS [Fix]
Mar 11, 2024 am 09:40 AM
Windows PC keeps booting into BIOS [Fix]
Mar 11, 2024 am 09:40 AM
If your Windows PC frequently enters the BIOS interface, this may cause difficulty in use. I'm stuck with the BIOS screen every time I turn on my computer, and restarting doesn't help. If you are facing this problem, then the solutions provided in this article will help you. Why does my computer keep booting in BIOS? Your computer's frequent restarts in BIOS mode may be caused by a variety of reasons, such as improper boot sequence settings, damaged SATA cables, loose connections, BIOS configuration errors, or hard drive failures, etc. Fix Windows PC Keeps Booting into BIOS If your Windows PC keeps booting into BIOS, use the fix below. Check your boot order and re-plug the