How to add QT TabBar to Windows 11 File Explorer
Windows 11 made a lot of big changes when it first came out, simplifying many menus and making the entire system more approachable and user-friendly. But some aspects of the operating system are still of the past, and this is the case with File Explorer.
File Explorer is the default file manager of the system, and it was very confusing to use in the past. Until the release of Windows 11, the application became even simpler and easier to use.
However, if you want to browse, it still forces you to open two separate windows instead of tabs, which can be a bit annoying.
We live in a world where our favorite web browsers like Firefox, Chrome, and Edge allow you to surf the web with multiple tabs open without having to switch between two separate windows .
Multiple tabs are everywhere, and it’s hard to imagine a browsing app without this feature.
Luckily, there is a way to add multiple tab functionality to File Explorer, and that's by downloading QT TabBar. This is the best way to run multiple tabs on Windows 11.
What is QT TabBar?
It is a third-party software that integrates itself into File Explorer and allows multiple tabs to be opened at the same time.
This may not sound like a big deal since it's so ubiquitous on web browsers, but when it's missing it's very noticeable and makes using the app less intuitive.
It’s unclear whether Microsoft plans to include this feature in future versions of Windows 11. This is certainly possible because Windows 10’s File Explorer has multiple tab functionality.
It's entirely within Microsoft's purview to add this content, but nothing has been officially revealed.

Installing and configuring QT TabBar can be a bit tricky. This tutorial will show you how to download and configure the QT TabBar so that you can customize the application to your needs. QT TabBar requires a Zip file application such as WinRar or 7Zip.
How to enable QT TabBar in Windows 11?
1. Download QT TabBar
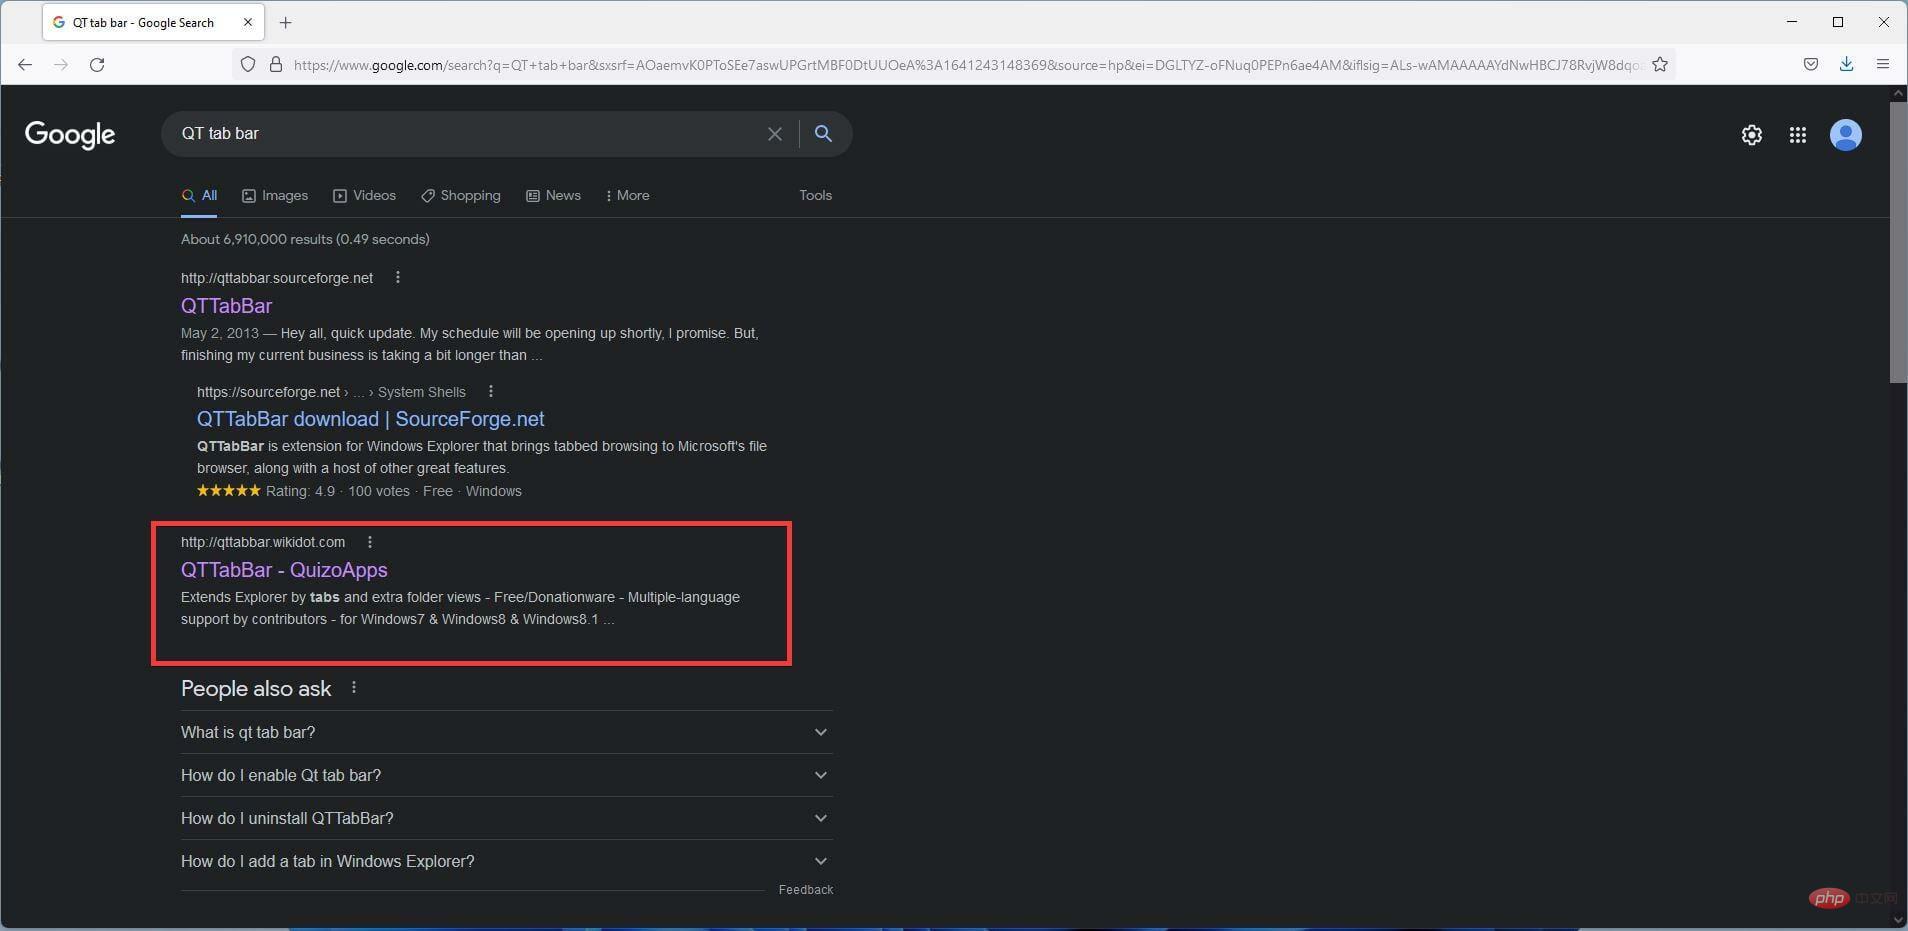
- In the search bar, search QT TabBar.
- Find and click theQuizoApps entry.

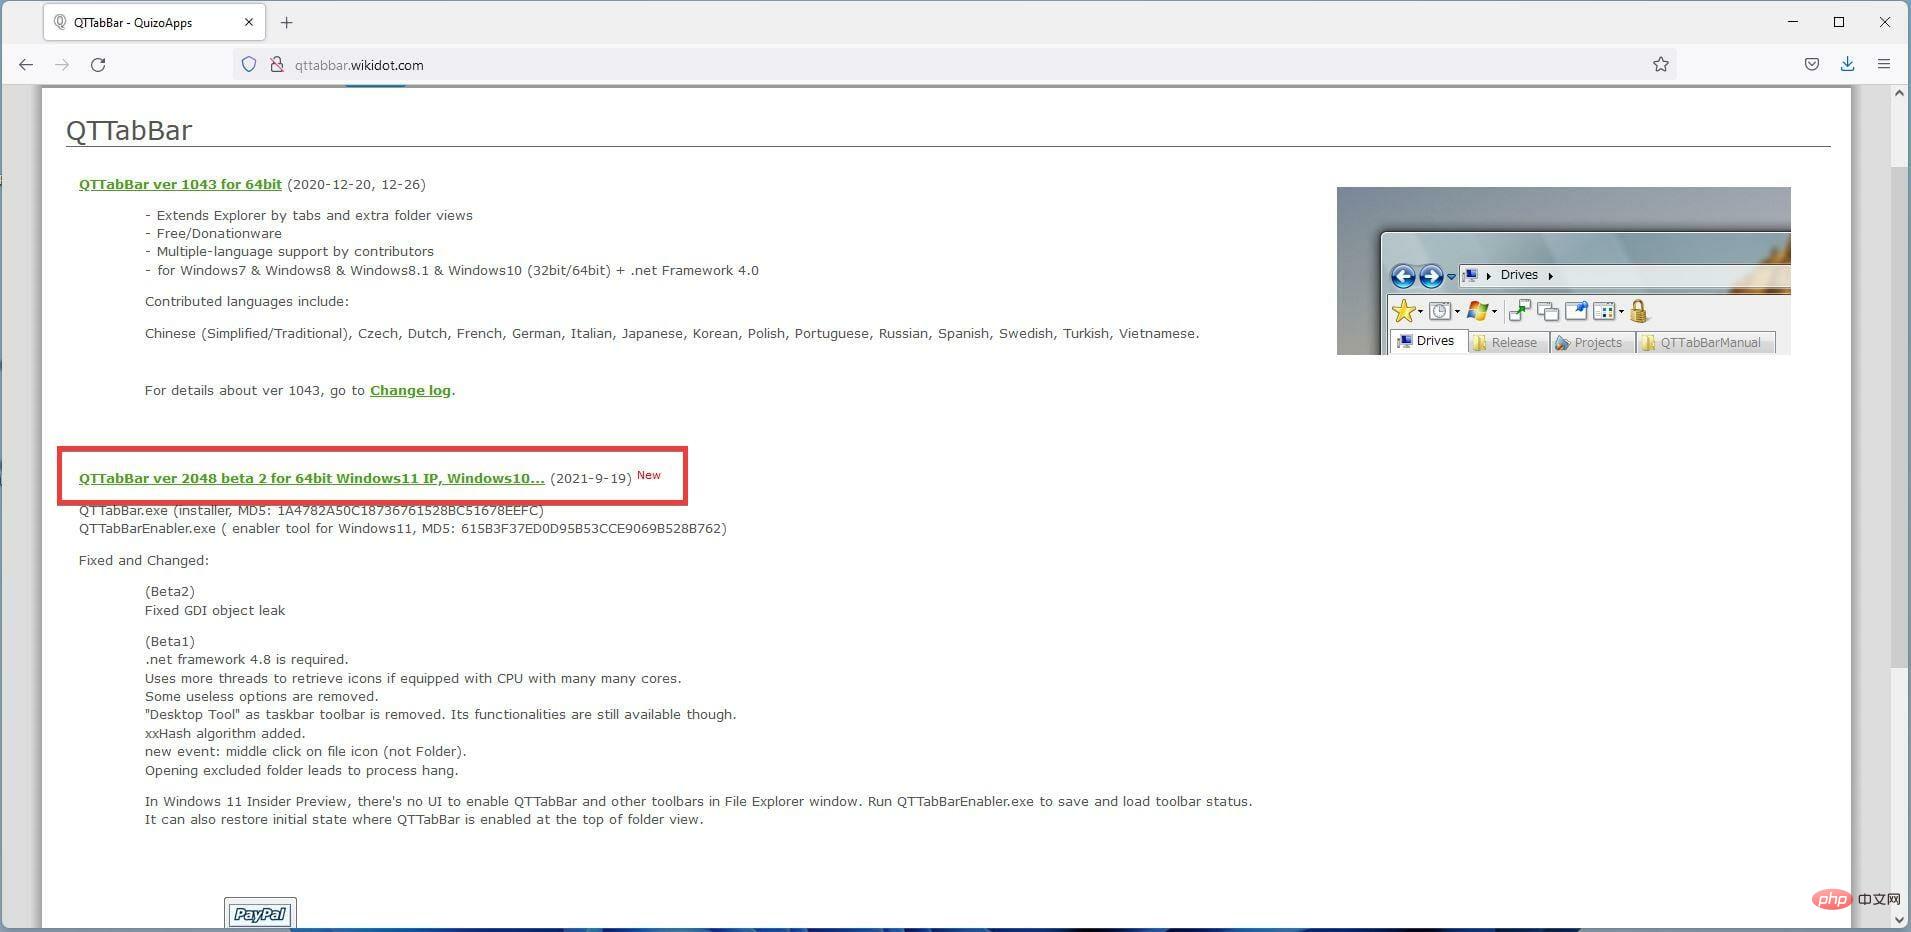
- Click the QT TabBar for Windows 11 hyperlink. This will start the download.

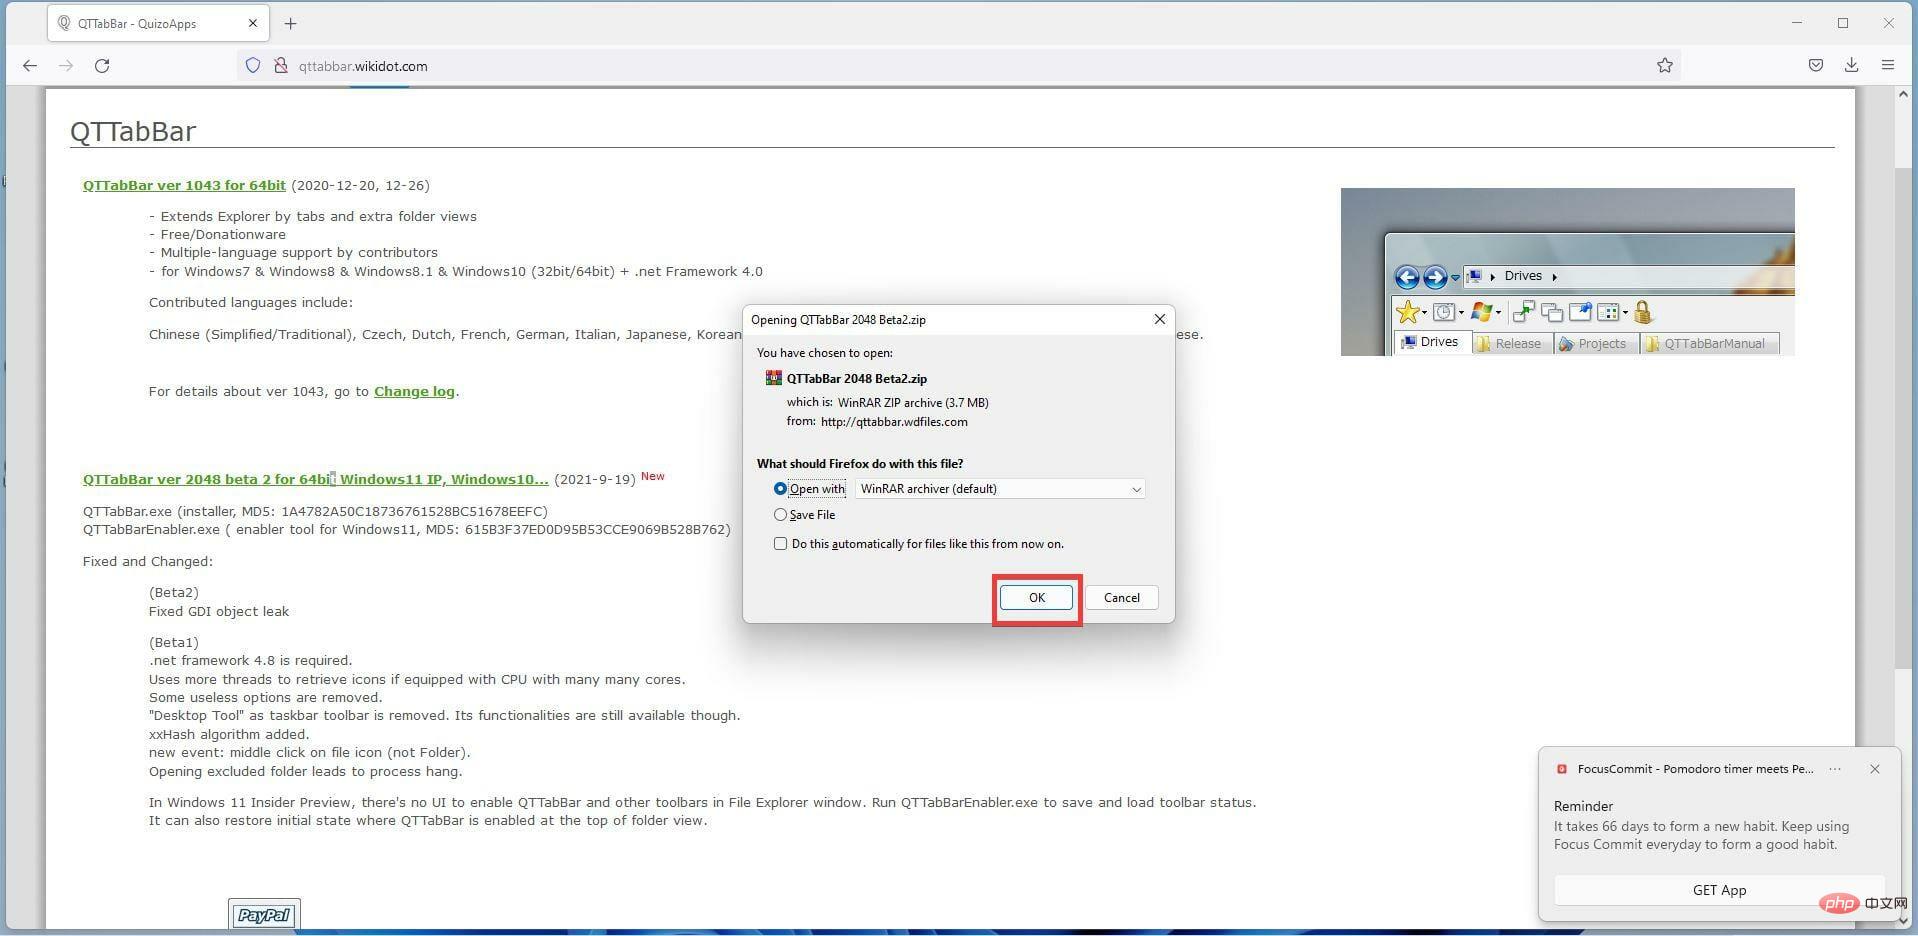
- A small prompt may appear asking you what you want to do with the file. Click Open with and select your Zip file opener application.
- Instead, you can save the file and keep it for later until you have an application to open it.
- After making your selection, click "OK".

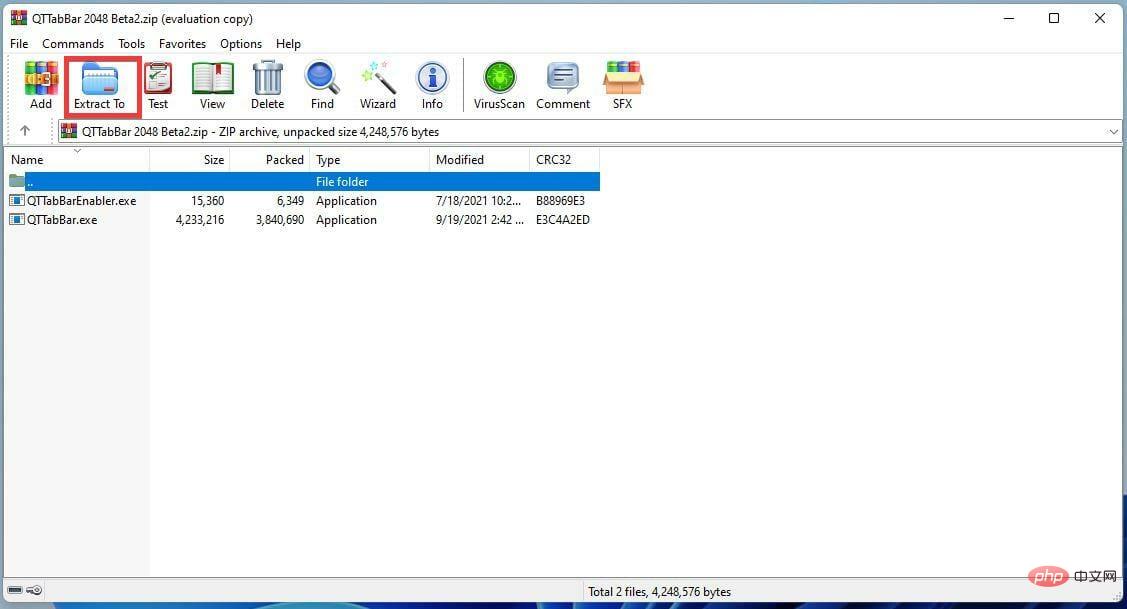
- After downloading, the Zip file application will open.
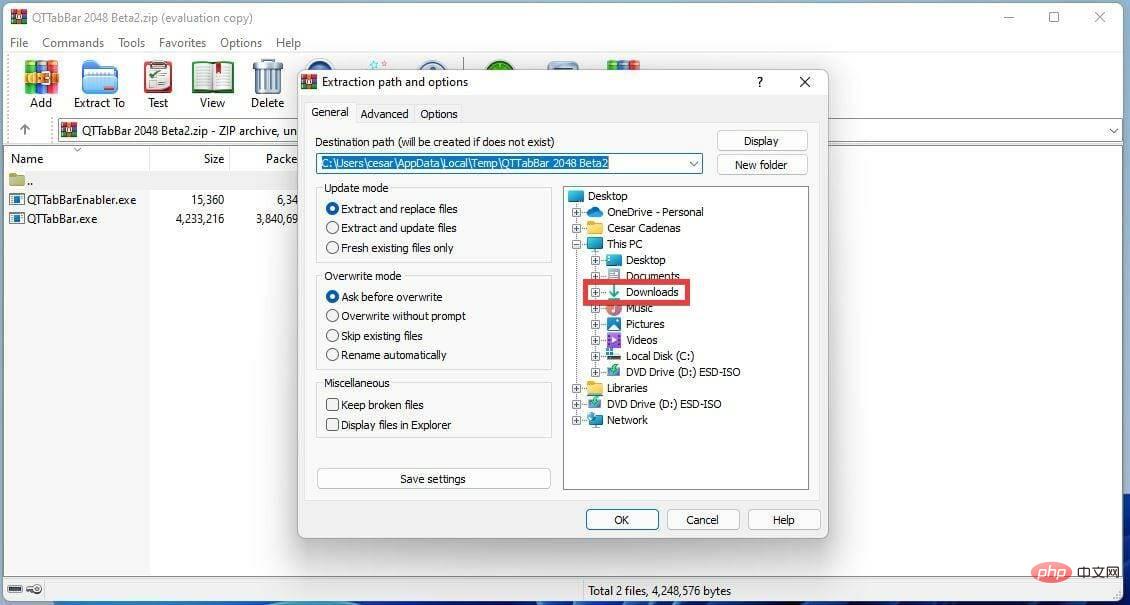
- Click on the folder and select Extract to in the top bar.

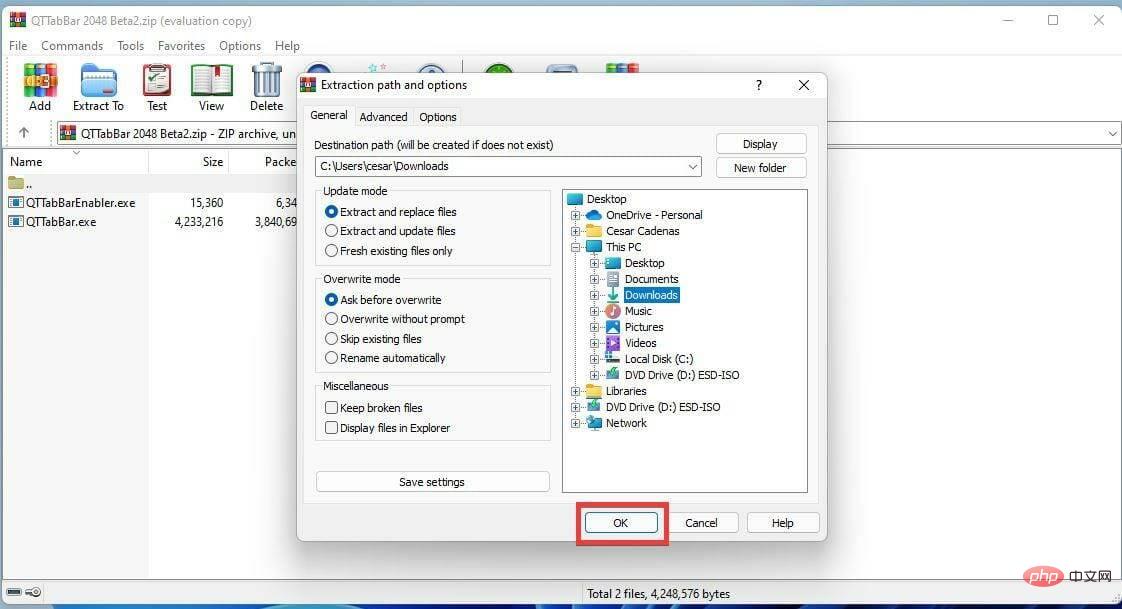
- Select the location to which you want to extract the files. For example, this will select Downloads.

- Click OK.

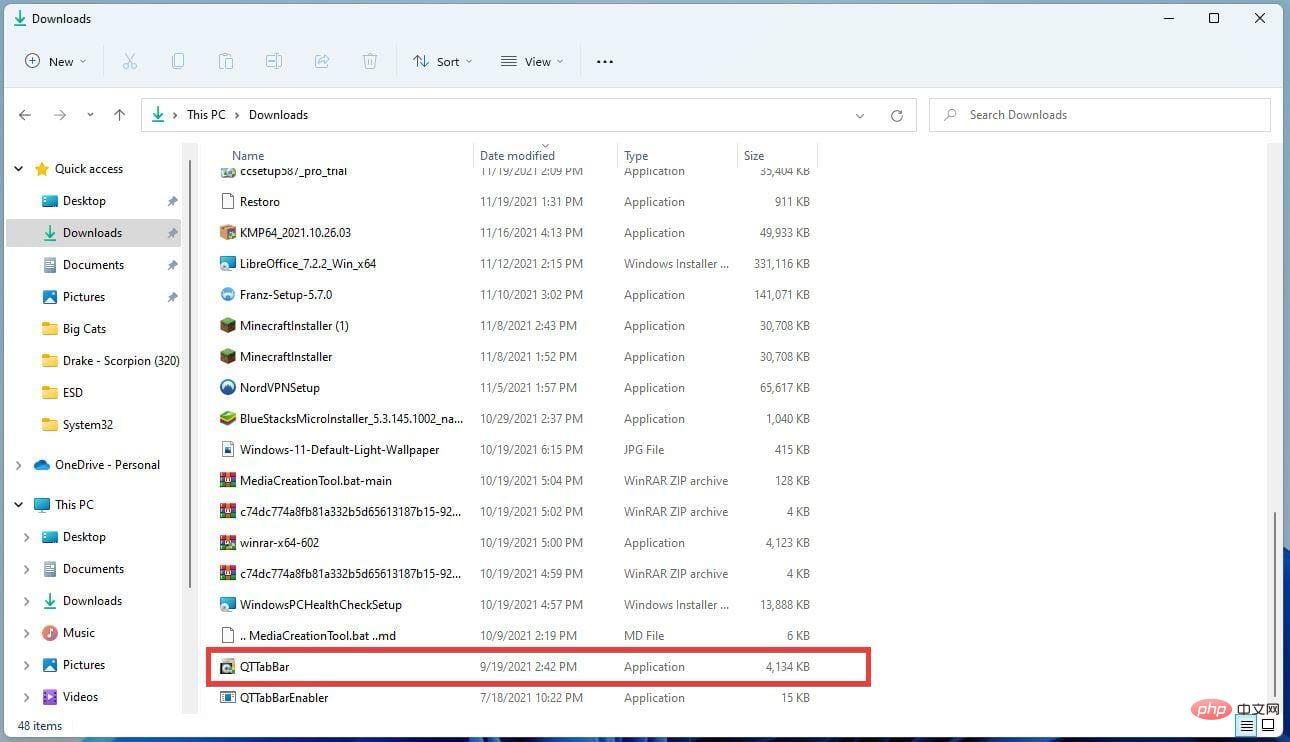
- Go to the destination where the file was extracted to.
- Find and double-click the installation file.

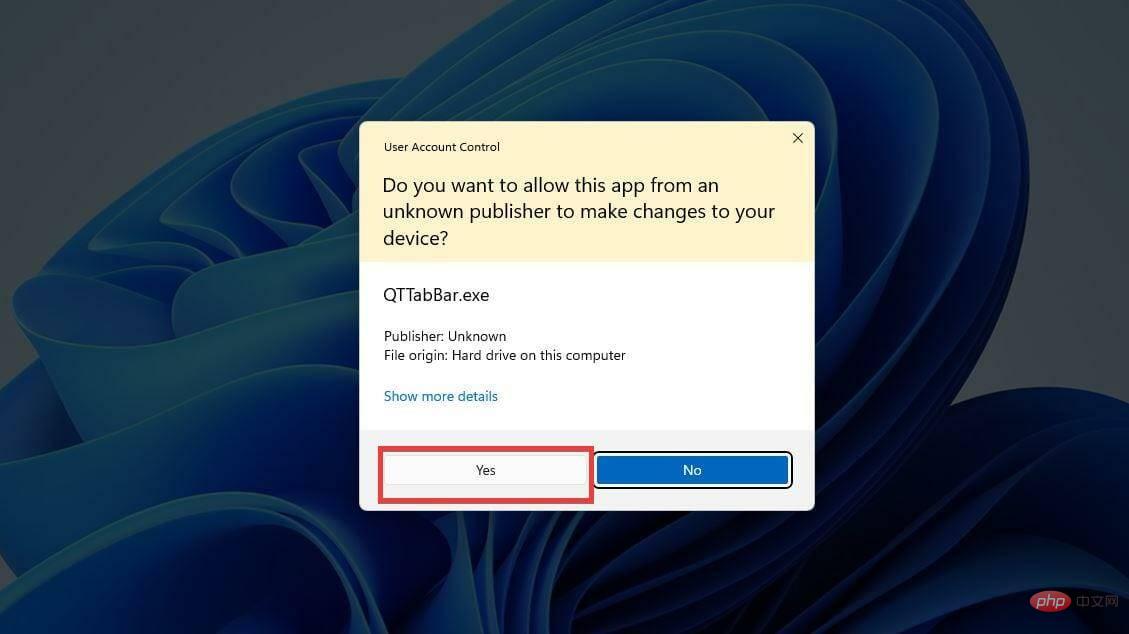
- A small window will appear asking if you want to make changes. Select Yes.

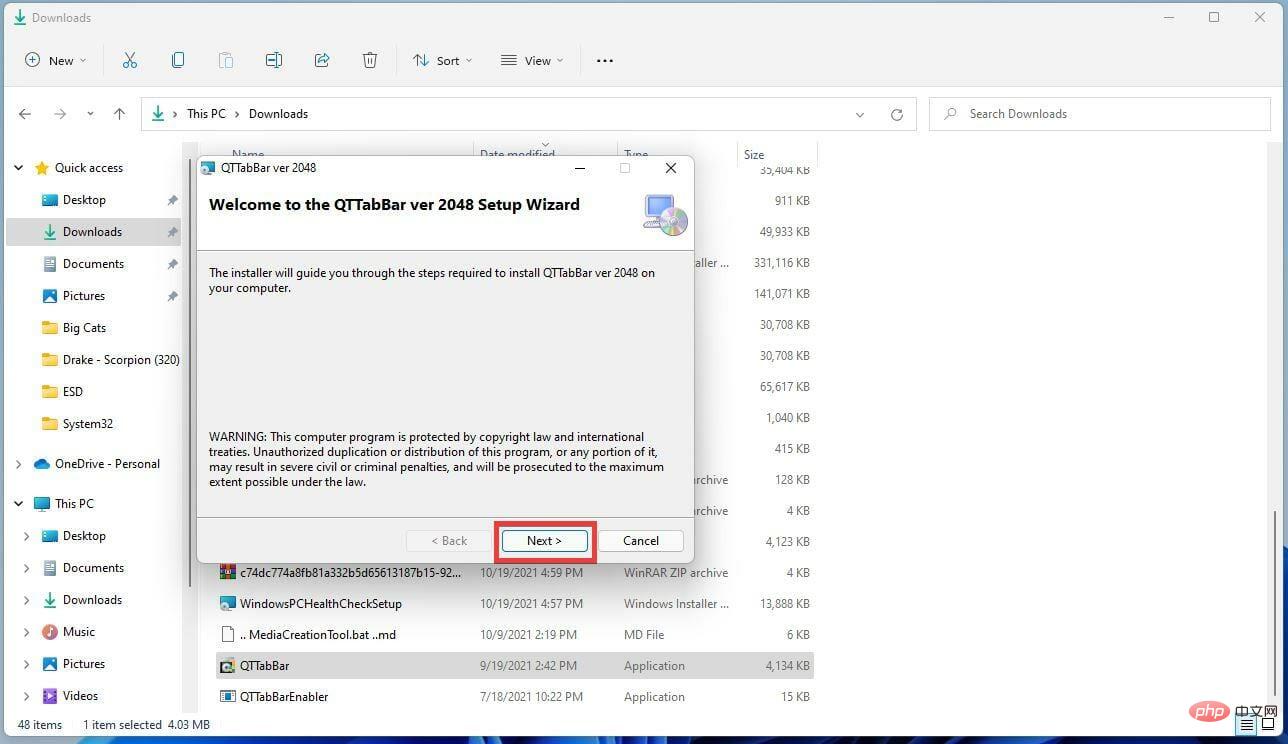
- The QT TabBar setup wizard will appear. Select Next.

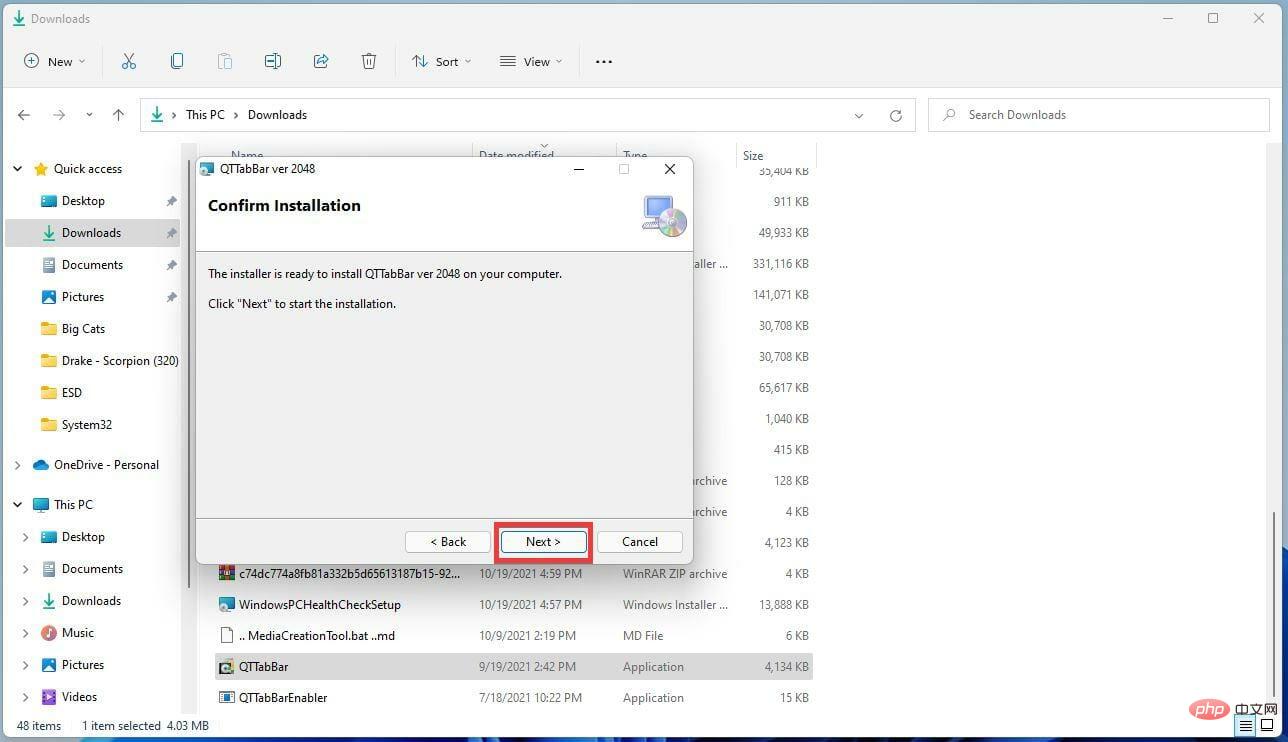
- In the next window, select Next to start the installation.

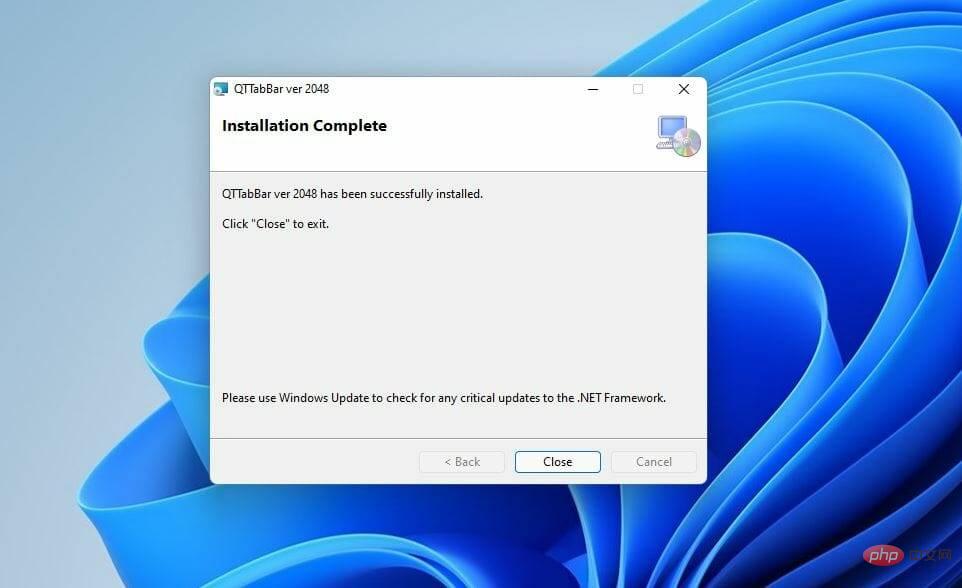
- After installation, QT TabBar will be automatically installed into File Explorer.

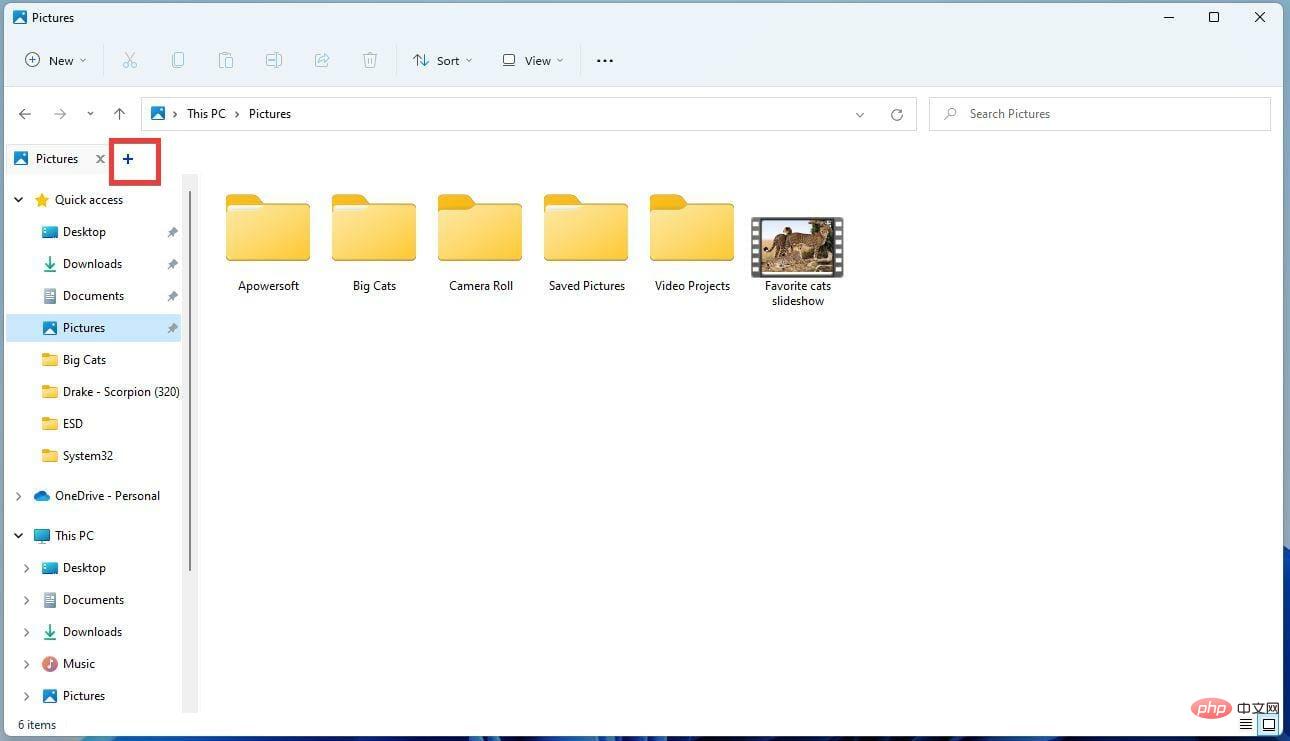
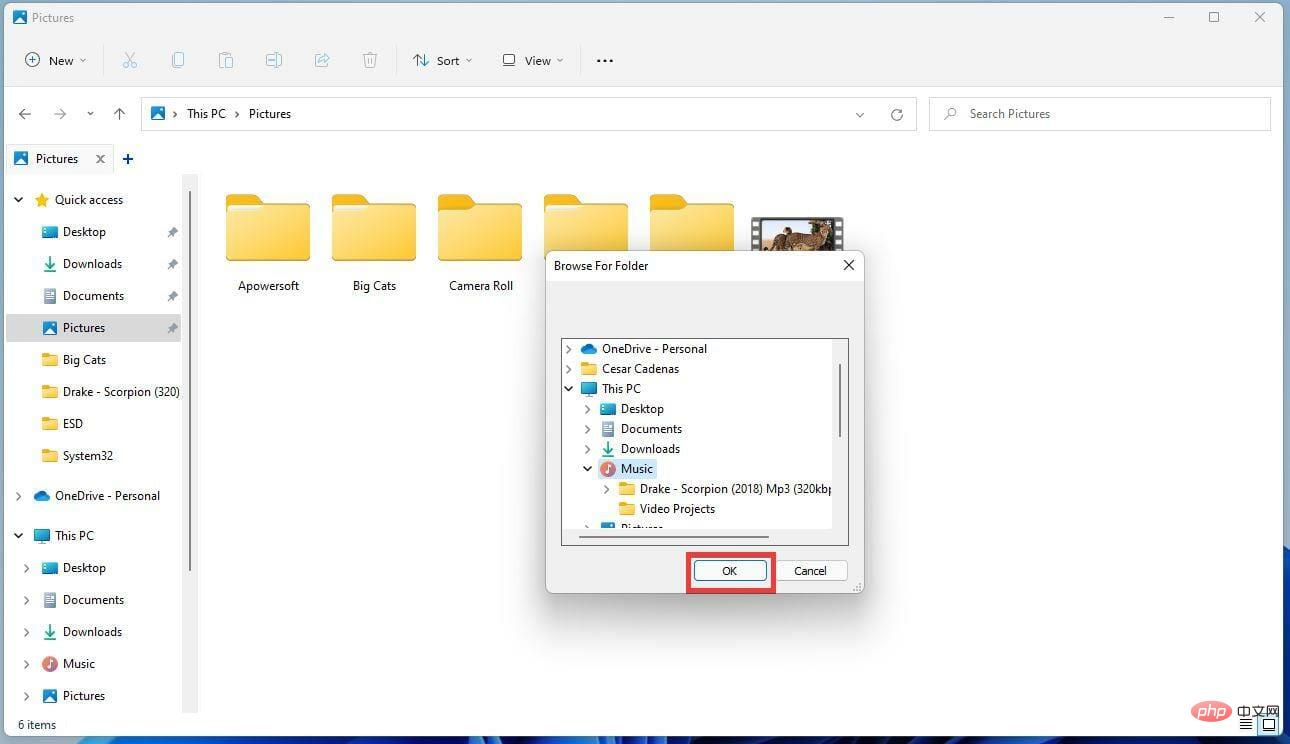
- To add a tab, click the followed by the sign in the top bar.

- A small window will appear where you can select what you want to open from the folder to a certain part of your computer.

- After making your selection, click "OK".

2. Configure QT TabBar
- To change and configure the settings of QT TabBar, first open File Explorer .
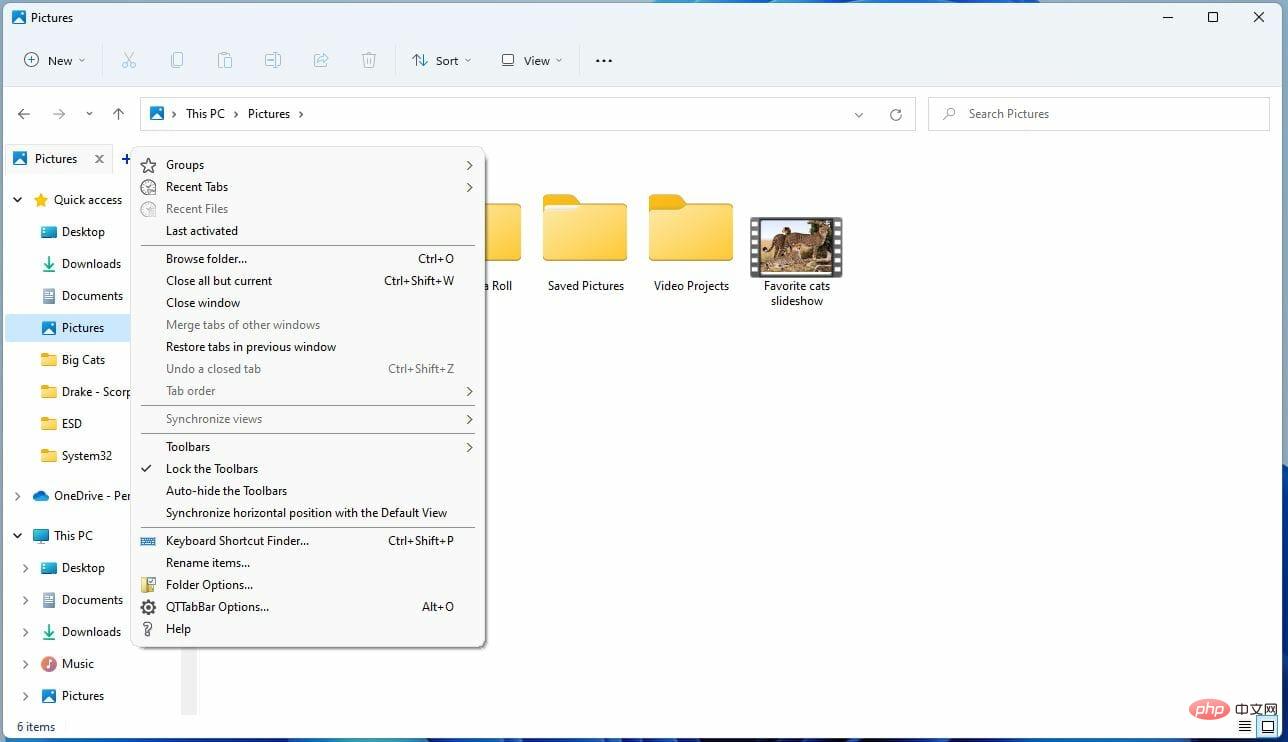
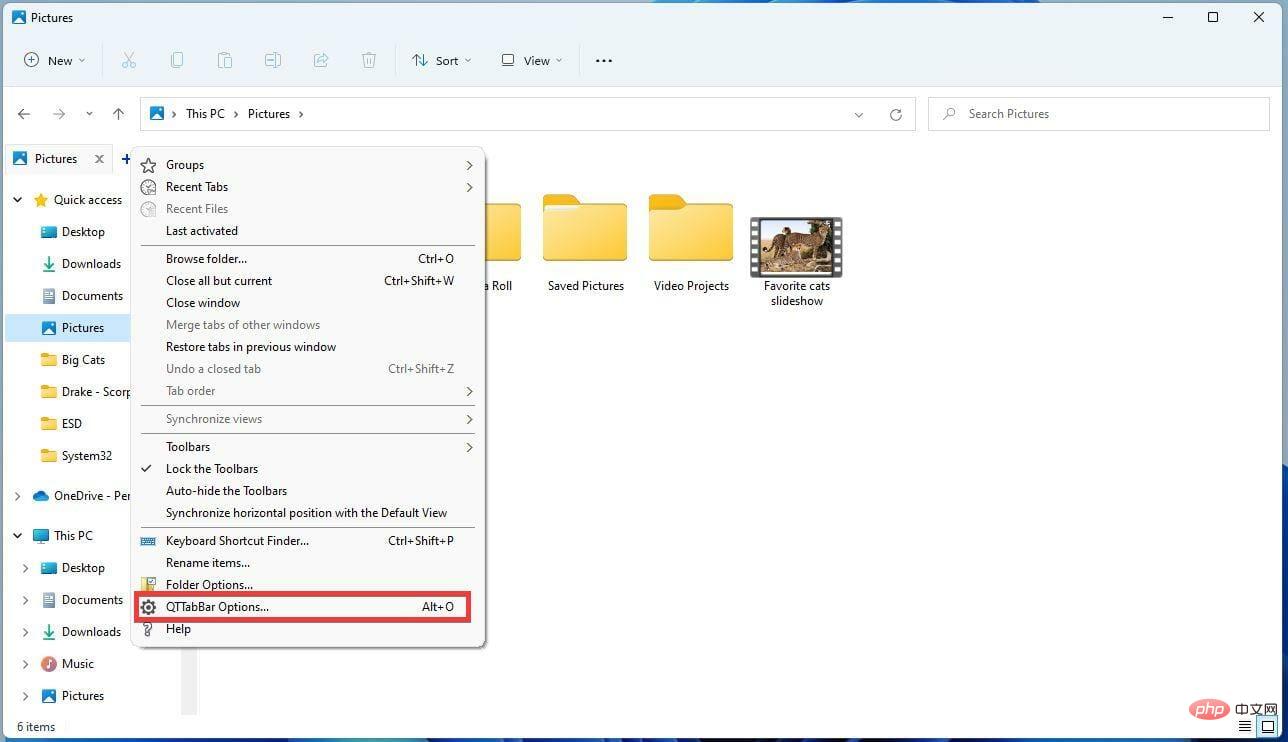
- Hover over the plus sign next to the tab and right-click it.

- Scroll down and click on the QTTabBar option....

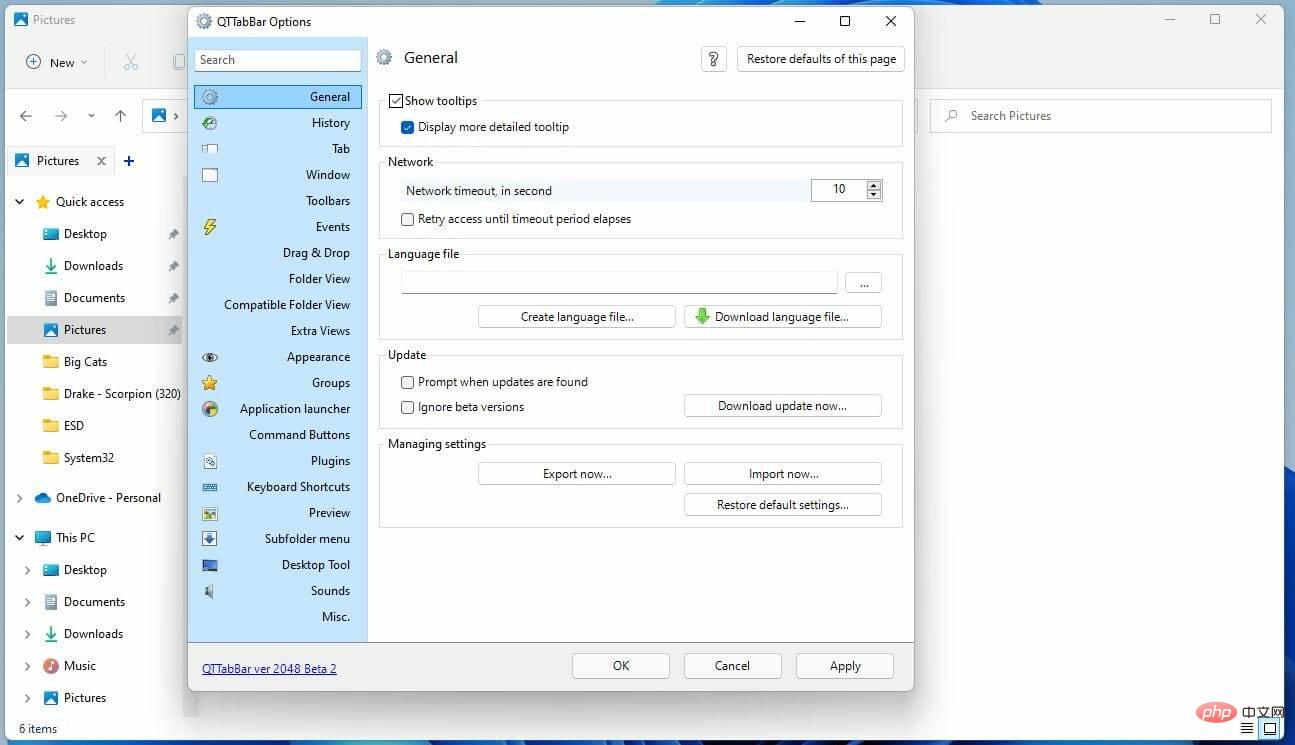
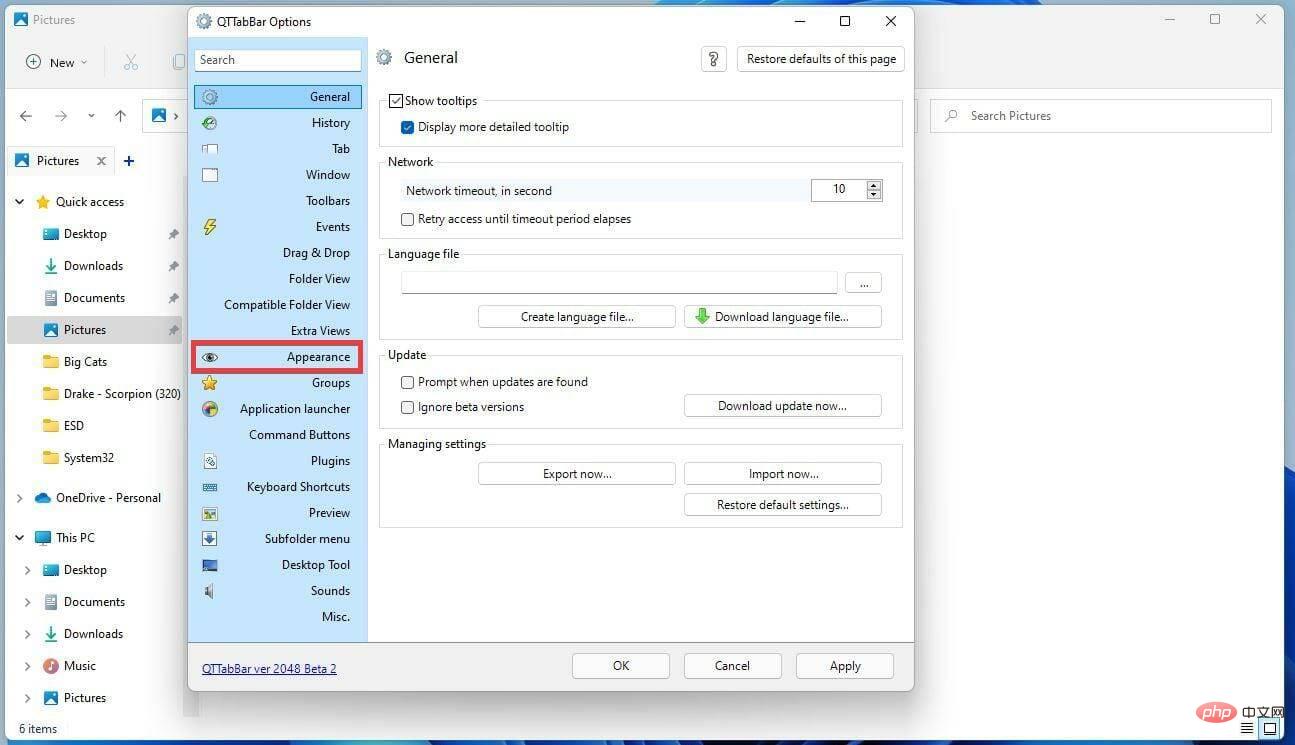
- The QTTabBar options window will open, allowing you to configure the tab according to your needs.
- The General tab allows you to change File Explorer's language file (if you have one), and you can even choose whether you want to be notified of any updates.

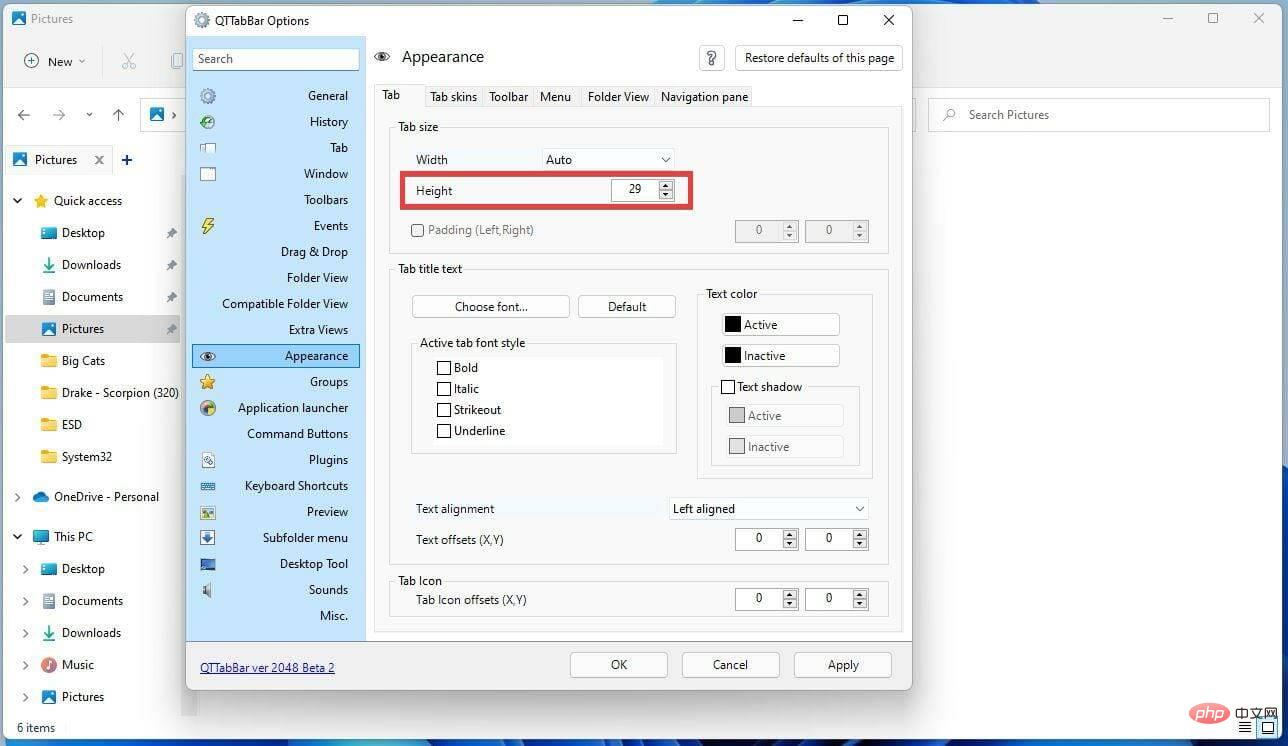
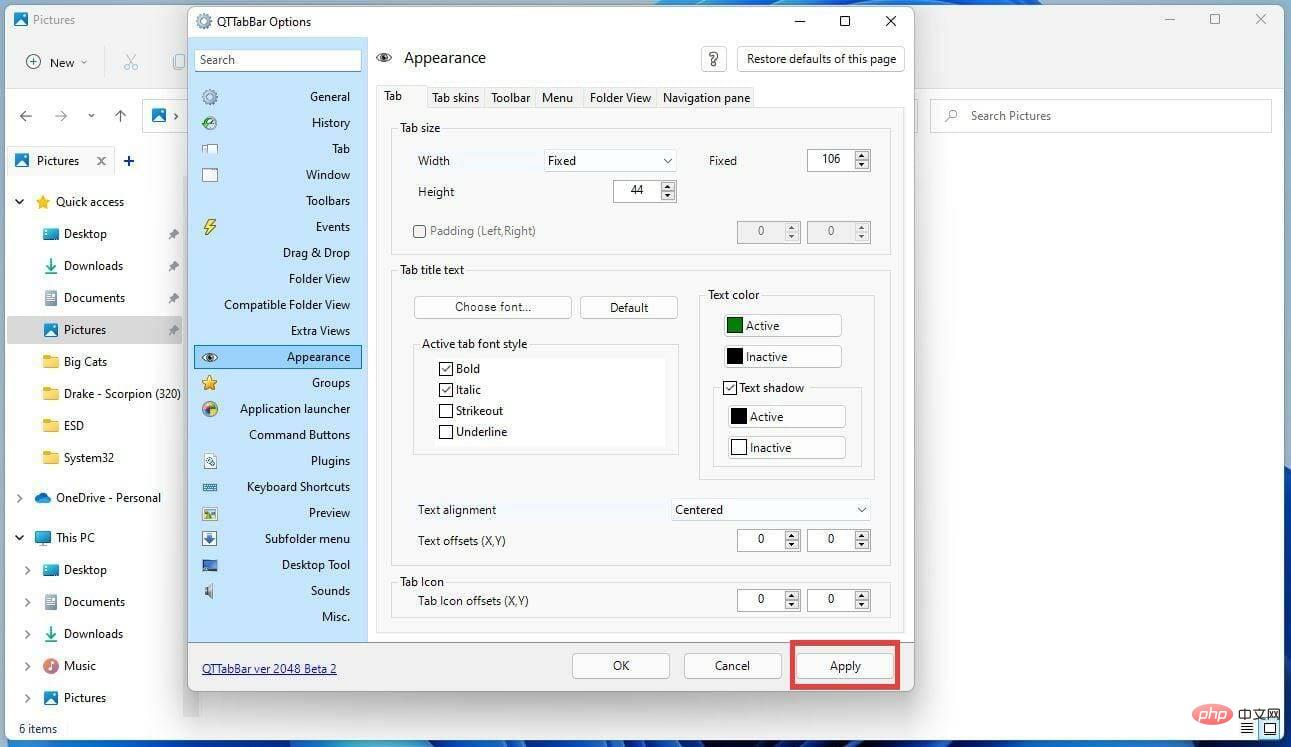
- If you want to change the appearance of the tab, click the "Appearance" tab on the left.

- To change the appearance of the tab size, adjust the tab's Height number.

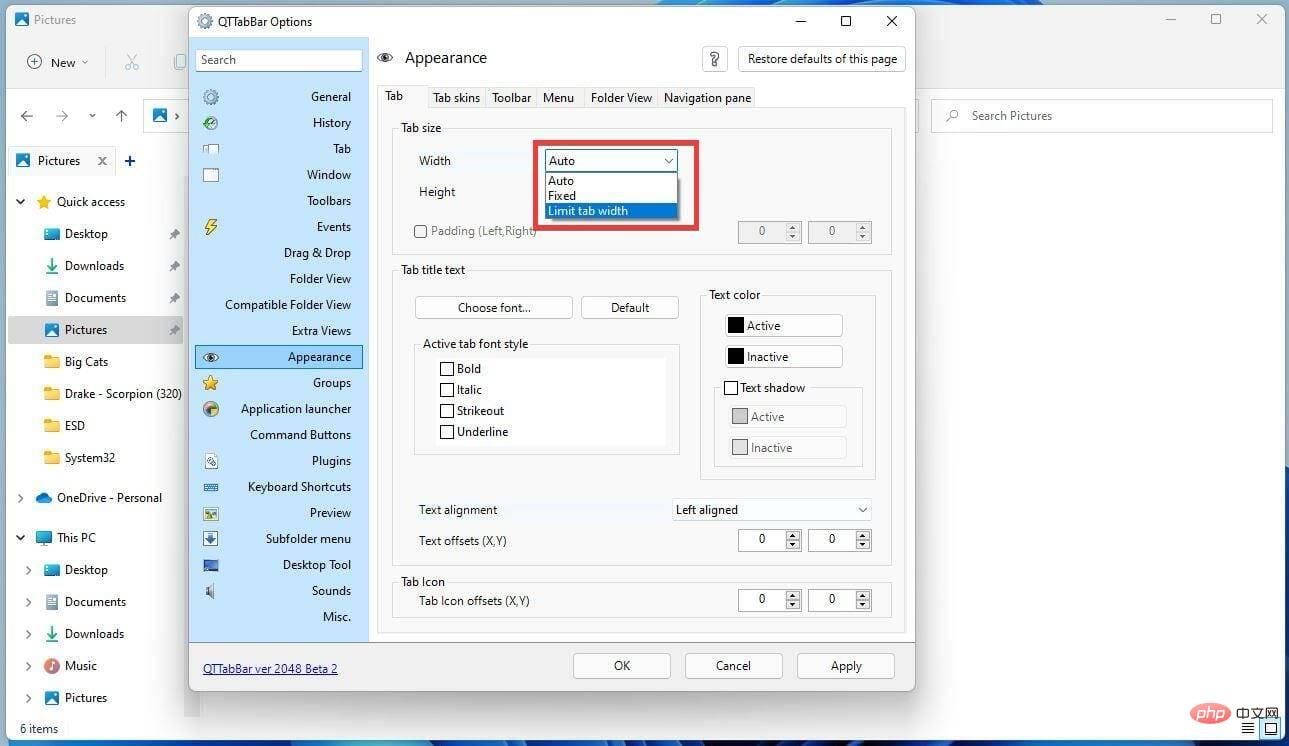
- To change the width, click the drop-down menu Width and select an option.
- Auto adjusts the width based on the height, Fixed allows you to set the size manually, and Limit tab width increases the limit on how big a tab can be.

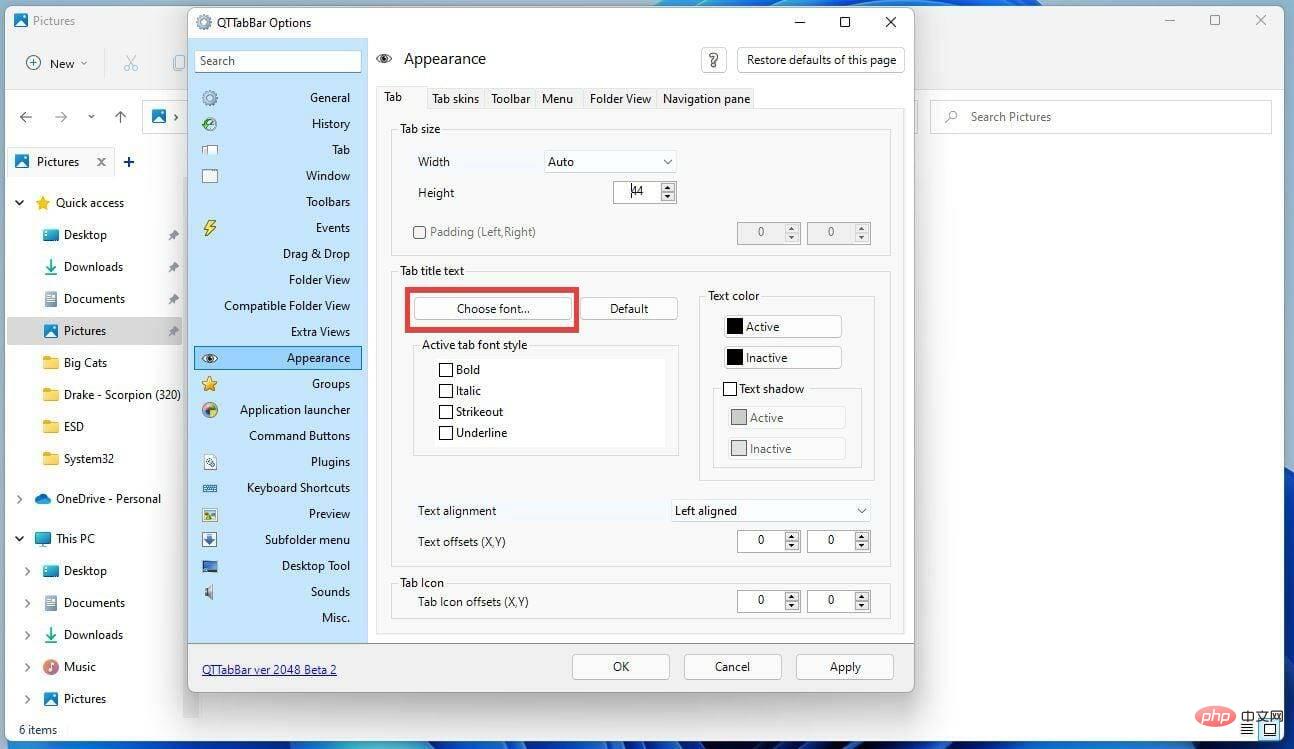
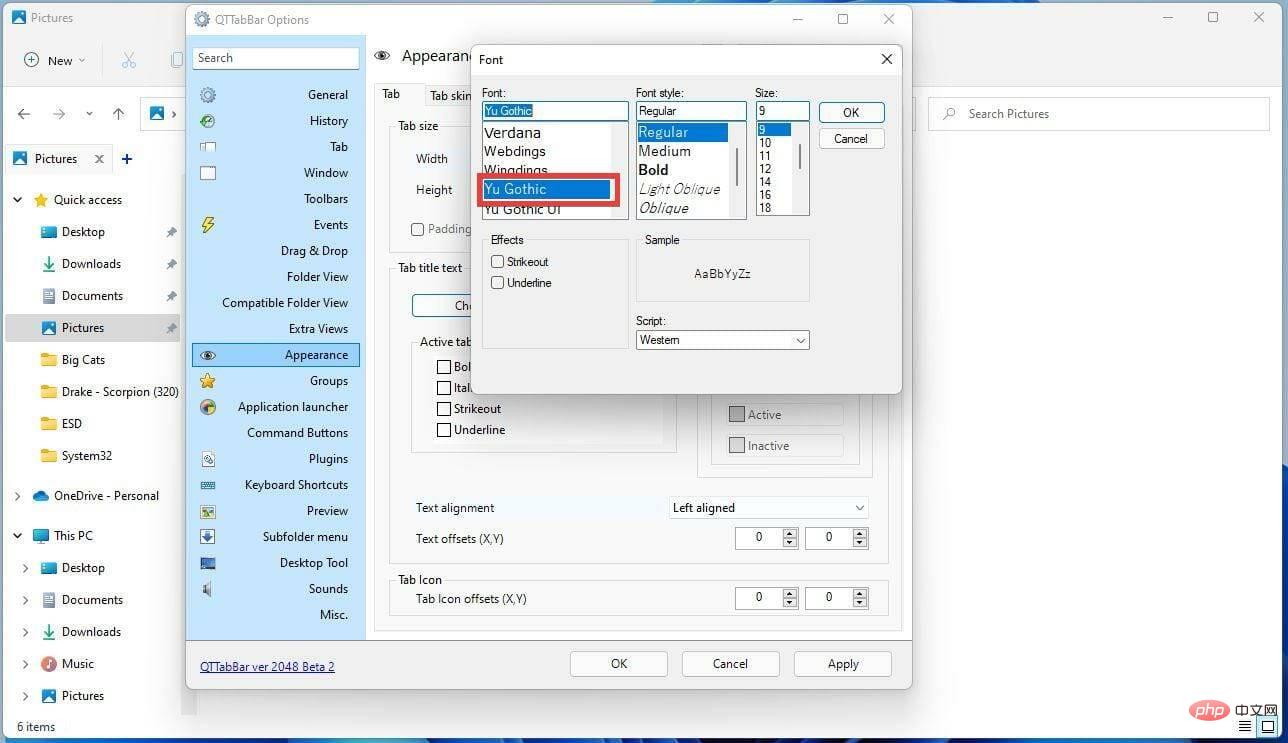
- You can change the font of a tab by pressing the "Select Font" button and making a selection.

- Change the font and select OK.

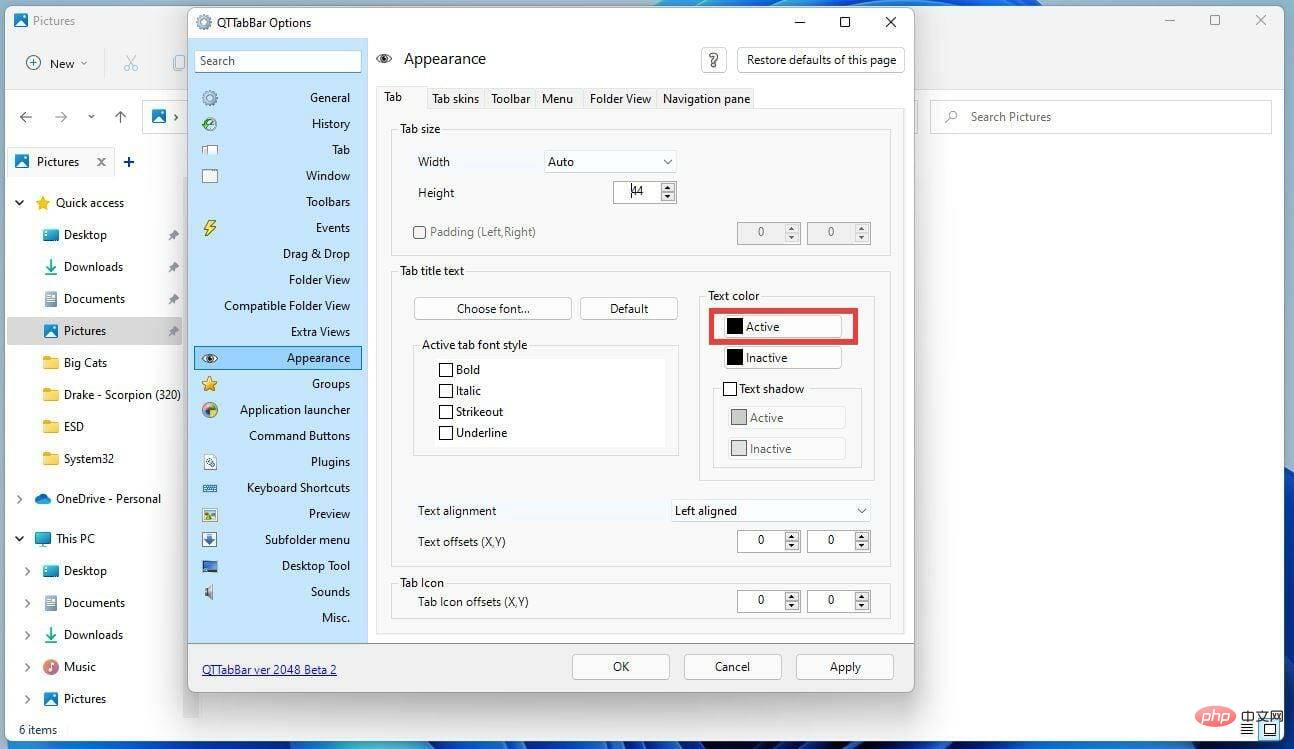
- Change the color by selecting Activity in the Text Color section.

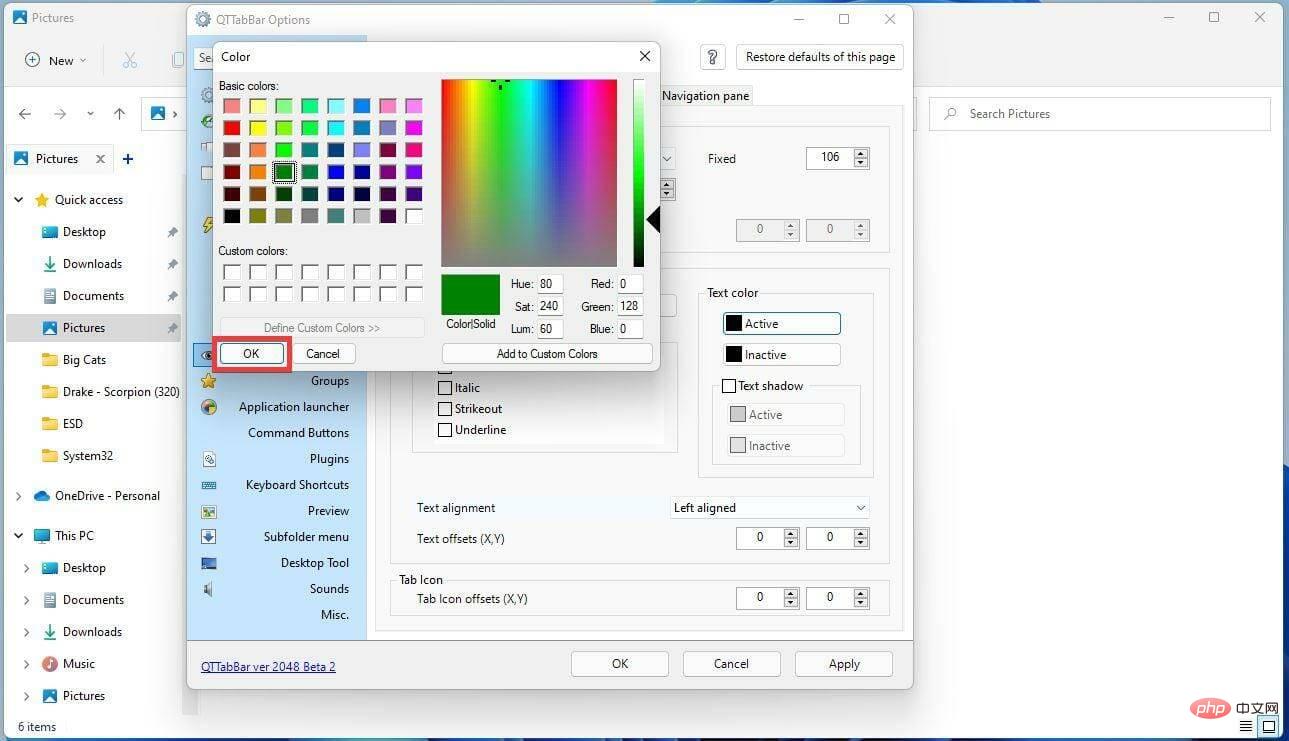
- Select a color and click "OK" .

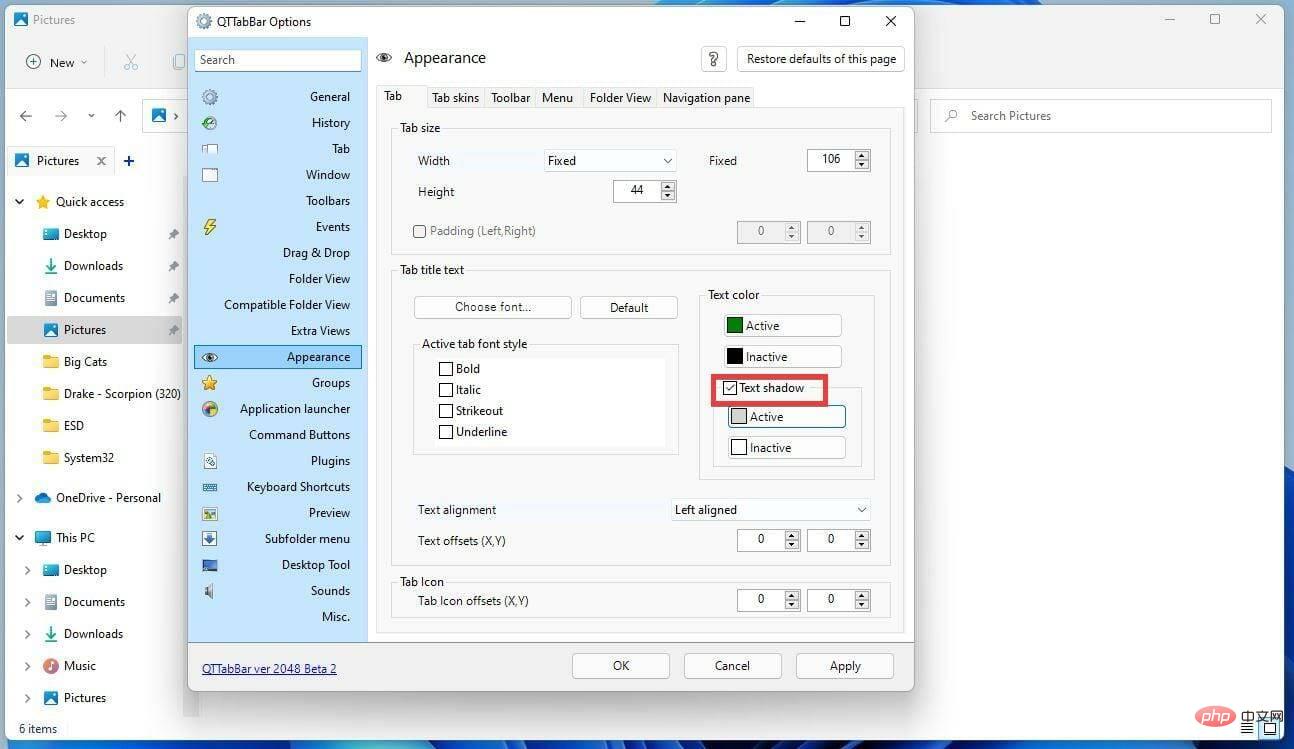
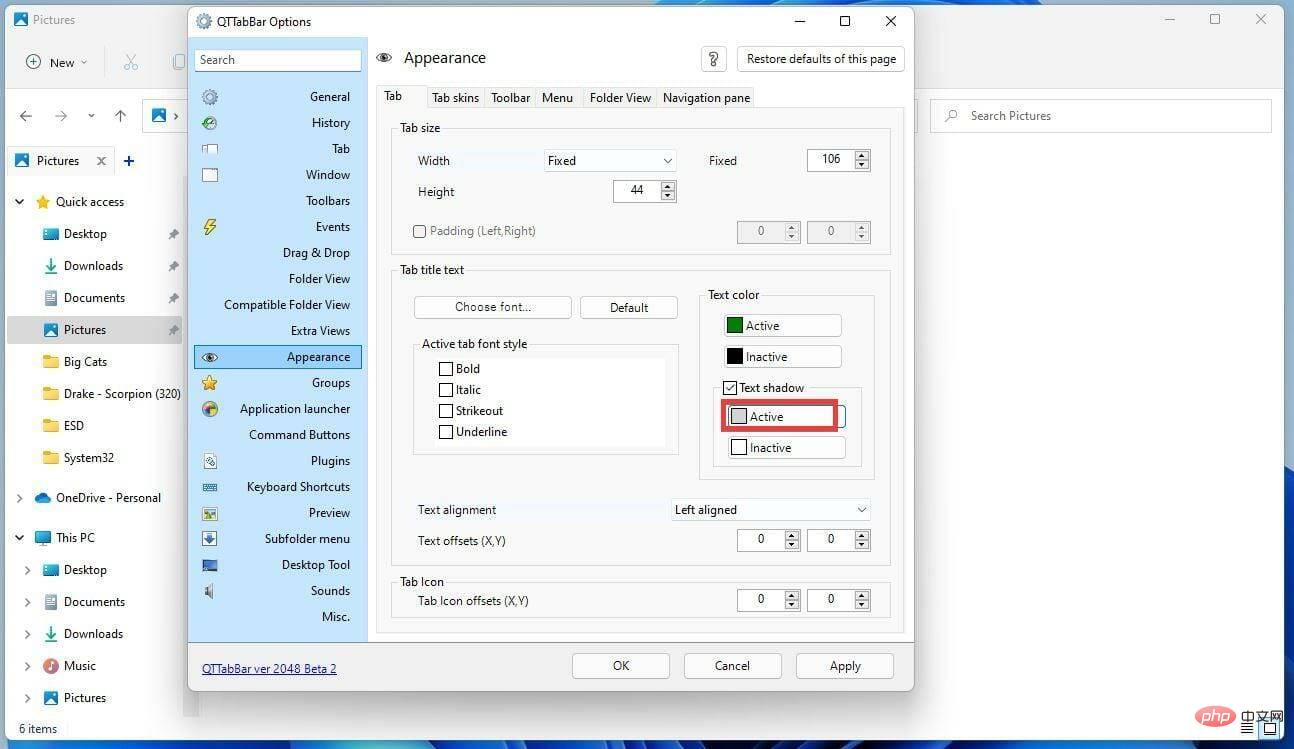
- Clicking on the Text Shadow will add a background to the text to make it stand out.

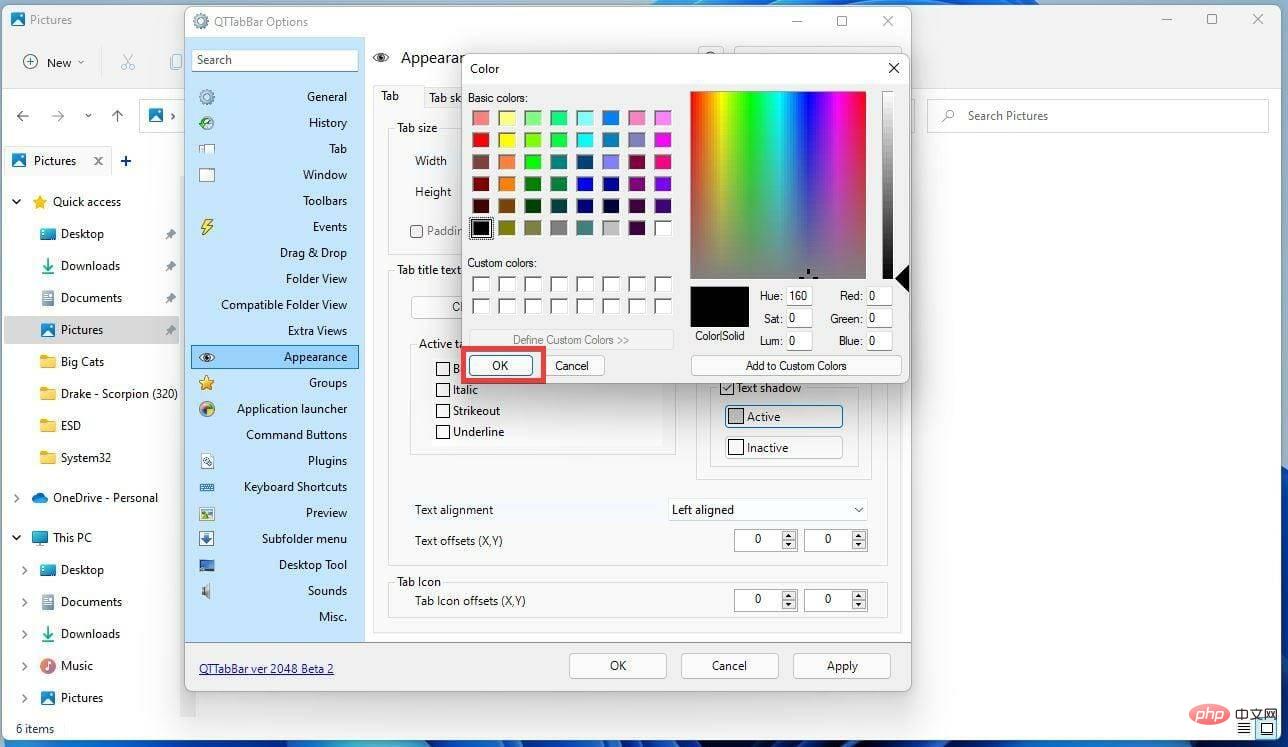
- Here, click Active again. Then choose a color as the shade.

- Choose a color as the shade. Click OK.

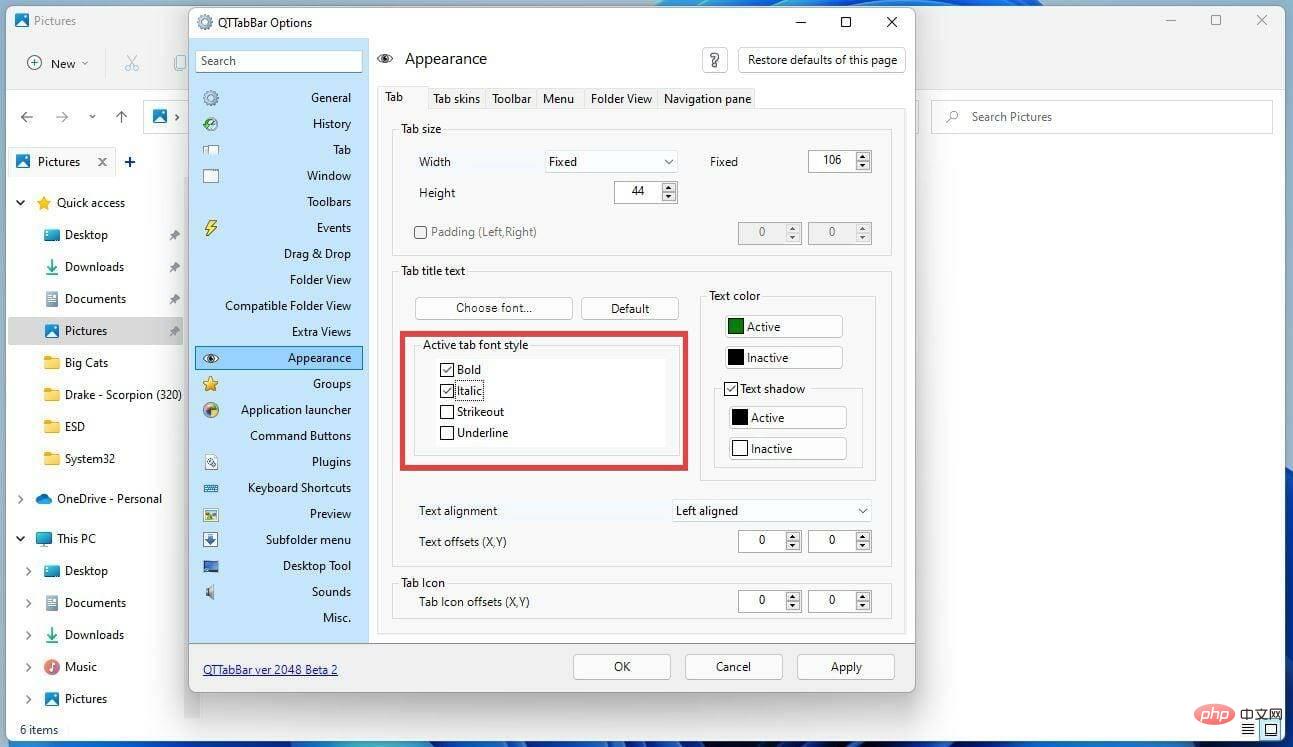
- Change the font style by selecting the options on the left.

-
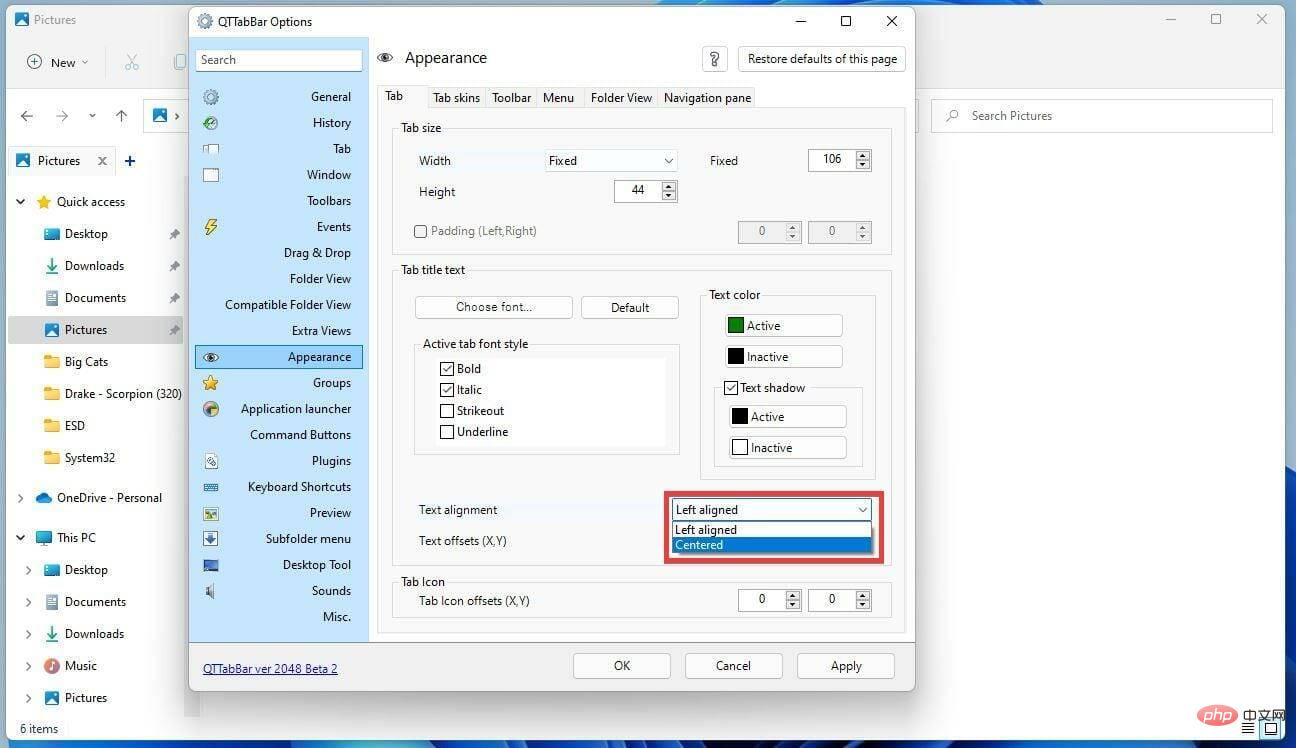
Text Alignment The drop-down menu next to changes the position of the text within the tab.

- When you have completed the changes you want to make, click Apply at the bottom.

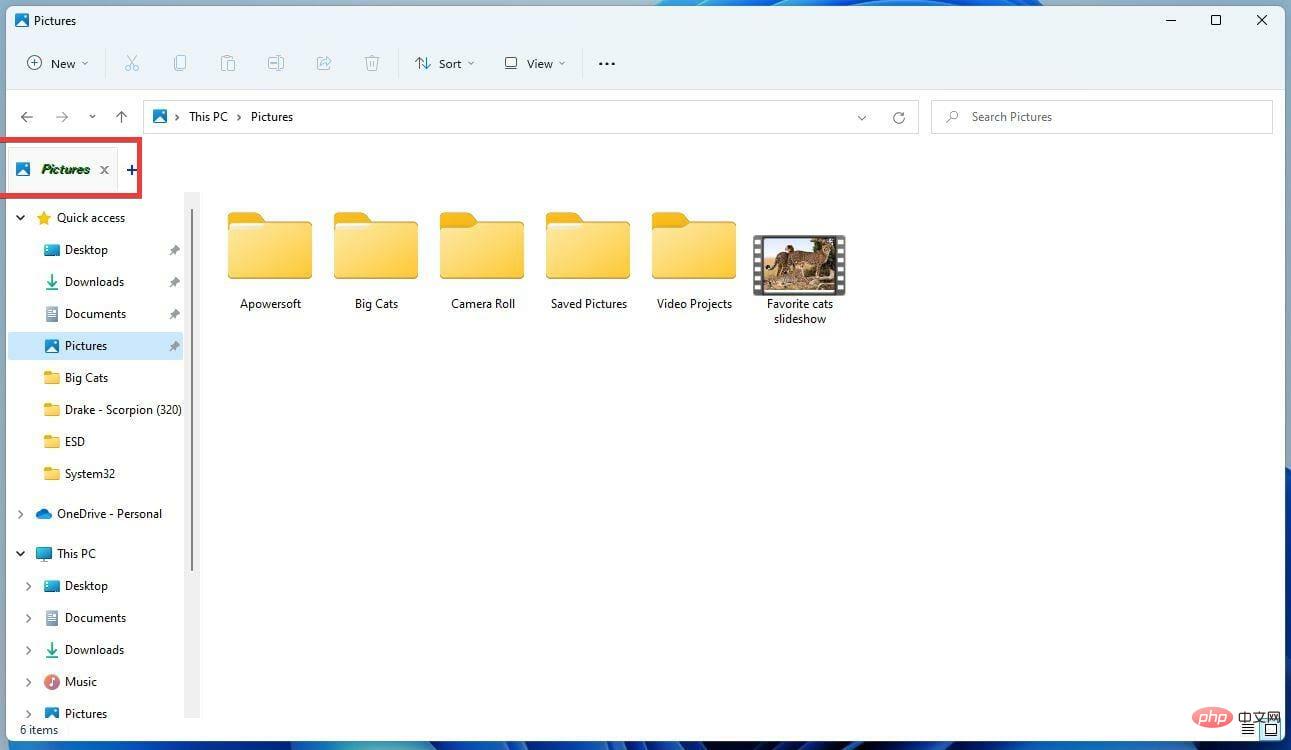
- Click "OK" Close the window and review the changes.

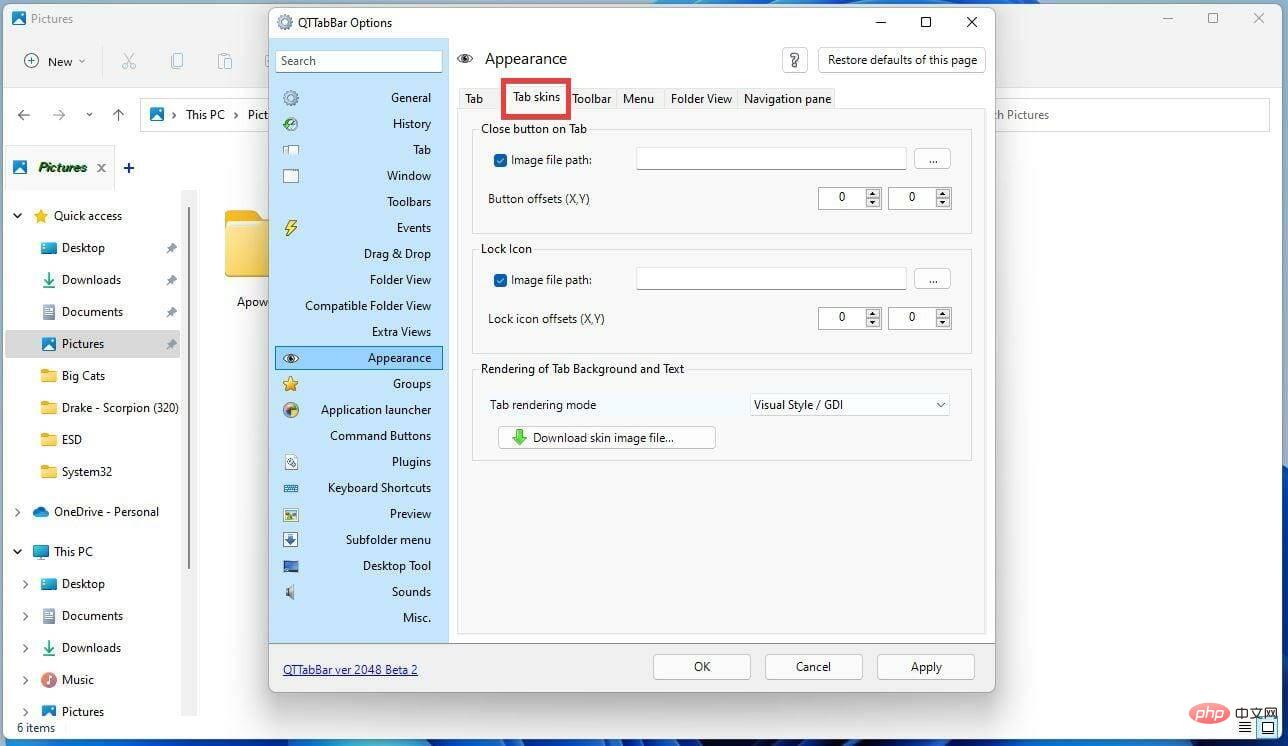
- You can also change the skin of the option cards by going to the Tab skins tab at the top.

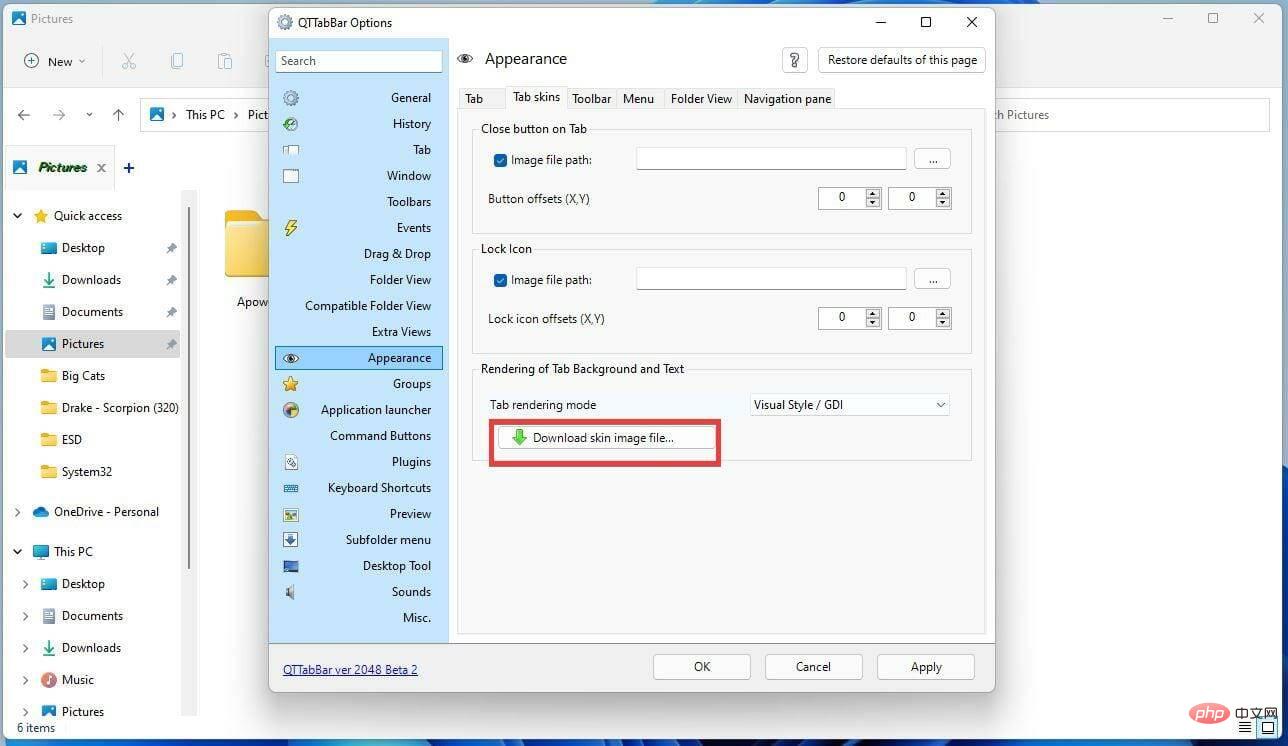
- Click to download the skin image file... in the render section of the label background and text.

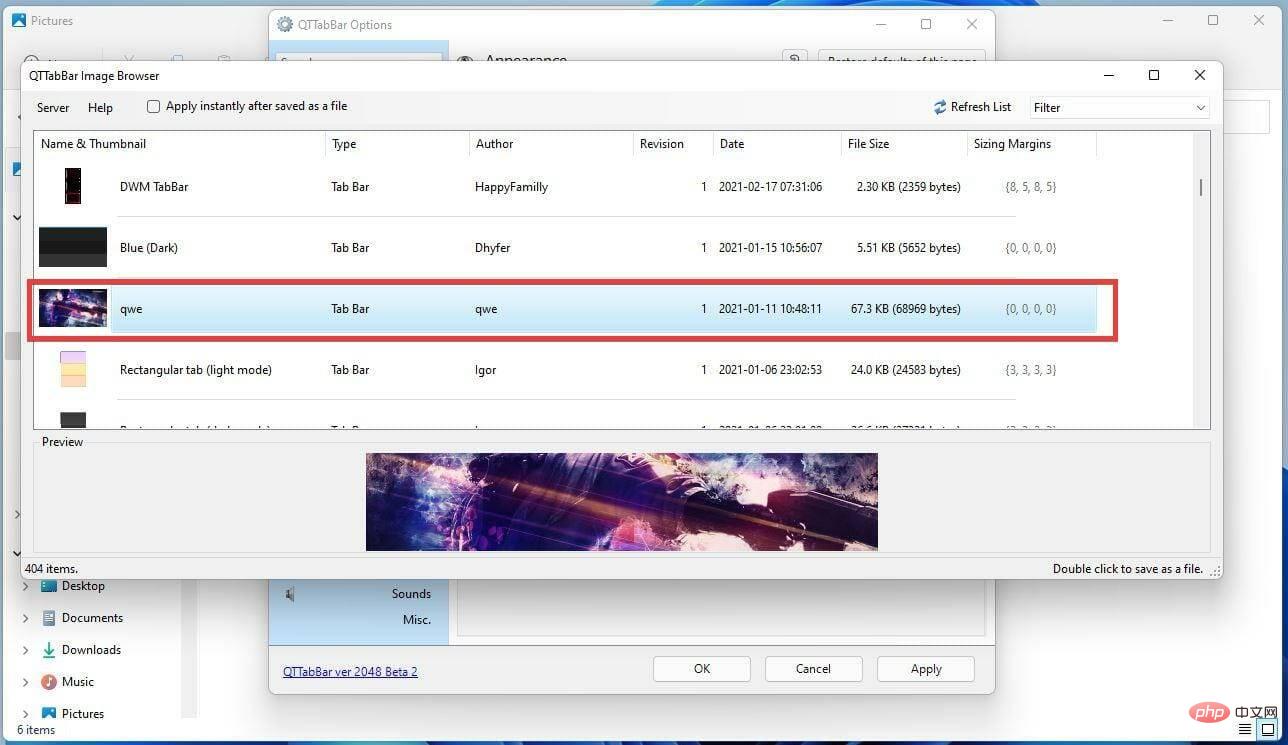
- In the QT TabBar image browser, scroll and find the image you want to use as the tab background.

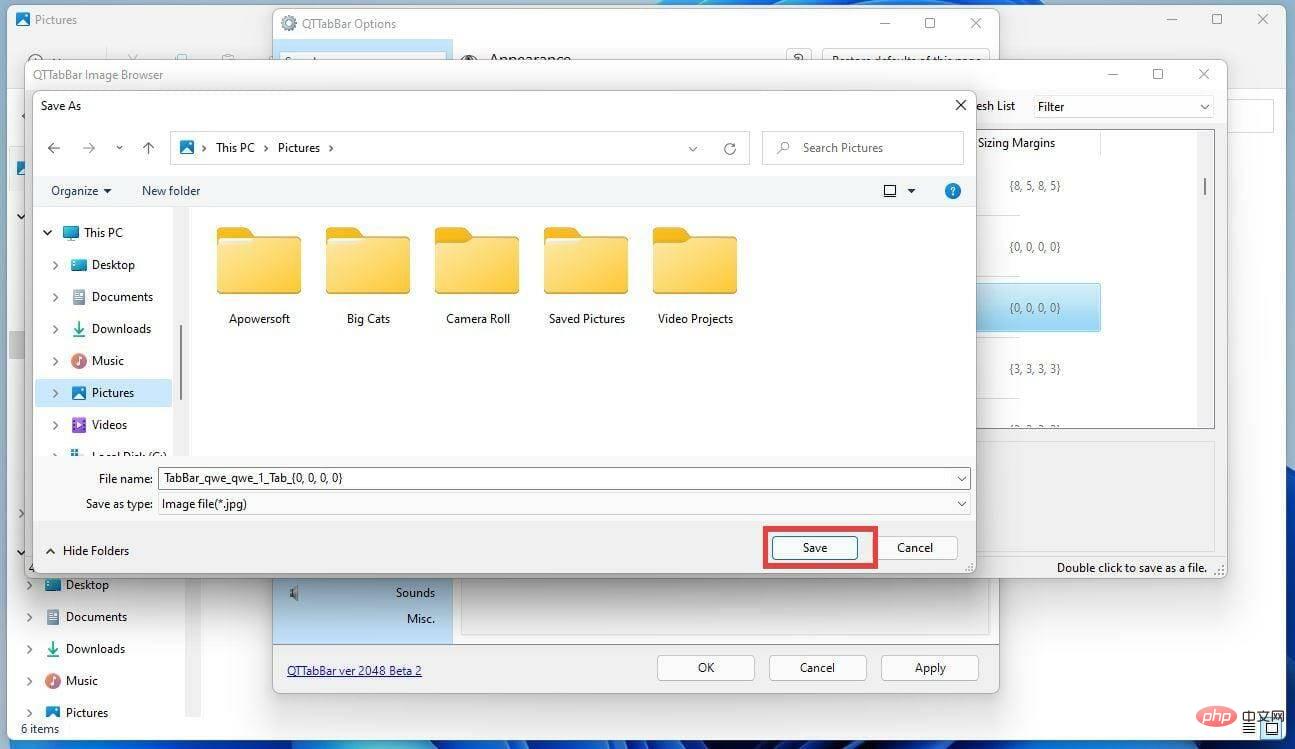
- Double-click it to save the file.
- This will open File Explorer. Choose a location to save the image.

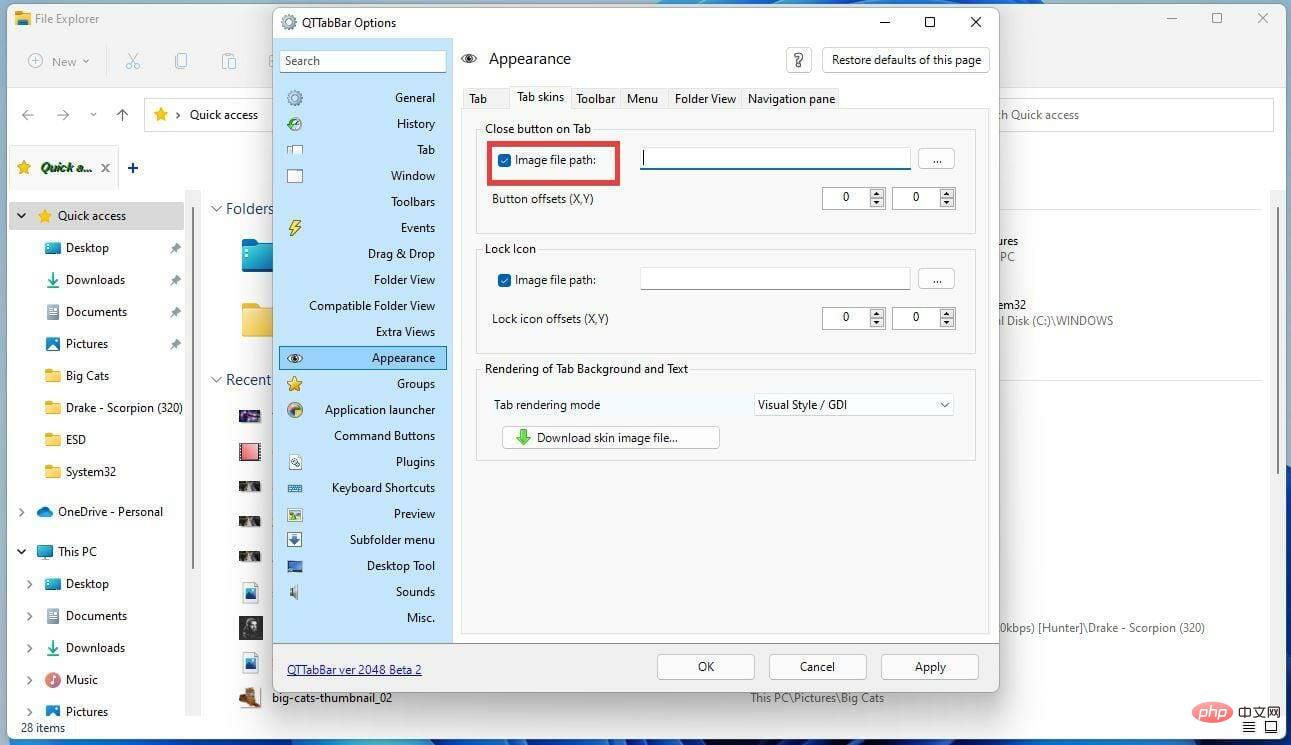
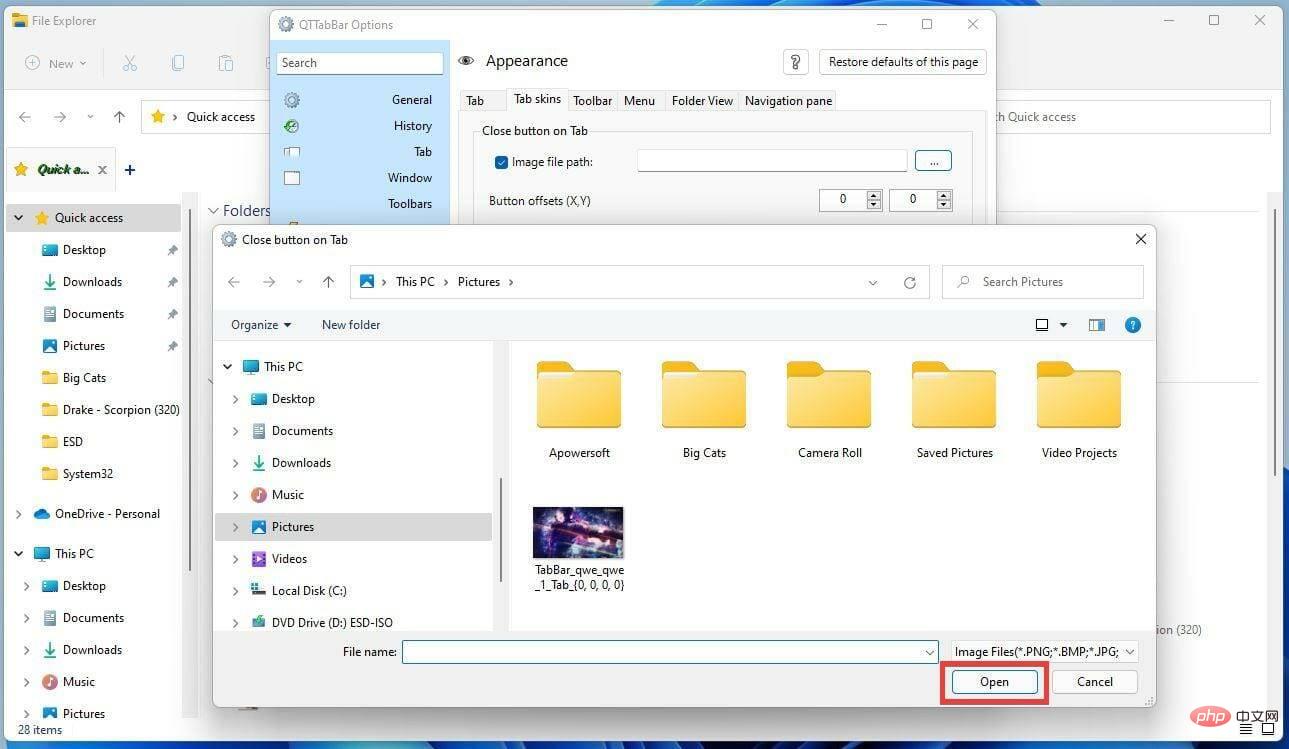
- Return to the Tab skins window and select Image file path under the Close button on the Tab.

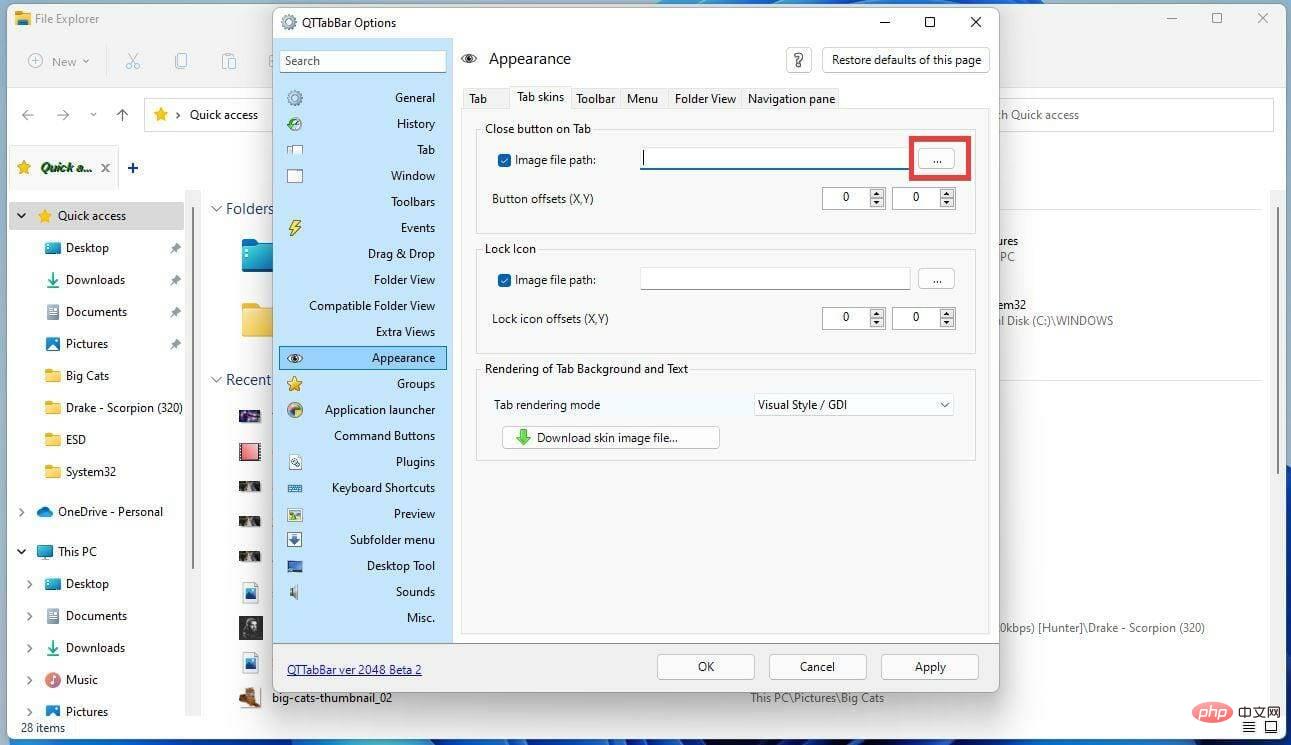
- Click the button with three dots and search for previously saved images.

- Find the image, click on it and press to open .

- Click "Apply", then click "OK".

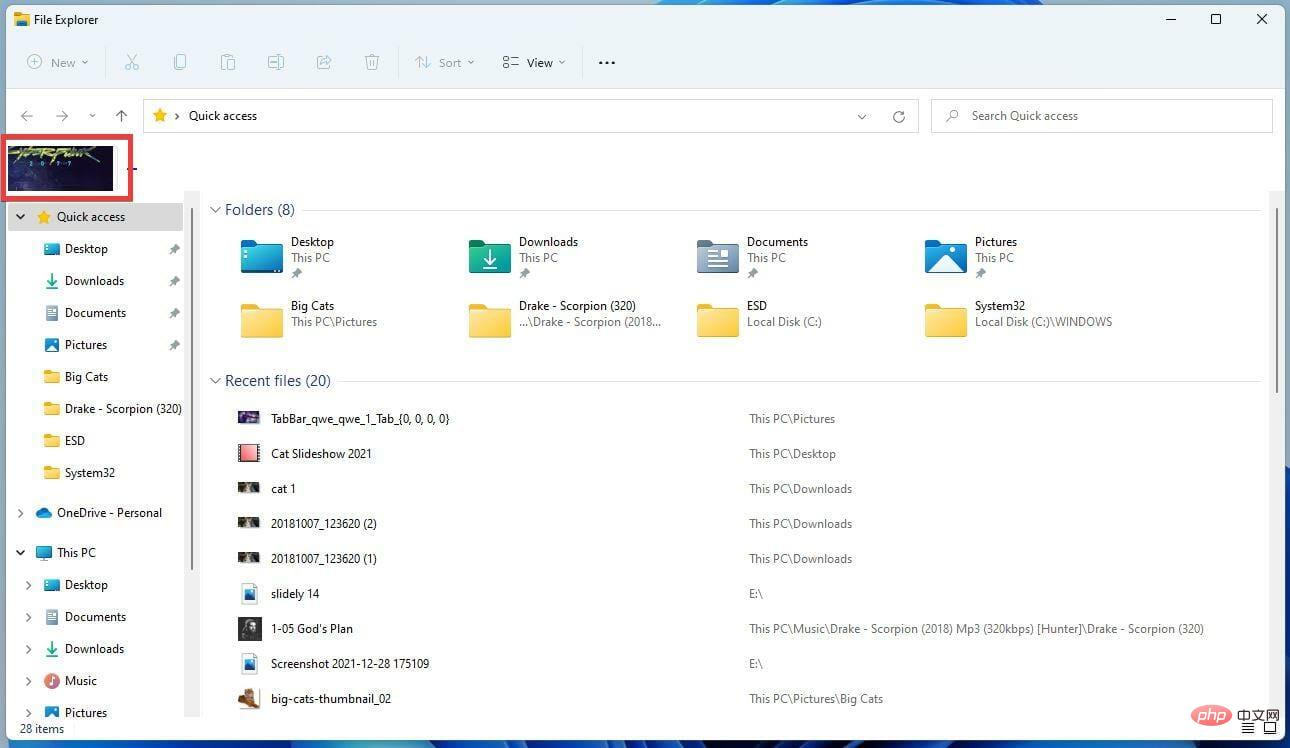
- You can now see that the tab now contains the images you downloaded and selected from the library.
3. Changing the Toolbar Design
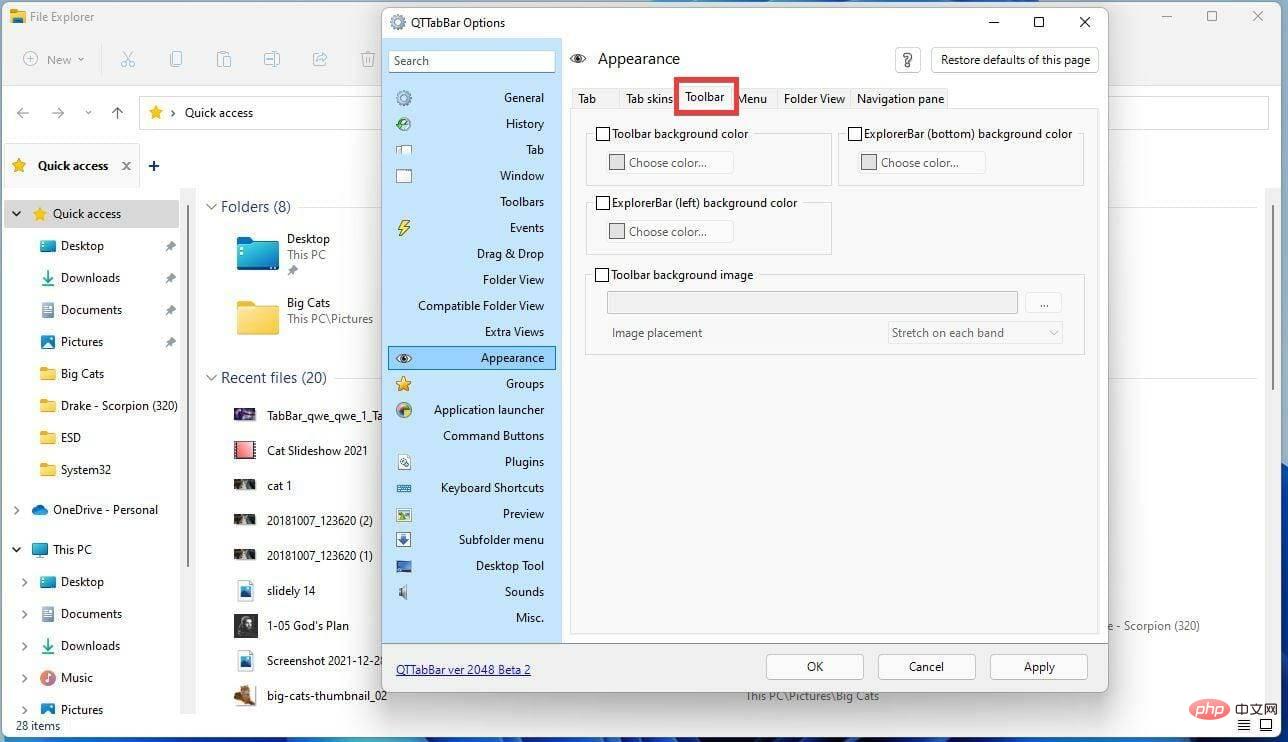
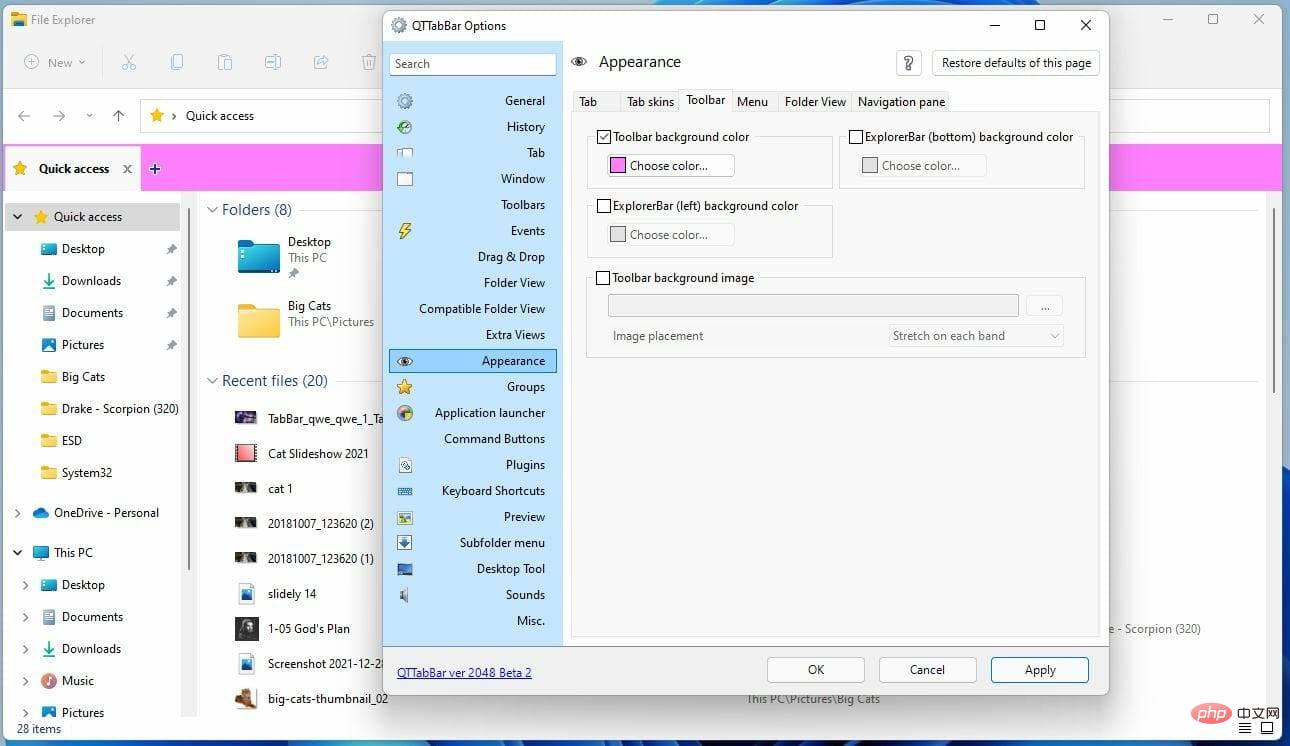
- You can further change the design of the toolbar by first going to the Toolbar tab in the QT TabBar options.

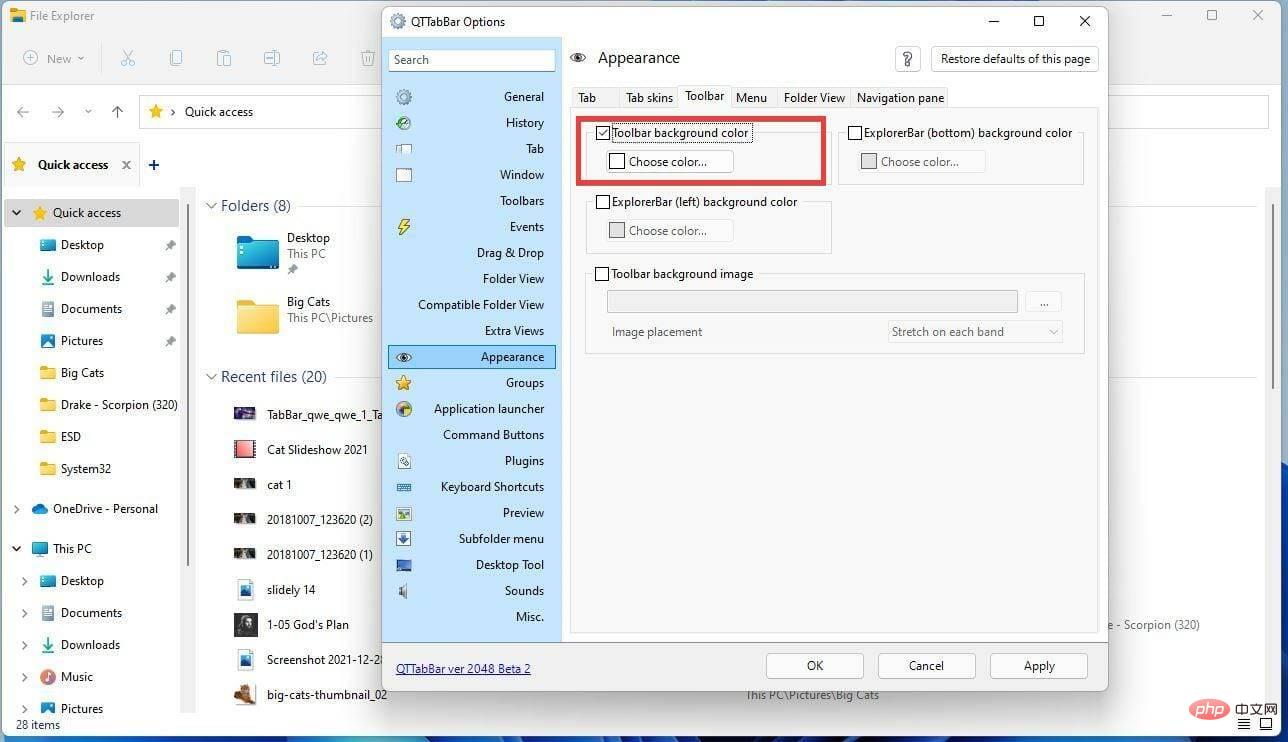
- Click Toolbar Background Color to change its color.

- Click to select a color...
- Select a color and click "OK" .

- Click Apply to change the color.

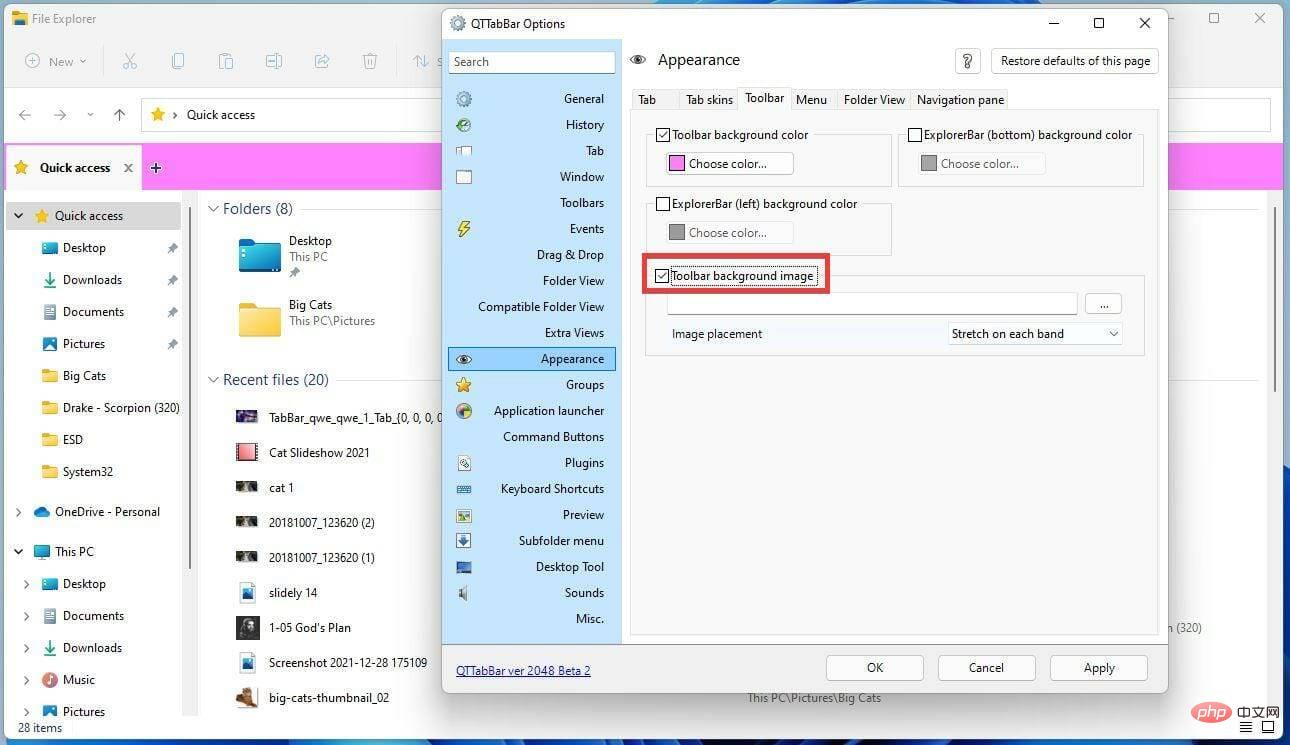
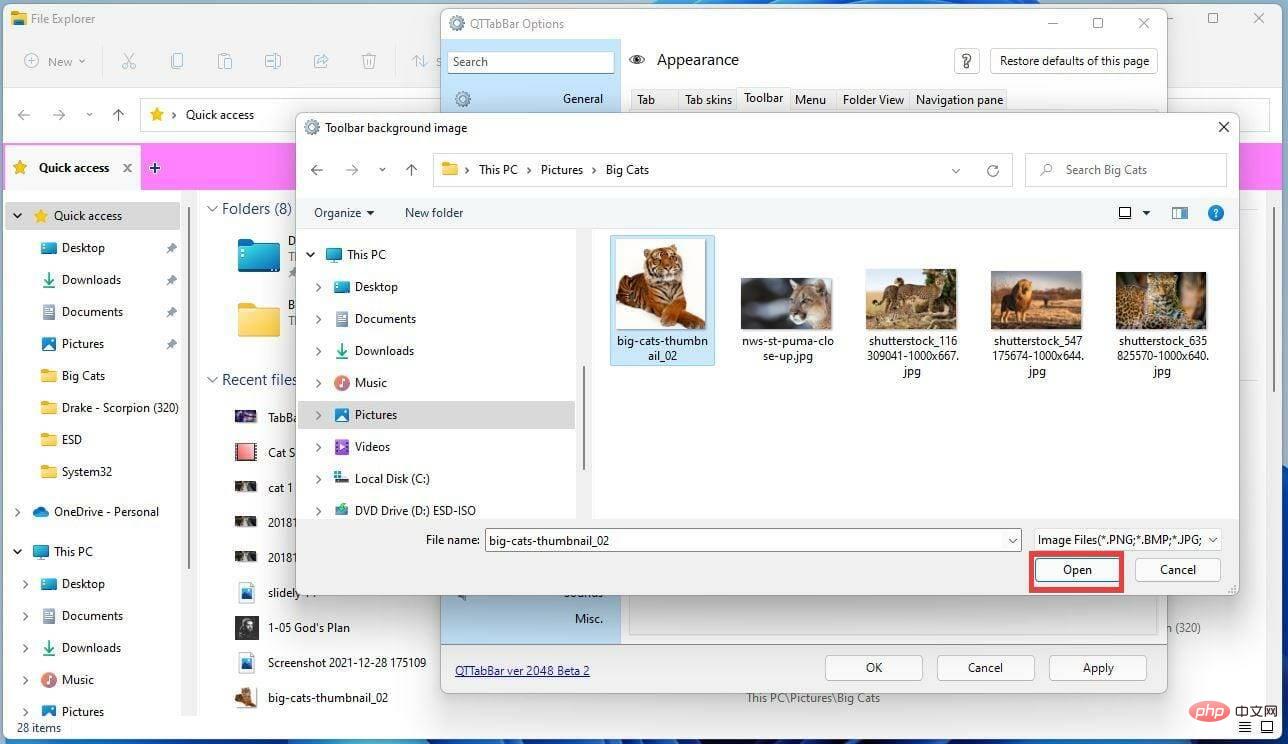
- You can change the background image by first clicking on the Toolbar background image.

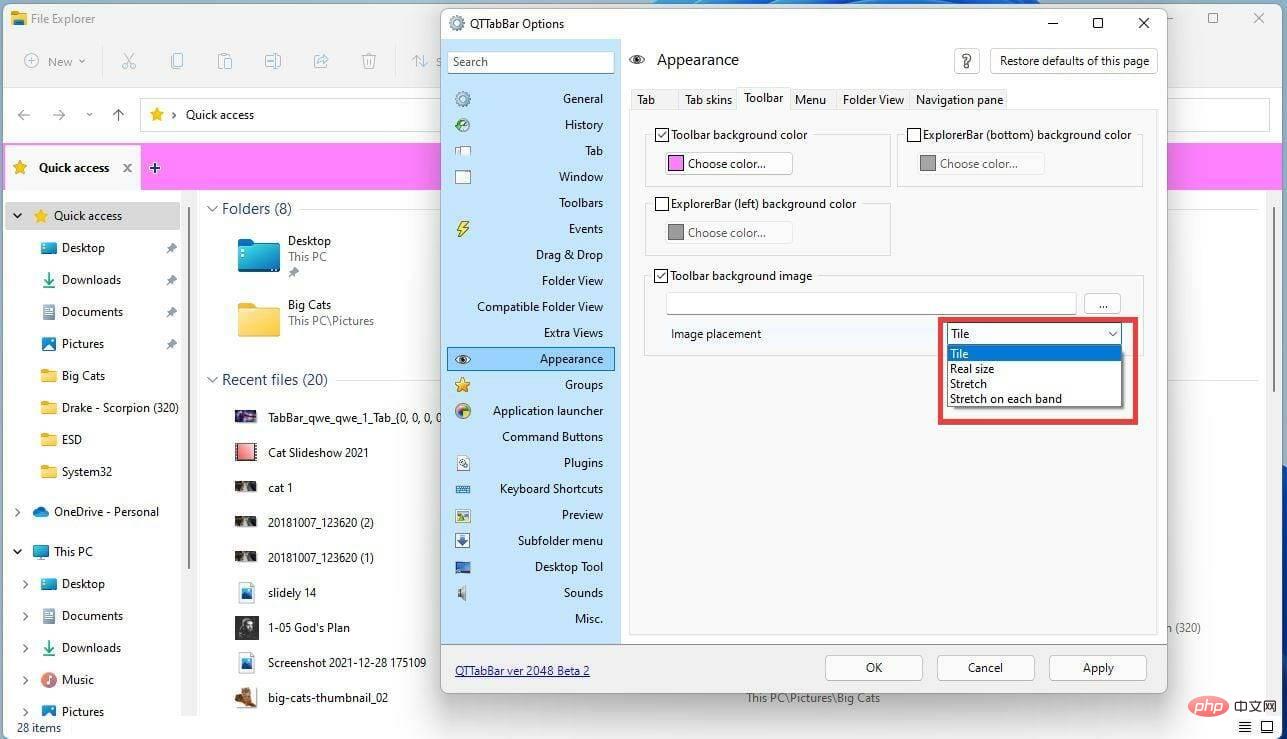
- Click the drop-down menu next to Image Placement to change how images appear on the toolbar.

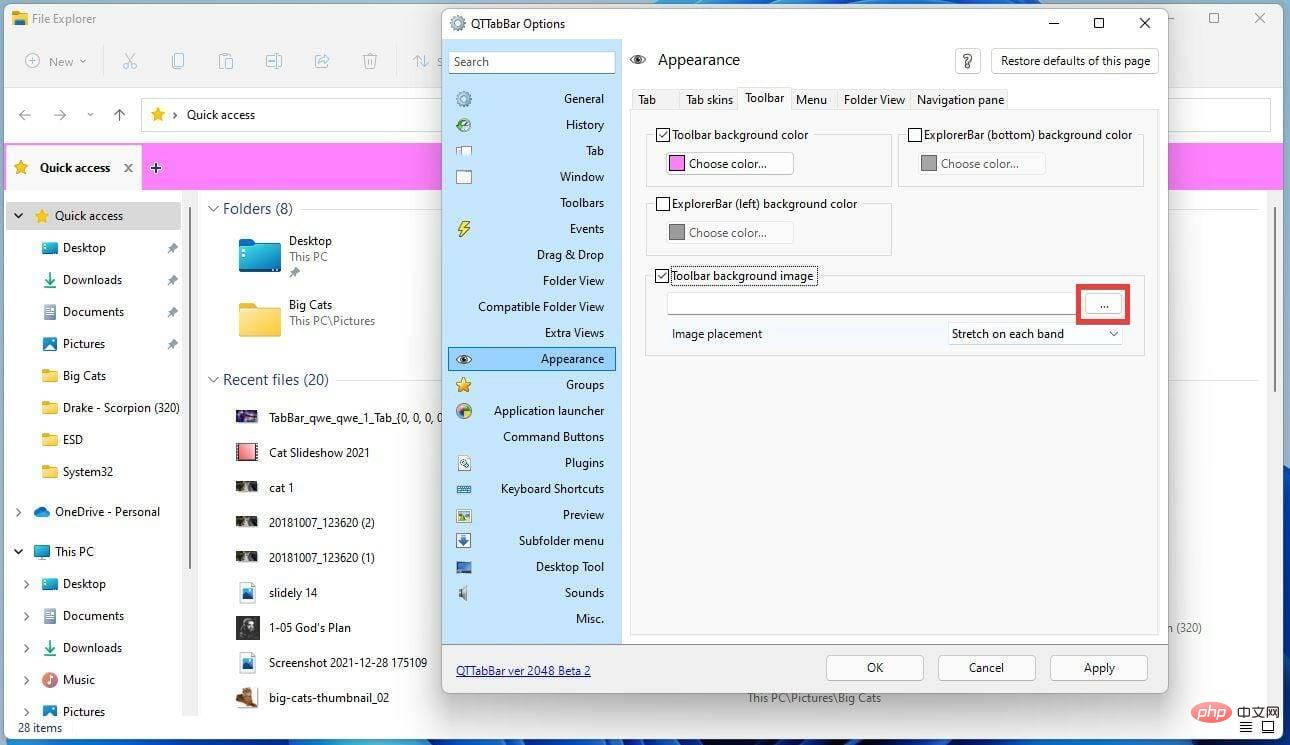
- Click the three dots above the image location.

- Click on the image you want to place in the toolbar, then click "Open".

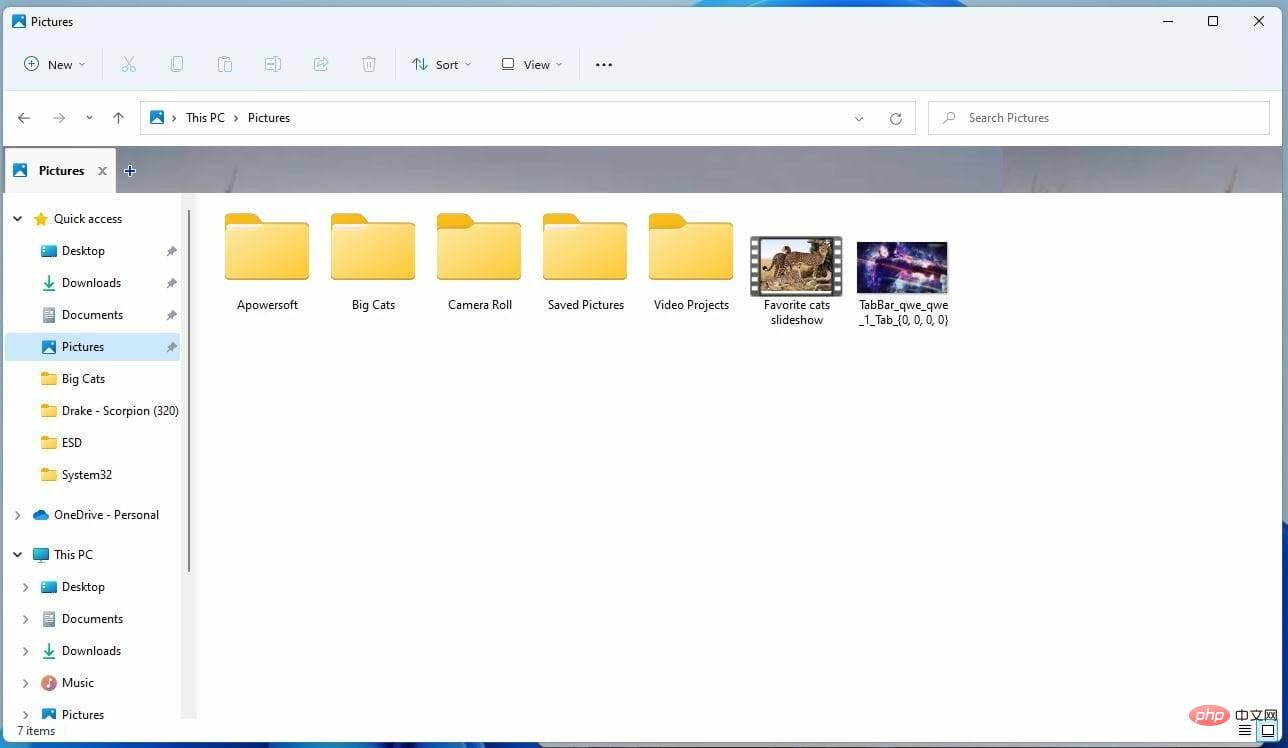
- Click Apply, then click OK to close the window to view the changes.

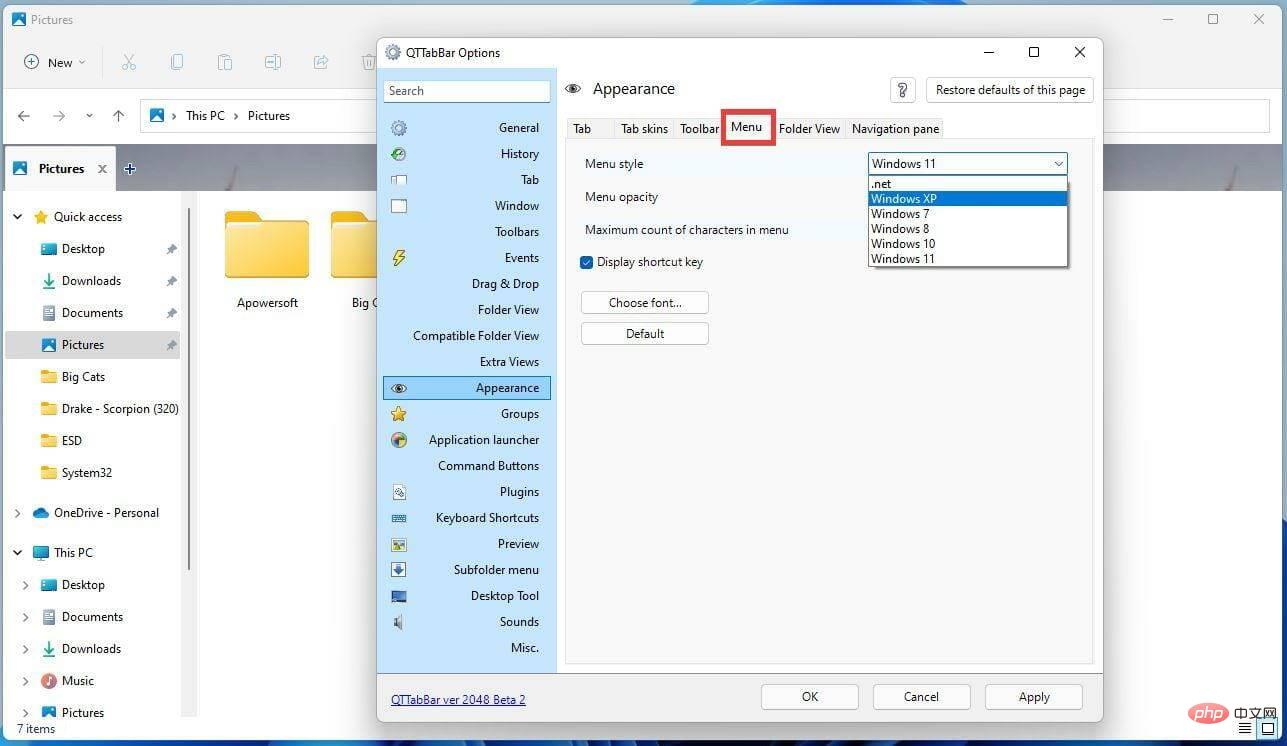
- It’s worth pointing out how to change the appearance of the menu by going to the “Menu” tab.

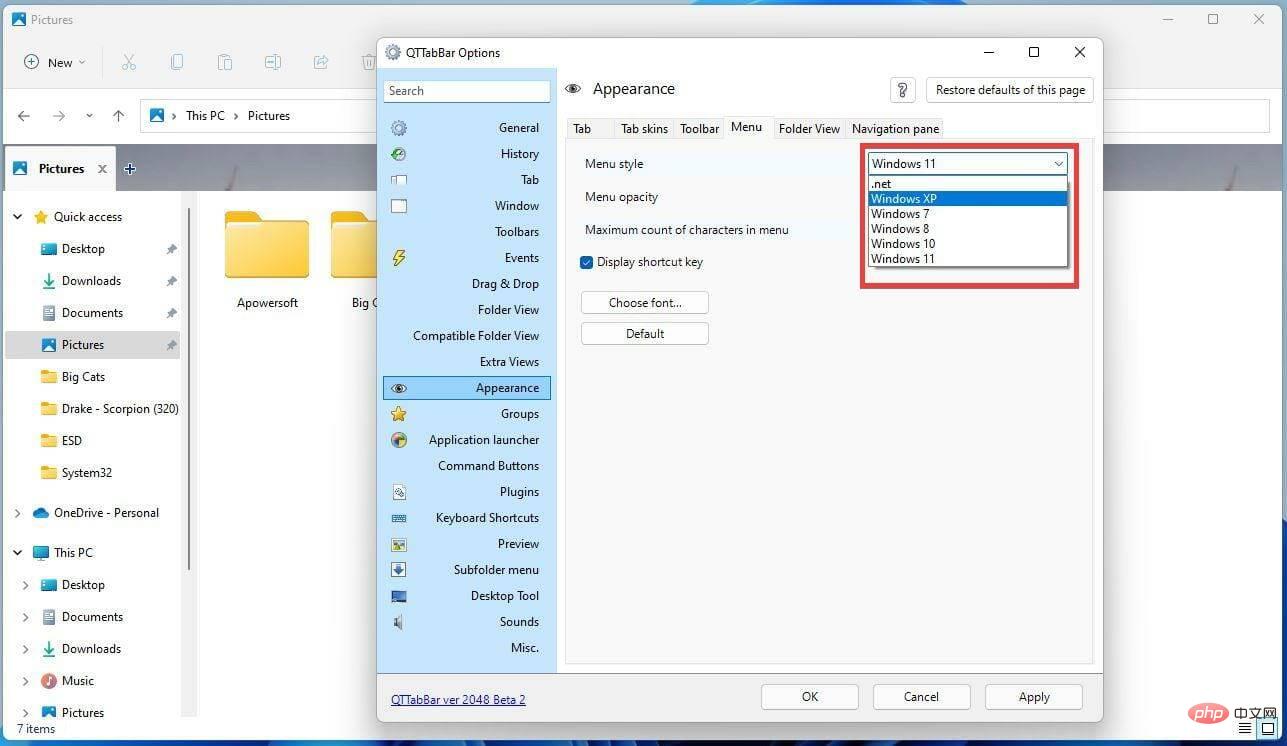
- You can change the length of File Explorer by clicking the Menu Style drop-down list to change the style of File Explorer.
- For example, you can choose Windows 10 style or Windows XP style.

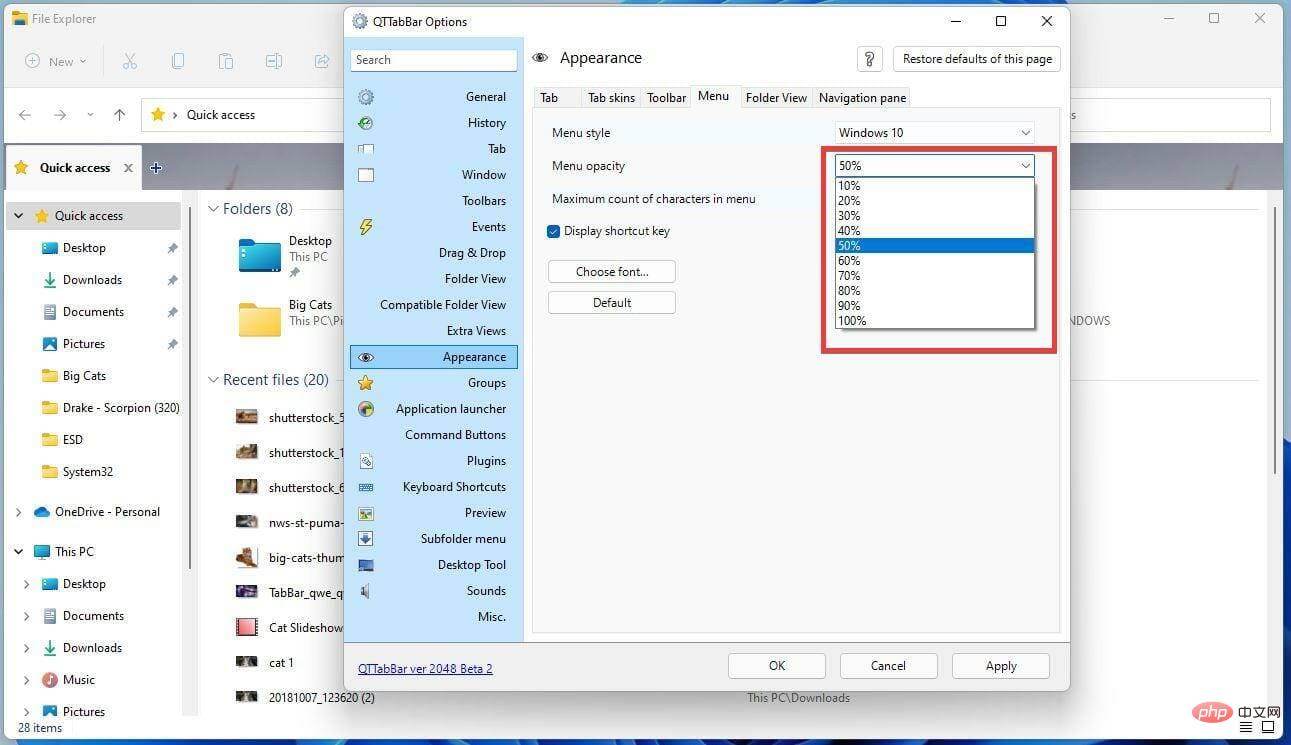
- The opacity of the menu can be changed by clicking on the drop-down menu and changing the amount.

- Click "Apply", then click "OK".

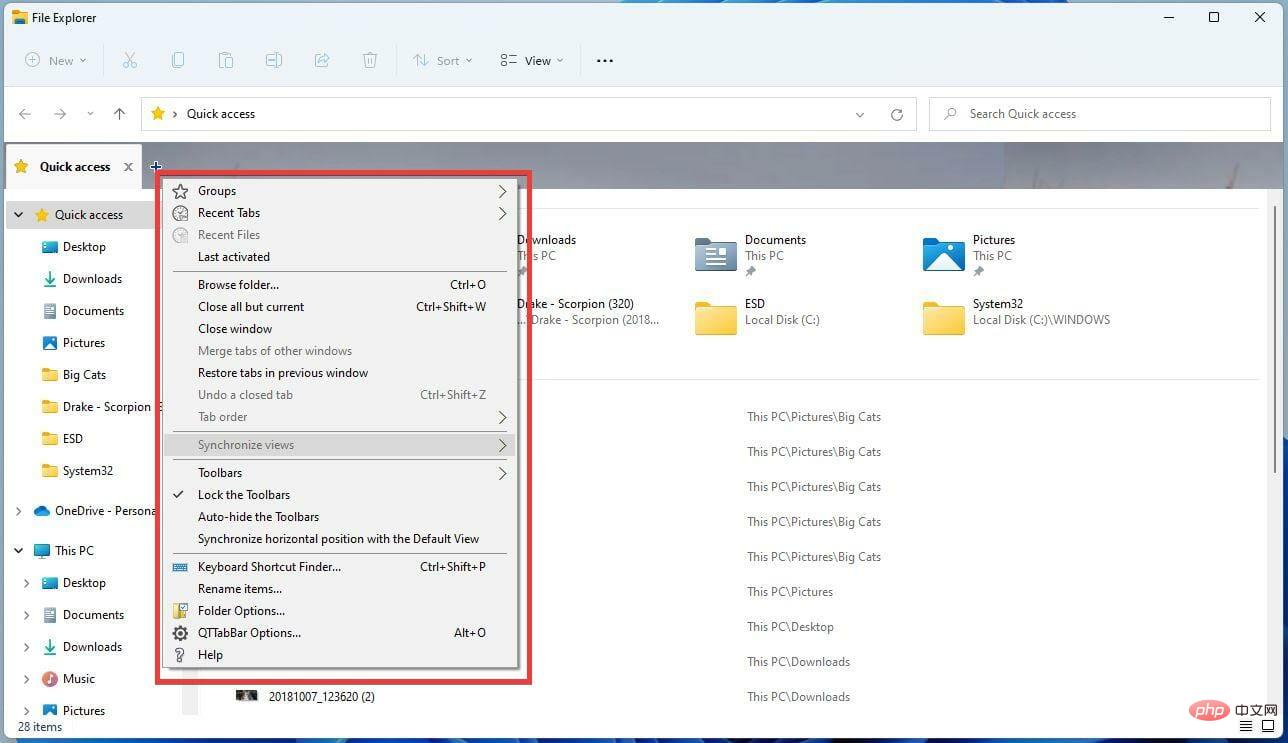
- As shown in the picture, the menu adopts Windows 10 style and uses a hard box design.

Is there any way I can enhance my Windows 11 experience?
There are many ways you can simplify your Windows 11 experience. There are many neat tips and tricks you can use, such as resizing the taskbar and learning new keyboard shortcuts. My favorite is to press Windows Key A to bring up quick settings.
If your Windows 11 computer keeps randomly freezing, you should also know how to fix it. Limited system memory is a major factor in many computer freezes and incompatibilities with GPUs. Upgrading to Windows 11 may cause this issue if your old drivers don't match your new system.

# Speaking of errors, DirectX issues can also occur on Windows 11 computers. DirectX is an API library important for Windows computers to display video, audio, and video games.
The above is the detailed content of How to add QT TabBar to Windows 11 File Explorer. For more information, please follow other related articles on the PHP Chinese website!

Hot AI Tools

Undresser.AI Undress
AI-powered app for creating realistic nude photos

AI Clothes Remover
Online AI tool for removing clothes from photos.

Undress AI Tool
Undress images for free

Clothoff.io
AI clothes remover

AI Hentai Generator
Generate AI Hentai for free.

Hot Article

Hot Tools

Notepad++7.3.1
Easy-to-use and free code editor

SublimeText3 Chinese version
Chinese version, very easy to use

Zend Studio 13.0.1
Powerful PHP integrated development environment

Dreamweaver CS6
Visual web development tools

SublimeText3 Mac version
God-level code editing software (SublimeText3)

Hot Topics
 1371
1371
 52
52
 Fix: ERR_ADDRESS_UNREACHABLE error in Google Chrome
May 15, 2023 pm 06:22 PM
Several Windows users have complained that when they try to access some websites on Google Chrome browser on their systems, they are unable to access the web pages. It also displays a message on the browser saying "The site cannot be reached" with error code ERR_ADDRESS_UNREACHABLE. There could be many potential reasons behind this issue, it could be due to website server issues, proxy server settings, unstable internet connection, etc. If you encounter similar problems, don't panic. After deeply analyzing the problem in this article, we got a bunch of solutions. Before proceeding, try the following workarounds: Try checking if the user is trying to access the site from other devices and there are no issues, then this
 How to fix preview pane not working in Windows 11
Apr 24, 2023 pm 06:46 PM
One of the features that comes with Windows File Explorer is the preview pane, which displays a preview of the file you selected. This means you can view the contents of the file before opening it. The preview pane of File Explorer provides previews for different types of files such as Office-related documents, PDFs, text files, images, and videos. It usually works fine, but sometimes the file preview isn't available. Recently, many Windows 11 users have raised the issue that File Explorer’s preview pane is not working and they are unable to view file previews. Are you facing the issue of preview pane not working on your Windows computer? Then, continue reading this article. Here we have compiled a list of fixes that can help you fix
 Can't use MSI Afterburner in Windows 11? Try the following fixes.
May 09, 2023 am 09:16 AM
MSIAfterburner is an overclocking tool suitable for most graphics cards. Apart from that, you can also use it to monitor the performance of your system. But some users reported that MSIAfterburner is not working in Windows 11. This may be due to several reasons, which we discuss in the following sections. However, when this happens, it prevents you from changing the performance or monitoring it while playing the game. As expected, this poses a significant challenge to gamers. That’s why we’ve dedicated this tutorial to help you understand the issue and walk you through the most effective fixes for MSIAfterburned not working in Windows 11 issue.
 Fix: VAN 1067 error when running Valorant on Windows 11
May 22, 2023 pm 02:41 PM
The operating system looks much better than its predecessor and has gamer-oriented features like AutoHDR and DirectStorage, but Valorant players have had some trouble launching the game. This is not the first issue faced by gamers earlier, Valorant not opening on Windows 11 is another issue plaguing them but we have covered the ways to fix it. Now it seems that Valorant players who switched to Windows 11 are facing issues due to Secure Boot and TPM2.0 services, which causes the game menu to only show an exit option while running. Many users are getting the VAN1067 error, but it shouldn't be a cause for alarm
 To fix this, you need to use an interactive window station
Apr 24, 2023 pm 11:52 PM
This operation requires an interactive window station which is a rather strange bug. Software windows that allow users to interact with the app are not open, you need to enable them. This bug has been linked to the 2021 Printing Nightmare vulnerability. However, it continues to this day, affecting your computer and device drivers. Fortunately, it's easy to fix. Why does this error occur in the first place? Before describing how to fix this error, be sure to list the causes of this error. This way, you can take the necessary steps to ensure it doesn't happen again. Corrupted files are messing up your computer files – Corruption can be caused by a variety of reasons, from malware to power outages. It is recommended that you run an SFC scan. You have an overzealous antivirus app – antivirus software sometimes blocks
 DirectX function GetDeviceRemovedReason fails with error
May 17, 2023 pm 03:38 PM
Almost every high-end game we play relies on DirectX to run efficiently. However, some users reported encountering the DirectX function GetDeviceRemovedReasonfailedwith followed by the error reason. The above reasons are not self-evident to the average user and require some level of research to determine the root cause and the most effective solution. To make things easier, we've dedicated this tutorial to this problem. In the following sections, we will help you identify the potential causes and walk you through the troubleshooting steps to eliminate the DirectX function GetDeviceRemovedReasonfailedwitherror. what causes
 How to disable video autoplay in Opera browser?
Apr 22, 2023 pm 10:43 PM
The latest version of the Opera browser includes a new automatic video popup feature. Using this feature, you will notice that the video will pop up automatically when you navigate to another tab in the browser. It has been noticed that this pop-up video can be resized and moved around the screen. When you navigate back to the Videos tab, it resumes and the floating window disappears. The video pop-up feature is useful for multitasking users who like to watch videos while working. However, not every Opera user will like this automatic video popup feature. If you are one of those Opera browser users who are annoyed by videos popping up every time you change tabs, then you have found the right post. Here we detail how to disable this popup in Opera
 How to Optimize Internet Connection Speed in Windows 11
Apr 23, 2023 pm 10:46 PM
How to solve the problem of slow network speed in Windows 11? 1. Restart your computer Navigate to the desktop and press Alt+F4 to activate the "Shut down Windows" box. Click the drop-down menu and select Restart from the list of options. Next, click OK. For most problems you encounter in Windows 11, one of the most effective solutions is to simply restart your computer. If it is a background process or error that is causing the problem, restarting the operating system will eliminate it, thus fixing the error. After restarting the computer, check whether the network speed problem of Windows 11 is resolved. 2. Make sure the PC is within range of the router (Wi-Fi network) In the case of a wireless network, the farther the device is from the router, the slower the internet speed will be


