How to fix missing sleep option in Windows 11/10
When you open the power options menu on a Windows PC, the options visible are Restart, Sleep, and Shutdown. Windows provides its users with a sleep option that retains the last used programs, thus saving battery power. When your PC is in sleep mode, it neither shuts down nor is fully functional. You can make it functional by using your mouse and keyboard. Recently, many users have reported that the sleep option is missing from the power menu on their Windows PCs. This can be frustrating for users because they can't put the system to sleep and save battery.
Are you one of these users who is troubled by this lack of sleep option? Then, read this article to find some troubleshooting methods that can help you restore sleep options on your system.
Fix 1 – Restore default power options
1. Click the Windows button (four squares) on the taskbar.
In the Windows search box, type the text command prompt.
Right-click Command Prompt in the search results and select the option Run as administrator.

When User Account Control prompts for permissions, click Yes.
2. After opening the command prompt, copy-paste or type the command given below andpress Enter.
powercfg –restoredefaultschemes

restart the computer.
Check whether you can see the sleep option after the system starts. Fix 2 – Run Power Troubleshooter1. Use theWindows R key combination on your keyboard to open the Run dialog box.
Copy and paste the command mentioned below into the Run box and click on "OK" to execute it.
msdt.exe /id PowerDiagnostic

Power Troubleshooter window opens to find and fix issues related to your computer's power settings.
Here, clickNext.
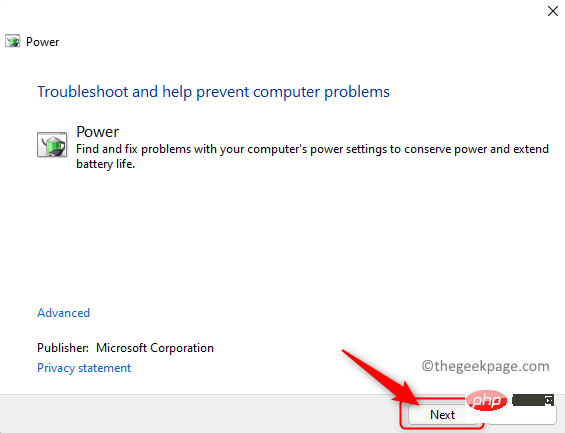
RestartPC and check if the problem is resolved.
Fix 3 – Enable Sleep in Power Options1. Press theWindows logo key Rshortcut key on your keyboard to open Run .
Typepowercfg.cpl and press Enter to go to Power Options in Control Panel.

Power Options window, clickSelect the power button in the left pane. Functions" link.

Close Settings will be grayed out.
To change these settings, clickChange settings that are currently unavailable.
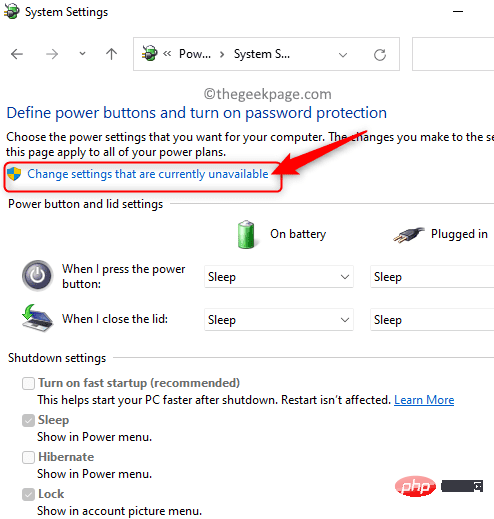
Shutdown settings.
Make sure thebox next to the Sleep option is checked to make it visible in the Power menu.
If this option is already checked, uncheck it and check again. Then, click theSave Changes button at the bottom of the screen.
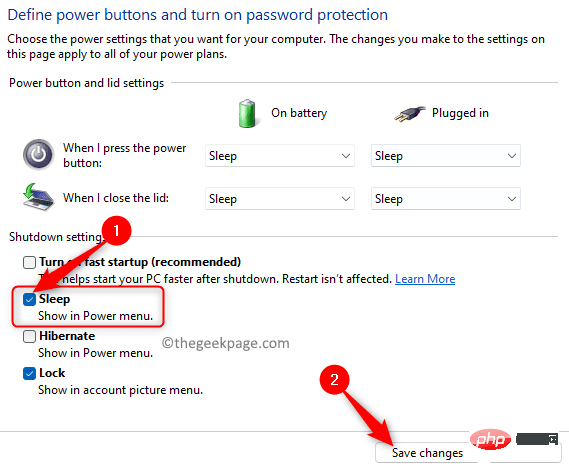
Restart your system. Check if sleep option is available.
Fix 4 – Enable Sleep Mode via Local Group Policy Editor1. Simply press theWindows and R keys simultaneously to open Runframe.
Typegpedit.msc and press Enter to open the Local Group Policy Editor.

Local Group Policy Editor window that opens, select Computer Configuration.
InComputer Configuration, click Administrative Templates to expand it.
Now, selectWindows Components –> File Explorer.
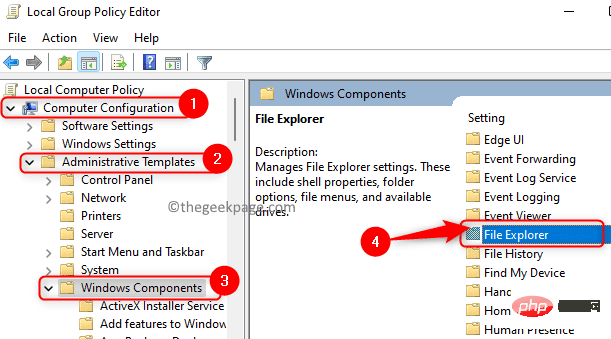
3. After selecting File Explorer, look for Show Sleep Options in the Power Options menu on the right, and then Double-click on it to open its settings.

In the window that opens, select Enable or Not configure the option.
Then, click Apply and then OK to confirm and save these changes to the settings.
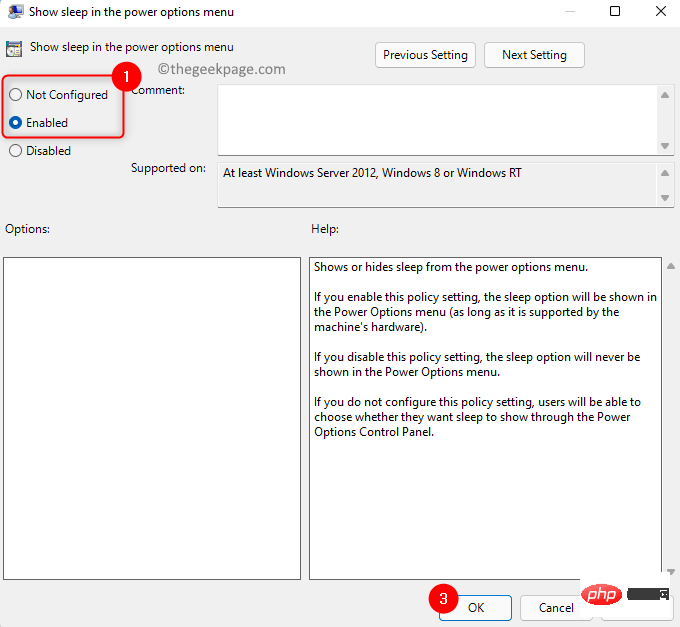
#4. Open the power menu and check if the problem of missing sleep option is resolved.
Fix 5 – Perform a clean boot
1. Click the Windows (four blue squares) button on the taskbar.
Type msconfig in the Windows search bar that appears.
In the search results listed, click System Configuration.

2. In the System Configuration window, go to the Services tab.
Check the box next to Hide all Microsoft services at the bottom.
Then, click the Disable All button in the lower right corner.

#3. Now, select the Launch tab.
Here, click on the link Open task Manager.

4. You will be in the Startup tab of Task Manager.
Disableall enabled programs. To do this, right-click the program and select the Disable option.

Close Task Manager.
5. Return to the system configuration window, click Apply, and click OK.
In the window that pops up asking to restart to apply changes, click the Restart button.

#6. After the system restarts, check whether the problem of missing sleep option has been resolved.
If the problem is resolved after a clean boot, try enabling one program at a time to check which one is interfering. Once you find the program causing the problem, make changes in your system configuration to start normally.
Fix 6 – Update graphics driver
1. Press the Windows logo X key on your keyboard.
In the pop-up menu, select Device Manager.

#2. In Device Manager, click the small arrow# next to Display Adapter ##Expand it.
Right-click on your graphics card and select the Update Driver option.

Update Driver window for the selected graphics card.
Here, clickSearch automatically for drivers.

restart the computer.
5. Check whether the problem has been resolved. If the problem persists, try updating the drivers for other graphics cards present on the system. If the issue is not resolved after this, then you can also try updating the driver from the graphics card manufacturer’s website. Intel: https://www.intel.in/content/www/in/en/support/detect.htmlNVIDIA: https://www.nvidia.in/Download /index.aspx?lang=en-inAMD: https://www.amd.com/en/supportFix 7 – Check for Windows Updates1 . PressWindows R to open Run.
Typems-settings:windowsupdate and press Enter to open the Windows Update page in Settings.

2. In the window that opens, click the Check for Updates button.

#Once you do this, Windows will start checking for any updates to Windows.
If any updates are found, you can download and install them.
3. After updating Windows to the latest versionRestart your PC.
Check if you can see the sleep option in the power menu.
The above is the detailed content of How to fix missing sleep option in Windows 11/10. For more information, please follow other related articles on the PHP Chinese website!

Hot AI Tools

Undresser.AI Undress
AI-powered app for creating realistic nude photos

AI Clothes Remover
Online AI tool for removing clothes from photos.

Undress AI Tool
Undress images for free

Clothoff.io
AI clothes remover

AI Hentai Generator
Generate AI Hentai for free.

Hot Article

Hot Tools

Notepad++7.3.1
Easy-to-use and free code editor

SublimeText3 Chinese version
Chinese version, very easy to use

Zend Studio 13.0.1
Powerful PHP integrated development environment

Dreamweaver CS6
Visual web development tools

SublimeText3 Mac version
God-level code editing software (SublimeText3)

Hot Topics
 1385
1385
 52
52
 FSP showcases its new 2500W Cannon Pro power supply and U700-B chassis, which can control four RTX 4090 graphics cards at the same time
Jun 10, 2024 pm 09:13 PM
News from this site on June 8 FSP displayed a variety of PC accessories at Computex 2024 Taipei International Computer Show, including PC cases of various sizes, new air-cooled and liquid-cooled radiators, and a variety of new power supplies. ▲Picture source: Wccftech FSP is showing off its new CannonPro2500W power supply this year, which has been upgraded to ATX3.1 and Gen5.1 standards and has passed 80PLUS230VEU Platinum certification. This power supply is equipped with four PCIe12V-2x6 connectors and can power four RTX4090 graphics cards at the same time. In addition, FSP also launched a new MEGATI series power supply, which adopts 80PLUS platinum design, complies with ATX3.1 standard, has a rated power of 1650W, and is equipped with
 How to Fix Error Code 1132 in Zoom on Windows PC
May 30, 2023 am 11:08 AM
Zoom's video conferencing capabilities have made it popular among users while working from home. Many Zoom desktop client users have reported seeing error code 1132 along with an “Unknown error has occurred” message on their Windows PCs. Usually, this error code pops up when users try to log into their account and join any meeting in Zoom. In the error window, the user has the option to open a browser and join the meeting. However, some users reported that they were unable to open the meeting even on the browser. Windows firewall settings, outdated Zoom installation, or Zoom blacklisting your account could be some of the possible reasons for this error. Are you encountering an error code while using the Zoom app
![Event ID 157: Disk has been removed unexpectedly [Fixed]](https://img.php.cn/upload/article/000/887/227/168576249277516.jpg?x-oss-process=image/resize,m_fill,h_207,w_330) Event ID 157: Disk has been removed unexpectedly [Fixed]
Jun 03, 2023 am 11:21 AM
Event ID 157: Disk has been removed unexpectedly [Fixed]
Jun 03, 2023 am 11:21 AM
Disk has been accidentally deleted is an error in the system event log on Windows devices. This is an unusual issue on the virtual disk that all XBOX Live PC and Microsoft PC installations rely on. Typically, this problem occurs when something disrupts the system's communication with the disk. Event ID157 in Event Viewer The disk has been accidentally deleted, preventing the user from installing the game using the specified virtual drive. This virtual drive will not be visible in File Explorer like other drives. You may also encounter VMWare issues where the disk has been accidentally deleted. The solution below will fix the problem, but you must make changes directly in VMWare's emulated operating system. Depend on
 Fix: Windows Driver Foundation missing error
Jun 02, 2023 pm 09:15 PM
It's really frustrating when your Windows PC lags or runs slowly while playing games or performing resource-intensive tasks. Your PC may have all the processing power to handle these tasks, but if certain drivers fail to load, then your PC will experience multiple issues. One such error is WindowsDriverFoundation missing issue. When this error pops up, you should know that some important system-related drivers fail to load on your Windows PC. Since drivers are one of the most important components that allow the hardware to communicate with your PC, any issues with the drivers can cause the hardware process to malfunction. Several users reported that Window
 Does Windows 11 provide support for VB6 applications?
May 30, 2023 am 08:31 AM
Windows 11 introduces more macOS-style UI elements. You get a redesigned taskbar with the Start menu in the center. Yes, you can change its position, but by default it will be placed in the center. The Control Center has also received some design tweaks. In the next update, support for Android apps will also come along with redesigned Notepad and Media Player. Although all these features make Windows 11 a nice upgrade over Windows 10, certain doubts are brewing in the minds of users. There is a segment of users and developers who are concerned about whether Windows 11 will support legacy applications and technologies, whether they are lagging behind or not. Since V
 Steps to restart your iPhone
Aug 29, 2023 am 10:53 AM
Although it seems like a basic task, quite a few people often find themselves wondering how to restart their iPhone. This article will give you a comprehensive guide with everything you need to know about the process of restarting your iPhone effectively. There may be countless reasons why you want to restart your iPhone. Often, you might deal with unexpected issues on your device, in which case a simple reboot might be the magic bullet to fix the problem. Technical glitches, poor performance, and unresponsive applications are just a few examples of problems that a restart can correct. One of the initial troubleshooting steps I take when faced with a challenge regarding my iPhone is to perform a quick restart of the device. This seemingly simple action can solve a variety of small problems quickly and easily
![Change the power button action on Windows 11 [5 Tips]](https://img.php.cn/upload/article/000/887/227/169600135086895.png?x-oss-process=image/resize,m_fill,h_207,w_330) Change the power button action on Windows 11 [5 Tips]
Sep 29, 2023 pm 11:29 PM
Change the power button action on Windows 11 [5 Tips]
Sep 29, 2023 pm 11:29 PM
The power button can do more than shut down your PC, although this is the default action for desktop users. If you want to change the power button action in Windows 11, it's easier than you think! Keep in mind that the physical power button is different from the button in the Start menu, and the changes below won't affect the operation of the latter. Additionally, you'll find slightly different power options depending on whether it's a desktop or laptop. Why should you change the power button action in Windows 11? If you put your computer to sleep more often than you shut it down, changing the way your hardware power button (that is, the physical power button on your PC) behaves will do the trick. The same idea applies to sleep mode or simply turning off the display. Change Windows 11
 Assassin 4 is upgraded again, Kyushu Fengshen releases Assassin 4 VC LCD air-cooled radiator and other new products
Jun 12, 2024 pm 09:39 PM
This site reported on June 5 that Kyushu Fengshen released the enhanced version of the Assassin 4 flagship air-cooled radiator Assassin 4VLCD at the 2024 Taipei International Computer Show. Assassin 4VCLCD maintains the basic structure of the original Assassin 4 dual towers, dual fans and 7 heat pipes, and upgrades the traditional copper base to a VC vapor chamber, which significantly improves the thermal conductivity efficiency and further increases the heat dissipation capacity from 280W to 300W. At the same time, Assassin 4VCLCD is equipped with a top-cover LCD screen that can display CPU status parameters in real time. As for other tower air-cooled radiators, Kyushu Fengshen has launched a digital display PRO version for its AK400/620 products. The new product has a larger screen area, can display more data at the same time, and supports color imaging that can detect system health in real time.


