

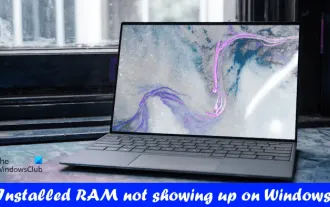
Windows 11 not using all available RAM? Fix now

At some point, we have all noticed that our system consumes a lot of RAM, thus affecting its performance. But some users are reporting the opposite, with Windows 11 not using all available RAM.
Memory is used to temporarily store the files you are currently working on, and problems with it can have a serious impact on your computer's functionality.
The errors we deal with here are tricky because most users are unable to determine the root cause and there isn't much data on the internet to troubleshoot and eliminate the problem.
In the following tutorial, we’ll list the reasons behind this and ways to make Windows 11 use all the RAM on your system.
Why isn't Windows 11 using all the RAM on my PC?
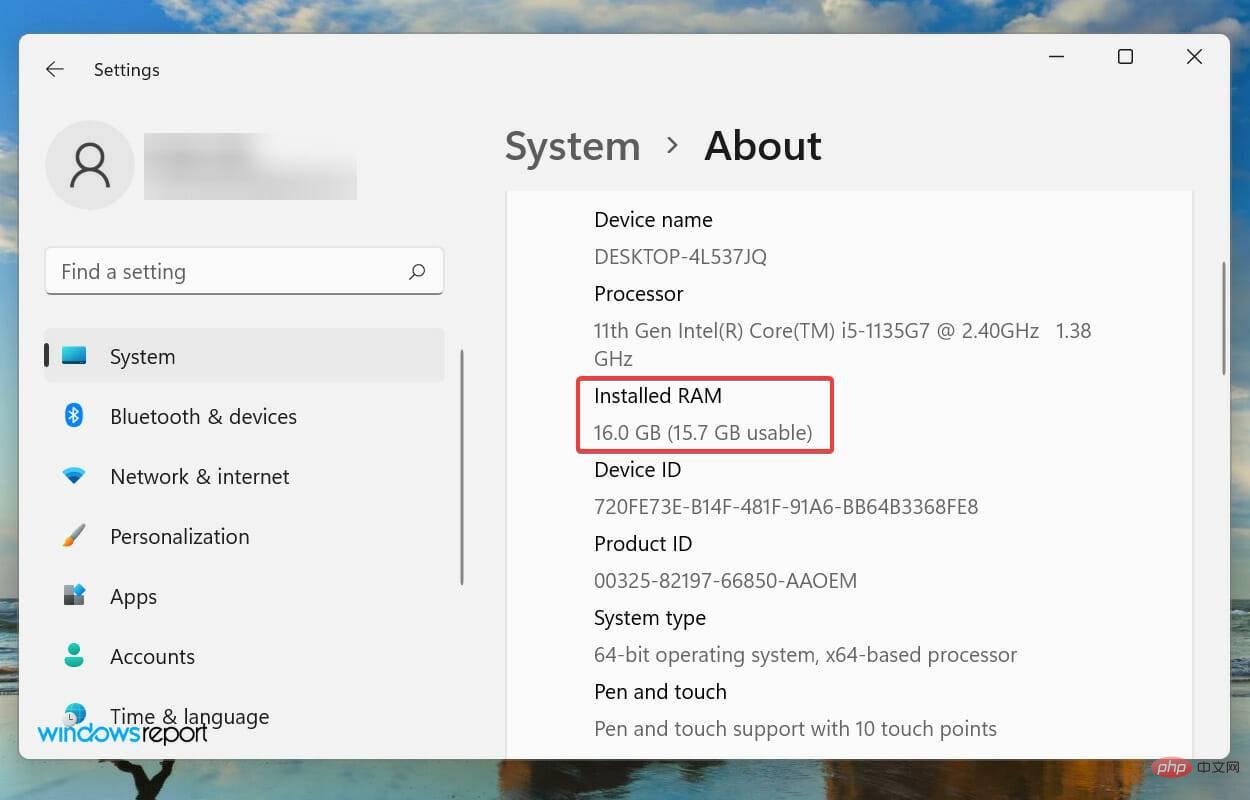
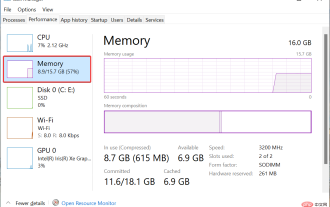
First of all, your computer never uses all available memory or RAM. For example, the Dell Inspiron laptop used to write this article has 16 GB of RAM installed, of which only 15.7 GB is usable.
#However, if you notice that the operating system cannot even utilize the available RAM, this could be due to a setup error, a slot issue, or the RAM itself.
In addition, some devices, such as graphics cards, also reserve a certain amount of RAM/memory.
By now you are quite familiar with the concept and can better solve problems. Now let us introduce you to the most effective fixes to eliminate Windows 11 not using all RAM issue.
What should I do if Windows 11 is not using all the RAM?
1. Run the Windows Memory Diagnostic Tool
- Press Windows S to launch the Search menu and enter in the text field at the top Windows Memory Diagnosis Tools, and then click the relevant search results that appear.

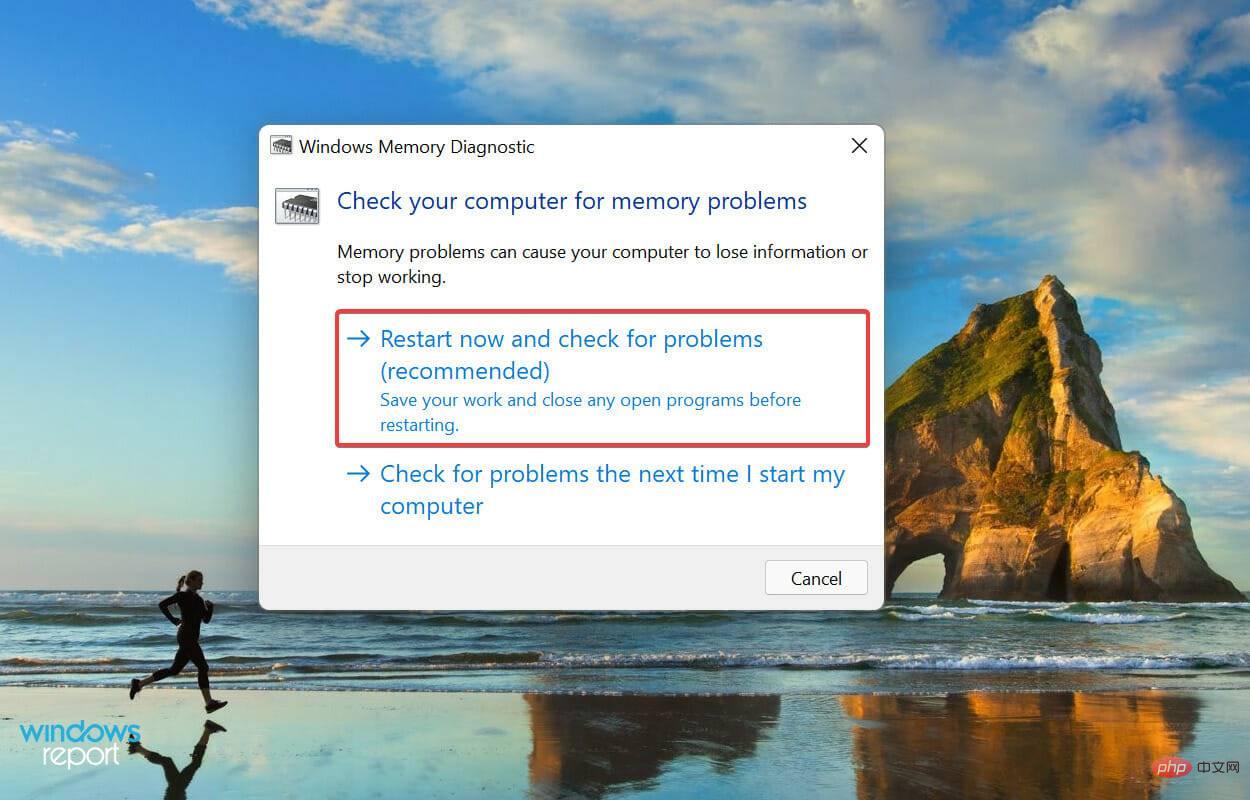
- Now, select Restart now and check for issues from the two options listed here (recommended).
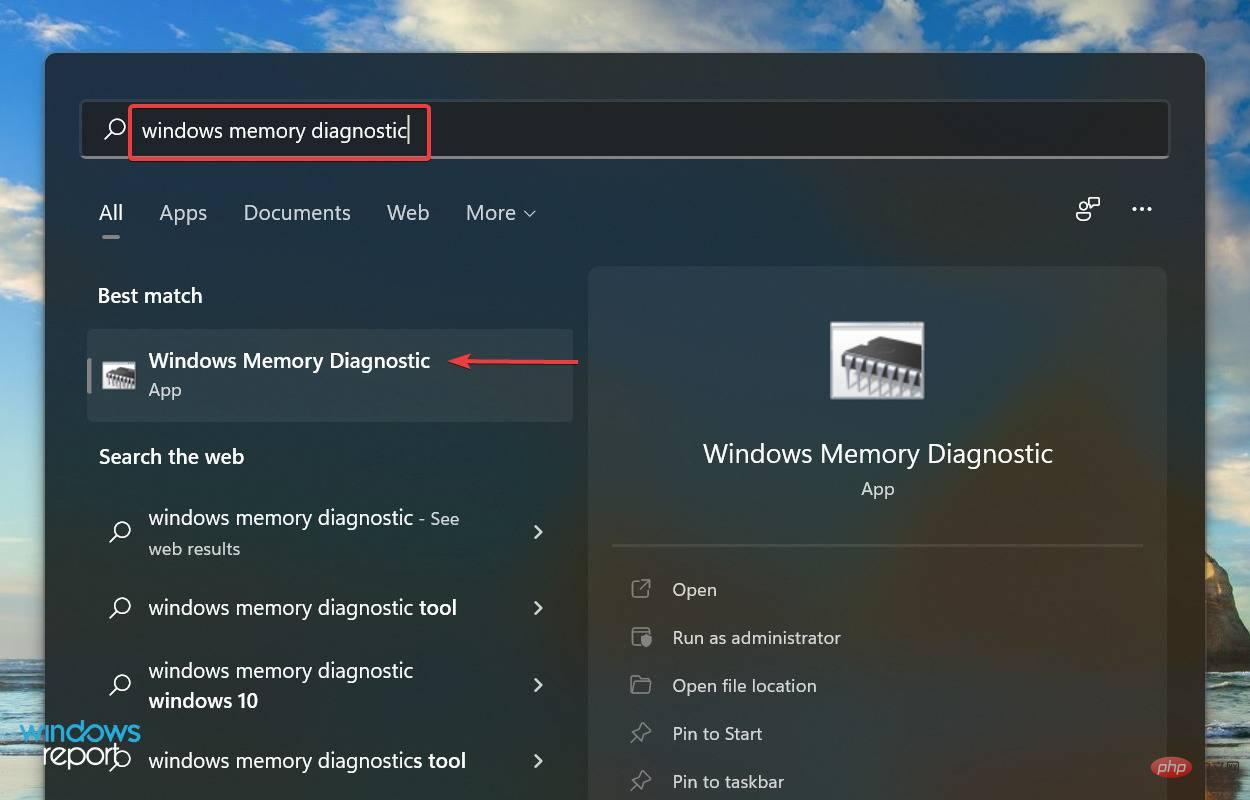
#Microsoft provides a dedicated built-in tool, Windows Memory Diagnostic, that can identify RAM problems and eliminate them automatically. Your primary method should be to run this tool when Windows 11 is not using all of your RAM.
Remember to save all open files to avoid data loss as the computer will restart.
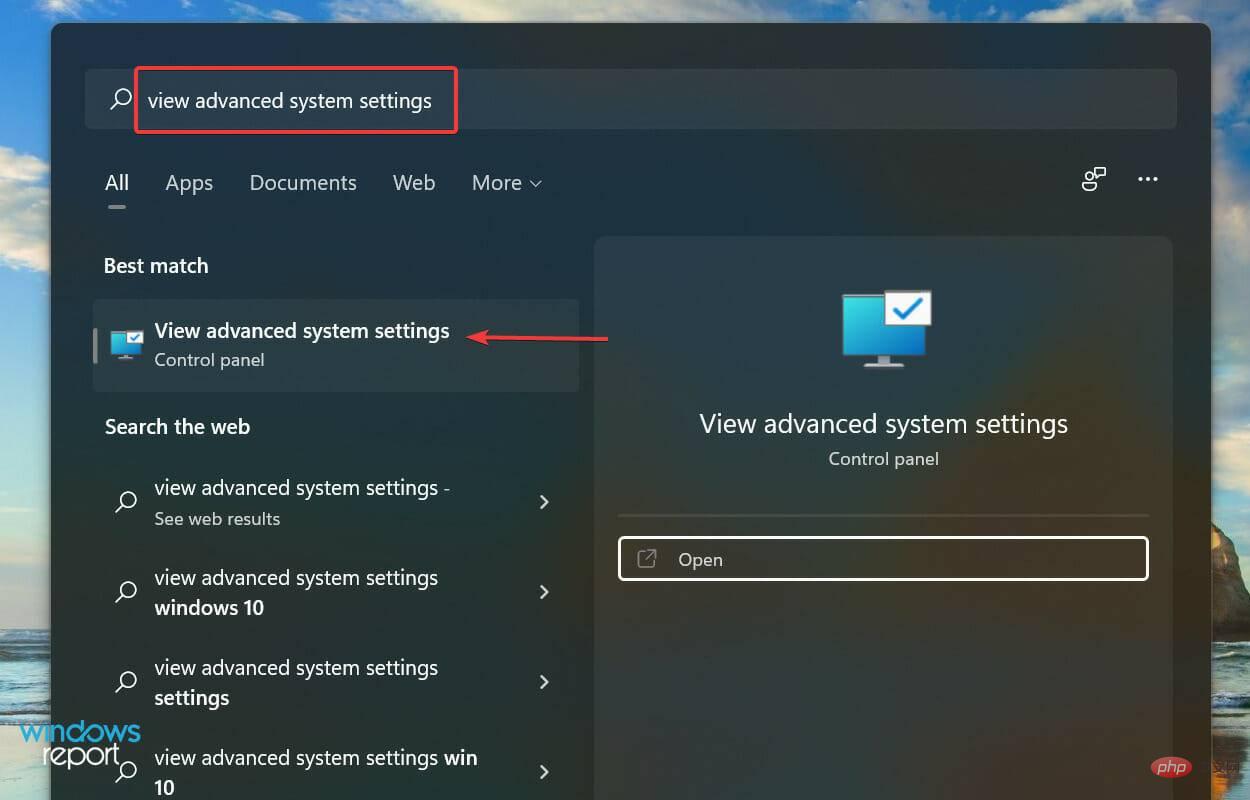
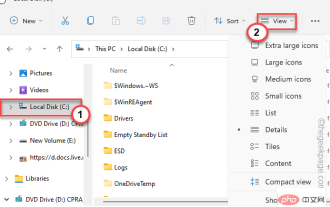
2. Check the page file
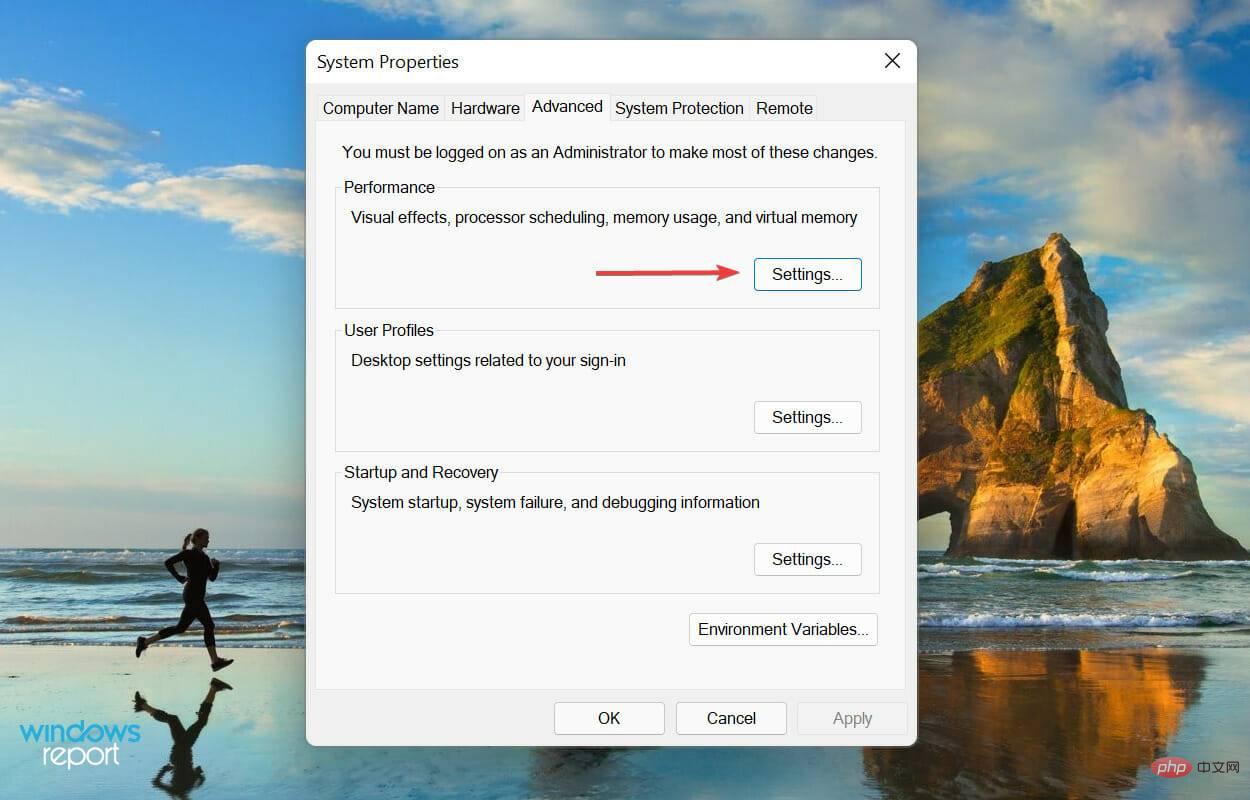
- Press Windows S to launch the search menu and enter in the text field at the top to view Advanced system settings and click on the relevant search results that appear.
- Click "Settings" under "Performance" in the "Advanced" tab.
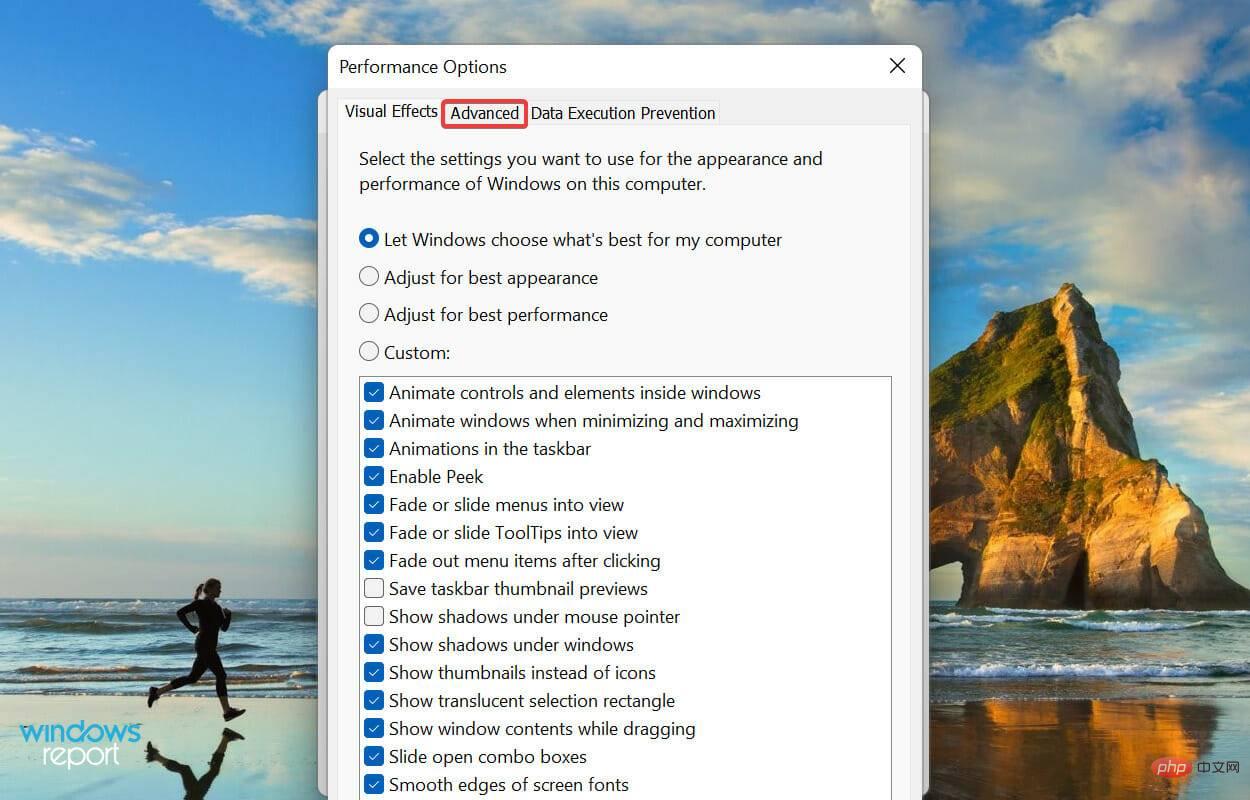
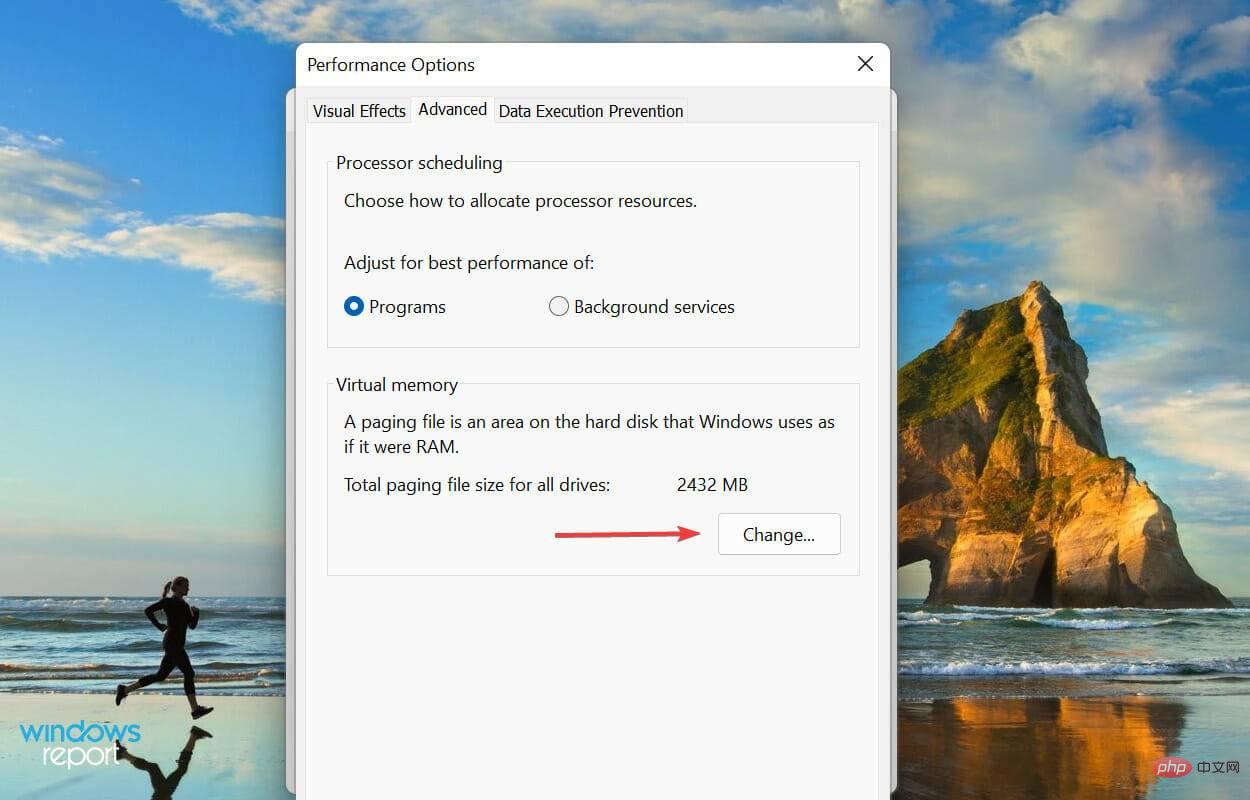
- Navigate to the Advanced tab in the Performance Options window.
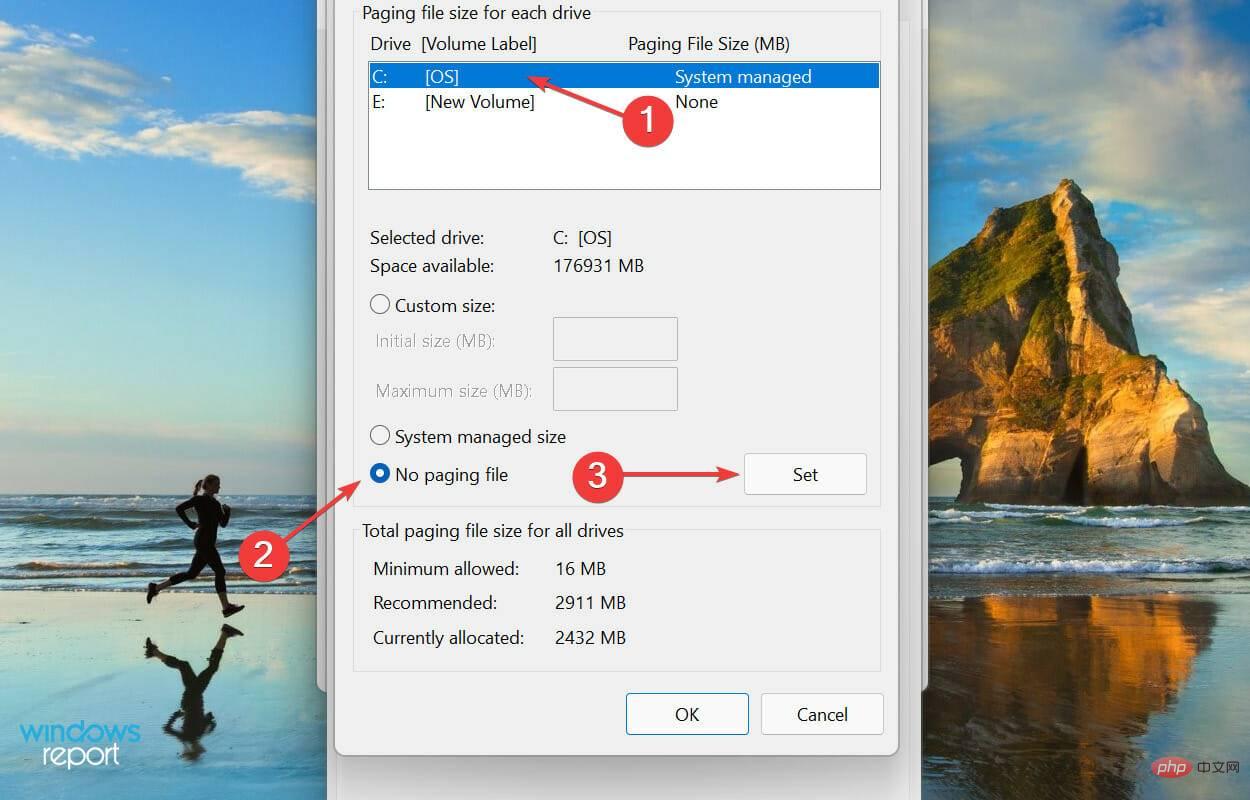
- Click Change under Virtual Memory.
-
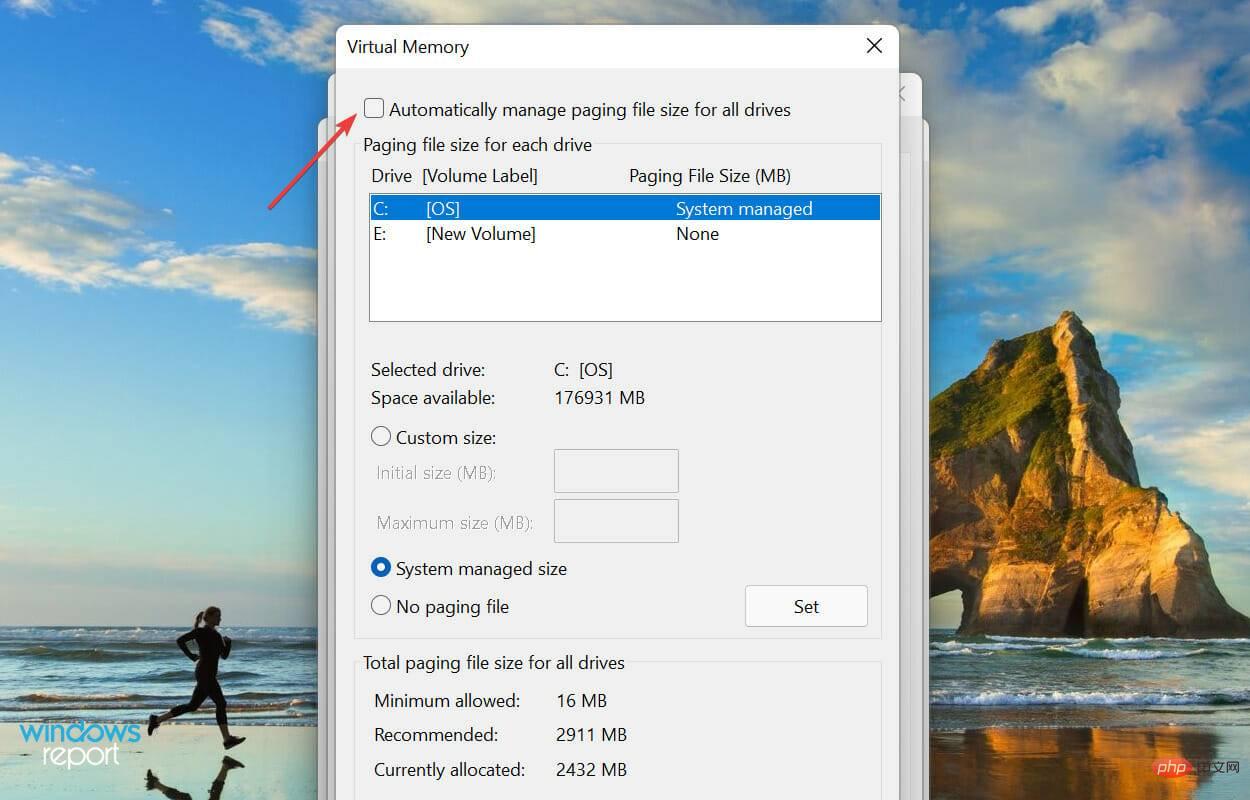
Uncheck the Automatically manage paging file size for all drives checkbox.
- Select the drive, check the No paging file option, and click the Settings button.
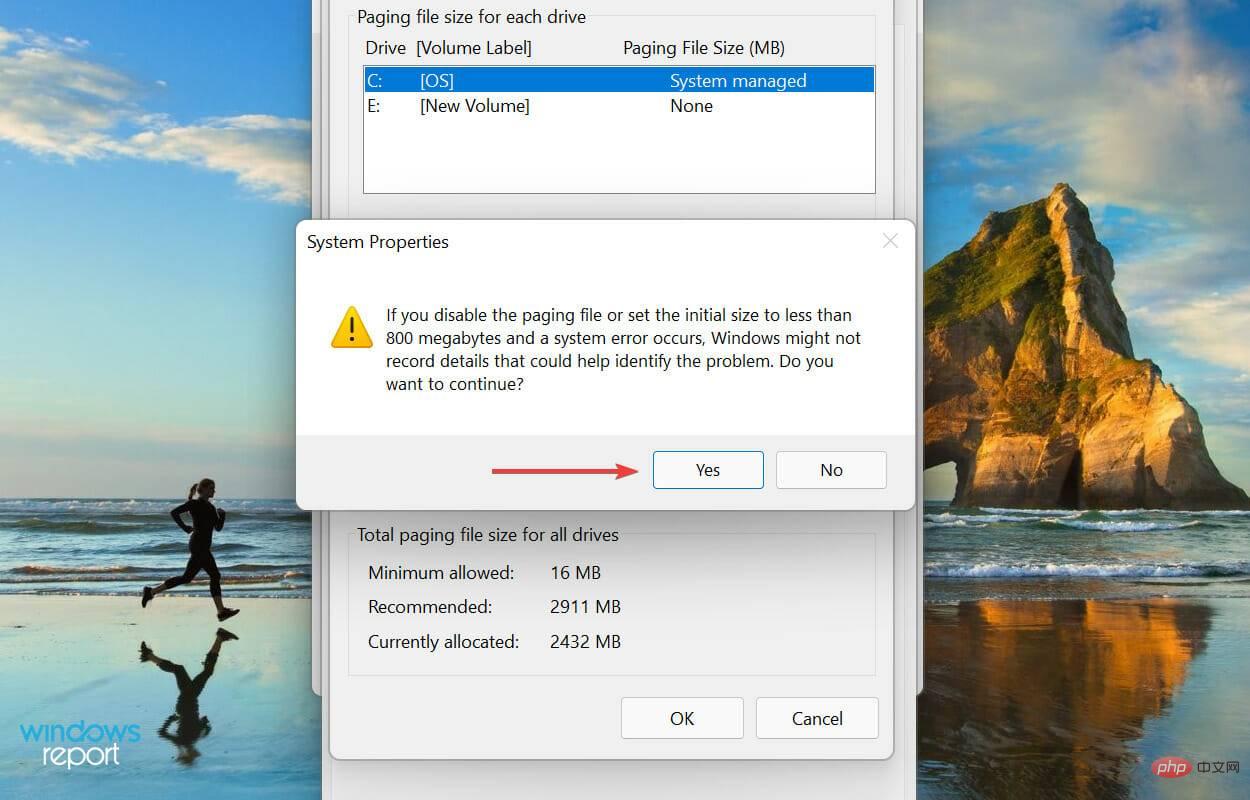
- Click Yes in the warning box that appears.
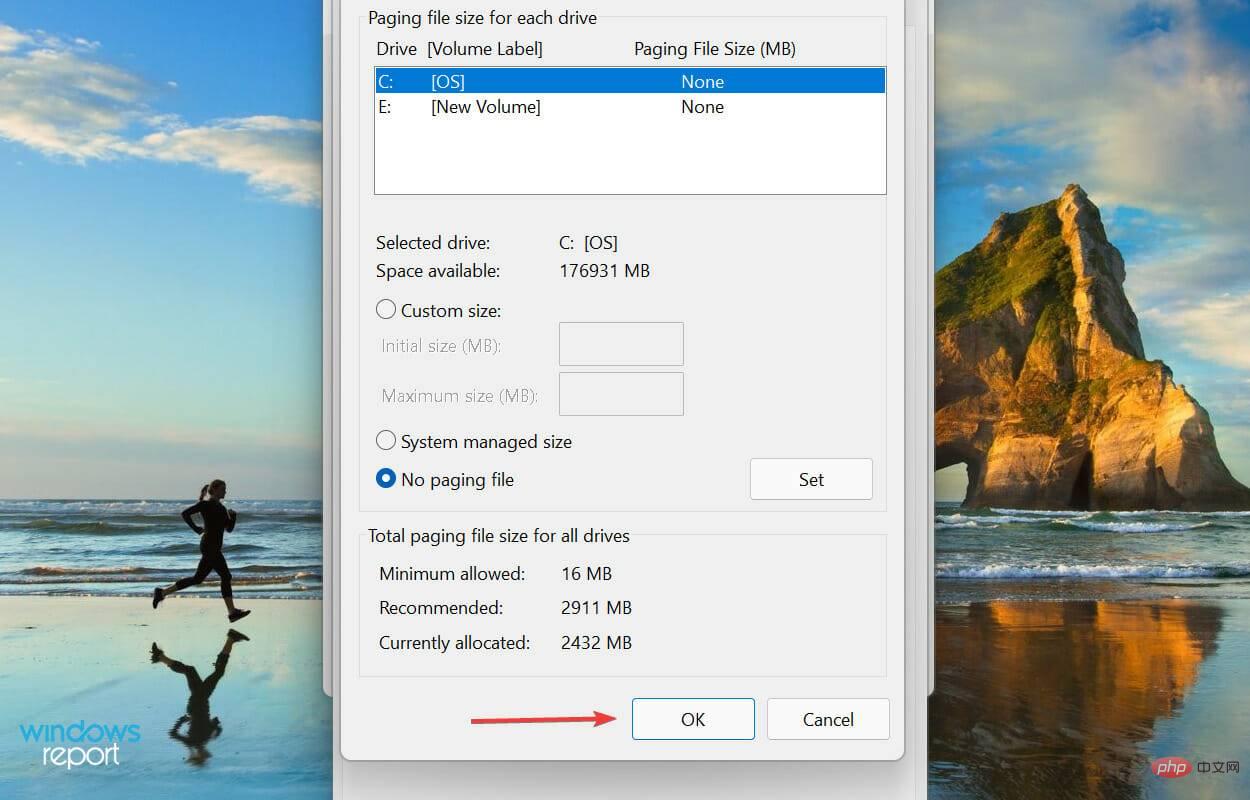
- If all drives have the page file, repeat the process for all drives and click OK at the bottom to save the changes. Finally, restart your computer for the changes to take effect.
3. Modify available RAM
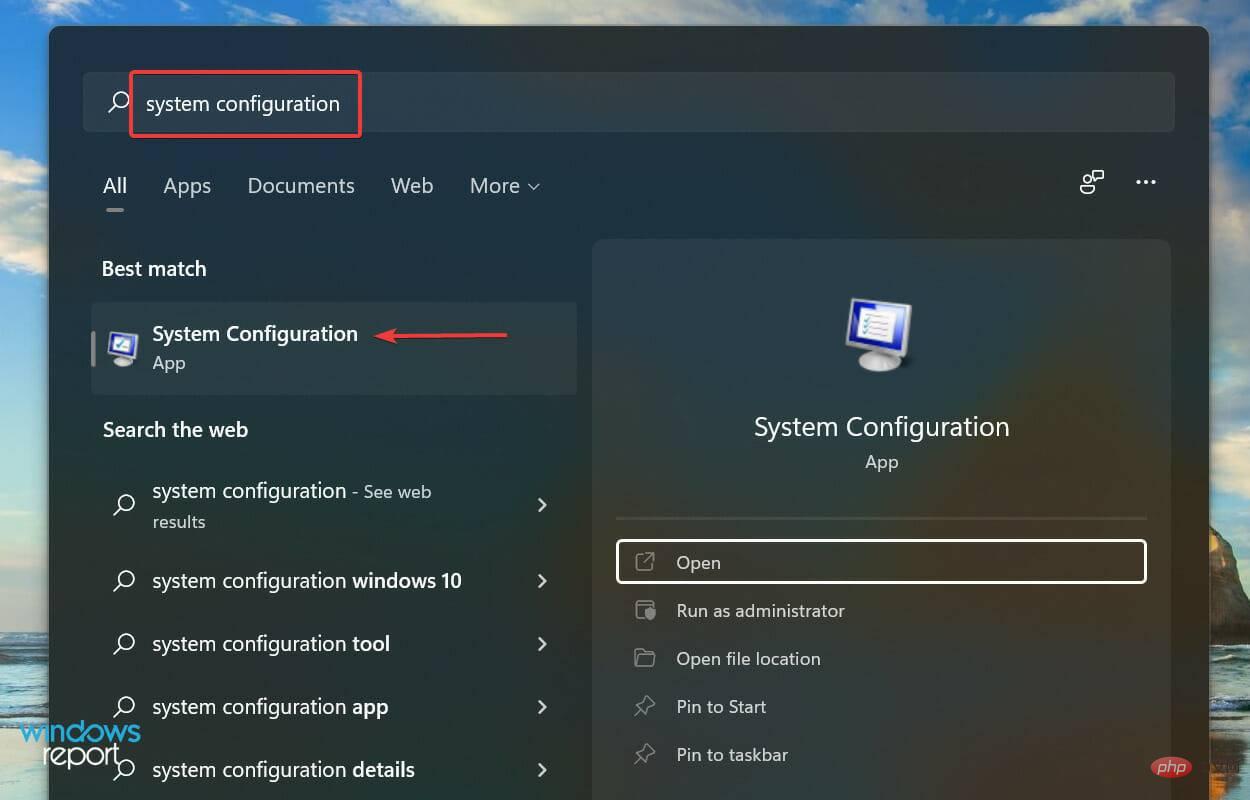
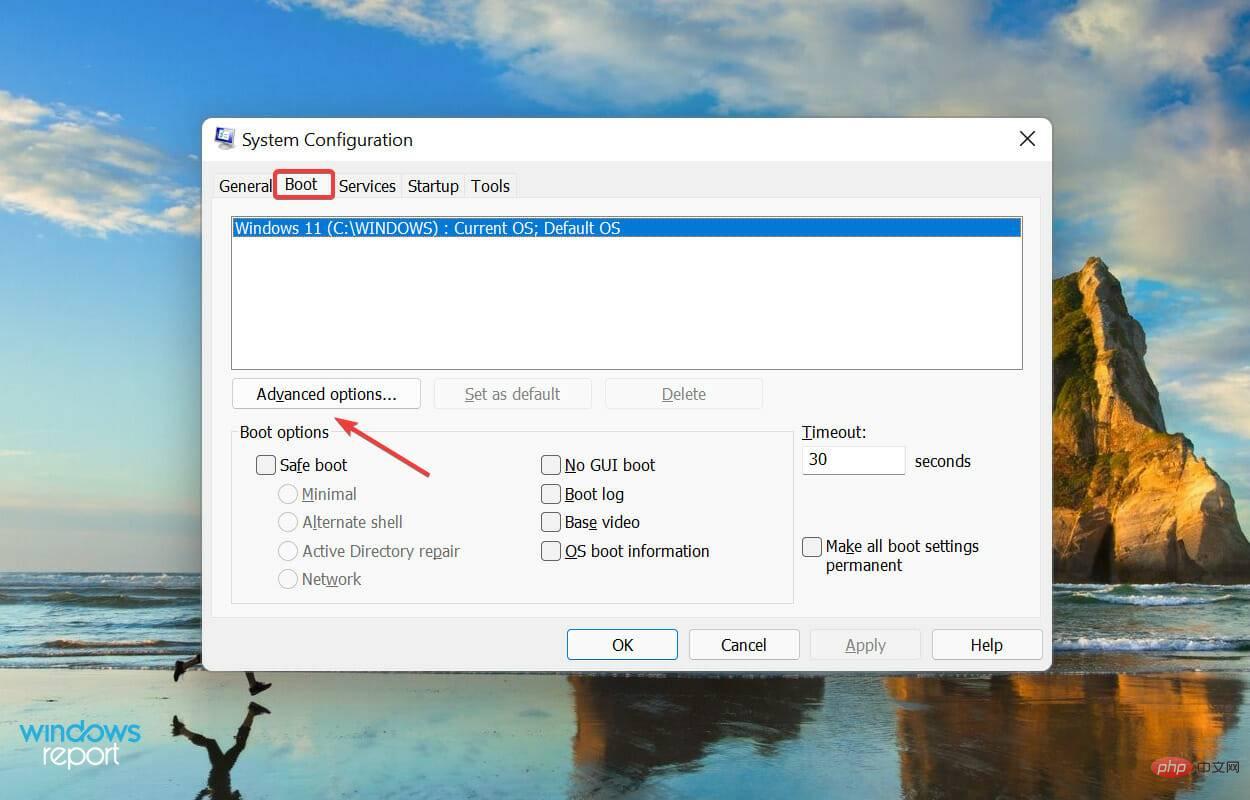
- Press Windows S to launch the search menu, enter System Configuration in the text field at the top, then Click on the relevant search results that appear.
- Now, go to the Boot tab and click on Advanced Options.
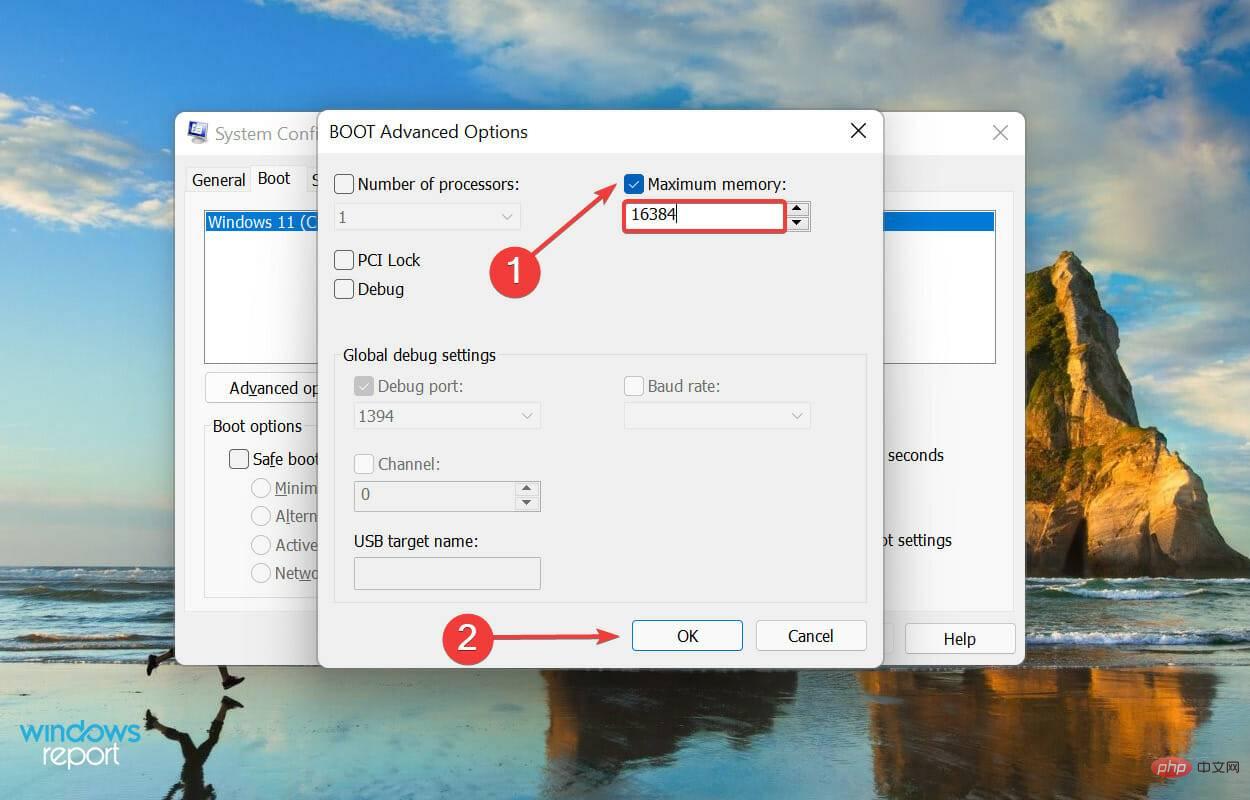
- Check the Maximum Memory checkbox, enter the RAM installed on your system in the text field below, and click OK at the bottom.
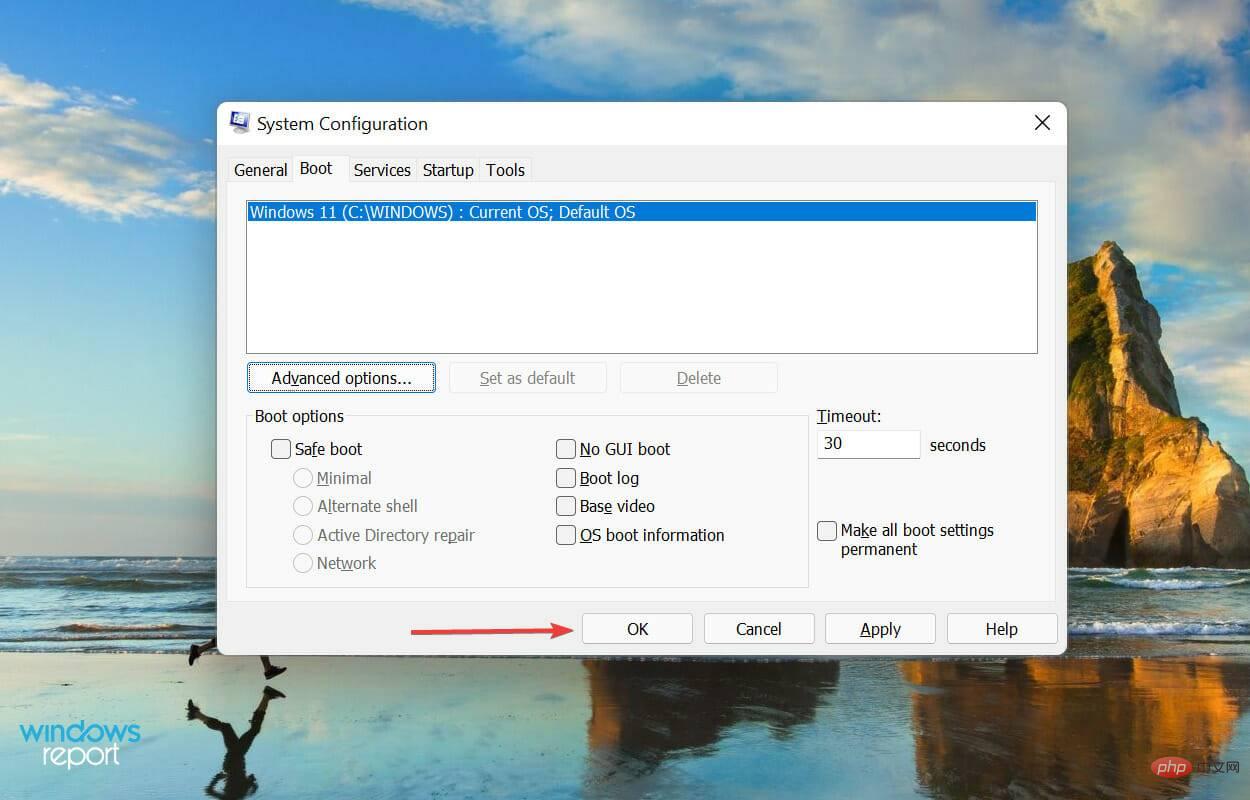
- Click "OK" again to save changes and close the System Configuration window.
- If prompted, please restart your computer.
- If it doesn't work, uncheck the Maximum memory checkbox in the BOOT Advanced Options window and save the changes.
If your Windows 11 computer is not using all of its RAM, making these modifications in the system configuration can help.
To calculate the value in the previous text field, check the RAM installed in your system and multiply it by 1024 to find the value in MB (Megabytes). For example, your computer has 16 GB RAM, so the value to enter becomes 16 x 1024 = 16384 MB.
4. Modify the registry
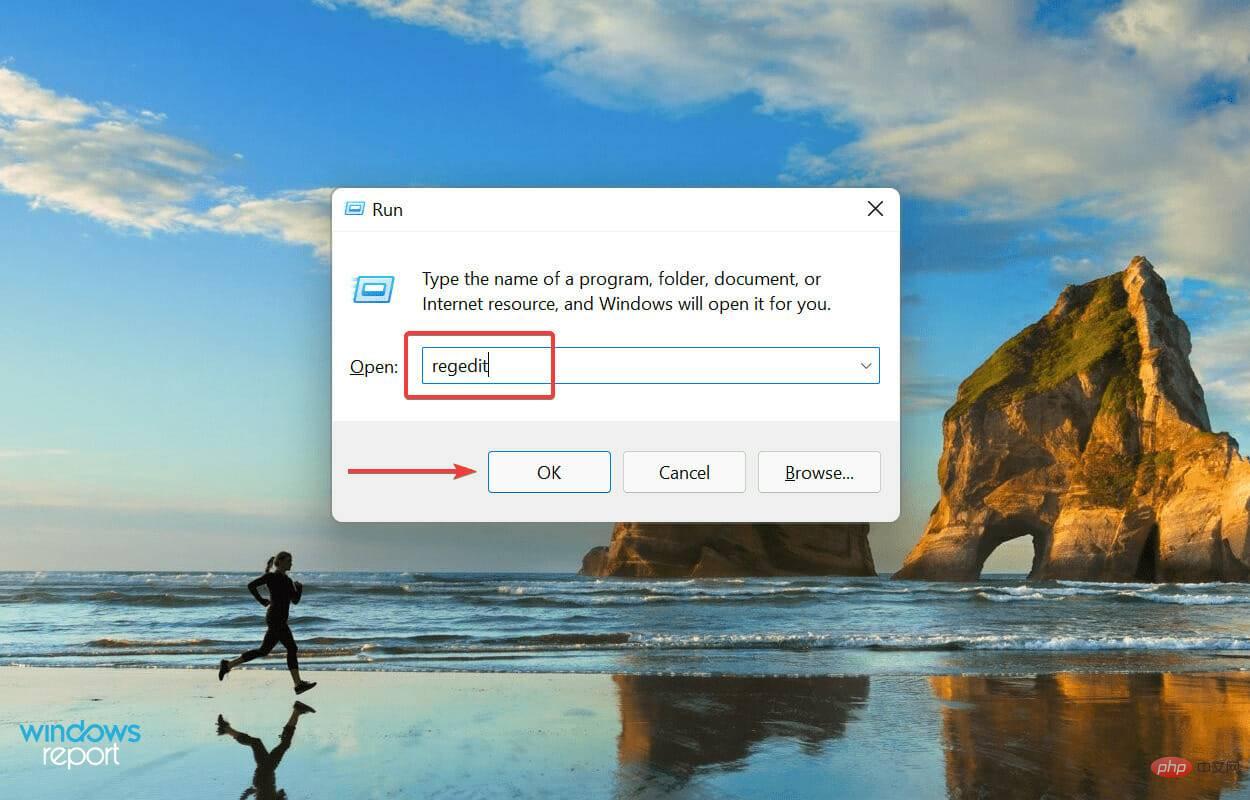
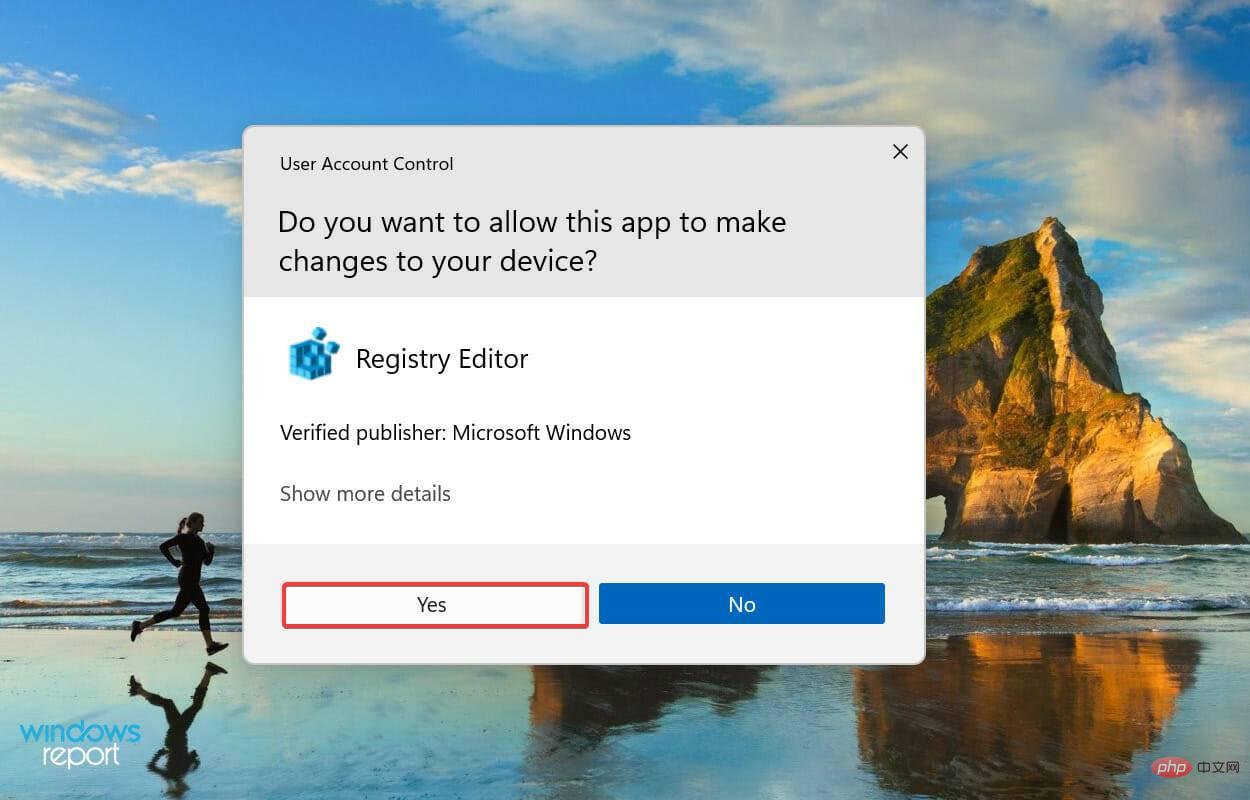
- Press Windows R to start the run command and enter regedit## in the text field #, then click OK or hit Enter to start Registry Editor. Click
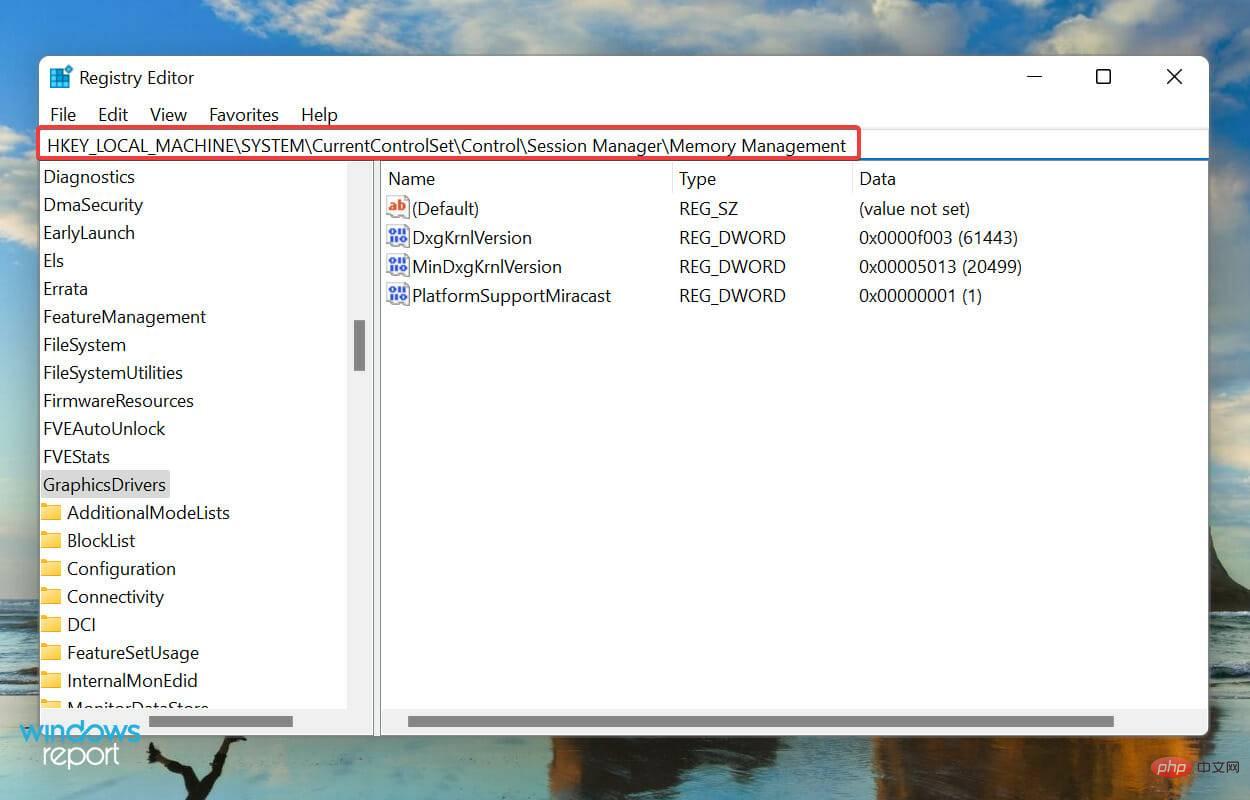
- Yes on the pop-up UAC (User Account Control) prompt. Now enter the following path in the address bar at the top and hit
- Enter. Alternatively, you can use the left pane to navigate the path:
HKEY_LOCAL_MACHINE\SYSTEM\CurrentControlSet\Control\Session Manager\Memory Management<strong></strong>##Find and double-click the ClearPageFileAtShutdown - DWORD to modify its value data. Enter 1
- under Numeric Data and click OK to save changes. Close the registry and then restart the computer.
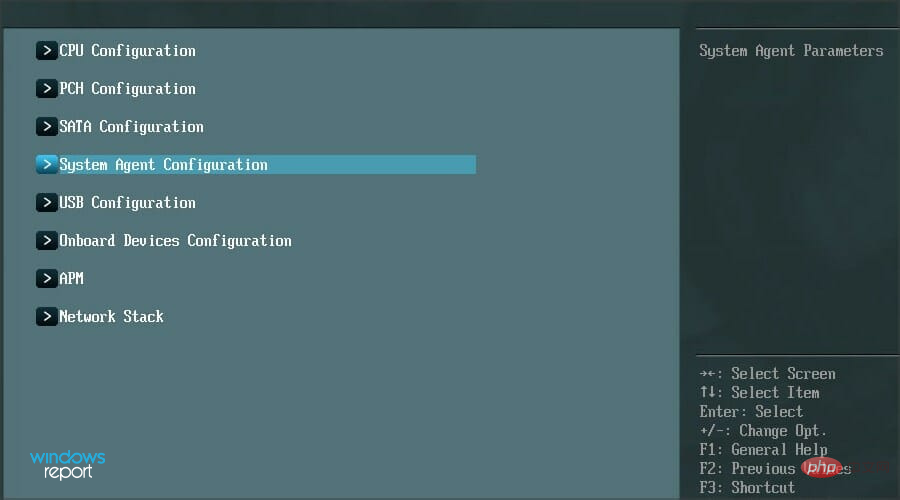
- 5. Enable memory remapping in BIOS
 ##Find and double-click the
 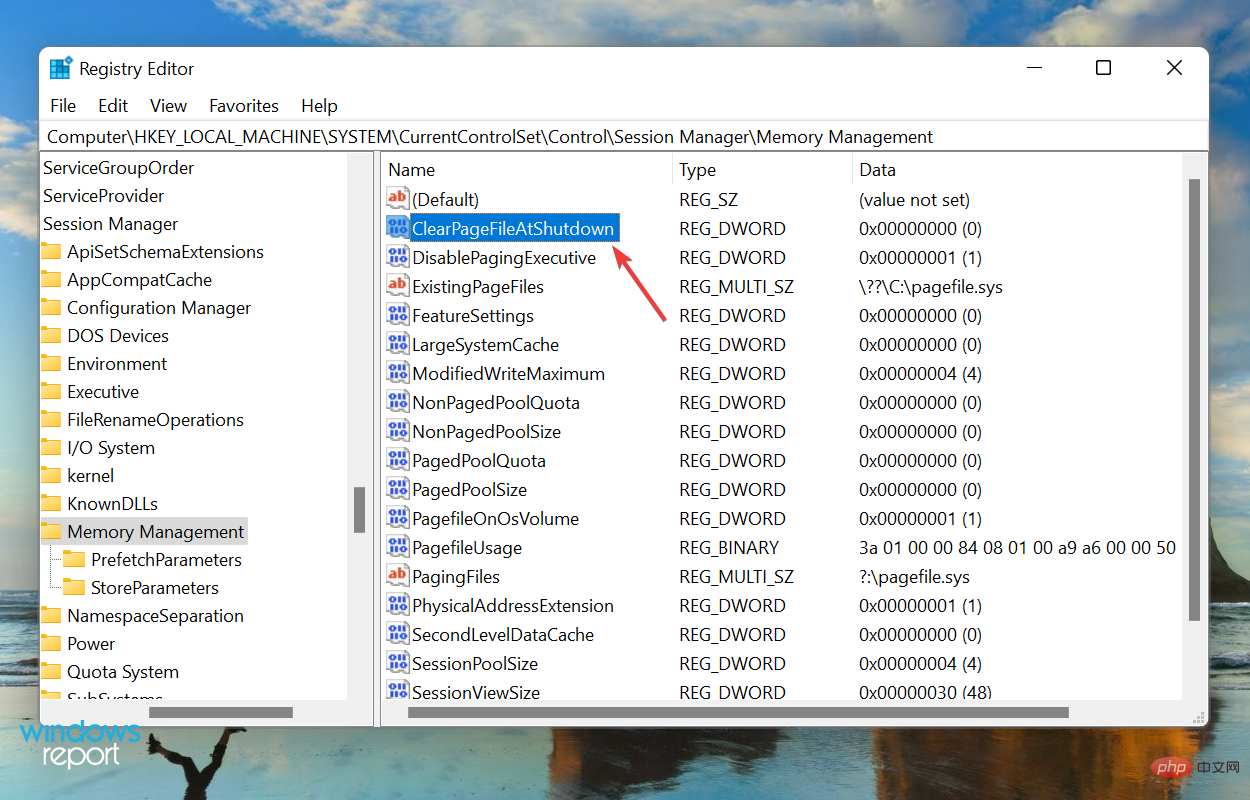 Enter
Enter 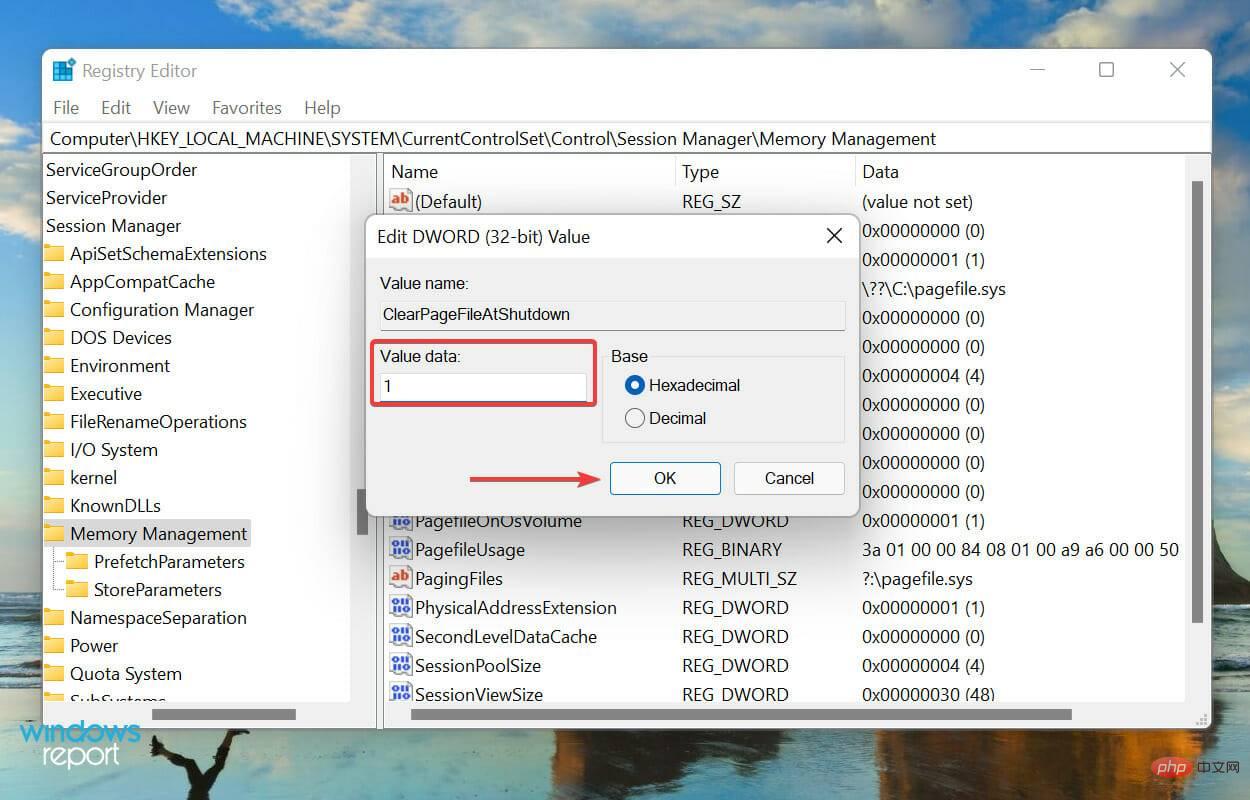 Close the registry and then restart the computer.
 - F12
- key when the display lights up to enter BIOS, navigate to the Advanced tab, and select System Agent Configuration options. Now, select Memory Remapping Feature
- and enable it. It is known that enabling memory remapping increases the RAM available to Windows on your system. However, this feature is not available on all devices, so check if you have it before proceeding with this method.
 Now, select
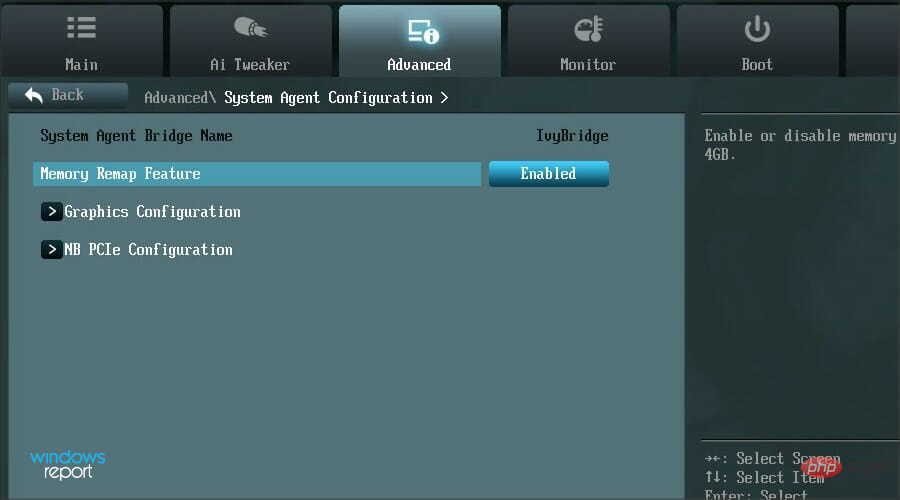
Once completed, check if Windows 11 is now using all available RAM.
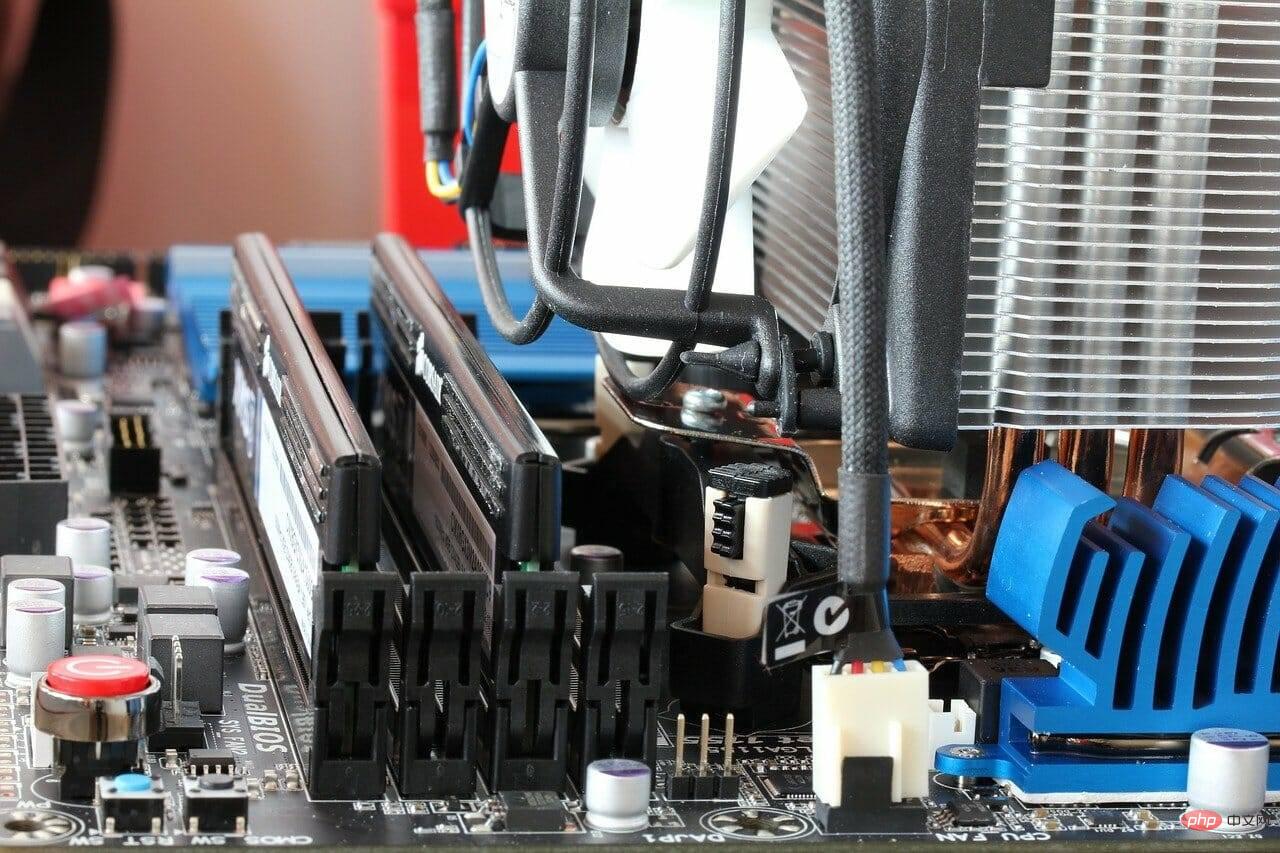
6. Rearrange the RAM modules
If you have a variety of slots available, rearranging the RAM modules may help. To do this, turn off the computer, open the back panel, remove the memory modules and replace their slots. Check if this solves the problem.
If it still exists, it's also possible that some slots have expired. To verify, insert the same memory modules in all slots and check the available RAM on the system each time.
Also, some systems require you to arrange the RAM in a specific order when all slots are unused. For example, if you have four slots available but are only using two memory modules, you may want to use the first and third slots.
7. Take your computer to a repair center
If you have reached this part of the article after performing the above methods and the problem persists, it may be an issue with the hardware itself.
It could be a dead or malfunctioning slot, a connection issue, or other similar issues.
In this case we recommend taking your PC to a repair center as the components we deal with here It's fragile, the connections are complicated, and any mistake you make can seriously damage your system.
How to solve high RAM usage issue in Windows 11?
If you have low RAM installed or you are using too many programs at once, RAM usage may become high, which may show up through poor system performance. Programs may lag or freeze, or the system may crash entirely.
The above is the detailed content of Windows 11 not using all available RAM? Fix now. For more information, please follow other related articles on the PHP Chinese website!

Hot AI Tools

Undresser.AI Undress
AI-powered app for creating realistic nude photos

AI Clothes Remover
Online AI tool for removing clothes from photos.

Undress AI Tool
Undress images for free

Clothoff.io
AI clothes remover

AI Hentai Generator
Generate AI Hentai for free.

Hot Article
Hot Tools

Notepad++7.3.1
Easy-to-use and free code editor

SublimeText3 Chinese version
Chinese version, very easy to use

Zend Studio 13.0.1
Powerful PHP integrated development environment

Dreamweaver CS6
Visual web development tools

SublimeText3 Mac version
God-level code editing software (SublimeText3)
Hot Topics
 1378
1378
 52
52

![Corsair iCUE software not detecting RAM [Fixed]](https://img.php.cn/upload/article/000/465/014/170831448976874.png?x-oss-process=image/resize,m_fill,h_207,w_330) Corsair iCUE software not detecting RAM [Fixed]
Feb 19, 2024 am 11:48 AM
Corsair iCUE software not detecting RAM [Fixed]
Feb 19, 2024 am 11:48 AM
This article will explore what users can do when the CorsairiCUE software does not recognize the RAM in a Windows system. Although the CorsairiCUE software is designed to let users control their computer's RGB lighting, some users have found that the software does not function properly, resulting in an inability to detect RAM modules. Why doesn't ICUE pick up my memory? The main reason why ICUE cannot correctly identify RAM is usually related to background software conflicts. In addition, incorrect SPD write settings may also cause this problem. Fixed issue with CorsairIcue software not detecting RAM If CorsairIcue software is not detecting RAM on your Windows computer, please use the following suggestions.
 How to increase virtual memory (page file) in Windows 11
May 13, 2023 pm 04:37 PM
How to increase virtual memory (page file) in Windows 11
May 13, 2023 pm 04:37 PM
If you notice a certain amount of lag when running high-end applications or games, it could be that the RAM/memory is generally running full. This is where you increase the virtual memory or page file size in Windows 11. Virtual memory or page file is one of the most misunderstood concepts and there are many myths surrounding it. No matter what anyone else says or does, it's important to thoroughly understand how to get the best performance from your computer. In the following sections, we'll walk you through the steps to increase virtual memory in Windows 11, helping you understand its importance and the optimal virtual memory size. Why do you need virtual memory? The page file or virtual memory is basically the part of the hard drive that is used as RAM. When memory is full and cannot store more data
 Windows 11 not using all available RAM? Fix now
Apr 14, 2023 am 10:25 AM
Windows 11 not using all available RAM? Fix now
Apr 14, 2023 am 10:25 AM
At some point or another, we have all noticed that our system consumes a lot of RAM, thus affecting its performance. But some users are reporting the opposite, with Windows 11 not using all available RAM. Memory is used to temporarily store the files you are currently working on, and problems with it can have a serious impact on your computer's functionality. The errors we're dealing with here are tricky because most users can't determine the root cause, and there's not a lot of data on the internet to fix and eliminate the problem. In the following tutorial, we’ll list the reasons behind this and ways to make Windows 11 use all the RAM on your system. Why isn't Windows 11 using all the RAM on my PC? First, your plan
 CAMM2 for desktop PCs: MSI explains the benefits of the new RAM standard for gaming towers
Aug 17, 2024 pm 06:47 PM
CAMM2 for desktop PCs: MSI explains the benefits of the new RAM standard for gaming towers
Aug 17, 2024 pm 06:47 PM
The first LPCAMM2 modules for laptops are already being delivered, and desktop mainboards are also expected to be equipped with CAMM2 in future. CAMM2 and LPCAMM2 are not compatible with each other, and even on desktop PCs, customers need to be caref
 Installed memory not showing up on Windows 11
Mar 10, 2024 am 09:31 AM
Installed memory not showing up on Windows 11
Mar 10, 2024 am 09:31 AM
If you have installed new RAM but it is not showing up on your Windows computer, this article will help you resolve the issue. Usually, we improve the performance of the system by upgrading RAM. However, system performance also depends on other hardware such as CPU, SSD, etc. Upgrading RAM can also improve your gaming experience. Some users have noticed that installed memory is not showing up in Windows 11/10. If this happens to you, you can use the advice provided here. Installed RAM not showing up on Windows 11 If the installed RAM is not showing up on your Windows 11/10 PC, the following suggestions will help you. Is the installed memory compatible with your computer's motherboard? in BIO
 How to add swap space on Ubuntu 22.04 LTS
Feb 20, 2024 am 11:12 AM
How to add swap space on Ubuntu 22.04 LTS
Feb 20, 2024 am 11:12 AM
Swap space plays an important role in Linux systems, especially when the system is low on memory. It acts as a backup memory storage space that helps the system run smoothly and maintain stability even under high load. This article provides you with a detailed guide to adding swap space on Ubuntu 22.04LTS to ensure that your system performance is optimized and can handle various workloads. Understanding Swap Space Swap space provides virtual memory that is used to supplement the system's physical RAM. When the system is low on RAM, the kernel swaps data to disk to prevent out-of-memory and system crashes. Linux systems commonly use swap space to handle this situation. Run multiple memory-intensive applications simultaneously to process very large files or data
 Not enough physical memory available in VMWare Workstation Fix
Apr 20, 2023 pm 03:43 PM
Not enough physical memory available in VMWare Workstation Fix
Apr 20, 2023 pm 03:43 PM
Virtual machines on VMWare require large amounts of physical memory to run and function properly. RAM is an important part of a virtual machine and if there is not enough amount of physical RAM available, it cannot even start and throws a long error message "Not enough physical memory to start this virtual machine". As the error message suggests, this is the result of insufficient physical memory in the system. Solution – 1. The first thing you should do is to restart your system. This will obviously clear some extra memory for the host. After restarting, start VMWare directly and start the virtual machine. 2. If you have another virtual machine, try running it and test it. Fix 1 – Edit the config.ini file You can edit the configuration file so that the virtual machine only uses system-available
 What are the characteristics of cache, rom and ram?
Aug 26, 2022 pm 04:05 PM
What are the characteristics of cache, rom and ram?
Aug 26, 2022 pm 04:05 PM
Characteristics of cache: A one- or two-level high-speed, small-capacity memory set between the CPU and the main memory. The information is naturally lost when the computer is powered off. Characteristics of ROM: it can only read data from the memory, but cannot write information into it. The data will still exist after the computer is powered off. Characteristics of ram: it can read data from the memory and write information to the memory; it is used to store commands, programs and data required to run the program; information is naturally lost when the computer is powered off.