

Code attached, detailed steps for connecting ChatGPT to Feishu


ChatGPT has become popular recently, and the boss is also ready to ask us to connect ChatGPT to Feishu. After a morning of research, we finally successfully registered and connected the Feishu robot to ChatGPT.
Let me share with you the detailed steps to access Feishu.
How to access Feishu
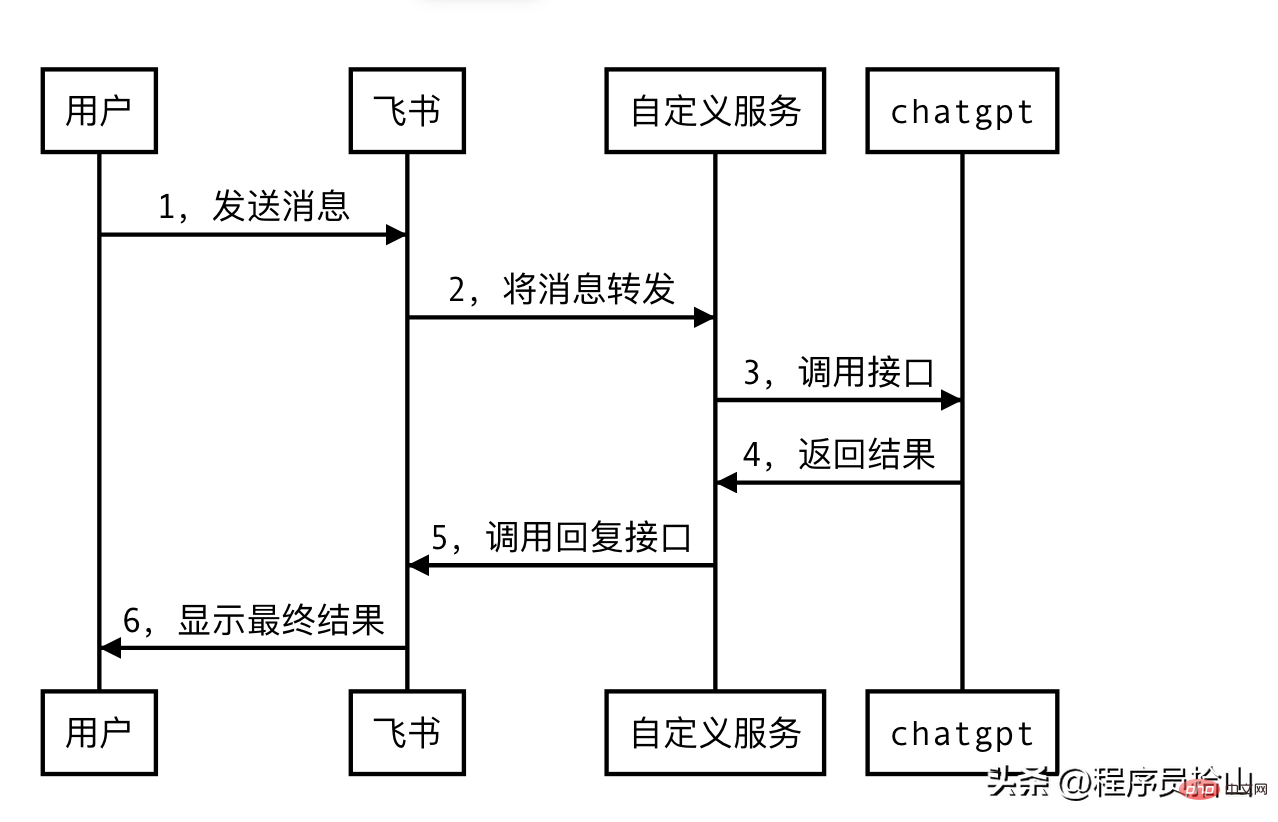
The interaction between Feishu and chatgpt is as follows. Our custom service acts as a middleman to forward messages.
Create a Feishu robot
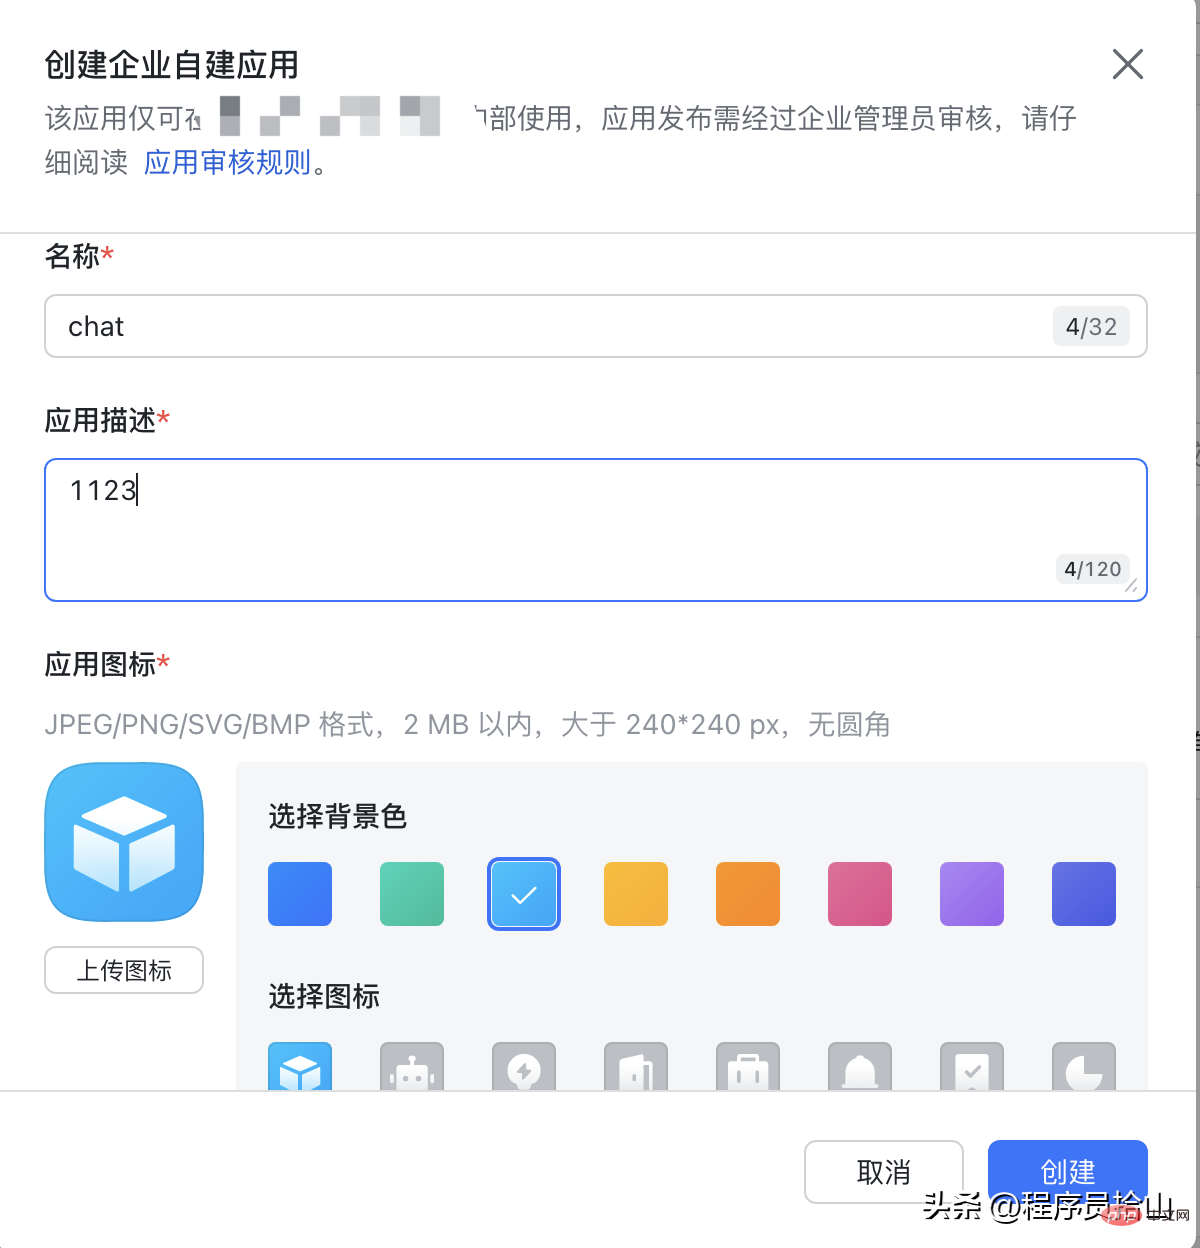
1. Enter the Feishu open platform and choose to create a self-built application for the enterprise.
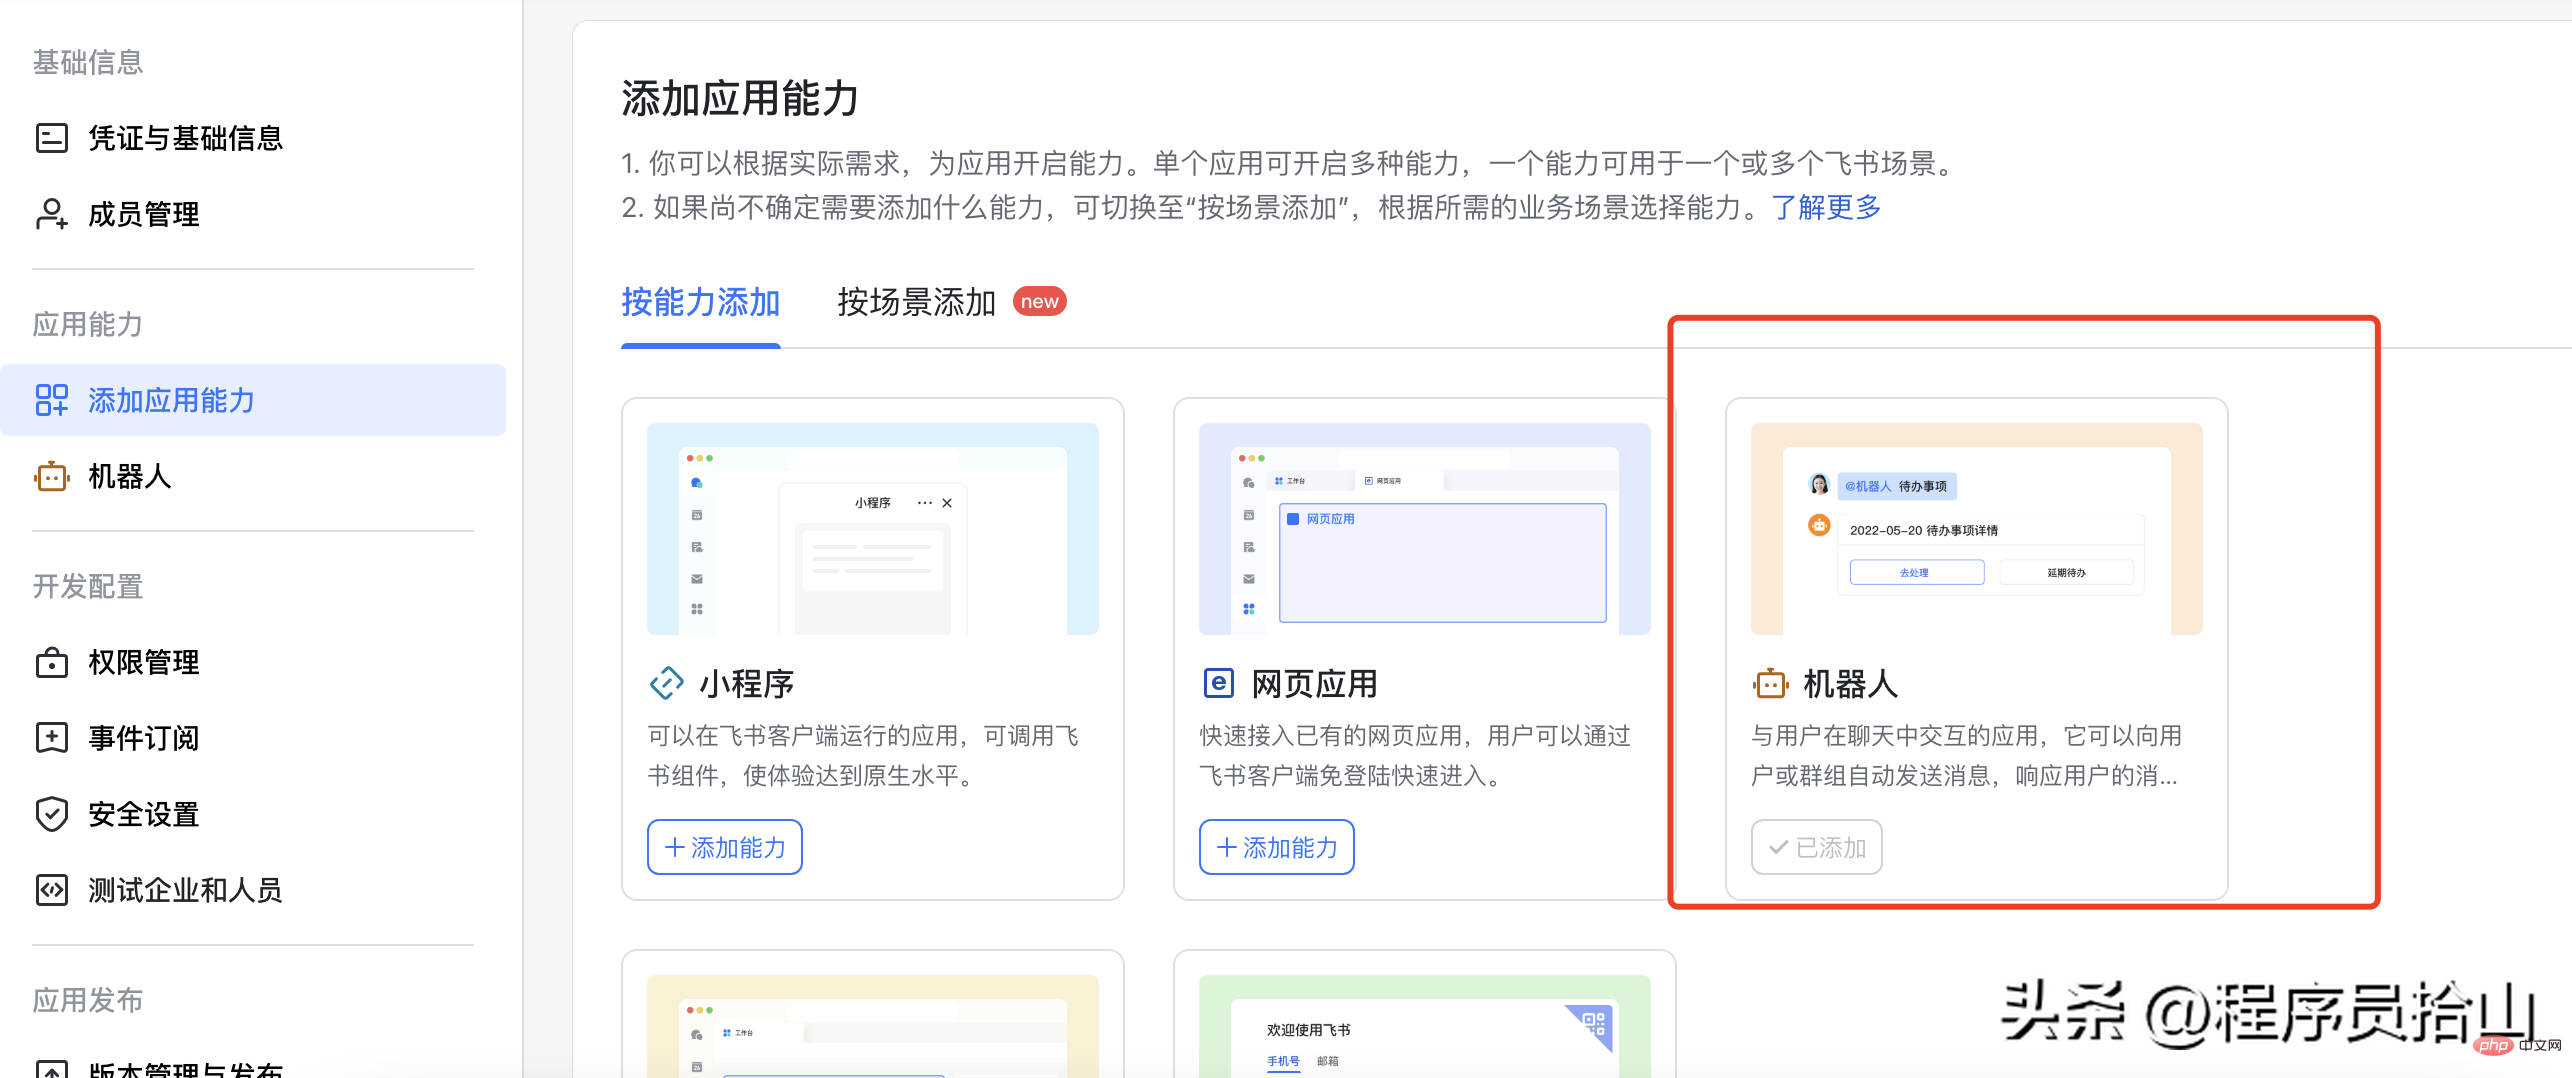
#2. After creating the application, click to enter the application and add the robot.
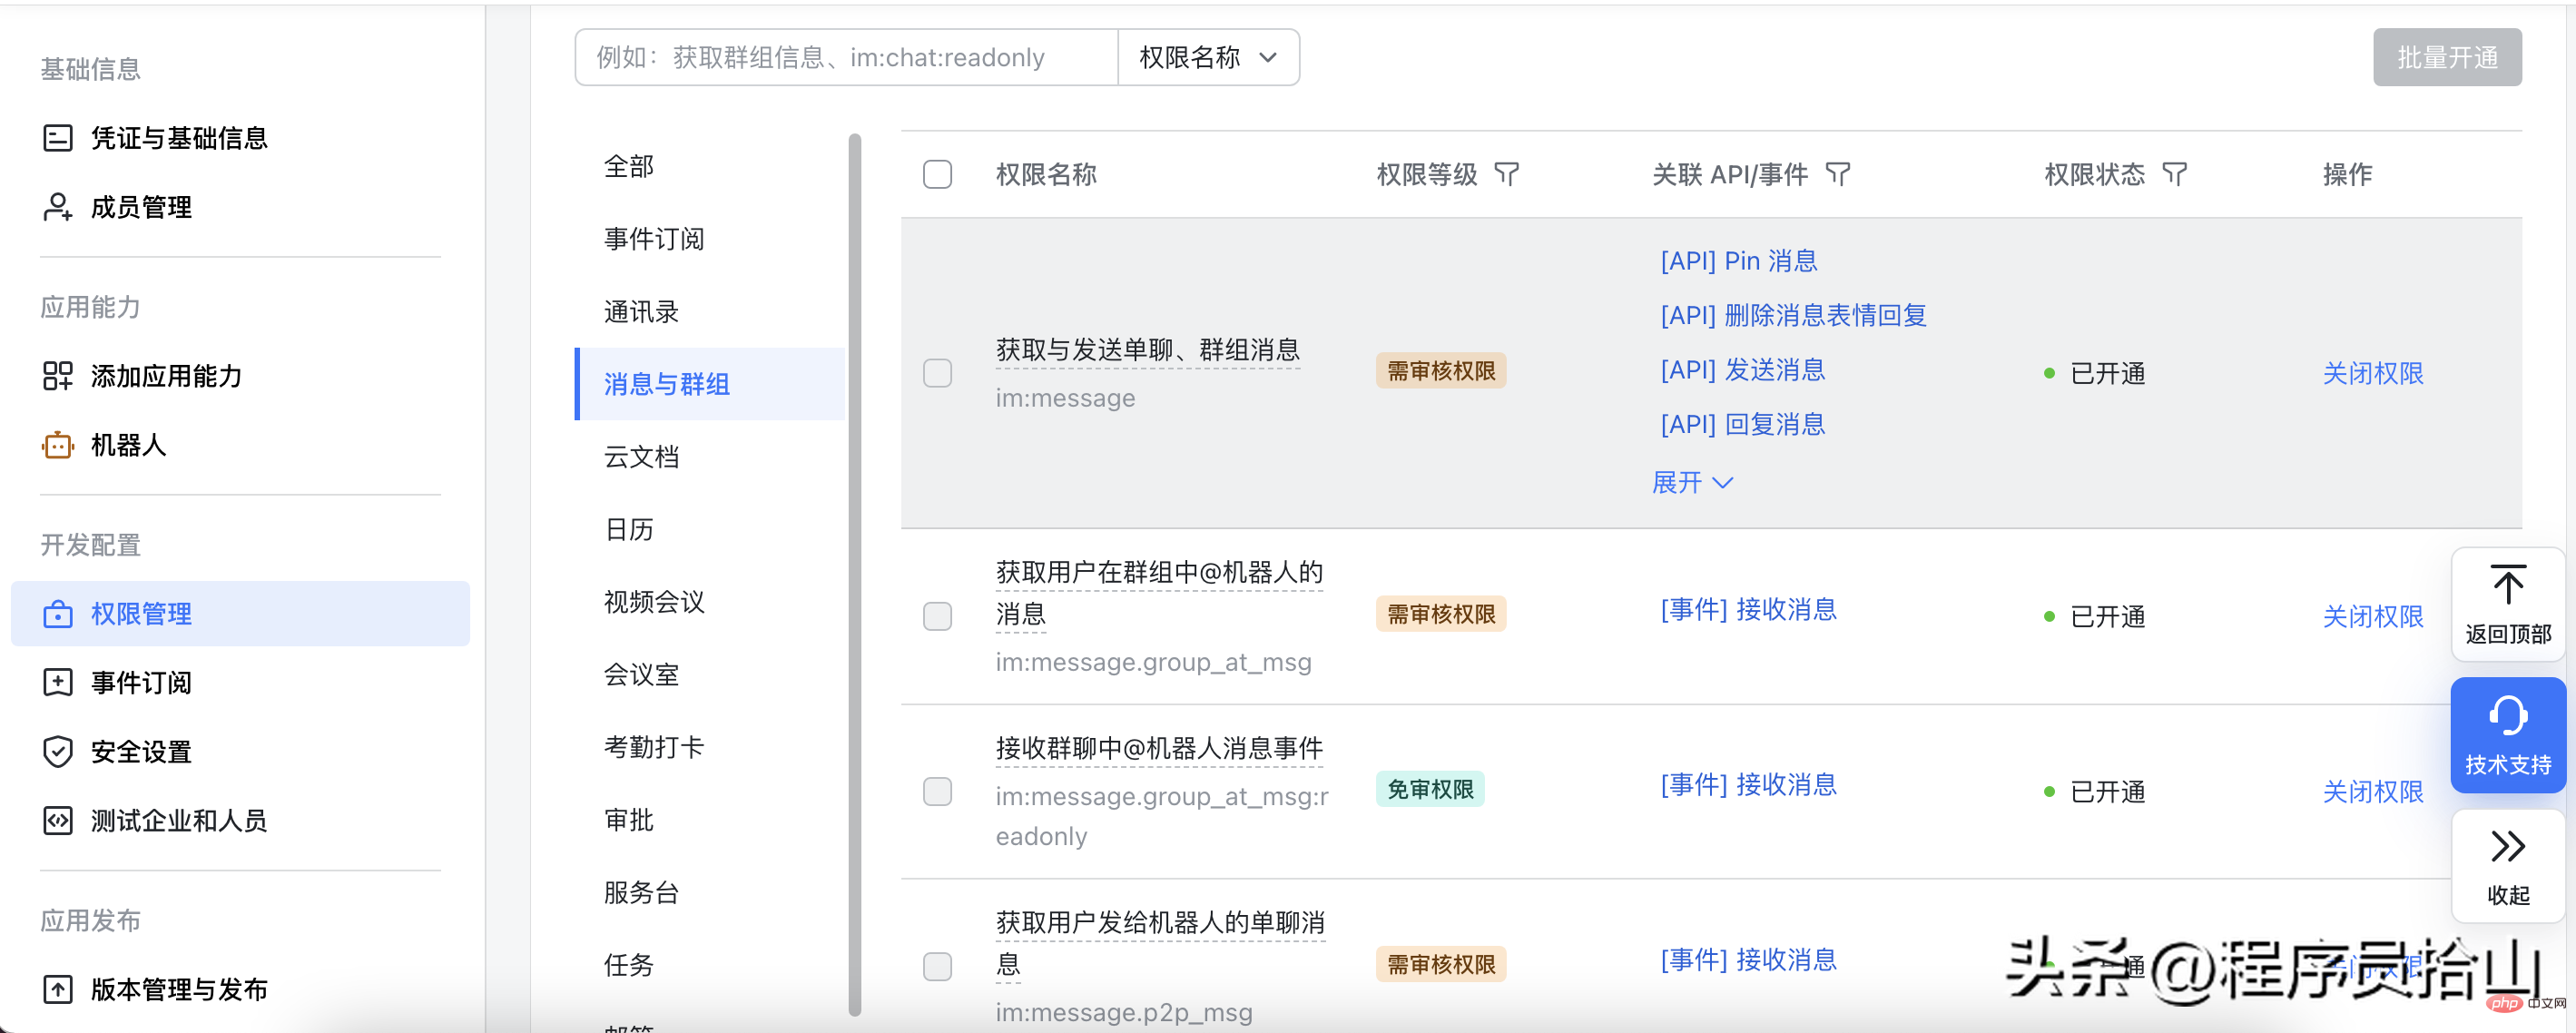
#3. Configure message-related permissions for the robot. If you are not sure what permissions are required, you can enable them all first.
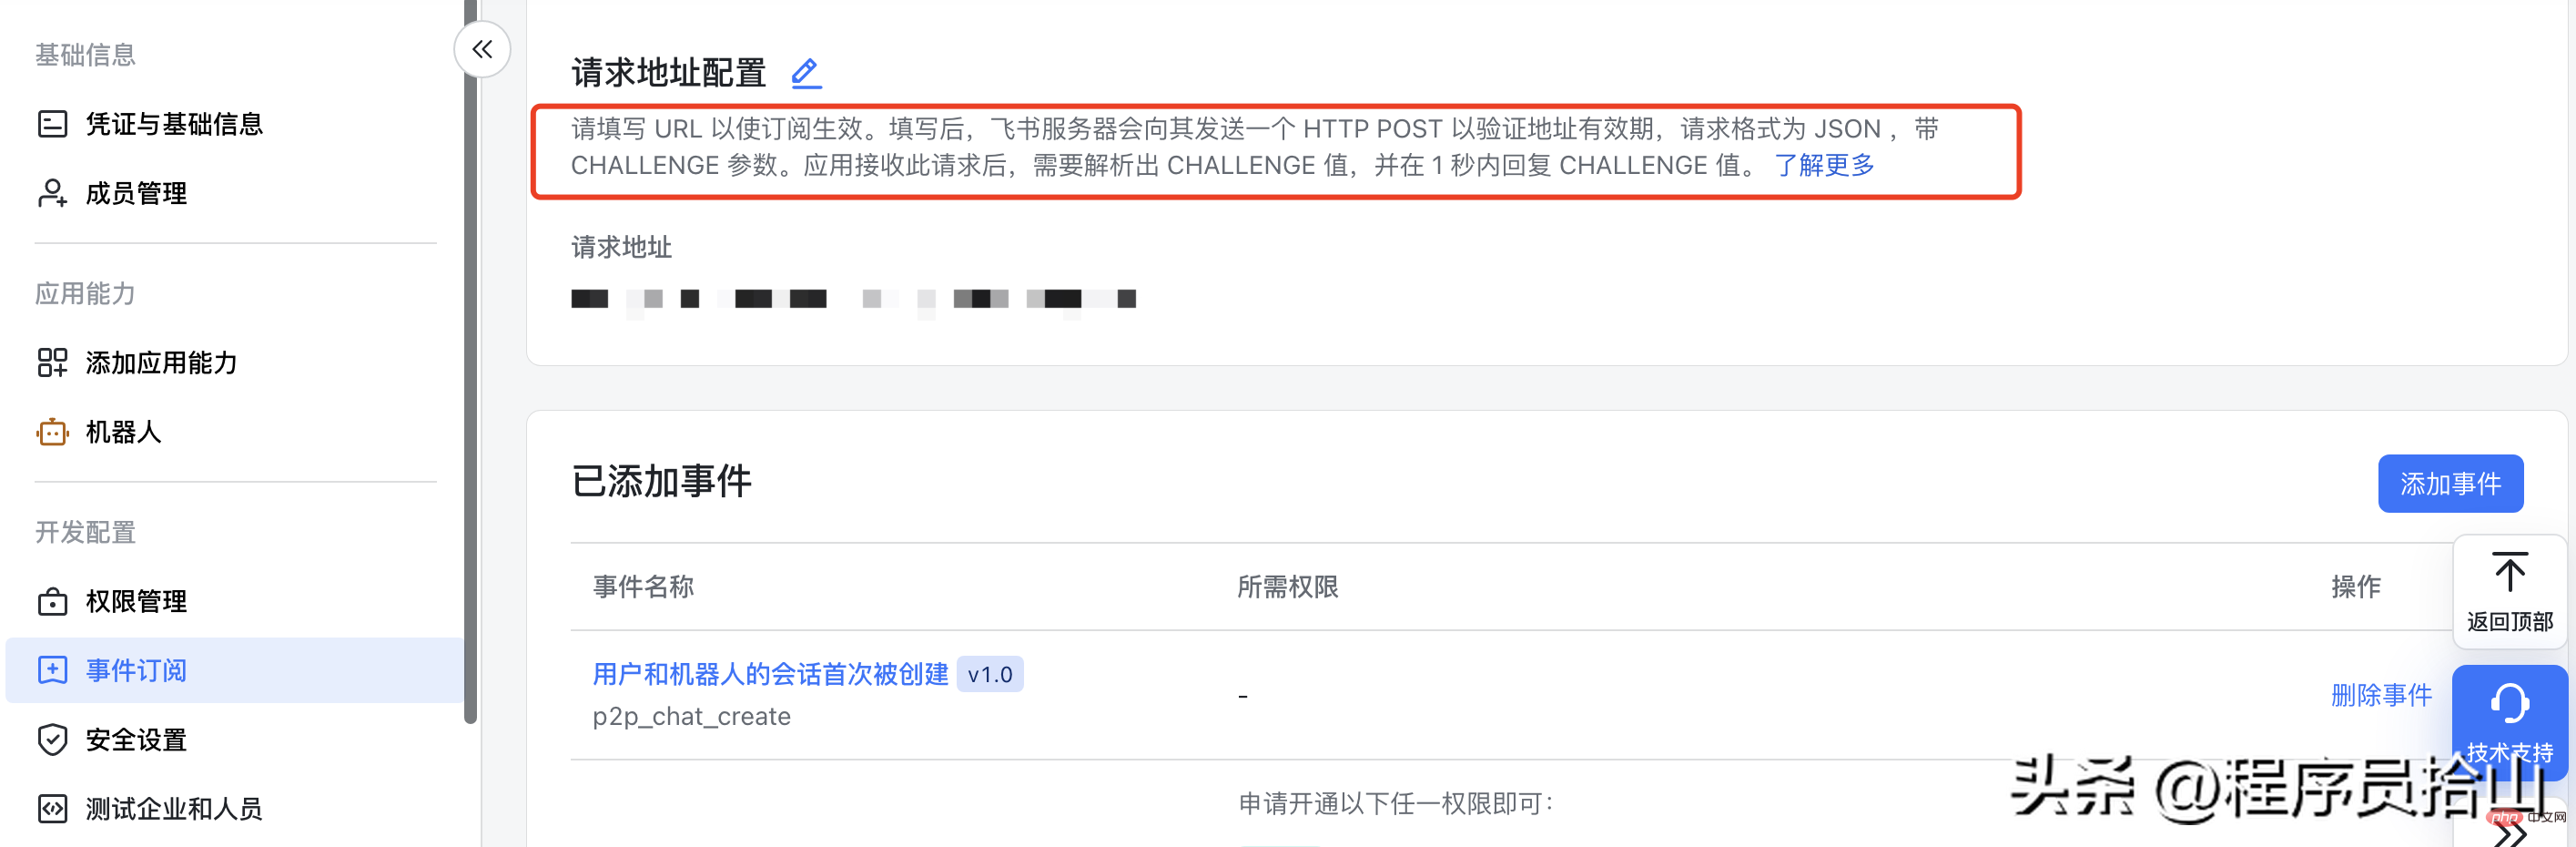
4. Configure event subscription. Event subscription requires first developing an interface for Feishu to verify. The interface needs to be accessible from the public network.
The code of this interface can be referred to as follows:
@PostMapping(value = "/message")
public FeishuEventDTO message(@RequestBody String body) {
log.info("收到消息:{}", body);
FeishuEventParams feishuEventParams = JSON.parseObject(body, FeishuEventParams.class);
FeishuEventDTO eventDTO = new FeishuEventDTO();
eventDTO.setChallenge(feishuEventParams.getChallenge());
return eventDTO;
}

@Data
public class FeishuEventParams {

private String challenge;
private String token;
private String type;
}

@Data
public class FeishuEventDTO {
private String challenge;
}One thing to note is that this verification interface and the following receive Feishu messages The interface is the same address, but the message body is different.
That is to say, the verification interface is one-time use, and this interface needs to be modified after the verification is completed.
We first publish this interface to a project that can be accessed from the public network. For example, the interface address is
https://www.php.cn/link/4aee31b0ec9f7bb7885473d95961e9a6

OK, now the configuration of Feishu is basically completed. Here is the logic we need to process.
Docking logic and implementation
Let me first talk about the general logic of our company’s docking for your reference.
After a user sends a message to Feishu, Feishu will forward the message to our own service.
But there will be a problem here, that is, when multiple users initiate conversations concurrently, or when many people in a large group are @our robot, we need to remember everyone's reply and query it in chatgpt After getting the result, reply to this person accurately.
Since our company is currently also using it for internal testing and does not want to implement too complicated, the idea we adopt is: when each user's session is forwarded to our service, the session content is first saved to a global ConcurrentLinkedQueue queue, and then start a thread to continuously consume this queue.
The generic type of queue is an object constructed in advance. This object stores the message ID of the current message, the sender, the question content, etc.
Every time an object is consumed, the object's question content is sent to chatgpt. After obtaining the response result, the session reply interface provided by Feishu is called to reply to the user. (If the amount of concurrency is relatively large, it can be made asynchronous here).
Okay, that’s the general idea, let’s take a look at the specific code.
1. Open our project and introduce the jar provided by chatgpt.
<dependency>
<groupId>com.theokanning.openai-gpt3-java</groupId>
<artifactId>service</artifactId>
<version>0.10.0</version>
</dependency>
2, rewrite the above verification interface and change it to receive Feishu messages. (Do not change the interface path)
@Slf4j
@RestController
@RequestMapping(value = "/query")
public class QureyController {

public static ConcurrentLinkedQueue<FeishuResponse> consumer
= new ConcurrentLinkedQueue<>();

@PostMapping(value = "/message")
public String message(@RequestBody String body) {
log.info("收到飞书消息:{}", body);
JSONObject jsonObject = JSONObject.parseObject(body);
JSONObject header = jsonObject.getJSONObject("header");
String eventType = header.getString("event_type");
if ("im.message.receive_v1".equals(eventType)) {
JSONObject event = jsonObject.getJSONObject("event");
JSONObject message = event.getJSONObject("message");
String messageType = message.getString("message_type");
if ("text".equals(messageType)) {
String messageId = message.getString("message_id");
String content = message.getString("content");
JSONObject contentJson = JSON.parseObject(content);
String text = contentJson.getString("text");

FeishuResponse feishuResponse = new FeishuResponse();
feishuResponse.setMessageId(messageId);
feishuResponse.setQuery(text);
log.info("投递用户消息,{}", JSON.toJSON(feishuResponse));
consumer.add(feishuResponse);
} else {
log.info("非文本消息");
}
}

return "suc";
}
}The structure of FeishuResponse is as follows.
@Data
public class FeishuResponse {

private String messageId;

private String query;

}3, write a task thread.
@Slf4j
public class AutoSendTask implements Runnable {
//你的chatgpt的key
public static final String token = "";
public static OpenAiService openAiService = null;

static {
openAiService = new OpenAiService(token, Duration.ofSeconds(60));
}

@Override
public void run() {
while (true) {
try {
FeishuResponse poll = consumer.poll();
if (poll == null) {
log.info("no query,sleep 2s");
TimeUnit.SECONDS.sleep(2);
} else {
String query = this.query(poll.getQuery());
this.reply(poll, query);
}
} catch (InterruptedException e) {
log.error("Thread exception...", e);
}
}
}

private String query(String q) {
log.info("开始提问:{}", q);
CompletionRequest completionRequest = CompletionRequest.builder()
.prompt(q)
.model("text-davinci-003")
.maxTokens(2048)
.echo(false)
.build();
StringBuilder sb = new StringBuilder();
CompletionResult completion = openAiService.createCompletion(completionRequest);
log.info("q:{},获取响应:{}", q, JSON.toJSONString(completion));
completion.getChoices().forEach(v -> {
sb.append(v.getText());
});
String rs = sb.toString();
if (rs.startsWith("?")) {
rs = rs.replaceFirst("?", "");
}
if (rs.startsWith("nn")) {
rs = rs.replaceFirst("nn", "");
}
log.info("格式化后的rs:{}", rs);
return rs;
}

private String reply(FeishuResponse poll, String rs) {
JSONObject params = new JSONObject();
params.put("uuid", RandomUtil.randomNumbers(10));
params.put("msg_type", "text");

JSONObject content = new JSONObject();
content.put("text", rs);
params.put("content", content.toJSONString());

String url = String.format("https://open.feishu.cn/open-apis/im/v1/messages/%s/reply",
 poll.getMessageId());
String tenantAccessToken = FeishuUtils.getTenantAccessToken();
String body = null;
try (HttpResponse authorization = HttpUtil.createPost(url)
.header("Authorization", "Bearer " + tenantAccessToken)
.body(params.toJSONString())
.execute()) {
body = authorization.body();
}

return body;
}

}The tool class for obtaining Feishu token is as follows:
@Slf4j
public class FeishuUtils {

public static final String tokenUrl
= "https://open.feishu.cn/open-apis/auth/v3/app_access_token/internal/";
//构建一个cache 缓存飞书的token
static Cache<String, String> tokenCache =
CacheBuilder.newBuilder().expireAfterWrite(Duration.ofSeconds(3500)).build();
//这个是飞书应用的appid和key,可以在创建的飞书应用中找到
public static final String appId = "";
public static final String appKey = "";

public static String getTenantAccessToken() {
String token = null;
try {
token = tokenCache.get("token", () -> {
JSONObject params = new JSONObject();
params.put("app_id", appId);
params.put("app_secret", appKey);
String body;
try (HttpResponse execute = HttpUtil.createPost(tokenUrl)
.body(params.toJSONString()).execute()) {
body = execute.body();
}
log.info("获取飞书token:{}", body);
if (StrUtil.isNotBlank(body)) {
String tenantAccessToken = JSON.parseObject(body).getString("tenant_access_token");
tokenCache.put("token", tenantAccessToken);
return tenantAccessToken;
}
return null;
});
} catch (ExecutionException e) {
throw new RuntimeException(e);
}
return token;
}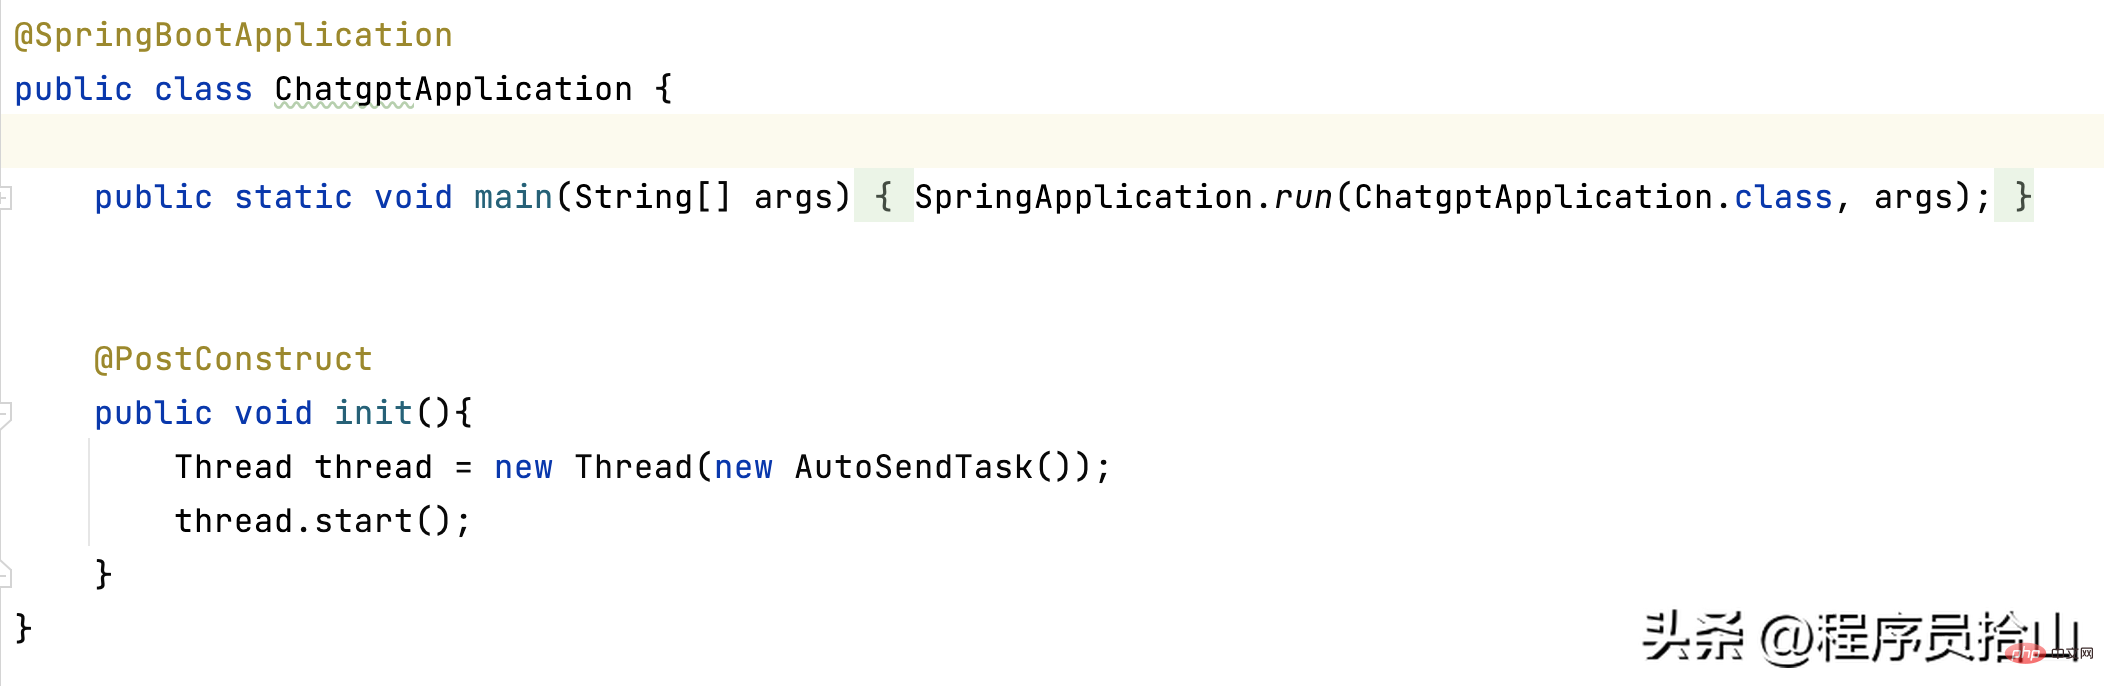
}4. Just start the thread class.
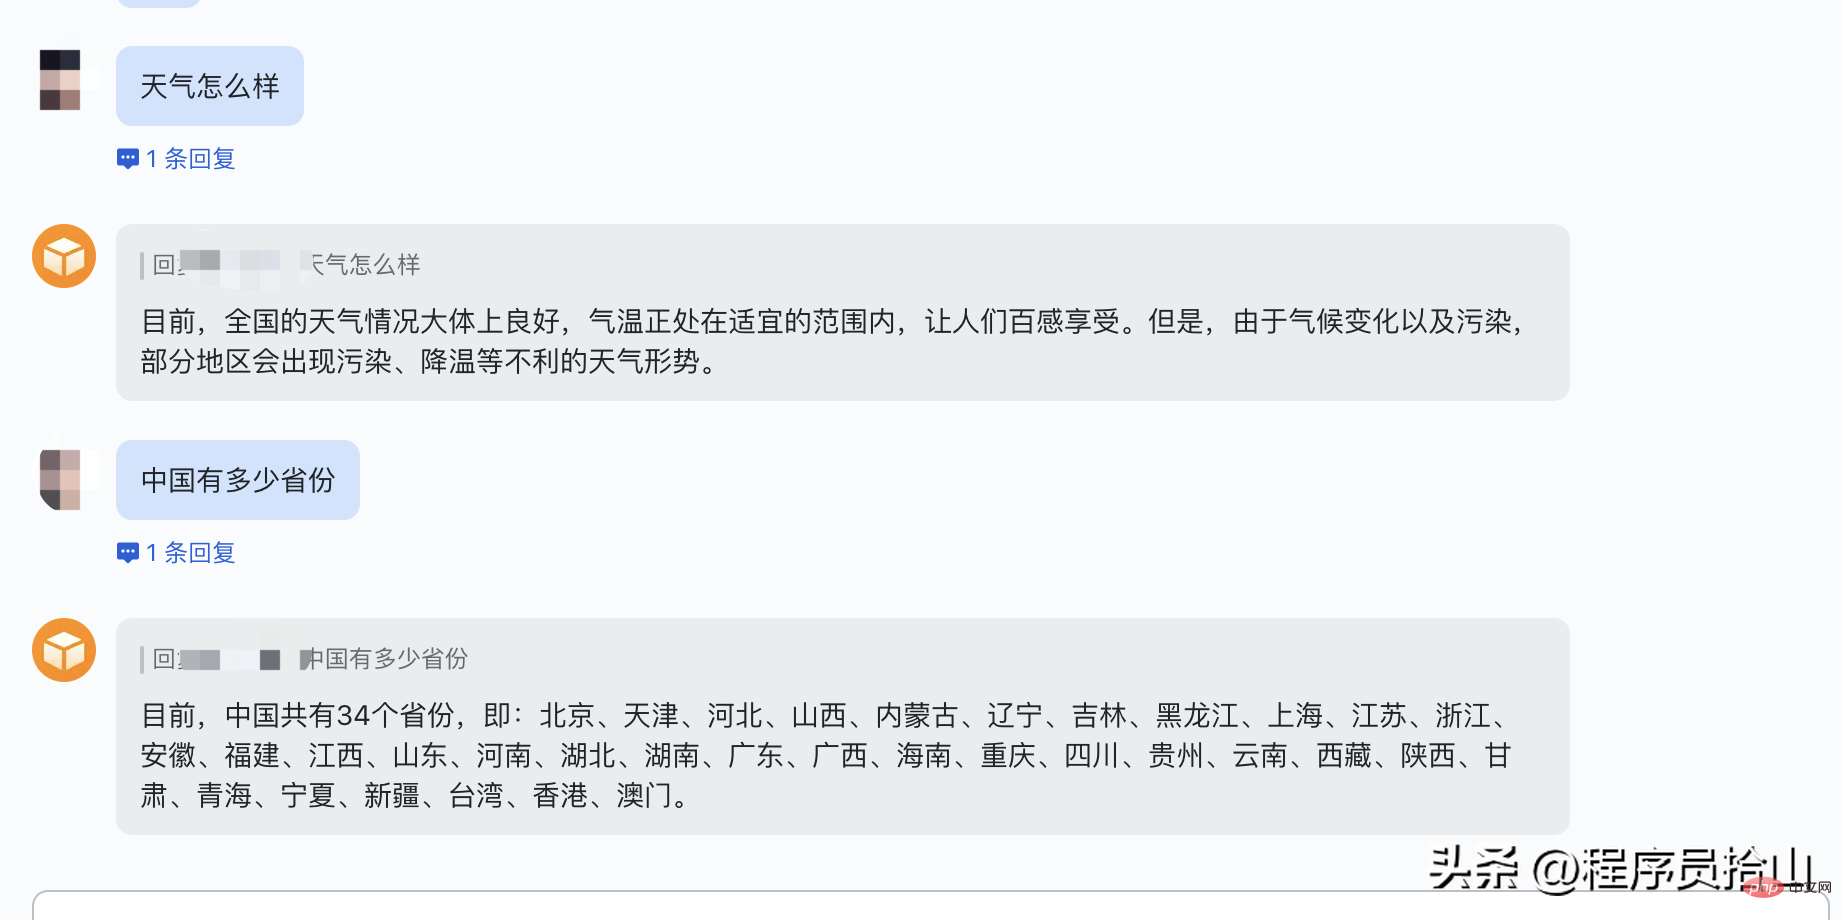
Finally, for the sake of privacy, the effect of chatgpt group conversation will not be displayed. Let’s show the effect of direct conversation with the robot.
Finally
Since we introduced chatgpt just with a trying attitude, the code is relatively rough. If there is anything wrong with the writing , I hope everyone will understand.
The code in this article also introduces additional jars: guava, hutool-all, and fastjson.
The above is the detailed content of Code attached, detailed steps for connecting ChatGPT to Feishu. For more information, please follow other related articles on the PHP Chinese website!

Hot AI Tools

Undresser.AI Undress
AI-powered app for creating realistic nude photos

AI Clothes Remover
Online AI tool for removing clothes from photos.

Undress AI Tool
Undress images for free

Clothoff.io
AI clothes remover

AI Hentai Generator
Generate AI Hentai for free.

Hot Article
Hot Tools

Notepad++7.3.1
Easy-to-use and free code editor

SublimeText3 Chinese version
Chinese version, very easy to use

Zend Studio 13.0.1
Powerful PHP integrated development environment

Dreamweaver CS6
Visual web development tools

SublimeText3 Mac version
God-level code editing software (SublimeText3)
Hot Topics
 1376
1376
 52
52

 ChatGPT now allows free users to generate images by using DALL-E 3 with a daily limit
Aug 09, 2024 pm 09:37 PM
ChatGPT now allows free users to generate images by using DALL-E 3 with a daily limit
Aug 09, 2024 pm 09:37 PM
DALL-E 3 was officially introduced in September of 2023 as a vastly improved model than its predecessor. It is considered one of the best AI image generators to date, capable of creating images with intricate detail. However, at launch, it was exclus
 The perfect combination of ChatGPT and Python: creating an intelligent customer service chatbot
Oct 27, 2023 pm 06:00 PM
The perfect combination of ChatGPT and Python: creating an intelligent customer service chatbot
Oct 27, 2023 pm 06:00 PM
The perfect combination of ChatGPT and Python: Creating an Intelligent Customer Service Chatbot Introduction: In today’s information age, intelligent customer service systems have become an important communication tool between enterprises and customers. In order to provide a better customer service experience, many companies have begun to turn to chatbots to complete tasks such as customer consultation and question answering. In this article, we will introduce how to use OpenAI’s powerful model ChatGPT and Python language to create an intelligent customer service chatbot to improve
 How to install chatgpt on mobile phone
Mar 05, 2024 pm 02:31 PM
How to install chatgpt on mobile phone
Mar 05, 2024 pm 02:31 PM
Installation steps: 1. Download the ChatGTP software from the ChatGTP official website or mobile store; 2. After opening it, in the settings interface, select the language as Chinese; 3. In the game interface, select human-machine game and set the Chinese spectrum; 4 . After starting, enter commands in the chat window to interact with the software.
 How to develop an intelligent chatbot using ChatGPT and Java
Oct 28, 2023 am 08:54 AM
How to develop an intelligent chatbot using ChatGPT and Java
Oct 28, 2023 am 08:54 AM
In this article, we will introduce how to develop intelligent chatbots using ChatGPT and Java, and provide some specific code examples. ChatGPT is the latest version of the Generative Pre-training Transformer developed by OpenAI, a neural network-based artificial intelligence technology that can understand natural language and generate human-like text. Using ChatGPT we can easily create adaptive chats
 Can chatgpt be used in China?
Mar 05, 2024 pm 03:05 PM
Can chatgpt be used in China?
Mar 05, 2024 pm 03:05 PM
chatgpt can be used in China, but cannot be registered, nor in Hong Kong and Macao. If users want to register, they can use a foreign mobile phone number to register. Note that during the registration process, the network environment must be switched to a foreign IP.
 How to build an intelligent customer service robot using ChatGPT PHP
Oct 28, 2023 am 09:34 AM
How to build an intelligent customer service robot using ChatGPT PHP
Oct 28, 2023 am 09:34 AM
How to use ChatGPTPHP to build an intelligent customer service robot Introduction: With the development of artificial intelligence technology, robots are increasingly used in the field of customer service. Using ChatGPTPHP to build an intelligent customer service robot can help companies provide more efficient and personalized customer services. This article will introduce how to use ChatGPTPHP to build an intelligent customer service robot and provide specific code examples. 1. Install ChatGPTPHP and use ChatGPTPHP to build an intelligent customer service robot.
 How to use ChatGPT and Python to implement user intent recognition function
Oct 27, 2023 am 09:04 AM
How to use ChatGPT and Python to implement user intent recognition function
Oct 27, 2023 am 09:04 AM
How to use ChatGPT and Python to implement user intent recognition function Introduction: In today's digital era, artificial intelligence technology has gradually become an indispensable part in various fields. Among them, the development of natural language processing (Natural Language Processing, NLP) technology enables machines to understand and process human language. ChatGPT (Chat-GeneratingPretrainedTransformer) is a kind of
 SearchGPT: Open AI takes on Google with its own AI search engine
Jul 30, 2024 am 09:58 AM
SearchGPT: Open AI takes on Google with its own AI search engine
Jul 30, 2024 am 09:58 AM
Open AI is finally making its foray into search. The San Francisco company has recently announced a new AI tool with search capabilities. First reported by The Information in February this year, the new tool is aptly called SearchGPT and features a c
