How to detect and recognize license plates using Python?
Translator|Bugatti
Reviewer|Sun Shujuan
License plate detection and recognition technology is widely used and can be used in road systems, ticketless parking lots, Vehicle access control, etc. This technology combines computer vision and artificial intelligence.
This article will use Python to create a license plate detection and recognition program. The program processes the input image, detects and recognizes the license plate, and finally displays the license plate characters as output.
1. Create a Python environment
To easily complete this tutorial, you need to be familiar with the basics of Python. The program environment should be created first.
Before you start programming, you need to install several libraries in your environment. Open any Python IDE and create a Python file. Run the command on the terminal to install the corresponding library. You should have Python PIP pre-installed on your computer.
- #OpenCV-Python: You will use this library to preprocess input images and display individual output images. pip install OpenCV-Python
- imutils: You will use this library to crop the original input image to the desired width. pip install imutils
- pytesseract: You will use this library to extract license plate characters and convert them into strings. pip install pytesseract The pytesseract library relies on the Tesseract OCR engine for character recognition.
2. How to install Tesseract OCR on your computer?
Tesseract OCR is an engine that can recognize language characters. Before using the pytesseract library, you should install it on your computer. Here are the steps:
#1. Open any Chrome-based browser.
2. Download the Tesseract OCR installer.
3. Run the installer and install it like any other program.
After preparing the environment and installing tesseract OCR, you can write your program.
1. Import the library
First import the library installed in the environment. Importing libraries allows you to call and use their functions in your project.
- import cv2
- import imutils
- import pytesseract
You need Import the OpenCV-Python library in cv2 form. Import other libraries using the same names as when installed.
2. Get the input
and point pytesseract to the location where the Tesseract engine is installed. Use the cv2.imread function to take the car image as input. Replace the image name with the name of the image you are using. Store images in the same folder as your project for ease of use.
pytesseract.pytesseract.tesseract_cmd = 'C:\Program Files\Tesseract-OCR\tesseract.exe'
original_image = cv2.imread('image3.jpeg')You can replace the input image below with the image you want to use.
3. Preprocess the input
Adjust the image width to 500 pixels and then convert the image to grayscale because of canny edge detection Function only works on grayscale images. Finally, the bilateralFilter function is called to reduce image noise.
original_image = imutils.resize(original_image, width=500 )
gray_image = cv2.cvtColor(original_image, cv2.COLOR_BGR2GRAY)
gray_image = cv2.bilateralFilter(gray_image, 11, 17, 17)
4. Detect the license plate at the input end
Detecting the license plate is the process of determining the part of the car that has the license plate characters.
(1) Perform edge detection
First call the cv2.Canny function, which can automatically detect preprocessing edges on the image.
edged_image = cv2.Canny(gray_image, 30,200)
We will find the outline through these edges.
(2) Find contours
Call the cv2.findContours function and pass a copy of the edge image. This function will detect contours. Use the cv2.drawContours function to draw the detected contours on the original image. Finally, output the original image with all visible contours drawn.
contours, new = cv2.findContours(edged_image.copy(), cv2.RETR_LIST, cv2.CHAIN_APPROX_SIMPLE)
img1 = original_image.copy()
cv2.drawContours(img1, contours, -1, (0, 255, 0), 3)
cv2.imshow("img1", img1)The program draws all the contours it finds on the car image.
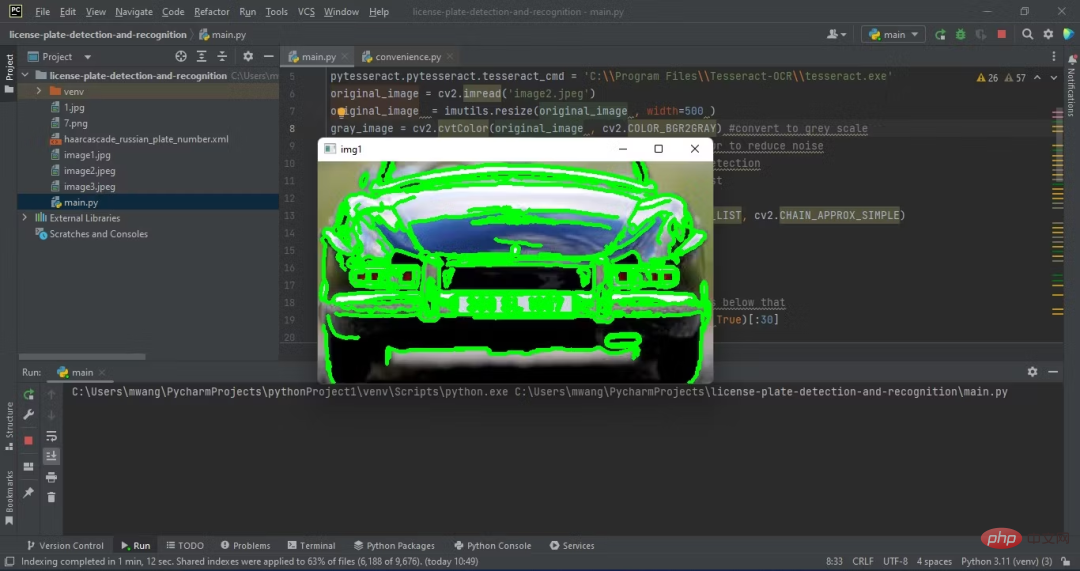
After you find the contours, you need to filter them to identify the best candidate contours.
(3) Filter contours
Filter the contours based on the minimum area of 30. Outlines smaller than this area are ignored as they are unlikely to be license plate outlines. Make a copy of the original image and draw the first 30 contours on the image. Finally, the image is displayed.
contours = sorted(contours, key = cv2.contourArea, reverse = True)[:30]
# stores the license plate contour
screenCnt = None
img2 = original_image.copy()

# draws top 30 contours
cv2.drawContours(img2, contours, -1, (0, 255, 0), 3)
cv2.imshow("img2", img2)The number of outlines is now less than at the beginning. The only contours drawn are those that approximately contain the license plate.
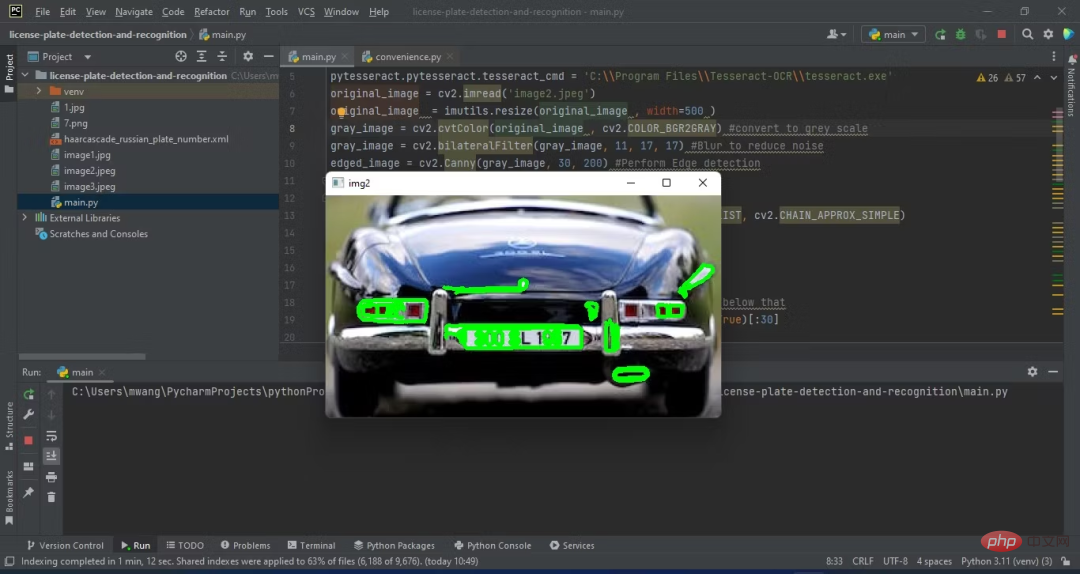
Finally, you need to iterate through the filtered outlines and determine which one is the license plate.
(4) Traverse the first 30 contours
Create a for loop that traverses the contours. Find a contour with four corners and determine its perimeter and coordinates. Store an image containing the outline of a license plate. Finally, the license plate outline is drawn on the original image and displayed.
count = 0
idx = 7

for c in contours:
# approximate the license plate contour
contour_perimeter = cv2.arcLength(c, True)
approx = cv2.approxPolyDP(c, 0.018 * contour_perimeter, True)

# Look for contours with 4 corners
if len(approx) == 4:
screenCnt = approx

# find the coordinates of the license plate contour
x, y, w, h = cv2.boundingRect(c)
new_img = original_image [ y: y + h, x: x + w]

# stores the new image
cv2.imwrite('./'+str(idx)+'.png',new_img)
idx += 1
break

# draws the license plate contour on original image
cv2.drawContours(original_image , [screenCnt], -1, (0, 255, 0), 3)
cv2.imshow("detected license plate", original_image )After the loop, the program has identified the outline containing the license plate.
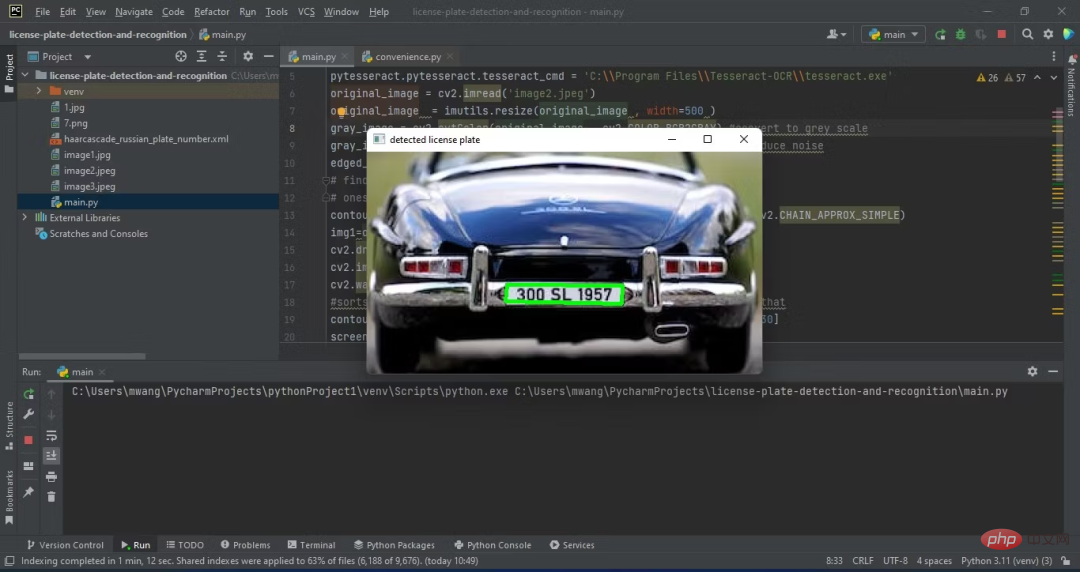
5.识别检测到的车牌
识别车牌意味着读取已裁剪车牌图像上的字符。加载之前存储的车牌图像并显示它。然后,调用pytesseract.image_to_string函数,传递已裁剪的车牌图像。这个函数将图像中的字符转换成字符串。
# filename of the cropped license plate image
cropped_License_Plate = './7.png'
cv2.imshow("cropped license plate", cv2.imread(cropped_License_Plate))

# converts the license plate characters to string
text = pytesseract.image_to_string(cropped_License_Plate, lang='eng')已裁剪的车牌如下所示。上面的字符将是您稍后在屏幕上输出的内容。
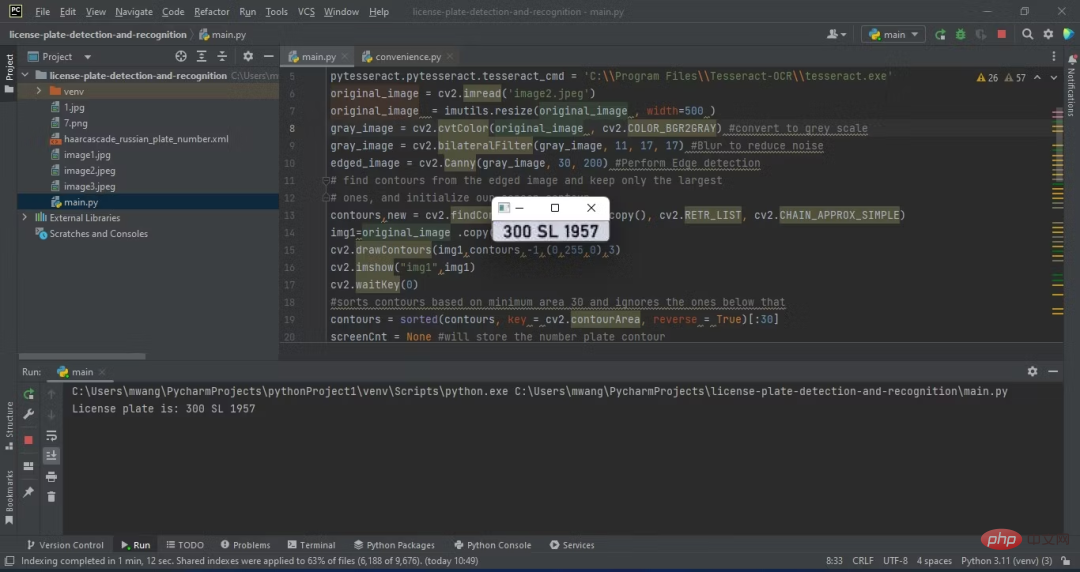
检测并识别车牌之后,您就可以显示输出了。
6.显示输出
这是最后一步。您将提取的文本输出到屏幕上。该文本含有车牌字符。
print("License plate is:", text)
cv2.waitKey(0)
cv2.destroyAllWindows()程序的预期输出应该如下图所示:
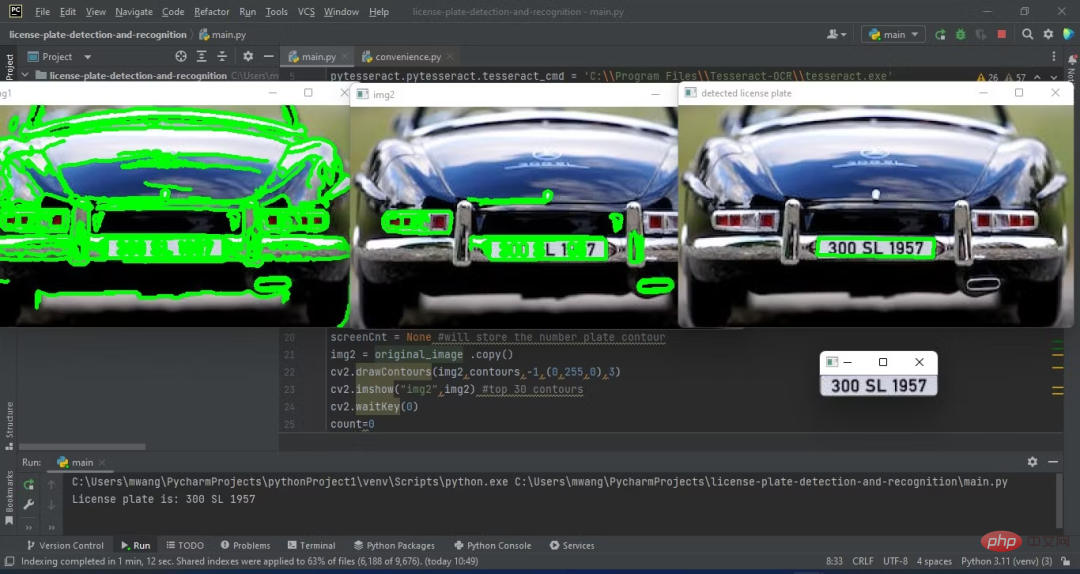
车牌文本可以在终端上看到。
三、磨砺您的Python技能
用Python检测和识别车牌是一个有意思的项目。它有挑战性,所以应该会帮助您学到关于Python的更多知识。
说到编程,实际运用是掌握一门语言的关键。为了锻炼技能,您需要开发有意思的项目。
原文链接:https://www.makeuseof.com/python-car-license-plates-detect-and-recognize/
The above is the detailed content of How to detect and recognize license plates using Python?. For more information, please follow other related articles on the PHP Chinese website!

Hot AI Tools

Undresser.AI Undress
AI-powered app for creating realistic nude photos

AI Clothes Remover
Online AI tool for removing clothes from photos.

Undress AI Tool
Undress images for free

Clothoff.io
AI clothes remover

AI Hentai Generator
Generate AI Hentai for free.

Hot Article

Hot Tools

Notepad++7.3.1
Easy-to-use and free code editor

SublimeText3 Chinese version
Chinese version, very easy to use

Zend Studio 13.0.1
Powerful PHP integrated development environment

Dreamweaver CS6
Visual web development tools

SublimeText3 Mac version
God-level code editing software (SublimeText3)

Hot Topics
 1382
1382
 52
52
 PHP and Python: Code Examples and Comparison
Apr 15, 2025 am 12:07 AM
PHP and Python have their own advantages and disadvantages, and the choice depends on project needs and personal preferences. 1.PHP is suitable for rapid development and maintenance of large-scale web applications. 2. Python dominates the field of data science and machine learning.
 How is the GPU support for PyTorch on CentOS
Apr 14, 2025 pm 06:48 PM
Enable PyTorch GPU acceleration on CentOS system requires the installation of CUDA, cuDNN and GPU versions of PyTorch. The following steps will guide you through the process: CUDA and cuDNN installation determine CUDA version compatibility: Use the nvidia-smi command to view the CUDA version supported by your NVIDIA graphics card. For example, your MX450 graphics card may support CUDA11.1 or higher. Download and install CUDAToolkit: Visit the official website of NVIDIACUDAToolkit and download and install the corresponding version according to the highest CUDA version supported by your graphics card. Install cuDNN library:
 Python vs. JavaScript: Community, Libraries, and Resources
Apr 15, 2025 am 12:16 AM
Python and JavaScript have their own advantages and disadvantages in terms of community, libraries and resources. 1) The Python community is friendly and suitable for beginners, but the front-end development resources are not as rich as JavaScript. 2) Python is powerful in data science and machine learning libraries, while JavaScript is better in front-end development libraries and frameworks. 3) Both have rich learning resources, but Python is suitable for starting with official documents, while JavaScript is better with MDNWebDocs. The choice should be based on project needs and personal interests.
 Detailed explanation of docker principle
Apr 14, 2025 pm 11:57 PM
Docker uses Linux kernel features to provide an efficient and isolated application running environment. Its working principle is as follows: 1. The mirror is used as a read-only template, which contains everything you need to run the application; 2. The Union File System (UnionFS) stacks multiple file systems, only storing the differences, saving space and speeding up; 3. The daemon manages the mirrors and containers, and the client uses them for interaction; 4. Namespaces and cgroups implement container isolation and resource limitations; 5. Multiple network modes support container interconnection. Only by understanding these core concepts can you better utilize Docker.
 MiniOpen Centos compatibility
Apr 14, 2025 pm 05:45 PM
MinIO Object Storage: High-performance deployment under CentOS system MinIO is a high-performance, distributed object storage system developed based on the Go language, compatible with AmazonS3. It supports a variety of client languages, including Java, Python, JavaScript, and Go. This article will briefly introduce the installation and compatibility of MinIO on CentOS systems. CentOS version compatibility MinIO has been verified on multiple CentOS versions, including but not limited to: CentOS7.9: Provides a complete installation guide covering cluster configuration, environment preparation, configuration file settings, disk partitioning, and MinI
 How to operate distributed training of PyTorch on CentOS
Apr 14, 2025 pm 06:36 PM
PyTorch distributed training on CentOS system requires the following steps: PyTorch installation: The premise is that Python and pip are installed in CentOS system. Depending on your CUDA version, get the appropriate installation command from the PyTorch official website. For CPU-only training, you can use the following command: pipinstalltorchtorchvisiontorchaudio If you need GPU support, make sure that the corresponding version of CUDA and cuDNN are installed and use the corresponding PyTorch version for installation. Distributed environment configuration: Distributed training usually requires multiple machines or single-machine multiple GPUs. Place
 How to choose the PyTorch version on CentOS
Apr 14, 2025 pm 06:51 PM
When installing PyTorch on CentOS system, you need to carefully select the appropriate version and consider the following key factors: 1. System environment compatibility: Operating system: It is recommended to use CentOS7 or higher. CUDA and cuDNN:PyTorch version and CUDA version are closely related. For example, PyTorch1.9.0 requires CUDA11.1, while PyTorch2.0.1 requires CUDA11.3. The cuDNN version must also match the CUDA version. Before selecting the PyTorch version, be sure to confirm that compatible CUDA and cuDNN versions have been installed. Python version: PyTorch official branch
 How to install nginx in centos
Apr 14, 2025 pm 08:06 PM
CentOS Installing Nginx requires following the following steps: Installing dependencies such as development tools, pcre-devel, and openssl-devel. Download the Nginx source code package, unzip it and compile and install it, and specify the installation path as /usr/local/nginx. Create Nginx users and user groups and set permissions. Modify the configuration file nginx.conf, and configure the listening port and domain name/IP address. Start the Nginx service. Common errors need to be paid attention to, such as dependency issues, port conflicts, and configuration file errors. Performance optimization needs to be adjusted according to the specific situation, such as turning on cache and adjusting the number of worker processes.


