AI ban on smoking is okay! Smoking recognition + face recognition
Hello, everyone.
Today I will share with you a smoking recognition and face recognition project. Many public places, production sites and schools have bans on smoking. It is still necessary to implement a ban on smoking and let AI automatically identify smoking behavior and identify who is smoking.
Use the target detection algorithm to determine smoking behavior, extract the face of the smoker, and use the face recognition algorithm to determine who is smoking. The idea is relatively simple, but the details are still a little troublesome.
The training data and source code used in the project have been packaged. It’s still the same as before, get it in the comment section.
1. Detecting cigarettes
I used 5k pieces of labeled smoking data as training data

and placed them in the dataset directory.
Train YOLOv5 target detection model.
First step, copy data/coco128.yaml to smoke.yaml, and modify the data set directory and category configuration information
path: ../dataset/smoke # dataset root dir
train: images/train# train images (relative to 'path') 128 images
val: images/test# val images (relative to 'path') 128 images
test:# test images (optional)

# Classes
names:
0: smoke
Second step, copy ./models/yolov5s.yaml to smoke.yaml, modify nc
nc: 1# number of classes
The third step is to download the yolov5s.pt pre-trained model and place it in the {yolov5 directory}/weights directory
Execute the following command to train.
python ./train.py --data ./data/smoke.yaml --cfg ./models/smoke.yaml --weights ./weights/yolov5s.pt --batch-size 30 --epochs 120 --workers 8 --name smoke --project smoke_s

After the training is completed, you can see the following output:

The call is just fine.
After the training is completed, the best.pt position can be found and used later for cigarette detection.
model = torch.hub.load('../28_people_counting/yolov5', 'custom', './weights/ciga.pt', source='local')

results = self.model(img[:, :, ::-1])
pd = results.pandas().xyxy[0]
ciga_pd = pd[pd['class'] == 0]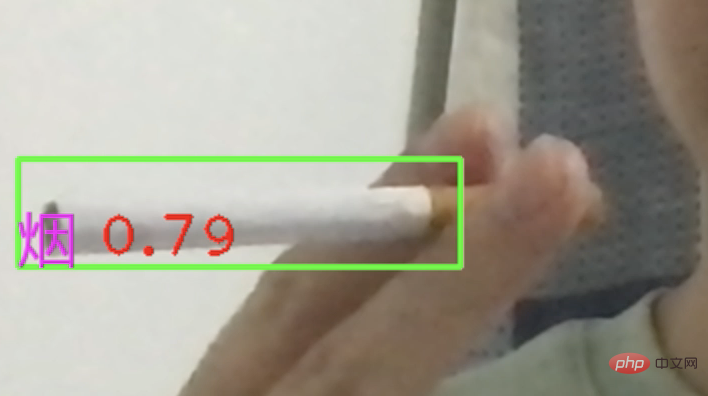
After being able to identify cigarettes, we still need to determine whether we are currently smoking.
You can use the cigarette detection frame and the mouth detection frame to calculate the IOU to determine. To put it bluntly, it is to determine whether the two frames intersect. If so, it is considered that you are currently smoking.
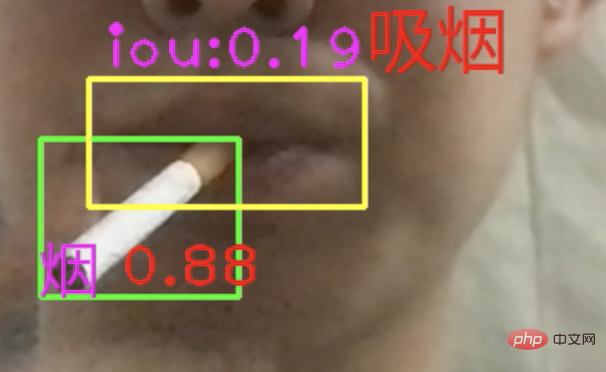
Mouth detection frame, using facial key points to identify.
2. Face recognition
There are many mature models for face recognition algorithms. We don’t need to train them ourselves, we can just adjust the database directly.
I am using the dlib library here, which can identify 68 key points on a face and extract facial features based on these 68 key points.

face_detector = dlib.get_frontal_face_detector()
face_sp = dlib.shape_predictor('./weights/shape_predictor_68_face_landmarks.dat')

dets = face_detector(img, 1)

face_list = []
for face in dets:
l, t, r, b = face.left(), face.top(), face.right(), face.bottom()

face_shape = face_sp(img, face)face_detectorcan detect faces and return face detection frames. face_sp is based on face detection frames and identifies 68 key points of faces.
From these 68 key points, we can obtain the mouth detection frame to determine whether you are smoking.
Finally, we still hope to use face recognition algorithms to identify who is smoking.
The first step is to extract facial features
face_feature_model = dlib.face_recognition_model_v1('./weights/dlib_face_recognition_resnet_model_v1.dat')

face_descriptor = face_feature_model.compute_face_descriptor(img, face_shape)face_descriptorCalculate a feature vector for each face based on the position and distance between the 68 key points of the face. This principle is similar to the word2vec we shared before or mapping videos to N-dimensional vectors.
The second step is to enter the existing faces into the face database. I prepared 3 smoking behaviors in movies and TV series

Cut faces from the videos, vectorize them, and write them into the face database (replaced with files)

The third step, after smoking occurs, we can crop out the smoker’s face, calculate the face vector, compare it with the features of the face database, and find the best Similar faces, return the corresponding name

def find_face_name(self, face_feat):
"""
人脸识别,计算吸烟者名称
:param face_feat:
:return:
"""
cur_face_feature = np.asarray(face_feat, dtype=np.float64).reshape((1, -1))

# 计算两个向量(两张脸)余弦相似度
distances = np.linalg.norm((cur_face_feature - self.face_feats), axis=1)
min_dist_index = np.argmin(distances)
min_dist = distances[min_dist_index]

if min_dist < 0.3:
return self.face_name_list[min_dist_index]
else:
return '未知'
There are many areas where this project can be expanded, for example: the video I provided only has a single face, and it will definitely be used in actual monitoring. It’s multiple faces. At this time, the MOT algorithm can be used to track pedestrians, and then each person can be individually identified for smoking
Also, a separate statistical area can be created to save the identified smoking behaviors and use them as evidence for warnings and punishments .
The above is the detailed content of AI ban on smoking is okay! Smoking recognition + face recognition. For more information, please follow other related articles on the PHP Chinese website!

Hot AI Tools

Undresser.AI Undress
AI-powered app for creating realistic nude photos

AI Clothes Remover
Online AI tool for removing clothes from photos.

Undress AI Tool
Undress images for free

Clothoff.io
AI clothes remover

AI Hentai Generator
Generate AI Hentai for free.

Hot Article

Hot Tools

Notepad++7.3.1
Easy-to-use and free code editor

SublimeText3 Chinese version
Chinese version, very easy to use

Zend Studio 13.0.1
Powerful PHP integrated development environment

Dreamweaver CS6
Visual web development tools

SublimeText3 Mac version
God-level code editing software (SublimeText3)

Hot Topics
 1386
1386
 52
52
 Centos shutdown command line
Apr 14, 2025 pm 09:12 PM
The CentOS shutdown command is shutdown, and the syntax is shutdown [Options] Time [Information]. Options include: -h Stop the system immediately; -P Turn off the power after shutdown; -r restart; -t Waiting time. Times can be specified as immediate (now), minutes ( minutes), or a specific time (hh:mm). Added information can be displayed in system messages.
 How to check CentOS HDFS configuration
Apr 14, 2025 pm 07:21 PM
Complete Guide to Checking HDFS Configuration in CentOS Systems This article will guide you how to effectively check the configuration and running status of HDFS on CentOS systems. The following steps will help you fully understand the setup and operation of HDFS. Verify Hadoop environment variable: First, make sure the Hadoop environment variable is set correctly. In the terminal, execute the following command to verify that Hadoop is installed and configured correctly: hadoopversion Check HDFS configuration file: The core configuration file of HDFS is located in the /etc/hadoop/conf/ directory, where core-site.xml and hdfs-site.xml are crucial. use
 What are the backup methods for GitLab on CentOS
Apr 14, 2025 pm 05:33 PM
Backup and Recovery Policy of GitLab under CentOS System In order to ensure data security and recoverability, GitLab on CentOS provides a variety of backup methods. This article will introduce several common backup methods, configuration parameters and recovery processes in detail to help you establish a complete GitLab backup and recovery strategy. 1. Manual backup Use the gitlab-rakegitlab:backup:create command to execute manual backup. This command backs up key information such as GitLab repository, database, users, user groups, keys, and permissions. The default backup file is stored in the /var/opt/gitlab/backups directory. You can modify /etc/gitlab
 Centos install mysql
Apr 14, 2025 pm 08:09 PM
Installing MySQL on CentOS involves the following steps: Adding the appropriate MySQL yum source. Execute the yum install mysql-server command to install the MySQL server. Use the mysql_secure_installation command to make security settings, such as setting the root user password. Customize the MySQL configuration file as needed. Tune MySQL parameters and optimize databases for performance.
 How is the GPU support for PyTorch on CentOS
Apr 14, 2025 pm 06:48 PM
Enable PyTorch GPU acceleration on CentOS system requires the installation of CUDA, cuDNN and GPU versions of PyTorch. The following steps will guide you through the process: CUDA and cuDNN installation determine CUDA version compatibility: Use the nvidia-smi command to view the CUDA version supported by your NVIDIA graphics card. For example, your MX450 graphics card may support CUDA11.1 or higher. Download and install CUDAToolkit: Visit the official website of NVIDIACUDAToolkit and download and install the corresponding version according to the highest CUDA version supported by your graphics card. Install cuDNN library:
 Detailed explanation of docker principle
Apr 14, 2025 pm 11:57 PM
Docker uses Linux kernel features to provide an efficient and isolated application running environment. Its working principle is as follows: 1. The mirror is used as a read-only template, which contains everything you need to run the application; 2. The Union File System (UnionFS) stacks multiple file systems, only storing the differences, saving space and speeding up; 3. The daemon manages the mirrors and containers, and the client uses them for interaction; 4. Namespaces and cgroups implement container isolation and resource limitations; 5. Multiple network modes support container interconnection. Only by understanding these core concepts can you better utilize Docker.
 How to choose a GitLab database in CentOS
Apr 14, 2025 pm 05:39 PM
When installing and configuring GitLab on a CentOS system, the choice of database is crucial. GitLab is compatible with multiple databases, but PostgreSQL and MySQL (or MariaDB) are most commonly used. This article analyzes database selection factors and provides detailed installation and configuration steps. Database Selection Guide When choosing a database, you need to consider the following factors: PostgreSQL: GitLab's default database is powerful, has high scalability, supports complex queries and transaction processing, and is suitable for large application scenarios. MySQL/MariaDB: a popular relational database widely used in Web applications, with stable and reliable performance. MongoDB:NoSQL database, specializes in
 How to operate distributed training of PyTorch on CentOS
Apr 14, 2025 pm 06:36 PM
PyTorch distributed training on CentOS system requires the following steps: PyTorch installation: The premise is that Python and pip are installed in CentOS system. Depending on your CUDA version, get the appropriate installation command from the PyTorch official website. For CPU-only training, you can use the following command: pipinstalltorchtorchvisiontorchaudio If you need GPU support, make sure that the corresponding version of CUDA and cuDNN are installed and use the corresponding PyTorch version for installation. Distributed environment configuration: Distributed training usually requires multiple machines or single-machine multiple GPUs. Place


