

Fix: Printer sharing not working on Windows 11

Office printers and professional printers are designed to be shared with multiple workers. Therefore, they can connect to it and print important documents when necessary. However, some users have expressed concerns about printer sharing issues they encountered after upgrading to Windows 11. Although this issue can occur with any version of Windows, so let’s jump into the main solutions to fix this problem.
Fix 1 – Troubleshooting Printers in Firewalls
There are two steps to these fixes. Therefore, we recommend you to apply the first one and test the printer sharing functionality. If that doesn't work, move on to the next one.
Step 1 – Turn off Windows Defender Firewall
Windows Firewall on your Windows computer might be blocking your connection to the printer.
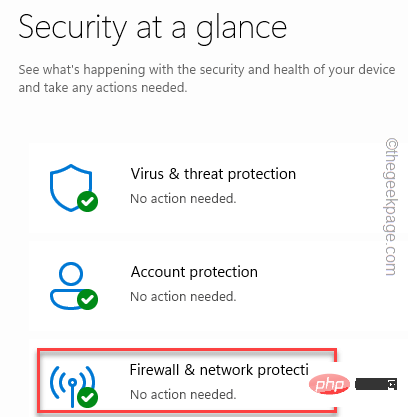
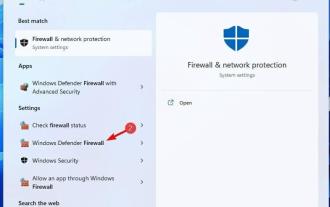
1. Launch Windows Security Center from the search box.
2. There you will find a setting called "Firewall and Network Protection".
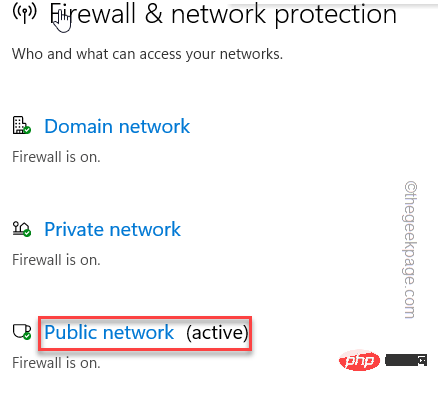
3. Now, click on the network type that has “(Activity)” written next to it.
This is an active connection.
4. Next, scroll down to find Microsoft Defender Firewall.
5. Set the setting to "Off" to disable the firewall.
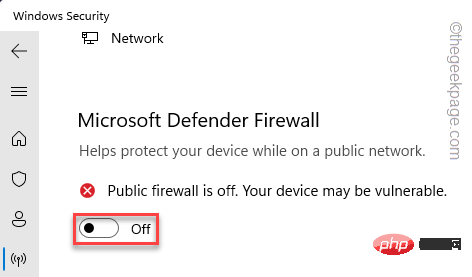
After this, close Windows Security Center.
Then, try printing a test page from the remote device to test whether the printer can be shared.
Step 2 – Allow File and Printer Sharing
If the printer sharing feature still does not work, you must allow certain services through the firewall.
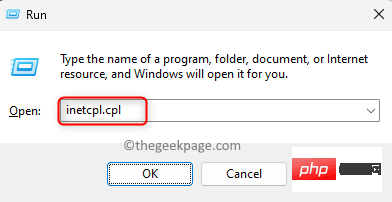
1. Use Win key and R key at the same time.
2. Then, enter this and click Enter.
firewall.cpl

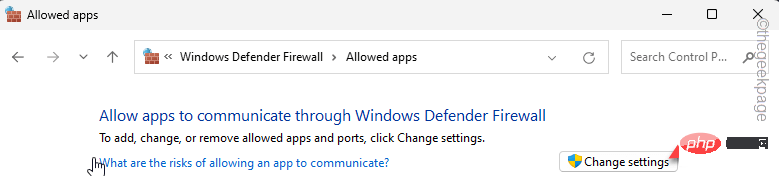
3. In the firewall settings, click "Allow an application or feature through Windows Defender Firewall".
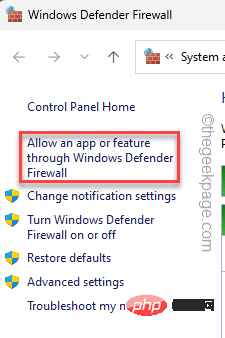
4. After that, click "Change Settings".
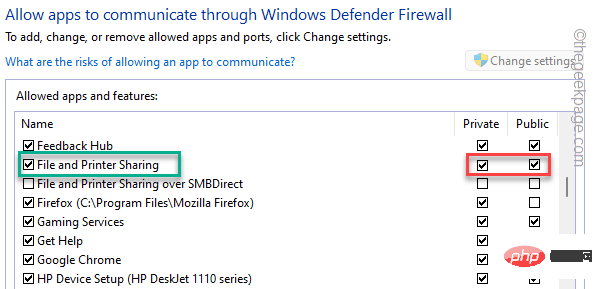
5. Next, just make sure "#" is checked in both the "Public" and "Private" features. ##File and Printer Sharing" function.
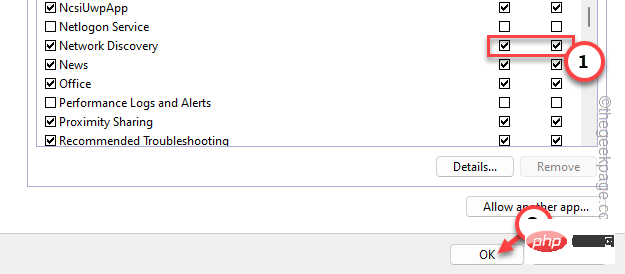
Network Discovery" feature.
7.After that, click "OK" to save it.
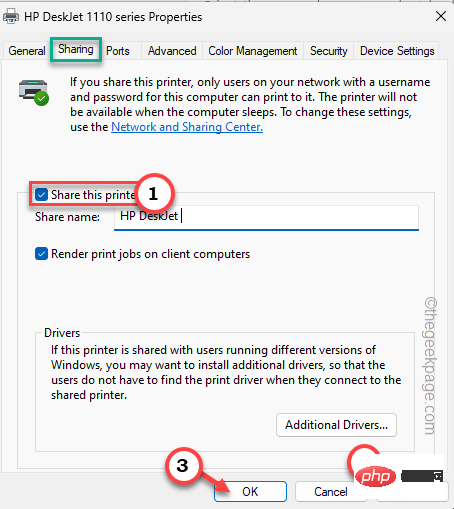
Win key and R key at the same time.
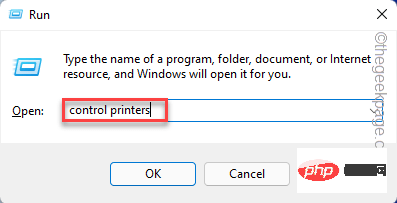
2. Then, type this information in the Run panel and click "OK" to open the printer settings.
control printers
Printers and Scanners".

Printer Properties.
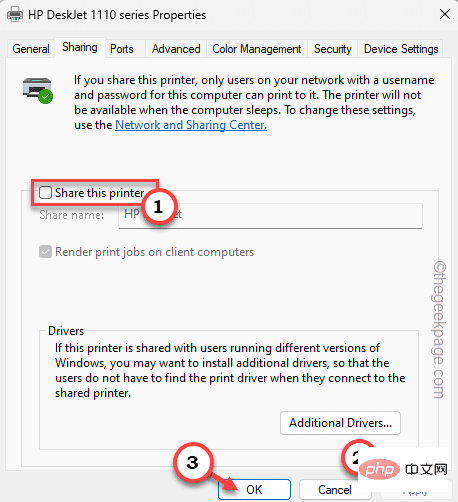
Share” section.
7. Now,uncheck the "Share this printer" box.
8. After that, click "Apply" and "OK".
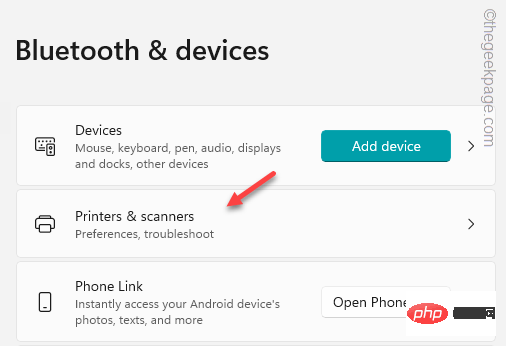
Settings. You can do this by using both the Windows I keys.
2. Then, click "Bluetooth and Devices" in the left pane. Next, in the right pane, click "Printers and Scanners".
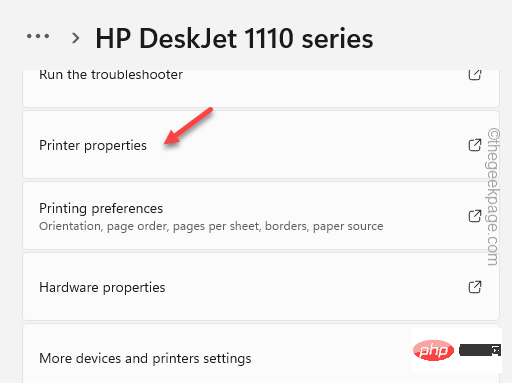
#3. In the right pane, if you look, you can find the faulty printer. Turn on the printer.
4. Next, click on "Printer Properties" to access Printer Properties.
5. Next, navigate to the “Share” section.
6. Now, check the "Share this printer" box.
7. Finally, click "Apply" and "OK".
Now when you turn on the printer sharing feature, you can now share the printer and print some documents.
This should resolve the printer issues you are facing.
Fix 3 – Install Printer Update
Install printer update on the system. You can do this through two channels. Please follow any of the methods below.
Method 1 - Via Windows Update
Windows devices receive periodic driver updates through the Optional Driver Update Channel. You can download and install it from Settings.
1. Open Settings.
2. Then, continue to "Windows Update" on the left pane.
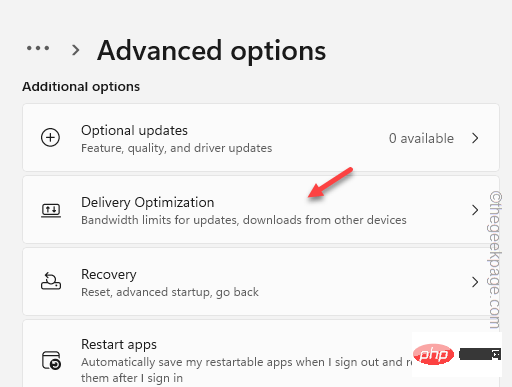
3. Now, if you look, you will find a setting called "Advanced Options". Open it.
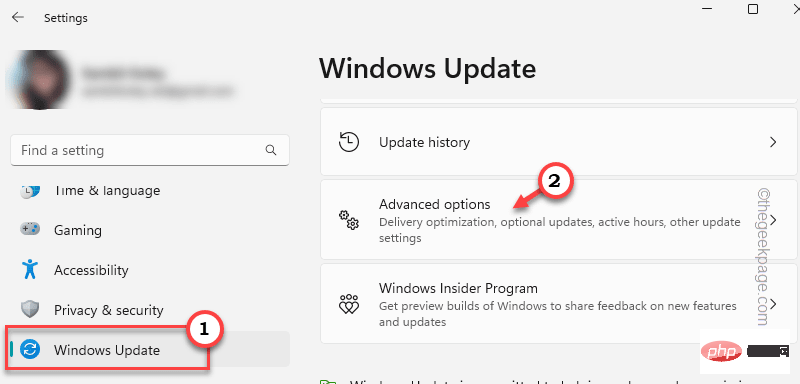
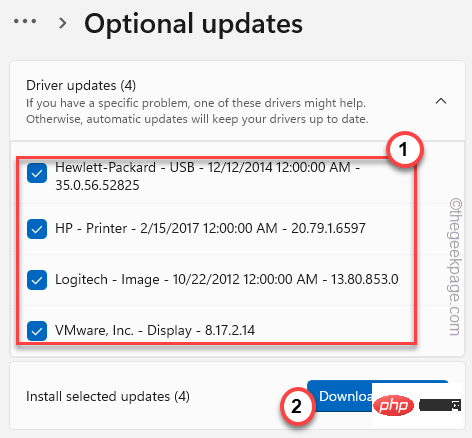
4. Next, click on “Optional Updates”.
5. Here you can see any new printer driver updates. So, please check all driver updates and click "Download andInstall" to install the printer driver.
Method 2 – Manual Update
Alternatively, you can directly download the latest version of the printer driver and install it on your system.
We have shown the steps for HP printer.
1. Go to the printer manufacturer's website or search using the printer driver model number.
Below are links to drivers for all popular printer manufacturers –
- Canon Driver Download
- HP Software and Driver Download
- Epson Download
- Brother Driver Download
- Sharp Driver Download
- Samsung Printer Software Installer
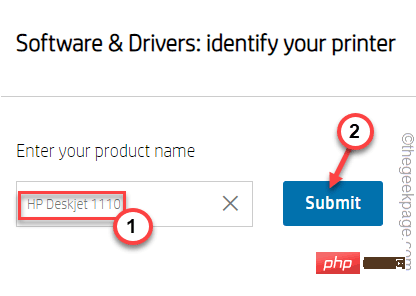
2. Then, enter your printer model and click "Submit" to search for the latest printer driver.
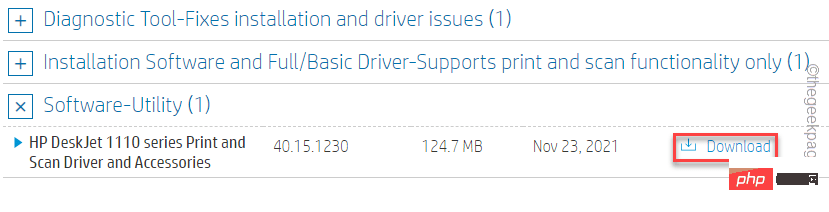
Go to Software Utilities and find the printer driver.
3. Then, click "Download" to download the latest driver.
#4. After downloading the driver, go to the location in File Explorer.
5. Now, Run the driver installer to start installing the driver.
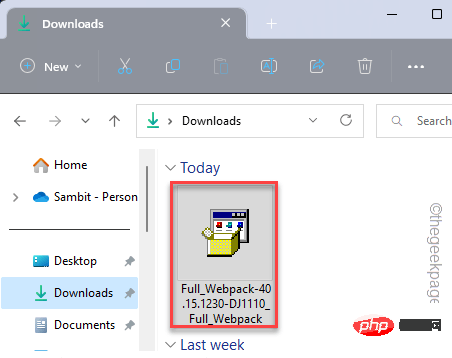
Follow the on-screen steps to complete the installation.
Fix 4 – Troubleshooting Printers
Windows has a dedicated printer troubleshooter that should identify and fix the cause of printer sharing issues and fix it.
You can go to Troubleshooting through Settings. However, there is a better way.
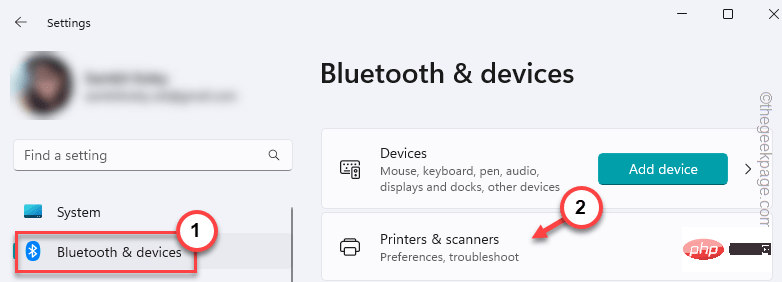
1. Press Win key and I key at the same time.
2. Then, click on the "Bluetooth and Devices" section to open it.
3. Next, click on "Printers and Scanners" to open it.
#4. Here, click on the printer that cannot be shared.
5. Now, click on “Run Troubleshooter” to run the Printer TroubleshooterTroubleshooter.
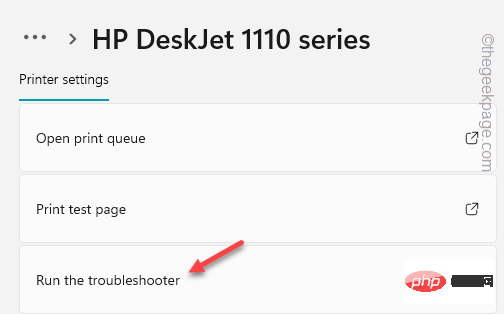
Now, this printer troubleshooter will launch and try to identify any issues you are facing.
It will run all necessary diagnostics on the specified printer and prescribe some fixes for it. After applying the patch, the printer will be ready to be shared again.
Try printing the document again.
Fix 5 – Uninstall any recent updates
If this issue occurred after your system received a system update, this may be the culprit. So please uninstall it and check.
1. First, open Windows Settings.
2. Then, in the left pane, click "Windows Update" to open it.
3. After that, on the right pane, click on "Update History" to access it.
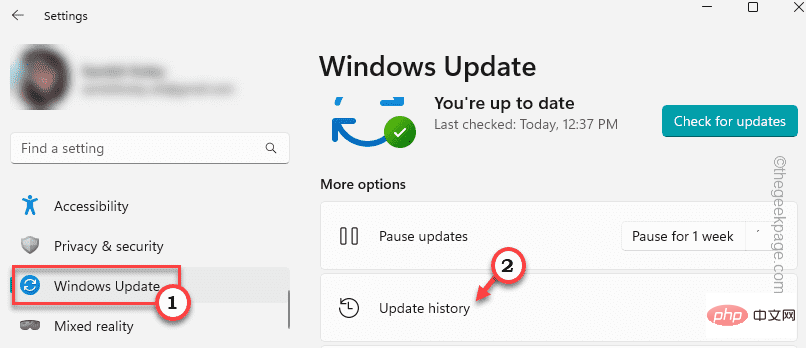
4. Next, in the same part of the screen, click on "Uninstall Updates" to open it.
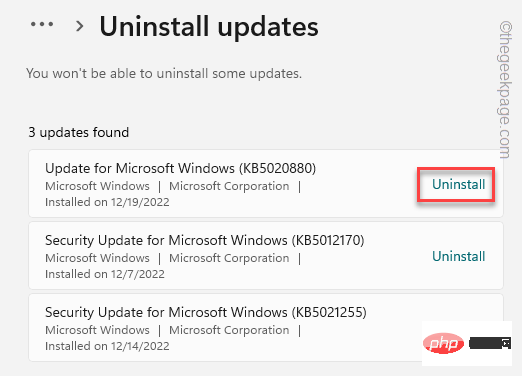
5. Now, on the right pane, you will find the complete list of updates. You can determine which update was installed on which date. So you can actually see which update is causing this.
6. Now, click on "Uninstall" to uninstall the update from your computer.
It will take some time to uninstall updates from your computer. Windows will restart your computer multiple times during this process. So please wait patiently until the system restarts. Then, check if the printer can be shared.
Fix 6 – Uninstall and reinstall the printer
If nothing works, uninstall the printer from the affected system and reinstall it.
Uninstall the printer
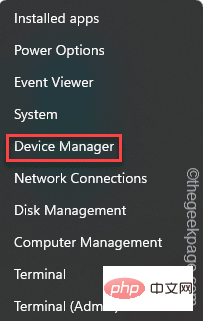
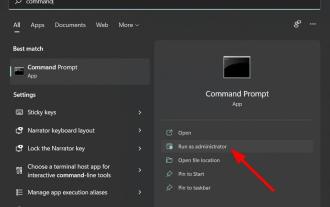
1. First, just press the Windows key and X key at the same time.
2. After that, click "Device Manager" to open it.
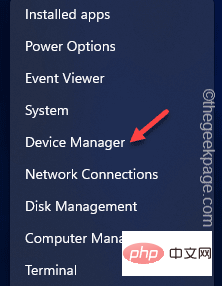
3. Now, click on “Print Queue” to expand it.
4. Then, right-click the printer device and click "Uninstall Device".
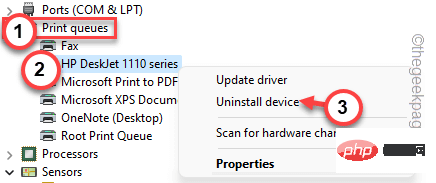
5. When the warning message appears, click "Uninstall" to uninstall the printer driver.

#After uninstalling the printer driver, you can simply close the window.
Reinstall the printer
You can reinstall the printer driver in several ways.
Method 1
Just restart the computer once. Restart the device to reinstall the printer driver.
Method 2
Even after restarting the system,
1. Open Device Manager.
2. Just press the win key X key once. Then, from the menu, click "Device Manager".
2. When you see the Device Manager window is open, just click "Actions" in the menu bar.
3. Then simply click on "Scan for Hardware Changes".
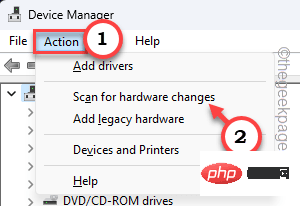
You will see the printer driver again.
Method 3
If you still cannot use the printer, you can download the latest printer driver for the printer and install it.
1. Go to the printer manufacturer's website.
2. There, search for the latest printer driver for the specified printer model.
3. Download the driver package installer and run it on your system.
The above is the detailed content of Fix: Printer sharing not working on Windows 11. For more information, please follow other related articles on the PHP Chinese website!

Hot AI Tools

Undresser.AI Undress
AI-powered app for creating realistic nude photos

AI Clothes Remover
Online AI tool for removing clothes from photos.

Undress AI Tool
Undress images for free

Clothoff.io
AI clothes remover

Video Face Swap
Swap faces in any video effortlessly with our completely free AI face swap tool!

Hot Article
Hot Tools

Notepad++7.3.1
Easy-to-use and free code editor

SublimeText3 Chinese version
Chinese version, very easy to use

Zend Studio 13.0.1
Powerful PHP integrated development environment

Dreamweaver CS6
Visual web development tools

SublimeText3 Mac version
God-level code editing software (SublimeText3)
Hot Topics
 1386
1386
 52
52

 Fix: Windows Activation Error 0x87e10bc6 on Windows 11
Apr 19, 2023 pm 01:37 PM
Fix: Windows Activation Error 0x87e10bc6 on Windows 11
Apr 19, 2023 pm 01:37 PM
The Windows 11 activation error 0x87e10bc6 issue occurs when some users try to activate the platform using a product key through settings. When this issue occurs, the Activation tab in Settings displays the following error message: Something is preventing us from communicating with the activation server. Wait a few minutes and try again. Error code: 0x87e10bc6. Specific activation errors may occur because a firewall blocks the connection to Microsoft's activation servers. Therefore, when this error occurs, users cannot activate Windows 11 using their product key. Unfortunately, even Windows 10 users have been plagued by the same issue in the past, so prepare for the benefits
 How to fix 'Error: 0x80070185, Cloud operation was unsuccessful” in OneDrive
May 16, 2023 pm 04:26 PM
How to fix 'Error: 0x80070185, Cloud operation was unsuccessful” in OneDrive
May 16, 2023 pm 04:26 PM
OneDrive is a popular cloud storage application provided by Microsoft. Most of us use OneDrive to store our files, folders, documents, etc. But some users complained that when they try to access shared files on OneDrive, it gives an error stating “Error: 0x80070185, Cloud operation was unsuccessful”. Therefore, they cannot perform any operations on OneDrive such as copying files, pasting, downloading shared files, etc. Nowadays, it is necessary to use these operations in our daily work. This error can be easily solved and for this we have some methods that we can apply and try to solve the problem. let's start! Method 1 – Sign out and sign back in to OneDrive app steps
 8 Big Fixes if Grammarly Not Working on Windows 10 Browser
May 05, 2023 pm 02:16 PM
8 Big Fixes if Grammarly Not Working on Windows 10 Browser
May 05, 2023 pm 02:16 PM
If you have syntax issues on your Windows 10 or 11 PC, this article will help you solve the problem. Grammarly is one of the most popular typing assistants for fixing grammar, spelling, clarity, and more. It has become an essential part of writing professionals. However, if it doesn't work properly, it can be a very frustrating experience. Many Windows users have reported that this tool does not work well on their computers. We did an in-depth analysis and found the cause and solution of this problem. Why doesn't Grammarly work on my PC? Grammarly on PC may not work properly due to several common reasons. It includes the following
 Win11 firewall advanced settings gray solution
Dec 24, 2023 pm 07:53 PM
Win11 firewall advanced settings gray solution
Dec 24, 2023 pm 07:53 PM
When setting up the firewall, many friends found that their win11 firewall advanced settings were grayed out and unable to be clicked. This may be caused by not adding a control unit, or by not opening the advanced settings in the correct way. Let’s take a look at how to solve it. Win11 firewall advanced settings gray method one: 1. First, click the start menu below, search and open "Control Panel" at the top 2. Then open "Windows Defender Firewall" 3. After entering, you can open "Advanced Settings" in the left column . Method 2: 1. If the above method cannot be opened, you can right-click "Start Menu" and open "Run" 2. Then enter "mmc" and press Enter to confirm opening. 3. After opening, click on the upper left
 How to Fix Steam Error Code 130 on Windows PC
Apr 28, 2023 pm 01:40 PM
How to Fix Steam Error Code 130 on Windows PC
Apr 28, 2023 pm 01:40 PM
Steam is a popular online game streaming platform that allows its users to purchase and play games as well as chat with other gamers on the platform. In addition to the features it offers, there are also some bugs encountered on the platform. One such error encountered by many Steam users is “Error code: 130 The webpage cannot be loaded (Unknown error)”. This error occurs when the Steam client attempts to load a web page but is unable to retrieve the page from its server. This error code may appear on any page in the Steam client, including inventory pages, update news, or store pages that prevent you from searching for a game you're interested in purchasing. One of the main reasons for this problem is a weak internet connection on your PC. Other possible causes are Stea
 Fix: Windows 11 Firewall blocks printer
May 01, 2023 pm 08:28 PM
Fix: Windows 11 Firewall blocks printer
May 01, 2023 pm 08:28 PM
Firewalls monitor network traffic and can block network connections for certain programs and hardware. Windows 11 includes its own Windows Defender Firewall, which may block printers from accessing the web. Therefore, affected users cannot use their Brother printers when the firewall blocks it. Keep in mind that this issue affects other brands as well, but today we’ll show you how to fix it. Why is my Brother printer blocked by the firewall? There are several causes for this issue, and you will most likely need to open certain ports before your printer can access the network. Printer software can also cause problems, so be sure to update it as well as your printer driver. Read on to learn how
 How to enable or disable firewall on Alpine Linux?
Feb 21, 2024 pm 12:45 PM
How to enable or disable firewall on Alpine Linux?
Feb 21, 2024 pm 12:45 PM
On AlpineLinux, you can use the iptables tool to configure and manage firewall rules. Here are the basic steps to enable or disable the firewall on AlpineLinux: Check the firewall status: sudoiptables -L If the output shows rules (for example, there are some INPUT, OUTPUT, or FORWARD rules), the firewall is enabled. If the output is empty, the firewall is currently disabled. Enable firewall: sudoiptables-PINPUTACCEPTsudoiptables-POUTPUTACCEPTsudoiptables-PFORWARDAC
 Resolve error code 0xc004f074 when activating Windows 11.
May 08, 2023 pm 07:10 PM
Resolve error code 0xc004f074 when activating Windows 11.
May 08, 2023 pm 07:10 PM
After installing the latest operating system on your PC, activating your copy of Windows 11 is the main job. Not only does it unlock the true potential of the Windows 11 operating system, but it also gets rid of the annoying "Activate your Windows 11" message. However, for some users, Windows 11 activation error 0xc004f074 hinders the smooth progress of activation. This bug apparently prevents users from activating Windows 11 and forces them to use an operating system with limited functionality. Windows 11 activation error code 0xc004f074 is related to the Key Management Service. You will encounter this problem when KMS is unavailable. Okay, that's it for this tutorial