

BSOD error 'Page fault in non-paged area” on Windows 11: 13 ways to fix it

Blue Screen of Death or Blue Screen of Death are scary Windows errors that can cause serious problems in your system. They may prevent you from starting Windows and, in the worst case, prevent you from fully accessing your data. Recently, many Windows 11 users have been facing BSOD error containing stop code Page Fault in non-paged area.
What causes the "Page Missing in Non-Page Area" blue screen?
Nonpaged AreaThe main cause of page faults in BSOD is system service, system component or driver failure. In some cases, third-party security software can also cause this issue. This includes antivirus, anti-cheat engines, and more.
A page fault occurs when a program, system service, or driver attempts to access a page file that should exist on the system but does not currently exist. This causes Windows 11 to stop and crash due to a page fault in the BSOD 's non-paged area stop code.
How to Fix “Page Fault in Non-Pageable Area” Blue Screen on Windows 11Since this is a stop code that can reference multiple errors, we recommend you to first use the one mentioned below Fix. If you are unable to start Windows on your system, then we recommend that you try these fixes in Safe Mode. You can also use recovery media and CMD if your system crashes in safe mode. let's start. Method 1: Restore the old driverThe most common cause of this blue screen of death is a driver error or incompatibility. If you have recently updated the drivers for the hardware components on your system, then this may be the reason why you are getting page faults in non-paged areasBSOD. Here are some common hardware components that have recently received driver updates that appear to be causing this blue screen on many systems.
NVMe Driver- Wi-Fi Driver
- Bluetooth Driver
- Webcam Driver
- Third Party Webcam Driver
- Third Party Docking Station Driver
- External Monitor or Graphics Driver
- iGPU Driver
- dGPU Driver
- and more. Identify the relevant hardware components and use the tutorial below to uninstall the relevant drivers from your system. After uninstalling, you can reinstall the previously known working driver to get everything back up and running again.
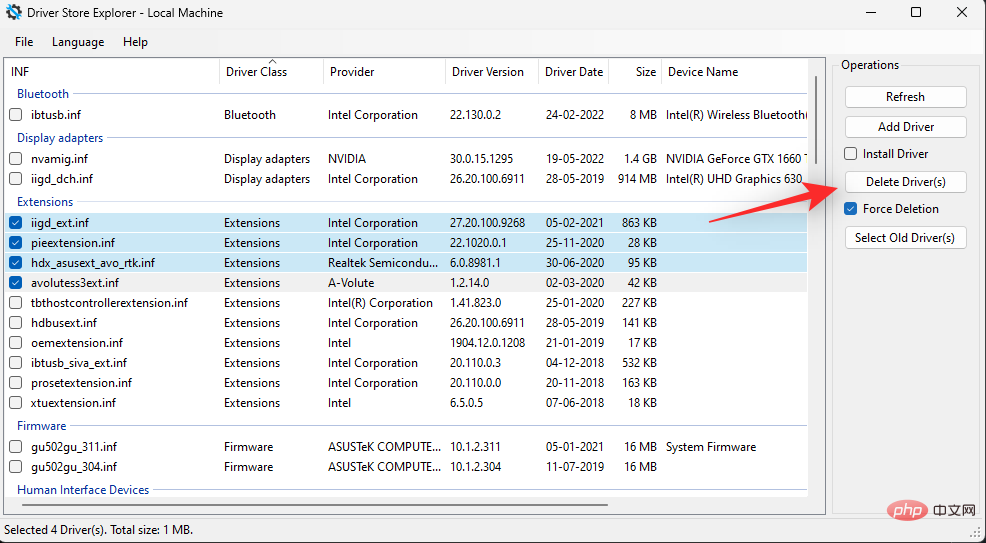
- DriverStoreExplorer |
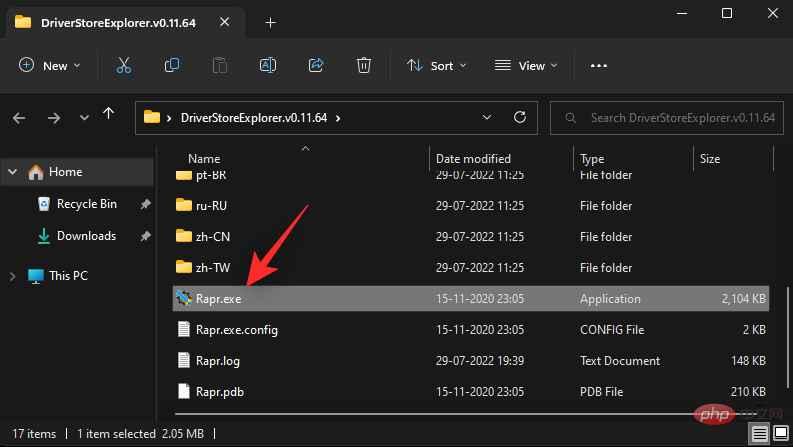
- Download Link Use the link above to download the latest version of DriverStoreExplorer and unzip the archive. After unzipping, double-click
.
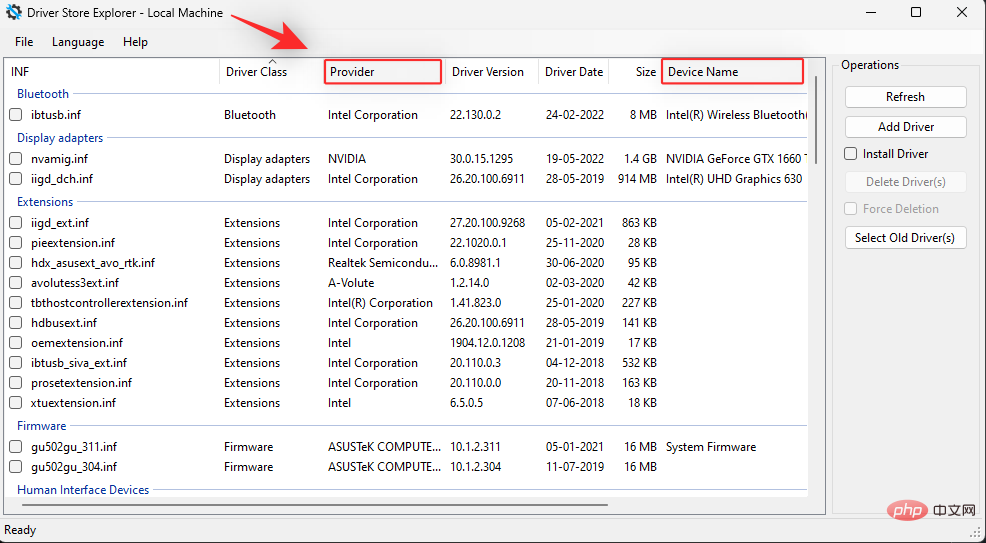
 DriverStoreExplorer will now scan your system and populate a list of all drivers installed on it. Find the recently installed driver in the list on the screen and check its box. You can use the
and Provider columns to identify the related driver.
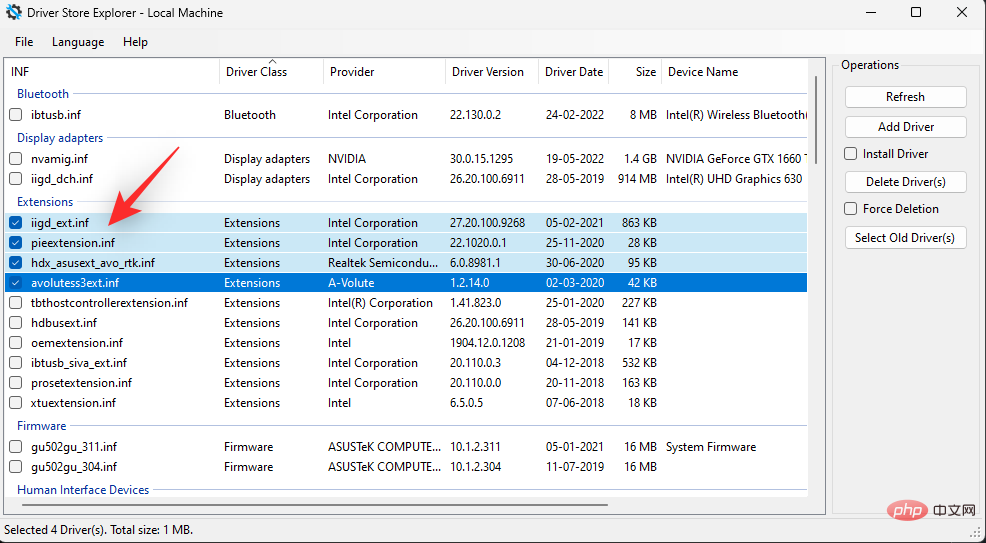
 If you have multiple drivers installed for the device in question, select the checkboxes for all drivers.
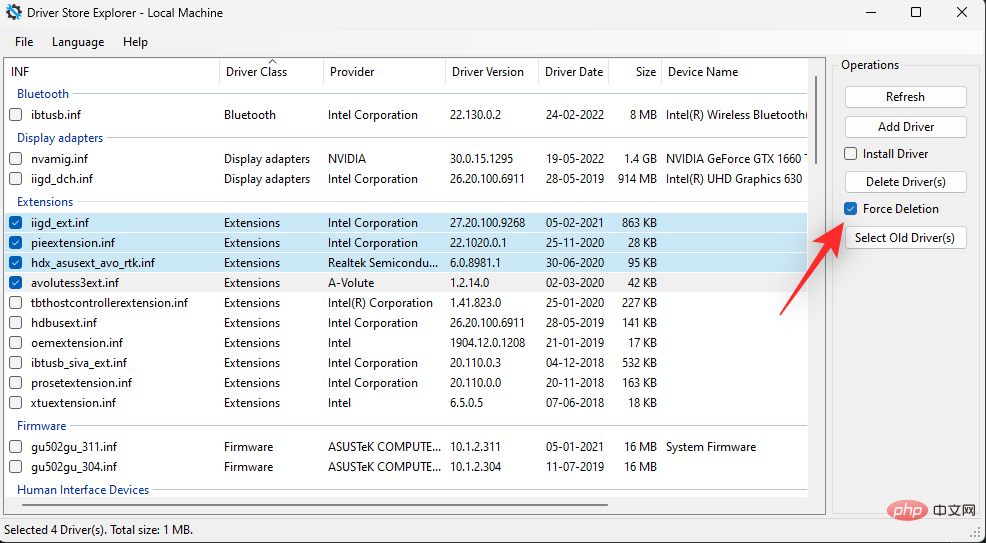
 Now check the
box.
 Click
Click
.
 Click
Click
to confirm your choice.
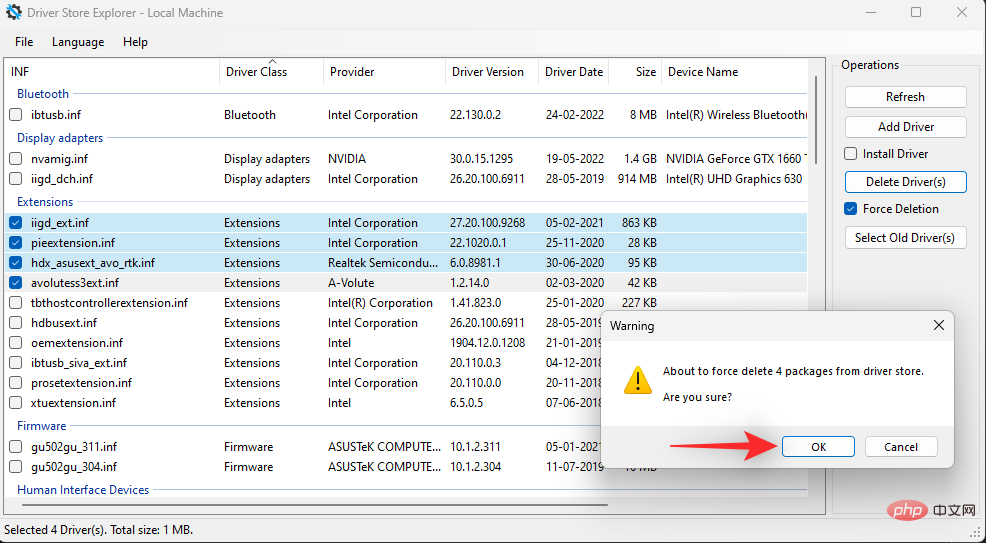 The selected driver will now be removed from your system. We recommend that you restart your system at this time. After restarting, reinstall known working drivers for relevant hardware components and try to use your PC for some time. If a recently installed driver was the cause of your issue, it should be fixed on your system by now.
Method 2: Check and Repair Your Disk
Another common cause of page faults in non-paged area BSOD is bad sectors on the boot drive. Your boot drive is the primary location for the page file, and Windows automatically manages its size by default.However, bad and damaged sectors on the boot drive may result in data loss in the page file, which may result in non-paged areas on the system
BSOD page faults .We recommend that you first check your disk for errors before running a scan to repair your disk and Windows image. Please follow the steps below to help you through the process.
PressWindows i
and clickRestore.

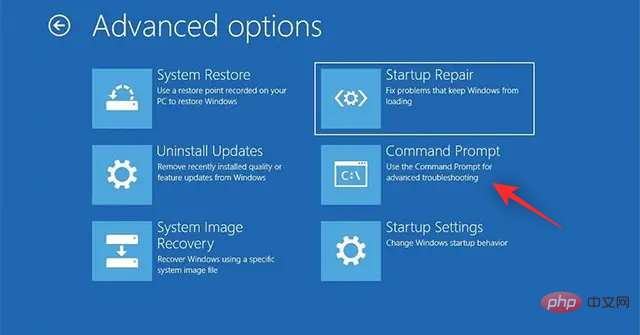
Click Restart now next to Advanced startup.
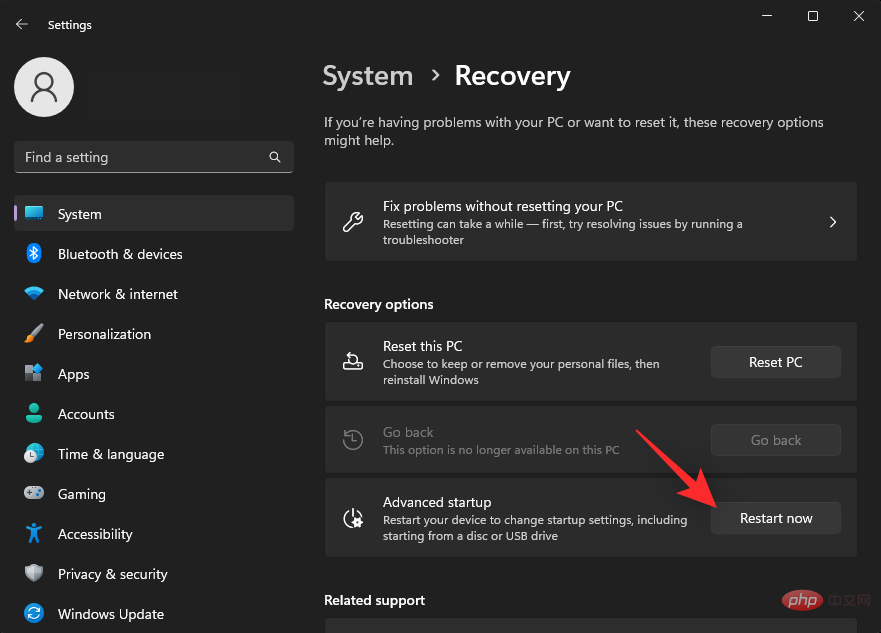
Your PC will now boot with advanced recovery options. Click Troubleshooting.
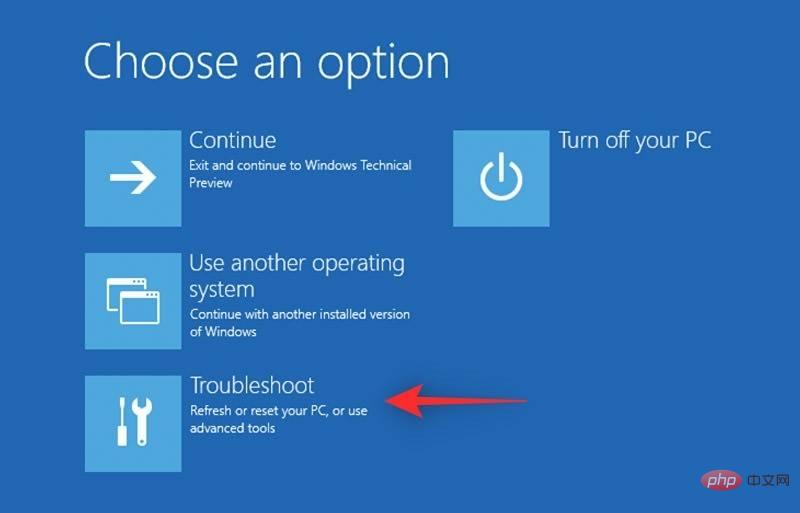
Now click on Command Prompt.
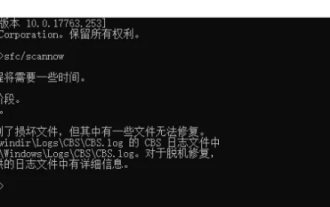
CMD will now launch on your screen. Use the following command to scan your primary boot drive. Replace C: with the drive letter of your boot drive (if applicable).
chkdsk c: /x /r
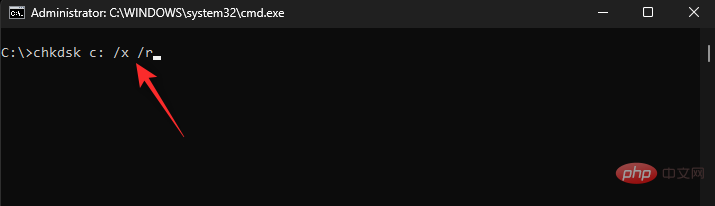
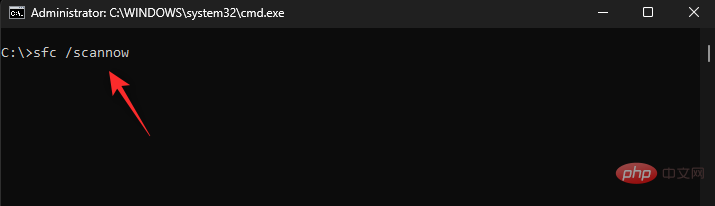
Wait for the scan to complete. Once completed, run the following command to check for errors.
sfc /scannow
Now use the following command to close CMD.
exit

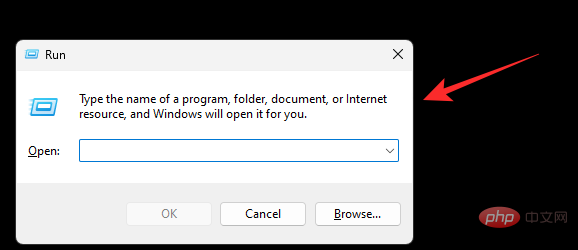
Once completed, restart your PC as usual and press Windows R Start Run.
Note: If you are unable to boot your PC normally, we recommend that you boot in Safe Mode with Networking.
Now enter the following and press Ctrl Shift Enter.
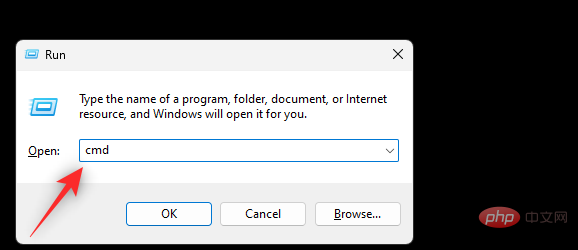
cmd
Use the following commands to check and repair your Windows image.
DISM /Online /Cleanup-Image /RestoreHealth

Now, wait for the process to complete. This may take some time and is completely normal. Once completed, restart your PC and try using your system again. If bad sectors on the boot drive or a damaged Windows image are causing page faults in the non-paged areaBSOD, now is the time to fix it for your PC.
Method 3: Check and install pending Windows updates
As mentioned above, driver incompatibility may also cause BSOD stop code Page Fault in Nonpaged Area. It's possible that Windows needs to be updated for new drivers in order for all features to work as expected on your system. Use the following tutorial to check for and install any pending Windows updates on your system.
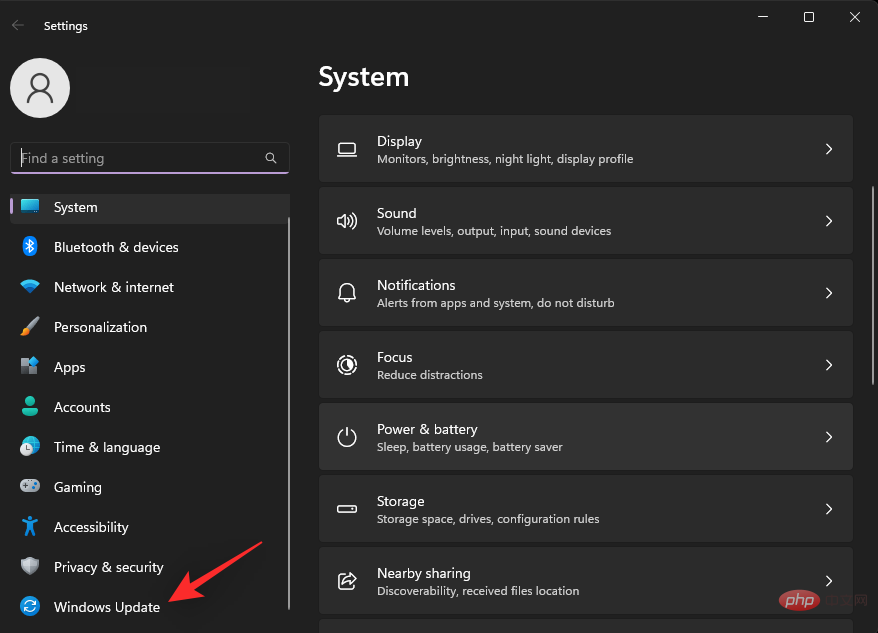
Press Windows i and click Windows Update.
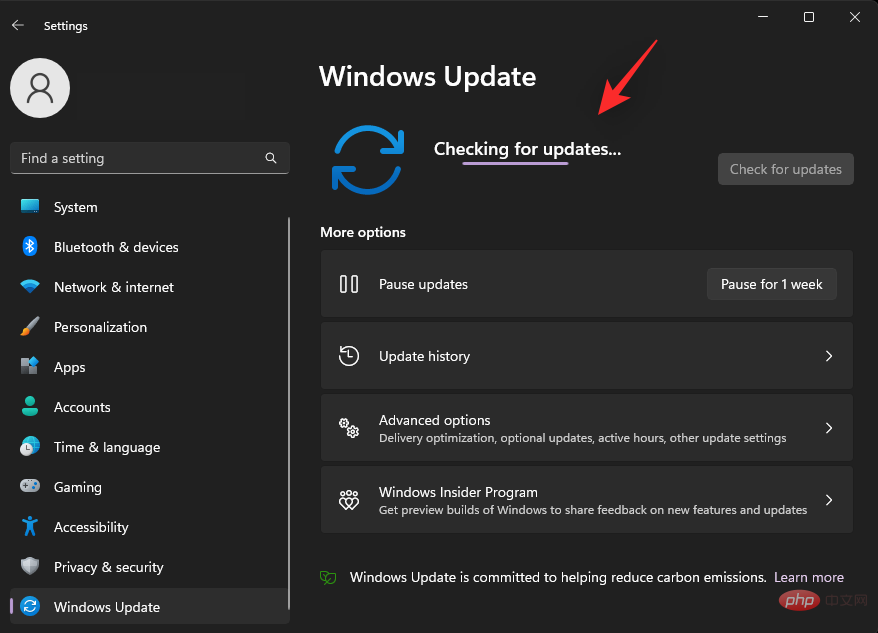
Now click Check for Updates. Download and install any Windows updates that appear on your system.
Also, click on Advanced Options.
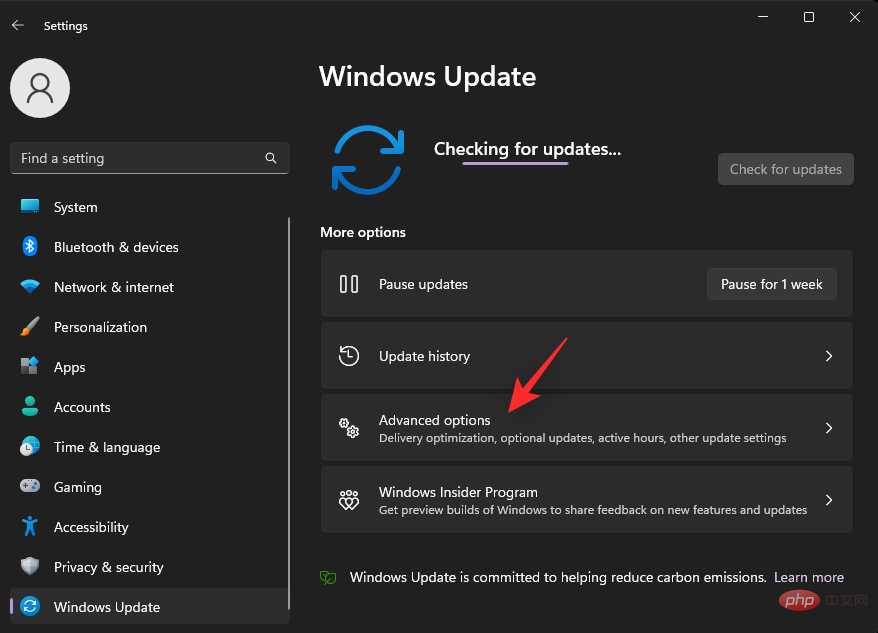
Now click Optional Update.

#Find available updates for any suspicious hardware components that may be causing this blue screen on your system. Download and install the relevant updates. Once done, restart your PC for good results. If the latest driver requires the pending update to function as expected, then this should help fix page faults in non-paged areas BSOD on your system.
Method 4: Set a custom size for the page file
We know that the page file is facing issues on your system and we can try assigning a custom size to it. By default, Windows manages the page file on the hard drive based on the memory required by the system and the space available on the drive.
This can sometimes cause problems and cause BSOD with stop code Page Fault in Nonpaged Area. In this case, setting custom and static page file sizes can help resolve the issue. Use the following steps to help you through the process.
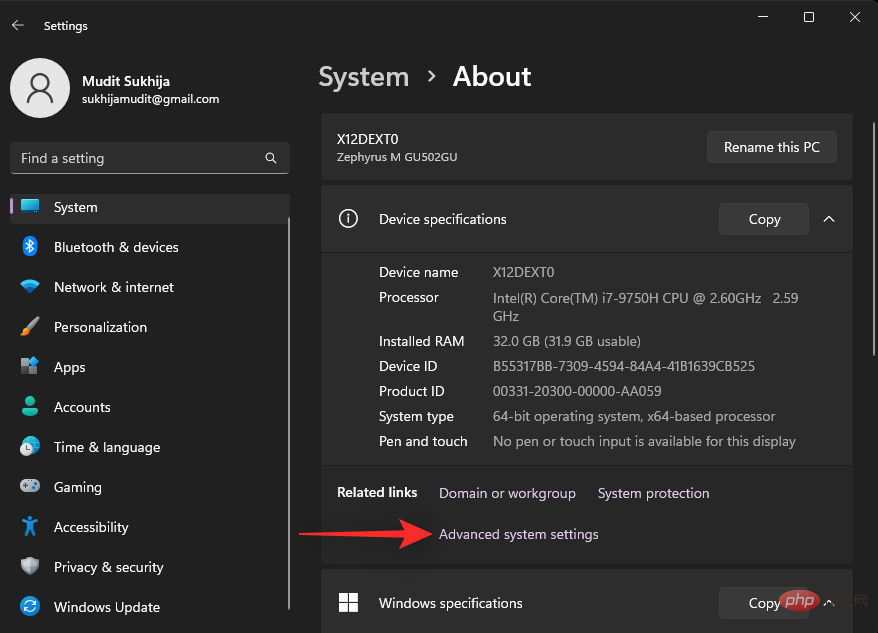
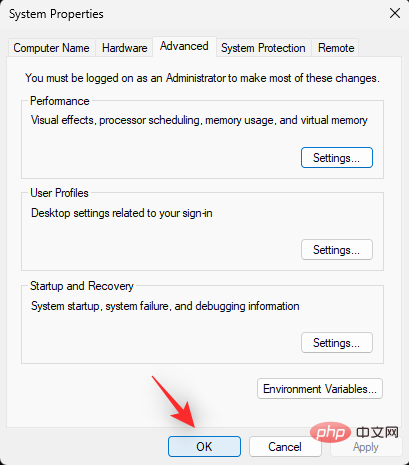
Press Windows i and click About.

Click Advanced System Settings.
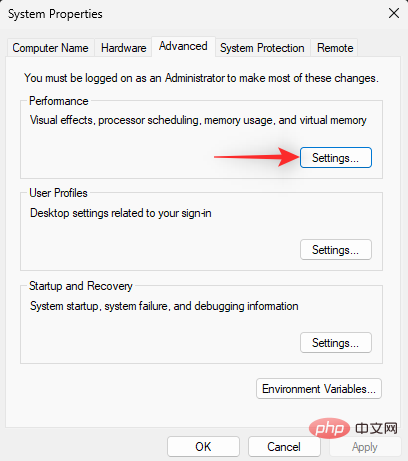
Click Settings under Performance.
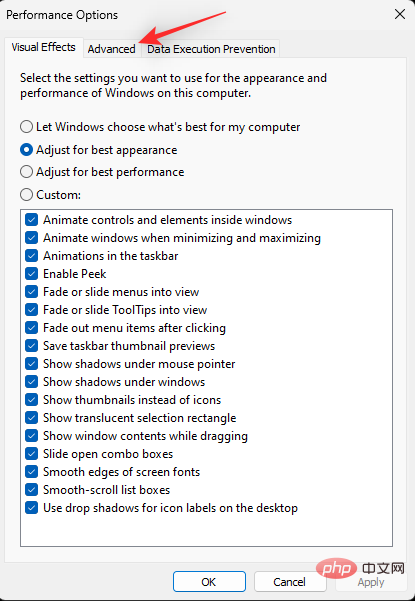
Click and switch to the "Advanced" tab at the top.
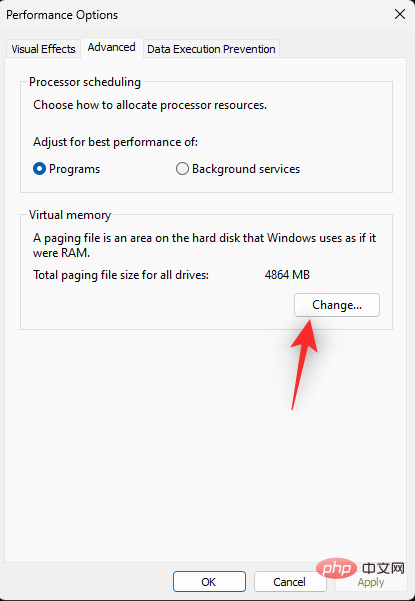
Click Change under the Virtual Memory section.
# Click and select your boot drive from the list at the top.
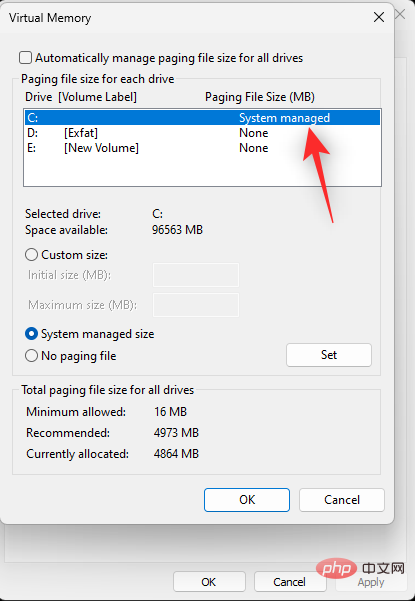
Click Custom size.
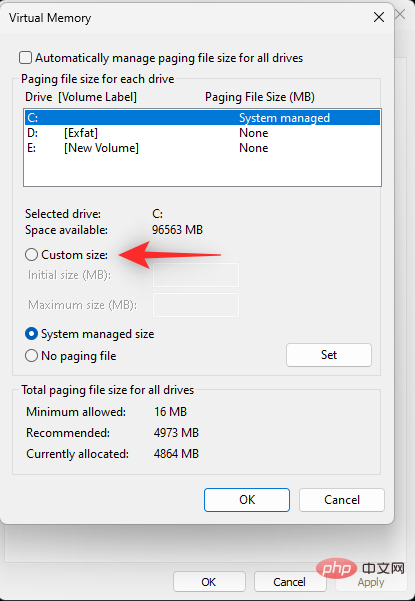
Now check the bottom section and consider the recommended size for the page file.
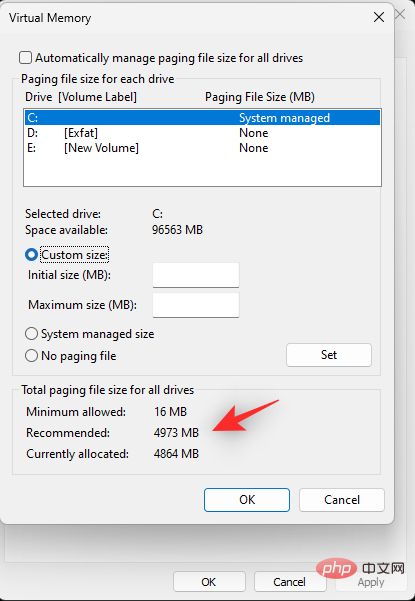
We recommend that you use a larger page file size than the recommended size and enter the same size at the top next to Initial size (MB).
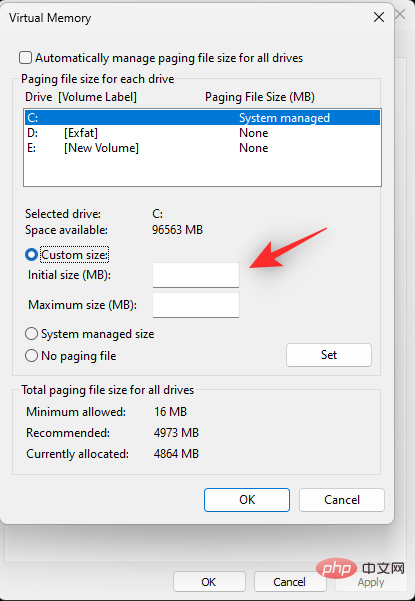
Select the desired maximum size for your page file and enter the same value next to Maximum Size (MB).

Click Settings.

# Repeat the above steps to set the static page file size for the other drives as well (if applicable). Click OK when finished.

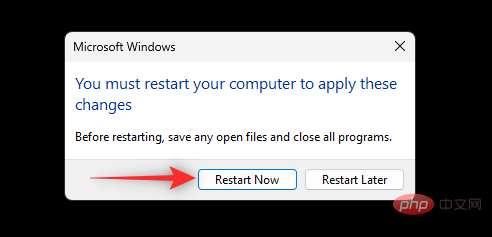
Close all Windows and you will be asked to restart your system. Click Restart Now to restart the system.
After restarting, your page file should be set to its new size. If an automatically managed page file is the cause of your problem, it should be fixed on your system by now.
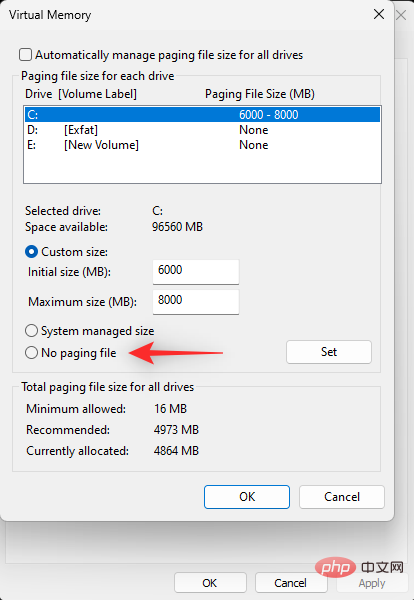
Method 5: Delete and Disable Page File
If setting custom and static sizes for your page file does not resolve the issue, then we recommend that you disable and delete your page file. This should help prevent non-paged areas blue screens of page faults on your system. Please follow the steps below to help you through the process.
Press Windows i and click About on the right.
Select Advanced System Settings.
Now click Settings in the Performance section.
#Click Advanced at the top.
Click Change in the Virtual Memory section.
#Now click and select your boot drive at the top.
Click No paging file.
Click Settings.

Repeat the above steps to disable the page file for other drives on the system. When finished, click OK.
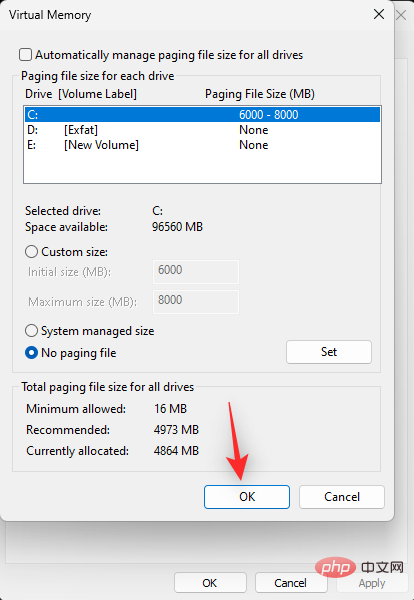
Click OK again.
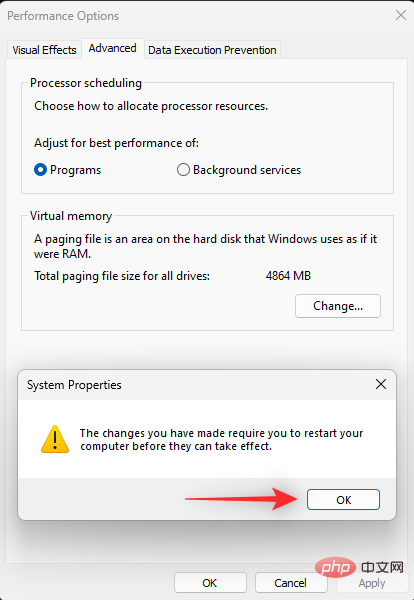
Finally, click "OK" to close your system settings.
You will now be prompted to reboot your system. We recommend that you restart your system as soon as possible to apply the necessary changes. Click Restart Now.
That's it! Once you reboot, you will no longer face page faults in non-paged area BSOD on your system.
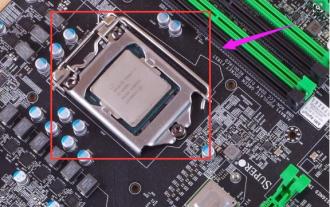
Method 6: Reinstall RAM
RAM is another hardware component that can ultimately cause page faults to BSOD non-paged areas on your system. This can happen due to overclocking, a new RAM stick, or a change in RAM speed. RAM timings can also harm your system, causing a Blue Screen of Death in the process.
If you have recently overclocked your RAM, changed the timings, or installed a new memory stick, then this is most likely the cause of thenon-paged area BSOD page fault on your system . If you can easily turn on your PC, then we recommend you try clearing the CMOS and reinstalling the RAM. After disconnecting the battery (if applicable), simply open your PC and remove the compatible RAM stick.
After removing the RAM stick, clear the system's CMOS by removing the battery for 10 seconds. Reinstall the battery and RAM when finished. To be on the safe side, we recommend swapping slots when available. You can now try to boot your PC again. If improper installation of RAM is the cause of the problem, then it is time to fix it on your system. Method 7: Try booting the system using a single stick of RAMThis may seem counterintuitive, but it seems to work for many users. If you have dual-channel memory installed on your system, you may be facing power issues with your second stick, depending on the age of your system. It is also possible that you are using RAM sticks with mismatched timings, which is causing this issue on your system. We recommend that you remove the second memory stick and try booting your PC with only one memory stick. If you have a laptop then you can try removing your external RAM stick and booting with the soldered memory. If your PC seems to run as expected with a single block of RAM, you may be experiencing hardware issues with your second block of RAM. We recommend that you contact your OEM or a certified technician to further troubleshoot your RAM stick. Method 8: Restore CPU, GPU, and RAM to normal speeds Overclocking can also have an adverse effect on your system, depending on the headroom available to your components. RAM overclocking is the leading cause ofnon-paged areas BSOD page faults on your system and we recommend reverting to stock speeds if you are using XMP profiles. Overclocking the CPU and GPU can also cause problems with the overall power supply of the system.
This can cause memory failure, and in the worst case, your RAM will fail completely. If restoring the RAM to stock speed doesn't help, then we recommend that you restore the CPU and GPU to stock speed as well. Most systems allow you to reset overclocking via a hard power reset. If you are unable to boot into Windows, this can help you get back to stock speed. Beyond that, if you're using a desktop, you'll most likely be able to control RAM and CPU overclocking from the BIOS. Use your BIOS to return to stock speed, and the page fault in thenon-paged area BSOD should be fixed on your system.
Method 9: Remove all virtual drivesVirtual drives are another cause of BSOD page faults in non-paged areas on many systems. The issue appears to stem from the way third-party programs install virtual drive drivers. These drivers may be incorrectly recognized by Windows, causing memory failures on the system. You can unmount the virtual drive by removing the related third-party program from the system. You can also force a virtual drive to be unmounted from the
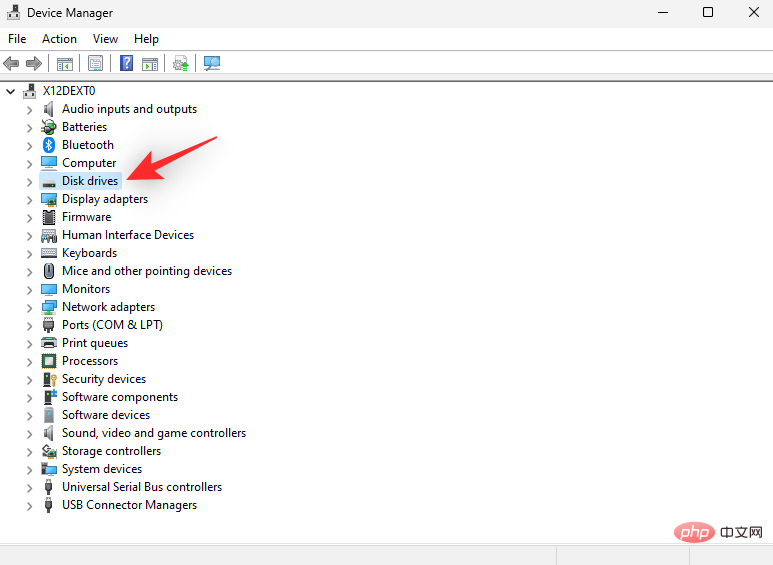
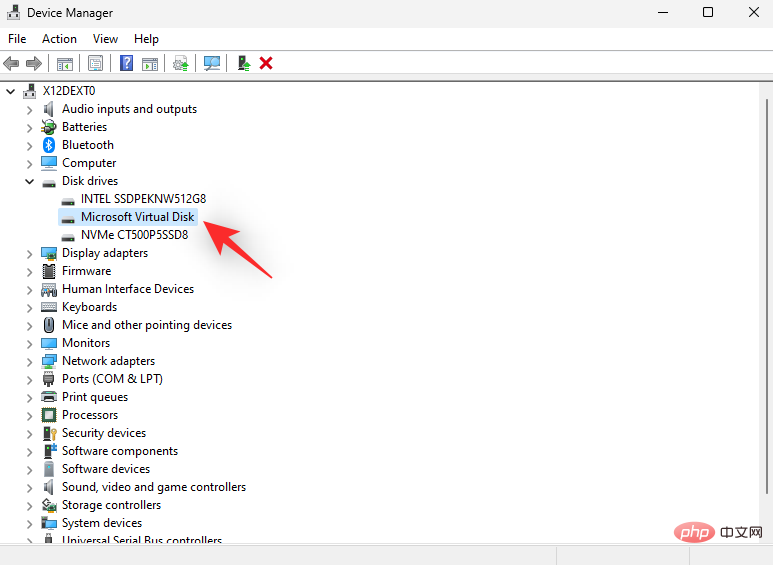
Device Manageror the Disk Management utility. Use the following steps to help you remove virtual drives from your system.
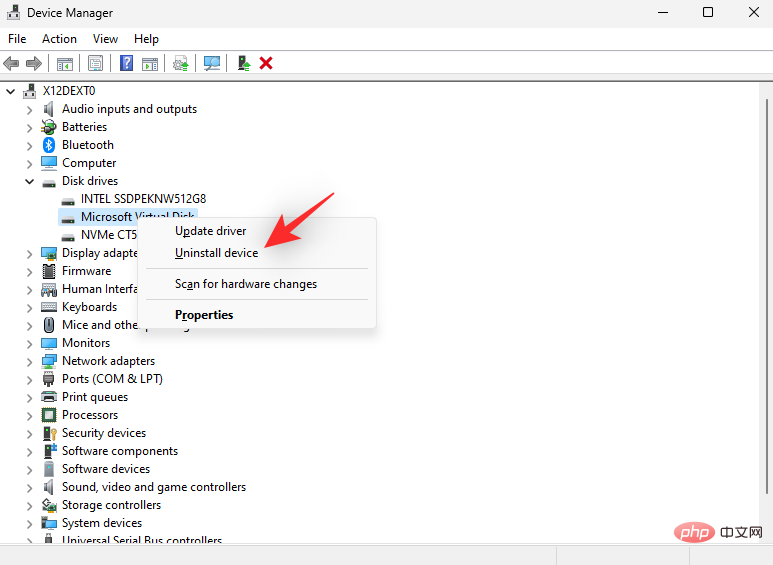
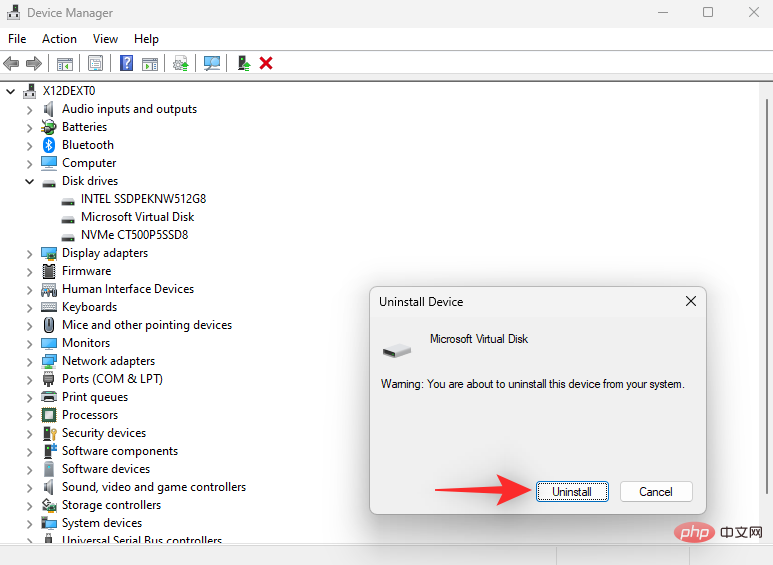
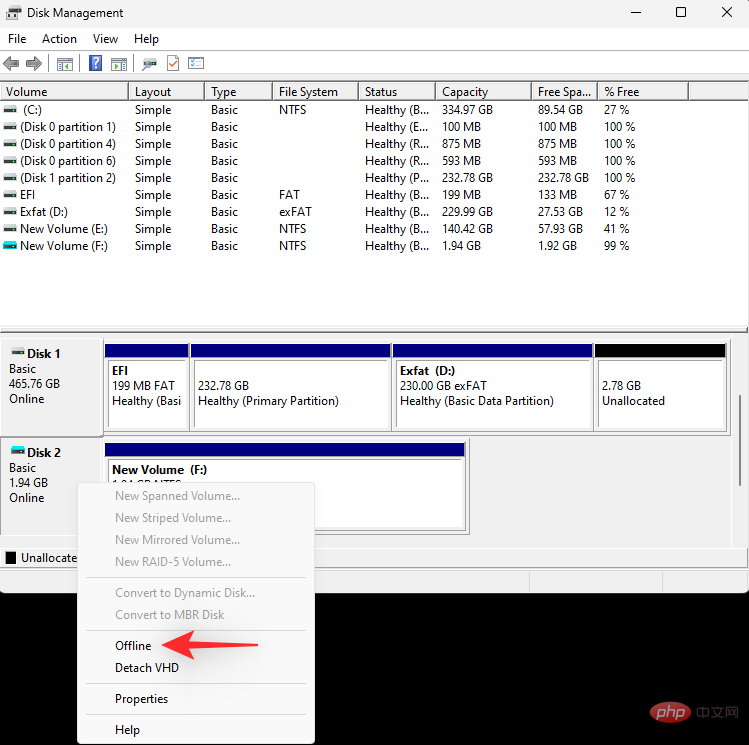
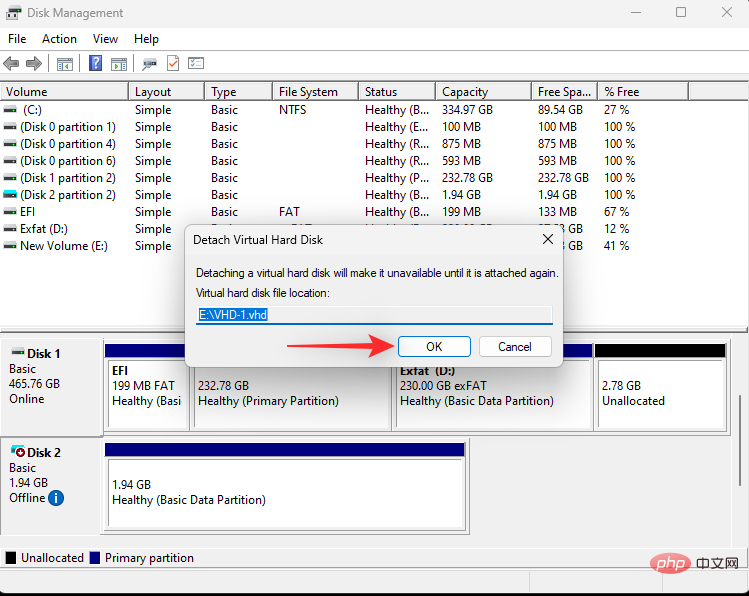
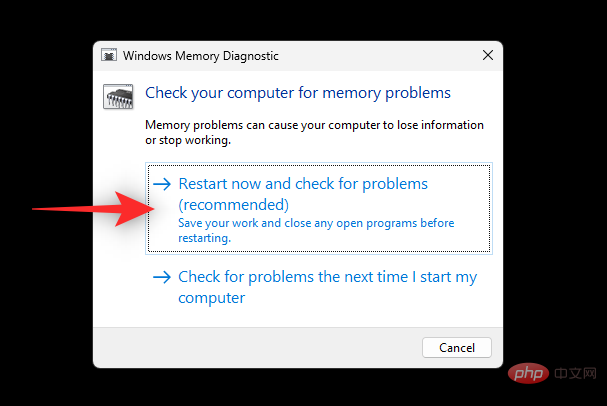
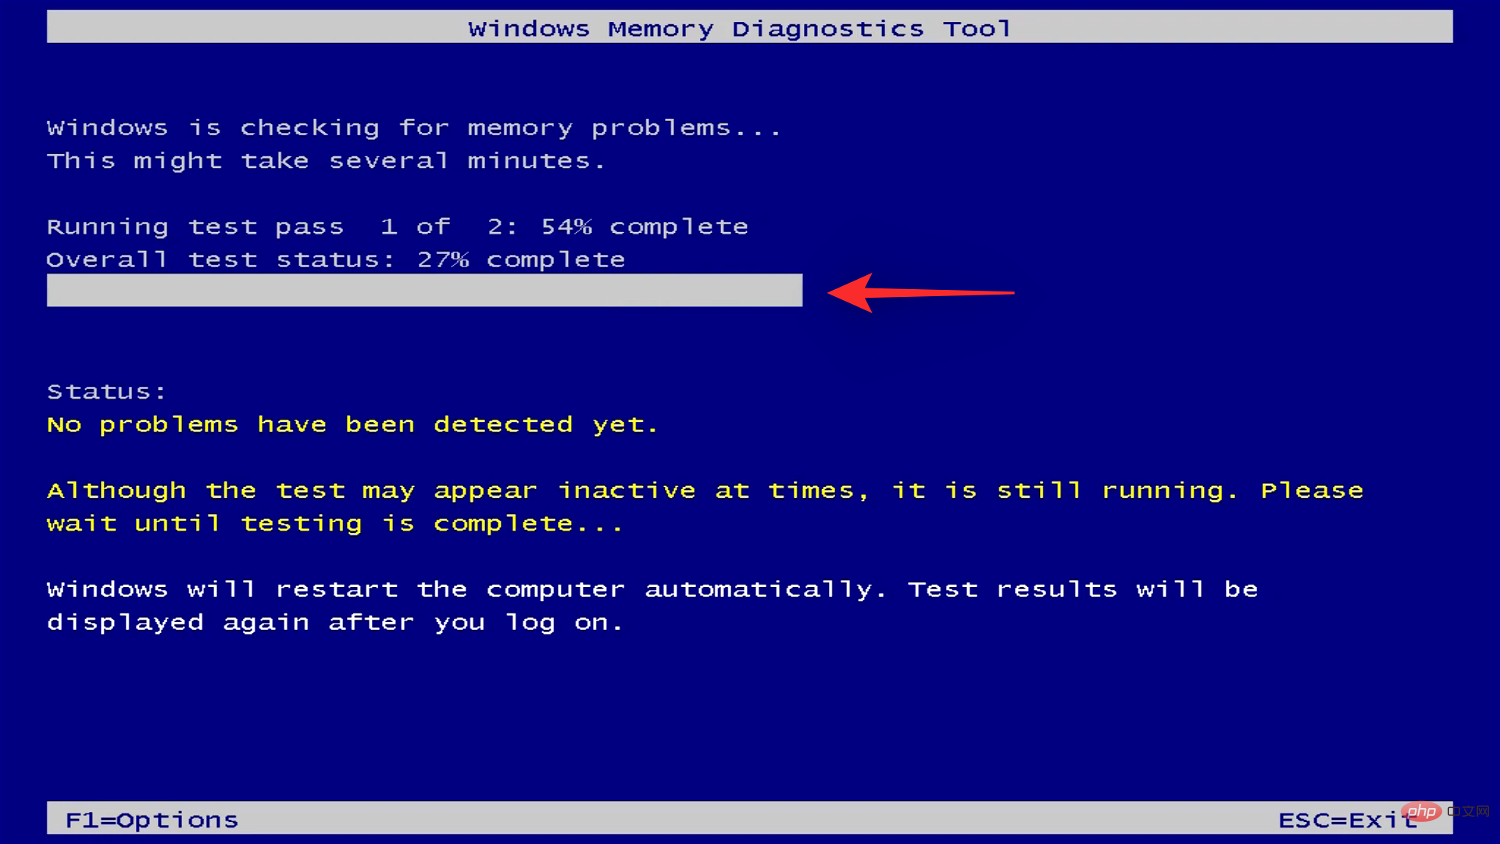
NOTE: Removing and deleting a virtual drive will cause you to lose the data it contains. We recommend that you back up your important data before proceeding with the steps below. Press Double-click Disk Drive. Now right click on the virtual drive in the list. Select Uninstall device. Click Uninstall. The selected virtual drive will now be unmounted from your system. Repeat the above steps to unmount more virtual drives from the system as needed. Launch the Start menu, search for Disk Management and launch it from the search results. Now scroll to the bottom and find your virtual drive. Once found, right-click on it. Select Offline. Right-click the virtual drive again and select Detach VHD. Click OK. #You can now proceed by deleting the virtual drive files from local storage to free up reserved space. Repeat the above steps to delete and remove more virtual drives from your PC as needed. Anti-cheat engines rely on modern hardware-based security features to help verify your identity and prevent cheating. However, these tools can continue to run in the background and can cause problems when using virtual drives, disks, and overclocked RAM. Some cheat engines don't play well with other programs, which can also cause errors in the page file on your system. We recommend that you try disabling or removing games that use anti-cheat engines on your system to see if that resolves the issue. If the anti-cheat engine was causing non-paged areas to BSOD page faults on your system, this should have been fixed by now. You can also try running the Windows Memory Diagnostic Tool to test the RAM on your system. This memory test is very comprehensive and should help identify your memory problems in most cases. Follow the steps below to help run the Windows Memory Diagnostic Tool on your system. NOTE: Your PC will restart during this process. We recommend that you save any important open work on your system before continuing with the following tutorial. Press Type the following and press Enter. Click Restart now and check for problems (recommended). Windows will now restart and run a memory test on your system. This may take some time, depending on your setup. You can track the progress of your test using the Status at the top. #After the test is complete, your PC will restart normally again. Log in to your account and you should see the test report on your desktop. If you don’t want to rely on Windows Defender, third-party security tools are a good way to maintain your system. However, they can sometimes cause problems with the page file, depending on the security measures deployed on the system. If you are still getting a page fault in a non-paged area blue screen at this point, it may be due to your third-party security software. We recommend that you temporarily disable it and see if that resolves the issue for you. You can also try to uninstall it and use Windows Defender for a while. Simply uninstall the relevant security software from the Settings app and Windows will automatically switch to Windows Defender as your default security software. After uninstalling, you should no longer encounter page faults in the non-paged area blue screen on your system if third-party security software was the cause of your problem. If at this point your system is still facing a blue screen in the non-paged area Wrong, then it's time to take some drastic measures. We recommend that you abandon your current startup drive and try reinstalling Windows on a different drive. Your boot drive may be degraded and face hardware failure, which in turn can cause problems with your page file. In this case, reinstalling Windows on a different drive can help you resolve the issue. However, if you don't have another drive, you may not have a choice at this point. You can use an external drive instead or try to temporarily obtain a different drive for your system in order to test a fresh installation of Windows 11. Option 1: Use Device Manager to delete the virtual drive
Windows X and select Device Manager. 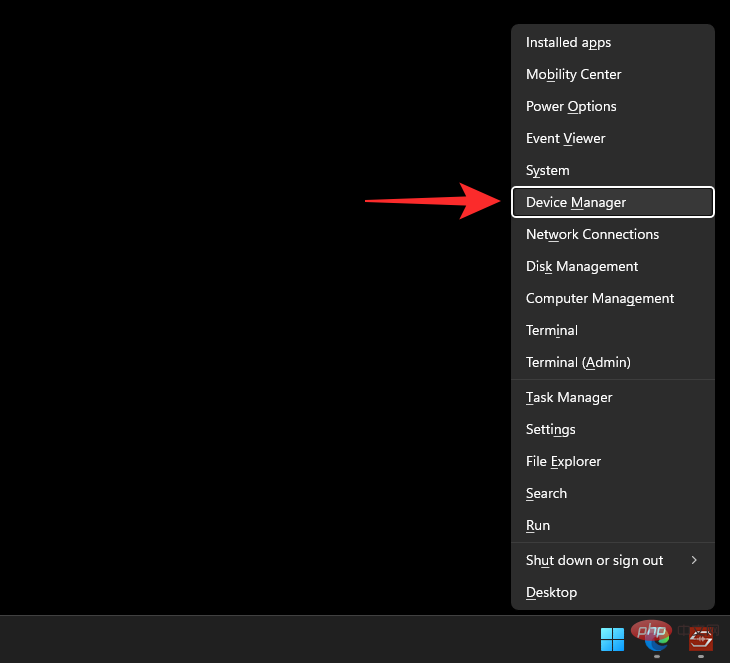
Option 2: Use Disk Management to delete the virtual drive


Method 10: Remove the game using an anti-cheat engine that relies on TPM and SecureBoot
Method 11: Run the Windows Memory Diagnostic Tool
Windows R to start Run. 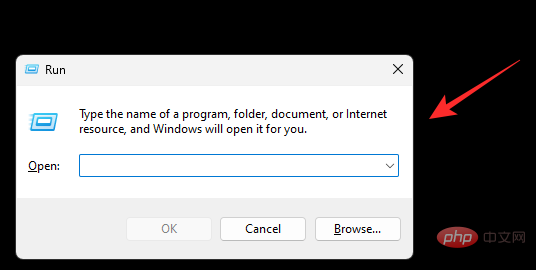
mdsched.exe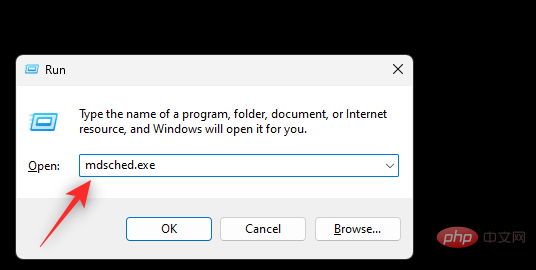
Method 12: Disable third-party security software
Method 13: Reinstall Windows on a different drive (last resort)
The above is the detailed content of BSOD error 'Page fault in non-paged area” on Windows 11: 13 ways to fix it. For more information, please follow other related articles on the PHP Chinese website!

Hot AI Tools

Undresser.AI Undress
AI-powered app for creating realistic nude photos

AI Clothes Remover
Online AI tool for removing clothes from photos.

Undress AI Tool
Undress images for free

Clothoff.io
AI clothes remover

Video Face Swap
Swap faces in any video effortlessly with our completely free AI face swap tool!

Hot Article
Hot Tools

Notepad++7.3.1
Easy-to-use and free code editor

SublimeText3 Chinese version
Chinese version, very easy to use

Zend Studio 13.0.1
Powerful PHP integrated development environment

Dreamweaver CS6
Visual web development tools

SublimeText3 Mac version
God-level code editing software (SublimeText3)
Hot Topics
 1386
1386
 52
52

 How to solve the computer blue screen system thread exception not handled?
Mar 13, 2024 pm 02:46 PM
How to solve the computer blue screen system thread exception not handled?
Mar 13, 2024 pm 02:46 PM
When the computer is running, it is inevitable that the computer will have a blue screen, a black screen, unresponsive operations, etc. Recently, some users have reported to the editor that their computers have a blue screen code systemthreadexceptionnothandled. What does this mean? How do we solve this problem? Let’s take a look at the detailed solutions below. What does systemthreadexceptionnothandled mean? Answer: The systemthreadexceptionnothandled blue screen is usually caused by soft faults such as driver conflicts and virtual memory configuration errors. Incompatible hardware and software, drivers or updated patches cause damage to system files. Solution:
 How to solve the problem of Win11 blue screen stuck at 100%
Jan 03, 2024 pm 08:50 PM
How to solve the problem of Win11 blue screen stuck at 100%
Jan 03, 2024 pm 08:50 PM
When we install or update win11 system, we may encounter the situation where the progress bar is stuck at 100%. First, we need to wait for a period of time to confirm whether there is a real problem. After confirming the problem, we can solve it by repairing the mechanical failure. , let’s take a look below. What to do if win11 blue screen is stuck at 100%. Method 1. First, we wait in this interface for a while to confirm whether it is really stuck. 2. After waiting for more than 10 minutes to confirm the problem, first use the power button to restart the computer. 3. If you can enter the system normally, hold down the "shift" key on the keyboard, then click the start menu with the mouse, select "Power" - "Restart" 4. After restarting the system, you will automatically enter the advanced repair options, select "Startup and Failure"
 How to restart the computer without blue screen when playing League of Legends
Feb 13, 2024 pm 07:12 PM
How to restart the computer without blue screen when playing League of Legends
Feb 13, 2024 pm 07:12 PM
As one of the most popular and influential online games, LOL has a huge user base. However, many friends have recently reported to the editor that a blue screen appears when playing LOL. This is really terrible. How should I deal with it? Don’t panic when encountering anything. Here, the editor will share with you some tips on solving LOL blue screen. lol blue screen solution: Reason 1, the computer's own memory is insufficient, resulting in a blue screen solution: In order to solve the problem of insufficient hard disk space, we can take some measures. First, make sure not to store too many files and data on your hard drive, and try to delete some files you no longer need. Secondly, to regularly clean up temporary files generated by the system, you can use the system's own cleaning tool or third-party cleaning software. Furthermore, if there are
![Corsair iCUE software not detecting RAM [Fixed]](https://img.php.cn/upload/article/000/465/014/170831448976874.png?x-oss-process=image/resize,m_fill,h_207,w_330) Corsair iCUE software not detecting RAM [Fixed]
Feb 19, 2024 am 11:48 AM
Corsair iCUE software not detecting RAM [Fixed]
Feb 19, 2024 am 11:48 AM
This article will explore what users can do when the CorsairiCUE software does not recognize the RAM in a Windows system. Although the CorsairiCUE software is designed to let users control their computer's RGB lighting, some users have found that the software does not function properly, resulting in an inability to detect RAM modules. Why doesn't ICUE pick up my memory? The main reason why ICUE cannot correctly identify RAM is usually related to background software conflicts. In addition, incorrect SPD write settings may also cause this problem. Fixed issue with CorsairIcue software not detecting RAM If CorsairIcue software is not detecting RAM on your Windows computer, please use the following suggestions.
 What to do if the blue screen code 0x0000001 occurs
Feb 23, 2024 am 08:09 AM
What to do if the blue screen code 0x0000001 occurs
Feb 23, 2024 am 08:09 AM
What to do with blue screen code 0x0000001? The blue screen error is a warning mechanism when there is a problem with the computer system or hardware. Code 0x0000001 usually indicates a hardware or driver failure. When users suddenly encounter a blue screen error while using their computer, they may feel panicked and at a loss. Fortunately, most blue screen errors can be troubleshooted and dealt with with a few simple steps. This article will introduce readers to some methods to solve the blue screen error code 0x0000001. First, when encountering a blue screen error, we can try to restart
 What to do if the blue screen error code 0x00000124 appears in Win7 system? The editor will teach you how to solve it
Mar 21, 2024 pm 10:10 PM
What to do if the blue screen error code 0x00000124 appears in Win7 system? The editor will teach you how to solve it
Mar 21, 2024 pm 10:10 PM
Computers are now the most commonly used. Whether it is work, study, or life, they are everywhere. However, computers also have their problems. People are overwhelmed with all kinds of problems, such as the blue screen 0x00000124 error in the Win7 system of the computer. Code is one of the more common problems for win7 users. What should you do if you encounter this problem? For this reason, the editor has brought a method to solve the blue screen 0x00000124. In the process of using the win7 system, it is inevitable to encounter problems of one kind or another, especially problems such as blue screen or black screen, which are often encountered by users. Some users of the win7 ultimate system reported that a blue screen appeared when the computer was turned on. And prompts 0x00000124 error code, how to deal with this
 The computer frequently blue screens and the code is different every time
Jan 06, 2024 pm 10:53 PM
The computer frequently blue screens and the code is different every time
Jan 06, 2024 pm 10:53 PM
The win10 system is a very excellent high-intelligence system. Its powerful intelligence can bring the best user experience to users. Under normal circumstances, users’ win10 system computers will not have any problems! However, it is inevitable that various faults will occur in excellent computers. Recently, friends have been reporting that their win10 systems have encountered frequent blue screens! Today, the editor will bring you solutions to different codes that cause frequent blue screens in Windows 10 computers. Let’s take a look. Solutions to frequent computer blue screens with different codes each time: causes of various fault codes and solution suggestions 1. Cause of 0×000000116 fault: It should be that the graphics card driver is incompatible. Solution: It is recommended to replace the original manufacturer's driver. 2,
 An effective method to solve the problem of win11 blue screen not restarting
Jan 04, 2024 pm 08:18 PM
An effective method to solve the problem of win11 blue screen not restarting
Jan 04, 2024 pm 08:18 PM
Sometimes when installing win11, there will be a blue screen showing 100% but not restarting. This may be because the system is stuck. We can try to restart manually. If it does not work after manual restart, there may be a problem with the system installed. Other system files need to be selected for installation. What to do if win11 blue screen is stuck at 100%. Method 1. Wait patiently for a while, because installing the system itself requires waiting. 2. If you still can't restart after a while, use the power button to restart manually. 3. If you enter the system directly after manual restart, it means that the installation has been completed and you can use it normally. Method 2 1. If we restart and re-enter the installation, and it is still stuck at 100%, it means that the system version is installed.