 Technology peripherals
 AI
AI
 AI has seen you clearly, YOLO+ByteTrack+multi-label classification network
AI has seen you clearly, YOLO+ByteTrack+multi-label classification network
Today I will share with you a pedestrian attribute analysis system. Pedestrians can be identified from video or camera video streams and each person's attributes can be marked.

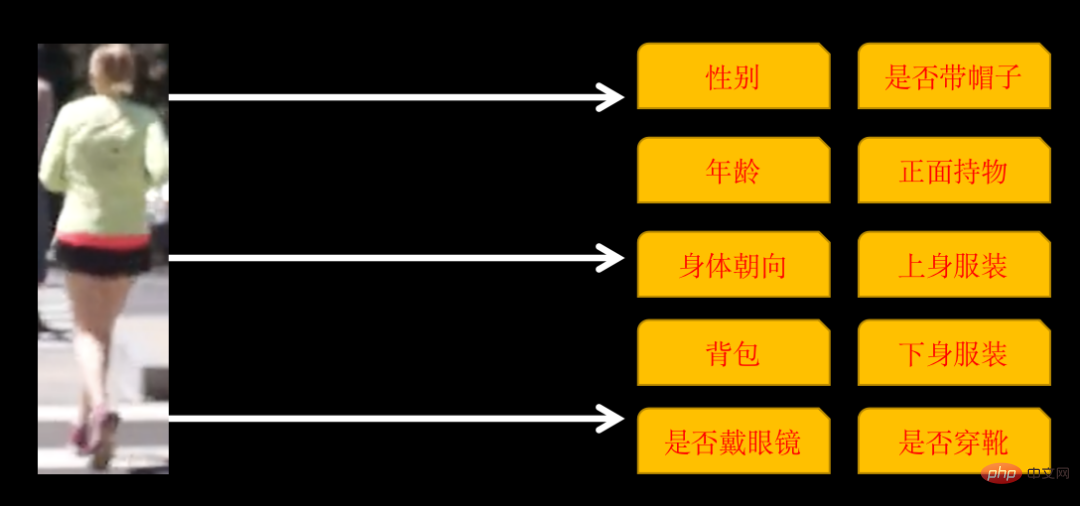
The recognized attributes include the following 10 categories

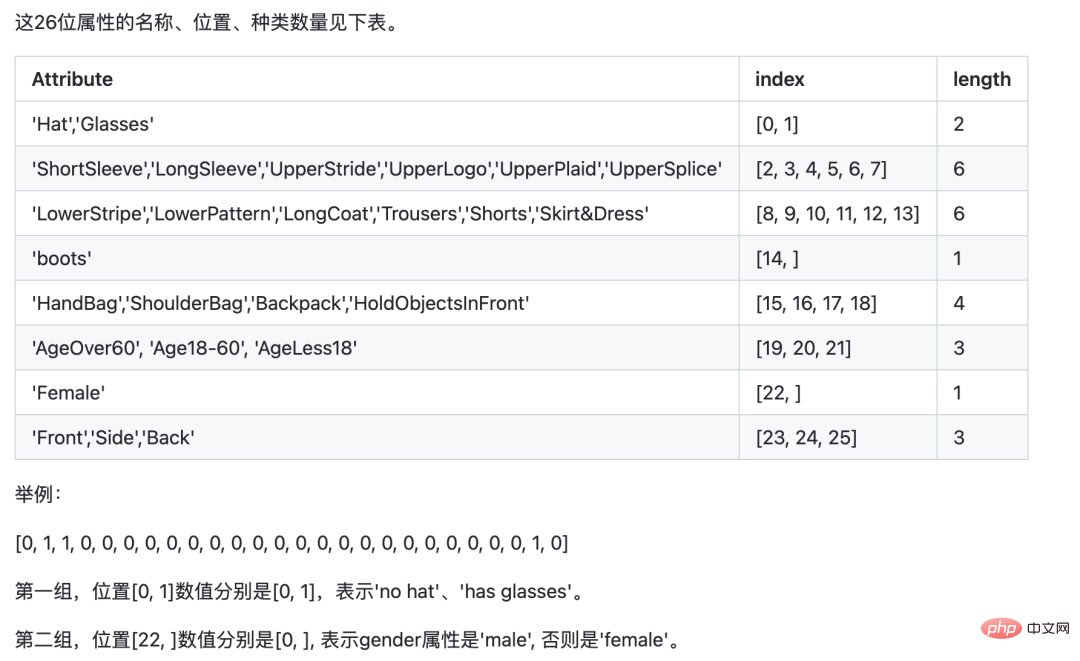
Some categories have multiple attributes. If the body orientation is: front , side and back, so there are 26 attributes in the final training.
Implementing such a system requires 3 steps:
- Use YOlOv5 to identify pedestrians
- Use ByteTrack to track and mark the same person
- Train multi-label images Classification network, identifying 26 attributes of pedestrians
1. Pedestrian recognition and tracking
Pedestrian recognition uses the YOLOv5 target detection model. You can train the model yourself, or you can directly use YOLOv5 pre-training Good model.
Pedestrian tracking uses Multi-Object Tracking Technology (MOT) technology. The video is composed of pictures. Although we humans can identify the same person in different pictures, if we do not track pedestrians, AI is unrecognizable. MOT technology is needed to track the same person and assign a unique ID to each pedestrian.
The training and use of the YOLOv5 model, as well as the principles and implementation plans of the multi-object tracking technology (MOT) technology, are detailed in the previous article. Interested friends can check out the article there. YOLOv5 ByteTrack counts traffic flow.
2. Training multi-label classification network
Most of the image classifications we first came into contact with were single-label classification, that is: a picture is classified into category 1, and the category can be two categories. It can also be multiple categories. Assuming there are three categories, the label corresponding to each picture may be in the following general format:
1 2 3 |
|
labelOnly one position is 1.
The multi-label classification network we are going to train today is a picture that contains multiple categories at the same time. The label format is as follows:
1 2 3 |
|
label can have multiple positions of 1.
There are two options for training such a network. One is to treat each category as a single-label classification, calculate the loss separately, summarize the total, and calculate the gradient to update the network parameters.
The other one can be trained directly, but you need to pay attention to the network details, taking ResNet50 as an example
1 2 3 4 5 6 7 8 9 10 11 12 13 14 15 16 17 |
|
The activation function of the final output layer must be sigmoid, because each attribute needs to be calculated separately Probability. In the same way, the loss function during training also needs to use binary_crossentropy.
In fact, the principles of the above two methods are similar, but the development workload is different.
For convenience here, I use PaddleCls for training. Paddle's configuration is simple, but its disadvantage is that it is a bit of a black box. You can only follow its own rules, and it is more troublesome to customize it.
The model training uses the PA100K data set. It should be noted that although the original label defined by the PA100K data set has the same meaning as Paddle, the order is different.
For example: The 1st digit of the original label represents whether the label is female, while Paddle requires the 1st digit to represent whether the label is wearing a hat, and the 22nd digit represents whether the label is female.

#We can adjust the original label position according to Paddle’s requirements, so that it will be easier for us to reason later.
Download PaddleClas
1 |
|
Unzip the downloaded dataset and place it in the dataset directory of PaddleClas.
Find the ppcls/configs/PULC/person_attribute/PPLCNet_x1_0.yaml configuration file and configure the image and label paths.
1 2 3 4 5 6 7 8 9 10 11 12 13 14 15 16 |
|
train_list.txt format is
1 |
|
After configuration, you can train directly
1 2 |
|
After training, export the model
1 2 3 4 |
|
will The exported results are placed in the ~/.paddleclas/inference_model/PULC/person_attribute/ directory

You can use the function provided by PaddleCls to directly call
1 2 3 4 5 6 7 |
|
for output The results are as follows:
1 |
|
The model training process ends here, the data set and the source code of the entire project have been packaged.
The above is the detailed content of AI has seen you clearly, YOLO+ByteTrack+multi-label classification network. For more information, please follow other related articles on the PHP Chinese website!

Hot AI Tools

Undresser.AI Undress
AI-powered app for creating realistic nude photos

AI Clothes Remover
Online AI tool for removing clothes from photos.

Undress AI Tool
Undress images for free

Clothoff.io
AI clothes remover

Video Face Swap
Swap faces in any video effortlessly with our completely free AI face swap tool!

Hot Article

Hot Tools

Notepad++7.3.1
Easy-to-use and free code editor

SublimeText3 Chinese version
Chinese version, very easy to use

Zend Studio 13.0.1
Powerful PHP integrated development environment

Dreamweaver CS6
Visual web development tools

SublimeText3 Mac version
God-level code editing software (SublimeText3)

Hot Topics
 1393
1393
 52
52
 1206
1206
 24
24
 Web3 trading platform ranking_Web3 global exchanges top ten summary
Apr 21, 2025 am 10:45 AM
Binance is the overlord of the global digital asset trading ecosystem, and its characteristics include: 1. The average daily trading volume exceeds $150 billion, supports 500 trading pairs, covering 98% of mainstream currencies; 2. The innovation matrix covers the derivatives market, Web3 layout and education system; 3. The technical advantages are millisecond matching engines, with peak processing volumes of 1.4 million transactions per second; 4. Compliance progress holds 15-country licenses and establishes compliant entities in Europe and the United States.
 What does cross-chain transaction mean? What are the cross-chain transactions?
Apr 21, 2025 pm 11:39 PM
Exchanges that support cross-chain transactions: 1. Binance, 2. Uniswap, 3. SushiSwap, 4. Curve Finance, 5. Thorchain, 6. 1inch Exchange, 7. DLN Trade, these platforms support multi-chain asset transactions through various technologies.
 Why is the rise or fall of virtual currency prices? Why is the rise or fall of virtual currency prices?
Apr 21, 2025 am 08:57 AM
Factors of rising virtual currency prices include: 1. Increased market demand, 2. Decreased supply, 3. Stimulated positive news, 4. Optimistic market sentiment, 5. Macroeconomic environment; Decline factors include: 1. Decreased market demand, 2. Increased supply, 3. Strike of negative news, 4. Pessimistic market sentiment, 5. Macroeconomic environment.
 Top 10 cryptocurrency exchange platforms The world's largest digital currency exchange list
Apr 21, 2025 pm 07:15 PM
Exchanges play a vital role in today's cryptocurrency market. They are not only platforms for investors to trade, but also important sources of market liquidity and price discovery. The world's largest virtual currency exchanges rank among the top ten, and these exchanges are not only far ahead in trading volume, but also have their own advantages in user experience, security and innovative services. Exchanges that top the list usually have a large user base and extensive market influence, and their trading volume and asset types are often difficult to reach by other exchanges.
 Ranking of leveraged exchanges in the currency circle The latest recommendations of the top ten leveraged exchanges in the currency circle
Apr 21, 2025 pm 11:24 PM
The platforms that have outstanding performance in leveraged trading, security and user experience in 2025 are: 1. OKX, suitable for high-frequency traders, providing up to 100 times leverage; 2. Binance, suitable for multi-currency traders around the world, providing 125 times high leverage; 3. Gate.io, suitable for professional derivatives players, providing 100 times leverage; 4. Bitget, suitable for novices and social traders, providing up to 100 times leverage; 5. Kraken, suitable for steady investors, providing 5 times leverage; 6. Bybit, suitable for altcoin explorers, providing 20 times leverage; 7. KuCoin, suitable for low-cost traders, providing 10 times leverage; 8. Bitfinex, suitable for senior play
 How to avoid losses after ETH upgrade
Apr 21, 2025 am 10:03 AM
After ETH upgrade, novices should adopt the following strategies to avoid losses: 1. Do their homework and understand the basic knowledge and upgrade content of ETH; 2. Control positions, test the waters in small amounts and diversify investment; 3. Make a trading plan, clarify goals and set stop loss points; 4. Profil rationally and avoid emotional decision-making; 5. Choose a formal and reliable trading platform; 6. Consider long-term holding to avoid the impact of short-term fluctuations.
 What are the top ten platforms in the currency exchange circle?
Apr 21, 2025 pm 12:21 PM
The top exchanges include: 1. Binance, the world's largest trading volume, supports 600 currencies, and the spot handling fee is 0.1%; 2. OKX, a balanced platform, supports 708 trading pairs, and the perpetual contract handling fee is 0.05%; 3. Gate.io, covers 2700 small currencies, and the spot handling fee is 0.1%-0.3%; 4. Coinbase, the US compliance benchmark, the spot handling fee is 0.5%; 5. Kraken, the top security, and regular reserve audit.
 WorldCoin (WLD) price forecast 2025-2031: Will WLD reach USD 4 by 2031?
Apr 21, 2025 pm 02:42 PM
WorldCoin (WLD) stands out in the cryptocurrency market with its unique biometric verification and privacy protection mechanisms, attracting the attention of many investors. WLD has performed outstandingly among altcoins with its innovative technologies, especially in combination with OpenAI artificial intelligence technology. But how will the digital assets behave in the next few years? Let's predict the future price of WLD together. The 2025 WLD price forecast is expected to achieve significant growth in WLD in 2025. Market analysis shows that the average WLD price may reach $1.31, with a maximum of $1.36. However, in a bear market, the price may fall to around $0.55. This growth expectation is mainly due to WorldCoin2.


