How to lock a Microsoft Word document to prevent editing
If you don't lock and protect your Word document, the chances of someone else opening your Word document and overwriting it are very high. Well, one way to make sure no one else is editing your Word document is to print it out. But to be sure, this option is not always practical since it involves physical copies. Another option is to convert your Word document to PDF and then share the PDF. But there are PDF editors available, and editing PDFs is easy.
So are there any other solutions? How do you lock your document and set a password so that anyone who wants to edit your document must enter this password? Sound cool? So, read on.
How to Lock and Protect a Microsoft Word Document
Step 1: First, open the Word document you want to lock and protect in Microsoft Word.
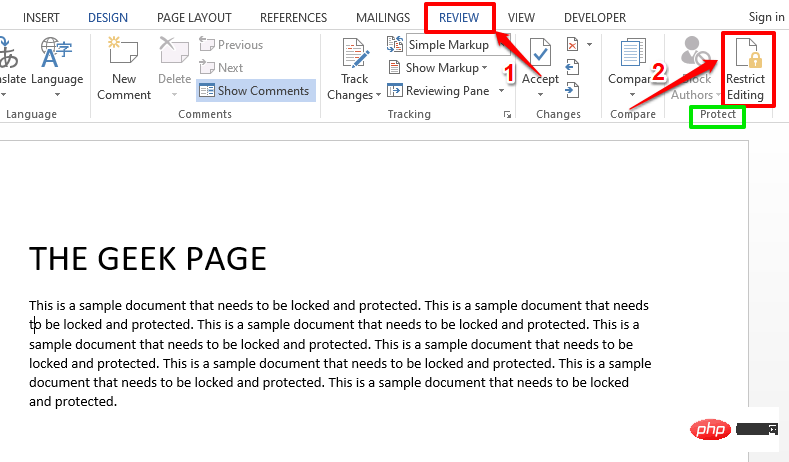
Now, click on the "Review" tab at the top. Then click the "Restrict Editing" button in the "Protect" section.
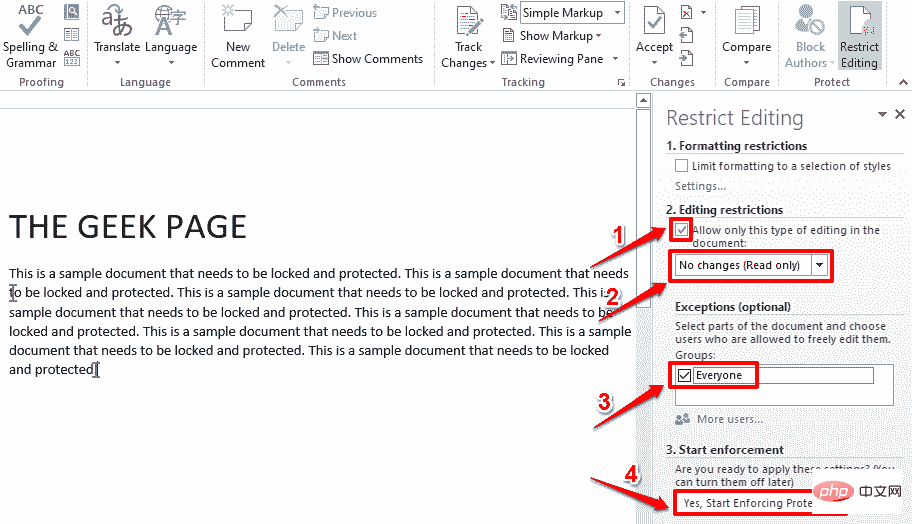
Step 2: When the Restrict Editing option is turned on, do the following:
- Under the Editing Limitations section, select the checkbox corresponding to Allow only this type of editing in the document. Under the same section itself, select
- No changes (read-only) from the associated drop-down menu. Now, under the
- Exceptions (optional) heading, select the checkbox corresponding to Everyone. Finally, under the " Start execution
- " section, click the "Yes, start execution of protection" button.
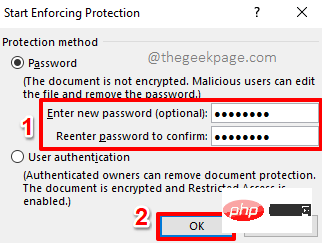
: You can now see a window called Start Enforcing Protection. Under the Password section, you must provide a password to protect your document and then confirm the password by re-entering it. If you want to unlock your document later, you will need this password. If you think you'll forget your password, write it down somewhere. After entering the password, click the
Confirmbutton.
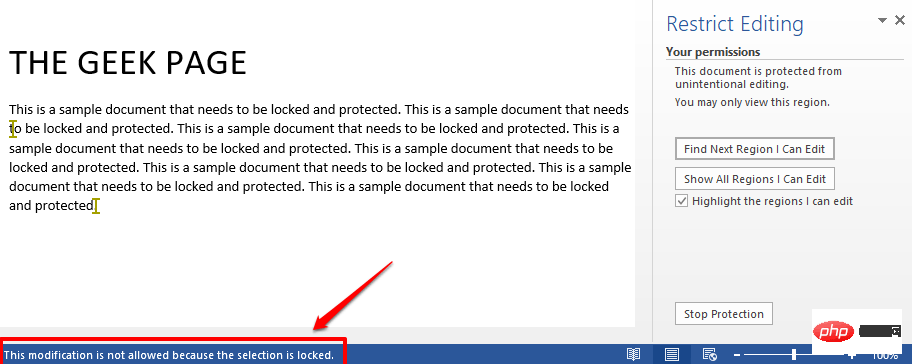
: That’s it. Your document is now protected. If you try to edit your document now, at the bottom of the window you will receive a message stating This modification is not allowed because the selection is locked.
 How to Unlock a Protected Microsoft Word Document
So no one can edit your document anymore. But what if you yourself want to edit the document at some point in the future? Well, let's see how to do this.
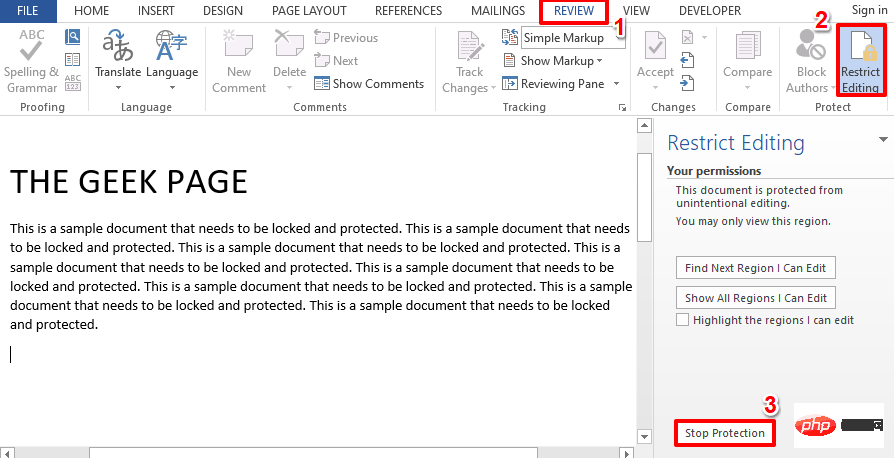
Step 1: Open the protected document and click the Review tab at the top. Next, click the "Restrict Editing" button. Under the
Restrict Editingoption, you will be able to see a button called Stop Protection. click it.
 Step 2
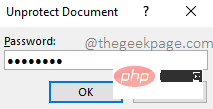
used when locking the document in Section 1. Enter the password and click the OK button.
 Step 3
The above is the detailed content of How to lock a Microsoft Word document to prevent editing. For more information, please follow other related articles on the PHP Chinese website!

Hot AI Tools

Undresser.AI Undress
AI-powered app for creating realistic nude photos

AI Clothes Remover
Online AI tool for removing clothes from photos.

Undress AI Tool
Undress images for free

Clothoff.io
AI clothes remover

AI Hentai Generator
Generate AI Hentai for free.

Hot Article

Hot Tools

Notepad++7.3.1
Easy-to-use and free code editor

SublimeText3 Chinese version
Chinese version, very easy to use

Zend Studio 13.0.1
Powerful PHP integrated development environment

Dreamweaver CS6
Visual web development tools

SublimeText3 Mac version
God-level code editing software (SublimeText3)

Hot Topics
 Insufficient memory or disk space to repagin or print this document Word error
Feb 19, 2024 pm 07:15 PM
This article will introduce how to solve the problem of insufficient memory or disk space to repage or print the document in Microsoft Word. This error usually occurs when users try to print a Word document. If you encounter a similar error, please refer to the suggestions provided in this article to resolve it. Insufficient memory or disk space to repage or print this document Word error How to resolve the Microsoft Word printing error "There is not enough memory or disk space to repage or print the document." Update Microsoft Office Close memory-hogging applications Change your default printer Start Word in safe mode Rename the NorMal.dotm file Save the Word file as another
 How to add redline to Word document
Mar 01, 2024 am 09:40 AM
It is 395 words, which is 495. This article will show you how to add red lines in Word documents. Redlining a document refers to making modifications to the document so that users can clearly see the changes. This feature is very important when multiple people are editing a document together. What redline means Marking a document Redlining means using red lines or callouts to indicate changes, edits, or revisions to a document. The term was inspired by the practice of using a red pen to mark printed documents. Redline comments are widely used in different scenarios, such as clearly showing recommended changes to authors, editors, and reviewers when editing a document. Propose changes and modifications in legal agreements or contracts Provide constructive criticism and suggestions on papers, presentations, etc. How to give W
 Can't open hyperlink in word document
Feb 18, 2024 pm 06:10 PM
In recent years, with the continuous development of network technology, our lives are inseparable from various digital tools and the Internet. When processing documents, especially in writing, we often use word documents. However, sometimes we may encounter a difficult problem, that is, the hyperlink in the word document cannot be opened. This issue will be discussed below. First of all, we need to make it clear that hyperlinks refer to links added in word documents to other documents, web pages, directories, bookmarks, etc. When we click on these links, I
 Learn the os.Stdout.Write function in the Go language documentation to implement standard output
Nov 03, 2023 pm 03:48 PM
Learn the os.Stdout.Write function in the Go language documentation to implement standard output. In the Go language, standard output is implemented through os.Stdout. os.Stdout is a variable of type *os.File, which represents the standard output device. In order to output content to standard output, you can use the os.Stdout.Write function. This article will introduce how to use the os.Stdout.Write function to implement standard output and provide specific code examples. os.
 Word document is blank when opening on Windows 11/10
Mar 11, 2024 am 09:34 AM
When you encounter a blank page issue when opening a Word document on a Windows 11/10 computer, you may need to perform repairs to resolve the situation. There are various sources of this problem, one of the most common being a corrupted document itself. Furthermore, corruption of Office files may also lead to similar situations. Therefore, the fixes provided in this article may be helpful to you. You can try to use some tools to repair the damaged Word document, or try to convert the document to another format and reopen it. In addition, checking whether the Office software in the system needs to be updated is also a way to solve this problem. By following these simple steps, you may be able to fix Word document blank when opening Word document on Win
 How to restore the deleted hosts file
Feb 22, 2024 pm 10:48 PM
Title: How to restore the hosts file after deletion Summary: The hosts file is a very important file in the operating system and is used to map domain names to IP addresses. If you accidentally delete the hosts file, you may be unable to access certain websites or have other network problems. This article will introduce how to recover accidentally deleted hosts file in Windows and Mac operating systems. Text: 1. Restore hosts file in Windows operating system. Hosts file in Windows operating system
 How to edit documents in Tencent Docs? -Tencent Document Editing Document Tutorial Guide
Mar 19, 2024 am 08:19 AM
Does anyone know how to edit documents in Tencent Docs? It doesn't matter if you don't know. Today, the editor will introduce detailed graphic explanations on how to edit documents in Tencent Docs. I hope it can help you. Detailed graphic explanation of editing documents in Tencent Documents 1. First, enter Tencent Documents directly (if you don’t have it, download it now!) and log in directly (QQ and TIM two login methods are supported) 2. After logging in, click Add in the upper right corner No., directly create online documents, online forms, new folders, etc.! 3. Then enter the information according to your needs!
 What to do if word document cannot be edited
Mar 19, 2024 pm 09:37 PM
After editing the document, we will save the document to provide convenience for editing and modifying the document next time. Sometimes we can modify it directly after clicking on the edited document, but sometimes for some unknown reason, there is no response no matter how we click on the word document, and the command will not be executed. , what should I do if the word document cannot be edited? Don’t worry, the editor will help you solve this problem. Let’s take a look at the operation process. After opening a Word document, when editing text, you will see a "Restrict Editing" prompt displayed on the right side of the page, as shown in the figure below. 2. You need to cancel editing and you need to know the set password. Click "Stop Protection" below the pop-up prompt, as shown in the figure below. 3. Then enter the password in the "Unprotect Document" dialog box and click OK, as shown in the figure below.


