4 confirmation prompts for installing Windows 11 on an unsupported CPU
Since its release in late 2021, this Windows operating system has shown the world many desirable features. For the first time in a long time, Microsoft is shocking the world with a brand new UI.
No wonder many people don’t even mind installing Windows 11 on an unsupported processor.
Users realize that they cannot upgrade to the latest Windows operating system on their PC because the PC they are getting does not currently meet the Windows 11 system requirements or the processor is not currently supported by Windows 11.
The good news, however, is that there's a Microsoft-approved hack that should make it even better in no time. This hack enables you to bypass processor checks.
Keep reading to learn how to install Windows 11 on unsupported hardware.
Minimum System Requirements for Windows 11
If you are wondering what the minimum system requirements are for Windows 11, check out the following list:
- Processor: You The computer processor should be 1 GHz or faster with two or more cores on a compatible 64-bit processor or System on a Chip (SoC)
- RAM: The RAM size of the PC should be 4 GB or Larger
- Storage: Installing this Windows requires 64 GB* or more storage space
- You should note that downloading updates and enabling certain features may require additional storage space
- Graphics Card: Should be compatible with DirectX 12 or higher, with WDDM 2.0 driver
- System Firmware: UEFI, supports Secure Boot
- TPM: Trusted Platform Module (TPM) version 2.0
- Monitor: High-definition (720p) monitor, 9-inch or larger, 8 bits per color channel
We also have an article detailing Windows 11 technical specifications, More relevant information may be provided.
But if you're interested in finding out how to install Windows 11 on an unsupported PC, we'll show you how. We break down the entire process from start to finish into simple steps.
How to install Windows 11 on an unsupported CPU?
Notes Before you start installing Windows 11 on an unsupported computer, we recommend that you back up important data. AOMEI Backupper is a great solution; it will keep your system safe and prevent data loss.1. Download Windows 11 ISO
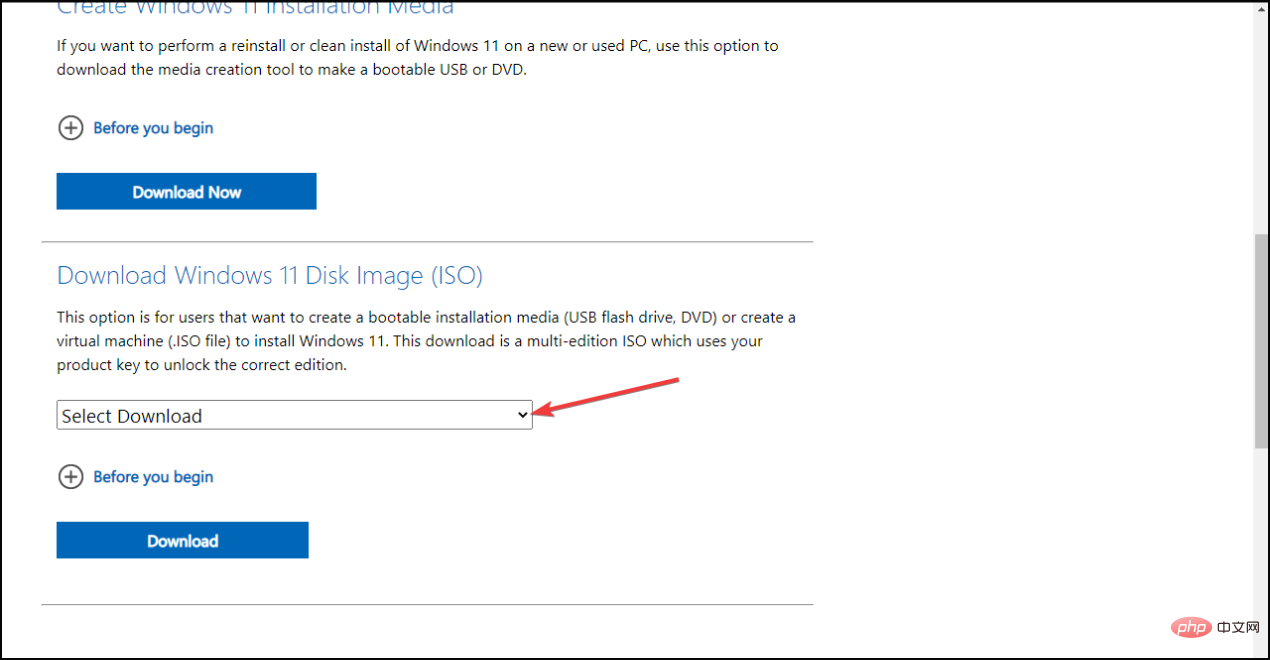
- Download Windows 11 Disk Image (ISO ).
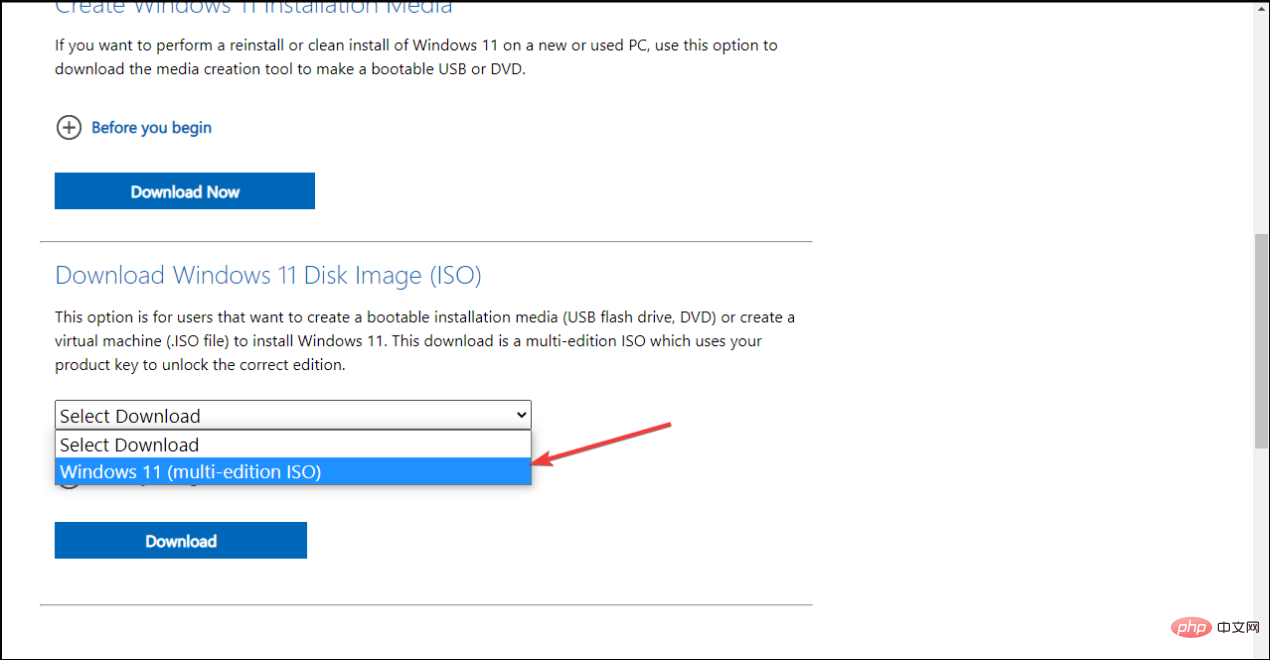
- Open the Select Download drop-down menu.

- Select Windows 11.

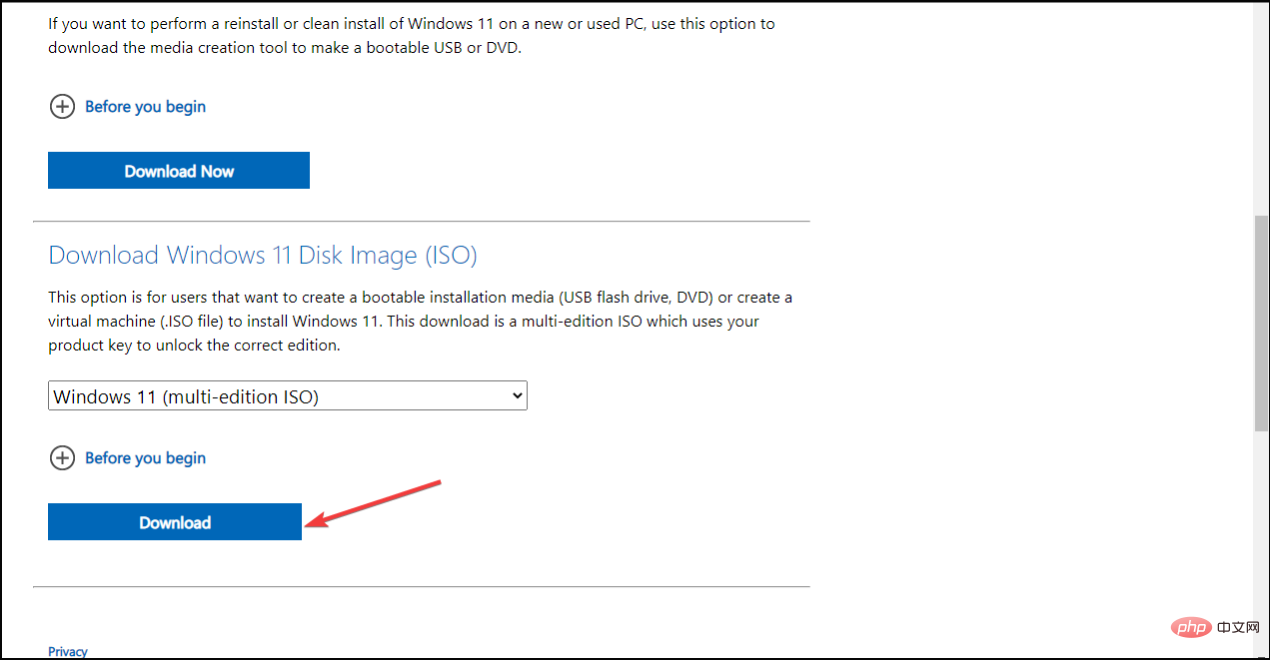
- Click the Download button.

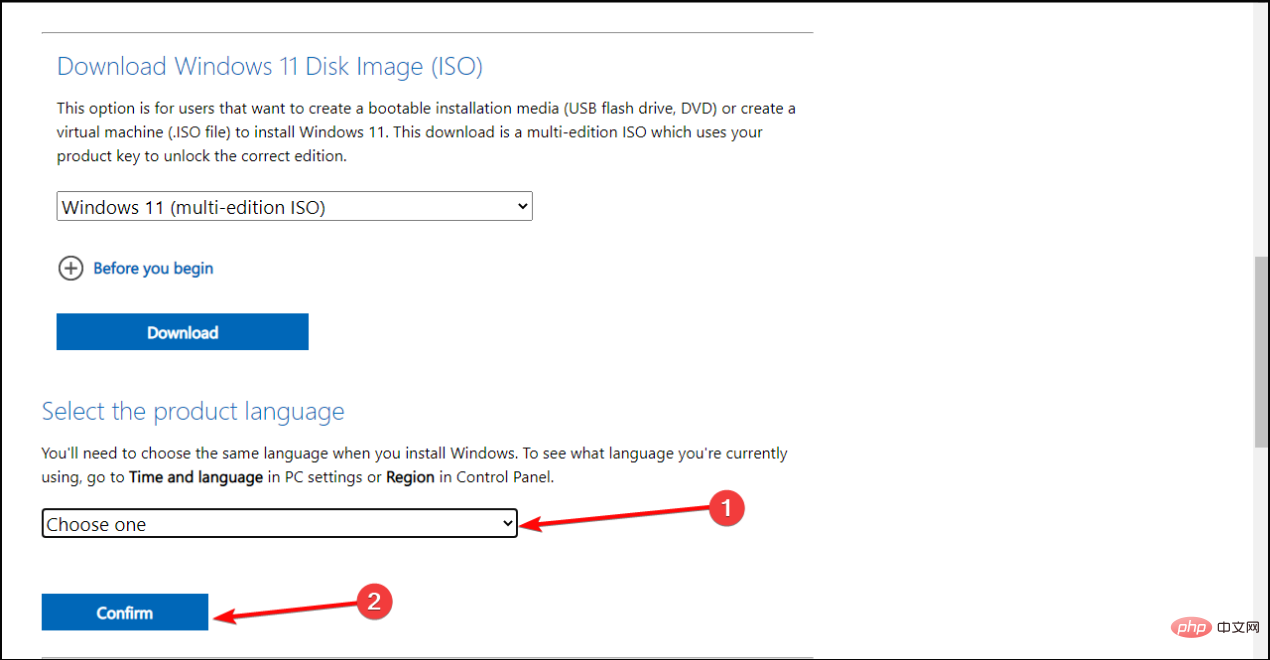
- Click to select a drop-down menu and select your product language, then click Confirm.

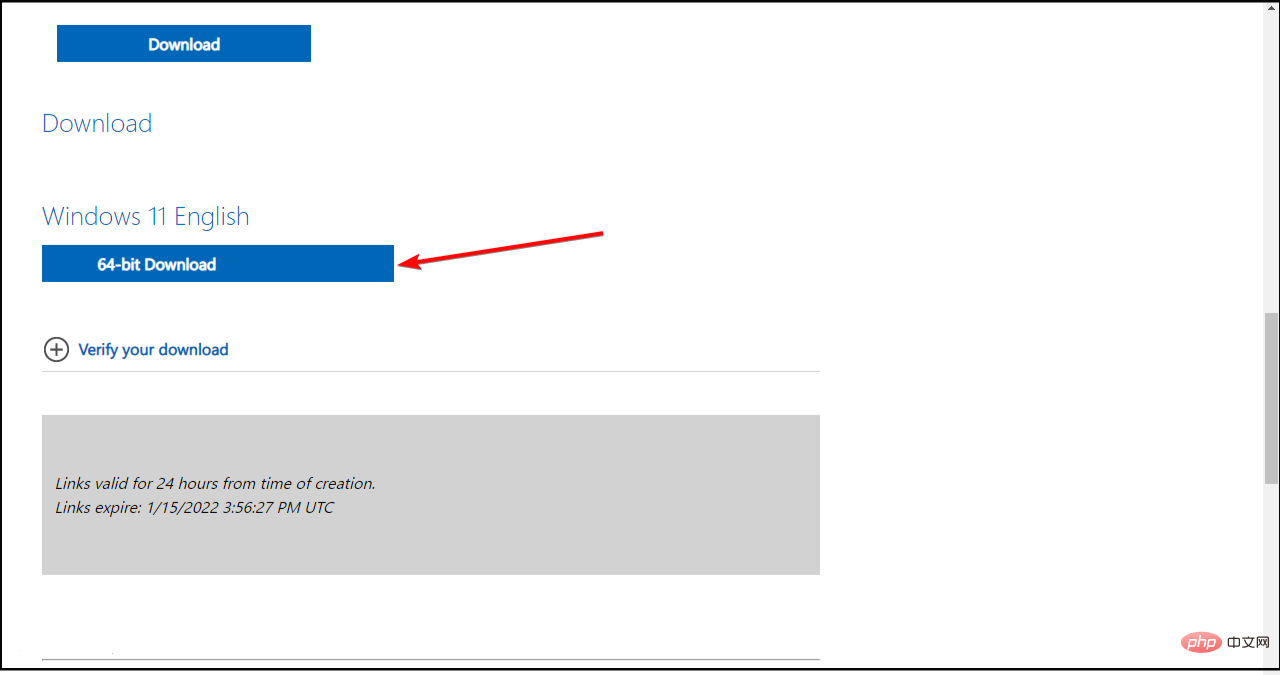
- Click 64-bit download.

Your browser should start downloading the image (should be around 5.1GB). While the download is in progress, you can continue to the next step.
2. Bypass the CPU check by editing the Windows registry
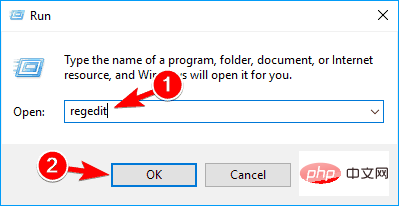
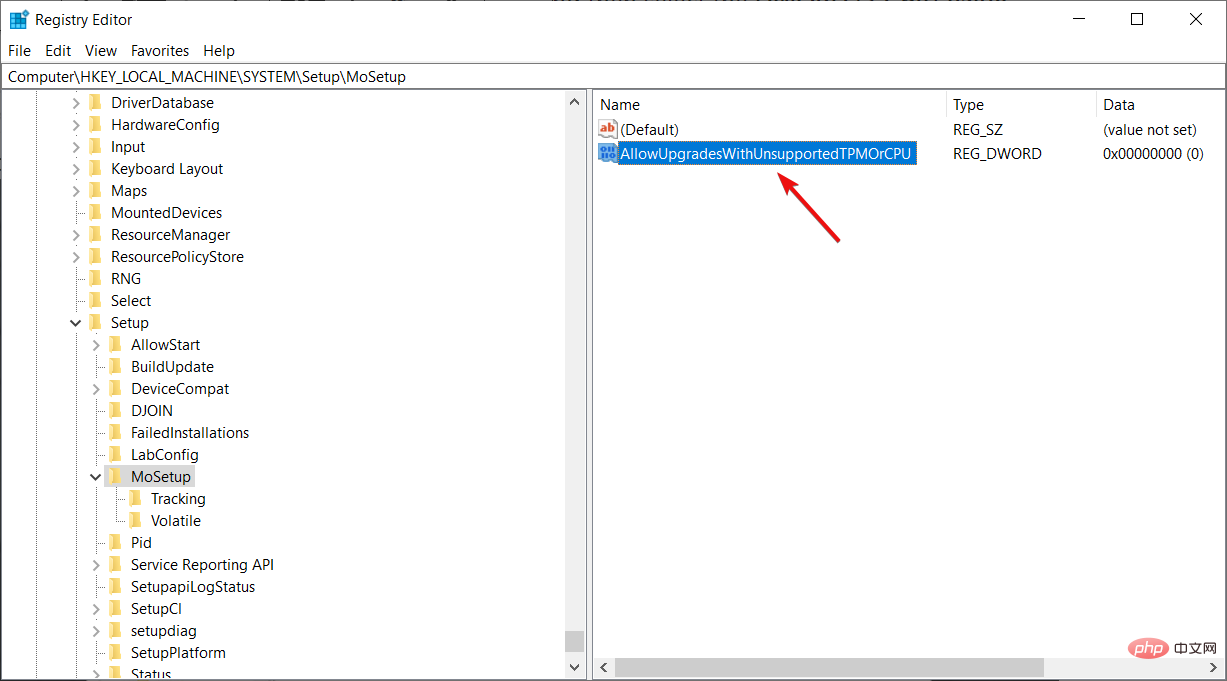
- Press the Windows R key to start Run , type regedit, and click OK, or press Enter to start the Registry Editor.

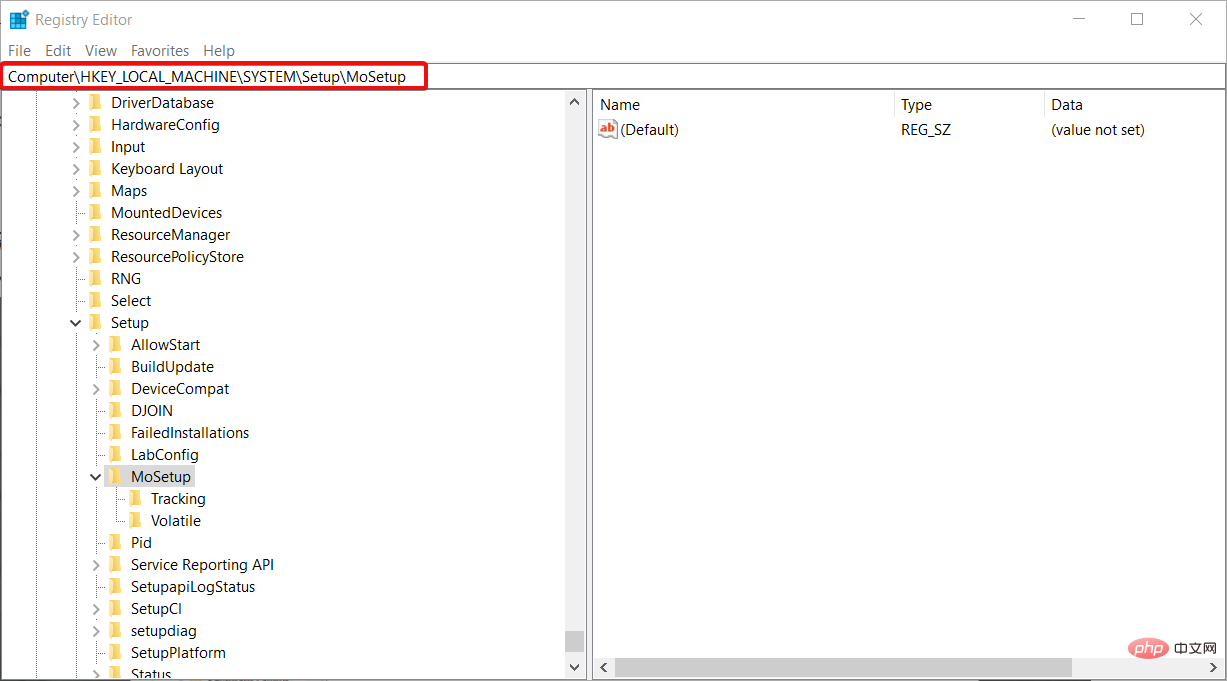
- Navigate to the following path:
<strong>HKEY_LOCAL_MACHINE\SYSTEM\Setup\MoSetup</strong>
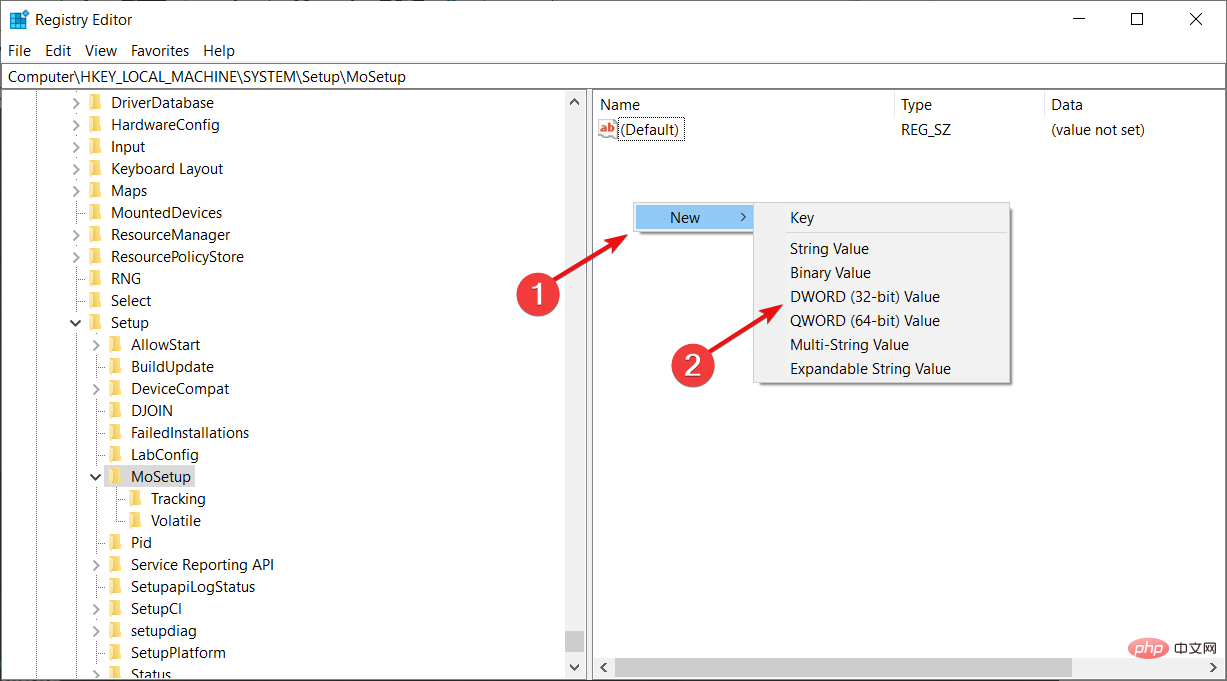
- In the right pane, you can Right-click and select New, then select DWORD (32-bit) Value.

- After creating the value, you can rename it to AllowUpgradesWithUnsupportedTPMOrCPU.

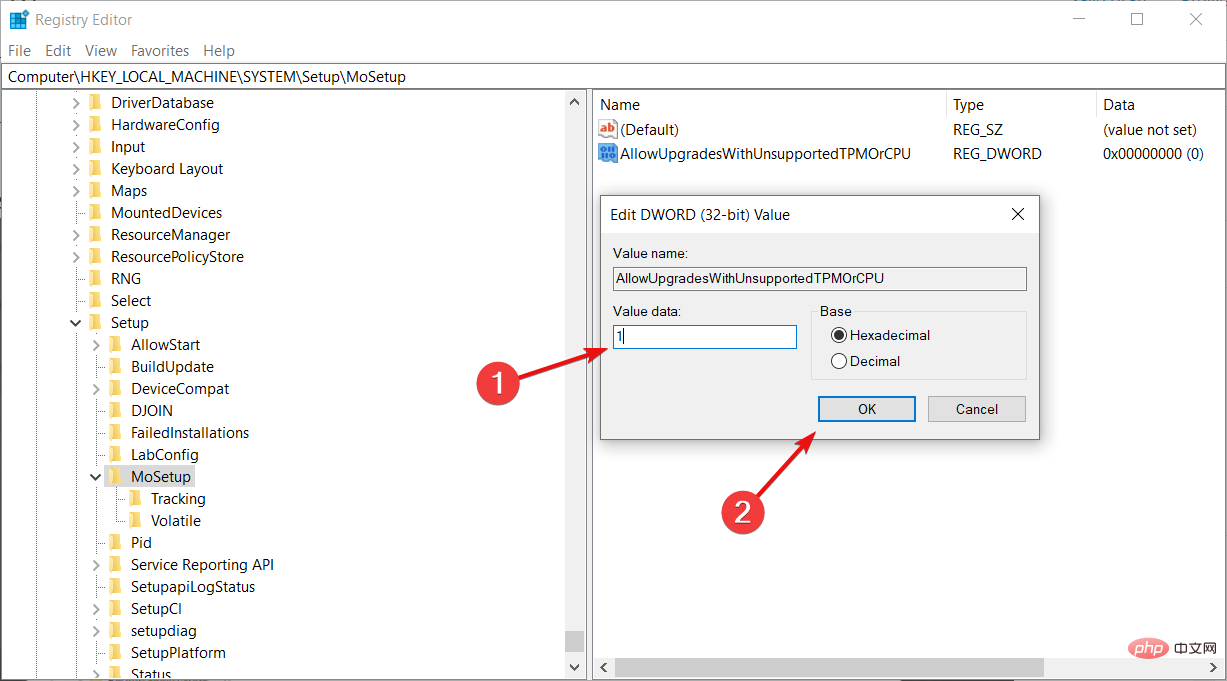
- You can now double-click this new value and enter 1 in the Value Data field. Click OK and close Registry Editor.

Once you restart your PC and go for the next solution, the system will ignore any shortcomings about your CPU, even TPM 2.0 requirements.
3. Install Windows 11 from ISO image
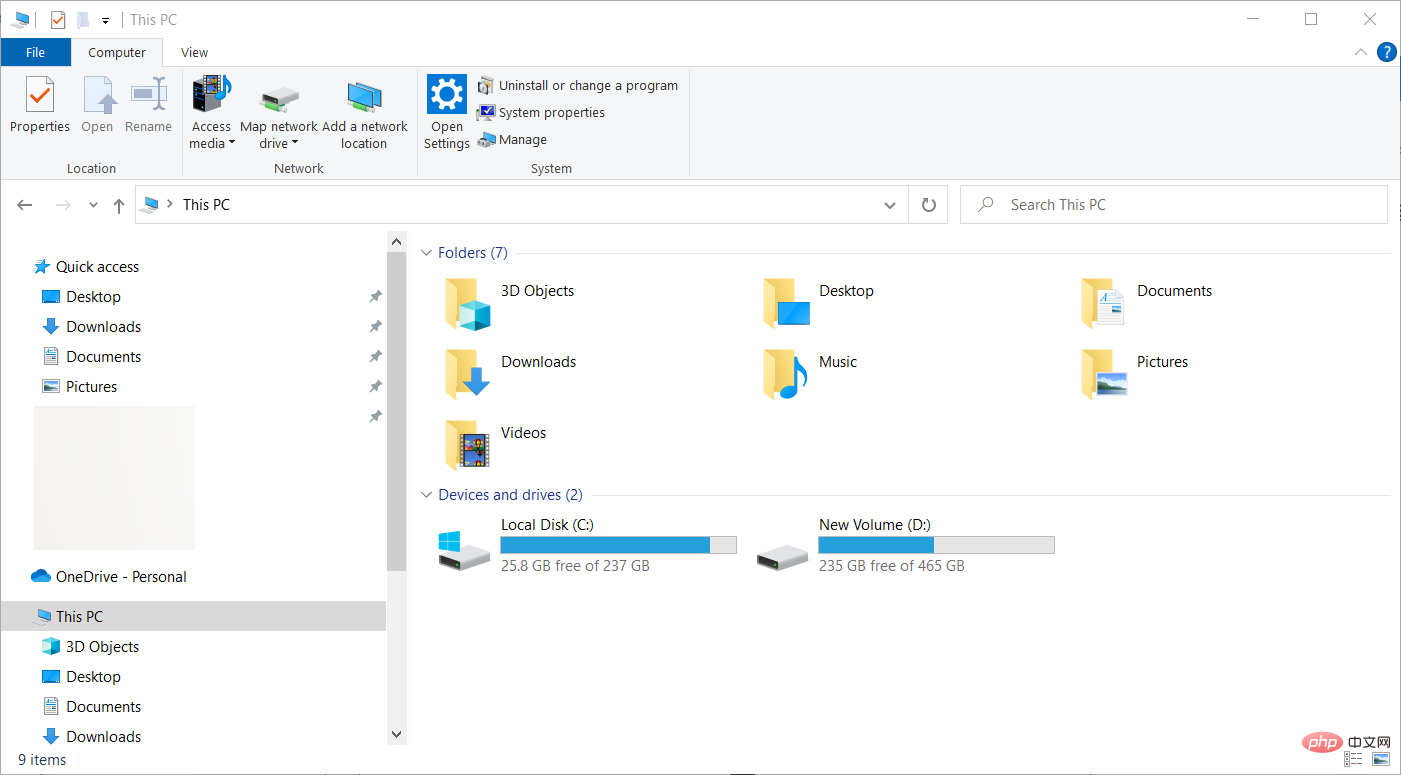
- After the ISO download is complete, press the Windows E key to start File Explorer.

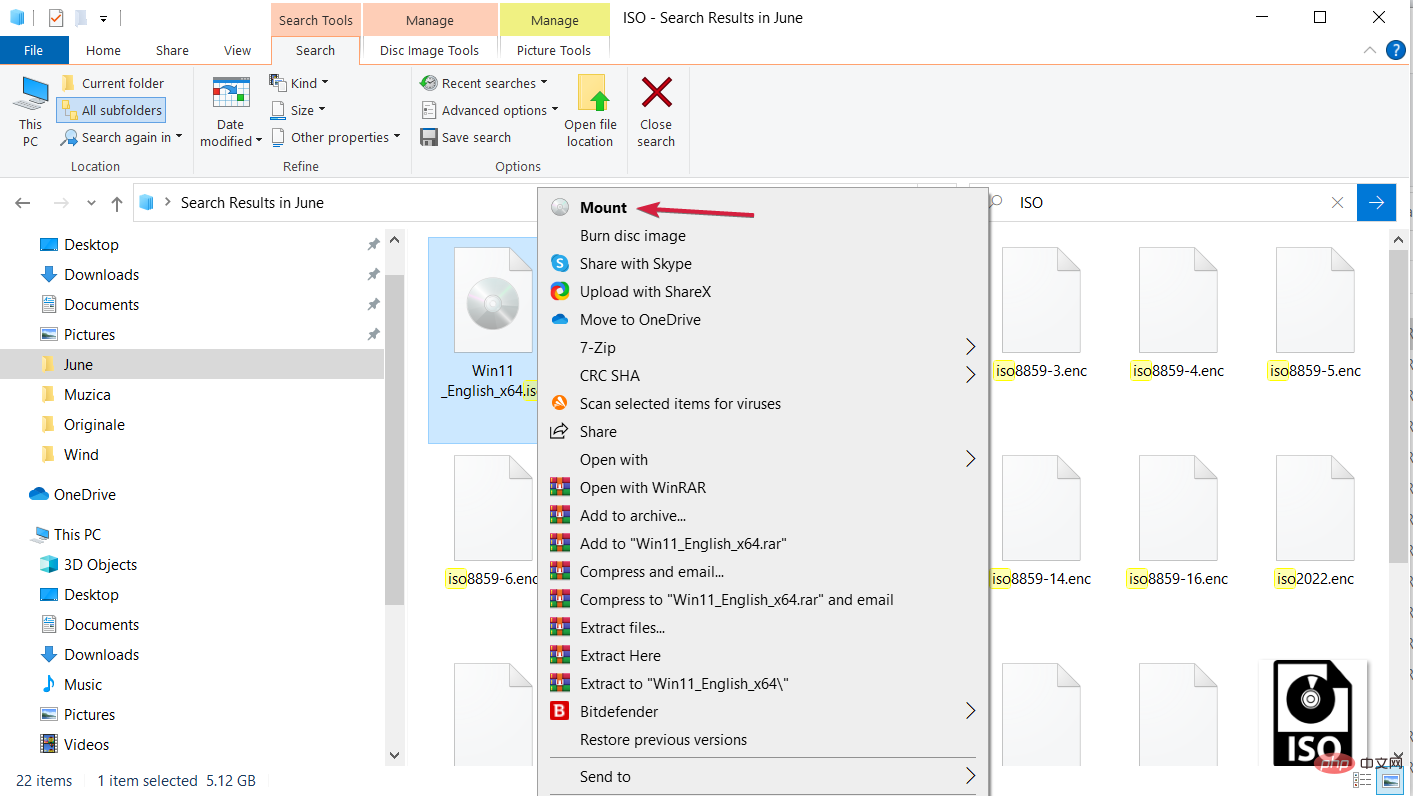
- Find the ISO, right-click it and select Mount.

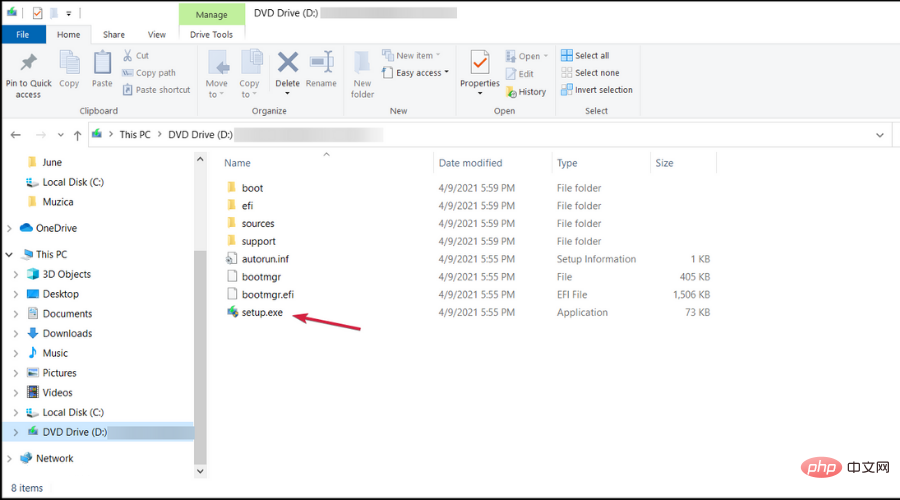
- A new virtual drive will appear on your PC. Access it and double-click the setup.exe file to start the installation process.

After installation, you should see a warning message instead of a rejection message. This message comes with an option to install Windows 11 without losing data.
Again, we must reiterate, back up your important data before starting the entire process.
4. Install Windows 11 from a USB drive
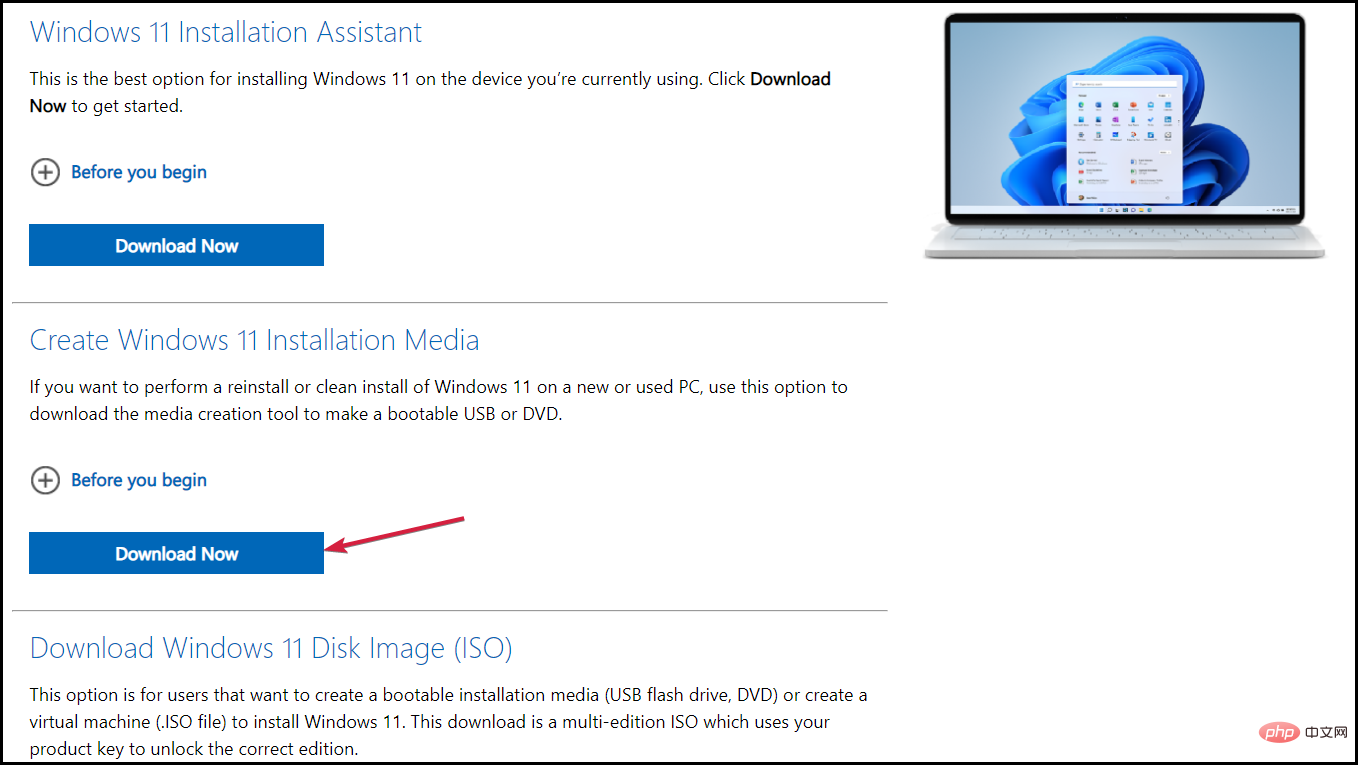
Notes If you boot from a Windows 11 USB drive, it will clean-install the operating system, but the process will still pass the CPU check. Therefore, you can only run the setup from a USB drive while the system is running and after performing the registry tweaks in Solution 2.- Download Windows 11 Media Creation Tool.

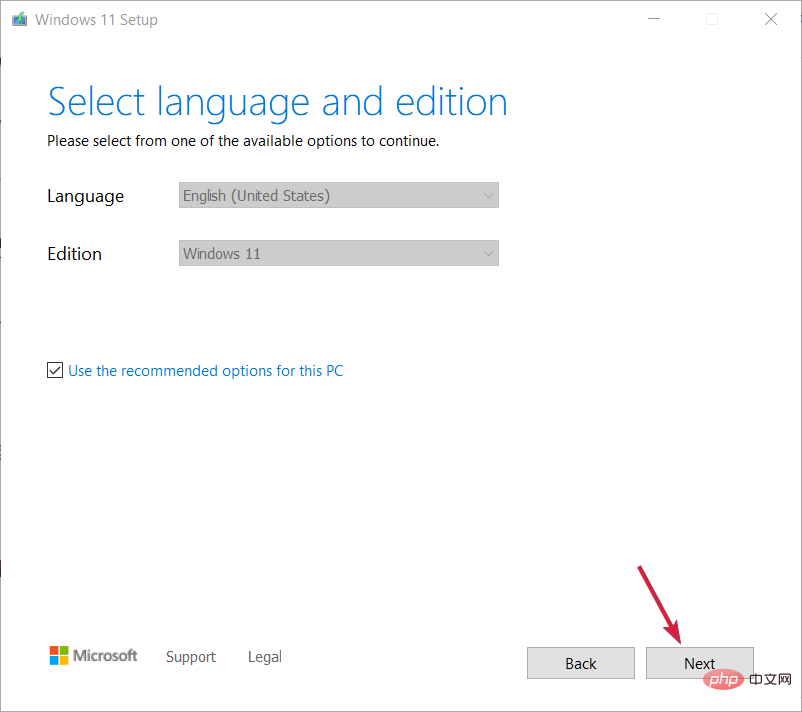
- Run the installer, accept the terms, then select the language and version of your operating system, then click Next.

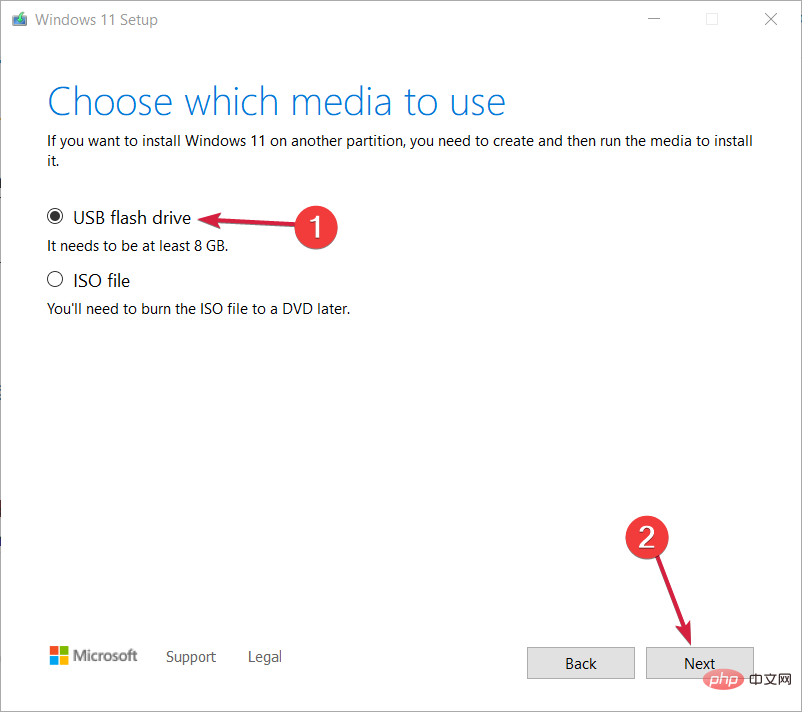
- Check the USB Flash Drive box and select Next.

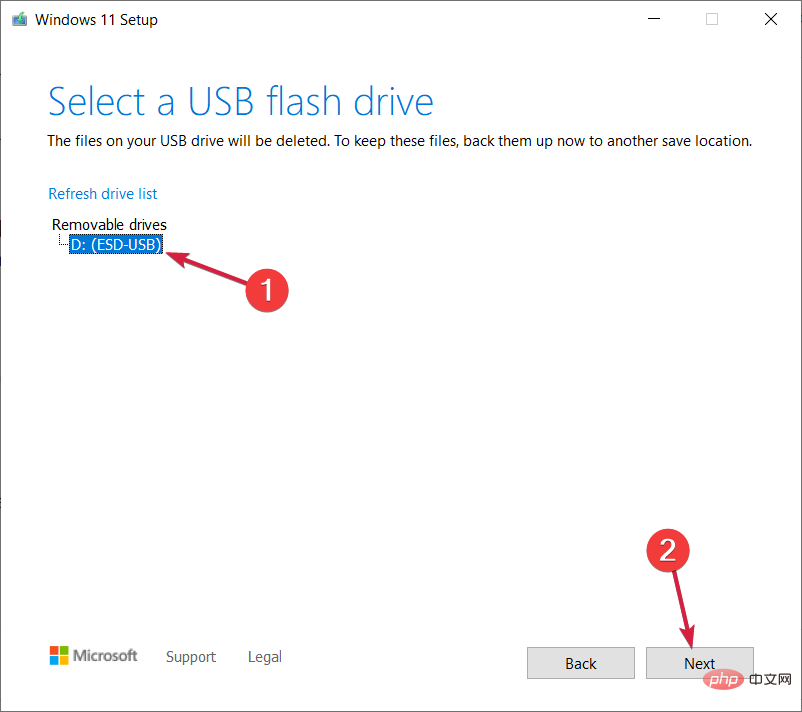
- Make sure you have connected the USB flash media to your PC, select it from the list and click Next.

- Also, make sure you have an Internet connection as the application will download the Windows 11 package and create a bootable version. Once the process is complete, click the Complete button.
- Now, all you need to do is launch File Explorer by pressing the Windows E key, access the Windows 11 USB bootable drive and double-click to install The file installation begins.
As we mentioned in the comments above, it is possible to install Windows 11 on unsupported CPUs via USB, as you can see above.
However, this step can only be performed after you modify the registry as described in the second solution of this tutorial.
This is because if you boot from a newly created bootable flash media, the system will check the CPU and will not verify the installation.
Another way to install Windows 11 on an unsupported CPU is to use Rufus, a tool that allows you to install images that will also pass TPM and Secure Boot checks.
Should you upgrade an unsupported CPU?
Let’s be clear about this. If you're still undecided whether you really want to go through the process of installing Windows 11 on an unsupported laptop, we recommend that you don't do it.
This is because Microsoft warns that the tendency for errors to occur is high. They also warned that they may eventually stop providing security updates to unsupported PCs running this operating system.
So if you don't have the above requirements, upgrading to a new operating system may not be ideal. However, if you don't mind a little lag here and there, feel free to follow the steps we've provided above.
To avoid any issues, you can also install Windows 11 on a virtual machine and test it thoroughly before loading it on your host computer.
It's important to note that these steps are intended to show you how to install Windows 11 on an unsupported processor. These steps simply cause Windows to ignore CPU requirements.
If you are still having problems installing this latest operating system, then you can check out our article on how to install Windows 11 without a TPM.
As you probably know, another important requirement for installing Windows 11 is for your PC to support a feature called Secure Boot.
The above is the detailed content of 4 confirmation prompts for installing Windows 11 on an unsupported CPU. For more information, please follow other related articles on the PHP Chinese website!

Hot AI Tools

Undresser.AI Undress
AI-powered app for creating realistic nude photos

AI Clothes Remover
Online AI tool for removing clothes from photos.

Undress AI Tool
Undress images for free

Clothoff.io
AI clothes remover

AI Hentai Generator
Generate AI Hentai for free.

Hot Article

Hot Tools

Notepad++7.3.1
Easy-to-use and free code editor

SublimeText3 Chinese version
Chinese version, very easy to use

Zend Studio 13.0.1
Powerful PHP integrated development environment

Dreamweaver CS6
Visual web development tools

SublimeText3 Mac version
God-level code editing software (SublimeText3)

Hot Topics
 1378
1378
 52
52
 What should the CPU utilization be when gaming?
Feb 19, 2024 am 11:21 AM
It's common for games to slow down your computer because they consume a lot of resources. It's crucial to understand your CPU usage when gaming so you can avoid overloading it. Therefore, keeping track of appropriate CPU usage is key to keeping your gaming experience smooth. In this article, we'll look at the appropriate CPU usage you should achieve while your game is running. CPU utilization during gaming CPU utilization is an important indicator of processor workload and depends on the performance specifications of the CPU. More powerful CPUs generally have higher usage. A CPU with more cores and threads can improve the overall performance of your system. Multi-threading support helps unleash the full potential of your CPU. In games, CPU usage depends on processor utilization, which can affect the game
 How to set CPU performance to full in Win11
Feb 19, 2024 pm 07:42 PM
Many users find that the computer is not running smoothly enough when using the Win11 system. They want to improve CPU performance, but they don't know how to do it. The following will introduce in detail how to set the CPU performance to the highest level in Win11 system to make your computer more efficient. Setting method: 1. Right-click "This PC" on the desktop and select "Properties" in the option list. 2. After entering the new interface, click "Advanced System Settings" in "Related Links". 3. In the window that opens, click the "Advanced" tab at the top, then click the & at the bottom of "Performance"
 How to undervolt and overclock your CPU using Intel XTU
Feb 19, 2024 am 11:06 AM
Intel XTU is a powerful application that allows you to easily manage your computer's performance. You can fix overheating issues by adjusting the CPU voltage, or boost performance by overclocking. In this article, we'll look at how you can take advantage of Intel XTU to optimize your computer's performance, whether that's adjusting voltage or overclocking. What effect do undervolting and overclocking have on the CPU? Before we move on to learning how to undervolt and overclock a CPU, we first have to understand what they are. Undervolting refers to gradually reducing the voltage required by the CPU. This process helps reduce heat emissions, as high voltage results in higher temperatures. By reducing the voltage supply to the CPU, the temperature can be effectively reduced. If your laptop starts to slow down after getting hot, you should solve the problem promptly.
 The difference between boxed and bulk cpu
Jan 23, 2024 am 09:46 AM
The differences between boxed and bulk CPUs: 1. Quality; 2. Warranty period; 3. Fan; 4. Price; 5. Packaging; 6. Sales channels. Detailed introduction: 1. Quality, whether it is boxed or bulk, there is no difference in the quality of the CPU itself. They are all manufactured by the same manufacturer and undergo the same quality testing and quality control process; 2. Warranty period, boxed CPU A longer warranty period is usually provided, usually three years, while bulk CPUs usually only have a one-year warranty, this is because boxed CPUs are usually sold by official or authorized dealers, etc.
 How to increase the clock frequency of your computer's CPU
Feb 20, 2024 am 09:54 AM
How to Overclock Computer CPUs With the continuous advancement of technology, people's demand for computer performance is also getting higher and higher. An effective way to improve computer performance is to increase the CPU's operating frequency through overclocking. Overclocking allows the CPU to process data faster, providing higher computing power. So, how to overclock a computer CPU? The following will introduce you to the basic principles and specific operation methods of overclocking. First, let's understand how overclocking works. The operating frequency of the CPU is determined by the crystal oscillator on the motherboard
 144-core, 3D-stacked SRAM: Fujitsu details next-generation data center processor MONAKA
Jul 29, 2024 am 11:40 AM
According to news from this website on July 28, foreign media TechRader reported that Fujitsu introduced in detail the FUJITSU-MONAKA (hereinafter referred to as MONAKA) processor planned to be shipped in 2027. MONAKACPU is based on the "cloud native 3D many-core" architecture and adopts the Arm instruction set. It is oriented to the data center, edge and telecommunications fields. It is suitable for AI computing and can realize mainframe-level RAS1. Fujitsu said that MONAKA will achieve a leap in energy efficiency and performance: thanks to technologies such as ultra-low voltage (ULV) technology, the CPU can achieve 2 times the energy efficiency of competing products in 2027, and cooling does not require water cooling; in addition, the application performance of the processor It can also reach twice as much as your opponent. In terms of instructions, MONAKA is equipped with vector
 The operation process of WIN10 service host occupying too much CPU
Mar 27, 2024 pm 02:41 PM
1. First, we right-click the blank space of the taskbar and select the [Task Manager] option, or right-click the start logo, and then select the [Task Manager] option. 2. In the opened Task Manager interface, we click the [Services] tab on the far right. 3. In the opened [Service] tab, click the [Open Service] option below. 4. In the [Services] window that opens, right-click the [InternetConnectionSharing(ICS)] service, and then select the [Properties] option. 5. In the properties window that opens, change [Open with] to [Disabled], click [Apply] and then click [OK]. 6. Click the start logo, then click the shutdown button, select [Restart], and complete the computer restart.
 Leak reveals key specs of Intel Arrow Lake-U, -H, -HX and -S
Jun 15, 2024 pm 09:49 PM
IntelArrowLakeisexpectedtobebasedonthesameprocessorarchitectureasLunarLake,meaningthatIntel'sbrandnewLionCoveperformancecoreswillbecombinedwiththeeconomicalSkymontefficiencycores.WhileLunarLakeisonlyavailableasava


