

How to remove author and last modified information in Microsoft Word

Microsoft Word documents contain some metadata when saved. These details are used for identification on the document, such as when it was created, who the author was, date modified, etc. It also has other information such as number of characters, number of words, number of paragraphs, and more. If you might want to remove the author or last modified information or any other information so that other people don't know the values, then there is a way. In this article, let’s see how to remove a document’s author and last modified information.
Delete the author and last modified information in the Microsoft Word document
Step 1 –Go to the # where the last modified information needs to be changed. Location of ##Microsoft Document
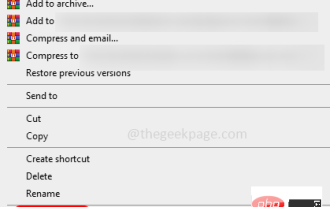
Step 2 –Right-click the document and click Properties from the list that appears

Step 3 – In the window that opens, go to the Details tab
Step 4 –At the bottom, click Remove Properties and Personal Information

Step 5 –Pass Click the radio button next to select the option to remove the following attributes from this file

Step 6 – Now, under the Sources section, select Author, Last Saved By, Manager by clicking the checkbox next to it ( a tick should be present)

Step 7 –ClickOK
Note: If you also want to select from other fields To delete the information, then you can also select and check the required fields
Step 8 –After clicking “OK”, you can observe that the values in the selected fields have been deleted.

Delete author and last modified information in Microsoft Word documents in batches
Step 1 – will All Word documents whose author and last modified information need to be deleted are placed in a folder
Step 2 – Open the folder and immediatelyselect the document. To do this press Press the Ctrl A keys together
Step 3 –Right-click on the selected document and click# from the list that appears ##Properties##Step 4 –
Follow the same steps mentioned in the above method [Step3 to Step 7] to complete.
The above is the detailed content of How to remove author and last modified information in Microsoft Word. For more information, please follow other related articles on the PHP Chinese website!

Hot AI Tools

Undresser.AI Undress
AI-powered app for creating realistic nude photos

AI Clothes Remover
Online AI tool for removing clothes from photos.

Undress AI Tool
Undress images for free

Clothoff.io
AI clothes remover

Video Face Swap
Swap faces in any video effortlessly with our completely free AI face swap tool!
Hot Article
Hot Tools

Notepad++7.3.1
Easy-to-use and free code editor

SublimeText3 Chinese version
Chinese version, very easy to use

Zend Studio 13.0.1
Powerful PHP integrated development environment

Dreamweaver CS6
Visual web development tools

SublimeText3 Mac version
God-level code editing software (SublimeText3)
Hot Topics
 1393
1393
 52
1209
24
52
1209
24

 How to remove author and last modified information in Microsoft Word
Apr 15, 2023 am 11:43 AM
How to remove author and last modified information in Microsoft Word
Apr 15, 2023 am 11:43 AM
Microsoft Word documents contain some metadata when saved. These details are used for identification on the document, such as when it was created, who the author was, date modified, etc. It also has other information such as number of characters, number of words, number of paragraphs, and more. If you might want to remove the author or last modified information or any other information so that other people don't know the values, then there is a way. In this article, let’s see how to remove a document’s author and last modified information. Remove author and last modified information from Microsoft Word document Step 1 – Go to
 How to write fractions in Microsoft Word
Apr 13, 2023 pm 02:04 PM
How to write fractions in Microsoft Word
Apr 13, 2023 pm 02:04 PM
We all know that Microsoft Word is very flexible and has many features. The most important thing is that we know how to make the most of what Microsoft Word has to offer. One of the amazing features is to insert a fractional value into your Word document. Fractions are used in many places. But when we insert a fraction into a Word document, it doesn't always format like a fraction. In this article, we explain how to easily insert well-formatted fractional numbers into a Microsoft Word document in some very simple steps. Read on to learn how to easily master this super handy Word trick. In Microsoft W
 How to make an image look transparent in Microsoft Word
May 29, 2023 pm 02:01 PM
How to make an image look transparent in Microsoft Word
May 29, 2023 pm 02:01 PM
Changing the transparency of an image or fading an image into the background can also be done using Microsoft Word. It lets you adjust color and transparency, apply background effects, and more. In this article, we will see how easy and simple it is to make an image transparent in Word. How to make an image look transparent Step 1: Open Microsoft Word and click on the Insert option at the top Step 2: Click on the Shape drop-down menu and select the shape of your choice. Here I'm going to select the rectangle. Step 3: Draw a rectangle to select an area on the word page, then right-click on it. Step 4: Click the "Fill" drop-down menu from the options that appear and select "Picture" to add an image. Step 5: Click Stock
 How to get the GPU in Windows 11 and check the graphics card details
Nov 07, 2023 am 11:21 AM
How to get the GPU in Windows 11 and check the graphics card details
Nov 07, 2023 am 11:21 AM
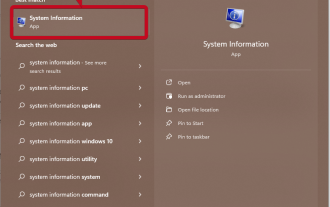
Using System Information Click Start and enter System Information. Just click on the program as shown in the image below. Here you can find most of the system information, and one thing you can find is graphics card information. In the System Information program, expand Components, and then click Show. Let the program gather all the necessary information and once it's ready, you can find the graphics card-specific name and other information on your system. Even if you have multiple graphics cards, you can find most content related to dedicated and integrated graphics cards connected to your computer from here. Using the Device Manager Windows 11 Just like most other versions of Windows, you can also find the graphics card on your computer from the Device Manager. Click Start and then
 How to share contact details with NameDrop: How-to guide for iOS 17
Sep 16, 2023 pm 06:09 PM
How to share contact details with NameDrop: How-to guide for iOS 17
Sep 16, 2023 pm 06:09 PM
In iOS 17, there's a new AirDrop feature that lets you exchange contact information with someone by touching two iPhones. It's called NameDrop, and here's how it works. Instead of entering a new person's number to call or text them, NameDrop allows you to simply place your iPhone near their iPhone to exchange contact details so they have your number. Putting the two devices together will automatically pop up the contact sharing interface. Clicking on the pop-up will display a person's contact information and their contact poster (you can customize and edit your own photos, also a new feature of iOS17). This screen also includes the option to "Receive Only" or share your own contact information in response.
 The single-view NeRF algorithm S^3-NeRF uses multi-illumination information to restore scene geometry and material information.
Apr 13, 2023 am 10:58 AM
The single-view NeRF algorithm S^3-NeRF uses multi-illumination information to restore scene geometry and material information.
Apr 13, 2023 am 10:58 AM
Current image 3D reconstruction work usually uses a multi-view stereo reconstruction method (Multi-view Stereo) that captures the target scene from multiple viewpoints (multi-view) under constant natural lighting conditions. However, these methods usually assume Lambertian surfaces and have difficulty recovering high-frequency details. Another approach to scene reconstruction is to utilize images captured from a fixed viewpoint but with different point lights. Photometric Stereo methods, for example, take this setup and use its shading information to reconstruct the surface details of non-Lambertian objects. However, existing single-view methods usually use normal map or depth map to represent the visible
 How to create user input prompts in Microsoft Word
Apr 14, 2023 pm 04:40 PM
How to create user input prompts in Microsoft Word
Apr 14, 2023 pm 04:40 PM
Let's say you have a requirement where you have to collect data from 50 people. You can send them a Word file and they can fill it out easily. But you need the formatting and alignment and everything else to be the same in all 50 documents. Well, if you gave the original Word file to these 50 people, instead of 50 identical documents, you would get 50 completely different documents, needless to say. So, is there a solution? Of course, you know we have a solution for you! Let’s talk templates! Word templates are the perfect solution for your tasks. By using a Word template, you can prompt users to enter some data when they open the template document. They can be provided by the user
 How NameDrop works on iPhone (and how to disable it)
Nov 30, 2023 am 11:53 AM
How NameDrop works on iPhone (and how to disable it)
Nov 30, 2023 am 11:53 AM
In iOS17, there is a new AirDrop feature that allows you to exchange contact information with someone by touching two iPhones at the same time. It's called NameDrop, and here's how it actually works. NameDrop eliminates the need to enter a new person's number to call or text them so they have your number, you can simply hold your iPhone close to their iPhone to exchange contact information. Putting the two devices together will automatically pop up the contact sharing interface. Clicking on the popup will display a person's contact information and their contact poster (a photo of your own that you can customize and edit, also new to iOS 17). This screen also includes "Receive Only" or share your own contact information in response