The requested pause, continue, or stop is not valid for this service
When the system faces any issue related to Internet connectivity, the user executes the command to flush DNS cache or stop DNS. Some other users also flush the DNS cache if the DNS cache gets corrupted or if there is any kind of DNS settings issue in the system.
Recently many Windows users have reported that when they try to execute the command to stop the DNS client service, it throws an error message that says "The requested pause, continue, or stop is not valid for this service." and the command was not executed.
Since they are unable to execute this command, the DNS related issues remain in the system without being resolved.
For some users, the refresh DNS cache command works perfectly. But after the recent Windows 11 upgrade and Windows 10 21H1 version, users are not allowed to stop the DNS client service using the command net stop dnscache.
In this article, we will show you how to resolve this issue so that users can stop the DNS client service.
How to check if the DNS client service is running
Here are the steps on how to check the DNS client service in Windows system.
Step 1: Press the Windows R key at the same time to open the Run command box.
Step 2: After opening the run command box, type services.msc in the text box, and then press the Enter key.
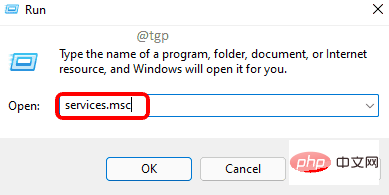
Step 3: This will open the Services application window on your system.
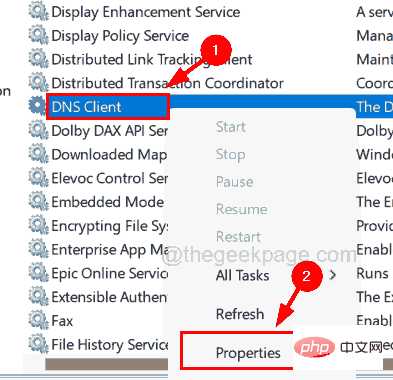
Step 4: In the Services window, find the service named DNS ClientService from the list of services as shown below.
Step 5: Right-click the DNSClient service and select Properties from the context menu.
Step 6: In the properties window, you can see that Startup type has been set to automatic, Startup and the Stop button is disabled.
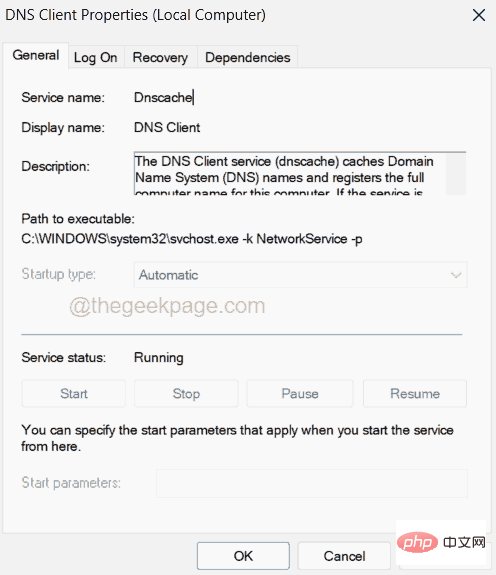
Step 7: This applies to all user accounts as well as administrator accounts in Windows 11,10 systems.
How to use Registry Editor to automatically clear DNS client cache
Before continuing with this method, you need to export the registry files on your system in case the registry file becomes corrupted while editing. It can be restored as registry files are very important for any system.
Please follow the steps below on how to edit the registry file to fix this issue.
Step 1: Press the Windows R keys simultaneously on your keyboard to open the Run box.
Step 2: Next, type regedit in the text box and press the Enter key.
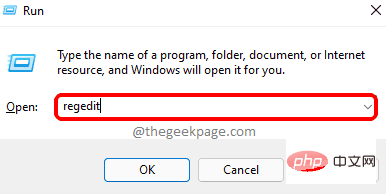
Step 3: Click Yes to accept the on-screen UAC prompt to continue.
Step 4: Once the Registry Editor window opens, clear its address bar.
Step 5: Copy and paste the following lines into the address bar and press Enter.
HKEY_LOCAL_MACHINE\SYSTEM\CurrentControlSet\Services\Dnscache\Parameters
Step 6: Once you reach the registry key parameters, select it in the left panel. Step 7 value
to create a new DWORD (32-bit) value as shown in the screenshot below.Step 8: Rename this DWORD value to MaxCacheTtl and
double-click to open its editing window. 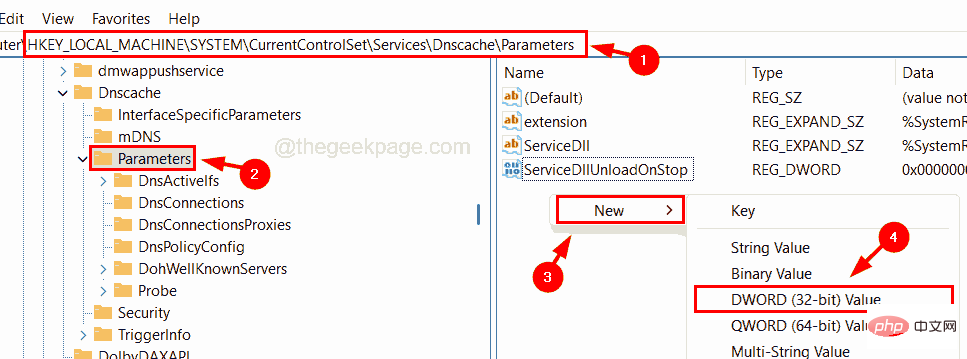
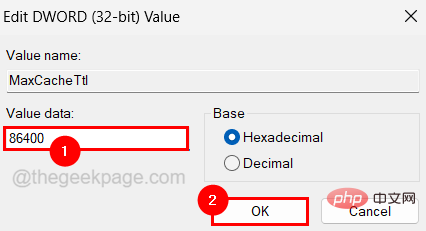
Step 9: Enter the value 86400 in the Value Data
text box and click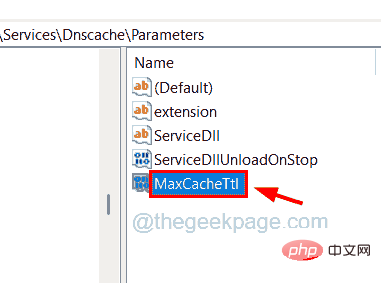 OK
OK
Step 10: Next, follow the instructions in Step 7 to create another DWORD value.
 Step 11: Rename the other newly created DWORD value to
Step 12: Right-click 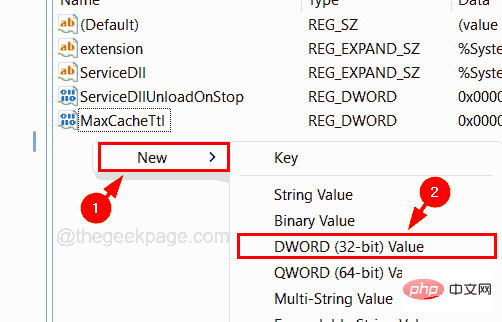 MaxNegativeCacheTtl
Modify from the menu.
Step 13: Enter 5 in its numerical data text box, and then click
OK to close the window . 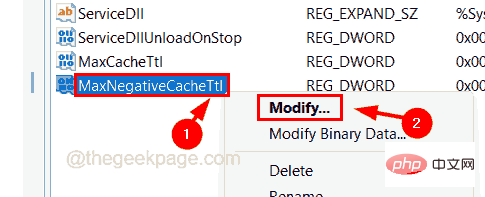
Step 14: Close the Registry Editor and restart the system once. Step 15: This should refresh the DNS cache every few hours.
Hopefully this article helped you understand this error and how to clear the DNS client cache yourself every few hours. You do not need to stop the DNS Client service which is disabled for all user accounts and administrators.
The above is the detailed content of The requested pause, continue, or stop is not valid for this service. For more information, please follow other related articles on the PHP Chinese website!

Hot AI Tools

Undresser.AI Undress
AI-powered app for creating realistic nude photos

AI Clothes Remover
Online AI tool for removing clothes from photos.

Undress AI Tool
Undress images for free

Clothoff.io
AI clothes remover

AI Hentai Generator
Generate AI Hentai for free.

Hot Article

Hot Tools

Notepad++7.3.1
Easy-to-use and free code editor

SublimeText3 Chinese version
Chinese version, very easy to use

Zend Studio 13.0.1
Powerful PHP integrated development environment

Dreamweaver CS6
Visual web development tools

SublimeText3 Mac version
God-level code editing software (SublimeText3)

Hot Topics
 What does Discord Do Not Disturb mean and how to use it?
Jun 03, 2023 pm 01:02 PM
If you have Discord Do Not Disturb enabled, you will not see any notifications on your app. This includes servers, group chats, and direct messages. Discord is a chat application that allows users to communicate through text, pictures, and video calls in games. It is designed to be a communication channel for gamers to chat and coordinate with each other in real time. DND settings allow you to disable all incoming messages you don't want to see. This is useful if you don't want to be disturbed by any messages while you are working. Additionally, you can also try the best Discord bots that can help you manage your guild while you are away. If you're wondering what Discord Do Not Disturb means and how to use it, this tutorial should help. D
 Error code 22: How to fix graphics device driver Try updating graphics driver or clearing CMOS
May 19, 2023 pm 01:43 PM
What does graphics device error code 22 mean and what causes it? When you encounter error code 22, you will always see the error message This device is disabled. (Code 22). You can view more details about this graphics device driver error code 22 by going to the Device Status area in the device properties. We also discussed Error code 11 in Windows 43. You can also check out our guide on how to fix graphics device error code 31 on your PC. Device is actually disabled: The device in question may throw you this error code 22 and is actually disabled. There are driver issues: Incompatible or corrupted driver files can also cause multiple issues with the device program. Drivers are not the most
 How to solve win11 DNS server error
Jan 10, 2024 pm 09:02 PM
We need to use the correct DNS when connecting to the Internet to access the Internet. In the same way, if we use the wrong dns settings, it will prompt a dns server error. At this time, we can try to solve the problem by selecting to automatically obtain dns in the network settings. Let’s take a look at the specific solutions. How to solve win11 network dns server error. Method 1: Reset DNS 1. First, click Start in the taskbar to enter, find and click the "Settings" icon button. 2. Then click the "Network & Internet" option command in the left column. 3. Then find the "Ethernet" option on the right and click to enter. 4. After that, click "Edit" in the DNS server assignment, and finally set DNS to "Automatic (D
 Fix: WD My Cloud doesn't show up on the network in Windows 11
Oct 02, 2023 pm 11:21 PM
If WDMyCloud is not showing up on the network in Windows 11, this can be a big problem, especially if you store backups or other important files in it. This can be a big problem for users who frequently need to access network storage, so in today's guide, we'll show you how to fix this problem permanently. Why doesn't WDMyCloud show up on Windows 11 network? Your MyCloud device, network adapter, or internet connection is not configured correctly. The SMB function is not installed on the computer. A temporary glitch in Winsock can sometimes cause this problem. What should I do if my cloud doesn't show up on the network? Before we start fixing the problem, you can perform some preliminary checks:
 How to assign multiple IP addresses in one LAN card on Windows 10/11
May 30, 2023 am 11:25 AM
Sometimes it is necessary to assign multiple addresses to a single LAN card. For example, if you need to run multiple websites with unique IP addresses or bind applications to different IP addresses, etc. If you are thinking about how to assign multiple addresses to a single network interface card or LAN card, this article will help you achieve it. Follow the steps below till the end and it will be done. So let’s get started! Assign multiple IP addresses to one LAN card Step 1: Use the Windows+R keys together to open the run prompt and type ncpa.cpl, then press the Enter key to open the Network Connection window. Step 2: Right click on your network adapter Ethernet or WiFi option and click Properties. Step 3: From the Properties Window
 NVIDIA Setup Unable to Continue? 4 easy ways to fix it
Jun 03, 2023 am 09:52 AM
The NVIDIA installer cannot continue is an error message that prevents you from installing drivers for your graphics card. No matter how many times you try to install it on your computer, you'll almost certainly get the same message over and over again. Additionally, this error occurs with various drivers and Windows iterations, indicating multiple potential causes. That said, it doesn't exclude anyone, and troubleshooting the issue can be a frustrating experience for many users. Fortunately, there's a good chance that one (if not more) of the following methods will work for you, so read on to find out which one works best. Even if the driver installation fails, after you download and install the driver, an NVIDIA folder will be created in the partition where the operating system is installed. This is because it will be
 How to Fix Error Code 1132 in Zoom on Windows PC
May 30, 2023 am 11:08 AM
Zoom's video conferencing capabilities have made it popular among users while working from home. Many Zoom desktop client users have reported seeing error code 1132 along with an “Unknown error has occurred” message on their Windows PCs. Usually, this error code pops up when users try to log into their account and join any meeting in Zoom. In the error window, the user has the option to open a browser and join the meeting. However, some users reported that they were unable to open the meeting even on the browser. Windows firewall settings, outdated Zoom installation, or Zoom blacklisting your account could be some of the possible reasons for this error. Are you encountering an error code while using the Zoom app
![How to Fix iMessage Activation Error on iPhone [Solved]](https://img.php.cn/upload/article/000/465/014/168534860275610.png?x-oss-process=image/resize,m_fill,h_207,w_330) How to Fix iMessage Activation Error on iPhone [Solved]
May 29, 2023 pm 04:23 PM
How to Fix iMessage Activation Error on iPhone [Solved]
May 29, 2023 pm 04:23 PM
Many users have observed that they receive error messages while trying to activate iMessage on their iPhone. The error message they received is shown below. iMessage activation, an error occurred during activation. try again. Most of the iPhone users who have recently switched from Android to iPhone or those who have upgraded their iPhone to the latest model face such errors on their iPhone. This issue must occur on iPhone due to the following reasons. Problems with SIM card Weak internet connection or no data Date and time settings incorrectly iPhone with outdated iOS. There is a problem with Apple ID. If you also encounter the same problem with your iPhone, please don’t worry. You can read the following text


