

Brightness control slider not working issue fixed in Windows 10

Normally, brightness adjustment is done in the window settings or using the function keys on the keyboard. However, if the brightness control slider is not working, it could be due to outdated display drivers, or it could be some Windows updates that need to be installed, a hardware issue, or it could be something else. Let's try to solve this problem. In this article, we have a few ways to try and get rid of the brightness control not working problem. let's start!
The normal way to control screen brightness is as follows
Using Window Settings
Step 1 –Used togetherWindows I Key to open window settings
Step 2 –Click System

3rd Step – On the display page, there is a slider under Brightness and Color. If you drag the slider on the right, the brightness will increase, and if you drag the slider on the left, the brightness will decrease.

Adjust the brightness using the function keys on the keyboard
In the keyboard, you can see the function keys on the top row. It also has keys that can increase or decrease the brightness. Keys vary for each manufacturer. For example, my laptop has fn f9 (press fn key and f9 key) and fn f10 (press fn key and f10 key) keys to adjust brightness.
But if this brightness control doesn't work, then how do you change the brightness? Try the following methods to achieve it.
Method 1: Change Brightness Using Windows Quick Settings
Step 1 –Open Quick Settings, to do this change Windows A Keys together
Step 2 –On the right side you will find various options. At the bottom, you'll have the Brightness Slider drag it to adjust.

If the slider is not found or it is inactive, update the adapter driver as described below.
Method 2: Update the display adapter driver
Step 1 –Also use the Windows R key to open the run prompt
Step 2 –Type devmgmt.msc in the run prompt, and then press the Enter key. This will open the Device Manager window

Step 3 –Expand by clicking the arrow mark next to itDisplay AdaptersOptions
Step 4 –Right click on the Core Adapter, here I am using Intel. Then click Update Driver

Step 5 –In the window that opens, select Automatically search for drivers. Select the listed driver and update it

Step 6 – If you already have it installed best driver, please go back and click Browse my computer for driver
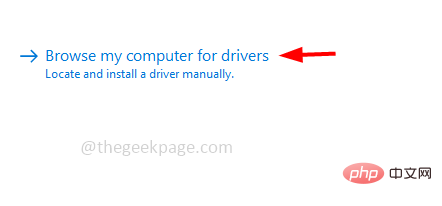
Step 7 –Select Let me choose from a list of available drivers on my computer

Step 8 –In the Model sectionSelectRequired Drivers and click Next

##Step 9 –Update driver, staying connected to the internet and not interrupting the process takes a few minutes
Step 10 –After the update, restart the system and check if the issue is resolved .
Method 3: Roll back to a previously installed driver
Step 1 –Also use the Windows R key to open Run prompt
Step 2 –Type devmgmt.msc in the run prompt, and then press the Enter key. This will open the Device Manager window

Step 3 –Expand by clicking the arrow mark next to itDisplay AdaptersOptions
Step 4 –Right click on CoreAdapter, here I am using Intel. Then click on Properties

Step 5 –Go to Drivertab

Step 6 –Then click the Rollback Driver button to return to the previously installed driver. Then check if the problem is resolved.
NOTE: If the Rollback Driver button is disabled, it means you have no previous driver to return to.

Method 4: Scan for hardware changes
Step 1 –Also using Windows R key to open the run prompt
Step 2 –Type devmgmt.msc in the run prompt, and then press the Enter key. This will open the Device Manager window
Step 3 – Right click on your computer Name , then click Scan for hardware changes

Step 4 –If any changes were made, it will be set back Default Settings
Step 5 – Restart the system and check if the issue is resolved and working properly
Method 5: Check for Windows Updates
Step 1 –Use the Windows I key together to open Window Settings
Step 2 –Click on Update & Security

Step 3 –On the right side of the Windows Update page, click the Check for Updates button

Step 4 –If there is any update available, it will be installed. Then see if the brightness slider works.
Method 6: Change Brightness Using PowerShell Command
Step 1 –Open PowerShell. To do this, press the Windows ## Step 2 – A User Account Control window will appear, click Yes
 Step 3 –
copyandpasteinto the PowerShell window, then press theEnter
key(Get-WmiObject -Namespace root/WMI -Class WmiMonitorBrightnessMethods).WmiSetBrightness(1,70)
 Step 1 –
browser
you use). Type Intel Display Driver for Windows 10in the search bar (I am using a Windows 10 machine) and press Enter
Steps 2 –Click the Intel HD Graphics Driver for Windows 10 linkStep 3 –On the right, under Automatic Driver and Software Updates, Click the Get Started
button
Step 4 –In the support page, click on the applicable Intel driver and Support Assistant (Intel DSA) Download Now button #The downloaded .EXE file and click Run
 Step 6 –
Install button. After installation, it will automatically update the driver and the problem will be solved. ChatGPT China trial version click to enter: https://yundongfang.com/chatgpt.php
The above is the detailed content of Brightness control slider not working issue fixed in Windows 10. For more information, please follow other related articles on the PHP Chinese website!

Hot AI Tools

Undresser.AI Undress
AI-powered app for creating realistic nude photos

AI Clothes Remover
Online AI tool for removing clothes from photos.

Undress AI Tool
Undress images for free

Clothoff.io
AI clothes remover

Video Face Swap
Swap faces in any video effortlessly with our completely free AI face swap tool!

Hot Article
Hot Tools

Notepad++7.3.1
Easy-to-use and free code editor

SublimeText3 Chinese version
Chinese version, very easy to use

Zend Studio 13.0.1
Powerful PHP integrated development environment

Dreamweaver CS6
Visual web development tools

SublimeText3 Mac version
God-level code editing software (SublimeText3)
Hot Topics
 1386
1386
 52
52

 How to convert XML to PDF on your phone?
Apr 02, 2025 pm 10:18 PM
How to convert XML to PDF on your phone?
Apr 02, 2025 pm 10:18 PM
It is not easy to convert XML to PDF directly on your phone, but it can be achieved with the help of cloud services. It is recommended to use a lightweight mobile app to upload XML files and receive generated PDFs, and convert them with cloud APIs. Cloud APIs use serverless computing services, and choosing the right platform is crucial. Complexity, error handling, security, and optimization strategies need to be considered when handling XML parsing and PDF generation. The entire process requires the front-end app and the back-end API to work together, and it requires some understanding of a variety of technologies.
 What is the reason why PS keeps showing loading?
Apr 06, 2025 pm 06:39 PM
What is the reason why PS keeps showing loading?
Apr 06, 2025 pm 06:39 PM
PS "Loading" problems are caused by resource access or processing problems: hard disk reading speed is slow or bad: Use CrystalDiskInfo to check the hard disk health and replace the problematic hard disk. Insufficient memory: Upgrade memory to meet PS's needs for high-resolution images and complex layer processing. Graphics card drivers are outdated or corrupted: Update the drivers to optimize communication between the PS and the graphics card. File paths are too long or file names have special characters: use short paths and avoid special characters. PS's own problem: Reinstall or repair the PS installer.
 xml online formatting
Apr 02, 2025 pm 10:06 PM
xml online formatting
Apr 02, 2025 pm 10:06 PM
XML Online Format Tools automatically organizes messy XML code into easy-to-read and maintain formats. By parsing the syntax tree of XML and applying formatting rules, these tools optimize the structure of the code, enhancing its maintainability and teamwork efficiency.
 How to solve the problem of loading when PS is always showing that it is loading?
Apr 06, 2025 pm 06:30 PM
How to solve the problem of loading when PS is always showing that it is loading?
Apr 06, 2025 pm 06:30 PM
PS card is "Loading"? Solutions include: checking the computer configuration (memory, hard disk, processor), cleaning hard disk fragmentation, updating the graphics card driver, adjusting PS settings, reinstalling PS, and developing good programming habits.
 Does H5 page production require continuous maintenance?
Apr 05, 2025 pm 11:27 PM
Does H5 page production require continuous maintenance?
Apr 05, 2025 pm 11:27 PM
The H5 page needs to be maintained continuously, because of factors such as code vulnerabilities, browser compatibility, performance optimization, security updates and user experience improvements. Effective maintenance methods include establishing a complete testing system, using version control tools, regularly monitoring page performance, collecting user feedback and formulating maintenance plans.
 How to speed up the loading speed of PS?
Apr 06, 2025 pm 06:27 PM
How to speed up the loading speed of PS?
Apr 06, 2025 pm 06:27 PM
Solving the problem of slow Photoshop startup requires a multi-pronged approach, including: upgrading hardware (memory, solid-state drive, CPU); uninstalling outdated or incompatible plug-ins; cleaning up system garbage and excessive background programs regularly; closing irrelevant programs with caution; avoiding opening a large number of files during startup.
 The XML file is too large, can I convert PDFs on my phone?
Apr 02, 2025 pm 09:54 PM
The XML file is too large, can I convert PDFs on my phone?
Apr 02, 2025 pm 09:54 PM
It is difficult to directly convert super large XML to PDF on mobile phones. It is recommended to adopt a partition strategy: cloud conversion: upload to the cloud platform and processed by the server. It is efficient and stable but requires network and possible payment; segmented processing: Use programming tools to split large XML into small files and convert them one by one, requiring programming capabilities; find conversion tools that specialize in processing large files, pay attention to checking user reviews to avoid choosing software that is prone to crash.
 How to solve the problem of loading when the PS opens the file?
Apr 06, 2025 pm 06:33 PM
How to solve the problem of loading when the PS opens the file?
Apr 06, 2025 pm 06:33 PM
"Loading" stuttering occurs when opening a file on PS. The reasons may include: too large or corrupted file, insufficient memory, slow hard disk speed, graphics card driver problems, PS version or plug-in conflicts. The solutions are: check file size and integrity, increase memory, upgrade hard disk, update graphics card driver, uninstall or disable suspicious plug-ins, and reinstall PS. This problem can be effectively solved by gradually checking and making good use of PS performance settings and developing good file management habits.