How to record your screen and apply effects using Microsoft Powerpoint
If you are thinking about how to quickly record your computer screen and make a video, then Microsoft Powerpoint can help you. Yes, you heard it right, it is PowerPoint with screen recording capabilities and you can also add some fancy effects to your videos. To learn about it, read this article and create a beautiful presentation yourself. let's start!
How to record computer screen in Powerpoint
Step 1: OpenMicrosoft PowerPoint and open a blank slide. To do this, click the drop-down icon on New Slide and select Blank.

Step 2: Click the Insert tab at the top, then click Screen Recording in the upper right corner.

Step 3: A dialog box appears with some options, such as recording, select area, audio, etc. You can record in full screen or even select a specific area of the screen to record. Using the Audio option you can capture the audio by clicking on it and when you don't want the audio you can click on it again to disable it. There is a Record Pointer option through which you can also record the mouse pointer.

Step 4: Now to record, Click the Select Area button and select the area you want to capture on the screen . Or you can use the shortcut Windows key Shift A

Step 5: Click the Record button from the popup window or use the shortcutWindows key Shift R. Recording will start.

Step 6: A countdown will appear, telling you that if you want to stop recording, press the Windows Shift Q key at the same time.
Alternatively, you can hover the pointer over the top middle of the screen to return to the control window, and click Stop to stop recording. But please note that the control window will be captured during recording. If you don't want to log this, you can use the shortcut keys above.

If you want to keep the control window throughout the recording process, click the pin bar in the upper right corner of the control window.

Step 7: When the recording stops, it will appear in the PowerPoint presentation slide.
Step 8: To play the recording, click the Play button at the bottom of the slide. A simple video recording is completed and you can save the video. If you want to apply some effects to make it look better, follow these steps.

How to apply effects to video in Powerpoint
You can change some settings of the captured video, such as background change, color change, etc.
Step 1: Click on the Slideshow with screen recording, then you will see the "Video Format" tab in the top ribbon click on it . You can choose any video style you want to apply.

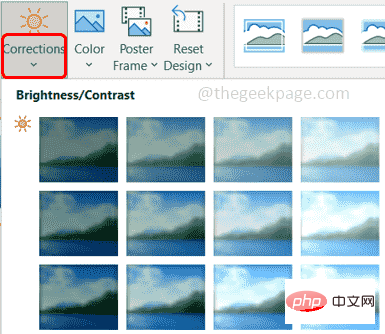
Step 2: Go to the Correction drop-down menu under "Video Format" and select the format you want. Here you can make your video look brighter, brighter, and more.

Step 3: You can make a color change by clicking on the Color option next to the Correction option and selecting the color of your choice.

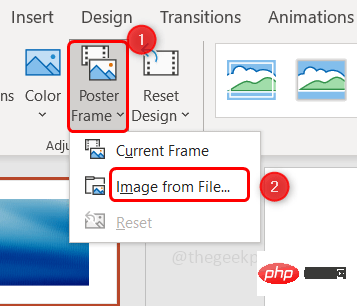
Step 4: Another fun modification you can make to your video is Poster Frame. Click the Poster Frame drop-down menu and select an image from the file

Stock Image .

Selectthe image of your choice and clickinsert.
Step 7: Now you can see the poster image on the video until you press the play button, it will disappear once the video starts. The poster frame usually represents the entire content of the video.
Step 8: You can also reset the design by clicking the ResetDesign drop-down menu and selecting the Reset Design option , or if you wish to reset the dimensions along with the design, select Reset Design and Dimensions.

Step 9: The options are not limited here, you can also change the shape of the video by clicking on Video Shape under the Video Format tab , then select the desired shape from the list.

Step 10: Select by clicking on the Video Border option and selecting the color of your choice and other options The border of the video.

Step 11: You can use the “Video Effects” option to give really nice effects.

Crop button, a black line will appear, you can drag to crop the video.

click there is a screen recording slideshow and at the top there is a playback option click on it.

Play button at the top.

Add at the top BookmarksOptions. A small yellow circle appears, indicating the bookmark.
By doing this, you can easily revisit specific parts of the video at any time by clicking on the bookmark (little circle)
click it (the small circle) and then click the Delete bookmark option at the top.

Trim Video” option Completed below. Click on the Trim Video option and drag the bars (red and green) to the desired point until you have to trim it. Then click OK

File option and click Save as.

Save.
Step 21: There is another way, if you want to upload the video on social media, click on the "File" tab and then click on "Export ".
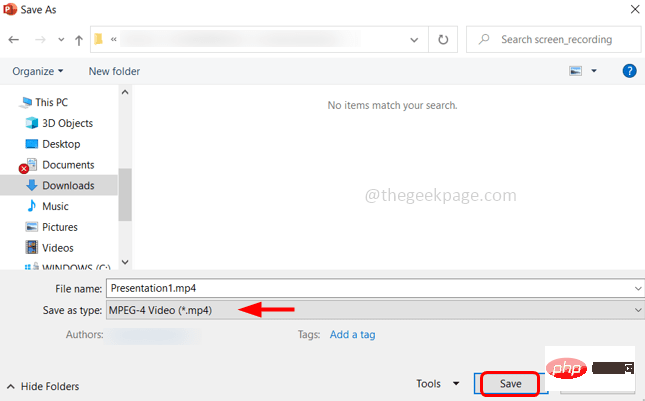
Step 22: SelectCreate Video from the right and click Create Video.

.mp4 file type. Click Save

The above is the detailed content of How to record your screen and apply effects using Microsoft Powerpoint. For more information, please follow other related articles on the PHP Chinese website!

Hot AI Tools

Undresser.AI Undress
AI-powered app for creating realistic nude photos

AI Clothes Remover
Online AI tool for removing clothes from photos.

Undress AI Tool
Undress images for free

Clothoff.io
AI clothes remover

AI Hentai Generator
Generate AI Hentai for free.

Hot Article

Hot Tools

Notepad++7.3.1
Easy-to-use and free code editor

SublimeText3 Chinese version
Chinese version, very easy to use

Zend Studio 13.0.1
Powerful PHP integrated development environment

Dreamweaver CS6
Visual web development tools

SublimeText3 Mac version
God-level code editing software (SublimeText3)

Hot Topics
 How to highlight text in PowerPoint
Apr 19, 2023 pm 12:04 PM
How to Highlight Text in PowerPoint 2019 or 365 If you are using PowerPoint 2019 or have a Microsoft 365 subscription, highlighting text is quick and easy. There are two main ways to highlight text in PowerPoint. How to Highlight Selected Text in PowerPoint The first way is to select the text you want to highlight before applying the effect. To highlight selected text in PowerPoint: Click and drag the text you want to highlight. In the Home tab, click the down arrow next to the Text Highlight Color tool. Click on the highlight color of your choice
 How to blur an image in PowerPoint
Apr 14, 2023 pm 12:13 PM
How to Blur Part of an Image in PowerPoint There is no official tool that allows you to blur part of an image in a PowerPoint presentation. Instead, you do this using a combination of shapes and other features. To blur part of an image in PowerPoint: Open your PowerPoint presentation. Press Insert > Shape and choose a suitable shape to cover your image. Draw the image onto the slide and position it over the area of the image you want to blur. If you want to design a custom shape
 How to Create a Macro in Powerpoint Step by Step
May 13, 2023 pm 02:13 PM
A macro is simply a set of instructions written by the user and saved under the macro name. When a macro name is called in a presentation, it automatically executes the set of instructions defined under the macro name. Macros are embedded into PowerPoint presentations when needed. Macro code can be written in PowerPoint using VBA. It helps us create our own designs and reuse them. Macros can also be created in other Microsoft Office applications. Let’s see how to create a simple macro in PowerPoint. Steps involved in macro creation are Step 1. Open PowerPoint. Type PowerPoint in the search space in the lower left corner. You can open Po with just one click
 How to blur part of an image in PowerPoint application
Apr 14, 2023 pm 07:19 PM
When giving a presentation using the best PowerPoint app ever, adding images relevant to your presentation makes it easier for your audience to understand the topic and content, not just the text or paragraphs. Sometimes there is something very sensitive in the image that is not considered safe to show to viewers. Therefore, it is standard practice to blur specific parts of an image. However, blurring a part of an image in PowerPoint application is not easily done by any direct method. In this post, we have shown a simple method by which you can blur any specific part of an image in PowerPoint application using a few steps given below. How to blur images in PowerPoint application
 What are the main functions of powerpoint
Sep 14, 2022 pm 03:54 PM
The main function of powerpoint is to create presentations; users can also make presentations on a projector or computer, or print out presentations. PPT is suitable for work reports, corporate publicity, product promotions, wedding celebrations, project bidding, management consulting, Education and training and other fields, and has functions such as photo album production, document merging, application masterboard, picture movement, animation control, etc.
 How to insert an image into a shape in PowerPoint
Apr 17, 2023 pm 02:28 PM
How to Insert an Image into a Shape in PowerPoint Inserting an image into a shape is useful for creating visual elements that stand out in your presentation. It could be an arrow, a heart, or a cross, but each of these shapes provides a purpose or emotion that can help your image pack a punch. If you're not sure how to insert an image into a shape in PowerPoint, follow these steps: Open your PowerPoint presentation. Click the Insert tab in the ribbon. Click the shape. Select the desired shape and draw it on the slide. Next, select the shape you drew and select the Format Shape tab on the ribbon bar. Click the shape fill. Fill dropdown menu from shape
 What is included in the fill effect option for setting the slide background in powerpoint
Jul 27, 2021 pm 02:04 PM
The fill effect options for setting the slide background in PowerPoint include gradients, textures, patterns and pictures. The method to set the slide background is to select "Format Background" or click the "Design" tab to set the background.
 What kind of software is PowerPoint?
Dec 10, 2020 pm 03:23 PM
PowerPoint is a "presentation" software. PowerPoint refers to Microsoft's presentation software. Users can present on a projector or computer, or they can print out the presentation and make it into film for application in a wider range of fields.


