

Python Deep Learning 18-DeepDream of Generative Deep Learning

DeepDream Introduction
DeepDream is an artistic image modification technology, which is mainly based on the trained convolutional neural network CNN to generate images.
When generating images, the neural network is frozen, that is, the weights of the network are no longer updated, only the input images need to be updated. Commonly used pre-trained convolutional networks include Google's Inception, VGG network and ResNet network, etc.
Basic steps of DeePDream:
- Get the input image
- Input the image into the network and get the output value of the neuron you want to visualize
- Calculate the gradient of the neuron output value to each pixel of the picture
- Use gradient descent to continuously update the picture
Repeat steps 2, 3, and 4 until the set conditions are met
The following is the general process of using Keras to implement DeepDream:
Using Keras to implement DeepDream
Get the test image
In [1]:
# ---------------
from tensorflow import keras
import matplotlib.pyplot as plt
%matplotlib inline

base_image_path = keras.utils.get_file(
"coast.jpg",
origin="https://img-datasets.s3.amazonaws.com/coast.jpg")

plt.axis("off")
plt.imshow(keras.utils.load_img(base_image_path))
plt.show()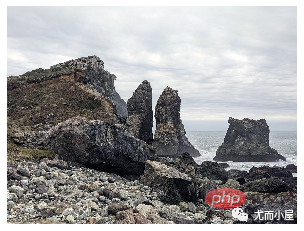
The above is a picture of the coastline that comes with Keras. Here are the changes to this picture.
Prepare the pre-trained model InceptionV3
In [2]:
# 使用Inception V3实现
from keras.applications import inception_v3

# 使用预训练的ImageNet权重来加载模型
model = inception_v3.InceptionV3(weights="imagenet", # 构建不包含全连接层的Inceptino
 include_top=False)
Downloading data from https://storage.googleapis.com/tensorflow/keras-applications/inception_v3/inception_v3_weights_tf_dim_ordering_tf_kernels_notop.h5
87916544/87910968 [==============================] - 74s 1us/step
87924736/87910968 [==============================] - 74s 1us/step
In [3]:
model.summary()

Set DeepDream configuration
In [4]:
# 层的名称 + 系数:该层对需要最大化的损失的贡献大小

layer_settings = {"mixed4":1.0,
"mixed5":1.5,
"mixed6":2.0,
"mixed7":2.5}

outputs_dict = dict(
[
(layer.name, layer.output) # 层的名字 + 该层的输出
for layer in [model.get_layer(name) for name in layer_settings.keys()]
]
)

outputs_dictOut[4]:
{'mixed4': <KerasTensor: shape=(None, None, None, 768) dtype=float32 (created by layer 'mixed4')>,
 'mixed5': <KerasTensor: shape=(None, None, None, 768) dtype=float32 (created by layer 'mixed5')>,
 'mixed6': <KerasTensor: shape=(None, None, None, 768) dtype=float32 (created by layer 'mixed6')>,
'mixed7': <KerasTensor: shape=(None, None, None, 768) dtype=float32 (created by layer 'mixed7')>}In [5]:
# 特征提取

feature_extractor = keras.Model(inputs=model.inputs, outputs=outputs_dict)
feature_extractor
Out[5]:
<keras.engine.functional.Functional at 0x15b5ff0d0>
Calculating loss
In [6]:
def compute_loss(image):
features = feature_extractor(image)# 特征提取
loss = tf.zeros(shape=())# 损失初始化

for name in features.keys():# 遍历层
coeff = layer_settings[name] # 某个层的系数
activation = features[name]# 某个层的激活函数
#为了避免出现边界伪影,损失中仅包含非边界的像素
loss += coeff * tf.reduce_mean(tf.square(activation[:, 2:-2, 2:-2, :])) # 将该层的L2范数添加到loss中;
return loss
Gradient ascent process
In [7]:
import tensorflow as tf

@tf.function
def gradient_ascent_step(image, lr): # lr--->learning_rate学习率
with tf.GradientTape() as tape:
tape.watch(image)
loss = compute_loss(image)# 调用计算损失方法
grads = tape.gradient(loss, image)# 梯度更新
grads = tf.math.l2_normalize(grads)
image += lr * grads
return loss, image

def gradient_ascent_loop(image, iterations, lr, max_loss=None):
for i in range(iterations):
loss, image = gradient_ascent_step(image, lr)
if max_loss is not None and loss > max_loss:
break
print(f"第{i}步的损失值是{loss:.2f}")

return imagePicture generation
np.expand_dims usage (personal addition)
In [8]:
import numpy as np

array = np.array([[1,2,3],
[4,5,6]]
)
array
Out[8]:
array([[1, 2, 3],
 [4, 5, 6]])
In [9]:
array.shape
Out[9]:
(2, 3)
In [10]:
array1 = np.expand_dims(array,axis=0)
array1
Out[10]:
array([[[1, 2, 3],
[4, 5, 6]]])
In [ 11]:
array1.shape
Out[11]:
(1, 2, 3)
In [12]:
array2 = np.expand_dims(array,axis=1)
array2
Out[12]:
array([[[1, 2, 3]],

 [[4, 5, 6]]])
In [13] :
array2.shape
Out[13]:
(2, 1, 3)
In [14]:
array3 = np.expand_dims(array,axis=-1)
array3
Out[14]:
array([[[1],
[2],
[3]],

 [[4],
[5],
[6]]])
In [15]:
array3.shape
Out[15]:
(2, 3, 1)
np.clip function (personally added)
np.clip(
array,
min(array),
max(array),
out=None):
In [16]:
array = np.array([1,2,3,4,5,6])

np.clip(array, 2, 5)# 输出长度和原数组相同
Out[16]:
array([2, 2, 3, 4, 5, 5])
In [17]:
array = np.arange(18).reshape((6,3))
array
Out[17]:
array([[ 0,1,2],
 [ 3,4,5],
 [ 6,7,8],
 [ 9, 10, 11],
 [12, 13, 14],
 [15, 16, 17]])
In [18]:
np.clip(array, 5, 15)
Out[18]:
array([[ 5,5,5],
 [ 5,5,5],
 [ 6,7,8],
 [ 9, 10, 11],
 [12, 13, 14],
 [15, 15, 15]])
Parameter setting
In [19]:
step = 20.#梯度上升的步长
num_octave = 3# 运行梯度上升的尺度个数
octave_scale = 1.4# 两个尺度间的比例大小
iterations = 30# 在每个尺度上运行梯度上升的步数
max_loss = 15.# 损失值若大于15,则中断梯度上升过程
Picture preprocessing
In [20]:
import numpy as np

def preprocess_image(image_path):# 预处理
img = keras.utils.load_img(image_path)# 导入图片
img = keras.utils.img_to_array(img)# 转成数组
img = np.expand_dims(img, axis=0)# 增加数组维度;见上面解释(x,y) ---->(1,x,y)
img = keras.applications.inception_v3.preprocess_input(img)
return img


def deprocess_image(img):# 图片压缩处理
img = img.reshape((img.shape[1], img.shape[2], 3))
img /= 2.0
img += 0.5
img *= 255.
# np.clip:截断功能,保证数组中的取值在0-255之间
img = np.clip(img, 0, 255).astype("uint8")
return imgGenerate picture
In [21]:
# step = 20.#梯度上升的步长
# num_octave = 3# 运行梯度上升的尺度个数
# octave_scale = 1.4# 两个尺度间的比例大小
# iterations = 30# 在每个尺度上运行梯度上升的步数
# max_loss = 15.0# 损失值若大于15,则中断梯度上升过程

original_img = preprocess_image(base_image_path)# 预处理函数
original_shape = original_img.shape[1:3]

print(original_img.shape)# 四维图像
print(original_shape)# 第2和3维度的值
(1, 900, 1200, 3)
(900, 1200)
In [22]:
successive_shapes = [original_shape]

for i in range(1, num_octave):
shape = tuple([int(dim / (octave_scale ** i)) for dim in original_shape])
successive_shapes.append(shape)
successive_shapes = successive_shapes[::-1]# 翻转

shrunk_original_img = tf.image.resize(original_img, successive_shapes[0])

img = tf.identity(original_img)
for i, shape in enumerate(successive_shapes):
print(f"Processing octave {i} with shape {shape}")
# resize
img = tf.image.resize(img, shape)
img = gradient_ascent_loop(# 梯度上升函数调用
img,
iteratinotallow=iterations,
lr=step,
max_loss=max_loss
)
# resize
upscaled_shrunk_original_img = tf.image.resize(shrunk_original_img, shape)
same_size_original = tf.image.resize(original_img, shape)

lost_detail = same_size_original - upscaled_shrunk_original_img
img += lost_detail
shrunk_original_img = tf.image.resize(original_img, shape)

keras.utils.save_img("dream.png", deprocess_image(img.numpy()))The result is:
Processing octave 0 with shape (459, 612)
第0步的损失值是0.80
第1步的损失值是1.07
第2步的损失值是1.44
第3步的损失值是1.82
......
第26步的损失值是11.44
第27步的损失值是11.72
第28步的损失值是12.03
第29步的损失值是12.49
At the same time, a new picture is generated locally. Take a look at the effect:

Take another look at the original picture: In comparison, the new picture is a bit dreamy!

The above is the detailed content of Python Deep Learning 18-DeepDream of Generative Deep Learning. For more information, please follow other related articles on the PHP Chinese website!

Hot AI Tools

Undresser.AI Undress
AI-powered app for creating realistic nude photos

AI Clothes Remover
Online AI tool for removing clothes from photos.

Undress AI Tool
Undress images for free

Clothoff.io
AI clothes remover

Video Face Swap
Swap faces in any video effortlessly with our completely free AI face swap tool!

Hot Article
Hot Tools

Notepad++7.3.1
Easy-to-use and free code editor

SublimeText3 Chinese version
Chinese version, very easy to use

Zend Studio 13.0.1
Powerful PHP integrated development environment

Dreamweaver CS6
Visual web development tools

SublimeText3 Mac version
God-level code editing software (SublimeText3)
Hot Topics
 1386
1386
 52
52

 Can vs code run in Windows 8
Apr 15, 2025 pm 07:24 PM
Can vs code run in Windows 8
Apr 15, 2025 pm 07:24 PM
VS Code can run on Windows 8, but the experience may not be great. First make sure the system has been updated to the latest patch, then download the VS Code installation package that matches the system architecture and install it as prompted. After installation, be aware that some extensions may be incompatible with Windows 8 and need to look for alternative extensions or use newer Windows systems in a virtual machine. Install the necessary extensions to check whether they work properly. Although VS Code is feasible on Windows 8, it is recommended to upgrade to a newer Windows system for a better development experience and security.
 Is the vscode extension malicious?
Apr 15, 2025 pm 07:57 PM
Is the vscode extension malicious?
Apr 15, 2025 pm 07:57 PM
VS Code extensions pose malicious risks, such as hiding malicious code, exploiting vulnerabilities, and masturbating as legitimate extensions. Methods to identify malicious extensions include: checking publishers, reading comments, checking code, and installing with caution. Security measures also include: security awareness, good habits, regular updates and antivirus software.
 How to run programs in terminal vscode
Apr 15, 2025 pm 06:42 PM
How to run programs in terminal vscode
Apr 15, 2025 pm 06:42 PM
In VS Code, you can run the program in the terminal through the following steps: Prepare the code and open the integrated terminal to ensure that the code directory is consistent with the terminal working directory. Select the run command according to the programming language (such as Python's python your_file_name.py) to check whether it runs successfully and resolve errors. Use the debugger to improve debugging efficiency.
 Can visual studio code be used in python
Apr 15, 2025 pm 08:18 PM
Can visual studio code be used in python
Apr 15, 2025 pm 08:18 PM
VS Code can be used to write Python and provides many features that make it an ideal tool for developing Python applications. It allows users to: install Python extensions to get functions such as code completion, syntax highlighting, and debugging. Use the debugger to track code step by step, find and fix errors. Integrate Git for version control. Use code formatting tools to maintain code consistency. Use the Linting tool to spot potential problems ahead of time.
 Python vs. JavaScript: The Learning Curve and Ease of Use
Apr 16, 2025 am 12:12 AM
Python vs. JavaScript: The Learning Curve and Ease of Use
Apr 16, 2025 am 12:12 AM
Python is more suitable for beginners, with a smooth learning curve and concise syntax; JavaScript is suitable for front-end development, with a steep learning curve and flexible syntax. 1. Python syntax is intuitive and suitable for data science and back-end development. 2. JavaScript is flexible and widely used in front-end and server-side programming.
 Golang vs. Python: Concurrency and Multithreading
Apr 17, 2025 am 12:20 AM
Golang vs. Python: Concurrency and Multithreading
Apr 17, 2025 am 12:20 AM
Golang is more suitable for high concurrency tasks, while Python has more advantages in flexibility. 1.Golang efficiently handles concurrency through goroutine and channel. 2. Python relies on threading and asyncio, which is affected by GIL, but provides multiple concurrency methods. The choice should be based on specific needs.
 What is vscode What is vscode for?
Apr 15, 2025 pm 06:45 PM
What is vscode What is vscode for?
Apr 15, 2025 pm 06:45 PM
VS Code is the full name Visual Studio Code, which is a free and open source cross-platform code editor and development environment developed by Microsoft. It supports a wide range of programming languages and provides syntax highlighting, code automatic completion, code snippets and smart prompts to improve development efficiency. Through a rich extension ecosystem, users can add extensions to specific needs and languages, such as debuggers, code formatting tools, and Git integrations. VS Code also includes an intuitive debugger that helps quickly find and resolve bugs in your code.
 Can vscode run ipynb
Apr 15, 2025 pm 07:30 PM
Can vscode run ipynb
Apr 15, 2025 pm 07:30 PM
The key to running Jupyter Notebook in VS Code is to ensure that the Python environment is properly configured, understand that the code execution order is consistent with the cell order, and be aware of large files or external libraries that may affect performance. The code completion and debugging functions provided by VS Code can greatly improve coding efficiency and reduce errors.
