
Translator|Zhu Xianzhong
Reviewer|Sun Shujuan
In classic machine learning, the Random Forests algorithm can be described as a "silver bullet" type of algorithm model .
This model is great for several reasons:
In this article , I would like to better analyze the various components that make up the random forest algorithm. To achieve this, I will break down the random forest algorithm into its most basic components and explain the computational tasks of each component. By the end of the article, we will be able to have a deeper understanding of how random forest algorithms work and how to use them in a more intuitive way. It should be noted that the examples we will use in this article will focus on classification functions, but many of the principles are equally applicable to regression scenarios.
Let’s start by calling a classic random forest mode. This is the highest level and is what many people use when training random forests in Python.
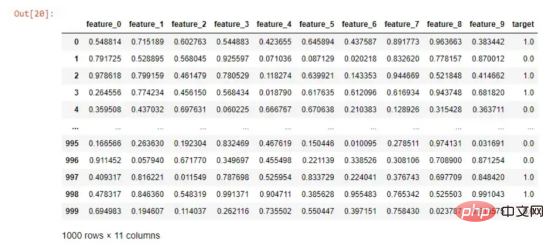
Simulated Data
If I want to run a random forest algorithm to predict my target column, then I just do The following:
from sklearn.ensemble import RandomForestClassifier
from sklearn.model_selection import train_test_split

X_train, X_test, y_train, y_test = train_test_split(df.drop('target', axis=1), df['target'], test_size=0.2, random_state=0)

# 训练随机森林算法并计算得分
simple_rf_model = RandomForestClassifier(n_estimators=100, random_state=0)
simple_rf_model.fit(X_train, y_train)
print(f"accuracy: {simple_rf_model.score(X_test, y_test)}")

# accuracy: 0.93Running a random forest classifier is very simple. As shown in the code above, I just defined the n_estimators parameter and set the parameter random_state to 0. I can tell you from personal experience that many people will stare at the accuracy of 0.93 and not relax. They seemed to feel very satisfied and easily began the frenzied deployment work. But we won't do that today.
First, let’s revisit the following “innocuous” line of code:
simple_rf_model = RandomForestClassifier(n_estimators=100, random_state=0)
Random state is a feature of most data science models that ensures that others can replicate your work . Therefore, we won't worry too much about the random_state parameter.
But, let’s delve into the n_estimators parameter. If we look at the relevant documentation in scikit-learn, we will find the following concise definition:
"The number of trees in the forest."
Now , let us define a random forest more specifically. Random Forest is an ensemble model that is the consensus content of many decision trees. This definition may be incomplete, but we will come back to it later.
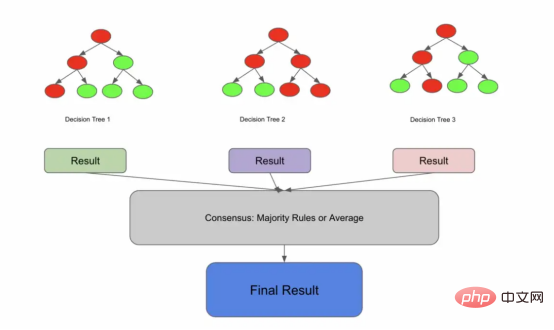
Many trees communicating with each other and reaching consensus
This might make you think that if you break it down into the following , you may get a random forest:
#创建决策树
tree1 = DecisionTreeClassifier().fit(X_train, y_train)
tree2 = DecisionTreeClassifier().fit(X_train, y_train)
tree3 = DecisionTreeClassifier().fit(X_train, y_train)

# 预测X_test上的每一棵决策树
predictions_1 = tree1.predict(X_test)
predictions_2 = tree2.predict(X_test)
predictions_3 = tree3.predict(X_test)
print(predictions_1, predictions_2, predictions_3)

# 采取优先级策略
final_prediction = np.array([np.round((predictions_1[i] + predictions_2[i] + predictions_3[i])/3) for i in range(len(predictions_1))])
print(final_prediction)
In the above example, we trained 3 decision trees on X_train, which means n_estimators=3. After training 3 trees, we predicted each tree on the same test set and then ended up with predictions where 2 of the 3 trees were selected.
That makes sense, but it doesn't seem entirely correct. If all decision trees were trained on the same data, wouldn't they all come to the same conclusion, thereby negating the overall advantage?
Let us add this sentence based on the previous definition: "Random forest is an ensemble model, which is the consensus of many unrelated decision trees."
Decision trees can become uncorrelated in two ways:
1. You have a large enough dataset size to sample unique parts of the data into each decision tree. This approach is not popular because it usually requires large amounts of data.
2. You can use a technique called sampling with replacement. Sampling with replacement is when a sample drawn from the population is returned to the sample population before the next sample is drawn.
To explain sampling with replacement, let's say I have 5 marbles of 3 colors, so the overall look is this:
blue, blue, red, green, red
If I want to sample some marbles, I usually Pull a few out of it and maybe you'll end up with:
blue, red
This is because once I picked up the red, I didn't put it back into the original pile of marbles.
However, if I sample with replacement, I can actually pick up any marble twice. Since the red is back in my pile, I still have a chance to pick it up again.
red, red
In the random forest algorithm, the default value is to construct a sample that is approximately 2/3 of the original sample population size. If my original training data is 1000 rows, then the training data sample I feed into the tree is probably around 670 rows. That said, it would be a good parameter to try different sampling rates when building a random forest.
Different from the previous code, the following code is closer to a random forest, where the parameter n_estimators=3.
import numpy as np
import pandas as pd
from sklearn.tree import DecisionTreeClassifier
from sklearn.model_selection import train_test_split

# 对于每一棵树从X_train中采用3次放回抽样
df_sample1 = df.sample(frac=.67, replace=True)
df_sample2 = df.sample(frac=.67, replace=True)
df_sample3 = df.sample(frac=.67, replace=True)

X_train_sample1, X_test_sample1, y_train_sample1, y_test_sample1 = train_test_split(df_sample1.drop('target', axis=1), df_sample1['target'], test_size=0.2)
X_train_sample2, X_test_sample2, y_train_sample2, y_test_sample2 = train_test_split(df_sample2.drop('target', axis=1), df_sample2['target'], test_size=0.2)
X_train_sample3, X_test_sample3, y_train_sample3, y_test_sample3 = train_test_split(df_sample3.drop('target', axis=1), df_sample3['target'], test_size=0.2)

#生成决策树
tree1 = DecisionTreeClassifier().fit(X_train_sample1, y_train_sample1)
tree2 = DecisionTreeClassifier().fit(X_train_sample2, y_train_sample2)
tree3 = DecisionTreeClassifier().fit(X_train_sample3, y_train_sample3)

# 在X_test上预测每一棵决策树
predictions_1 = tree1.predict(X_test)
predictions_2 = tree2.predict(X_test)
predictions_3 = tree3.predict(X_test)
df = pd.DataFrame([predictions_1, predictions_2, predictions_3]).T
df.columns = ["tree1", "tree2", "tree3"]

# 采取优先级策略
final_prediction = np.array([np.round((predictions_1[i] + predictions_2[i] + predictions_3[i])/3) for i in range(len(predictions_1))])
preds = pd.DataFrame([predictions_1, predictions_2, predictions_3, final_prediction, y_test]).T.head(20)
preds.columns = ["tree1", "tree2", "tree3", "final", "label"]
preds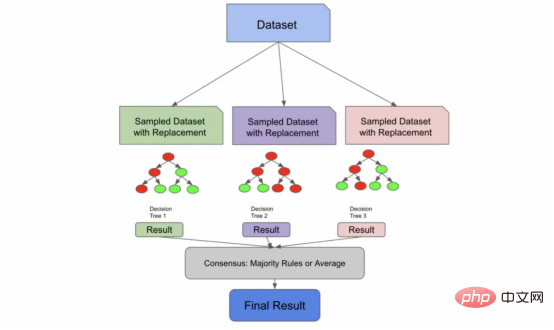
我们用放回抽样,把这些样本输送给树,产生结果,并达成共识。
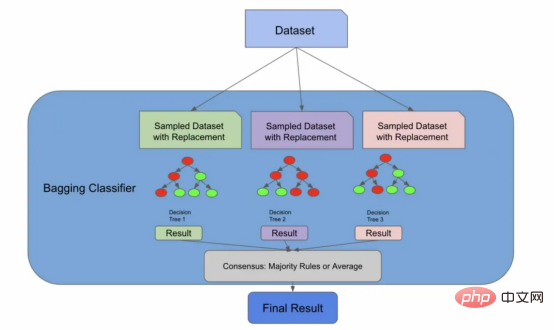
早期的架构实际上就是一个装袋分类器
我们现在将引入一种新的算法,一种称为自助聚集(Bootstrap Aggregation,也称为“Bagging”)的有监督的学习算法。但请放心,这又会与随机森林算法联系起来。我们引入这个新概念的原因是,正如我们将要在文章后面的图中看到的,我们到目前为止所做的一切实际上都是装袋分类器所做的!
在下面的代码中,装袋分类器使用了一个名为bootstrap的参数,它实际上执行了我们刚才手动执行的放回抽样步骤。其实,sklearn库的随机森林算法实现也存在相同的参数。如果bootstrap参数的值是false,那么我们将为每个分类器使用整个总体。
import numpy as np
from sklearn.tree import DecisionTreeClassifier
from sklearn.ensemble import BaggingClassifier

# 集合中所使用的树的数量
n_estimators = 3

# 初始化装袋分类器
bag_clf = BaggingClassifier(
DecisionTreeClassifier(), n_estimators=n_estimators, bootstrap=True)

# 根据训练数据拟合装袋分类器
bag_clf.fit(X_train, y_train)

# 对测试数据进行预测
y_pred = bag_clf.predict(X_test)
pd.DataFrame([y_pred, y_test]).T
装袋分类器BaggingClassifier非常棒,因为您可以将它们与未命名为决策树的评估器一起使用!您可以插入许多算法,Bagging算法会将其转化为集成解决方案。随机森林算法实际上扩展了装袋算法(如果bootstrapping = true),因为它部分地利用Bagging算法来形成不相关的决策树。
然而,即使bootstrapping=false,随机森林算法也需要额外一步来确保树之间的不相关性——特征采样。
特征采样(Feature sampling)意味着不仅对行进行采样,还对列进行采样。与行不同,随机森林的列在没有放回的情况下被采样,这意味着我们不会有重复的列来训练1棵树。
有许多方法可以对特征进行采样。您可以指定要采样的固定最大特征数量,获取特征总数的平方根,或者尝试使用日志数据。这些方法中的每一种都有各自的利弊,并将取决于您的数据和具体使用场景。
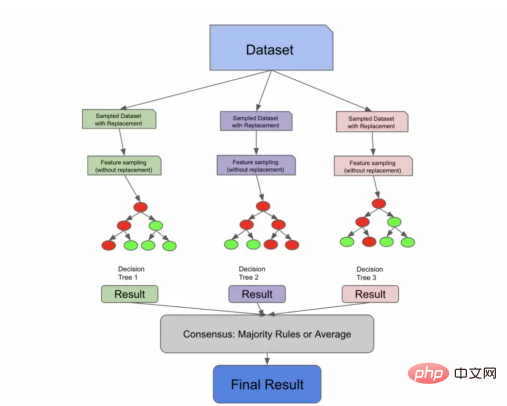
通过特征采样扩展了Bagging算法
下面的代码片段使用sqrt技术对列进行采样,对行进行采样,训练3个决策树,并使用优先级规则进行预测。我们首先使用放回进行采样,他们对列进行采样,训练我们的单个树,让我们的树根据测试数据进行预测,然后采用优先级规则实现共识。
import numpy as np
import pandas as pd
import math
from sklearn.tree import DecisionTreeClassifier
from sklearn.model_selection import train_test_split
#对于每一棵树从X_train中取3个样本
df_sample1 = df.sample(frac=.67, replace=True)
df_sample2 = df.sample(frac=.67, replace=True)
df_sample3 = df.sample(frac=.67, replace=True)

# 分割训练集
X_train_sample1, y_train_sample1 = df_sample1.drop('target', axis=1), df_sample1['target']
X_train_sample2, y_train_sample2 = df_sample2.drop('target', axis=1), df_sample2['target']
X_train_sample3, y_train_sample3 = df_sample3.drop('target', axis=1), df_sample3['target']

# 使用sqrt获取训练和测试的采样特征,现在注意replace如何等于False的
num_features = len(X_train.columns)
X_train_sample1 = X_train_sample1.sample(n=int(math.sqrt(num_features)), replace=False, axis = 1)
X_train_sample2 = X_train_sample2.sample(n=int(math.sqrt(num_features)), replace=False, axis = 1)
X_train_sample3 = X_train_sample3.sample(n=int(math.sqrt(num_features)), replace=False, axis = 1)

# 创建决策树,这次我们对列进行采样
tree1 = DecisionTreeClassifier().fit(X_train_sample1, y_train_sample1)
tree2 = DecisionTreeClassifier().fit(X_train_sample2, y_train_sample2)
tree3 = DecisionTreeClassifier().fit(X_train_sample3, y_train_sample3)

# 预测X_test上的每个决策树
predictions_1 = tree1.predict(X_test[X_train_sample1.columns])
predictions_2 = tree2.predict(X_test[X_train_sample2.columns])
predictions_3 = tree3.predict(X_test[X_train_sample3.columns])
preds = pd.DataFrame([predictions_1, predictions_2, predictions_3]).T
preds.columns = ["tree1", "tree2", "tree3"]

# 使用优先级规则
final_prediction = np.array([np.round((predictions_1[i] + predictions_2[i] + predictions_3[i])/3) for i in range(len(predictions_1))])
preds = pd.DataFrame([predictions_1, predictions_2, predictions_3, final_prediction, y_test]).T.head(20)
preds.columns = ["tree1", "tree2", "tree3", "final", "label"]当我运行这段代码时,我发现我的决策树开始预测不同的事情,这表明我们已经删除了树之间的许多相关性。
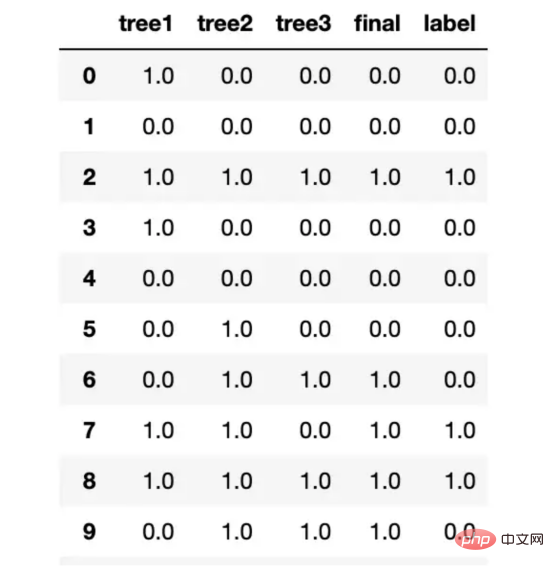
我的测试结果树之间不再总是彼此保持一致了
到目前为止,我们已经剖析了数据是如何被送入大量决策树的。在前面的代码示例中,我们使用DecisionTreeClassifier函数来训练决策树,但为了完全理解随机森林,我们需要先来解释一下什么是决策树。
一棵名副其实的决策树看起来像一棵倒挂的树。从一种高级别角度上看,该算法试图提出问题,并将数据分割成不同的节点。下图显示了决策树的形象示意。
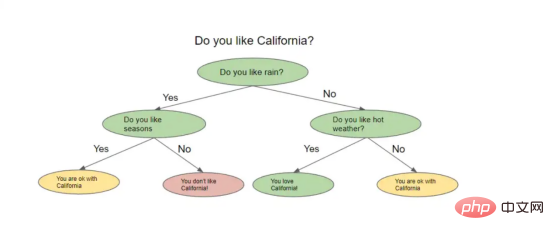
决策树示例
决策树根据前一个问题的答案提出一系列问题。对于它提出的每一个问题,可能都有多个答案,我们不妨可以将其想象为分割节点。上一个问题的答案将决定树将询问的下一个问题。在询问了一系列问题之后的某个时刻,你得到了答案。
但是你怎么知道你的答案是准确的,或者你询问了正确的问题呢?实际上,您可以用几种不同的方法来评估决策树,我们当然也会对这些方法加以解释。
介绍到现在,我们需要讨论一个叫做熵(entropy)的新术语。从一种高角度来看,熵是衡量节点中杂质或随机性水平的一种方法。顺便说一句,还有另一种流行的方法来测量节点的杂质,称为基尼系数(Gini impurity),但我们不会在本文中解析该方法,因为它与许多关于熵的概念重叠,尽管计算略有不同。一般的想法是,熵或基尼系数越高,节点中的方差越大,我们的目标是减少这种不确定性。
决策树试图通过将所询问的节点拆分为更小、更同质的节点来最小化熵。熵的实际公式是:

为了进一步解释熵的概念,让我们回到那个弹珠的例子:
假设我有10个弹珠。其中5个是蓝色的,5个是绿色的。我的总体数据集的熵为1.0,那么计算熵的代码如下:
from collections import Counter
from math import log2

#我的预测分类为:0或者1。其中,0代表蓝色弹珠,1代表是绿色弹珠。
data = [0, 0, 0, 1, 1, 1, 1, 0, 1, 0]
# 获取标签的长度
len_labels = len(data)
def calculate_entropy(data, len_labels):
# 对每一种分类进行计数
counts = Counter(labels)
# 我们计算分数,这个例子的输出应该是[.5,.5]
probs = [count / num_labels for count in counts.values()]
# 实际熵计算
return - sum(p * log2(p) for p in probs)

calculate_entropy(labels, num_labels)
如果数据完全充满绿色弹珠,熵将为0,并且熵将随着我们接近50%的分割而增加。
每次减少熵,我们都会获得一些关于数据集的信息,因为我们减少了随机性。信息增益告诉我们哪个特征相对来说最能让我们最小化熵。计算信息增益的方法是:
entropy(parent) — [weighted_average_of_entropy(children)]
在这种情况下,父节点是原始节点,子节点是拆分节点的结果。
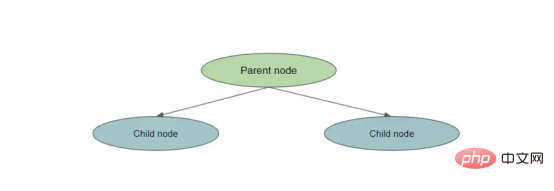
拆分一个节点
为了计算信息增益,我们执行以下操作:
下面的代码实现了将父节点拆分为两个子节点的简单信息增益:
def information_gain(left_labels, right_labels, parent_entropy):
"""计算拆分的信息增益"""
#计算左侧节点的权重
proportion_left_node = float(len(left_labels)) / (len(left_labels) + len(right_labels))
#计算右节点的权重
proportion_right_node = 1 - proportion_left_node
# 计算子节点的加权平均值
weighted_average_of_child_nodes = ((proportion_left_node * entropy(left_labels)) + (proportion_right_node * entropy(right_labels)))
#返回父节点熵——子节点的加权熵
return parent_entropy - weighted_average_of_child_nodes
考虑到上述这些概念,我们现在已经准备好实现一棵小型决策树了!
在没有任何指导的情况下,决策树将继续拆分节点,直到所有最终的叶节点都是纯的。控制树的复杂性的想法被称为修剪(pruning),我们可以在树完全建成后修剪它,也可以在生长阶段之前使用特定参数对树进行预修剪。预修剪树复杂度的一些方法是控制拆分的数量、限制最大深度(从根节点到叶节点的最长距离)或设置信息增益。
以下代码将所有这些概念联系在一起:
保持增长,直到满足停止条件——在这种情况下,这是我们的最大深度限制,节点的熵为0。
import pandas as pd
import numpy as np
from math import log2

def entropy(data, target_col):
# calculate the entropy of the entire dataset
values, counts = np.unique(data[target_col], return_counts=True)
entropy = np.sum([-count/len(data) * log2(count/len(data)) for count in counts])
return entropy

def compute_information_gain(data, feature, target_col):
parent_entropy = entropy(data, target_col)
# 计算在给定特征上拆分的信息增益
split_values = np.unique(data[feature])
# initialize at 0
weighted_child_entropy = 0
# 计算加权熵,记住这与新节点中的点数有关
for value in split_values:
sub_data = data[data[feature] == value]
node_weight = len(sub_data)/len(data)
weighted_child_entropy += node_weight * entropy(sub_data, target_col)
#与之前相同的计算,我们只是从父节点熵中减去加权熵
return parent_entropy - weighted_child_entropy

def grow_tree(data, features, target_col, depth=0, max_depth=3):
# 我们将最大深度设置为3以“预修剪”或限制树的复杂性
if depth >= max_depth or len(np.unique(data[target_col])) == 1:
# 如果达到最大深度或所有标签都相同,则停止生长树。所有标签相同意味着熵为0
return np.unique(data[target_col])[0]
# 我们根据信息增益计算最佳特征(或最佳问题)
node = {}
gains = [compute_information_gain(data, feature, target_col) for feature in features]
best_feature = features[np.argmax(gains)]

for value in np.unique(data[best_feature]):
sub_data = data[data[best_feature] == value]
node[value] = grow_tree(sub_data, features, target_col, depth+1, max_depth)

return node


# 模拟一些数据并制作一个数据帧,注意我们是如何建立一个目标的
data = {
'A': [1, 2, 1, 2, 1, 2, 1, 2],
'B': [3, 3, 4, 4, 3, 3, 4, 4],
'C': [5, 5, 5, 5, 6, 6, 6, 6],
'target': [0, 0, 0, 1, 1, 1, 1, 0]
}
df = pd.DataFrame(data)

# 定义我们的特征和标签
features = ["A", "B", "C"]
target_col = "target"

# 成长树
tree = grow_tree(df, features, target_col, max_depth=3)
print(tree)预测这棵树意味着,用新数据遍历生长的树,直到它到达叶节点。最后一个叶节点是预测。
我们在上一节中讨论的所有内容都是有关单棵决策树如何做出决策。下图将这些概念与我们之前讨论的随机森林采样概念联系起来。
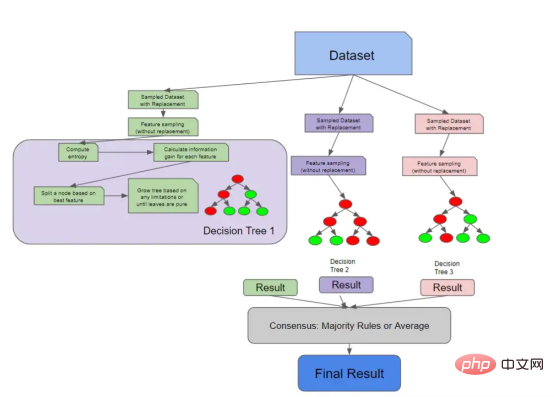
具有解构决策树的随机森林架构
因为决策树实际上检查每个特征的信息增益,所以您可以计算随机森林中的特征重要性。特征重要性的计算通常被视为所有树中杂质的平均减少。随机森林不像Logistic回归模型那样可解释,因此特征重要性为我们提供了一点关于树如何生长的知识。
最后,有几种方法可以测试你训练过的随机森林。您可以始终使用经典的机器学习方法,并使用测试集来衡量模型对未知数据的概括程度。然而,这通常需要第二次计算。随机森林有一个独特的属性,称为袋外错误或OOB错误。还记得我们如何仅对数据集的一部分进行采样以构建每个树吗?
实际上,您可以在训练时使用其余的样本来进行验证,这实际上只有在算法存在集成特性的情况下才是可能的。这意味着,在一次试验中,我们就可以了解我们的模型如何很好地推广到未知数据。
总结一下,我们在本文中所学到的内容:
from sklearn.ensemble import RandomForestClassifier
from sklearn.model_selection import train_test_split

X_train, X_test, y_train, y_test = train_test_split(df.drop('target', axis=1), df['target'], test_size=0.2, random_state=0)

# 训练和评分随机森林
simple_rf_model = RandomForestClassifier(n_estimators=100, random_state=0)
simple_rf_model.fit(X_train, y_train)
print(f"accuracy: {simple_rf_model.score(X_test, y_test)}")

# accuracy: 0.93当查看训练随机森林的原始代码时,这几行代码中发生了多少不同的计算和评估,这让我感到惊讶。为了防止过度拟合,在树木和森林层面上进行评估,并实现一些基本的可解释性,需要考虑很多因素,此外,由于现有的所有框架,很容易进行设置。
我希望下次你训练随机森林模型时,你能够查看随机森林的scikit学习文档页面,并更好地了解你的所有选项。虽然有一些直观的默认设置,但应该清楚您可以进行多少不同的调整,以及这些技术中有多少可以扩展到其他模型。
我在写这篇文章时很开心,并且亲自了解了很多关于这个漂亮算法的工作原理。我希望你也能从中学习到一些东西!
朱先忠,51CTO社区编辑,51CTO专家博客、讲师,潍坊一所高校计算机教师,自由编程界老兵一枚。
原文标题:Demystifying the Random Forest,作者:Siddarth Ramesh
The above is the detailed content of Practical analysis of machine learning random forest algorithm. For more information, please follow other related articles on the PHP Chinese website!


